文章目錄
- 簡單隊列(Simple Queue)模式
- 配置類定義
- 消費者定義
- 發送消息測試消費
- 工作隊列(Work Queues)模式
- 配置類定義
- 消費者定義
- 發送消息測試消費
- 負載均衡調優
- 發布/訂閱(Publish/Subscribe)模式
- 配置類定義
- 消費者定義
- 發送消息測試消費
- 路由(Routing)模式
- 配置類定義
- 消費者定義
- 發送消費測試消費
- 主題(Topics)模式
- 配置類定義
- 消費者定義
- 發送消息測試消費
- RPC(Remote Procedure Call)模式
- 配置類定義
- 請求與響應實體類
- 消費者定義
- 發送消息測試消費
簡單隊列(Simple Queue)模式
- 結構:一個生產者對應一個消費者,生產者將消息發送到指定隊列,消費者從該隊列獲取消息。
- 工作流程:生產者創建一個消息并發送到 RabbitMQ 的隊列中,消費者從這個隊列里取出消息進行處理。
- 應用場景:適用于任務處理邏輯簡單,對消息處理速度要求不高,且消息處理順序要求不嚴格的場景,比如簡單的日志收集系統。
以下是簡單隊列(Simple Queue)模式的使用案例。
配置類定義
package test;import org.springframework.amqp.core.*;
import org.springframework.context.annotation.Bean;
import org.springframework.context.annotation.Configuration;@Configuration
public class SimpleQueueConfig {@Beanpublic DirectExchange simpleQueueExchange() {return ExchangeBuilder// 指定名稱為simple-queue-exchange的交換機.directExchange("simple-queue-exchange")// 聲明為持久化交換機.durable(true).build();}@Beanpublic Queue simpleQueue() {return QueueBuilder// 指定一個名稱為simple-queue的持久化隊列.durable("simple-queue").build();}@Beanpublic Binding simpleQueueToSimpleQueueExchangebinding() {// 綁定隊列給交換機,根據隊列名為路由鍵return BindingBuilder.bind(simpleQueue()).to(simpleQueueExchange()).withQueueName();}}
消費者定義
package test;import lombok.extern.slf4j.Slf4j;
import org.springframework.amqp.rabbit.annotation.RabbitListener;
import org.springframework.stereotype.Component;@Component
@Slf4j
public class SimpleQueueConsumer {@RabbitListener(queues = "simple-queue")public void consumer(String message) {log.info("消費者接收消息:{}", message);}}
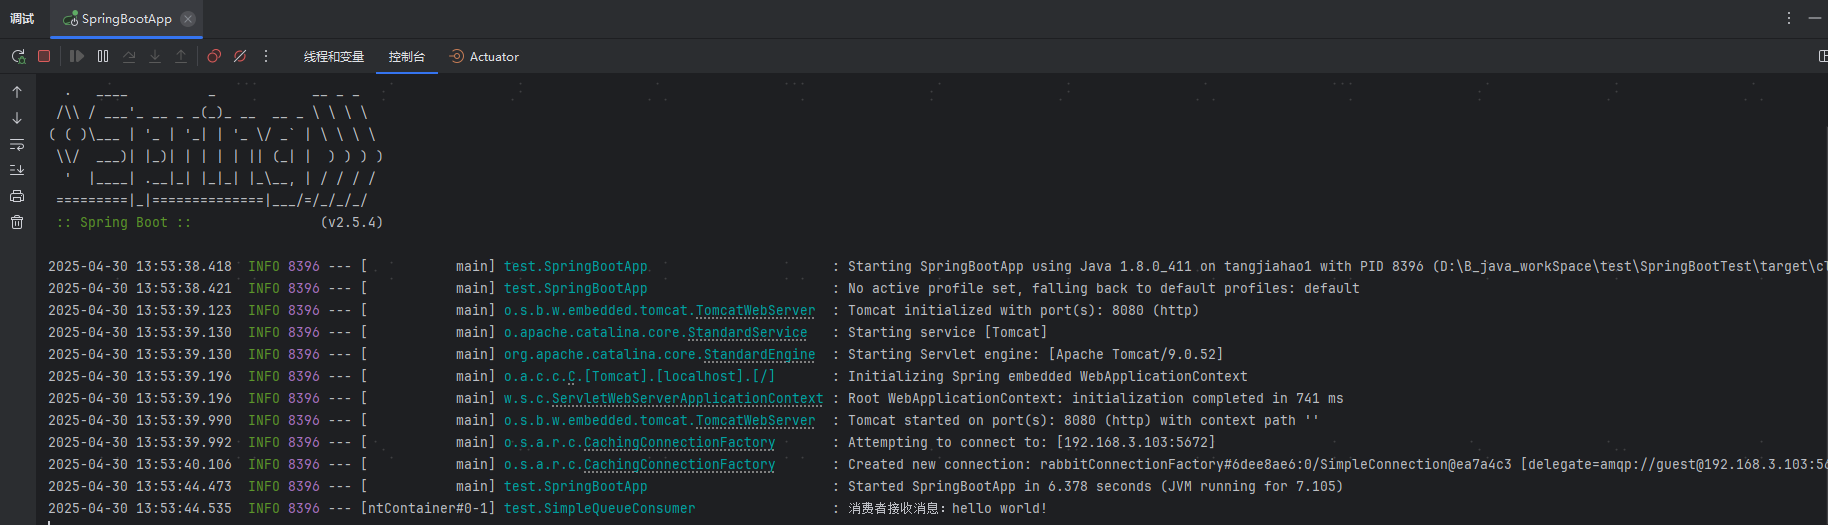
發送消息測試消費
package test;import org.springframework.amqp.rabbit.core.RabbitTemplate;
import org.springframework.boot.SpringApplication;
import org.springframework.boot.autoconfigure.SpringBootApplication;
import org.springframework.context.ApplicationContext;@SpringBootApplication
public class SpringBootApp {public static void main(String[] args) {ApplicationContext context = SpringApplication.run(SpringBootApp.class, args);RabbitTemplate rabbitTemplate = context.getBean(RabbitTemplate.class);rabbitTemplate.convertAndSend("simple-queue", "hello world!");}}
控制臺輸出:
工作隊列(Work Queues)模式
- 結構:一個生產者對應多個消費者,多個消費者共同從一個隊列中獲取消息進行處理。
- 工作流程:生產者將消息發送到隊列,多個消費者從該隊列中獲取消息(默認采用輪詢的負載均衡策略),一條消息只會被一個消費者處理。
- 應用場景:適用于需要將大量任務分發給多個工作者并行處理的場景,例如訂單處理、圖片處理等。
以下是工作隊列(Work Queues)模式的使用案例。
配置類定義
定義一個 DirectExchange 類型的交換機與兩個隊列,通過隊列名作為 RoutingKey 進行綁定。
package test;import org.springframework.amqp.core.*;
import org.springframework.context.annotation.Bean;
import org.springframework.context.annotation.Configuration;@Configuration
public class WorkQueueConfig {@Beanpublic DirectExchange workQueueExchange(){return ExchangeBuilder.directExchange("work-queue-exchange").durable(true).build();}@Beanpublic Queue workQueue(){return QueueBuilder.durable("work-queue").build();}@Beanpublic Binding workQueueToWorkQueueExchangeBinding(){return BindingBuilder.bind(workQueue()).to(workQueueExchange()).withQueueName();}}
消費者定義
定義兩個消費者,分別監聽兩個不同的隊列。
消費者 1:
package test;import lombok.extern.slf4j.Slf4j;
import org.springframework.amqp.rabbit.annotation.RabbitListener;
import org.springframework.stereotype.Service;@Slf4j
@Service
public class WorkQueueConsumer01 {@RabbitListener(queues = "work-queue")public void receive(String message){log.info("WorkQueueConsumer01 receive a message:{}",message);}}
消費者 2:
package test;import lombok.extern.slf4j.Slf4j;
import org.springframework.amqp.rabbit.annotation.RabbitListener;
import org.springframework.stereotype.Service;@Slf4j
@Service
public class WorkQueueConsumer02 {@RabbitListener(queues = "work-queue")public void receive(String message){log.info("WorkQueueConsumer02 receive a message:{}",message);}}
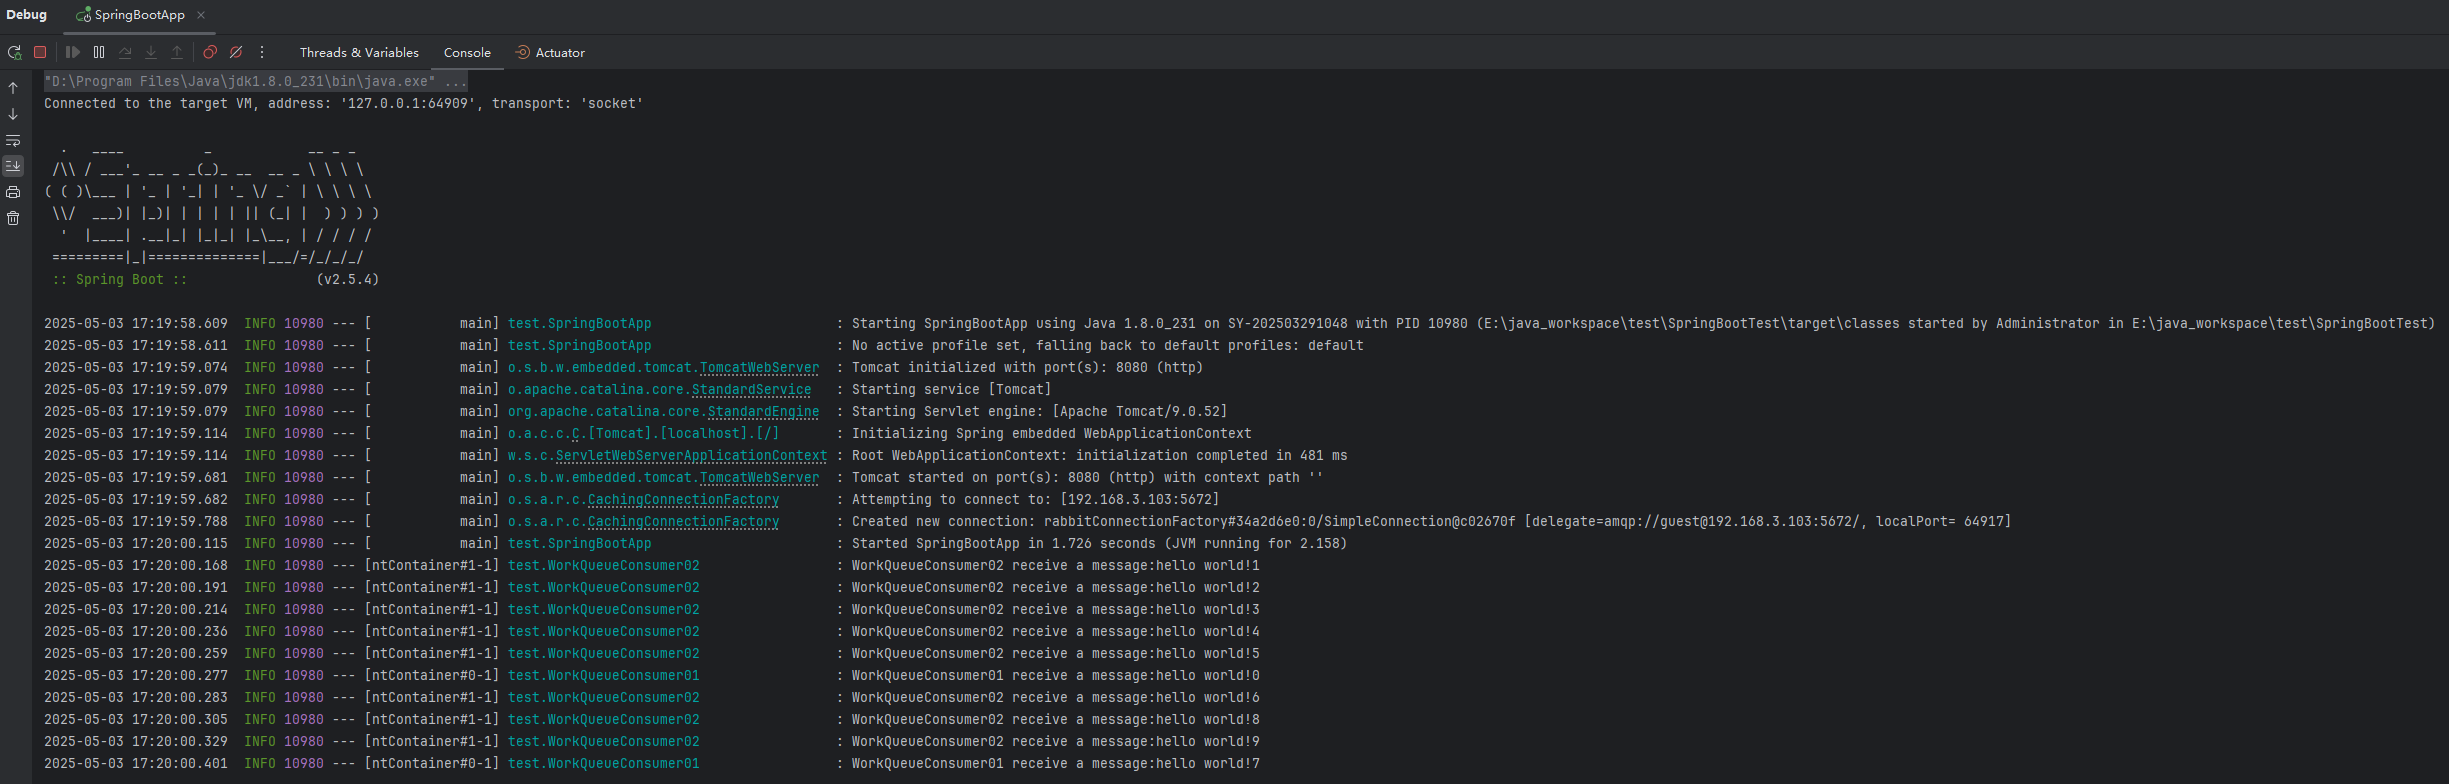
發送消息測試消費
向 work-queue-exchange 交換機中發送 10 條消息。
package test;import org.springframework.amqp.rabbit.core.RabbitTemplate;
import org.springframework.boot.SpringApplication;
import org.springframework.boot.autoconfigure.SpringBootApplication;
import org.springframework.context.ApplicationContext;@SpringBootApplication
public class SpringBootApp {public static void main(String[] args) {ApplicationContext context = SpringApplication.run(SpringBootApp.class, args);RabbitTemplate rabbitTemplate = context.getBean(RabbitTemplate.class);for (int i = 0; i < 10; i++) {rabbitTemplate.convertAndSend("work-queue-exchange", "work-queue", "hello world!" + i);}}}
控制臺輸出:

在上例結果,消費者 1 與消費者 2 對消息進行了輪詢處理。
負載均衡調優
在工作隊列模式下,多個消費者處理消息默認按照輪詢的規則進行處理。但是如果其中某個消費者的處理能力比其他消費者更為強大,那么它實際上可以處理更多的消息,如果此時還是按照輪詢規則來處理消息,這樣是對該消費者能力的一種浪費。
對于上述情況,在 RabbitMQ 中支持調整消費者處理消息時的負載均衡策略,具體而言,即通過設置預取數量(prefetch count)參數,以實現更靈活的消息分發策略,即讓處理能力更強大的消費者處理更多的消息。
在 Spring Boot 中,可以通過設置 spring.rabbitmq.listener.simple.prefetch 參數來控制消費者的預取數量:
spring:rabbitmq:listener:simple:prefetch: 1
將預取數量設置為 1,則每個消費者在處理完當前消息并確認(ACK)之后才會接收下一條消息,從而避免了某個消費者負載過重的情況。
模擬當某個消費者處理能力較弱:
package test;import lombok.extern.slf4j.Slf4j;
import org.springframework.amqp.rabbit.annotation.RabbitListener;
import org.springframework.stereotype.Service;@Slf4j
@Service
public class WorkQueueConsumer01 {@RabbitListener(queues = "work-queue")public void receive(String message) throws InterruptedException {// 模擬WorkQueueConsumer01處理能力較弱Thread.sleep(1);log.info("WorkQueueConsumer01 receive a message:{}",message);}}
再次向交換機發送 10 條消息,控制臺輸出:
在上述結果中,由于 WorkQueueConsumer01 處理消息的能力更弱,所以更多的消息被分攤到了 WorkQueueConsumer02 處理。
發布/訂閱(Publish/Subscribe)模式
- 結構:包含一個生產者、一個交換機(Exchange)和多個隊列,多個消費者分別監聽不同的隊列。
- 工作流程:生產者將消息發送到交換機,交換機將消息廣播到綁定到它的所有隊列,每個綁定的隊列對應的消費者都能收到消息。
- 應用場景:適用于一個消息需要被多個不同的服務或模塊接收和處理的場景,如系統的通知功能。
以下是發布/訂閱(Publish/Subscribe)模式的使用案例。
配置類定義
定義一個 FanoutExchange 類型的交換機與三個隊列,讓三個隊列綁定到該交換機。
FanoutExchange 交換機不需要指定 RoutingKey。因為 FanoutExchange 交換機會將消息統一發送給與其綁定的所有隊列,指定 RoutingKey 實際上沒有任何意義。
package test;import org.springframework.amqp.core.*;
import org.springframework.context.annotation.Bean;
import org.springframework.context.annotation.Configuration;@Configuration
public class PublishSubscribeConfig {@Beanpublic Queue publishSubscribeQueue1() {return new Queue("publish-subscribe-queue-1");}@Beanpublic Queue publishSubscribeQueue2() {return new Queue("publish-subscribe-queue-2");}@Beanpublic Queue publishSubscribeQueue3() {return new Queue("publish-subscribe-queue-3");}@Beanpublic FanoutExchange publishSubscribeFanoutExchange() {return new FanoutExchange("publish-subscribe-fanout-exchange");}@Beanpublic Binding publishSubscribeBinding1() {return BindingBuilder.bind(publishSubscribeQueue1()).to(publishSubscribeFanoutExchange());}@Beanpublic Binding publishSubscribeBinding2() {return BindingBuilder.bind(publishSubscribeQueue2()).to(publishSubscribeFanoutExchange());}@Beanpublic Binding publishSubscribeBinding3() {return BindingBuilder.bind(publishSubscribeQueue3()).to(publishSubscribeFanoutExchange());}}
消費者定義
定義三個消費者,分別監聽三個不同的隊列。
第一個消費者:
package test;import lombok.extern.slf4j.Slf4j;
import org.springframework.amqp.rabbit.annotation.RabbitListener;
import org.springframework.stereotype.Service;@Slf4j
@Service
public class PublishSubscribeConsumer01 {@RabbitListener(queues = "publish-subscribe-queue-1")public void receive(String message) {log.info("PublishSubscribeConsumer 01 receive a Message:{}",message);}}
第二個消費者:
package test;import lombok.extern.slf4j.Slf4j;
import org.springframework.amqp.rabbit.annotation.RabbitListener;
import org.springframework.stereotype.Service;@Slf4j
@Service
public class PublishSubscribeConsumer02 {@RabbitListener(queues = "publish-subscribe-queue-2")public void receive(String message) {log.info("PublishSubscribeConsumer 02 receive a message:{}",message);}}
第三個消費者:
package test;import lombok.extern.slf4j.Slf4j;
import org.springframework.amqp.rabbit.annotation.RabbitListener;
import org.springframework.stereotype.Service;@Slf4j
@Service
public class PublishSubscribeConsumer03 {@RabbitListener(queues = "publish-subscribe-queue-3")public void receive(String message) {log.info("PublishSubscribeConsumer 03 receive a message:{}",message);}}
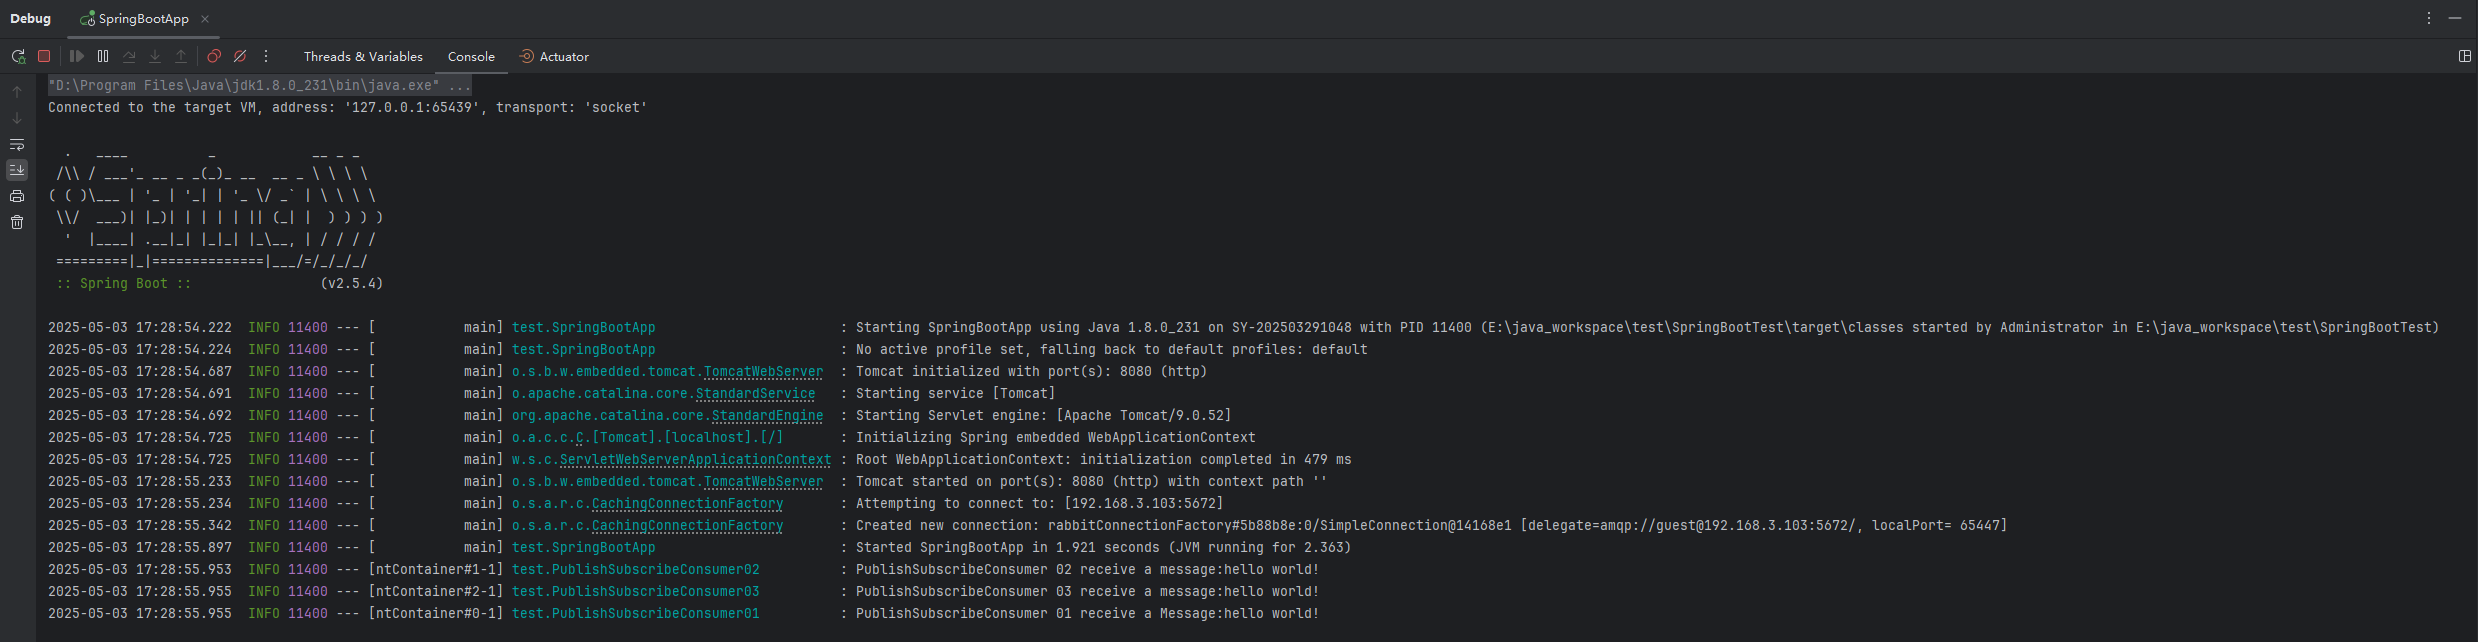
發送消息測試消費
向 publish-subscribe-fanout-exchange 發送一條消息。
package test;import org.springframework.amqp.rabbit.core.RabbitTemplate;
import org.springframework.boot.SpringApplication;
import org.springframework.boot.autoconfigure.SpringBootApplication;
import org.springframework.context.ApplicationContext;@SpringBootApplication
public class SpringBootApp {public static void main(String[] args) {ApplicationContext context = SpringApplication.run(SpringBootApp.class, args);RabbitTemplate rabbitTemplate = context.getBean(RabbitTemplate.class);rabbitTemplate.convertAndSend("publish-subscribe-fanout-exchange","","hello world!");}}
控制臺輸出:
路由(Routing)模式
- 結構:同樣包含生產者、交換機和多個隊列,但交換機類型為直連交換機(Direct Exchange),隊列通過路由鍵(routing key)綁定到交換機。
- 工作流程:生產者發送消息時指定路由鍵,交換機根據路由鍵將消息路由到與之綁定的隊列,只有綁定了對應路由鍵的隊列才能收到消息。
- 應用場景:適用于根據不同的業務規則將消息路由到不同隊列的場景,如根據日志的級別(info、error 等)將日志消息路由到不同的隊列。
以下是路由(Routing)模式的使用案例。
配置類定義
定義一個 DirectExchange,因為 DirectExchange 可以通過 RoutingKey 精確匹配消息,當然也可以使用其他類型的交換機,如 ToppicExchange。
定義三個不同名稱的隊列,其中兩個隊列綁定相同的 RoutingKey,而另外一個單獨綁定一個隊列。
package test;import org.springframework.amqp.core.*;
import org.springframework.context.annotation.Bean;
import org.springframework.context.annotation.Configuration;@Configuration
public class RoutingConfig {@Beanpublic DirectExchange routingExchange() {return ExchangeBuilder.directExchange("routing-exchange").durable(true).build();}@Beanpublic Queue routingQueue1() {return QueueBuilder.durable("routing-queue-1").build();}@Beanpublic Queue routingQueue2() {return QueueBuilder.durable("routing-queue-2").build();}@Beanpublic Queue routingQueue3() {return QueueBuilder.durable("routing-queue-3").build();}@Beanpublic Binding routingQueue1ToRoutingExchangeBinding() {return BindingBuilder.bind(routingQueue1()).to(routingExchange()).with("routing-key-1");}@Beanpublic Binding routingQueue2ToRoutingExchangeBinding() {return BindingBuilder.bind(routingQueue2()).to(routingExchange()).with("routing-key-2");}@Beanpublic Binding routingQueue3ToRoutingExchangeBinding() {return BindingBuilder.bind(routingQueue3()).to(routingExchange()).with("routing-key-2");}}
消費者定義
定義三個消費者,分別監聽三個不同的隊列。
第一個消費者:
package test;import lombok.extern.slf4j.Slf4j;
import org.springframework.amqp.rabbit.annotation.RabbitListener;
import org.springframework.stereotype.Service;@Slf4j
@Service
public class RoutingQueueConsumer01 {@RabbitListener(queues = "routing-queue-1")public void receive(String message){log.info("RoutingQueueConsumer01 receive a message:{}",message);}}
第二個消費者:
package test;import lombok.extern.slf4j.Slf4j;
import org.springframework.amqp.rabbit.annotation.RabbitListener;
import org.springframework.stereotype.Service;@Slf4j
@Service
public class RoutingQueueConsumer02 {@RabbitListener(queues = "routing-queue-2")public void receive(String message){log.info("RoutingQueueConsumer02 receive a message:{}",message);}}
第三個消費者:
package test;import lombok.extern.slf4j.Slf4j;
import org.springframework.amqp.rabbit.annotation.RabbitListener;
import org.springframework.stereotype.Service;@Slf4j
@Service
public class RoutingQueueConsumer03 {@RabbitListener(queues = "routing-queue-3")public void receive(String message){log.info("RoutingQueueConsumer03 receive a message:{}",message);}}
發送消費測試消費
向交換機發送消息,并指定 RoutingKey 為其中的兩個。
package test;import org.springframework.amqp.rabbit.core.RabbitTemplate;
import org.springframework.boot.SpringApplication;
import org.springframework.boot.autoconfigure.SpringBootApplication;
import org.springframework.context.ApplicationContext;@SpringBootApplication
public class SpringBootApp {public static void main(String[] args) {ApplicationContext context = SpringApplication.run(SpringBootApp.class, args);RabbitTemplate rabbitTemplate = context.getBean(RabbitTemplate.class);rabbitTemplate.convertAndSend("routing-exchange", "routing-key-1", "hello world by routing-key-1!");rabbitTemplate.convertAndSend("routing-exchange", "routing-key-2", "hello world by routing-key-2!");}}
控制臺輸出:
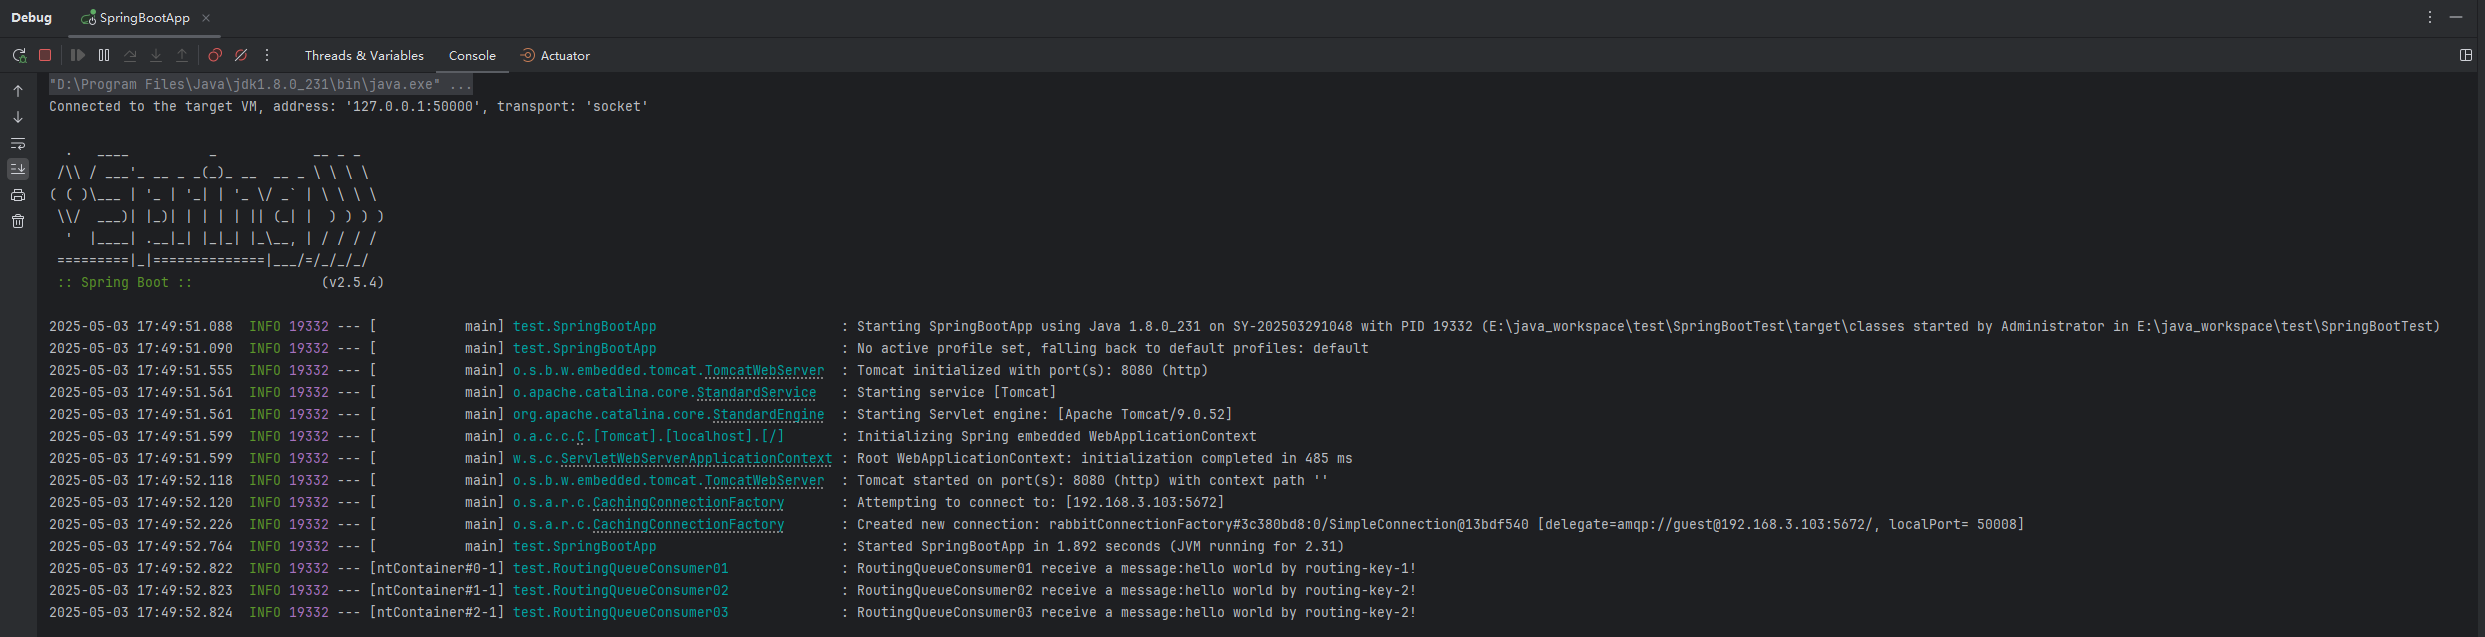
上述結果中,三個消費者都接受到了消息并成功處理。但實際上發送消息時,交換機只向兩個 RoutingKey 發送消息,而另外一個 RoutingKey 并沒有發送。這樣的情況下,三個消息者監聽三個不同隊列仍然能夠接受消息并處理,這是因為它們監聽的隊列所綁定的 RoutingKey 都被交換機投遞了消息。
主題(Topics)模式
- 結構:包含生產者、主題交換機(Topic Exchange)和多個隊列,隊列通過綁定鍵(binding key)綁定到交換機,綁定鍵可以使用通配符。
- 工作流程:生產者發送消息時指定路由鍵,交換機根據綁定鍵和路由鍵的匹配規則將消息路由到相應的隊列。
- 應用場景:適用于需要根據消息的主題進行靈活路由的場景,如新聞分類訂閱,用戶可以根據不同的主題訂閱不同的新聞。
生產者發送包含主題的消息,主題由一個或多個單詞組成,單詞之間使用點號 . 進行分隔。消費者可以使用通配符 * 和 # 對主題進行模糊匹配:
*:匹配一個單詞,可以代表任意一個詞。#:匹配零個或多個單詞,可以代表一個或多個詞。
以下是主題(Topics)模式的使用案例。
配置類定義
定義一個 TopicExchange,分別通過 log.info.* 與 log.error.# 的 RoutingKey 綁定到兩個不同的隊列。
package test;import org.springframework.amqp.core.*;
import org.springframework.context.annotation.Bean;
import org.springframework.context.annotation.Configuration;@Configuration
public class TopicConfig {@Beanpublic Queue topicQueue1() {return new Queue("topic-queue-1");}@Beanpublic Queue topicQueue2() {return new Queue("topic-queue-2");}@Beanpublic TopicExchange topicExchange() {return new TopicExchange("topic-exchange");}@Beanpublic Binding bindingExchange() {return BindingBuilder.bind(topicQueue1()).to(topicExchange()).with("log.info.*");}@Beanpublic Binding bindingExchange2() {return BindingBuilder.bind(topicQueue2()).to(topicExchange()).with("log.error.#");}}
消費者定義
定義兩個消費者分別監聽兩個不同隊列。
第一個消費者:
package test;import lombok.extern.slf4j.Slf4j;
import org.springframework.amqp.rabbit.annotation.RabbitListener;
import org.springframework.stereotype.Service;@Slf4j
@Service
public class TopicQueueConsumer01 {@RabbitListener(queues = "topic-queue-1")public void receive(String message){log.info("TopicQueueConsumer01 receive a message:{}",message);}}
第二個消費者:
package test;import lombok.extern.slf4j.Slf4j;
import org.springframework.amqp.rabbit.annotation.RabbitListener;
import org.springframework.stereotype.Service;@Slf4j
@Service
public class TopicQueueConsumer02 {@RabbitListener(queues = "topic-queue-2")public void receive(String message){log.info("TopicQueueConsumer02 receive a message:{}",message);}}
發送消息測試消費
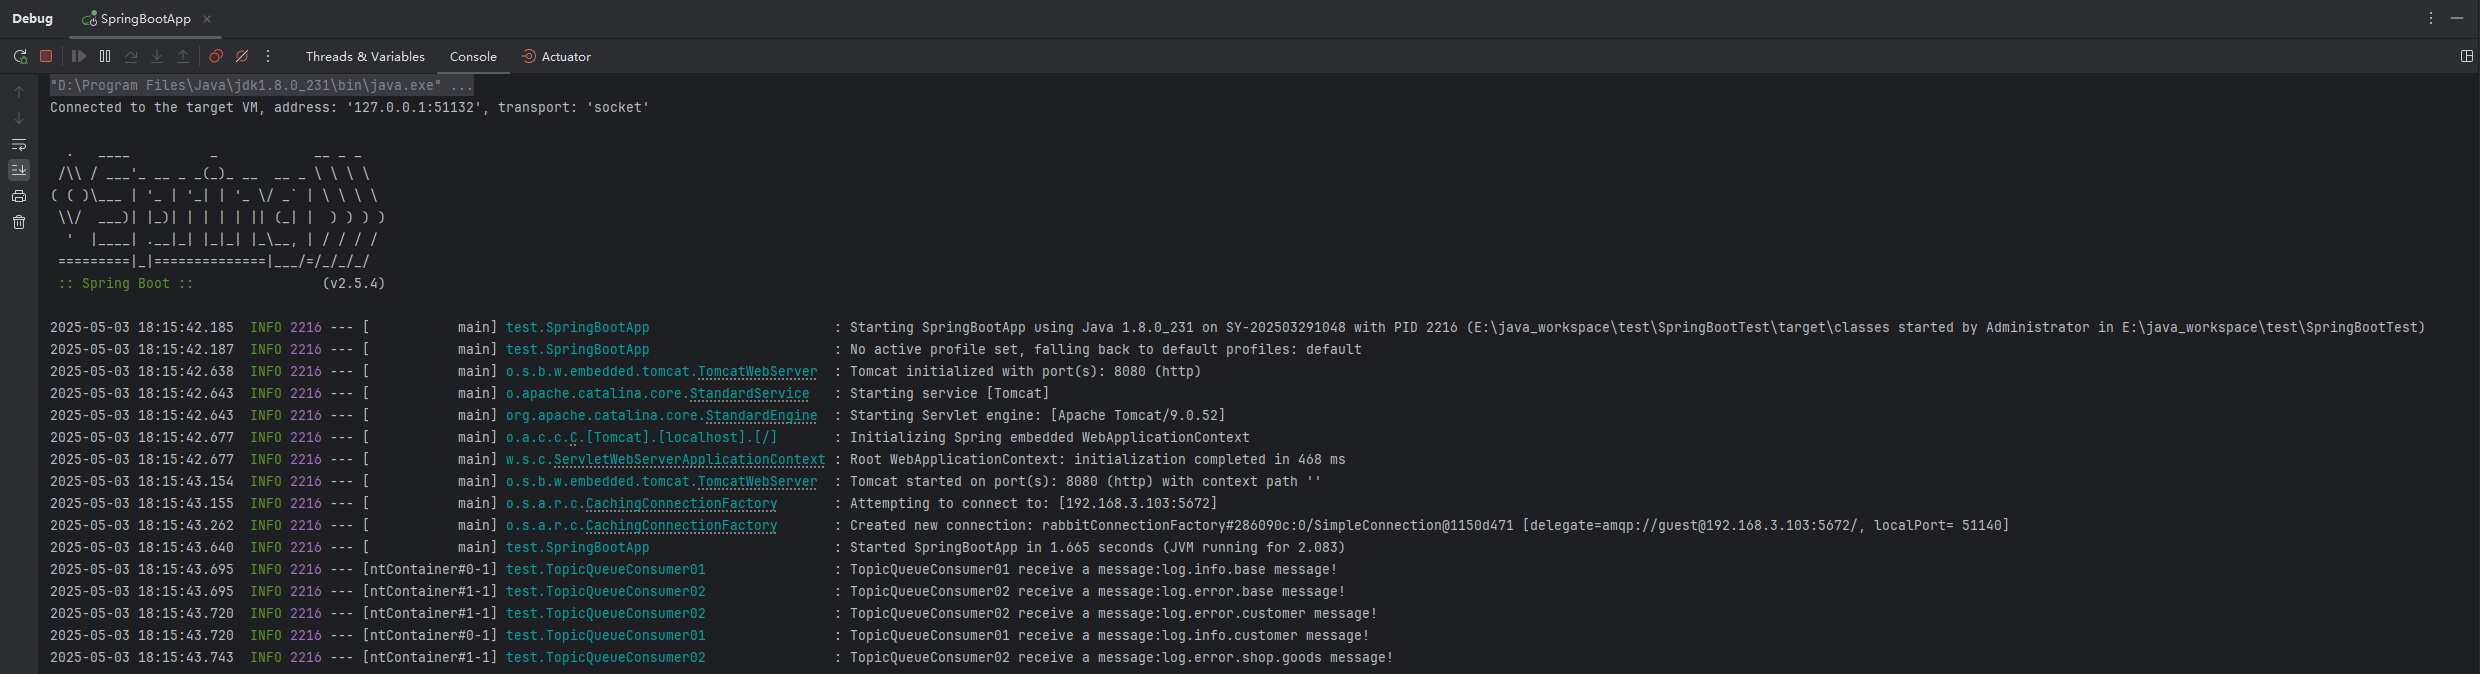
向 topic-exchange 交換機發送六條消息,通過不同的 RoutingKey。
package test;import org.springframework.amqp.rabbit.core.RabbitTemplate;
import org.springframework.boot.SpringApplication;
import org.springframework.boot.autoconfigure.SpringBootApplication;
import org.springframework.context.ApplicationContext;@SpringBootApplication
public class SpringBootApp {public static void main(String[] args) {ApplicationContext context = SpringApplication.run(SpringBootApp.class, args);RabbitTemplate rabbitTemplate = context.getBean(RabbitTemplate.class);rabbitTemplate.convertAndSend("topic-exchange", "log.info.base", "log.info.base message!");rabbitTemplate.convertAndSend("topic-exchange", "log.info.customer", "log.info.customer message!");rabbitTemplate.convertAndSend("topic-exchange", "log.info.shop.goods", "log.info.shop.goods message!");rabbitTemplate.convertAndSend("topic-exchange", "log.error.base", "log.error.base message!");rabbitTemplate.convertAndSend("topic-exchange", "log.error.customer", "log.error.customer message!");rabbitTemplate.convertAndSend("topic-exchange", "log.error.shop.goods", "log.error.shop.goods message!");}}
控制臺輸出:
RPC(Remote Procedure Call)模式
- 結構:包含客戶端(生產者)、服務端(消費者)、請求隊列和響應隊列。
- 工作流程:客戶端發送請求消息到請求隊列,并設置一個回調隊列用于接收響應;服務端從請求隊列獲取請求消息,處理后將響應消息發送到回調隊列,客戶端從回調隊列獲取響應。
- 應用場景:適用于需要在分布式系統中進行遠程過程調用的場景,如微服務之間的調用。
以下是主題(Topics)模式的使用案例。
配置類定義
定義一個交換機與一個隊列,通過隊列名進行綁定。
package test;import org.springframework.amqp.core.Binding;
import org.springframework.amqp.core.BindingBuilder;
import org.springframework.amqp.core.DirectExchange;
import org.springframework.amqp.core.Queue;
import org.springframework.amqp.support.converter.Jackson2JsonMessageConverter;
import org.springframework.context.annotation.Bean;
import org.springframework.context.annotation.Configuration;@Configuration
public class RpcConfig {@Beanpublic Queue rpcQueue() {return new Queue("rpc-queue", true);}@Beanpublic DirectExchange rpcExchange() {return new DirectExchange("rpc-exchange");}@Beanpublic Binding rpcQueueToRpcExchangeBinding() {return BindingBuilder.bind(rpcQueue()).to(rpcExchange()).withQueueName();}@Beanpublic Jackson2JsonMessageConverter jackson2JsonMessageConverter() {return new Jackson2JsonMessageConverter();}}
請求與響應實體類
創建 RPC 請求與響應實體類。
package test;import lombok.AllArgsConstructor;
import lombok.Data;
import lombok.NoArgsConstructor;import java.io.Serializable;@Data
@AllArgsConstructor
@NoArgsConstructor
public class RpcRequest implements Serializable {private String message;}
package test;import lombok.AllArgsConstructor;
import lombok.Data;
import lombok.NoArgsConstructor;import java.io.Serializable;@Data
@AllArgsConstructor
@NoArgsConstructor
public class RpcResponse implements Serializable {private int result;}
消費者定義
定義一個消費者從隊列中接收消息。
package test;import lombok.extern.slf4j.Slf4j;
import org.springframework.amqp.rabbit.annotation.RabbitListener;
import org.springframework.stereotype.Service;@Service
@Slf4j
public class RpcServer {@RabbitListener(queues = "rpc-queue")public RpcResponse handleRpcRequest(RpcRequest request) {log.info("RPC接收的消息:{}", request);return new RpcResponse(0);}}
發送消息測試消費
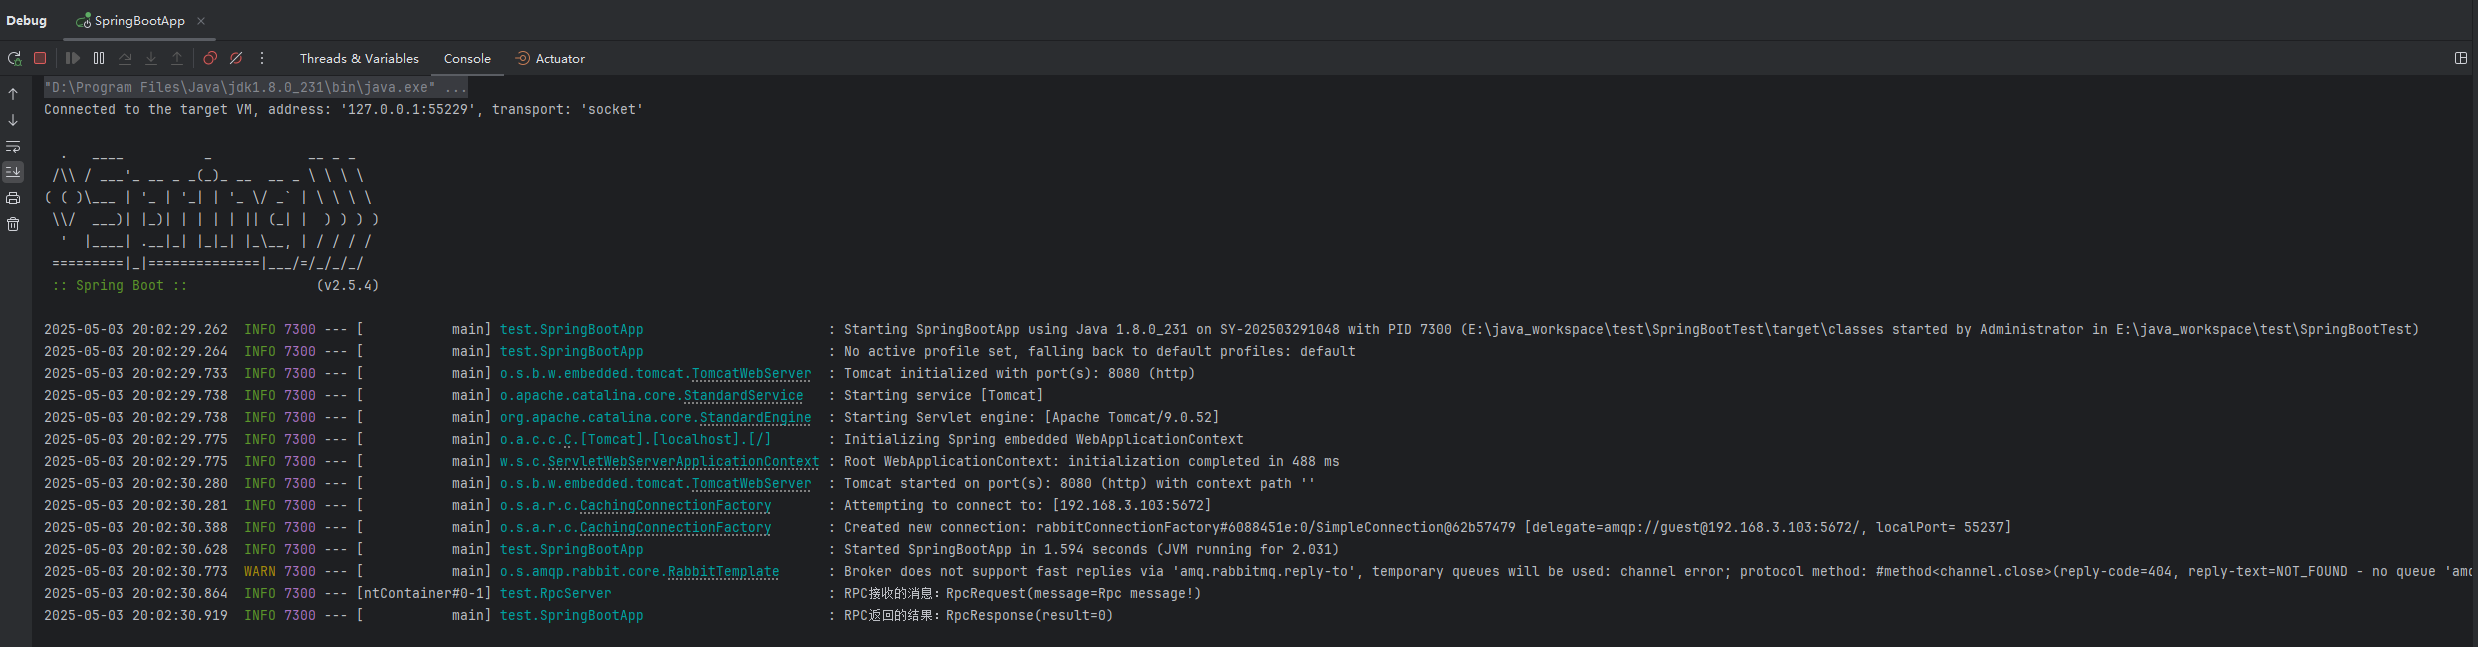
測試 RPC 消息的發送。
package test;import lombok.extern.slf4j.Slf4j;
import org.springframework.amqp.rabbit.core.RabbitTemplate;
import org.springframework.boot.SpringApplication;
import org.springframework.boot.autoconfigure.SpringBootApplication;
import org.springframework.context.ApplicationContext;@SpringBootApplication
@Slf4j
public class SpringBootApp {public static void main(String[] args) {ApplicationContext context = SpringApplication.run(SpringBootApp.class, args);RabbitTemplate rabbitTemplate = context.getBean(RabbitTemplate.class);String exchange = "rpc-exchange";String routingKey = "rpc-queue";RpcRequest rpcRequest = new RpcRequest("Rpc message!");RpcResponse rpcResponse = (RpcResponse) rabbitTemplate.convertSendAndReceive(exchange, routingKey, rpcRequest);log.info("RPC返回的結果:{}", rpcResponse);}}
控制臺輸出:


的解析)
)


 — 探針和鉤子)
