Spring框架支持透明地向應用程序添加緩存,以及對緩存進行管理,其管理緩存的核心是將緩存應用于操作數據的方法,從而減少操作數據的執行次數,同時不會對程序本身造成任何干擾。Spring Boot繼承了Spring框架的緩存管理功能,下面將對Spring Boot內置的緩存方案進行講解。
Spring的緩存機制將提供的緩存作用于Java 方法上,基于緩存中的可用信息,可以減少方法的執行次數。每次目標方法調用時,抽象使用緩存行為來檢查執行方法,即檢查執行方法是否給定了緩存的執行參數,如果是,則返回緩存結果,不執行具體方法;如果否,則執行方法,并將結果緩存后,返回給用戶。
Spring的默認的緩存方案通過org.springframework.cache.Cache和org.springframework.cache.CacheManager接口來統一不同的緩存技術。
Cache接口:緩存的組件定義規范,包含緩存的各種操作集合。Spring中為Cache接口提供了各種緩存的實現:RedisCache,EhCache,ConcurrentMapCache等
CacheManager接口:緩存管理器,基于緩存名稱對緩存進行管理,并制定了管理Cache的規則。?
在項目中添加某個緩存管理組件(如Redis)后,Spring Boot項目會選擇并啟用對應的緩存管理器。如果項目中同時添加了多個緩存組件,且沒有定義類型為CacheManager的Bean組件或者名為cacheResolver的緩存解析器,Spring Boot將嘗試按以下列表的順序查找有效的緩存組件進行緩存管理。 (1)Generic (2)JCache (EhCache 3、Hazelcast、Infinispan等) (3)EhCache 2.x (4)Hazelcast (5)Infinispan (6)Couchbase (7)Redis (8)Caffeine (9)Simple
聲明式緩存注解
要想使用Spring提供的默認緩存,需要對緩存進行聲明,也就是標志緩存的方法及緩存策略。對于緩存聲明,Spring提供了一系列的注解,使用這些注解可以實現Spring 默認的基于注解的緩存管理。
1.@EnableCaching注解
@EnableCaching是Spring框架提供的用于開啟基于注解的緩存支持的注解,當配置類上使用@EnableCaching注解,會默認提供CacheManager的實現,并通過AOP將緩存行為添加到應用程序。執行操作時,會檢查是否已經存在注解對應的緩存。如果找到了,就會自動創建一個代理攔截方法調用,使用緩存的Bean執行處理。
2.@Cacheable注解
@Cacheable注解用于標注可緩存的方法,通常標注的方法為數據查詢方法。標注@Cacheable注解的方法在執行時,會先查詢緩存,如果查詢到的緩存為空,則執行該方法,并將方法的執行結果添加到緩存;如果查詢到緩存數據,則不執行該方法,而是直接使用緩存數據。
@Cacheable注解提供了多個屬性,用于對緩存進行相關配置。
| 屬性名 | 說明 |
| value/cacheNames | 指定緩存的名稱,必備屬性,這兩個屬性二選一使用 |
| key | 指定緩存數據的key,默認使用方法參數值,可以使用SpEL表達式 |
| keyGenerator | 指定緩存數據的key的生成器,與key屬性二選一使用 |
| cacheManager | 指定緩存管理器 |
| cacheResolver | 指定緩存解析器,與cacheManager屬性二選一使用 |
| condition | 指定在符合某條件下進行數據緩存 |
| unless | 指定在符合某條件下不進行數據緩存 |
| sync | 指定是否使用異步緩存,默認為false |
(1)value/cacheNames屬性
value和cacheNames屬性作用相同,用于指定緩存的名稱,方法的返回結果會存放在指定名稱的緩存中。這兩個屬于必備選項,且要二選一使用。如果@Cacheable注解只配置value或者cacheNames屬性,那么屬性名可以省略。
@Cacheable("book")
public Book findById(Integer id){return bookDao.findById(id).get();
}
@Cacheable注解中可以指定多個緩存的名稱,以便使用多個緩存。
@Cacheable({"book","hotBook"})
public Book findById(Integer id){return bookDao.findById(id).get();
}
(2)key屬性
緩存的本質是鍵值對存儲,key用于指定唯一的標識,value用于指定緩存的數據,所以每次調用緩存方法都會轉換為訪問緩存的鍵。緩存的鍵通過key屬性進行指定,進行數據緩存時,如果沒有指定key屬性,Spring Boot默認配置類SimpleKeyGenerator中的generateKey(Object... params)方法會根據方法參數生成key值。對于沒有參數的方法,其key是默認創建的空參SimpleKey[]對象;對于只有一個參數的方法,其key默認是參數值;對于有多個參數的方法,其key是包含所有參數的SimpleKey對象。?
如果方法有多個參數,但是部分參數對緩存沒有任何用處,通常會選擇手動指定key屬性的值,key屬性的值可以通過SpEL表達式選擇所需要的參數。
@Cacheable(cacheNames="book", key="#id")
public Book findBookById(Integer id, boolean includeUsed){return bookDao.findById(id).get();
}
Cache緩存支持的SpEL表達式及說明
| 參數名 | 位置 | 描述 | 示例 |
| methodName | root對象 | 當前被調用的方法名 | #root.methodName |
| method | root對象 | 當前被調用的方法 | #root.method.name |
| target | root對象 | 當前被調用的目標對象實例 | #root.target |
| targetClass | root對象 | 當前被調用的目標對象的類 | #root.targetClass |
| args | root對象 | 當前被調用的方法的參數列表 | #root.args[0] |
| caches | root對象 | 當前被調用的方法的緩存列表 | #root.caches[0].name |
| argumentName | 執行上下文 | 當前被調用的方法參數,可以用#參數名或者#a0、#p0的形式(0代表參數索引,從0開始) | #comment_id、#a0、#p0 |
| result | 執行上下文 | 當前方法執行后的返回結果 | #result |
(3)keyGenerator屬性
keyGenerator屬性與key屬性本質作用相同,都是用于指定緩存數據的key,只不過keyGenerator屬性指定的不是具體的key值,而是key值的生成器規則,由其中指定的生成器生成具體的key。使用時,keyGenerator屬性與key屬性要二者選一。關于自定義key值生成器的定義,可以參考Spring Boot默認配置類SimpleKeyGenerator的定義方式,這里不再做具體說明。
(4)cacheManager/cacheResolver屬性
cacheManager和cacheResolver屬性分別用于指定緩存管理器和緩存解析器,這兩個屬性也是二選一使用,默認情況不需要配置,對于需要使用多個緩存管理器(如Redis、Ehcache等)的應用,可以為每個操作設置一個緩存管理器或緩存解析器。?
(5)condition屬性
condition屬性用于對數據進行有條件的選擇性存儲,只有當指定條件為true時才會對查詢結果進行緩存,可以使用SpEL表達式指定屬性值。?
@Cacheable(cacheNames="book", condition="#id > 1")
public Book findBook(Integer id){return bookDao.findById(id).get();
}
(6)unless屬性
unless屬性的作用與condition屬性相反,當指定的條件為true時,方法的返回值不會被緩存,也可以使用SpEL表達式指定。?
@Cacheable(cacheNames="book", unless = "#result==null")
public Book findBook(Integer id){return bookDao.findById(id).get();
}
(7)sync屬性
在多線程程序中,某些操作可能會同時引用相同的參數,導致相同的對象被計算好幾次,從而達不到緩存的目的。對于這種情況,可以使用sync屬性,sync屬性表示數據緩存過程中是否使用同步模式,默認值為false,通常不會使用該屬性。?
3.@CachePut注解
@CachePut注解的作用是更新緩存數據,當需要更新緩存且不影響方法執行時,可以使用@CachePut注解,通常用在數據更新方法上。@CachePut注解的執行順序是,先進行方法調用,然后將方法結果更新到緩存中。
@CachePut注解也提供了多個屬性,這些屬性與@Cacheable注解的屬性完全相同。通常不建議在同一個方法同時使用@CachePut和@Cacheable注解,這兩個注解關注不同的行為,@CachePut注解會強制執行方法并進行緩存更新,使用@Cacheable 注解時,如果請求能夠在緩存中獲取到對應的數據,就不會執行當前被@Cacheable 注解標注的方法。?
4.@CacheEvict注解
@CacheEvict注解的作用刪除緩存中的數據,通常標注在數據刪除方法上。@CacheEvict注解的默認執行順序是先進行方法調用,然后將緩存清除。 @CacheEvict注解也提供了多個屬性,這些屬性與@Cacheable注解的屬性基本相同,除此之外,還額外提供了兩個特殊屬性allEntries和beforeInvocation,下面對這兩個屬性分別進行講解。
(1)allEntries屬性 allEntries屬性表示是否清除指定緩存空間中的所有緩存數據,默認值為false,即默認只刪除指定key對應的緩存數據。
@CacheEvict(cacheNames = "book",allEntries = true)
public void delById(Integer id){bookDao.deleteById(id);
}
(2)beforeInvocation屬性 beforeInvocation屬性表示是否在方法執行之前進行緩存清除,默認值為false,即默認在執行方法后再進行緩存清除。
@CacheEvict(cacheNames = "book",beforeInvocation = true)
public void delById(Integer id){bookDao.deleteById(id);
}
5.@Caching注解
如果不同緩存之間的條件或者鍵表達式不同,就需要指定相同類型的多個注解,例如需要同時指定多個@CacheEvict或@CachePut,這個時候可以使用@Caching注解。@Caching注解用于針對復雜規則的數據緩存管理,@Caching注解中允許使用多個嵌套的 @Cacheable 、@CachePut 或 @CacheEvict。在@Caching注解內部包含有Cacheable、put和evict三個屬性,分別對應于@Cacheable、@CachePut和@CacheEvict三個注解。
@Caching(evict = { @CacheEvict("primary"),
@CacheEvict(cacheNames="secondary", key="#date")})
public void delById(Integer id, Date date){bookDao.deleteById(id);
}
@Caching(cacheable={@Cacheable(cacheNames ="comment",key = "#id")},put = {@CachePut(cacheNames = "comment",key = "#result.author")})public Comment getComment(int comment_id){return commentRepository.findById(comment_id).get();}?6.@CacheConfig注解
@CacheConfig注解使用在類上,主要用于統籌管理類中所有使用@Cacheable、@CachePut和@CacheEvict注解標注方法中的公共屬性。?
@CacheConfig(cacheNames = "book")
@Service
public class BookService {@Autowiredprivate BookRepository bookRepository;@Cacheablepublic Book findById(Integer id){return  bookRepository.findById(id).get();}
}
聲明式緩存注解的應用
1.創建項目
2.配置依賴
<!-- springboot默認應該有,不配應該沒關系-->
<dependency><groupId>org.springframework.boot</groupId><artifactId>spring-boot-starter-cache</artifactId>
</dependency>
<dependency>
<groupId>
org.springframework.boot
</groupId>
<artifactId>
spring-boot-starter-web
</artifactId>
</dependency>
<dependency>
<groupId>
org.springframework.boot
</groupId>
<artifactId>
spring-boot-starter-data-jpa
</artifactId>
</dependency>
<dependency>
<groupId>
mysql
</groupId>
<artifactId>
mysql-connector-java
</artifactId>
</dependency>
3.設置配置信息
spring:datasource:url:"jdbc:mysql://localhost:3306/springbootdata?characterEncoding=utf-8&serverTimezone=Asia/Shanghai"username:rootpassword:rootjpa:show-sql:true4.創建實體類
@Entity
@Table(name="book")
public  class  Book {
@Id
@GeneratedValue(strategy = GenerationType.IDENTITY)
private  Integer id; //圖書編號
@Column(name="name")
private  String name; //圖書名稱
private  String author; //圖書作者
private  String press; //圖書出版社
private  String status; //圖書狀態public  Integer getId() {
return  id;
}public  void  setId(Integer id) {
this .id = id;
}public  String getName() {
return  name;
}public  void  setName(String name) {
this .name = name;
}public  String getPress() {
return  press;
}public  void  setPress(String press) {
this .press = press;
}public  String getAuthor() {
return  author;
}public  void  setAuthor(String author) {
this .author = author;
}public  String getStatus() {
return  status;
}public  void  setStatus(String status) {
this .status = status;
}public  Book() {
}public  Book(Integer id, String name, String author, String press, String status) {
this .id = id;
this .name = name;
this .author = author;
this .press = press;
this .status = status;
}@Override
public  String toString() {
return  "Book{" +
"id=" + id +
", name='" + name + ''' +
", author='" + author + ''' +
", press='" + press + ''' +
", status='" + status + ''' +
'
}';
}
}
5.創建Repository接口
@Repository
public  interface  BookRepository extends  JpaRepository<Book,Integer> {
}
?6.創建Service接口和實現類
public  interface  BookService {
public  Book findById(Integer id);
public  Book updateById(Integer id,String name);
public  void  delById(Integer id);
}
@Service
@CacheConfig(cacheNames = "book")
@Transactional
public class BookServiceImpl implements BookService{
@Autowired
private BookRepository bookRepository;@Cacheable(key = "#id")
public Book findById(Integer id){
//根據id查找圖書信息
return bookRepository.findById(id).get();
}
@CachePut(key = "#id")
public Book updateById(Integer id,String name){
Book book=this .findById(id);
book.setName(name);
//更新圖書信息
return bookRepository.save(book);
}
@CacheEvict(key = "#id")
public void delById(Integer id){
//根據id刪除圖書信息
bookRepository.deleteById(id);
}
}?7.創建控制器類
@RestController
@RequestMapping("book")
public  class  BookController {
@Autowired
private  BookService bookService;@RequestMapping("/findById/{id}")
public  Book findById(@PathVariable Integer id){
//根據id查詢圖書信息
return  bookService.findById(id);
}
@RequestMapping("/editById/{id}/{name}")
public  Book editById(@PathVariable Integer id,@PathVariable String name){
//根據id修改圖書的名稱
return  bookService.updateById(id,name);
}
@RequestMapping("/delById/{id}")
public  void  delById(@PathVariable Integer id){
//根據id刪除圖書信息
bookService.delById(id);
}
}
8.在啟動類上開啟緩存
@SpringBootApplication
@EnableCaching
public  class  Chapter06Application {
public  static  void  main(String[] args) {
SpringApplication.run(Chapter06Application.class , args);
}
}
9.測試緩存效果
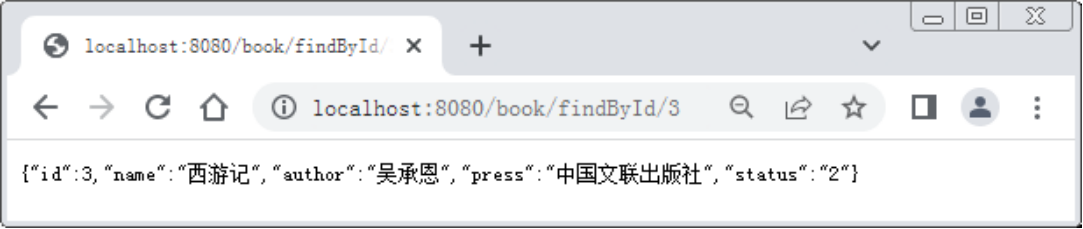
啟動項目,在瀏覽器中訪問http://localhost:8080/book/findById/3,查詢圖書信息,控制臺輸出信息。

查詢圖書信息后,瀏覽器中查詢到圖書信息。
再次在瀏覽器中訪問http://localhost:8080/book/findById/3,查詢id為3的圖書信息,控制臺輸出信息。

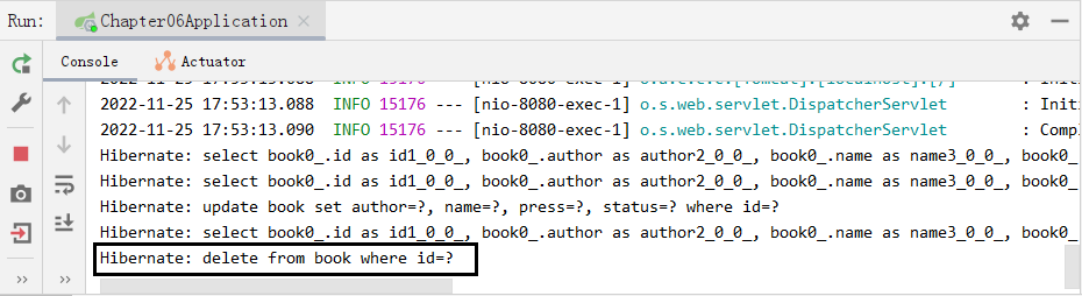
在瀏覽器中訪問http://localhost:8080/book/editById/3/西游釋厄傳,將id為3的圖書名稱更新為“西游釋厄傳”,此時控制臺輸出信息。

更新圖書信息后,瀏覽器中查詢圖書信息。

瀏覽器中訪問http://localhost:8080/book/delById/3,刪除id為3的圖書信息,控制臺輸出信息。
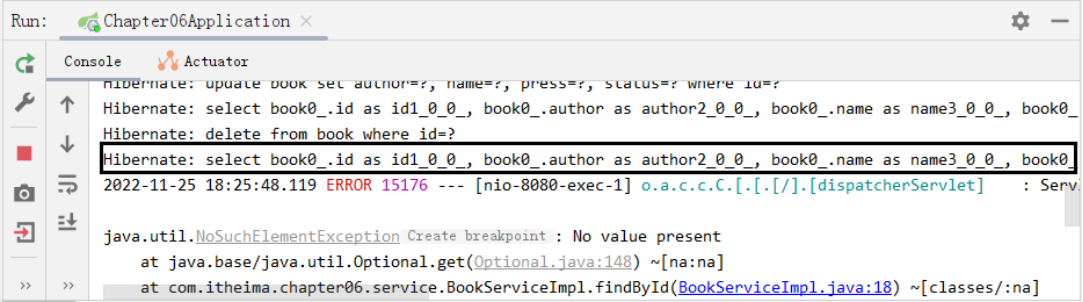
 在瀏覽器中再次訪問http://localhost:8080/book/findById/3,查詢id為3的圖書信息,控制臺輸出信息。
動手試一試 Spring Boot默認緩存管理?
測試發生一萬次請求需要的時間(jdk11以上)
import java.net.URI;
import java.net.http.HttpClient;
import java.net.http.HttpRequest;
import java.net.http.HttpResponse;
import java.time.Duration;
import java.util.concurrent.CompletableFuture;
import java.util.concurrent.TimeUnit;
import java.util.stream.Collectors;
import java.util.stream.IntStream;public class HttpRequestBenchmark {public static void main(String[] args) throws Exception {String url = "http://localhost:8081/get/1"; // 替換為你要請求的URLint numRequests = 10000; // 請求次數HttpClient client = HttpClient.newHttpClient();HttpRequest request = HttpRequest.newBuilder().uri(new URI(url)).build();long startTime = System.nanoTime();// 使用CompletableFuture來異步發送請求,并等待所有請求完成CompletableFuture<Void>[] futures = IntStream.range(0, numRequests).mapToObj(i -> CompletableFuture.runAsync(() -> {try {HttpResponse<String> response = client.send(request, HttpResponse.BodyHandlers.ofString());// 在這里可以處理響應,例如檢查狀態碼等System.out.println("xiangying------------------");// 這里只是簡單發送請求并忽略響應內容} catch (Exception e) {e.printStackTrace();}})).toArray(CompletableFuture[]::new);// 等待所有請求完成CompletableFuture.allOf(futures).join();long endTime = System.nanoTime();Duration duration = Duration.ofNanos(endTime - startTime);System.out.println("發送" + numRequests + "次HTTP請求需要的時間:" + duration.toMillis() + "毫秒");}
?

)


)


)


