flink本身是專注有狀態的無限流處理,有限流處理【batch批次】是無限流處理的一中特殊情況!
應用場景
- 實時ETL
集成流計算現有的諸多數據通道和SQL靈活的加工能力,對流式數據進行實時清洗、歸并和結構化處理;同時,對離線數倉進行有效的補充和優化,并為數據實時傳輸提供可計算通道。
- 實時報表
實時化采集、加工流式數據存儲;實時監控和展現業務、客戶各類指標,讓數據化運營實時化。如通過分析訂單處理系統中的數據獲知銷售增長率;通過分析分析運輸延遲原因或預測銷售量調整庫存;
- 監控預警
對系統和用戶行為進行實時監測和分析,以便及時發現危險行為,如計算機網絡入侵、詐騙預警等
- 在線系統
實時計算各類數據指標,并利用實時結果及時調整在線系統的相關策略,在各類內容投放、智能推送領域有大量的應用,如在客戶瀏覽商品的同時推薦相關商品等
flink主要角色
JobManager
協調分布式執行,它們用來調度task,協調檢查點(CheckPoint),協調失敗時恢復等TaskManager
也稱之為worker,主要職責是接收jobmanager協調的task,部署和啟動任務,接收上游的數據并處理。同時向resourcemanager反注冊自己的資源信息。
ResourceManager
管理集群資源,如Yarn
Dispatcher
作用:提供一個REST接口來讓我們提交需要執行的應用。一旦一個應用提交執行,Dispatcher會啟動一個JobManager,并將應用轉交給他。Dispatcher還會啟動一個webUI來提供有關作業執行信息注意:某些應用的提交執行的方式,有可能用不到DispatcherTask一個完整的處理階段(如map階段),由多個相同功能的SubTask組成?SubTaskTask的并行實例,是實際執行的最小單元。例如設置并行度為3的map操作會產生3個SubTask?slot:TaskManager中的資源格子,每個Slot有獨立的內存分配(如4GB)?一個Slot可以運行多個SubTask(線程級共享)
不同Job的Slot內存隔離,但共享網絡等資源?
slot sharing:?默認行為?:同一Job的上下游SubTask可共享Slot(如map和filter擠在一個Slot)?
優勢?:減少數據傳輸延遲(同Slot內直接內存交換)?提高資源利用率(輕量級操作不獨占Slot)
程序架構主要部分
source
本地集合:fromCollection(seq); fromElements();
文件:readTextFile(path);
socket:socketTextStream();
自定義:StreamExecutionEnvironment.addSource(sourceFunction),flink本身提供了許多源,也可以implements SourceFunction方法是為非并行源,或者為并行源 implements ParallelSourceFunction接口,或者extends RichParallelSourceFunction。
RichParallelSourceFunction與ParallelSourceFunction是Flink中用于實現自定義數據源的兩種關鍵接口,主要區別如下:
?功能擴展性?
- RichParallelSourceFunction繼承了RichFunction,提供了
open()和close()方法,支持訪問運行時上下文(如并行度、任務ID等),便于資源管理(如數據庫連接)7。- ParallelSourceFunction僅標記接口,無額外方法,需自行實現資源管理邏輯2。
?并行度支持?
- 兩者均支持并行執行(通過實現ParallelSourceFunction標記接口)26。
- 但RichParallelSourceFunction通過運行時上下文可動態分配數據分片(如MySQL分頁查詢)7。
?狀態管理?
- RichParallelSourceFunction可結合檢查點機制實現狀態一致性,適合有狀態數據源(如偏移量記錄)5。
- ParallelSourceFunction需自行處理狀態持久化4。
?典型應用場景?
- RichParallelSourceFunction適用于需要復雜初始化或狀態管理的場景(如連接外部系統)
- ParallelSourceFunction適合簡單無狀態數據源(如內存集合)3。
?實現復雜度?
- RichParallelSourceFunction需實現更多生命周期方法,但開發更規范6。
- ParallelSourceFunction更輕量,但靈活性較低2。
總結:優先選擇RichParallelSourceFunction以獲得更完善的開發支持,僅在無狀態且無需資源管理時考慮ParallelSourceFunction
- 需要訪問運行時上下文(如獲取并行任務ID)25
- 需管理資源(如數據庫連接、文件句柄)310
- 需結合檢查點機制實現狀態一致性(如Kafka偏移量記錄)58
- 典型場景:MySQL分頁查詢、Kafka消費者、分布式日志采集
import org.apache.flink.streaming.api.functions.source.RichParallelSourceFunction
import org.apache.flink.configuration.Configuration
import java.sql.{Connection, DriverManager, ResultSet}class MySQLRichParallelSource extends RichParallelSourceFunction[String] {private var connection: Connection = _private var isRunning = trueoverride def open(parameters: Configuration): Unit = {// 初始化數據庫連接connection = DriverManager.getConnection("jdbc:mysql://localhost:3306/test", "user", "password")}override def run(ctx: SourceFunction.SourceContext[String]): Unit = {val stmt = connection.createStatement()val rs = stmt.executeQuery("SELECT * FROM sensor_data")while (isRunning && rs.next()) {ctx.collect(rs.getString("value")) // 發射數據}}override def cancel(): Unit = isRunning = falseoverride def close(): Unit = {if (connection != null) connection.close()}
}
- 簡單無狀態數據生成(如內存集合、隨機數流)914
- 無需資源初始化/清理的并行任務115
- 典型場景:模擬傳感器數據、內存集合并行讀取
import org.apache.flink.streaming.api.functions.source.ParallelSourceFunction
import scala.util.Randomclass RandomParallelSource extends ParallelSourceFunction[Int] {private var isRunning = trueoverride def run(ctx: SourceFunction.SourceContext[Int]): Unit = {val rand = new Random()while (isRunning) {ctx.collect(rand.nextInt(100)) // 生成0-100隨機數Thread.sleep(500)}}override def cancel(): Unit = isRunning = false
}
transformation
- ?Map?
功能:對數據流中的每個元素進行一對一轉換14
val dataStream: DataStream[Int] = env.fromElements(1, 2, 3) val mappedStream = dataStream.map(_ * 2) // 輸出2,4,6
- ?FlatMap?
功能:將每個元素轉換為0個、1個或多個輸出元素17
val words = env.fromElements("hello world", "flink streaming") val splitWords = words.flatMap(_.split(" ")) // 輸出各單詞
- ?Filter?
功能:根據條件過濾數據元素24
val numbers = env.fromElements(1, 2, 3, 4) val evens = numbers.filter(_ % 2 == 0) // 輸出2,4
- ?KeyBy?
功能:按指定key對數據進行分區25
case class Sensor(id: String, temp: Double) val sensors = env.fromElements(Sensor("s1", 35.2), Sensor("s2", 28.5)) val keyedStream = sensors.keyBy(_.id)
- ?Reduce?
功能:對分組數據流進行聚合操作59
keyedStream.reduce((s1, s2) => Sensor(s1.id, s1.temp + s2.temp)) // 相同id的溫度累加
- ?Aggregations?
功能:內置聚合函數(sum/min/max等)25
keyedStream.sum("temp") // 按key求溫度總和
- ?Window?
功能:在數據流上定義時間或計數窗口58
sensors.keyBy(_.id) .window(TumblingProcessingTimeWindows.of(Time.seconds(5))) .sum("temp")
- ?Union?
功能:合并多個同類型數據流48
val stream1 = env.fromElements(1, 2) val stream2 = env.fromElements(3, 4) val merged = stream1.union(stream2) // 輸出1,2,3,4
- ?Join?
功能:基于key連接兩個數據流89
val streamA = env.fromElements(("a", 1), ("b", 2)) val streamB = env.fromElements(("a", 3), ("b", 4)) streamA.join(streamB) .where(_._1).equalTo(_._1) .window(TumblingEventTimeWindows.of(Time.seconds(5))) .apply((a,b) => (a._1, a._2 + b._2)) // 輸出("a",4),("b",6)
- ?CoFlatMap?
功能:連接兩個流并共享狀態8
val controlStream = env.fromElements("HIGH", "LOW") val dataStream = env.fromElements(1.2, 3.4, 5.6) controlStream.connect(dataStream) .flatMap( (ctrl: String, out: Collector[Double]) => {}, (value: Double, out: Collector[Double]) => { if (currentThreshold == "HIGH") out.collect(value) } )
- ?ProcessFunction?
功能:提供對時間和狀態的底層訪問
class TempAlertFunction extends ProcessFunction[Sensor, String] { override def processElement( sensor: Sensor, ctx: ProcessFunction[Sensor, String]#Context, out: Collector[String]): Unit = { if (sensor.temp > 100) { out.collect(s"Alert! ${sensor.id} temp=${sensor.temp}") } } }
- ?Iterate?
功能:創建迭代流處理循環
val numbers = env.fromElements(1, 2, 3, 4) val iterated = numbers.iterate( iteration => { val minusOne = iteration.map(_ - 1) val stillGreaterThanZero = minusOne.filter(_ > 0) val lessThanZero = minusOne.filter(_ <= 0) (stillGreaterThanZero, lessThanZero) } )
- ?Window Apply?
功能:對窗口數據應用自定義函數
sensors.keyBy(_.id) .window(TumblingEventTimeWindows.of(Time.seconds(5))) .apply { (key, window, vals, out: Collector[String]) => out.collect(s"$key: ${vals.map(_.temp).sum}") }
- ?Side Output?
功能:將數據分流到側輸出流
val outputTag = OutputTag[String]("side-output") val mainStream = numbers.process(new ProcessFunction[Int, Int] { override def processElement( value: Int, ctx: ProcessFunction[Int, Int]#Context, out: Collector[Int]): Unit = { if (value % 2 != 0) { ctx.output(outputTag, s"Odd: $value") } out.collect(value) } }) val sideStream = mainStream.getSideOutput(outputTag)
- ?Broadcast?
功能:將流廣播到所有并行任務8
val ruleStream = env.fromElements("rule1", "rule2").broadcast val dataStream = env.fromElements(1, 2, 3) dataStream.connect(ruleStream) .process(new BroadcastProcessFunction[Int, String, String] { override def processElement( value: Int, ctx: BroadcastProcessFunction[Int, String, String]#ReadOnlyContext, out: Collector[String]): Unit = { val rules = ctx.getBroadcastState(...) // 使用廣播規則處理數據 } })完整項目實現示例:
import org.apache.flink.streaming.api.scala._
import org.apache.flink.streaming.api.windowing.time.Time
import org.apache.flink.util.Collectorobject FlinkOperatorsDemo {case class SensorReading(id: String, timestamp: Long, temperature: Double)def main(args: Array[String]): Unit = {val env = StreamExecutionEnvironment.getExecutionEnvironment// 1. 數據源val sensorData = env.fromElements(SensorReading("sensor1", 1L, 35.6),SensorReading("sensor2", 2L, 28.3),SensorReading("sensor1", 3L, 37.2))// 2. 算子演示val processed = sensorData.filter(_.temperature > 30)  // Filter.map(r => (r.id, r.temperature))  // Map.keyBy(_._1)  // KeyBy.timeWindow(Time.seconds(5))  // Window.reduce((r1, r2) => (r1._1, r1._2 + r2._2))  // Reduceprocessed.print()env.execute("Flink Operators Demo")}
}
代碼說明:
- 包含Flink核心算子鏈式調用演示
- 使用case class定義數據類型
- 展示從數據源到窗口聚合的完整流程
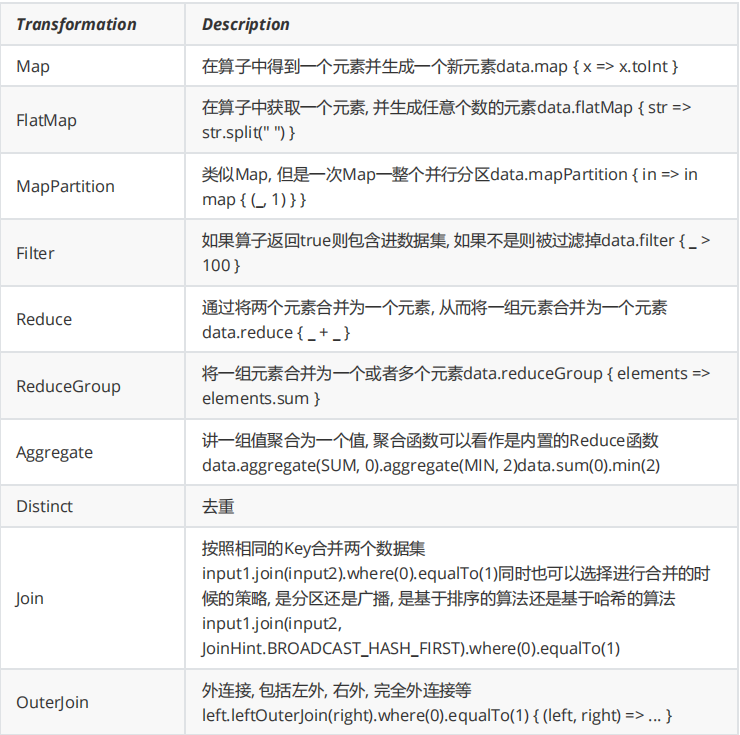
其他重要算子補充說明:
- ?Fold?:已棄用,推薦使用Reduce
- ?WindowAll?:非分組全局窗口
- ?Project?:選擇部分字段(僅DataSet API)
- ?Cross?:兩個流的笛卡爾積
- ?CoGroup?:分組連接兩個數據集
sink
文件: writeAsText(path)
HDFS:?
import org.apache.flink.streaming.api.scala._ import org.apache.flink.streaming.api.functions.sink.filesystem.StreamingFileSink import org.apache.flink.core.fs.Path import org.apache.flink.streaming.api.functions.sink.filesystem.bucketassigners.DateTimeBucketAssigner import org.apache.flink.streaming.api.functions.sink.filesystem.rollingpolicies.DefaultRollingPolicy import java.time.ZoneIdobject FlinkToHdfs {def main(args: Array[String]): Unit = {val env = StreamExecutionEnvironment.getExecutionEnvironment// 1. 創建測試數據源val dataStream = env.fromElements("2025-08-20 15:00:00,user1,click","2025-08-20 15:01:00,user2,purchase","2025-08-20 15:02:00,user3,view")// 2. 配置HDFS輸出路徑val hdfsPath = "hdfs://namenode:9000/flink/output"// 3. 創建StreamingFileSinkval sink = StreamingFileSink.forRowFormat(new Path(hdfsPath),new SimpleStringEncoder[String]("UTF-8")).withBucketAssigner(new DateTimeBucketAssigner[String]("yyyy-MM-dd--HH",ZoneId.of("UTC"))).withRollingPolicy(DefaultRollingPolicy.builder().withRolloverInterval(60 * 60 * 1000) // 1小時滾動一次.withInactivityInterval(15 * 60 * 1000) // 15分鐘不活動則滾動.withMaxPartSize(128 * 1024 * 1024) // 128MB.build()).build()// 4. 添加sink到數據流dataStream.addSink(sink)env.execute("Flink to HDFS Example")} }kafka:?FlinkKafkaProducer
redis:RedisSink
hbase:?
自定義:SinkToMySql extends RichSinkFunction
Chain
Operator Chain
數據傳輸
Flink在處理任務間的數據傳輸過程中,采用了緩沖區機制。
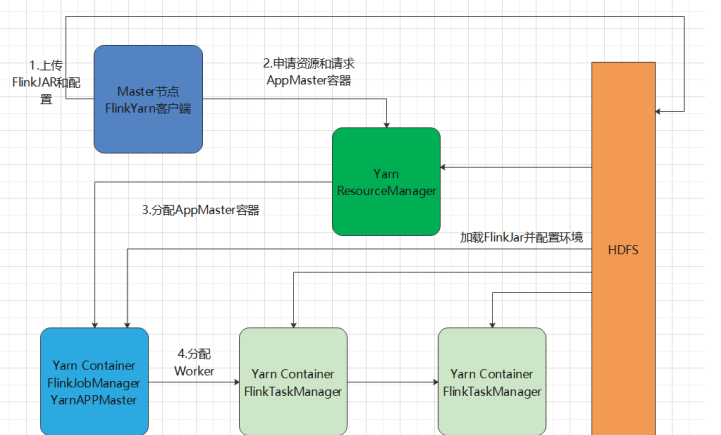
Yarn部署機制
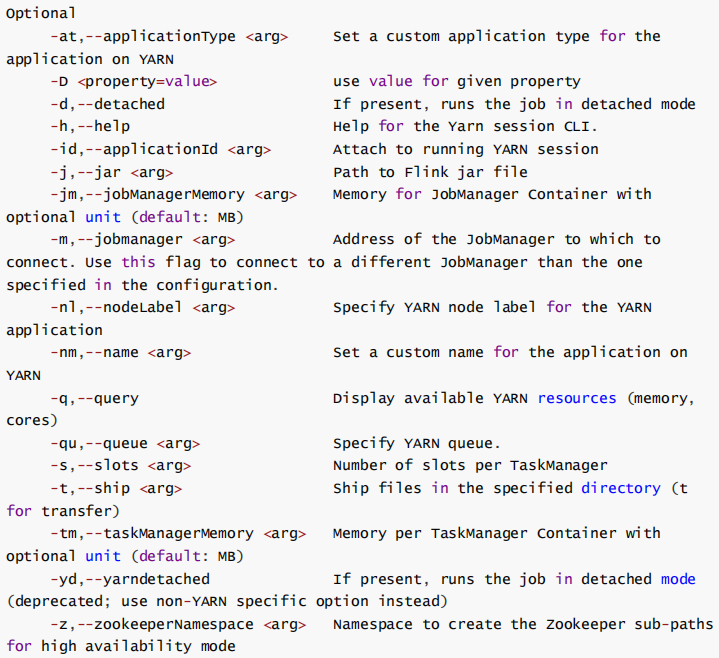
(1)啟動一個YARN?yarn-session.sh -h????????/export/servers/flink/bin/yarn-session.sh -n 2 -tm 800 -s 1 -d# -n 表示申請2個容器,這里指的就是多少個taskmanager# -s 表示每個TaskManager的slots數量# -tm 表示每個TaskManager的內存大小# -d 表示以后臺程序方式運行如果不想讓Flink YARN客戶端始終運行,那么也可以啟動分離的 YARN會話。該參數被稱為-d或--detached。在這種情況下,Flink YARN客戶端只會將Flink提交給集群,然后關閉它自己(2)直接在YARN上提交運行Flink作業(Run a Flink job on YARN)bin/flink run -m yarn-cluster -yn 2 -yjm 1024 -ytm 1024 /export/servers/flink/examples/batch/WordCount.jar
# -m jobmanager的地址
# -yn 表示TaskManager的個數停止yarn-cluster:yarn application -kill application_1527077715040_0003rm -rf /tmp/.yarn-properties-root
窗口
通俗講,Window是用來對一個無限的流設置一個有限的集合,從而在有界的數據集上進行操作的一種機制。流上的集合由Window來劃定范圍,比如“計算過去10分鐘”或者“最后50個元素的和”分為:時間窗口(TimeWindow)數量窗口(CountWindow)滾動窗口
時間驅動:keyedStream.timeWindow(Time.seconds(10))數量驅動:keyedStream.countWindow(3)滑動窗口
時間驅動:keyedStream.timeWindow(Time.seconds(10), Time.seconds(5))數量驅動:keyedStream.countWindow(3, 2)會話窗口
keyedStream.window(ProcessingTimeSessionWindows.withGap(Time.seconds(10)))全局窗口
EventTime[事件時間]
事件發生的時間,例如:點擊網站上的某個鏈接的時間,每一條日志都會記錄自己的生成時間。如果以EventTime為基準來定義時間窗口那將形成EventTimeWindow,要求消息本身就應該攜帶EventTime。如果要使用事件時間,要設置:env.setStreamTimeCharacteristic(TimeCharacteristic.EventTime) //設置使用事件時間IngestionTime[攝入時間]
數據進入Flink的時間,如某個Flink節點的source operator接收到數據的時間,例如:某個source消費到kafka中的數據。如果以IngesingtTime為基準來定義時間窗口那將形成IngestingTimeWindow,以source的systemTime為準ProcessingTime[處理時間]
某個Flink節點執行某個operation的時間,例如:timeWindow處理數據時的系統時間,默認的時間屬性就是Processing Time如果以ProcessingTime基準來定義時間窗口那將形成ProcessingTimeWindow,以operator的systemTime為準水印(水位線)
水位線是為了控制這個事件能不能被處理,如果在水位線允許的事件范圍之外,肯定是不會被當前窗口處理的。emitWatermark(當前最大時間 - 亂序允許時間)這個方法200ms周期執行,就是告訴框架只能提交這個時間及之后的時間的事件過來。?當水位線超過窗口結束時間時,對應的窗口才會被觸發計算。這種機制確保了:即使數據亂序到達,只要在允許的時間范圍內,仍然能被正確處理;超過容忍時間的遲到數據會被丟棄。
窗口的創建是根據事件時間來的,是獨立的任務來創建,框架會根據事件時間,將當前事件歸到那個窗口。水位線是觸發窗口計算,跟窗口創建沒關系。
例如:窗口[10:00:00 - 10:00:10),當窗口接收到第一條10:00:10事件,就會創建下一個[10:00:10- 10:00:20),但是這個時候因為水位線,上一個窗口還沒被觸發計算,只有當水位線時間 >= 10:00:10時,才會被觸發計算。
水位線生成器: 事件處理方法,給下游發送水位時間方法(200ms執行一次)
事件時間提取器:提取事件時間
new WatermarkStrategy[OrderDetail] {override def createWatermarkGenerator(context: WatermarkGeneratorSupplier.Context): WatermarkGenerator[OrderDetail] = {new WatermarkGenerator[OrderDetail] {//每來一條數據,都會調用onEventvar maxTimestamp = Long.MinValuevar maxOutOfOrderness = 500L;override def onEvent(event: OrderDetail, eventTimestamp: Long, output: WatermarkOutput): Unit = {maxTimestamp = Math.max(maxTimestamp, format.parse(event.orderCreateTime).getTime)}override def onPeriodicEmit(output: WatermarkOutput): Unit = {output.emitWatermark(new Watermark(maxTimestamp - maxOutOfOrderness))}}}//1.老版本 2. lambda}.withTimestampAssigner(new SerializableTimestampAssigner[OrderDetail] {override def extractTimestamp(element: OrderDetail, recordTimestamp: Long): Long = {format.parse(element.orderCreateTime).getTime}}
整體流程?:
- 數據流中每個事件會先經過
extractTimestamp提取時間戳- 然后觸發
onEvent方法處理- 最后周期性調用
onPeriodicEmit生成水位線?方法調用時機詳解?:
(1)?
extractTimestamp方法:
- ?調用時機?:每條數據到達時立即調用
- ?作用?:就像快遞員拆包裹看發貨日期,從數據中提取事件時間戳
- ?示例?:
MyEvent("A", 1630000000000)會提取出1630000000000(2)?
onEvent方法:
- ?調用時機?:緊接在
extractTimestamp之后- ?作用?:像記錄最高水位的標尺,比較并保存當前最大時間戳
- ?示例?:當收到時間戳1000的事件,會更新
currentMaxTimestamp = 1000(3)?
onPeriodicEmit方法:
- ?調用時機?:默認每200ms自動調用一次(類似心跳機制)
- ?作用?:發出水位線 = 當前最大時間戳 - 允許亂序時間
- ?示例?:如果
currentMaxTimestamp=5000,maxOutOfOrderness=3000,則發出水位線2000?參數說明?:
maxOutOfOrderness:相當于"寬容度",設置允許遲到數據的最長時間(如設為3000表示允許3秒內的遲到數據)currentMaxTimestamp:動態變化的變量,始終記錄已見數據的最大時間戳?工作類比?:
想象老師在批改時間亂序提交的作業:
extractTimestamp:查看每份作業的提交日期onEvent:記錄目前看到的最晚提交日期onPeriodicEmit:每隔一段時間宣布:"現在開始只接受比(最晚日期-3天)更早的作業"遲到數據處理方法:允許延遲,側輸出流,自定義觸發器,全局窗口+延遲合并遲到數據的處理機制?
1. ?允許延遲(Allowed Lateness)?
這是最常用的方式,?擴展窗口等待時間?:
javaCopy Code
.window(TumblingEventTimeWindows.of(Time.seconds(10))) .allowedLateness(Time.seconds(5)) // 允許5秒延遲
- ?運作方式?:
- 水位線到達?
窗口結束時間?時觸發?初次計算?- 在?
[窗口結束時間, 窗口結束時間+允許延遲]?區間內:
- 新到達的屬于該窗口的數據?重新觸發窗口計算?
- 窗口狀態持續更新
- ?示例?:
mermaidCopy Code
timeline title 10秒窗口 + 5秒允許延遲 section 事件時間 00:13 : 水位線到達00:10 → 觸發初次計算 00:14 : 遲到數據(事件時間00:09)到達 → 重新觸發計算 00:15 : 遲到數據(事件時間00:08)到達 → 再次觸發計算 00:16 : 水位線到達00:11 → 窗口正式關閉2. ?側輸出流(Side Output)?
捕獲?超過允許延遲的遲到數據?:
javaCopy Code
OutputTag<Event> lateTag = new OutputTag<>("late-data"); DataStream<Event> main = stream .keyBy(...) .window(...) .allowedLateness(Time.seconds(3)) .sideOutputLateData(lateTag) // 捕獲超時遲到數據 .process(...); // 獲取遲到數據流 DataStream<Event> lateStream = main.getSideOutput(lateTag);
- ?應用場景?:
- 關鍵業務數據補全(如金融交易)
- 延遲監控和告警
- 數據質量分析
3. ?觸發器(Trigger)自定義?
精細控制計算觸發邏輯:
javaCopy Code
.trigger(new ContinuousEventTimeTrigger(20) { @Override public TriggerResult onElement(...) { // 自定義遲到數據處理邏輯 if (isLateData(element)) { updateWindowState(element); // 手動更新窗口狀態 return TriggerResult.FIRE; // 立即觸發計算 } return super.onElement(...); } })
- ?適用場景?:
- 特殊業務規則(如證券交易中的尾單處理)
- 動態延遲策略(基于數據量調整)
4. ?全局窗口(GlobalWindow)+ 延遲合并?
處理?無界遲到數據?:
javaCopy Code
.window(GlobalWindows.create()) .trigger(PurgingTrigger.of( new LateDataFireTrigger() // 自定義處理所有遲到數據 ))
?遲到數據處理流程?
mermaidCopy Code
flowchart TD A[數據到達] --> B{事件時間是否在<br/>當前水位線之前?} B -->|是| C[遲到數據] B -->|否| D[正常處理] C --> E{是否在允許延遲內?} E -->|是| F[更新窗口狀態并重新觸發計算] E -->|否| G{是否配置側輸出?} G -->|是| H[輸出到側輸出流] G -->|否| I[直接丟棄]
?實際案例:電商訂單統計?
?場景?:統計每10分鐘的訂單總額,容忍3秒延遲,超時訂單單獨記錄
javaCopy Code
// 定義遲到標簽 OutputTag<Order> lateOrders = new OutputTag<>("late-orders"); SingleOutputStreamOperator<Double> result = orders .keyBy(Order::getCategory) .window(TumblingEventTimeWindows.of(Time.minutes(10))) .allowedLateness(Time.seconds(3)) .sideOutputLateData(lateOrders) .aggregate(new OrderSumAggregator()); // 處理主結果 result.print(); // 處理超時訂單 result.getSideOutput(lateOrders) .map(order -> "LATE_ORDER: " + order) .addSink(new LateOrderSink());?數據處理效果?:
數據事件時間 處理水位線 處理方式 12:15:07 12:15:10 進入正常窗口 [12:10,12:20) 12:19:58 12:20:05 允許延遲期內 → 更新窗口結果 12:20:02 12:20:08 允許延遲期內 → 再次更新結果 12:20:05 12:20:13 超過延遲期 → 輸出到側輸出流
?最佳實踐建議?
?允許延遲設置?:
- 一般設為網絡延遲峰值的 ?2-3倍?(如Kafka延遲監控的P99值)
- 不宜過大(避免狀態膨脹)
?監控配置?:
javaCopy Code
// 監控遲到數據比例 lateDataStream .map(_ => 1L).windowAll(TumblingProcessingTimeWindows.of(Time.hours(1))) .sum(0) .addSink(new LateDataMetricSink());?狀態清理優化?:
javaCopy Code
.withLateFiredPurgingTrigger() // 及時清理已完成窗口狀態?動態延遲策略?(高級):
javaCopy Code
.allowedLateness(ctx => { if (ctx.element().isPriority()) return Time.minutes(5); return Time.seconds(30); })💡 ?核心原則?:水位線決定?何時觸發計算?,允許延遲決定?等待遲到數據多久?,側輸出決定?超時數據的歸宿?。三者協同實現完整的遲到數據處理機制
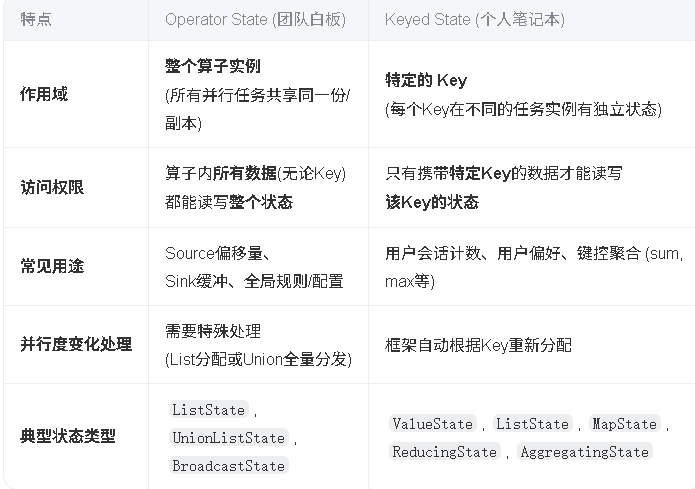
狀態
Flink中的狀態(State)是指算子任務在運行過程中需要記住的信息,這些信息可以用來實現復雜的有狀態計算。狀態是Flink實現精確一次(exactly-once)語義和故障恢復的基礎。
keyed state 鍵控狀態 只能用于keyedStream上
ValueState,MapState,ReducingState,AggregatingState
import org.apache.flink.api.common.functions.RichMapFunction
import org.apache.flink.api.common.state._
import org.apache.flink.api.common.typeinfo.TypeInformation
import org.apache.flink.configuration.Configuration
import org.apache.flink.streaming.api.scala._object KeyedStateExamples {def main(args: Array[String]): Unit = {val env = StreamExecutionEnvironment.getExecutionEnvironment// 示例數據流val input = env.fromElements(("user1", 10),("user2", 5),("user1", 20),("user3", 8),("user2", 15))// 1. ValueState示例val valueStateResult = input.keyBy(_._1).map(new ValueStateExample).print("ValueState結果")// 2. ListState示例val listStateResult = input.keyBy(_._1).map(new ListStateExample).print("ListState結果")// 3. MapState示例val mapStateResult = input.keyBy(_._1).map(new MapStateExample).print("MapState結果")// 4. ReducingState示例val reducingStateResult = input.keyBy(_._1).map(new ReducingStateExample).print("ReducingState結果")// 5. AggregatingState示例val aggregatingStateResult = input.keyBy(_._1).map(new AggregatingStateExample).print("AggregatingState結果")env.execute("Keyed State Examples")}
}// 1. ValueState實現
class ValueStateExample extends RichMapFunction[(String, Int), (String, Int)] {private var state: ValueState[Int] = _override def open(parameters: Configuration): Unit = {val stateDesc = new ValueStateDescriptor[Int]("valueState", TypeInformation.of(classOf[Int]))state = getRuntimeContext.getState(stateDesc)}override def map(value: (String, Int)): (String, Int) = {val current = Option(state.value()).getOrElse(0)val newValue = current + value._2state.update(newValue)(value._1, newValue)}
}// 2. ListState實現
class ListStateExample extends RichMapFunction[(String, Int), (String, List[Int])] {private var state: ListState[Int] = _override def open(parameters: Configuration): Unit = {val stateDesc = new ListStateDescriptor[Int]("listState", TypeInformation.of(classOf[Int]))state = getRuntimeContext.getListState(stateDesc)}override def map(value: (String, Int)): (String, List[Int]) = {state.add(value._2)(value._1, state.get().asScala.toList)}
}// 3. MapState實現
class MapStateExample extends RichMapFunction[(String, Int), (String, Map[String, Int])] {private var state: MapState[String, Int] = _override def open(parameters: Configuration): Unit = {val stateDesc = new MapStateDescriptor[String, Int]("mapState", TypeInformation.of(classOf[String]),TypeInformation.of(classOf[Int]))state = getRuntimeContext.getMapState(stateDesc)}override def map(value: (String, Int)): (String, Map[String, Int]) = {state.put(value._1, value._2)(value._1, state.entries().asScala.map(e => e.getKey -> e.getValue).toMap)}
}// 4. ReducingState實現
class ReducingStateExample extends RichMapFunction[(String, Int), (String, Int)] {private var state: ReducingState[Int] = _override def open(parameters: Configuration): Unit = {val stateDesc = new ReducingStateDescriptor[Int]("reducingState",(a: Int, b: Int) => a + b,  // ReduceFunctionTypeInformation.of(classOf[Int]))state = getRuntimeContext.getReducingState(stateDesc)}override def map(value: (String, Int)): (String, Int) = {state.add(value._2)(value._1, state.get())}
}// 5. AggregatingState實現
class AggregatingStateExample extends RichMapFunction[(String, Int), (String, Double)] {private var state: AggregatingState[Int, Double] = _override def open(parameters: Configuration): Unit = {val stateDesc = new AggregatingStateDescriptor[Int, (Int, Int), Double]("aggregatingState",new AverageAggregate,TypeInformation.of(classOf[(Int, Int)]),TypeInformation.of(classOf[Double]))state = getRuntimeContext.getAggregatingState(stateDesc)}override def map(value: (String, Int)): (String, Double) = {state.add(value._2)(value._1, state.get())}
}// 用于AggregatingState的聚合函數
class AverageAggregate extends AggregateFunction[Int, (Int, Int), Double] {override def createAccumulator(): (Int, Int) = (0, 0)override def add(value: Int, accumulator: (Int, Int)): (Int, Int) = {(accumulator._1 + value, accumulator._2 + 1)}override def getResult(accumulator: (Int, Int)): Double = {accumulator._1.toDouble / accumulator._2}override def merge(a: (Int, Int), b: (Int, Int)): (Int, Int) = {(a._1 + b._1, a._2 + b._2)}
}
算子狀態
import org.apache.flink.api.common.state.{ListState, ListStateDescriptor}
import org.apache.flink.runtime.state.{FunctionInitializationContext, FunctionSnapshotContext}
import org.apache.flink.streaming.api.checkpoint.CheckpointedFunction
import org.apache.flink.streaming.api.functions.source.SourceFunctionclass BufferingSource(threshold: Int) extends SourceFunction[String] with CheckpointedFunction {private var isRunning = trueprivate var bufferedElements = List[String]()private var checkpointedState: ListState[String] = _override def run(ctx: SourceFunction.SourceContext[String]): Unit = {while (isRunning) {bufferedElements ::= s"element-${System.currentTimeMillis()}"if (bufferedElements.size >= threshold) {bufferedElements.reverse.foreach(ctx.collect)bufferedElements = Nil}Thread.sleep(100)}}override def snapshotState(context: FunctionSnapshotContext): Unit = {checkpointedState.update(bufferedElements.asJava)}override def initializeState(context: FunctionInitializationContext): Unit = {checkpointedState = context.getOperatorStateStore.getListState(new ListStateDescriptor[String]("buffered-elements", classOf[String]))if (context.isRestored) {bufferedElements = checkpointedState.get().asScala.toList}}
}
class UnionListSource extends SourceFunction[Int] with CheckpointedFunction {private var checkpointedState: ListState[Int] = _private var toEmit = (1 to 100).toListoverride def run(ctx: SourceFunction.SourceContext[Int]): Unit = {toEmit.foreach { num =>ctx.collect(num)Thread.sleep(10)}}override def snapshotState(context: FunctionSnapshotContext): Unit = {checkpointedState.update(toEmit.asJava)}override def initializeState(context: FunctionInitializationContext): Unit = {checkpointedState = context.getOperatorStateStore.getUnionListState(new ListStateDescriptor[Int]("union-state", classOf[Int]))if (context.isRestored) {toEmit = checkpointedState.get().asScala.toList}} }import org.apache.flink.api.common.state.{MapStateDescriptor, BroadcastState} import org.apache.flink.streaming.api.functions.co.BroadcastProcessFunction import org.apache.flink.util.Collectorclass DynamicFilterFunction extends BroadcastProcessFunction[String, String, String] {private final val ruleDescriptor = new MapStateDescriptor[String, String]("rules", classOf[String], classOf[String])override def processElement(value: String,ctx: ReadOnlyContext,out: Collector[String]): Unit = {val rule = ctx.getBroadcastState(ruleDescriptor).get("filter")if (rule == null || value.contains(rule)) {out.collect(value)}}override def processBroadcastElement(rule: String,ctx: Context,out: Collector[String]): Unit = {ctx.getBroadcastState(ruleDescriptor).put("filter", rule)} }
廣播狀態
狀態存儲
狀態生存時間
CEP
)
http參數過濾)


:SPI(串行外設接口))
)
)


)
適配CmBacktrace錯誤追蹤)


