技能編輯器整體架構

角色資源劃分與管理
1. 角色資源結構

角色資源劃分與管理
1. 角色資源結構
// 骨骼重定向示例
void RetargetAnimation(Animation& srcAnim, Skeleton& targetSkeleton) {for (int frame = 0; frame < srcAnim.numFrames; ++frame) {for (Bone& bone : targetSkeleton.bones) {if (auto srcBone = srcAnim.skeleton.FindBone(bone.name)) {bone.transform = srcAnim.frames[frame].boneTransforms[srcBone->index];} else {// 使用默認姿勢bone.transform = targetSkeleton.bindPose[bone.index];}}}
}
時間軸技能編輯系統
1. 時間軸核心結構
?
2. 軌道類型設計
| 軌道類型 | 可編輯屬性 | 用途 |
|---|---|---|
| 動畫軌道 | 動畫片段、混合權重、播放速度 | 控制角色動作 |
| 特效軌道 | 特效資源、位置偏移、縮放、顏色 | 管理技能特效 |
| 鏡頭軌道 | 震動強度、模式、持續時間 | 控制相機效果 |
| 傷害軌道 | 傷害區域形狀、傷害值、Buff效果 | 技能傷害判定 |
| 事件軌道 | 自定義事件字符串 | 觸發腳本邏輯 |
| 音頻軌道 | 音效資源、音量、空間位置 | 管理技能音效 |
3. 關鍵幀數據序列化
{"tracks": [{"type": "Animation","keyframes": [{"time": 0.0,"animClip": "skill_prepare","blendTime": 0.1,"speed": 1.0},{"time": 1.2,"animClip": "skill_attack","blendTime": 0.2,"speed": 1.5}]},{"type": "VFX","keyframes": [{"time": 1.0,"effect": "charge_effect","position": {"x":0,"y":1.5,"z":0.5},"scale": 0.5},{"time": 1.5,"effect": "explosion_effect","position": {"x":0,"y":0,"z":3},"scale": 2.0}]}]
}
特效系統實現
1. 特效類型與參數
| 特效類型 | 控制參數 | 編輯器支持 |
|---|---|---|
| 粒子系統 | 發射率、生命周期、速度、大小、顏色梯度 | 實時預覽、曲線編輯 |
| 網格動畫 | 模型、材質、動畫序列 | 模型導入、動畫預覽 |
| 拖尾渲染 | 寬度、材質、生命周期 | 路徑編輯、動態預覽 |
| 貼花投影 | 投影范圍、材質、衰減 | 場景位置調整 |
| 屏幕后效 | 泛光強度、色差、畸變 | 參數滑塊、實時反饋 |
2. 鏡頭效果實現
// 相機震動系統
public class CameraShake {public float intensity = 0.5f;public float frequency = 10f;public float duration = 0.5f;public ShakeMode mode = ShakeMode.Perlin;private float elapsed = 0f;private Vector3 originalPos;public void Update(Camera camera, float deltaTime) {if (elapsed == 0) originalPos = camera.transform.position;elapsed += deltaTime;if (elapsed >= duration) {camera.transform.position = originalPos;return;}float percent = elapsed / duration;float currentIntensity = intensity * (1 - percent);Vector3 offset = CalculateOffset(currentIntensity);camera.transform.position = originalPos + offset;}private Vector3 CalculateOffset(float intensity) {switch (mode) {case ShakeMode.Perlin:float x = Mathf.PerlinNoise(Time.time * frequency, 0) * 2 - 1;float y = Mathf.PerlinNoise(0, Time.time * frequency) * 2 - 1;return new Vector3(x, y, 0) * intensity;case ShakeMode.Random:return Random.insideUnitSphere * intensity;default:return Vector3.zero;}}
}
3. 后處理特效實現
// 技能釋放時屏幕扭曲效果
float4 DistortionPass(VS_OUTPUT input) : SV_Target {float2 uv = input.uv;// 基于技能中心點的徑向扭曲float2 center = GetSkillCenterUV();float2 dir = uv - center;float dist = length(dir);// 扭曲強度隨時間衰減float intensity = GetSkillIntensity() * exp(-dist * 10.0);float timeFactor = sin(_Time.y * 20.0) * 0.5 + 0.5;// 應用扭曲uv += normalize(dir) * intensity * timeFactor * 0.1;return tex2D(_MainTex, uv);
}
傷害系統設計
1. 傷害區域檢測

2. 傷害公式系統
class DamageCalculator:def calculate(self, skill, attacker, target):base_dmg = skill.base_damage# 屬性修正attr_mod = 1.0 + (attacker.attack_power - target.defense) * 0.01# 暴擊計算crit_chance = attacker.critical_chance - target.critical_resistis_critical = random.random() < max(0, min(crit_chance, 0.8))crit_mod = 2.0 if is_critical else 1.0# 元素反應element_mod = self._element_reaction(skill.element, target.element)# 最終傷害final_dmg = base_dmg * attr_mod * crit_mod * element_modreturn final_dmg, is_criticaldef _element_reaction(self, src, target):reactions = {("Fire", "Nature"): 2.0, # 火克草("Water", "Fire"): 1.5, # 水克火("Nature", "Water"): 1.5, # 草克水("Light", "Dark"): 2.0, # 光克暗("Dark", "Light"): 2.0 # 暗克光}return reactions.get((src, target), 1.0)?3. Buff/Debuff系統
class BuffSystem {
public:void ApplyBuff(Entity target, Buff buff) {auto& buffs = target.buffs;// 檢查是否已存在同類Buffauto it = find_if(buffs.begin(), buffs.end(), [&](const Buff& b) { return b.id == buff.id; });if (it != buffs.end()) {// 刷新持續時間it->duration = max(it->duration, buff.duration);} else {// 應用新Buffbuffs.push_back(buff);buff.OnApply(target);}}void Update(Entity target, float deltaTime) {for (auto it = target.buffs.begin(); it != target.buffs.end(); ) {it->duration -= deltaTime;it->OnTick(target, deltaTime);if (it->duration <= 0) {it->OnRemove(target);it = target.buffs.erase(it);} else {++it;}}}
};
場景與AI集成
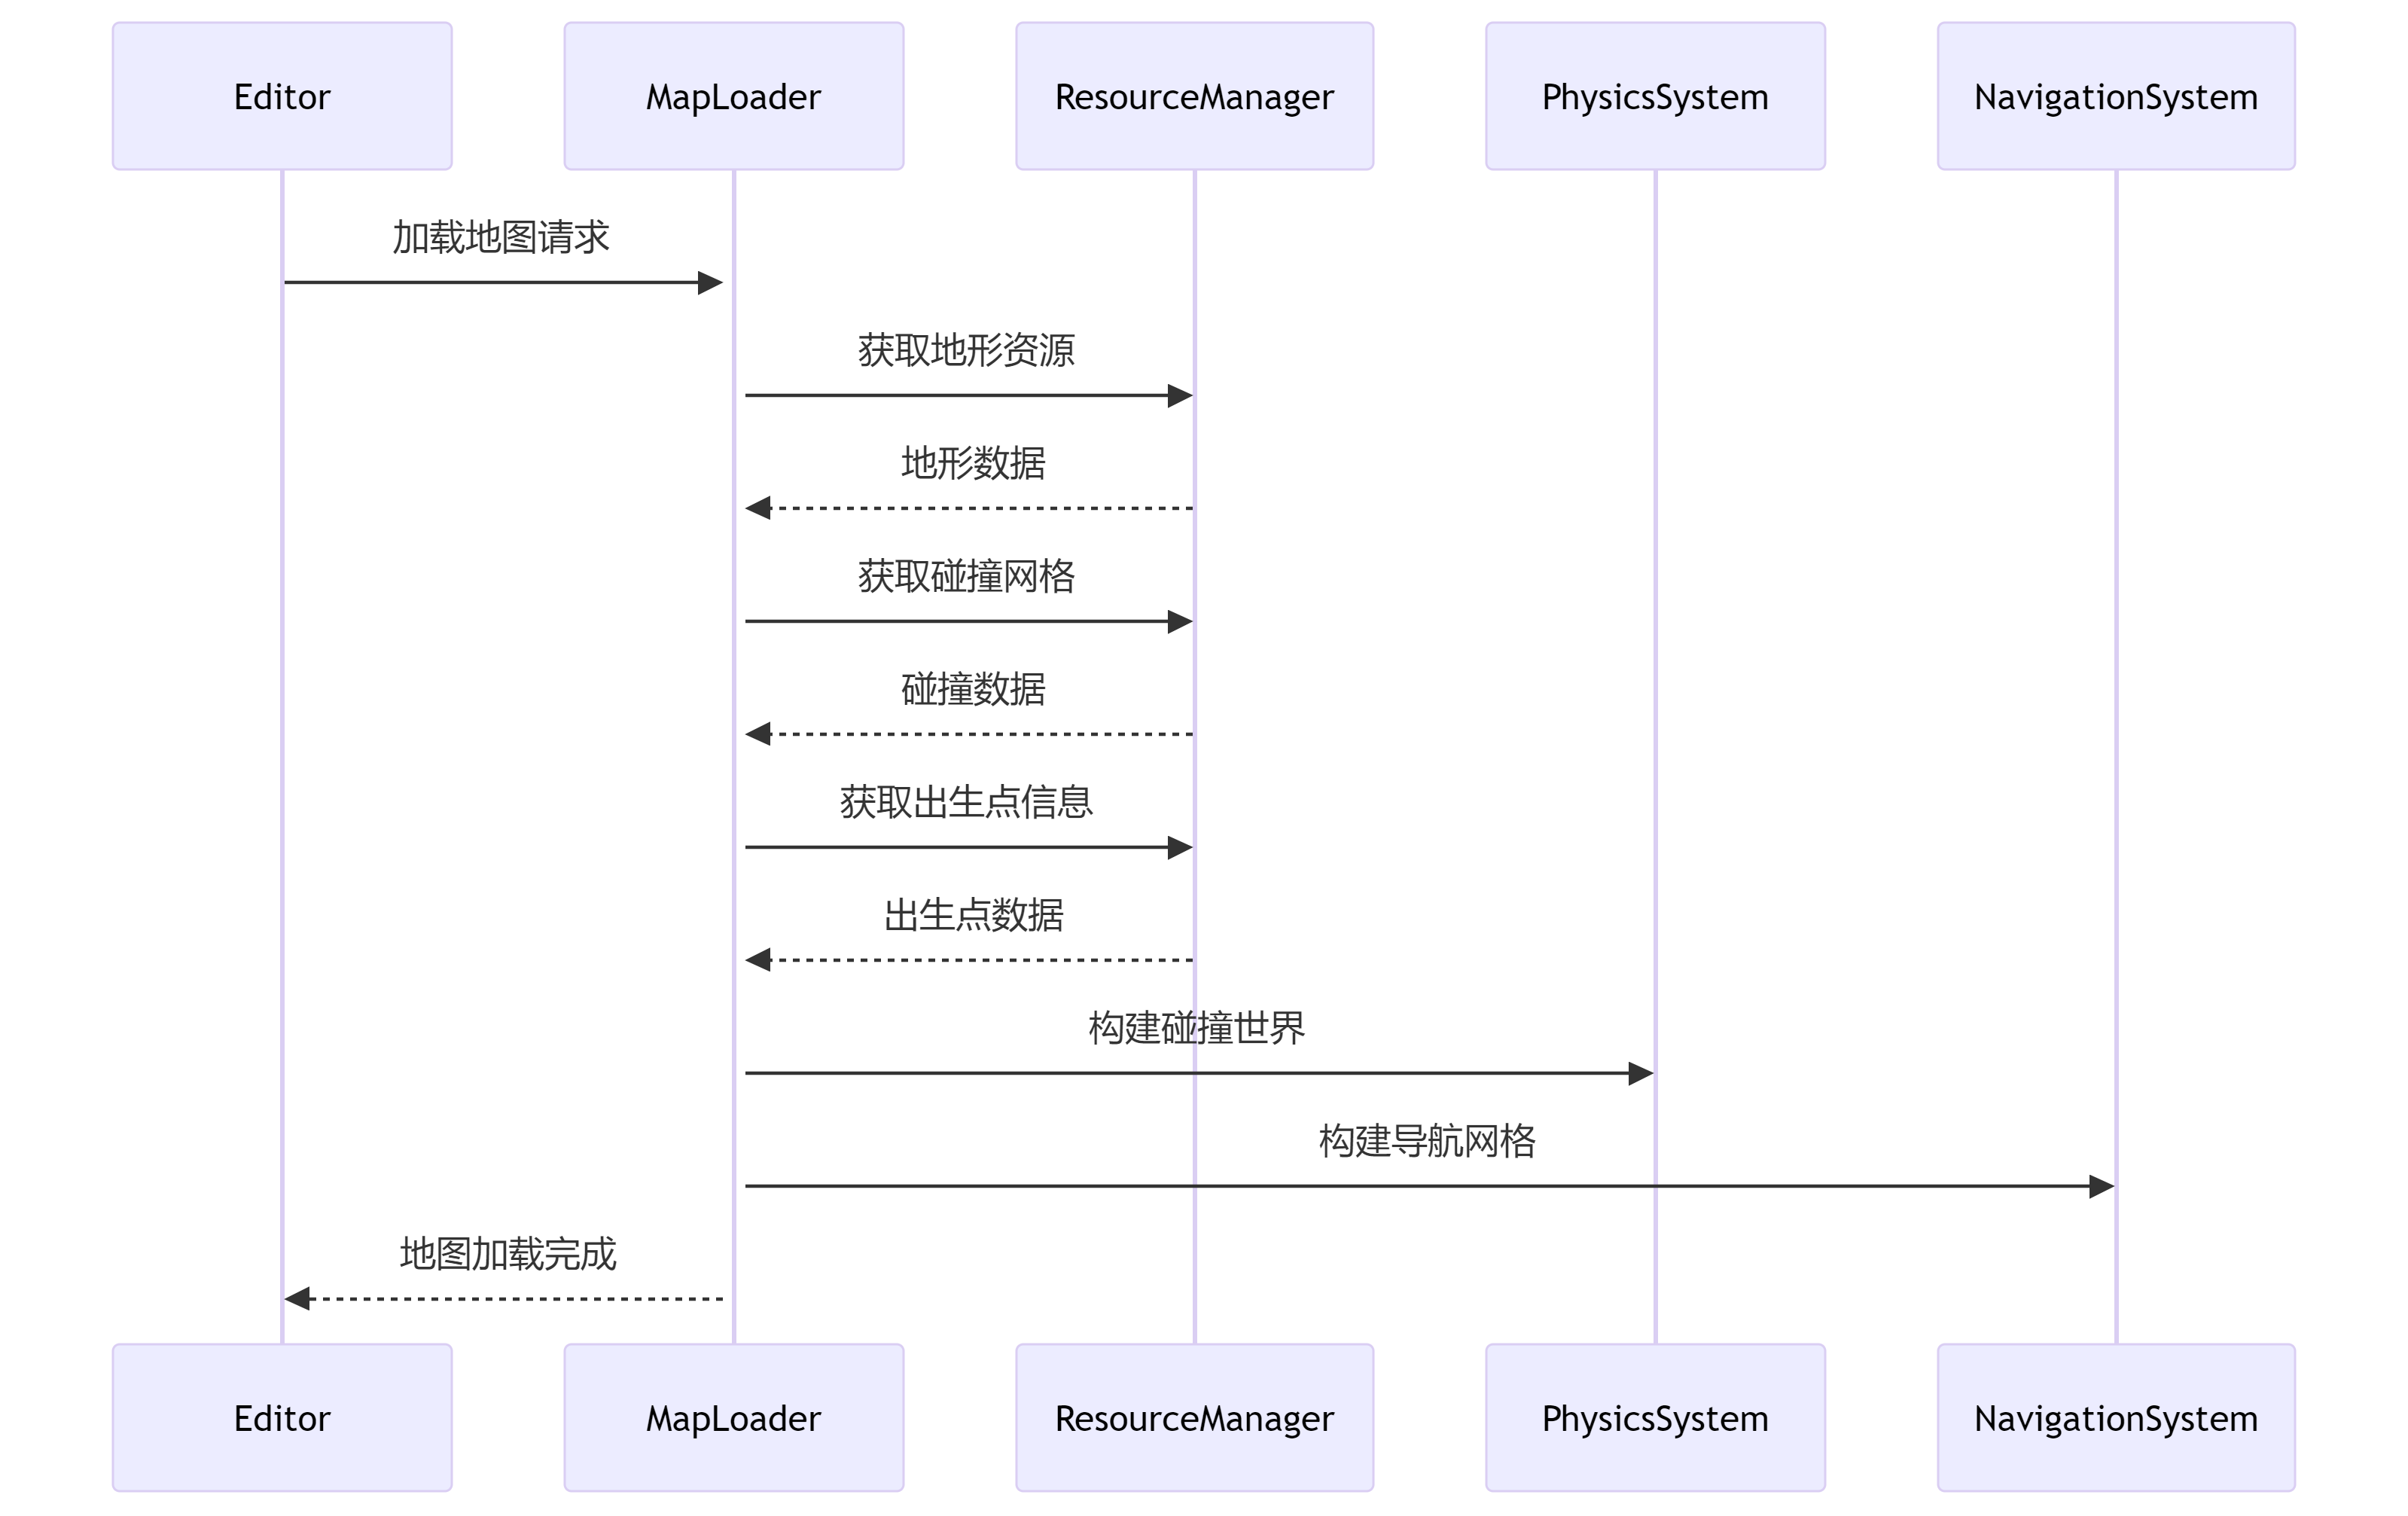
1. 地圖加載與管理
2. AI行為模擬系統
public class AISimulator {private List<AIEntity> entities = new List<AIEntity>();public void AddAI(AIEntity entity) {entities.Add(entity);}public void Update(float deltaTime) {foreach (var entity in entities) {entity.Update(deltaTime);// 決策系統if (entity.currentState == null) {entity.ChangeState(SelectState(entity));}// 執行當前狀態entity.currentState.Execute(entity);}}private AIState SelectState(AIEntity entity) {// 基于距離、血量等條件選擇狀態if (entity.target != null) {float dist = Vector3.Distance(entity.position, entity.target.position);if (dist < entity.attackRange) {return new AttackState();} else if (dist < entity.chaseRange) {return new ChaseState();}}return new PatrolState();}
}
編輯器界面設計
1. 主要工作區布局
+------------------------------------------+
| ?工具欄 [保存] [加載] [測試] [設置] ? ? ? |
+-------------------+----------------------+
| 資源瀏覽器 ? ? ? ?| ? ? ? ? ? ? ? ? ? ? ?|
| ? ? ? ? ? ? ? ? ? | ? ? ? ? ? ? ? ? ? ? ?|
| - 角色 ? ? ? ? ? ?| ?時間軸編輯器 ? ? ? ?|
| - 動畫 ? ? ? ? ? ?| +------------------+ |
| - 特效 ? ? ? ? ? ?| | 動畫軌道 ? ? ? ? | |
| - 地圖 ? ? ? ? ? ?| | 特效軌道 ? ? ? ? | |
| ? ? ? ? ? ? ? ? ? | | 傷害軌道 ? ? ? ? | |
| ? ? ? ? ? ? ? ? ? | | 鏡頭軌道 ? ? ? ? | |
| ? ? ? ? ? ? ? ? ? | +------------------+ |
| ? ? ? ? ? ? ? ? ? | ? ? ? ? ? ? ? ? ? ? ?|
| ? ? ? ? ? ? ? ? ? | ?3D預覽視口 ? ? ? ? ?|
| ? ? ? ? ? ? ? ? ? | +------------------+ |
| ? ? ? ? ? ? ? ? ? | | ? ? ? ? ? ? ? ? ?| |
| ? ? ? ? ? ? ? ? ? | | ? ? ? ? ? ? ? ? ?| |
| ? ? ? ? ? ? ? ? ? | | ? ? ? ? ? ? ? ? ?| |
| ? ? ? ? ? ? ? ? ? | +------------------+ |
| ? ? ? ? ? ? ? ? ? | ? ? ? ? ? ? ? ? ? ? ?|
+-------------------+ 屬性面板 ? ? ? ? ? ? |
| ? ? ? ? ? ? ? ? ? | +------------------+ |
| 事件日志 ? ? ? ? ?| | 當前選中項屬性 ? | |
| [信息] [警告] [錯誤] | ? ? ? ? ? ? ? ? ?| |
| ? ? ? ? ? ? ? ? ? | +------------------+ |
+-------------------+----------------------+
2. 核心功能實現
// Unity編輯器擴展示例
[CustomEditor(typeof(SkillData))]
public class SkillEditor : Editor {private SkillData skill;private TimelineEditor timelineEditor;private PreviewRenderer previewRenderer;private void OnEnable() {skill = (SkillData)target;timelineEditor = new TimelineEditor(skill.timeline);previewRenderer = new PreviewRenderer();}public override void OnInspectorGUI() {// 基礎屬性skill.skillName = EditorGUILayout.TextField("技能名", skill.skillName);skill.cooldown = EditorGUILayout.FloatField("冷卻時間", skill.cooldown);// 時間軸編輯區EditorGUILayout.LabelField("時間軸編輯", EditorStyles.boldLabel);timelineEditor.OnGUI();// 預覽窗口EditorGUILayout.Space();EditorGUILayout.LabelField("技能預覽", EditorStyles.boldLabel);Rect previewRect = GUILayoutUtility.GetRect(300, 300);previewRenderer.Render(previewRect);// 測試按鈕if (GUILayout.Button("測試技能")) {SkillTester.TestSkill(skill);}}
}
數據保存與加載
1. 技能數據格式
// Protobuf定義
message SkillData {string name = 1;float cooldown = 2;repeated Track tracks = 3;message Track {enum TrackType {ANIMATION = 0;VFX = 1;DAMAGE = 2;CAMERA = 3;AUDIO = 4;EVENT = 5;}TrackType type = 1;repeated Keyframe keyframes = 2;}message Keyframe {float time = 1;oneof data {AnimationKeyframe animation = 2;VFXKeyframe vfx = 3;DamageKeyframe damage = 4;CameraKeyframe camera = 5;AudioKeyframe audio = 6;EventKeyframe event = 7;}}// 各種關鍵幀數據定義...
}
2. 資源管理策略

測試與優化
性能優化要點
最佳實踐建議:
通過這樣的技能編輯器,設計師可以高效創建復雜的技能效果,而無需程序員介入,大幅提升游戲開發效率。
-
編輯器優化:
-
異步加載資源
-
分幀處理復雜計算
-
預覽質量分級控制
-
-
運行時優化:
// 技能實例池
class SkillInstancePool {
public:SkillInstance* Acquire(SkillData* data) {if (auto it = pool.find(data); it != pool.end() && !it->second.empty()) {auto inst = it->second.back();it->second.pop_back();return inst;}return new SkillInstance(data);}void Release(SkillInstance* inst) {auto& list = pool[inst->data];inst->Reset();list.push_back(inst);}private:unordered_map<SkillData*, vector<SkillInstance*>> pool;
};
測試工作流
總結
開發一個專業的技能編輯器需要整合多個系統:
-
角色系統:骨骼、動畫、皮膚的靈活管理
-
時間軸系統:多軌道編輯與關鍵幀控制
-
特效系統:粒子、光效、鏡頭效果集成
-
傷害系統:區域檢測、傷害計算、Buff管理
-
采用分層架構設計,保持模塊獨立性
-
使用可視化編輯與實時預覽相結合
-
實現高效的數據序列化方案
-
集成性能分析工具,確保運行時效率
-
提供AI測試環境,驗證技能平衡性
-
場景系統:地圖加載、AI行為模擬
-


)


![[學習] 哈希碼:原理、用途與實現詳解(C代碼示例)](http://pic.xiahunao.cn/[學習] 哈希碼:原理、用途與實現詳解(C代碼示例))


:初來乍到)
 基于移動端的專題教育平臺設計與實現)


