🌐【開源解析】基于PyQt5+Folium的谷歌地圖應用開發:從入門到實戰
🌈 個人主頁:創客白澤 - CSDN博客
🔥 系列專欄:🐍《Python開源項目實戰》
💡 熱愛不止于代碼,熱情源自每一個靈感閃現的夜晚。愿以開源之火,點亮前行之路。
👍 如果覺得這篇文章有幫助,歡迎您一鍵三連,分享給更多人哦


📌 概述
在當今數據可視化與地理信息系統的交叉領域,交互式地圖應用已成為不可或缺的工具。本文將深入剖析一個基于Python技術棧(PyQt5+Folium+Geopy)開發的**"谷歌地圖"桌面應用**,它集成了地址解析、地圖標注、距離測量等實用功能,并提供了三種不同的地圖樣式選擇。
相較于傳統Web地圖應用,本項目的創新點在于:
- 桌面端集成:通過PyQt5實現原生應用體驗
- 混合渲染技術:結合Folium的HTML生成與QWebEngineView的嵌入式渲染
- 跨框架通信:實現Python與JavaScript的雙向交互
- 輕量級架構:無需復雜GIS系統即可實現核心功能
🛠? 功能特性
核心功能矩陣
| 功能模塊 | 實現技術 | 特色說明 |
|---|---|---|
| 地理編碼 | Geopy/Nominatim | 支持全球地址解析 |
| 地圖渲染 | Folium+Leaflet | 三種專業地圖樣式 |
| 距離測量 | Geodesic算法 | 高精度大圓距離計算 |
| 交互界面 | PyQt5 | 響應式桌面UI |
| 地圖導出 | HTML5 | 可獨立運行的網頁地圖 |
特色功能詳解
- 智能地址解析:基于OpenStreetMap的Nominatim服務,支持模糊地址匹配
- 實時距離測量:選擇兩個標記點即可顯示精確的球面距離
- 動態標記高亮:可視化連線輔助空間關系分析
- 多地圖樣式:街道圖、衛星圖、地形圖一鍵切換
- 跨平臺運行:生成的HTML地圖可在任何瀏覽器查看
🎨 效果展示
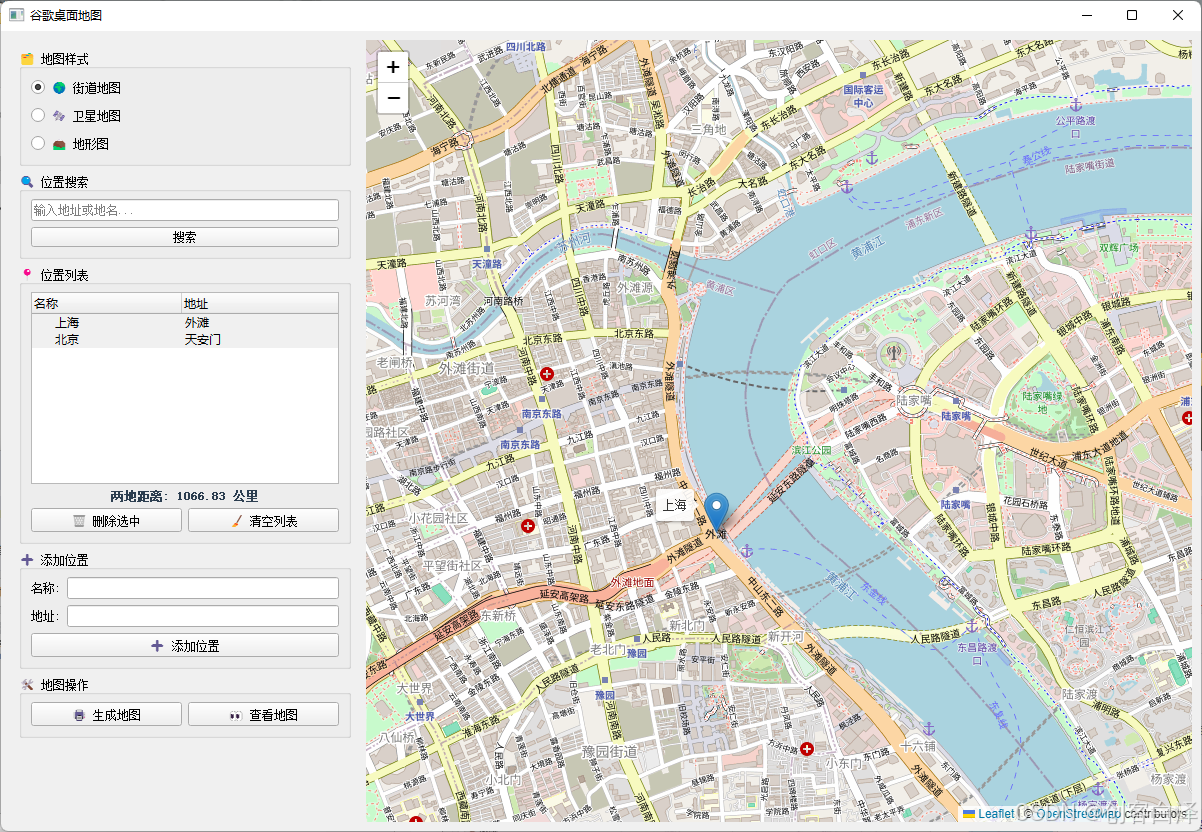
街道地圖
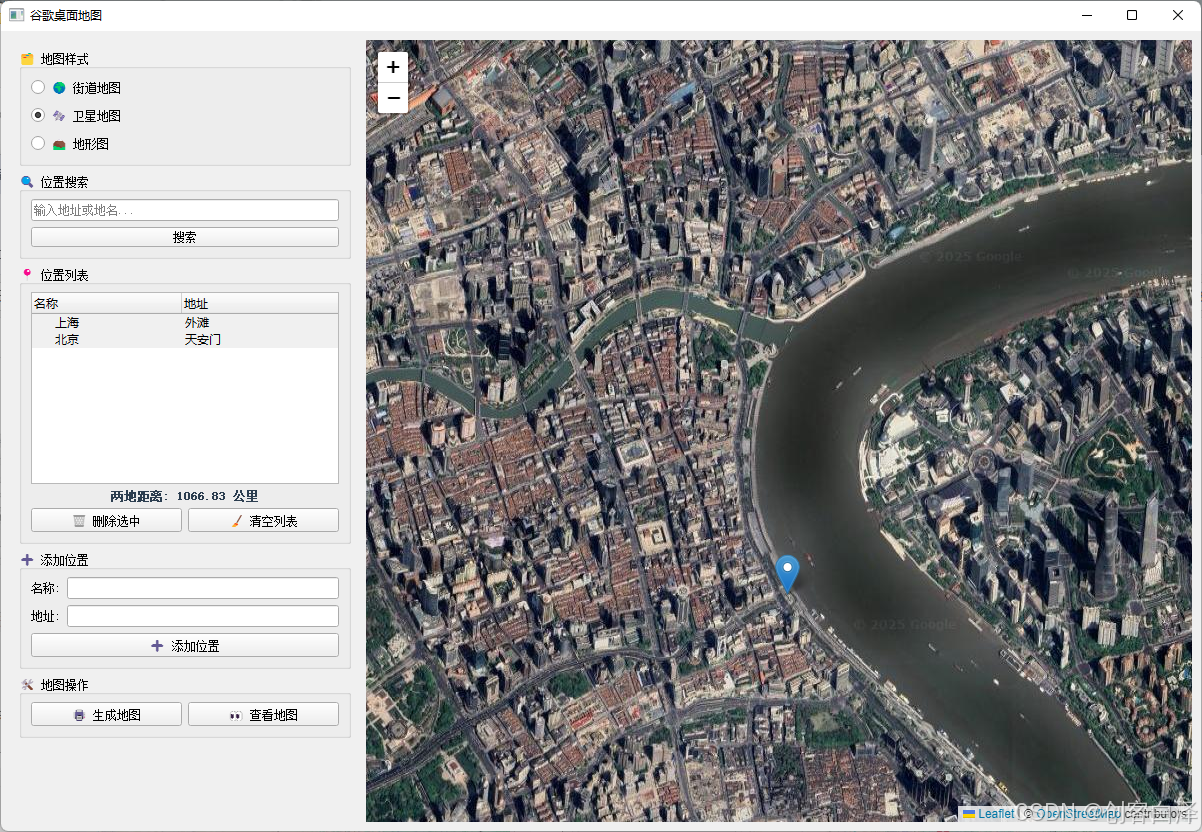
衛星地圖

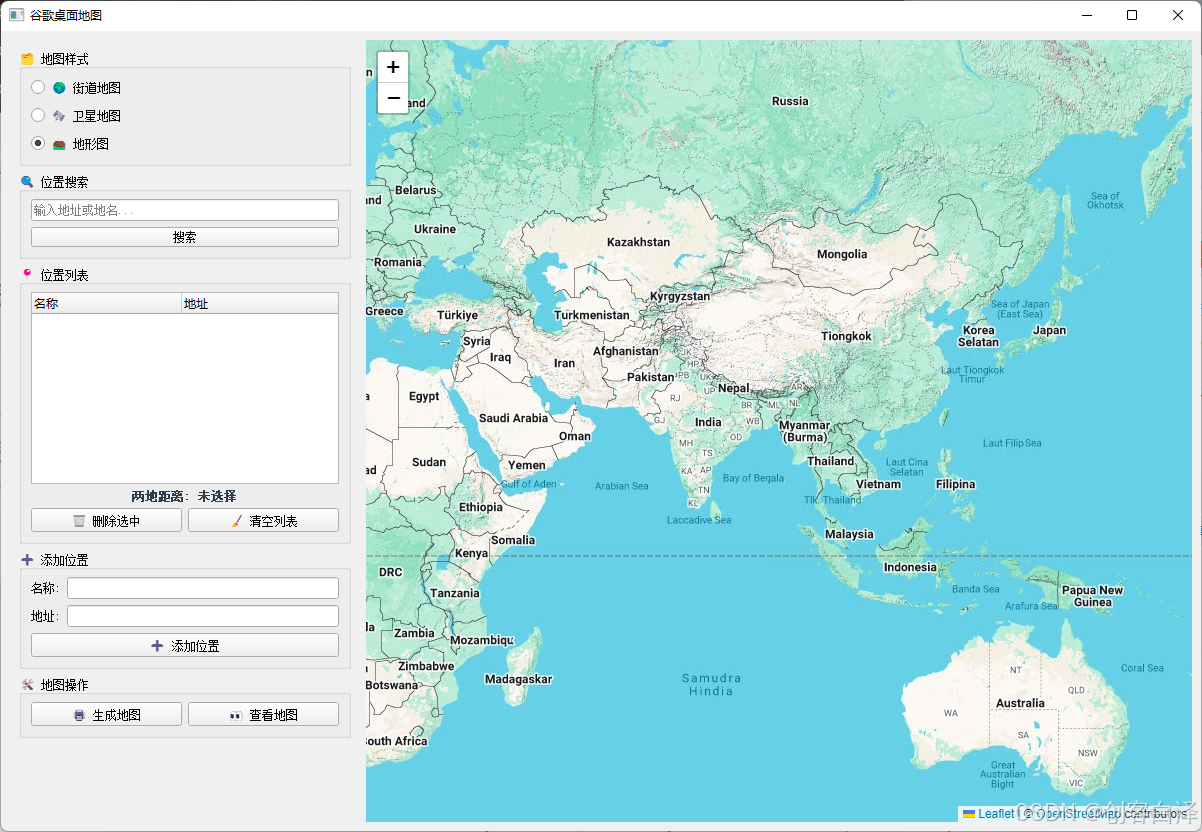
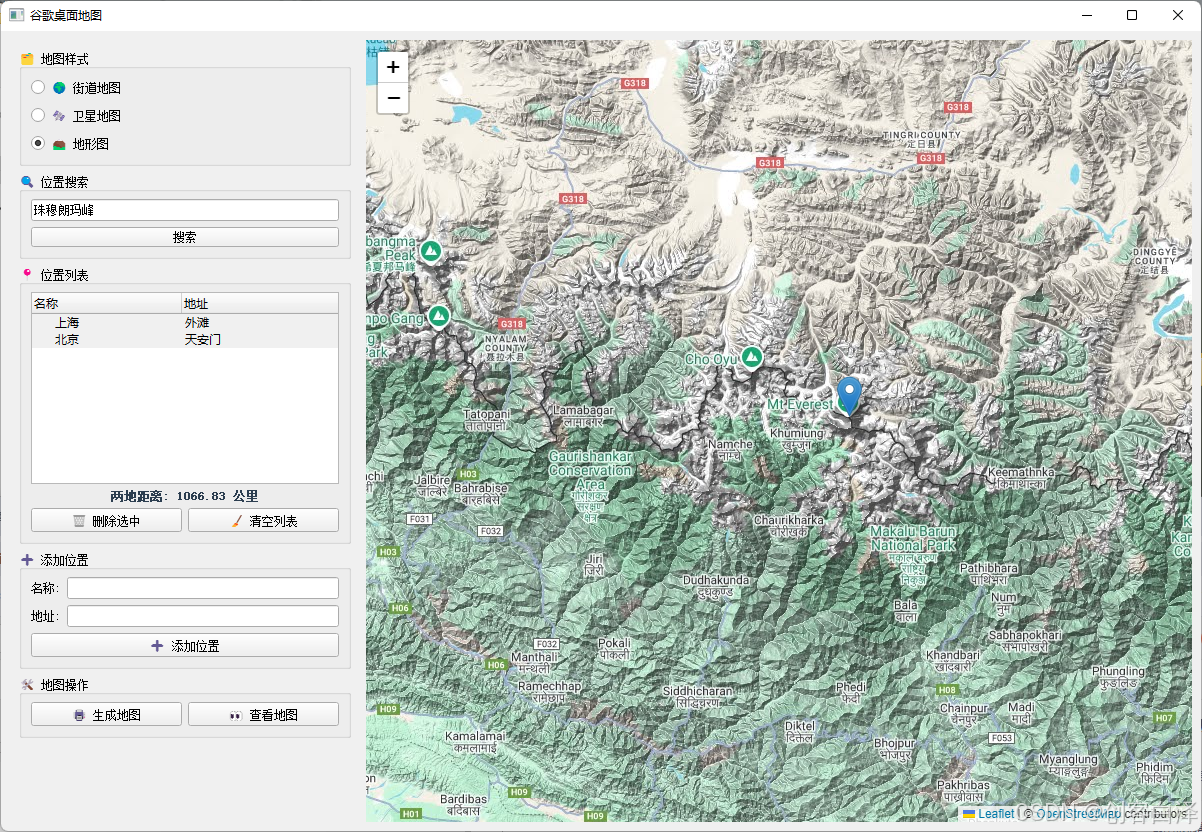
地形圖
距離測量演示

🧩 實現步驟詳解
1. 環境搭建
pip install PyQt5 folium geopy PyQtWebEngine
2. 核心架構設計
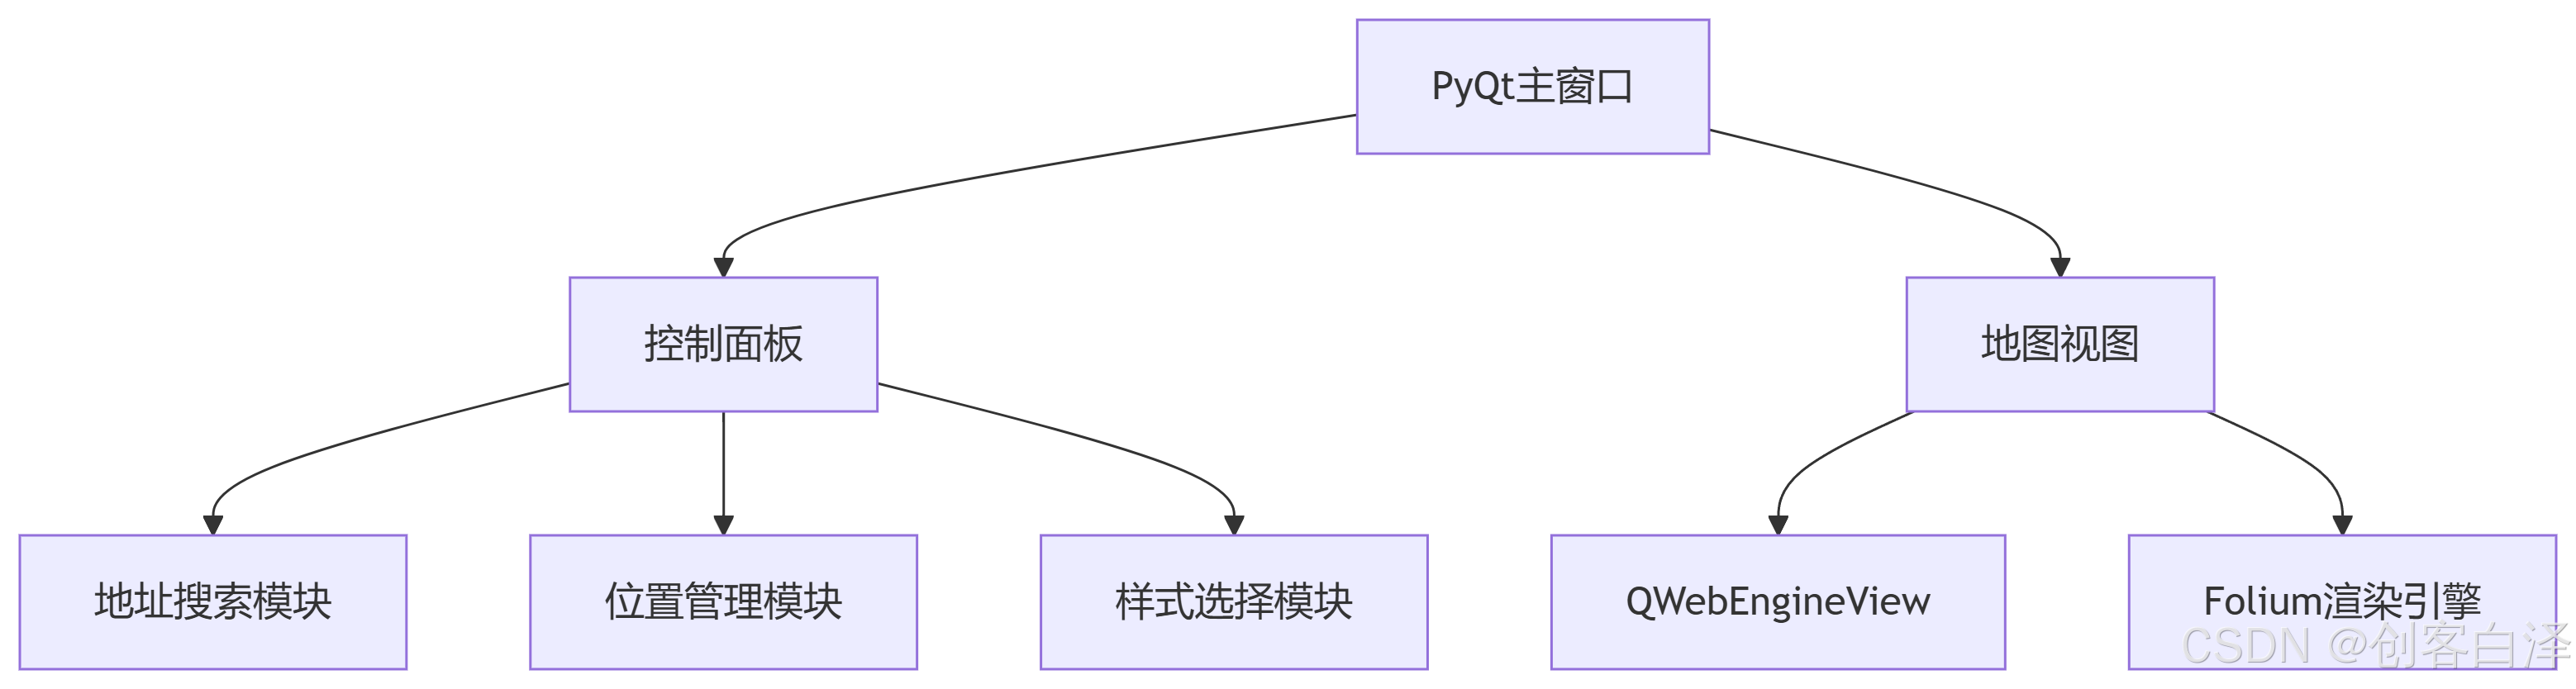
3. 關鍵技術實現
3.1 混合地圖渲染
def initialize_map(self):# 加載Leaflet庫html = """<!DOCTYPE html><html><head><link rel="stylesheet" href="https://unpkg.com/leaflet@1.9.4/dist/leaflet.css"/><script src="https://unpkg.com/leaflet@1.9.4/dist/leaflet.js"></script></head><body><div id="map"></div><script>// JavaScript地圖控制邏輯var map = L.map('map').setView([39.9042, 116.4074], 4);</script></body></html>"""self.map_view.setHtml(html)
3.2 跨語言通信
# Python調用JavaScript
self.map_view.page().runJavaScript("addMarker(39.9, 116.4, '北京', '中國首都');")# JavaScript回調Python
self.map_view.page().runJavaScript("""map.on('click', function(e) {console.log(e.latlng);});
""")
3.3 距離測量算法
from geopy.distance import geodesicdef calculate_distance(loc1, loc2):"""使用Vincenty公式計算球面距離"""return geodesic((loc1['latitude'], loc1['longitude']),(loc2['latitude'], loc2['longitude'])).kilometers
🔍 代碼深度解析
1. 地理編碼服務封裝
def geocode_location(self, address):try:location = self.geolocator.geocode(address)if location:return (location.latitude, location.longitude)return Noneexcept (GeocoderTimedOut, GeocoderServiceError) as e:# 實現自動重試機制time.sleep(0.5)return self.geocode_location(address)
優化點:增加了異常處理和自動重試機制,提高服務穩定性
2. 動態標記管理
def update_embedded_map(self):# 使用JS批量操作DOM元素js_clear = "clearMarkers();"js_add_markers = []for loc in self.locations:js_add_markers.append(f"addMarker({loc['latitude']}, {loc['longitude']}, "f"'{loc['name']}', '{loc['address']}');")self.map_view.page().runJavaScript(js_clear + "".join(js_add_markers))
性能優化:減少Python-JS通信次數,使用批量操作提升渲染效率
3. 地圖樣式熱切換
self.map_styles = {"🌍 街道地圖": {"url": "https://{s}.tile.openstreetmap.org/{z}/{x}/{y}.png","attr": "OpenStreetMap"},"🛰? 衛星地圖": {"url": "https://mt1.google.com/vt/lyrs=s&x={x}&y={y}&z={z}","attr": "Google"}
}def update_map_style(self):style = next(s for s in self.map_styles if self.style_buttons[s].isChecked())js = f"""map.eachLayer(layer => {{if (layer instanceof L.TileLayer) {{map.removeLayer(layer);}}}});L.tileLayer('{self.map_styles[style]["url"]}', {{attribution: '{self.map_styles[style]["attr"]}'}}).addTo(map);"""self.map_view.page().runJavaScript(js)
📥 源碼下載
import folium
from geopy.geocoders import Nominatim
from geopy.distance import geodesic # 添加距離計算功能
from geopy.exc import GeocoderTimedOut, GeocoderServiceError
from PyQt5.QtWidgets import (QApplication, QMainWindow, QWidget, QVBoxLayout, QHBoxLayout, QLabel, QLineEdit, QPushButton, QTreeWidget, QTreeWidgetItem,QRadioButton, QGroupBox, QFileDialog, QMessageBox, QScrollArea)
from PyQt5.QtCore import Qt, QUrl, QTimer
from PyQt5.QtWebEngineWidgets import QWebEngineView
from PyQt5.QtGui import QIcon
import sys
import webbrowser
import os
import timeclass SimpleMapViewerApp(QMainWindow):def __init__(self):super().__init__()self.setWindowTitle("谷歌桌面地圖")self.setGeometry(100, 100, 1200, 800)self.geolocator = Nominatim(user_agent="simple_map_viewer")self.locations = []self.current_map_file = os.path.join(os.path.expanduser("~"), "map.html")self.map_view = Noneself.map_initialized = Falseself.selected_markers = [] # 存儲選中的標記用于距離計算# 地圖樣式選項self.map_styles = {"🌍 街道地圖": "https://{s}.tile.openstreetmap.org/{z}/{x}/{y}.png","🛰? 衛星地圖": "https://mt1.google.com/vt/lyrs=s&x={x}&y={y}&z={z}","?? 地形圖": "https://mt1.google.com/vt/lyrs=p&x={x}&y={y}&z={z}"}# 創建UIself.create_widgets()# 延遲初始化地圖,確保WebEngineView完全加載QTimer.singleShot(500, self.initialize_map)def create_widgets(self):# 主窗口布局main_widget = QWidget()self.setCentralWidget(main_widget)main_layout = QHBoxLayout(main_widget)# 左側控制面板control_panel = QWidget()control_panel.setMinimumWidth(350)control_panel.setMaximumWidth(400)control_layout = QVBoxLayout(control_panel)# 地圖樣式選擇style_group = QGroupBox("🗂? 地圖樣式")style_layout = QVBoxLayout()self.style_buttons = []for style_name in self.map_styles:btn = QRadioButton(style_name)btn.toggled.connect(lambda checked, name=style_name: self.update_map_style() if checked else None)style_layout.addWidget(btn)self.style_buttons.append(btn)self.style_buttons[0].setChecked(True)style_group.setLayout(style_layout)control_layout.addWidget(style_group)# 搜索框search_group = QGroupBox("🔍 位置搜索")search_layout = QVBoxLayout()self.search_entry = QLineEdit()self.search_entry.setPlaceholderText("輸入地址或地名...")search_layout.addWidget(self.search_entry)search_btn = QPushButton("搜索")search_btn.setIcon(QIcon.fromTheme("edit-find"))search_btn.clicked.connect(self.search_location)search_layout.addWidget(search_btn)search_group.setLayout(search_layout)control_layout.addWidget(search_group)# 位置列表list_group = QGroupBox("📍 位置列表")list_layout = QVBoxLayout()self.location_list = QTreeWidget()self.location_list.setHeaderLabels(["名稱", "地址"])self.location_list.setColumnWidth(0, 150)self.location_list.setSelectionMode(QTreeWidget.ExtendedSelection)self.location_list.itemSelectionChanged.connect(self.on_location_selection_changed) # 添加選擇變化事件list_layout.addWidget(self.location_list)# 距離顯示標簽self.distance_label = QLabel("兩地距離: 未選擇")self.distance_label.setAlignment(Qt.AlignCenter)self.distance_label.setStyleSheet("font-weight: bold; color: #2c3e50;")list_layout.addWidget(self.distance_label)# 列表操作按鈕list_btn_layout = QHBoxLayout()remove_btn = QPushButton("🗑? 刪除選中")remove_btn.clicked.connect(self.remove_location)list_btn_layout.addWidget(remove_btn)clear_btn = QPushButton("🧹 清空列表")clear_btn.clicked.connect(self.clear_locations)list_btn_layout.addWidget(clear_btn)list_layout.addLayout(list_btn_layout)list_group.setLayout(list_layout)control_layout.addWidget(list_group)# 添加位置表單form_group = QGroupBox("? 添加位置")form_layout = QVBoxLayout()name_layout = QHBoxLayout()name_layout.addWidget(QLabel("名稱:"))self.name_entry = QLineEdit()name_layout.addWidget(self.name_entry)form_layout.addLayout(name_layout)addr_layout = QHBoxLayout()addr_layout.addWidget(QLabel("地址:"))self.address_entry = QLineEdit()addr_layout.addWidget(self.address_entry)form_layout.addLayout(addr_layout)add_btn = QPushButton("? 添加位置")add_btn.clicked.connect(self.add_location)form_layout.addWidget(add_btn)form_group.setLayout(form_layout)control_layout.addWidget(form_group)# 地圖操作按鈕map_btn_group = QGroupBox("🛠? 地圖操作")map_btn_layout = QHBoxLayout()create_btn = QPushButton("🖨? 生成地圖")create_btn.clicked.connect(self.create_map)map_btn_layout.addWidget(create_btn)show_btn = QPushButton("👀 查看地圖")show_btn.clicked.connect(self.show_map)map_btn_layout.addWidget(show_btn)map_btn_group.setLayout(map_btn_layout)control_layout.addWidget(map_btn_group)control_layout.addStretch()# 右側地圖預覽self.map_view = QWebEngineView()self.map_view.setHtml(self.get_empty_html())# 添加到主布局main_layout.addWidget(control_panel)main_layout.addWidget(self.map_view, stretch=1)def get_empty_html(self):"""返回初始空白HTML"""return """<!DOCTYPE html><html><head><title>地圖預覽</title><meta charset="utf-8" /><meta name="viewport" content="width=device-width, initial-scale=1.0"></head><body><div id="map" style="height:100%;width:100%;"></div></body></html>"""def initialize_map(self):"""初始化地圖,確保Leaflet庫正確加載"""html = """<!DOCTYPE html><html><head><title>地圖預覽</title><meta charset="utf-8" /><meta name="viewport" content="width=device-width, initial-scale=1.0"><link rel="stylesheet" href="https://unpkg.com/leaflet@1.9.4/dist/leaflet.css"integrity="sha256-p4NxAoJBhIIN+hmNHrzRCf9tD/miZyoHS5obTRR9BMY="crossorigin=""/><style>body { margin: 0; padding: 0; }#map { height: 100vh; width: 100%; }</style></head><body><div id="map"></div><script src="https://unpkg.com/leaflet@1.9.4/dist/leaflet.js"integrity="sha256-20nQCchB9co0qIjJZRGuk2/Z9VM+kNiyxNV1lvTlZBo="crossorigin=""></script><script>var map = L.map('map').setView([39.9042, 116.4074], 4);var osmLayer = L.tileLayer('https://{s}.tile.openstreetmap.org/{z}/{x}/{y}.png', {attribution: '© <a href="https://www.openstreetmap.org/copyright">OpenStreetMap</a> contributors'});osmLayer.addTo(map);// 存儲標記的數組var markers = [];var selectedMarkers = [];var line = null;function clearMarkers() {for (var i = 0; i < markers.length; i++) {map.removeLayer(markers[i]);}markers = [];if (line) {map.removeLayer(line);line = null;}}function addMarker(lat, lng, name, address) {var marker = L.marker([lat, lng]).addTo(map).bindPopup('<b>' + name + '</b><br>' + address).bindTooltip(name);markers.push(marker);return marker;}function setView(lat, lng, zoom) {map.setView([lat, lng], zoom);}function highlightMarkers(markerIndices) {// 重置所有標記樣式for (var i = 0; i < markers.length; i++) {markers[i].setIcon(L.icon({iconUrl: 'https://cdnjs.cloudflare.com/ajax/libs/leaflet/1.9.4/images/marker-icon.png',iconSize: [25, 41],iconAnchor: [12, 41],popupAnchor: [1, -34],shadowUrl: 'https://cdnjs.cloudflare.com/ajax/libs/leaflet/1.9.4/images/marker-shadow.png',shadowSize: [41, 41]}));}// 清除之前的線if (line) {map.removeLayer(line);line = null;}// 高亮選中的標記selectedMarkers = [];for (var i = 0; i < markerIndices.length; i++) {var idx = markerIndices[i];if (idx >= 0 && idx < markers.length) {markers[idx].setIcon(L.icon({iconUrl: 'https://raw.githubusercontent.com/pointhi/leaflet-color-markers/master/img/marker-icon-red.png',iconSize: [25, 41],iconAnchor: [12, 41],popupAnchor: [1, -34],shadowUrl: 'https://cdnjs.cloudflare.com/ajax/libs/leaflet/1.9.4/images/marker-shadow.png',shadowSize: [41, 41]}));selectedMarkers.push(markers[idx]);}}// 如果選中了兩個點,繪制連線if (selectedMarkers.length === 2) {var latlngs = [selectedMarkers[0].getLatLng(),selectedMarkers[1].getLatLng()];line = L.polyline(latlngs, {color: 'red',weight: 3,opacity: 0.7,dashArray: '10, 10'}).addTo(map);}}</script></body></html>"""self.map_view.setHtml(html)self.map_initialized = TrueQTimer.singleShot(500, self.update_map_style)def on_location_selection_changed(self):"""當位置列表選擇變化時觸發"""selected_items = self.location_list.selectedItems()selected_indices = [self.location_list.indexOfTopLevelItem(item) for item in selected_items]# 更新地圖上的高亮標記if self.map_initialized:js = f"highlightMarkers({selected_indices});"self.map_view.page().runJavaScript(js)# 計算并顯示距離if len(selected_indices) == 2:loc1 = self.locations[selected_indices[0]]loc2 = self.locations[selected_indices[1]]# 使用geodesic計算兩點間距離point1 = (loc1['latitude'], loc1['longitude'])point2 = (loc2['latitude'], loc2['longitude'])distance = geodesic(point1, point2).kilometersself.distance_label.setText(f"兩地距離: {distance:.2f} 公里")else:self.distance_label.setText("兩地距離: 請選擇兩個地點")def update_map_style(self):"""更新地圖樣式"""if not self.map_initialized:returnfor btn in self.style_buttons:if btn.isChecked():style_name = btn.text()tiles = self.map_styles[style_name]breakjs = f"""var newLayer = L.tileLayer('{tiles}', {{attribution: '© <a href="https://www.openstreetmap.org/copyright">OpenStreetMap</a> contributors'}});// 先清除所有瓦片圖層map.eachLayer(function(layer) {{if (layer instanceof L.TileLayer) {{map.removeLayer(layer);}}}});// 添加新圖層newLayer.addTo(map);"""self.map_view.page().runJavaScript(js)self.update_embedded_map()def geocode_location(self, address):"""將地址轉換為經緯度"""try:location = self.geolocator.geocode(address)if location:return (location.latitude, location.longitude)return Noneexcept (GeocoderTimedOut, GeocoderServiceError) as e:QMessageBox.critical(self, "錯誤", f"地理編碼錯誤: {e}")return Nonedef add_location(self):"""添加位置到列表"""name = self.name_entry.text().strip()address = self.address_entry.text().strip()if not name or not address:QMessageBox.warning(self, "警告", "請填寫名稱和地址")returncoords = self.geocode_location(address)if coords:self.locations.append({'name': name,'address': address,'latitude': coords[0],'longitude': coords[1]})item = QTreeWidgetItem([name, address])self.location_list.addTopLevelItem(item)self.name_entry.clear()self.address_entry.clear()self.update_embedded_map()else:QMessageBox.critical(self, "錯誤", f"無法找到地址: {address}")def remove_location(self):"""刪除選中的位置"""selected = self.location_list.selectedItems()if not selected:QMessageBox.warning(self, "警告", "請先選擇要刪除的位置")returnfor item in selected:index = self.location_list.indexOfTopLevelItem(item)if 0 <= index < len(self.locations):del self.locations[index]self.location_list.takeTopLevelItem(index)self.update_embedded_map()self.distance_label.setText("兩地距離: 未選擇") # 清除距離顯示def clear_locations(self):"""清空所有位置"""if not self.locations:returnreply = QMessageBox.question(self, '確認', '確定要清空所有位置嗎?', QMessageBox.Yes | QMessageBox.No, QMessageBox.No)if reply == QMessageBox.Yes:self.locations.clear()self.location_list.clear()self.update_embedded_map()self.distance_label.setText("兩地距離: 未選擇") # 清除距離顯示def search_location(self):"""搜索位置并定位"""query = self.search_entry.text().strip()if not query:QMessageBox.warning(self, "警告", "請輸入搜索內容")returntry:location = self.geolocator.geocode(query)if location:js = f"""setView({location.latitude}, {location.longitude}, 15);addMarker({location.latitude}, {location.longitude}, '{query.replace("'", "\\'")}', '');"""self.map_view.page().runJavaScript(js)else:QMessageBox.information(self, "提示", "未找到匹配的位置")except Exception as e:QMessageBox.critical(self, "搜索錯誤", str(e))def create_map(self):"""創建地圖并添加所有位置標記"""if not self.locations:QMessageBox.warning(self, "警告", "沒有可顯示的位置")return# 使用folium創建地圖first_loc = self.locations[0]map_obj = folium.Map(location=[first_loc['latitude'], first_loc['longitude']],zoom_start=12)# 根據當前選擇的樣式設置地圖瓦片for btn in self.style_buttons:if btn.isChecked():style_name = btn.text()tiles = self.map_styles[style_name]breakif style_name == "🌍 街道地圖":tiles = "OpenStreetMap"attr = Noneelif style_name == "🛰? 衛星地圖":tiles = "https://mt1.google.com/vt/lyrs=s&x={x}&y={y}&z={z}"attr = "Google Satellite"elif style_name == "?? 地形圖":tiles = "https://mt1.google.com/vt/lyrs=p&x={x}&y={y}&z={z}"attr = "Google Terrain"if attr:folium.TileLayer(tiles=tiles, attr=attr, name=style_name).add_to(map_obj)else:folium.TileLayer(tiles=tiles, name=style_name).add_to(map_obj)# 添加所有位置標記for loc in self.locations:folium.Marker(location=[loc['latitude'], loc['longitude']],popup=f"<b>{loc['name']}</b><br>{loc['address']}",tooltip=loc['name']).add_to(map_obj)# 如果有兩個點被選中,添加連線selected_items = self.location_list.selectedItems()if len(selected_items) == 2:loc1 = self.locations[self.location_list.indexOfTopLevelItem(selected_items[0])]loc2 = self.locations[self.location_list.indexOfTopLevelItem(selected_items[1])]# 添加兩點間連線folium.PolyLine(locations=[[loc1['latitude'], loc1['longitude']],[loc2['latitude'], loc2['longitude']]],color='red',weight=3,opacity=0.7,dash_array='10, 10').add_to(map_obj)# 計算并顯示距離distance = geodesic((loc1['latitude'], loc1['longitude']),(loc2['latitude'], loc2['longitude'])).kilometers# 在兩點中間添加距離標簽midpoint = [(loc1['latitude'] + loc2['latitude']) / 2,(loc1['longitude'] + loc2['longitude']) / 2]folium.Marker(location=midpoint,icon=folium.DivIcon(icon_size=(150, 36),icon_anchor=(75, 18),html=f'<div style="font-size: 12pt; color: red; background: white; padding: 2px; border-radius: 3px;">{distance:.2f} km</div>'),tooltip=f"直線距離: {distance:.2f} 公里").add_to(map_obj)# 保存地圖file_path, _ = QFileDialog.getSaveFileName(self, "保存地圖", self.current_map_file, "HTML Files (*.html)")if file_path:self.current_map_file = file_pathmap_obj.save(self.current_map_file)QMessageBox.information(self, "成功", f"地圖已生成: {self.current_map_file}")def show_map(self):"""在瀏覽器中顯示地圖"""if not os.path.exists(self.current_map_file):QMessageBox.critical(self, "錯誤", "請先生成地圖")returnwebbrowser.open('file://' + os.path.realpath(self.current_map_file))def update_embedded_map(self):"""更新內嵌地圖視圖"""if not self.map_initialized or not hasattr(self, 'map_view'):return# 清除所有標記self.map_view.page().runJavaScript("clearMarkers();")if not self.locations:# 如果沒有位置,重置到默認視圖self.map_view.page().runJavaScript("setView(39.9042, 116.4074, 4);")return# 設置地圖中心和縮放級別first_loc = self.locations[0]self.map_view.page().runJavaScript(f"setView({first_loc['latitude']}, {first_loc['longitude']}, 12);")# 添加標記for loc in self.locations:js = f"""addMarker({loc['latitude']}, {loc['longitude']}, '{loc['name'].replace("'", "\\'")}', '{loc['address'].replace("'", "\\'")}');"""self.map_view.page().runJavaScript(js)def main():app = QApplication(sys.argv)app.setStyle('Fusion') # 使用Fusion風格使UI更現代window = SimpleMapViewerApp()window.show()sys.exit(app.exec_())if __name__ == "__main__":main()
🚀 擴展方向
- 數據持久化:集成SQLite存儲位置數據
- 軌跡繪制:支持路徑規劃和導航功能
- POI搜索:接入更多地理編碼服務提供商
- 3D視圖:集成Cesium實現三維可視化
- 插件系統:支持功能模塊動態加載
💡 總結
本文詳細剖析了基于PyQt5和Folium的地圖應用開發全流程,關鍵技術點包括:
- 混合渲染架構:巧妙結合桌面應用的性能優勢和Web地圖的靈活性
- 精確距離測量:使用geodesic算法實現專業級距離計算
- 響應式UI設計:通過PyQt5構建美觀易用的交互界面
- 跨框架通信:實現Python邏輯與JavaScript渲染的無縫銜接
該解決方案特別適合以下場景:
- 企業內網GIS系統
- 科研數據可視化
- 物流路徑規劃
- 教學演示工具
未來展望:隨著WebAssembly技術的發展,這類混合架構應用將獲得更接近原生應用的性能表現,在地理信息領域具有廣闊的應用前景。
版權聲明:本文采用CC BY-NC-SA 4.0協議,轉載請注明出處。商業轉載請聯系作者授權。
)

)
)
)


 ----- Python的函數定義及其使用)


)


