以下是在 IntelliJ IDEA 中配置 Spring MVC 環境的詳細步驟:
步驟 1:創建 Maven Web 項目
-
新建項目
File -> New -> Project→ 選擇 Maven → 勾選 Create from archetype → 選擇maven-archetype-webapp。- 輸入
GroupId(如com.example)、ArtifactId(如spring-mvc-demo) → 點擊Next→ 完成項目創建。
-
項目結構
確保項目包含以下目錄:src/main/├── java/ # Java 代碼├── resources/ # 配置文件└── applicationContext.xml└── webapp/ # Web 資源├── WEB-INF/│ └── web.xml└── index.jsp
步驟 2:添加 Spring MVC 依賴
在 pom.xml 中添加以下依賴(Spring 5.x + Servlet 4.x):
<dependencies><!-- Spring MVC --><dependency><groupId>org.springframework</groupId><artifactId>spring-webmvc</artifactId><version>5.3.30</version></dependency>
</dependencies>
- 1、保存后執行
– 在 Maven 工具窗口中,展開項目 -> Lifecycle。
– 雙擊 ?clean → 等待清理完成。
– 雙擊 ?install → 等待依賴下載和構建完成。 - 2、將新的依賴加入到發布目錄中
– 點擊Edite Configurations–>選中當前Server–>右側選擇Deployment–>選中當前發布項目,點擊編輯按鈕,將新加入的依賴添加到左側(選中依賴,右鍵“Put into WEB-INF/lib”)
– 如下圖 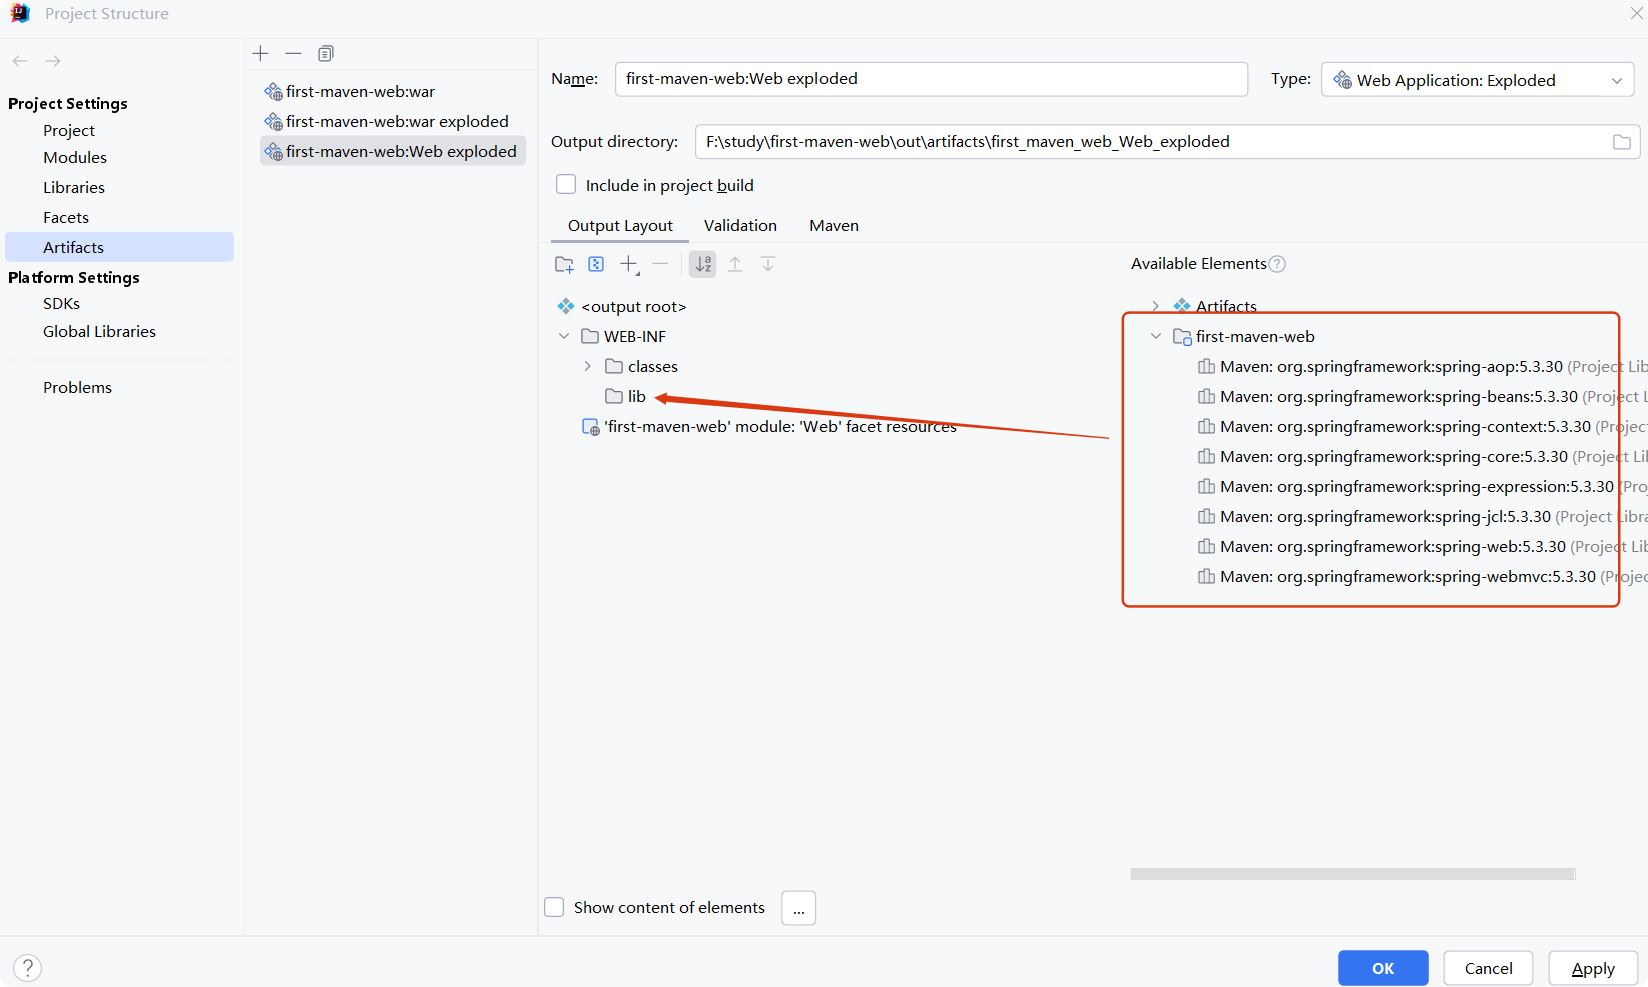
步驟 3:配置 DispatcherServlet
方式 1:通過 web.xml 配置
-
配置web.xml 文件
<web-app xmlns="https://jakarta.ee/xml/ns/jakartaee"xmlns:xsi="http://www.w3.org/2001/XMLSchema-instance"xsi:schemaLocation="https://jakarta.ee/xml/ns/jakartaee https://jakarta.ee/xml/ns/jakartaee/web-app_6_0.xsd"version="6.0"><servlet><servlet-name>springmvc</servlet-name><!--配置DispatcherServlet --><servlet-class>org.springframework.web.servlet.DispatcherServlet</servlet-class><init-param><param-name>contextConfigLocation</param-name><param-value>classpath:applicationContext.xml</param-value></init-param><!--設置web應用啟動時自動創建spring ioc容器并初始化DispatcherServlet--><load-on-startup>0</load-on-startup></servlet><servlet-mapping><servlet-name>springmvc</servlet-name><!--攔截所有對象--><url-pattern>/</url-pattern></servlet-mapping> </web-app> -
配置applicationContext.xml
在src/main/resource/下新建applicationContext.xml:
<?xml version="1.0" encoding="UTF-8"?>
<beans xmlns="http://www.springframework.org/schema/beans"xmlns:xsi="http://www.w3.org/2001/XMLSchema-instance"xmlns:mvc="http://www.springframework.org/schema/mvc"xmlns:context="http://www.springframework.org/schema/context"xsi:schemaLocation="http://www.springframework.org/schema/beanshttp://www.springframework.org/schema/beans/spring-beans.xsdhttp://www.springframework.org/schema/mvchttp://www.springframework.org/schema/mvc/spring-mvc.xsdhttp://www.springframework.org/schema/contexthttp://www.springframework.org/schema/context/spring-context.xsd
"><!--在spring ioc初始化過程中,自動創建并管理com.hirain及其子包中擁有如下注解的對象:@Repository@Service@Controller@Component--><context:component-scan base-package="com.hirain"/><!--啟用mvc注解開發模式--><mvc:annotation-driven/><!--將圖片、css、js等靜態資源排除在外,可提高執行效率--><mvc:default-servlet-handler/></beans>
方式 2:純 Java 配置(推薦)
-
創建配置類
src/main/java/com/example/config/WebConfig.java:package com.example.config;import org.springframework.context.annotation.ComponentScan; import org.springframework.context.annotation.Configuration; import org.springframework.web.servlet.config.annotation.EnableWebMvc; import org.springframework.web.servlet.config.annotation.ViewResolverRegistry; import org.springframework.web.servlet.config.annotation.WebMvcConfigurer;@Configuration @EnableWebMvc @ComponentScan(basePackages = "com.example.controller") public class WebConfig implements WebMvcConfigurer {@Overridepublic void configureViewResolvers(ViewResolverRegistry registry) {registry.jsp("/WEB-INF/views/", ".jsp");} } -
修改
web.xml使用AnnotationConfigServletWebServerApplicationContext:<context-param><param-name>contextClass</param-name><param-value>org.springframework.web.context.support.AnnotationConfigWebApplicationContext</param-value> </context-param> <context-param><param-name>contextConfigLocation</param-name><param-value>com.example.config.WebConfig</param-value> </context-param>
步驟 4:創建 Controller 和視圖
-
Controller 類
在src/main/java/com/example/controller下新建HelloController.java:package com.example.controller;import org.springframework.stereotype.Controller; import org.springframework.web.bind.annotation.GetMapping;@Controller public class HelloController {@GetMapping("/hello")public String hello() {return "hello"; // 對應 /WEB-INF/views/hello.jsp} } -
JSP 視圖
在src/main/webapp/WEB-INF/views下新建hello.jsp:<%@ page contentType="text/html;charset=UTF-8" language="java" %> <html> <head><title>Hello Spring MVC</title> </head> <body><h1>Hello, Spring MVC!</h1> </body> </html>
步驟 5:配置 Tomcat 并運行
-
添加 Tomcat 服務器
- 點擊右上角
Add Configuration→+→Tomcat Server -> Local。 - 指定 Tomcat 安裝路徑(若未配置,需先下載 Tomcat)。
- 點擊右上角
-
部署項目
- 在
Deployment標簽頁 → 點擊+→ 選擇Artifact→ 選擇spring-mvc-demo:war exploded。 - 設置上下文路徑(如
/demo)。
- 在
-
啟動服務器
- 點擊綠色三角按鈕 → 訪問
http://localhost:8080/demo/hello,看到頁面顯示 “Hello, Spring MVC!” 即成功。
- 點擊綠色三角按鈕 → 訪問
常見問題解決
-
404 錯誤
- 檢查
@Controller和@GetMapping注解是否生效。 - 確保
web.xml中的DispatcherServlet映射正確(如/或*.do)。
- 檢查
-
JSP 無法解析
- 確認視圖解析器的
prefix和suffix配置正確。 - 確保 JSP 文件位于
WEB-INF/views/目錄下。
- 確認視圖解析器的
-
依賴沖突
- 執行
mvn dependency:tree檢查依賴版本是否兼容。
- 執行
擴展配置
-
靜態資源處理
在spring-mvc-servlet.xml中添加:<mvc:resources mapping="/static/**" location="/static/"/>- 靜態文件存放在
src/main/webapp/static/目錄下。
- 靜態文件存放在
-
啟用注解驅動
確保<mvc:annotation-driven/>或@EnableWebMvc已配置。
完成以上步驟后,Spring MVC 環境即可正常運行。如果遇到問題,優先檢查控制臺日志和依賴樹。
)


:可變與不可變類型)


![[貪心_7] 最優除法 | 跳躍游戲 II | 加油站](http://pic.xiahunao.cn/[貪心_7] 最優除法 | 跳躍游戲 II | 加油站)
從 daz3d 導入到 UE5。在 UE5 中,我發現使用某個表情并與閉眼混合后,上眼瞼出現了問題)


)


USB3.2(10Gbps)開發筆記分享(1):硬件設計與開發環境搭建)
