
?? 歡迎大家來到景天科技苑??
🎈🎈 養成好習慣,先贊后看哦~🎈🎈
🏆 作者簡介:景天科技苑
🏆《頭銜》:大廠架構師,華為云開發者社區專家博主,阿里云開發者社區專家博主,CSDN全棧領域優質創作者,掘金優秀博主,51CTO博客專家等。
🏆《博客》:Rust開發,Python全棧,Golang開發,云原生開發,PyQt5和Tkinter桌面開發,小程序開發,人工智能,js逆向,App逆向,網絡系統安全,數據分析,Django,fastapi,flask等框架,云原生K8S,linux,shell腳本等實操經驗,網站搭建,數據庫等分享。所屬的專欄:Rust語言通關之路
景天的主頁:景天科技苑

文章目錄
- Rust結構體
- 1. 結構體基礎
- 1.1 什么是結構體
- 1.2 定義和實例化結構體
- 1.3 訪問結構體字段
- 1.4 可變結構體
- 1.5 字段初始化簡寫
- 1.6 結構體更新語法
- 2. 結構體高級特性
- 2.1 元組結構體
- 2.2 類單元結構體
- 2.3 結構體所有權
- 2.4 打印結構體
- 2.5 結構體方法語法
- 2.6 多個impl塊
- 2.7 關聯函數
- 2.8 關聯變量
- 3. 實際應用案例
- 3.1 圖形計算
- 3.2 學生管理系統
- 3.3 銀行賬戶系統
- 4. 最佳實踐和常見模式
- 4.1 構建者模式
- 4.2 使用Newtype模式
- 4.3 結構體解構
- 5. 性能考慮
- 5.1 結構體布局
- 5.2 零成本抽象
- 5.3 內聯優化
- 6. 總結
Rust結構體
1. 結構體基礎
1.1 什么是結構體
結構體(struct)是Rust中一種自定義數據類型,它允許你將多個相關的值組合在一起,形成一個有意義的組。結構體是創建更復雜數據類型的基礎,也是面向對象編程中"對象"概念的基石。
與元組類似,結構體的每個部分可以是不同類型。但與元組不同,結構體需要為每個部分命名,這使得數據訪問更加清晰明確。
1.2 定義和實例化結構體
定義結構體使用struct關鍵字,后跟結構體名稱和大括號內的字段定義:
結構體與元組類似。就像元組,結構體的每一部分可以是不同類型。
不同于元組,結構體需要命名各部分數據以便能清楚的表明其值的意義。
由于有了這些名字使得結構體比元組更靈活:不需要依賴順序來指定或訪問實例中的值。
定義結構體,需要使用 struct 關鍵字并為整個結構體提供一個名字。結構體的名字需要描述它所組合的數據的意義。
接著,在大括號中,定義每一部分數據的名字,它們被稱作 字段(field)或屬性,并定義字段類型。
結構體名首字母一般大寫
struct User {username: String,email: String,sign_in_count: u64,active: bool,
}
實例化結構體:
一旦定義了結構體后,為了使用它,通過為每個字段指定具體值來創建這個結構體的 實例。
創建一個實例需要以結構體的名字開頭,接著在大括號中使用 key: value 對的形式提供字段,其中 key 是字段的名字,value 是需要儲存在字段中的數據值。
實例中具體說明字段的順序不需要和它們在結構體中聲明的順序一致。換句話說,結構體的定義就像一個類
型的通用模板,而實例則會在這個模板中放入特定數據來創建這個類型的值。
let user1 = User {email: String::from("someone@example.com"),username: String::from("someusername123"),active: true,sign_in_count: 1,
};
1.3 訪問結構體字段
使用點號.訪問結構體字段:
為了從結構體中獲取某個特定的值,可以使用點號(.)來獲取結構體中的屬性。如果我們只想要用戶的郵箱地址,可以用 user1.email 。
要更改結構體中的值,如果結構體的實例是可變的,我們可以使用點號并為對應的字段賦值。
故要修改結構體的值,必須在創建結構體實例的時候,將實例設為mut 可變結構體,才能修改。
注意整個實例必須是可變的;Rust 并不允許只將特定字段標記為可變。另外需要注意同其他任何表達式一樣,我們可以
在函數體的最后一個表達式構造一個結構體,從函數隱式的返回一個結構體的新實例。
println!("User email: {}", user1.email);
1.4 可變結構體
如果要修改結構體字段,整個結構體實例必須是可變的:
let mut user1 = User {// ...
};user1.email = String::from("newemail@example.com");
Rust不允許只將某些字段標記為可變 - 要么整個實例可變,要么都不可變。
1.5 字段初始化簡寫
當變量名與字段名相同時,可以使用字段初始化簡寫語法:
fn build_user(email: String, username: String) -> User {User {email,    // 等同于 email: emailusername, // 等同于 username: usernameactive: true,sign_in_count: 1,}
}
1.6 結構體更新語法
可以從老的對象創建新的對象常常是很有幫助的,即復用大部分老對象的值并只改變一部分值。
可以使用其他實例創建新實例:
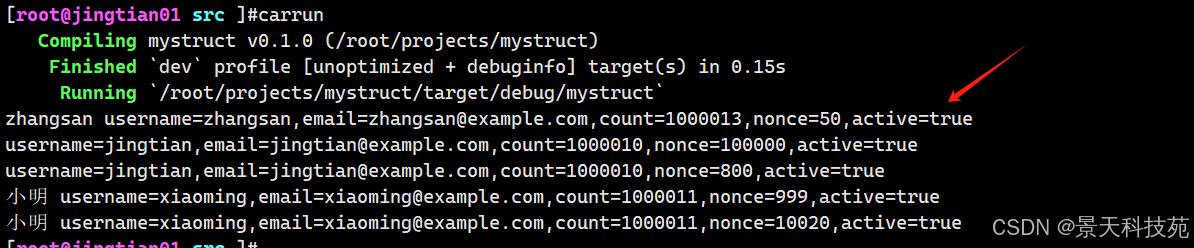
//創建結構體實例let mut user1 = User{username: String::from("jingtian"),email: String::from("jingtian@example.com"),count: String::from("1000010"),nonce: 100000,active: true,};let user3 = User{username: String::from("zhangsan"),email: String::from("zhangsan@example.com"),count: String::from("1000013"),nonce: 50,active: user1.active, //這里直接引用user1的字段來創建};//獲取結構體的值println!("zhangsan username={},email={},count={},nonce={},active={}",user3.username,user3.email,user3.count,user3.nonce,user3.active);
能拿到值
如果是多個字段引用舊對象,還可以更簡化
使用結構體更新語法,我們可以通過更少的代碼來達到相同的效果。 … 語法指定了剩余未顯式設置值的字段應有與給定實例對應字段相同的值。
let user3 = User{username: String::from("zhangsan"),email: String::from("zhangsan@example.com"),..user1 //.. 語法指定了剩余未顯式設置值的字段應有與給定實例對應字段相同的值
};//獲取結構體的值
println!("zhangsan username={},email={},count={},nonce={},active={}",user3.username,user3.email,user3.count,user3.nonce,user3.active);
使用結構體更新語法為一個 User 實例設置新的 email 和 username 值,不過其余值來自 user1 變量中實例的字段

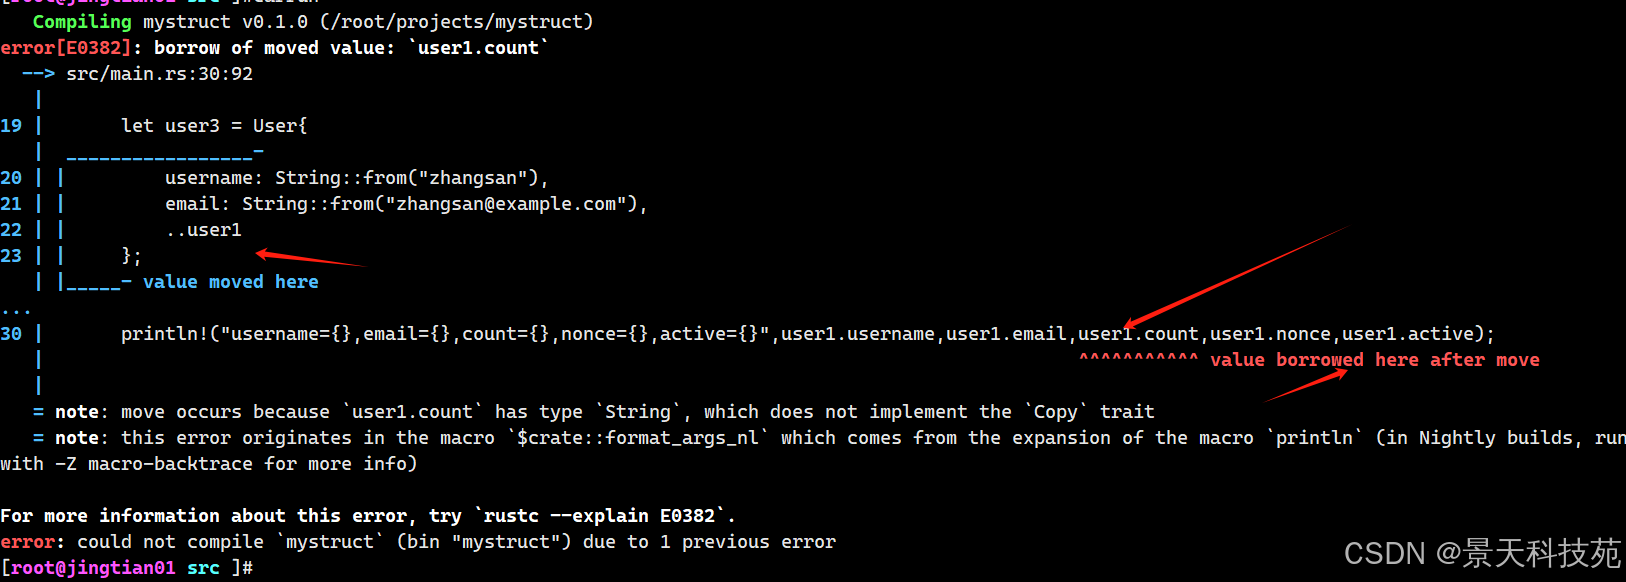
注意:使用結構體語法更新,user1字段后面不能加逗號,the base struct must always be the last field
并且user1對象在使用語法更新后,屬于被借用了,后面不能使用該對象了
否則會報錯
2. 結構體高級特性
2.1 元組結構體
元組結構體(tuple struct)有名字但沒有字段名,只有字段類型:
使用沒有命名字段的元組結構體來創建不同的類型
也可以定義與元組類似的結構體,稱為 元組結構體(tuple structs),有著結構體名稱提供的含義,但沒有具體的字段名,只有字段的類型。
元組結構體在你希望命名整個元組并使其與其他(同樣的)元組為不同類型時很有用,這時像常規結構體那樣為每個字段命名就顯得冗余和形式化了。
定義元組結構體以 struct 關鍵字和結構體名開頭并后跟元組中的類型。
例如,這里是兩個分別叫做 Color 和 Point 元組結構體的定義和用例:
//元組結構體
struct Color(i32, i32, i32);
struct Point(i32, i32, i32);
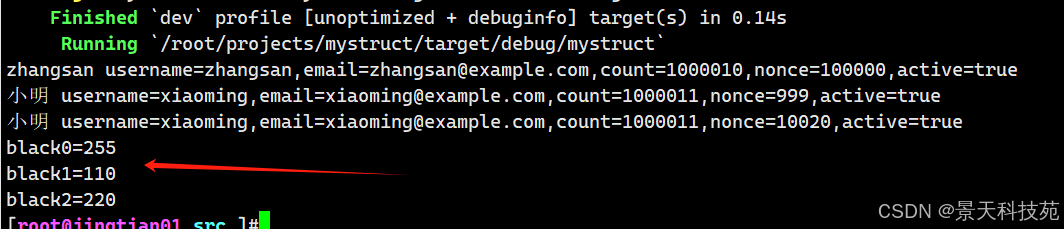
let black = Color(255, 110, 220);
let origin = Point(112, 213, 290);
println!("black0={}",black.0); //通過下標來獲取元組的值
println!("black1={}",black.1);
println!("black2={}",black.2);
元組結構體適用于需要給元組命名并使其不同于其他同類型元組的場景。
2.2 類單元結構體
沒有任何字段的結構體稱為類單元結構體(unit-like struct):
struct AlwaysEqual;let subject = AlwaysEqual;
這種結構體常用于需要在某個類型上實現trait但不需要存儲數據的情況。
2.3 結構體所有權
前面的User結構體使用了String而不是&str字符串切片,這意味著結構體擁有其數據的所有權。如果要使用引用,需要使用生命周期:
struct User {username: &str,  // 錯誤:需要生命周期說明符email: &str,sign_in_count: u64,active: bool,
}
正確的帶生命周期的定義:
struct User<'a> {username: &'a str,email: &'a str,sign_in_count: u64,active: bool,
}
2.4 打印結構體
上面我們打印結構體,都是打印結構體中的某些字段,非常不方便。
有沒有更快捷打印出結構體的方法呢?
可以采用自動推導的方法
只需要在定義結構體的時候,上方加上 #[derive(Debug)]
要實現Debug trait來打印結構體:
#[derive(Debug)]
struct Rectangle {width: u32,height: u32,
}let rect = Rectangle { width: 30, height: 50 };
println!("rect is {:?}", rect);  // 單行打印
println!("rect is {:#?}", rect); // 美化多行打印
2.5 結構體方法語法
方法 與函數類似:它們使用 fn 關鍵字和名稱聲明,可以擁有參數和返回值,同時包含一段該方法在某處被調用時會執行的代碼。
不過方法與函數是不同的,因為它們在結構體的上下文中被定義(或者是枚舉或 trait 對象的上下文),并且它們第一個參數總是 &self ,它代表調用該方法的結構體實例。
定義結構體的方法,使用impl關鍵字, impl 是 implementation 的縮寫,后面跟實現哪個結構體,就是哪個結構體的方法
fn定義的函數放到impl 大括號中,函數的第一個參數必須是 &self 。
impl Rectangle {fn area(&self) -> u32 {self.width * self.height}fn can_hold(&self, other: &Rectangle) -> bool {self.width > other.width && self.height > other.height}// 關聯函數(靜態方法)fn square(size: u32) -> Rectangle {Rectangle { width: size, height: size }}
}
使用方法:
let rect1 = Rectangle { width: 30, height: 50 };
println!("Area: {}", rect1.area());let rect2 = Rectangle { width: 10, height: 40 };
println!("Can rect1 hold rect2? {}", rect1.can_hold(&rect2));let square = Rectangle::square(10);  // 調用關聯函數
2.6 多個impl塊
可以為同一個結構體定義多個impl塊:
impl Rectangle {fn area(&self) -> u32 {self.width * self.height}
}impl Rectangle {fn perimeter(&self) -> u32 {2 * (self.width + self.height)}
}
2.7 關聯函數
impl 塊的另一個有用的功能是:允許在 impl 塊中定義 不 以 self 作為參數的函數。
這被稱為 關聯函數(associatedfunctions),因為它們與結構體相關聯。
即便如此它們仍是函數而不是方法,因為它們并不作用于一個結構體的實例。
我們已經使用過 String::from 關聯函數了。
關聯函數經常被用作返回一個結構體新實例的構造函數。
使用結構體名和 ::函數名() 語法來調用這個關聯函數:比如 let sq = Rectangle::square(3); 。
這個方法位于結構體的命名空間中: :: 語法用于關聯函數和模塊創建的命名空間
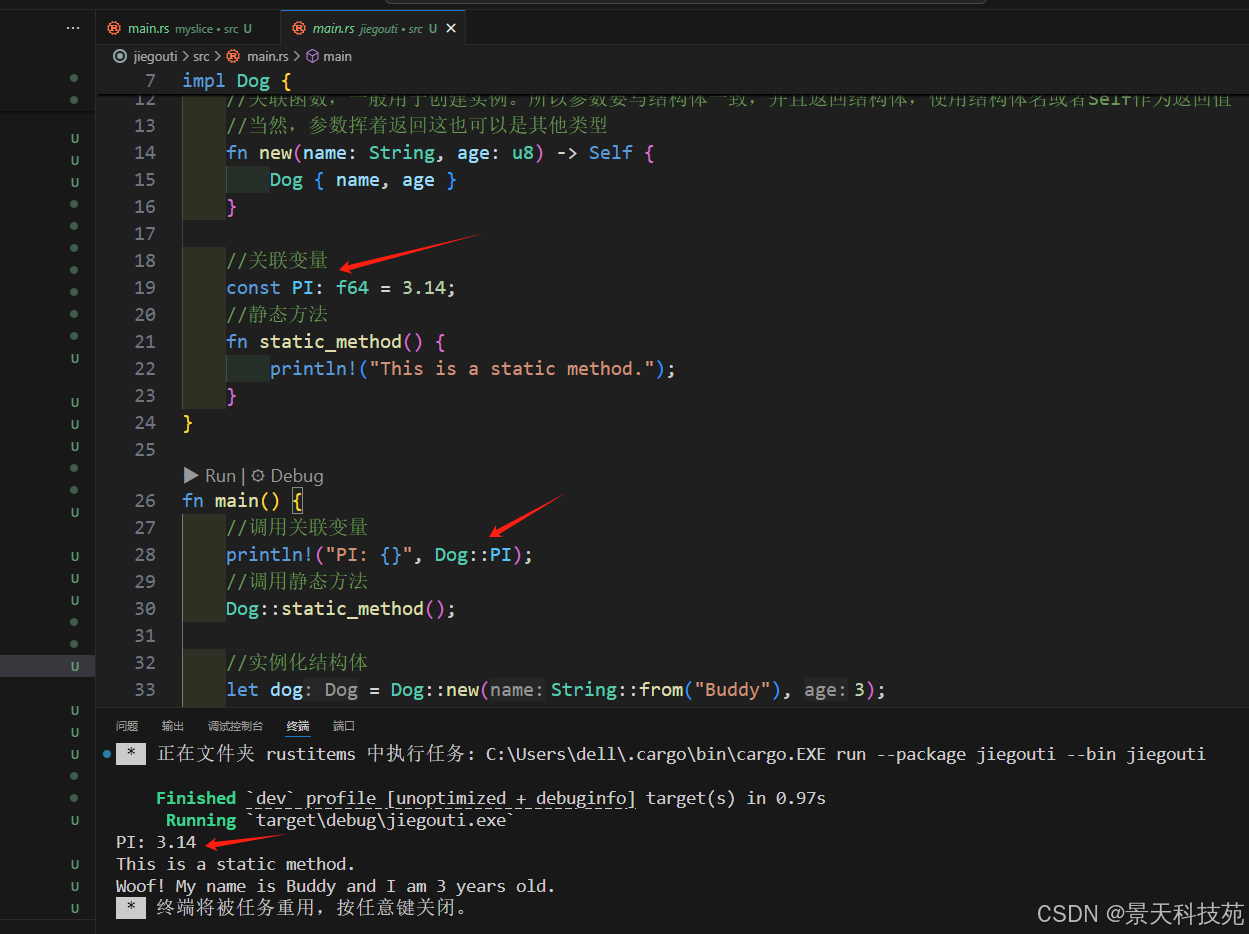
//創建結構體
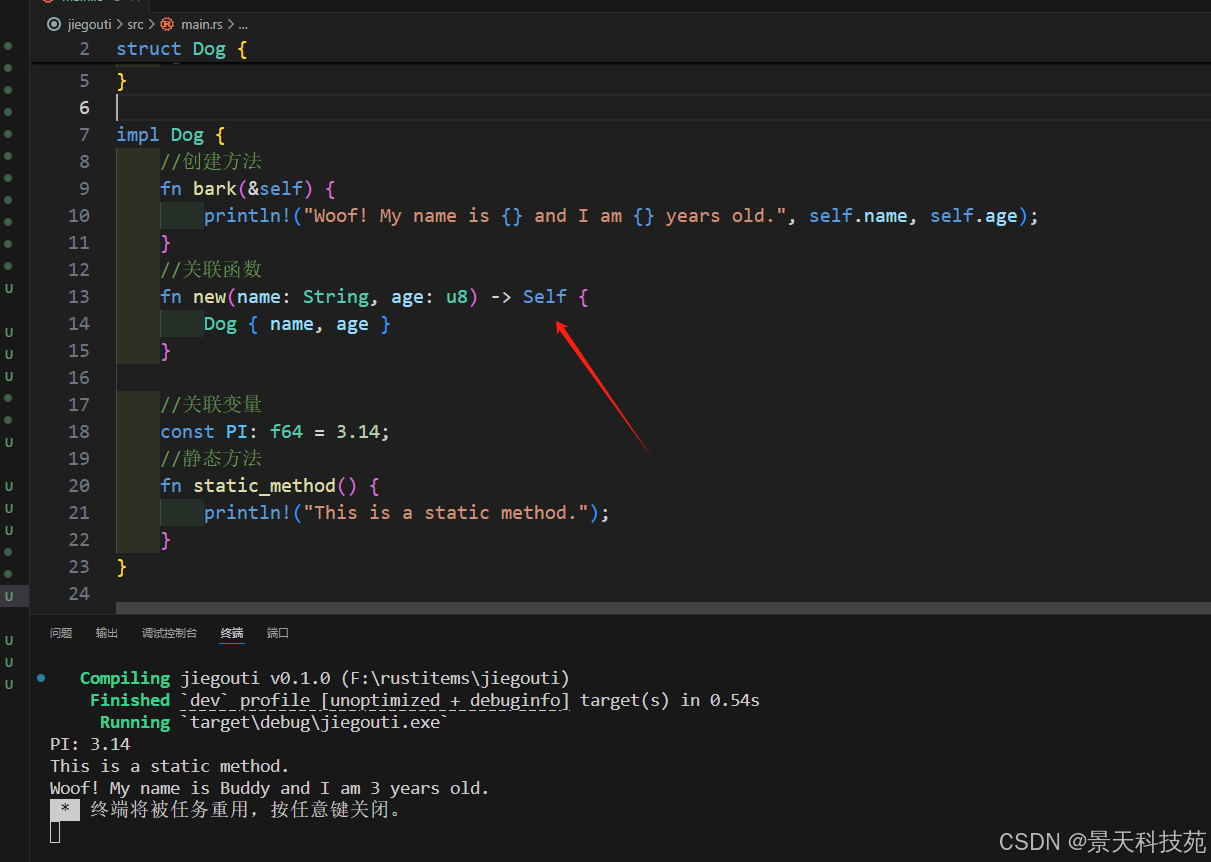
struct Dog {name: String,age: u8,
}impl Dog {//創建方法fn bark(&self) {println!("Woof! My name is {} and I am {} years old.", self.name, self.age);}//關聯函數,返回結構體Dog,也可以用Self 替代fn new(name: String, age: u8) -> Dog {Dog { name, age }}//關聯變量const PI: f64 = 3.14;//靜態方法fn static_method() {println!("This is a static method.");}
}fn main() {//調用關聯變量println!("PI: {}", Dog::PI);//調用靜態方法Dog::static_method();//實例化結構體 可以通過調用關聯函數來實例化,調用關聯函數,結構體名::函數名()let dog = Dog::new(String::from("Buddy"), 3);//調用方法dog.bark();}
2.8 關聯變量
這里的關聯邊變量指的是,和結構體類型相關的變量,也可以在特質或者枚舉中
impl Dog {const PI: f64 = 3.14}
調用時使用 Dog::PI
3. 實際應用案例
3.1 圖形計算
#[derive(Debug)]
struct Point {x: f64,y: f64,
}impl Point {fn new(x: f64, y: f64) -> Point {Point { x, y }}fn distance(&self, other: &Point) -> f64 {((self.x - other.x).powi(2) + (self.y - other.y).powi(2)).sqrt()}
}#[derive(Debug)]
struct Triangle {a: Point,b: Point,c: Point,
}impl Triangle {fn perimeter(&self) -> f64 {self.a.distance(&self.b) + self.b.distance(&self.c) + self.c.distance(&self.a)}fn area(&self) -> f64 {let ab = self.a.distance(&self.b);let bc = self.b.distance(&self.c);let ca = self.c.distance(&self.a);let s = self.perimeter() / 2.0;(s * (s - ab) * (s - bc) * (s - ca)).sqrt()}
}fn main() {let a = Point::new(0.0, 0.0);let b = Point::new(3.0, 0.0);let c = Point::new(0.0, 4.0);let triangle = Triangle { a, b, c };println!("Triangle perimeter: {}", triangle.perimeter());println!("Triangle area: {}", triangle.area());
}
3.2 學生管理系統
#[derive(Debug)]
struct Student {id: u32,name: String,age: u8,courses: Vec<Course>,
}#[derive(Debug)]
struct Course {name: String,credit: u8,score: Option<u8>, // 使用Option表示可能沒有成績
}impl Student {fn new(id: u32, name: String, age: u8) -> Student {Student {id,name,age,courses: Vec::new(),}}fn add_course(&mut self, name: String, credit: u8) {self.courses.push(Course {name,credit,score: None,});}fn update_score(&mut self, course_name: &str, score: u8) -> Result<(), String> {for course in &mut self.courses {if course.name == course_name {course.score = Some(score);return Ok(());}}Err(format!("Course {} not found", course_name))}fn calculate_gpa(&self) -> Option<f64> {if self.courses.is_empty() {return None;}let (total_score, total_credit) = self.courses.iter().filter_map(|c| c.score.map(|s| (s as f64 * c.credit as f64, c.credit as f64))).fold((0.0, 0.0), |(sum_score, sum_credit), (score, credit)| {(sum_score + score, sum_credit + credit)});Some(total_score / total_credit)}
}fn main() {let mut student = Student::new(1, String::from("Alice"), 20);student.add_course(String::from("Math"), 4);student.add_course(String::from("Physics"), 3);student.add_course(String::from("Chemistry"), 3);student.update_score("Math", 90).unwrap();student.update_score("Physics", 85).unwrap();student.update_score("Chemistry", 78).unwrap();println!("Student: {:?}", student);println!("GPA: {:.2}", student.calculate_gpa().unwrap());
}
3.3 銀行賬戶系統
use std::fmt;#[derive(Debug)]
struct BankAccount {account_number: String,holder_name: String,balance: f64,transactions: Vec<Transaction>,
}#[derive(Debug)]
enum TransactionType {Deposit,Withdrawal,Transfer,
}#[derive(Debug)]
struct Transaction {transaction_type: TransactionType,amount: f64,description: String,timestamp: String, // 簡化處理,實際應用中應使用專門的日期時間類型
}impl BankAccount {fn new(account_number: String, holder_name: String) -> BankAccount {BankAccount {account_number,holder_name,balance: 0.0,transactions: Vec::new(),}}fn deposit(&mut self, amount: f64, description: String) -> Result<(), String> {if amount <= 0.0 {return Err("Deposit amount must be positive".to_string());}self.balance += amount;self.add_transaction(TransactionType::Deposit, amount, description);Ok(())}fn withdraw(&mut self, amount: f64, description: String) -> Result<(), String> {if amount <= 0.0 {return Err("Withdrawal amount must be positive".to_string());}if self.balance < amount {return Err("Insufficient funds".to_string());}self.balance -= amount;self.add_transaction(TransactionType::Withdrawal, amount, description);Ok(())}fn transfer(&mut self, to_account: &mut BankAccount, amount: f64, description: String) -> Result<(), String> {if amount <= 0.0 {return Err("Transfer amount must be positive".to_string());}if self.balance < amount {return Err("Insufficient funds for transfer".to_string());}self.balance -= amount;to_account.balance += amount;let desc_self = format!("Transfer to {}: {}", to_account.account_number, description);let desc_to = format!("Transfer from {}: {}", self.account_number, description);self.add_transaction(TransactionType::Transfer, amount, desc_self);to_account.add_transaction(TransactionType::Transfer, amount, desc_to);Ok(())}fn add_transaction(&mut self, transaction_type: TransactionType, amount: f64, description: String) {// 簡化時間戳處理let timestamp = "2023-01-01 12:00:00".to_string();self.transactions.push(Transaction {transaction_type,amount,description,timestamp,});}fn print_statement(&self) {println!("Account Statement for {}", self.account_number);println!("Holder: {}", self.holder_name);println!("Current Balance: {:.2}", self.balance);println!("\nTransactions:");println!("{:<20} {:<10} {:<15} {}", "Date", "Type", "Amount", "Description");for txn in &self.transactions {println!("{:<20} {:<10} {:<15.2} {}", txn.timestamp,match txn.transaction_type {TransactionType::Deposit => "DEPOSIT",TransactionType::Withdrawal => "WITHDRAW",TransactionType::Transfer => "TRANSFER",},txn.amount,txn.description);}}
}impl fmt::Display for BankAccount {fn fmt(&self, f: &mut fmt::Formatter) -> fmt::Result {write!(f, "Account {} ({}): Balance {:.2}", self.account_number, self.holder_name, self.balance)}
}fn main() {let mut account1 = BankAccount::new("123456".to_string(), "Alice".to_string());let mut account2 = BankAccount::new("654321".to_string(), "Bob".to_string());account1.deposit(1000.0, "Initial deposit".to_string()).unwrap();account1.withdraw(200.0, "Cash withdrawal".to_string()).unwrap();account1.transfer(&mut account2, 300.0, "Rent payment".to_string()).unwrap();println!("{}", account1);println!("{}", account2);account1.print_statement();
}
4. 最佳實踐和常見模式
4.1 構建者模式
Rust沒有默認參數和重載,構建者模式是創建復雜結構體的常用方式:
struct Computer {cpu: String,memory: u32,storage: u32,gpu: Option<String>,has_wifi: bool,has_bluetooth: bool,
}struct ComputerBuilder {cpu: String,memory: u32,storage: u32,gpu: Option<String>,has_wifi: bool,has_bluetooth: bool,
}impl ComputerBuilder {fn new(cpu: String, memory: u32, storage: u32) -> ComputerBuilder {ComputerBuilder {cpu,memory,storage,gpu: None,has_wifi: false,has_bluetooth: false,}}fn gpu(mut self, gpu: String) -> ComputerBuilder {self.gpu = Some(gpu);self}fn wifi(mut self, has_wifi: bool) -> ComputerBuilder {self.has_wifi = has_wifi;self}fn bluetooth(mut self, has_bluetooth: bool) -> ComputerBuilder {self.has_bluetooth = has_bluetooth;self}fn build(self) -> Computer {Computer {cpu: self.cpu,memory: self.memory,storage: self.storage,gpu: self.gpu,has_wifi: self.has_wifi,has_bluetooth: self.has_bluetooth,}}
}impl Computer {fn print_specs(&self) {println!("CPU: {}", self.cpu);println!("Memory: {} GB", self.memory);println!("Storage: {} GB", self.storage);if let Some(gpu) = &self.gpu {println!("GPU: {}", gpu);} else {println!("GPU: Integrated");}println!("Wi-Fi: {}", if self.has_wifi { "Yes" } else { "No" });println!("Bluetooth: {}", if self.has_bluetooth { "Yes" } else { "No" });}
}fn main() {let gaming_pc = ComputerBuilder::new("Intel i7".to_string(), 16, 1000).gpu("NVIDIA RTX 3080".to_string()).wifi(true).bluetooth(true).build();gaming_pc.print_specs();let office_pc = ComputerBuilder::new("Intel i5".to_string(), 8, 500).wifi(true).build();office_pc.print_specs();
}
4.2 使用Newtype模式
Newtype模式是在現有類型上創建新類型的一種方式,用于增加類型安全和表達意圖:
struct Email(String);impl Email {fn new(email: &str) -> Result<Email, String> {if email.contains('@') {Ok(Email(email.to_string()))} else {Err("Invalid email format".to_string())}}
}struct User {name: String,email: Email,
}fn send_email(email: &Email, message: &str) {println!("Sending '{}' to {}", message, email.0);
}fn main() {let email = Email::new("user@example.com").unwrap();let user = User {name: "Alice".to_string(),email,};send_email(&user.email, "Hello from Rust!");// 下面的代碼會編譯錯誤,因為類型不匹配// let invalid_email = "not-an-email".to_string();// send_email(&invalid_email, "This won't work");
}
4.3 結構體解構
可以使用模式匹配來解構結構體:
struct Point3D {x: i32,y: i32,z: i32,
}fn print_coordinates(&Point3D { x, y, z }: &Point3D) {println!("x: {}, y: {}, z: {}", x, y, z);
}fn main() {let point = Point3D { x: 1, y: 2, z: 3 };print_coordinates(&point);// 也可以在let語句中解構let Point3D { x, y, z } = point;println!("x is {}", x);// 可以忽略某些字段let Point3D { x, .. } = Point3D { x: 4, y: 5, z: 6 };println!("only x: {}", x);
}
5. 性能考慮
5.1 結構體布局
Rust默認會對結構體字段進行重排以優化內存使用:
struct Unoptimized {a: u8,   // 1字節b: u32,  // 4字節c: u16,  // 2字節
}struct Optimized {b: u32,  // 4字節c: u16,  // 2字節a: u8,   // 1字節
}fn main() {println!("Unoptimized size: {}", std::mem::size_of::<Unoptimized>()); // 可能輸出12println!("Optimized size: {}", std::mem::size_of::<Optimized>());     // 可能輸出8
}
可以使用#[repr(C)]屬性禁用這種優化,保持C兼容的布局:
#[repr(C)]
struct CLike {a: u8,b: u32,c: u16,
}
5.2 零成本抽象
Rust的結構體和方法是零成本抽象,編譯后的代碼與直接操作數據一樣高效:
#[derive(Debug)]
struct Vector3D {x: f64,y: f64,z: f64,
}impl Vector3D {fn dot(&self, other: &Vector3D) -> f64 {self.x * other.x + self.y * other.y + self.z * other.z}fn cross(&self, other: &Vector3D) -> Vector3D {Vector3D {x: self.y * other.z - self.z * other.y,y: self.z * other.x - self.x * other.z,z: self.x * other.y - self.y * other.x,}}
}fn main() {let v1 = Vector3D { x: 1.0, y: 2.0, z: 3.0 };let v2 = Vector3D { x: 4.0, y: 5.0, z: 6.0 };println!("Dot product: {}", v1.dot(&v2));println!("Cross product: {:?}", v1.cross(&v2));
}
5.3 內聯優化
小結構體通常會被編譯器內聯,消除方法調用的開銷:
#[derive(Clone, Copy)]
struct Point2D {x: f32,y: f32,
}impl Point2D {#[inline]fn distance_squared(&self, other: Point2D) -> f32 {let dx = self.x - other.x;let dy = self.y - other.y;dx * dx + dy * dy}fn distance(&self, other: Point2D) -> f32 {self.distance_squared(other).sqrt()}
}
6. 總結
Rust的結構體是構建復雜數據類型的基礎,提供了強大的數據組織和抽象能力。通過本文,我們學習了:
- 結構體的基本定義和實例化
- 方法語法和關聯函數
- 高級特性如元組結構體和類單元結構體
- 實際應用案例:圖形計算、學生管理、銀行賬戶
- 設計模式如構建者模式和Newtype模式
- 性能考慮和優化技巧
結構體與Rust的其他特性如trait、泛型、生命周期等結合,可以構建出既安全又高效的復雜系統。掌握結構體的使用是成為Rust熟練開發者的重要一步。


)
)


)
:3秒對話式搞定“等時圈”繪制)


)
詳解)


