目錄
1.卷積核基本參數說明
?2.卷積相關操作說明
3.卷積操作示例
?
? ? ?1.卷積核基本參數說明
?????????pytorch進行圖像卷積操作之前,需要把圖像素格式進行分離,比如一個圖像為rgb格式,把R,G,B取出來作為一個ndarray,前文講過,在pytorch中進行圖像轉Tensor,大小變換,相關處理的庫,基本都放在?from torchvision import transforms里面,對于把正常的圖像轉換為單獨的RGB的ndarray,并且歸一化,使用 transforms.ToTensor即可一次性完成轉換。在訓練圖像相關模型的時候,主要是訓練卷積核的參數,一般的3*3的卷積核結構如代碼所示:
import cv2
import osimport numpy as np
import torch
import torchvision
from torchvision import transforms
from PIL import Image
from torch import nn
from matplotlib import pyplot as plt
from torchvision import transforms
#定義卷積核心,bias為False則不要偏置參數
#輸入通道為3,輸出通道為1,卷積核大小為3*3,偏置為真
cov = nn.Conv2d(3,1,3,bias=True)
print(cov.state_dict())'''
OrderedDict([('weight', tensor([[[[ 0.1062,  0.0600, -0.0675],[-0.0303,  0.0045, -0.0276],[ 0.0114,  0.1434, -0.1323]],[[-0.0622, -0.0029, -0.0695],[-0.0282, -0.0664, -0.0157],[ 0.0037, -0.0900, -0.0588]],[[-0.1231, -0.1717,  0.1089],[ 0.0051,  0.1269, -0.0846],[-0.0662,  0.0817,  0.1689]]]])), ('bias', tensor([0.0631]))])進程已結束,退出代碼為 0
'''
?2.卷積相關操作說明
? ? ? ?用transforms.ToTensor把圖像分為RGB單獨通道且歸一化后,就可以對圖像進行卷積操作,示例代碼如圖:
import cv2
import os
import numpy as np
import torch
import torchvision
from torchvision import transforms
from PIL import Image
from torch import nn
from matplotlib import pyplot as plt
from torchvision import transformscov = nn.Conv2d(3,1,3,bias=True)
# print(cov.state_dict())
#初始化卷積核所以參數為0.5
for x in cov.parameters():nn.init.constant_(x,0.5)print(cov.state_dict())
d = torch.ones(3,6,6)
d = torch.unsqueeze(d,0)
print(d)
c = cov(d)
print(c)'''
OrderedDict([('weight', tensor([[[[0.5000, 0.5000, 0.5000],[0.5000, 0.5000, 0.5000],[0.5000, 0.5000, 0.5000]],[[0.5000, 0.5000, 0.5000],[0.5000, 0.5000, 0.5000],[0.5000, 0.5000, 0.5000]],[[0.5000, 0.5000, 0.5000],[0.5000, 0.5000, 0.5000],[0.5000, 0.5000, 0.5000]]]])), ('bias', tensor([0.5000]))])
tensor([[[[1., 1., 1., 1., 1., 1.],[1., 1., 1., 1., 1., 1.],[1., 1., 1., 1., 1., 1.],[1., 1., 1., 1., 1., 1.],[1., 1., 1., 1., 1., 1.],[1., 1., 1., 1., 1., 1.]],[[1., 1., 1., 1., 1., 1.],[1., 1., 1., 1., 1., 1.],[1., 1., 1., 1., 1., 1.],[1., 1., 1., 1., 1., 1.],[1., 1., 1., 1., 1., 1.],[1., 1., 1., 1., 1., 1.]],[[1., 1., 1., 1., 1., 1.],[1., 1., 1., 1., 1., 1.],[1., 1., 1., 1., 1., 1.],[1., 1., 1., 1., 1., 1.],[1., 1., 1., 1., 1., 1.],[1., 1., 1., 1., 1., 1.]]]])
tensor([[[[14., 14., 14., 14.],[14., 14., 14., 14.],[14., 14., 14., 14.],[14., 14., 14., 14.]]]], grad_fn=<ConvolutionBackward0>)
'''
? ? ? ? 從示例代碼可以看出,因為我們定義的3通道輸入的3*3卷積核心,就生成了3個3*3的核心,3個核心分比對3個通道進行卷積((對應位置直接相乘)然后求和加偏置),得出輸出,同理如果定義卷積核輸出為三,那么就會定義3*3=9個卷積核每三個卷積核分別對圖像進行卷積操作,得出三個輸出通道。
3.卷積操作示例
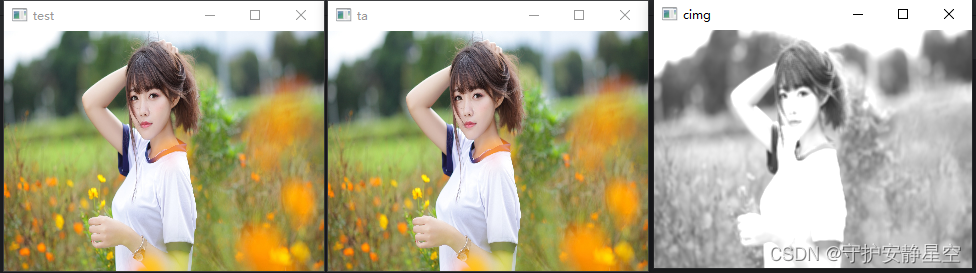
? ? ? ? 以一張圖像為例打開圖像,定義卷積核進行卷積操作:
import cv2
import os
import numpy as np
import torch
import torchvision
from torchvision import transforms
from PIL import Image
from torch import nn
from matplotlib import pyplot as plt
from torchvision import transformscov = nn.Conv2d(3,3,3,bias=True)
for x in cov.parameters():nn.init.constant_(x,0.05)
print(cov.state_dict())img = cv2.imread("E:/test/pythonProject/test.jpg")
img = cv2.resize(img,dsize=(320,240))
print('img.shape',img.shape)
trans = transforms.ToTensor()
timg = trans(img)
print('timg.shape',timg.shape)
cimg = cov(timg)
print('cimg.shape',cimg.shape)timg = timg.permute(1,2,0)
ta = timg.numpy()cimg = cimg.permute(1,2,0)
ca = cimg.data.numpy()cv2.imshow("test",img)
cv2.imshow("ta",ta)
cv2.imshow("cimg",ca)cv2.waitKey()'''
OrderedDict([('weight', tensor([[[[0.0500, 0.0500, 0.0500],[0.0500, 0.0500, 0.0500],[0.0500, 0.0500, 0.0500]],[[0.0500, 0.0500, 0.0500],[0.0500, 0.0500, 0.0500],[0.0500, 0.0500, 0.0500]],[[0.0500, 0.0500, 0.0500],[0.0500, 0.0500, 0.0500],[0.0500, 0.0500, 0.0500]]],[[[0.0500, 0.0500, 0.0500],[0.0500, 0.0500, 0.0500],[0.0500, 0.0500, 0.0500]],[[0.0500, 0.0500, 0.0500],[0.0500, 0.0500, 0.0500],[0.0500, 0.0500, 0.0500]],[[0.0500, 0.0500, 0.0500],[0.0500, 0.0500, 0.0500],[0.0500, 0.0500, 0.0500]]],[[[0.0500, 0.0500, 0.0500],[0.0500, 0.0500, 0.0500],[0.0500, 0.0500, 0.0500]],[[0.0500, 0.0500, 0.0500],[0.0500, 0.0500, 0.0500],[0.0500, 0.0500, 0.0500]],[[0.0500, 0.0500, 0.0500],[0.0500, 0.0500, 0.0500],[0.0500, 0.0500, 0.0500]]]])), ('bias', tensor([0.0500, 0.0500, 0.0500]))])
img.shape (240, 320, 3)
timg.shape torch.Size([3, 240, 320])
cimg.shape torch.Size([3, 238, 318])進程已結束,退出代碼為 0
'''
? ? ? ? 這里定義的卷積核輸入為3通道,輸出為3通道,這里三組卷積核,每組卷積核包含三個卷積核,三個卷積核分別對三個通道進行卷積,最后每組輸出一個通道,三組輸出三個通道圖像,因為卷積核參數一樣,所以最后卷積輸出的RGB值相等,輸出灰色圖像。
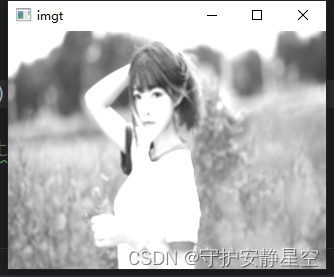
這里注意:
cimg = cimg.permute(1,2,0)
這個函數是進行維度調換,理解不了,可以先把他轉為numpy,再用cv2.merge((r,g,b))函數進行融合,cv2.split(imgt) 可以把圖像重新分為 r g b 的numpy.ndarray結構,如代碼所示:
t = cimg.data.numpy()r = t[0]
g = t[1]
b = t[2]imgt = cv2.merge((r,g,b))
r,g,b = cv2.split(imgt)
print(r.shape,g.shape,b.shape)cv2.imshow("imgt",imgt)
cv2.waitKey()'''
(238, 318) (238, 318) (238, 318)
'''


 + Pycharm 錯誤(無法啟動)+ python 報錯)
)


 和 puts() 有兩個小區別))


