文章目錄
- 代碼準備
- 創建jenkins 任務
- 測試推送
- 使用項目里面的jenkinsfile 進行升級操作
- 文字版本流程
- 項目構建
代碼準備
推送代碼到gitlab
代碼去叩叮狼教育找 k8s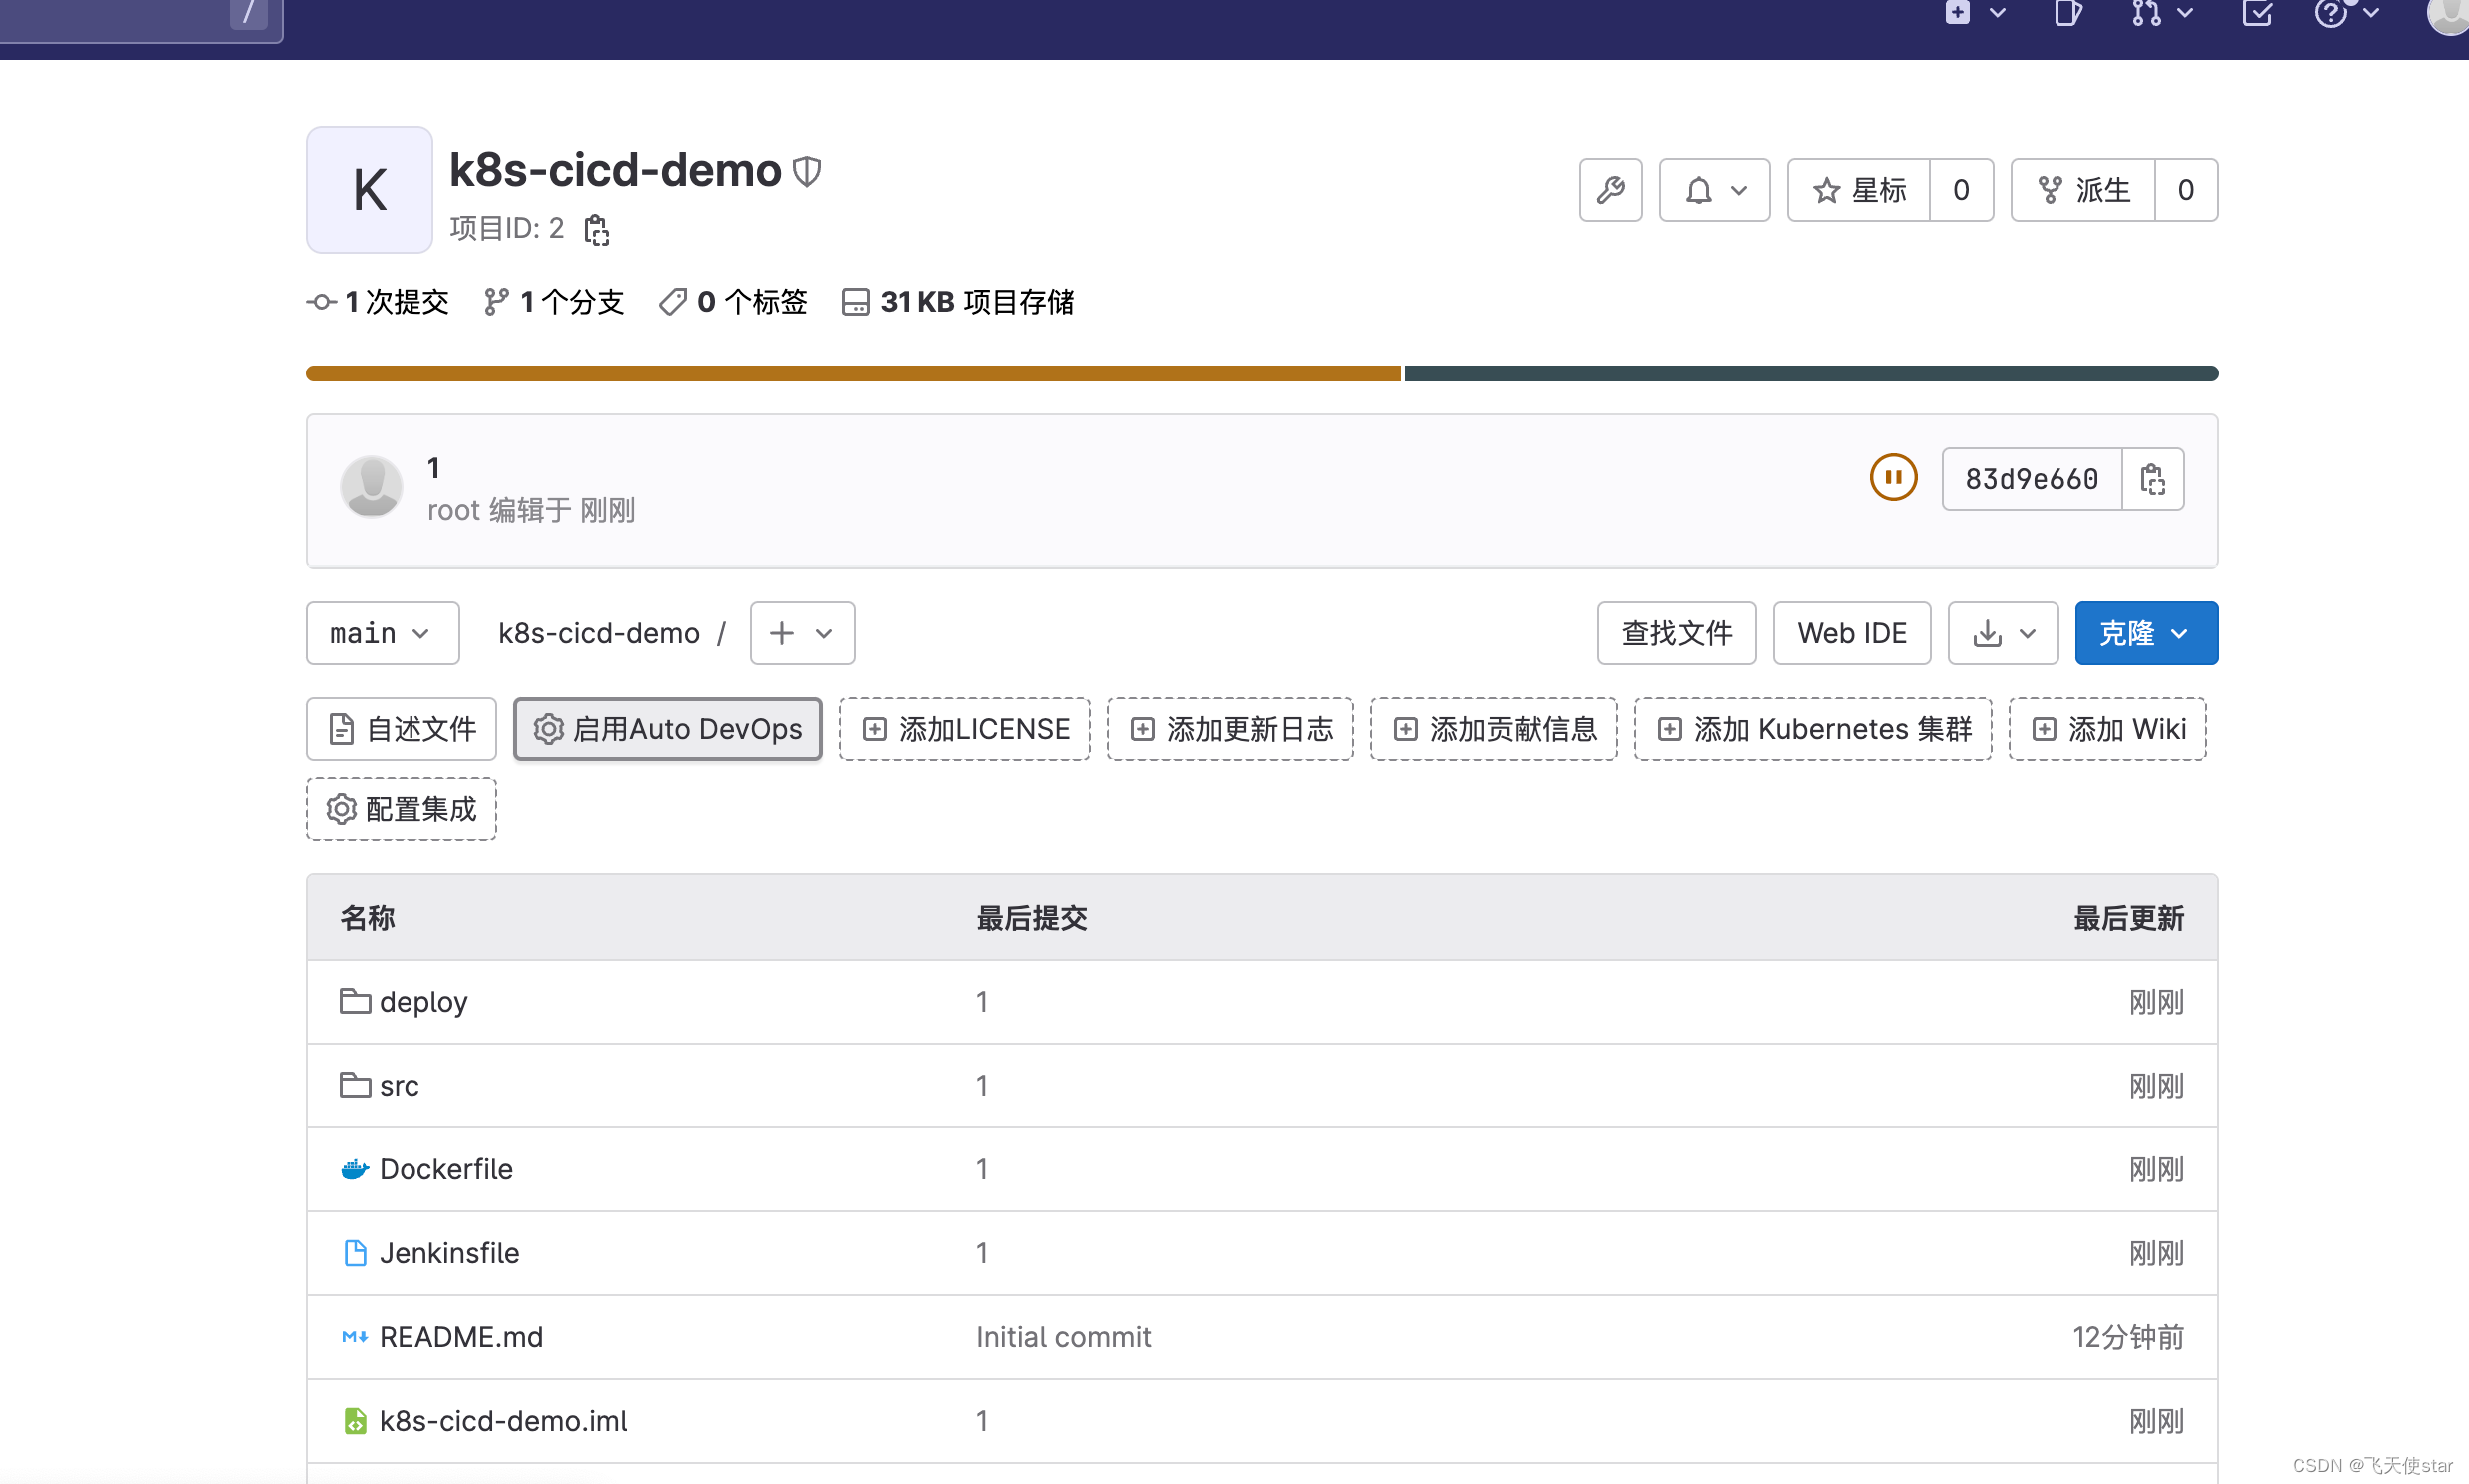
創建jenkins 任務
創建一個k8s-cicd-demo 流水線任務
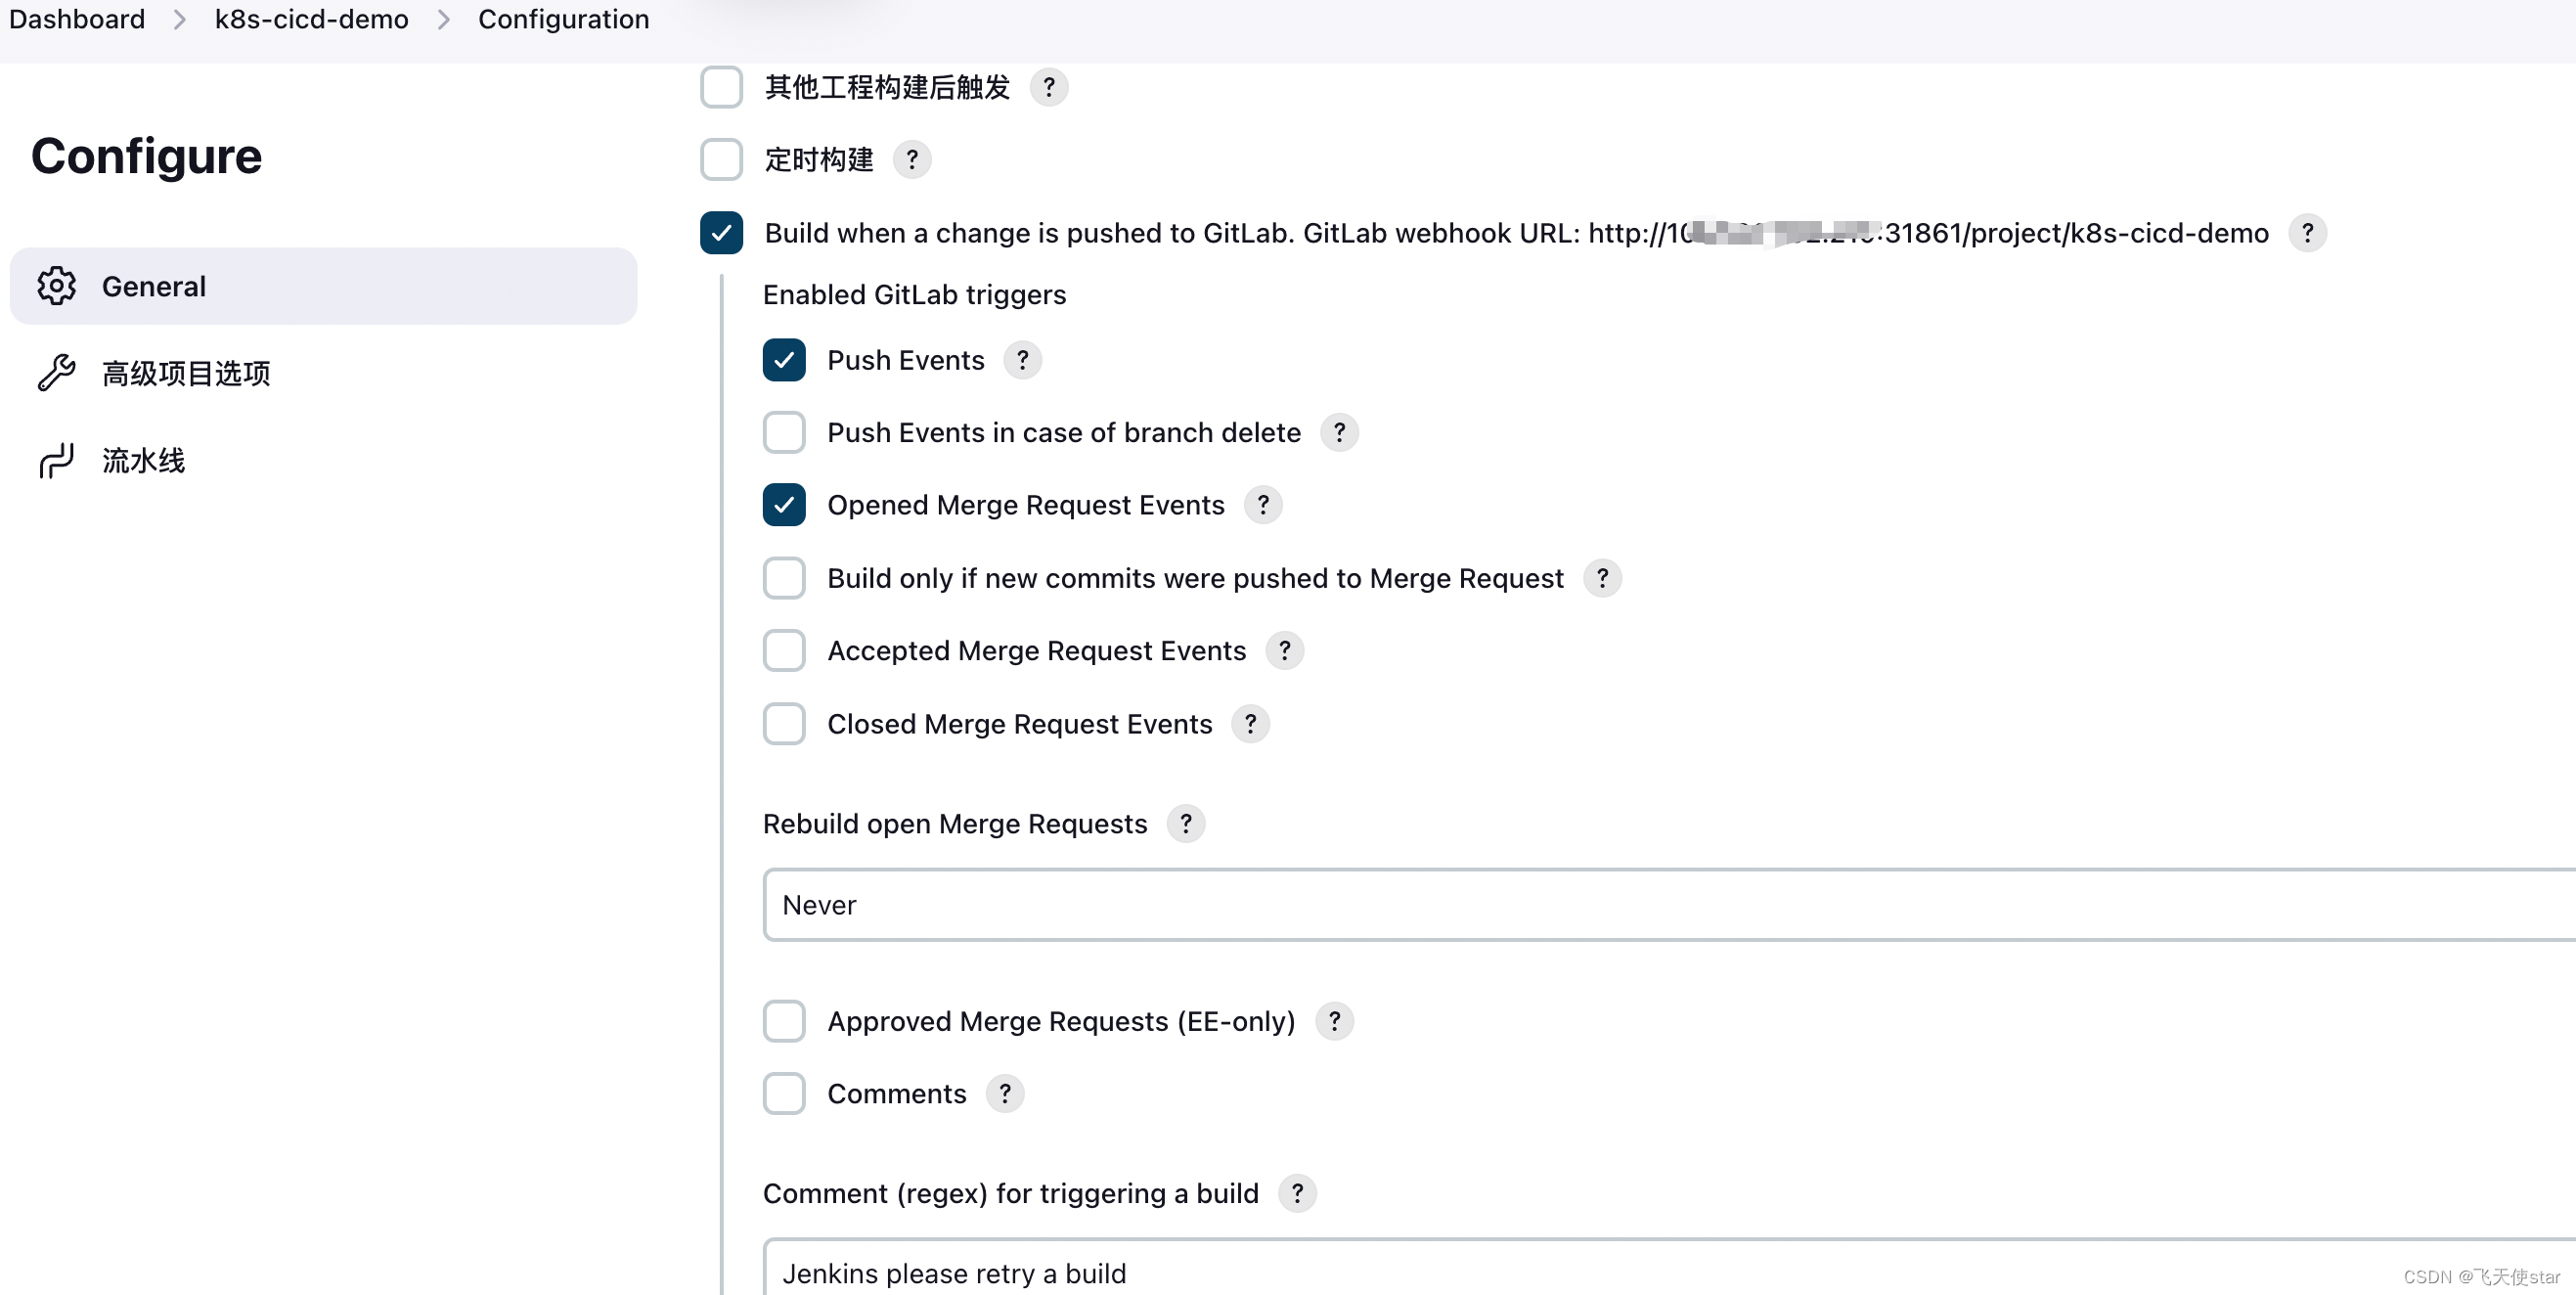
將jenkins 里面構建時候的地址還有token, 給到gitlab里面的webhooks 粘貼好
http://108.1.1.1:31861/project/k8s-cicd-demo
3b2976e09fb121a1d949c15289a87727
在這里插入圖片描述
測試推送
使用項目里面的jenkinsfile 進行升級操作
任務構建里面選擇git 的http地址
創建harbor 憑據

配置kubeconfig
管理Jenkins-> Managed files->Add->Custom file ->Content字段內容是kubeconfig(默認路徑在master節點/root/.kube/config–> cat /root/.kube/config)獲取內容
文字版本流程
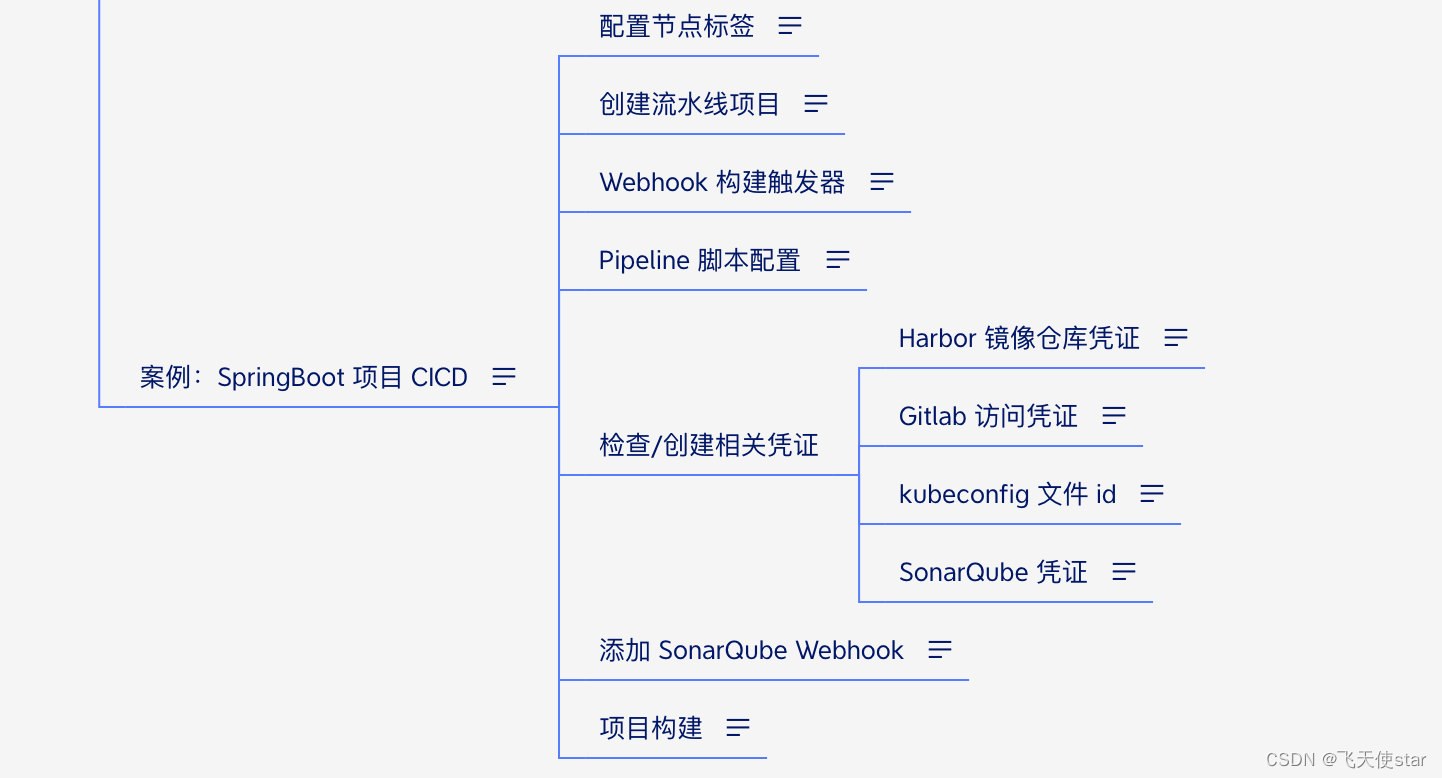
配置流水線節點標簽
系統管理 > 節點管理 > 列表中 master 節點最右側的齒輪按鈕
修改標簽的值與項目中 Jenkinsfile 中 agent > kubernetes > label 的值相匹配
在首頁點擊 Create a Job 創建一個流水線風格的項目
----------- Jenkins 流水線項目 Webhook 配置 -----------
在 Jenkins 項目配置下找到構建觸發器欄目
勾選 Build when a change is pushed to GitLab. GitLab webhook URL: http://192.168.113.121:31216/project/k8s-cicd-demo
上方的 URL 就是用于配置到 gitlab 項目 webhook 的地址
生成的token也復制到gitlab 的webhook地址中去
啟用 Gitlab 構建觸發器:
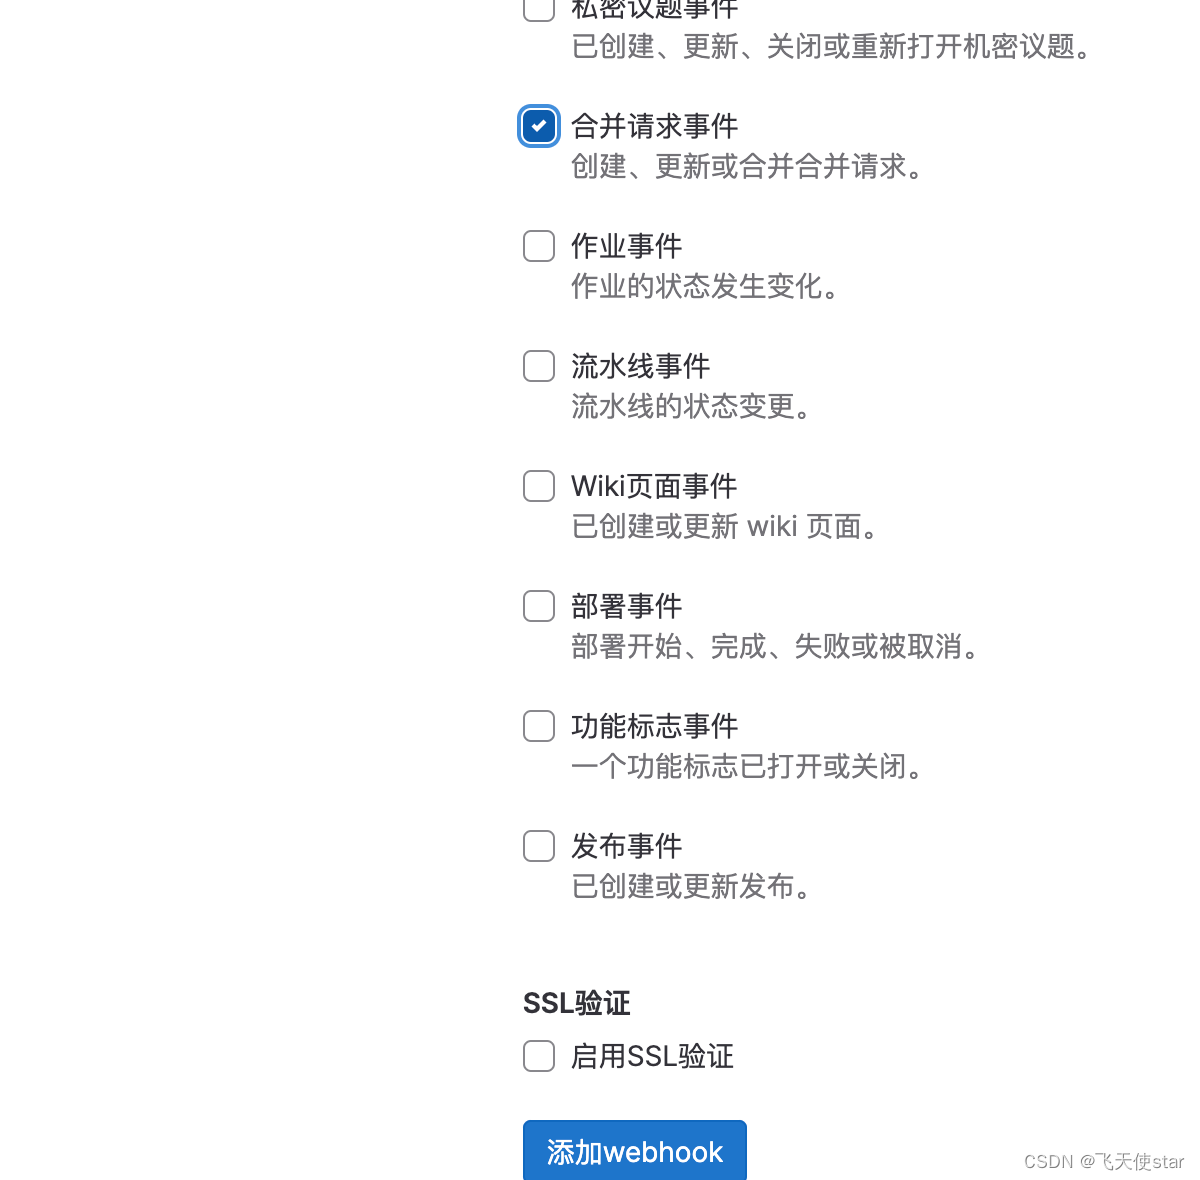
Push Events:勾選,表示有任意推送到 git 倉庫的操作都會觸發構建
Opend Merge Request Events:勾選,表示有請求合并時觸發構建
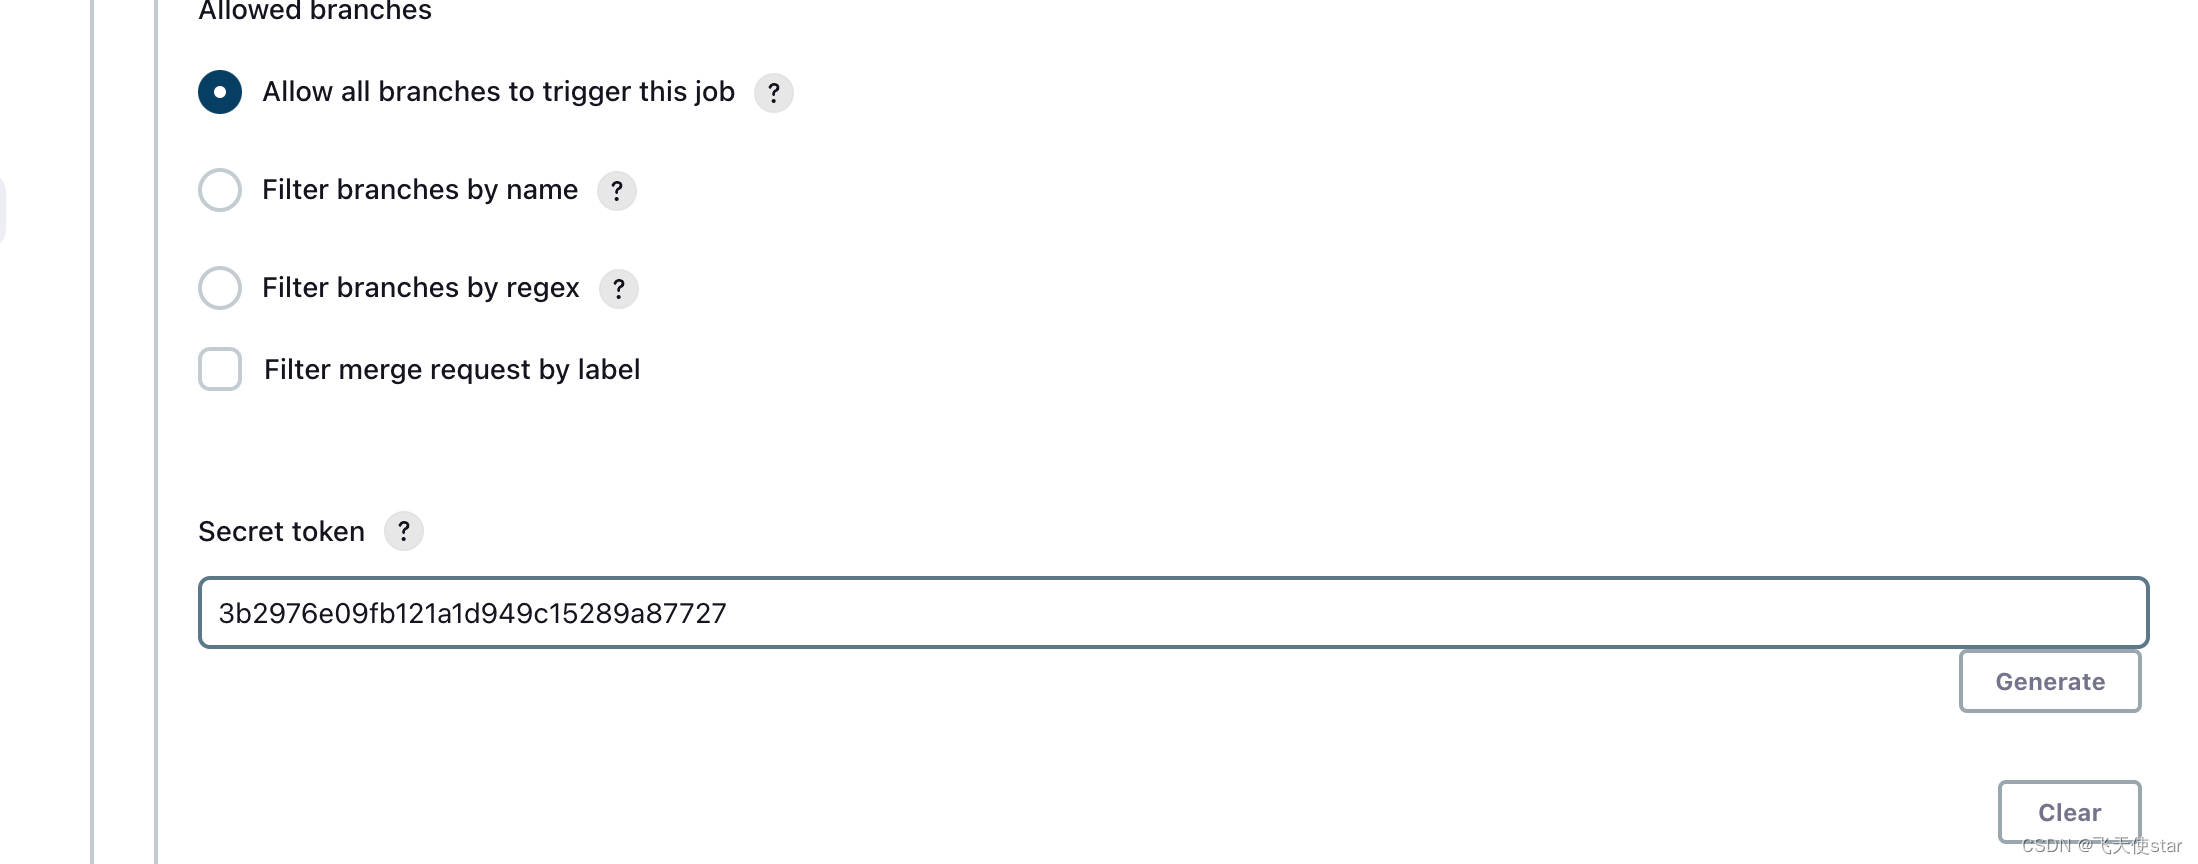
點擊高級 > Secret Token > Generate 按鈕,生成 token
保存以上配置
----------- GitLab 項目 Webhook 配置 -----------
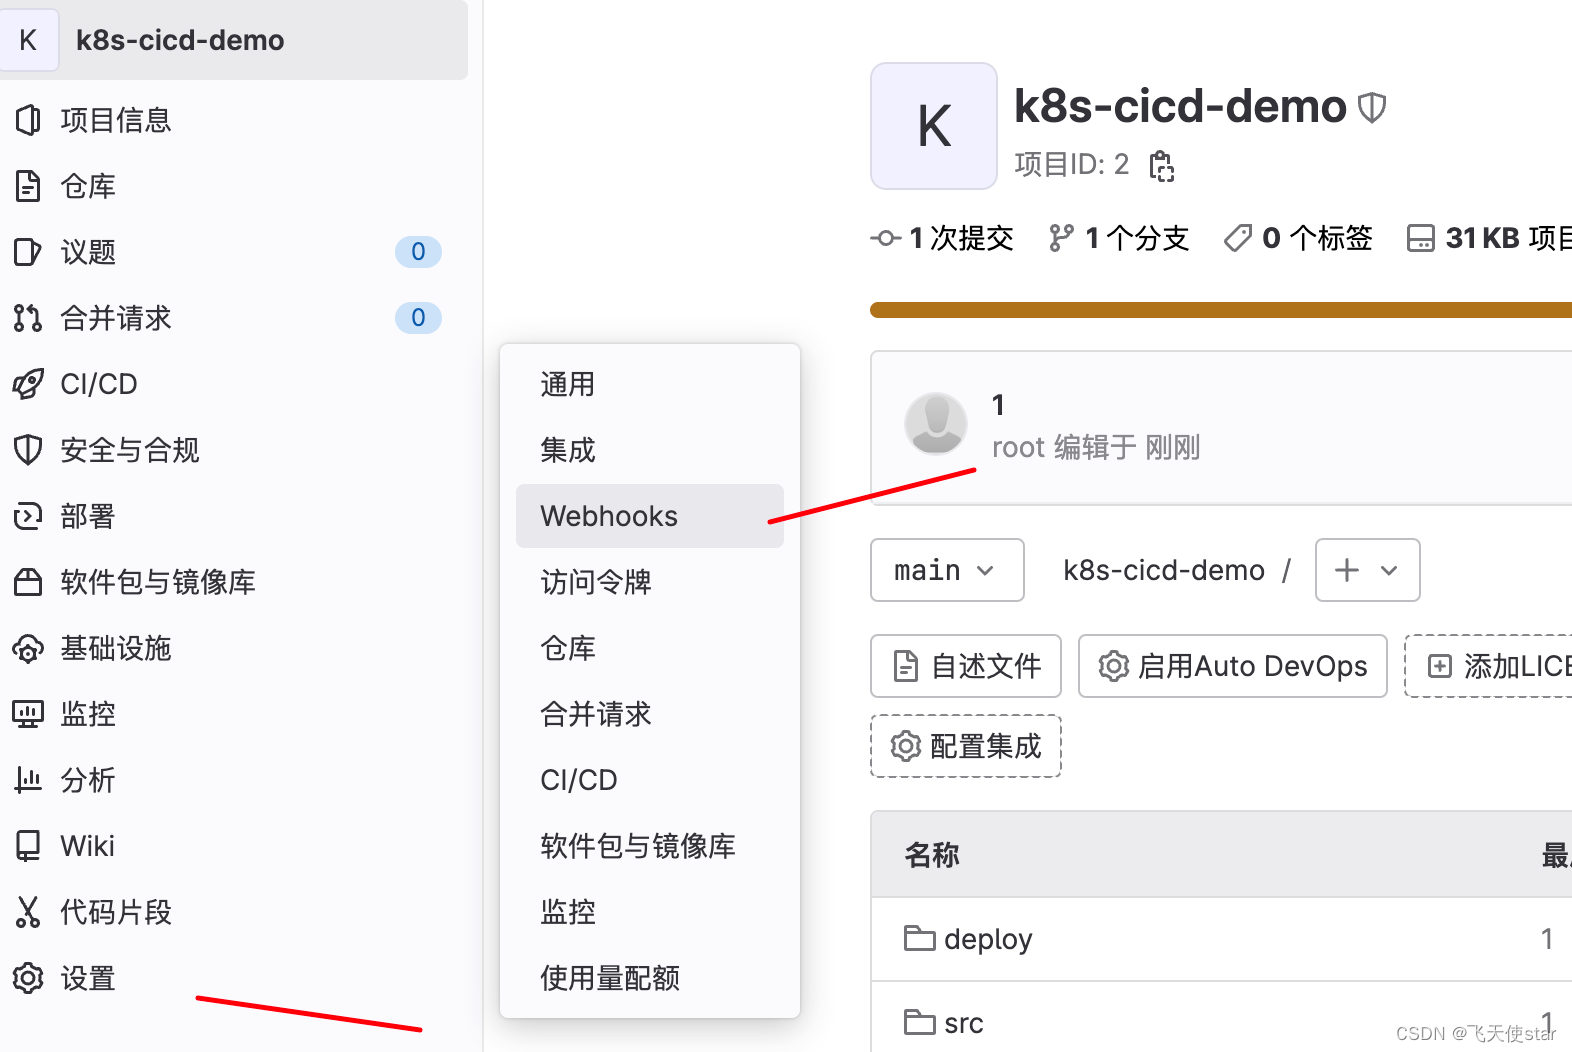
進入 GitLab 項目設置界面 > Webhooks
將上方 Jenkins 中的 URL 配置到 URL 處
將上方生成的 Secret Token 配置到 Secret 令牌
按照需求勾選觸發來源,這里我依然勾選 推送事件、合并請求事件
取消 SSL 驗證
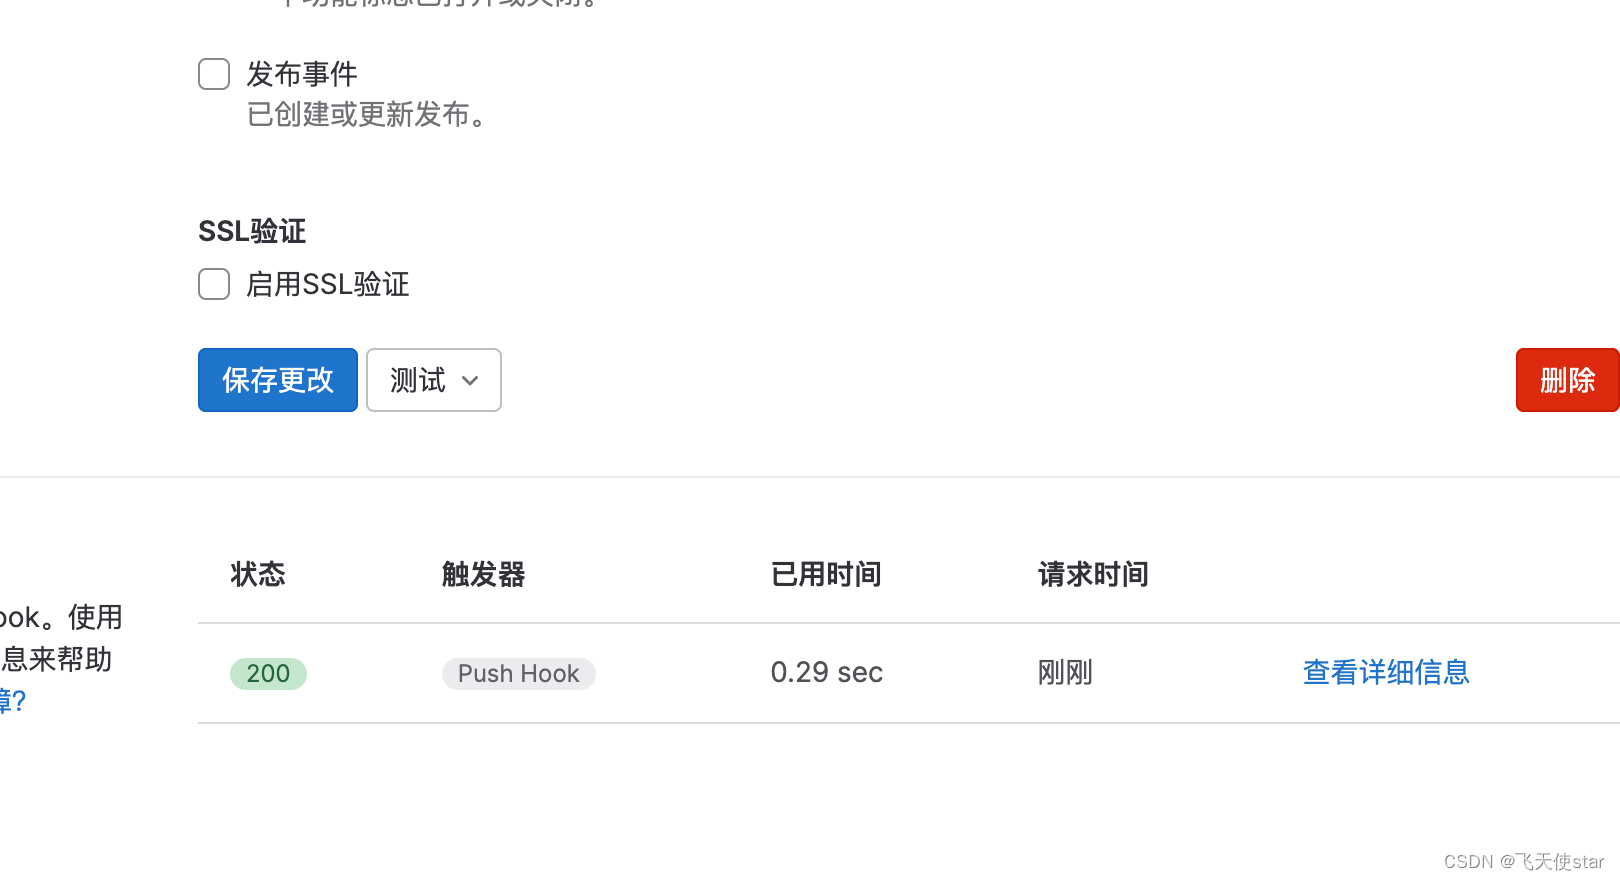
點擊添加 webhook 按鈕,添加后可以點擊測試確認鏈接是否可以訪問
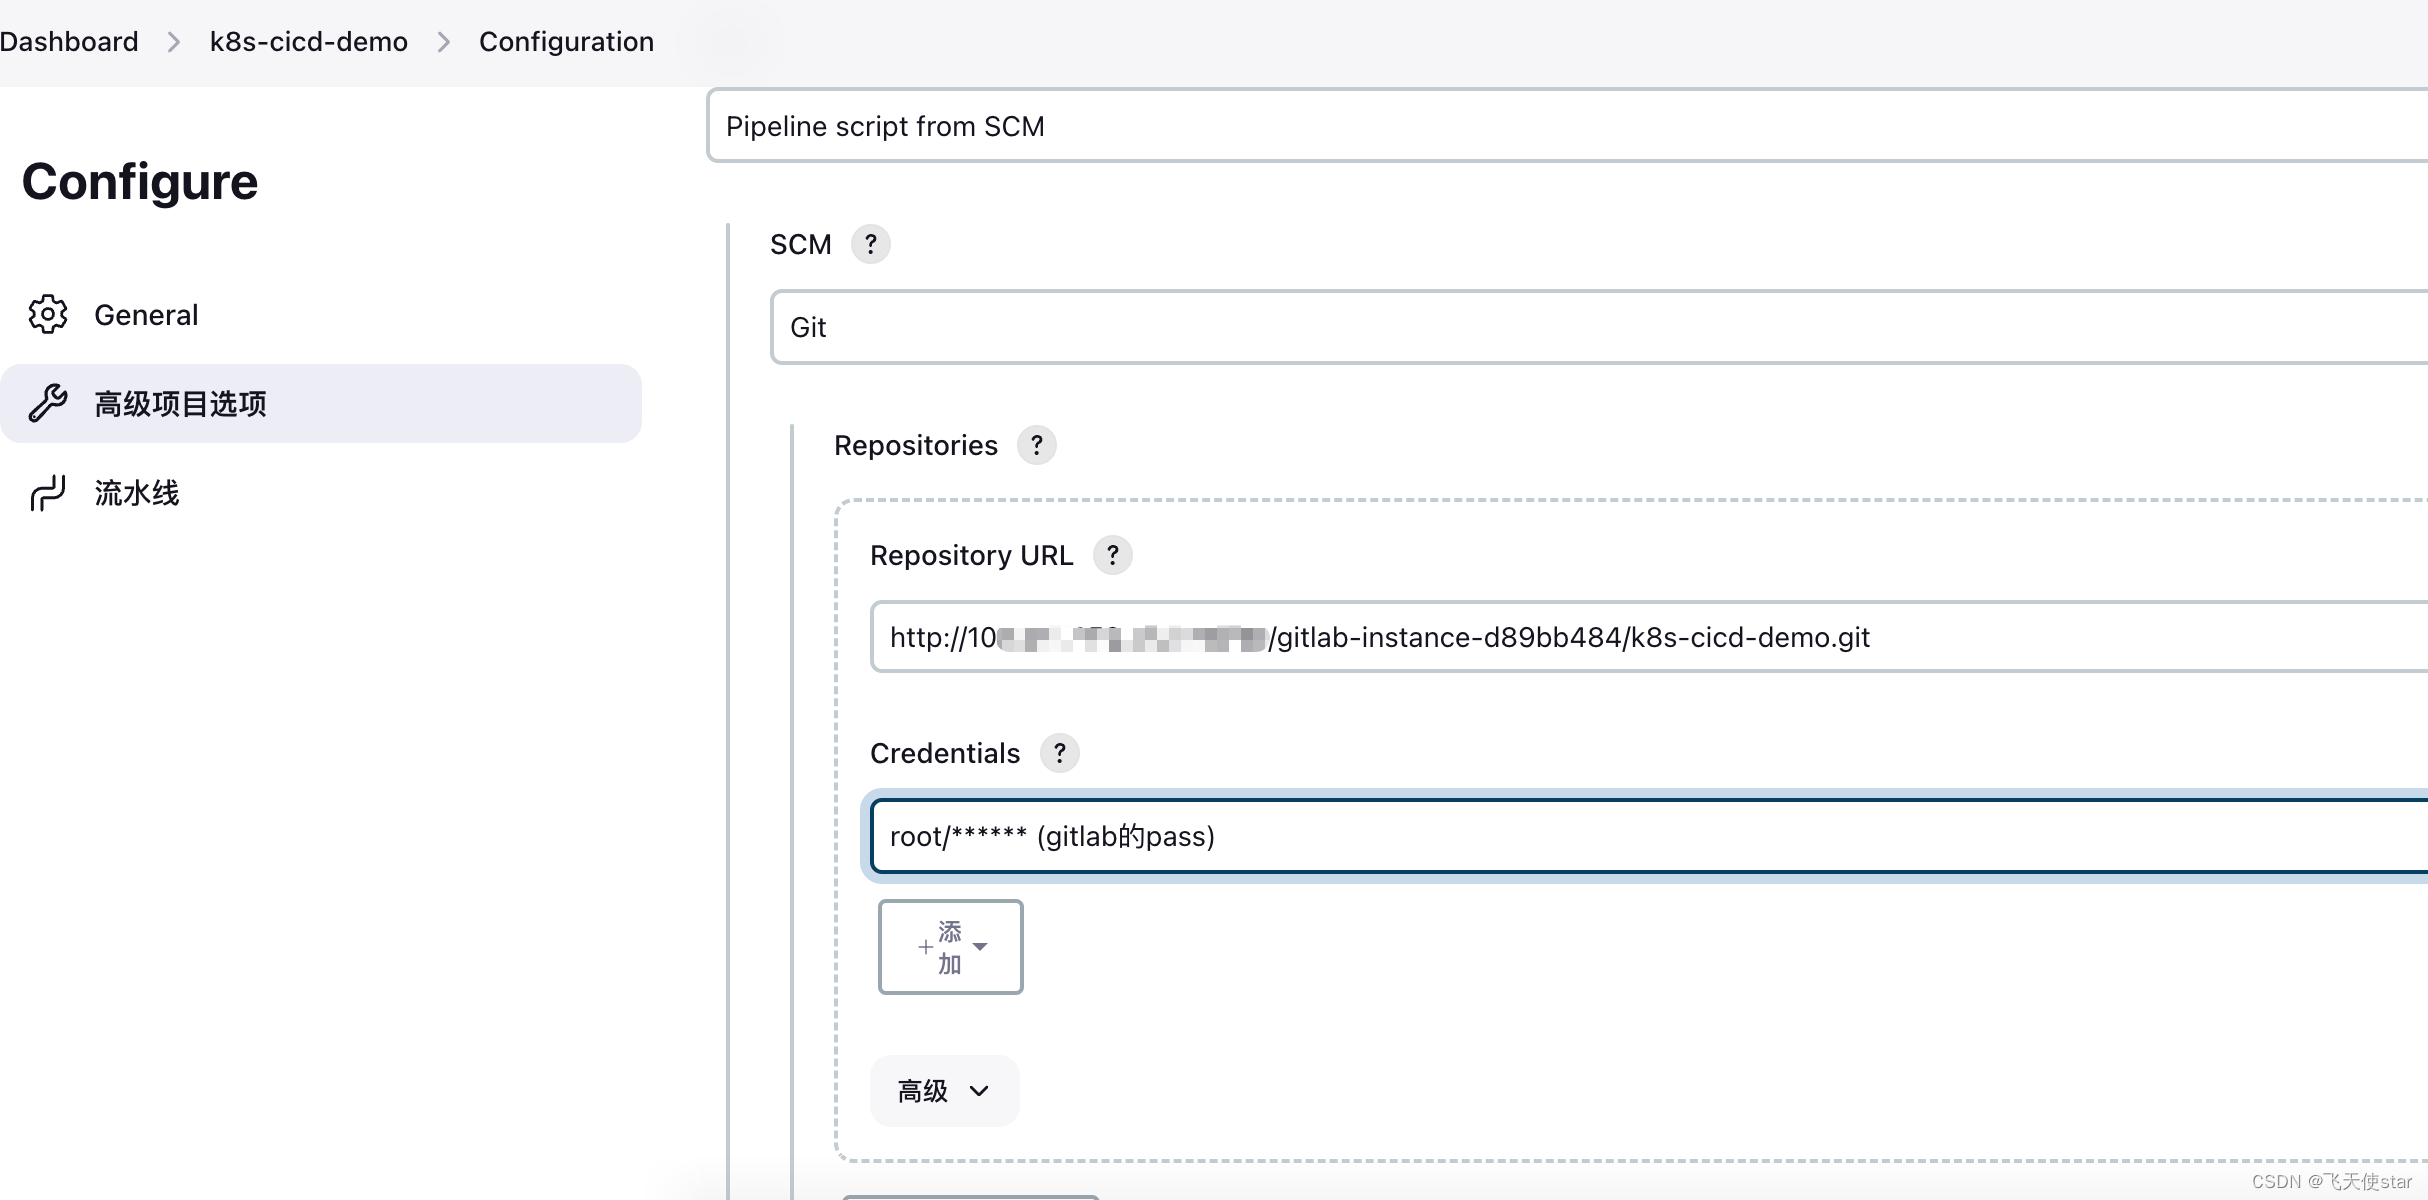
流水線:選擇定義為 Pipeline script from SCM 從遠程倉庫拉取 Jenkinsfile 配置
配置 SCM 為 Git
Repositories:
Repository URL:倉庫地址
Credentials:倉庫訪問的賬號密碼
Branches to build:選擇拉取哪個分支下的代碼
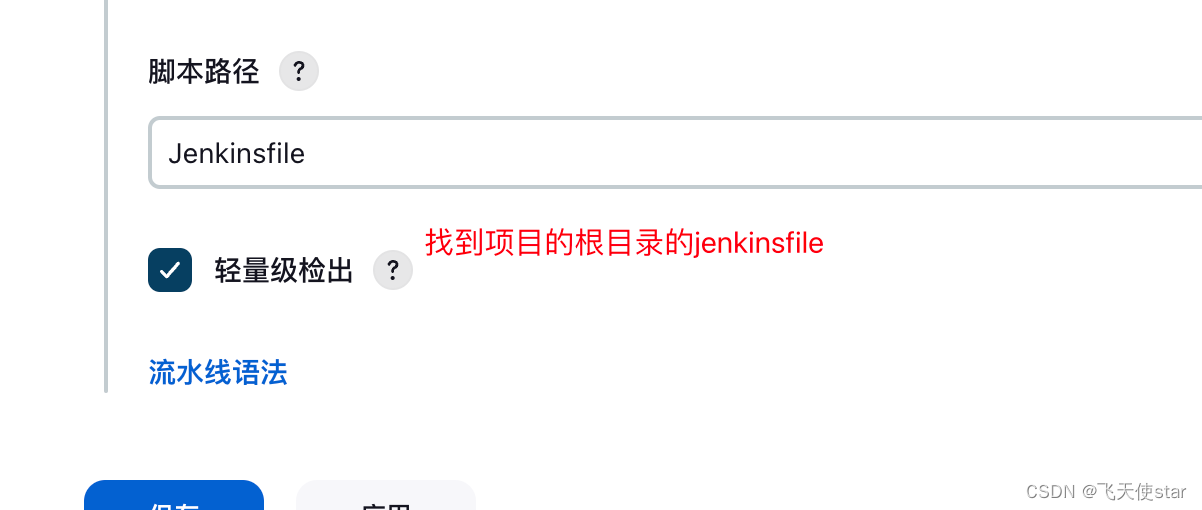
腳本路徑:Jenkinsfile 腳本文件名稱以及所在路徑
通過系統管理 > Manage Credentials > 憑據 > System > 全局憑證 > Add Credentials 添加 Username with password 類型憑證
填寫好用戶名密碼后,需要注意憑證 id 要與 Jenkinsfile 中的 DOCKER_CREDENTIAL_ID 一致
通過系統管理 > Manage Credentials > 憑據 > System > 全局憑證 > Add Credentials 添加 Username with password 類型憑證
填寫好用戶名密碼后,需要注意憑證 id 要與 Jenkinsfile 中的 GIT_CREDENTIAL_ID 一致
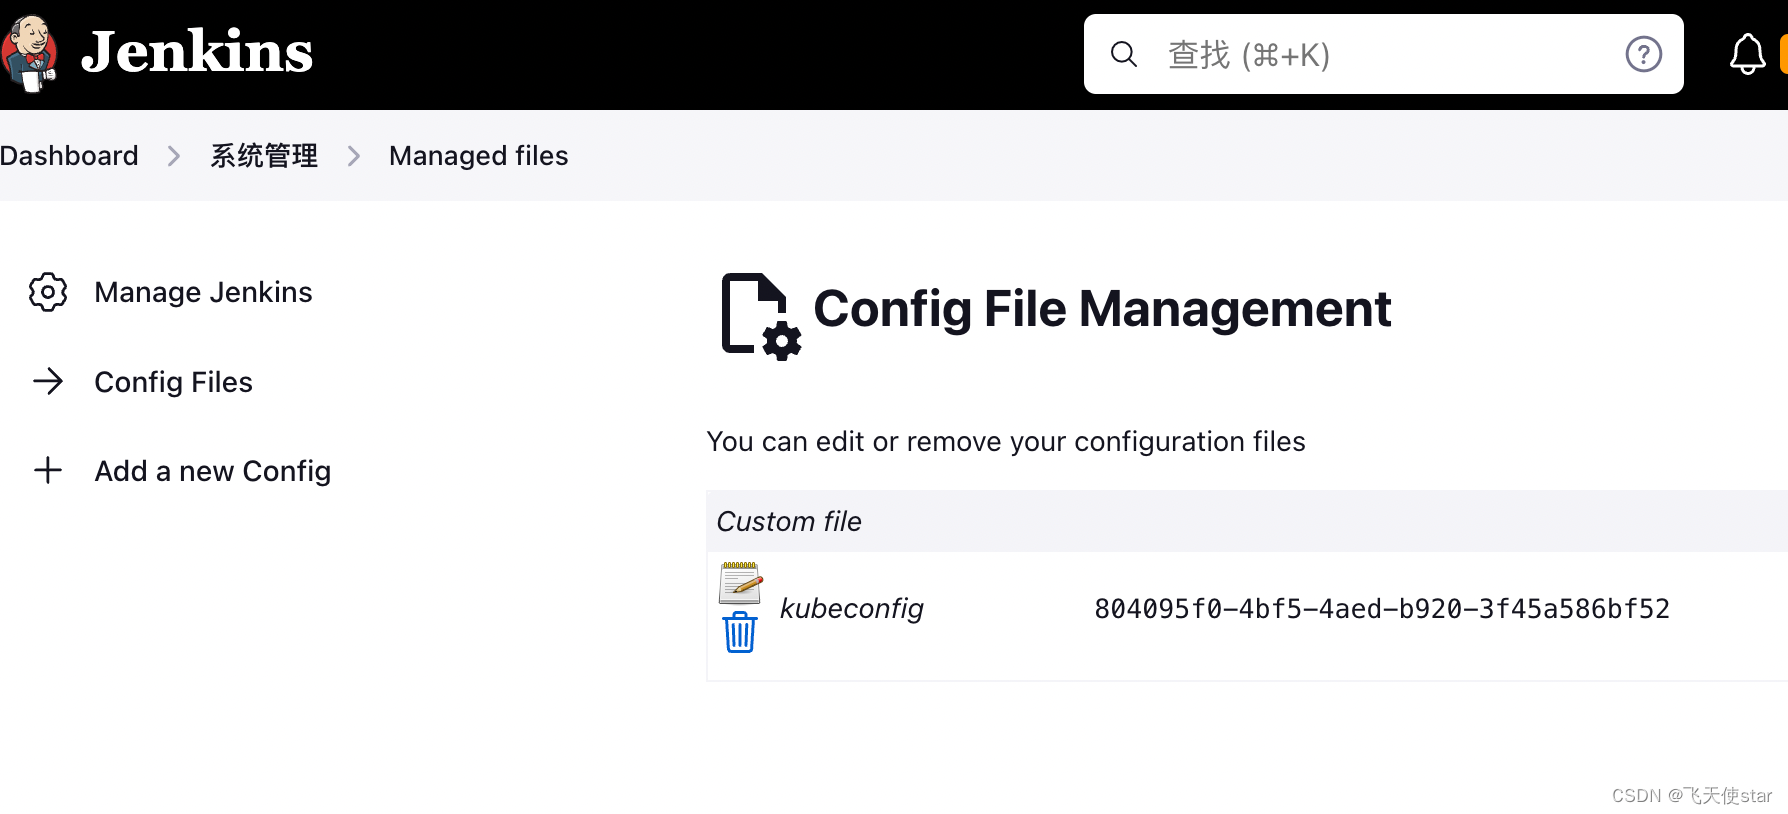
# 1. 事先安裝 Config File Provider 插件
# 2. 進入系統管理 > Mapped files > Add a new Config 添加配置文件
# 2.1 Type 選擇 Custom file 點擊 next
# 2.2 在 k8s master 節點執行 cat ~/.kube/config 查看文件內容,并將所有內容復制
# 2.3 將復制的內容貼到 Config file 的 Content 中后點擊 Submit 保存并提交
# 3. 復制保存后文件 id 到 Jenkinsfile 中的 KUBECONFIG_CREDENTIAL_ID 處# 1. 進入 SonarQube 系統,點擊右上角用戶頭像 > 我的賬號 進入設置頁面
# 2. 點擊 安全 > 填寫令牌名稱 > 點擊生成按鈕生成 token > 復制生成后的 token
# 3. 進入 jenkins 添加憑證管理頁面,添加 Secret Text 類型的憑證,將 token 貼入其中
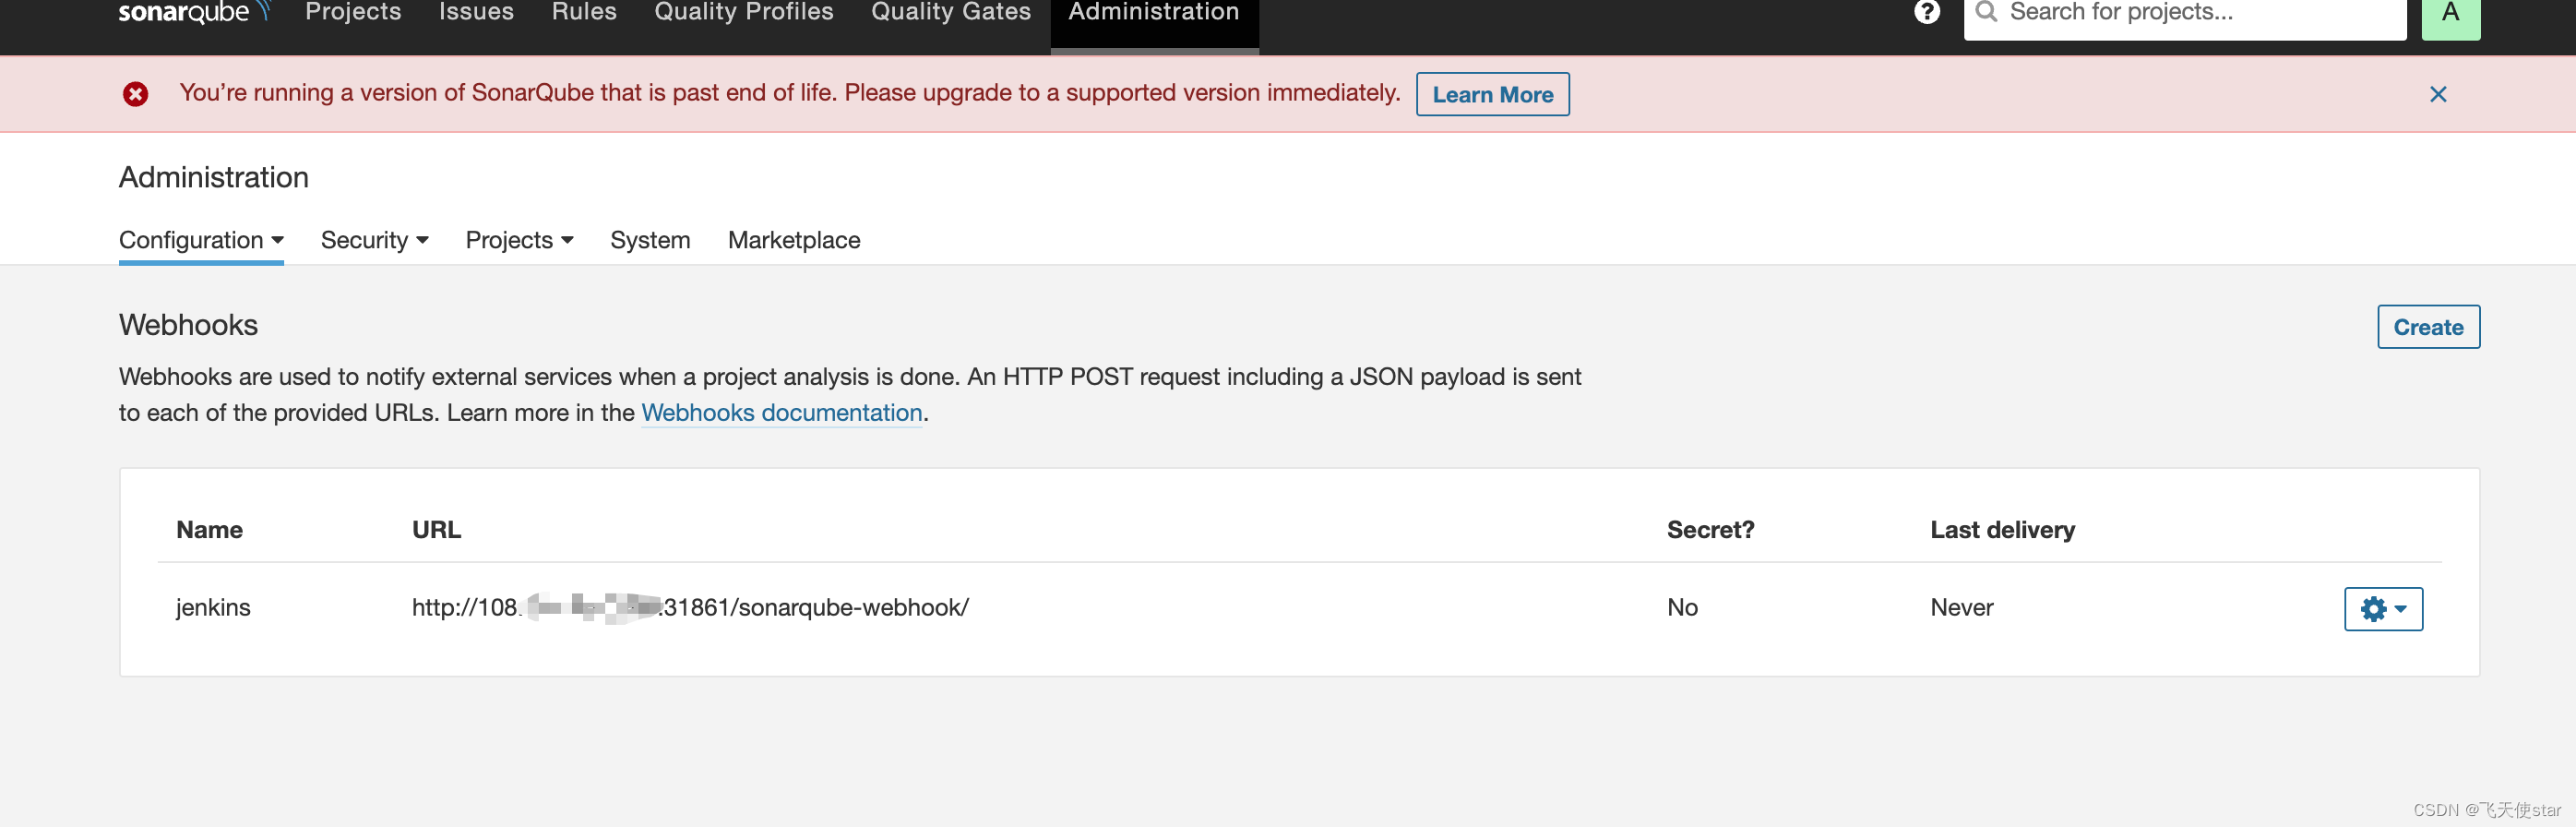
# 4. 保證憑證 id 與 Jenkinsfile 文件中的 SONAR_CREDENTIAL_ID 一致# 1. 進入 SonarQube 管理頁面,點擊頂部菜單欄的配置 > 配置(小三角) > 網絡調用
# 2. 點擊右側創建按鈕創建新的 Webhook,并填寫名稱與地址
# 名稱:jenkins
# 地址:http://jenkins訪問ip:端口/sonarqube-webhook/項目構建
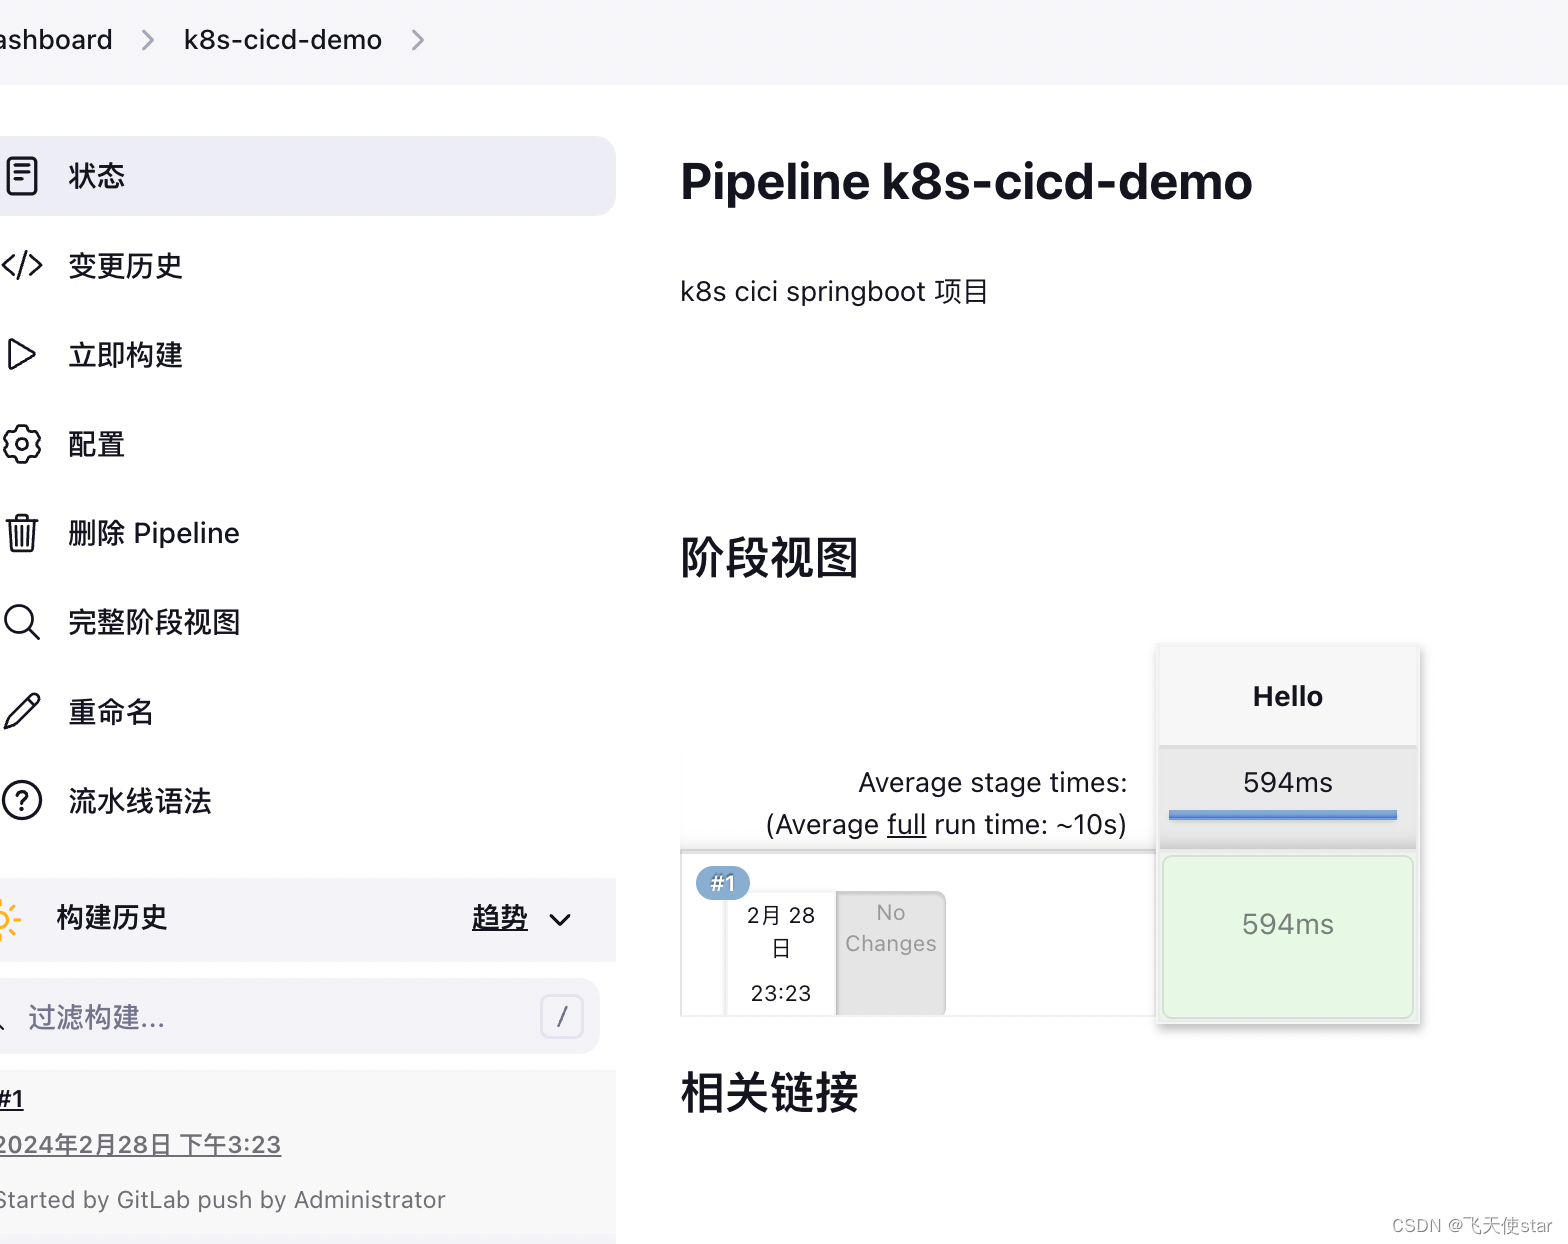
方式一:在 Jenkins 管理后臺,進入項目中點擊立即構建進行項目構建
方式二:在開發工具中修改代碼,并將代碼提交到遠程倉庫自動觸發構建
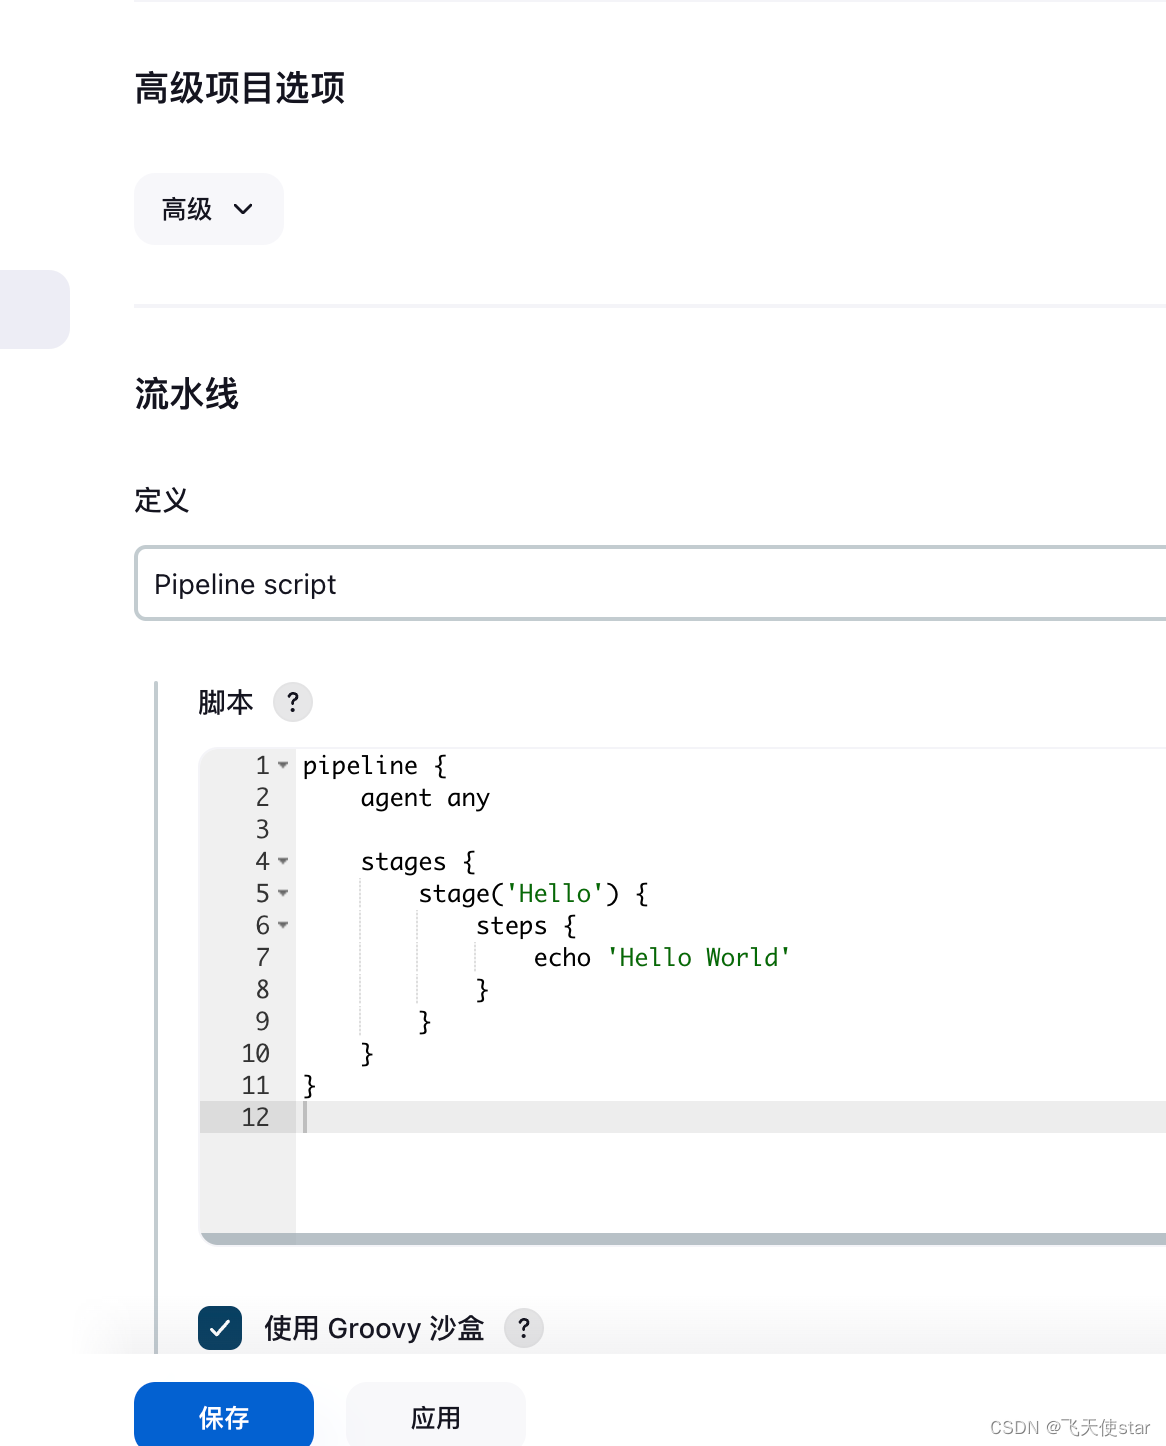
jenkinsfile代碼參考邏輯
pipeline {agent {node {label 'maven'}}stages {stage('clone code') {steps {container('maven') {git(url: 'http://108.1.1.1:28080/gitlab-instance-1a76a240/k8s-cicd-demo.git', credentialsId: 'git-user-pass', branch: '$BRANCH_NAME', changelog: true, poll: false)}}}stage('unit test') {steps {container('maven') {sh 'mvn clean test'}}}stage('sonarqube analysis') {agent nonesteps {withCredentials([string(credentialsId : 'sonarqube' ,variable : 'SONAR_TOKEN' ,)]) {withSonarQubeEnv('sonar') {container('maven') {sh '''mvn sonar:sonar -Dsonar.projectKey=$APP_NAME
echo "mvn sonar:sonar -Dsonar.projectKey=$APP_NAME"'''}}timeout(unit: 'MINUTES', activity: true, time: 5) {waitForQualityGate 'true'}}}}stage('build & push') {steps {container('maven') {sh 'mvn clean package -DskipTests'sh 'docker build -f Dockerfile -t $REGISTRY/$DOCKERHUB_NAMESPACE/$APP_NAME:SNAPSHOT-$BUILD_NUMBER .'withCredentials([usernamePassword(credentialsId : 'harbor-user-pass' ,passwordVariable : 'DOCKER_PASSWORD' ,usernameVariable : 'DOCKER_USERNAME' ,)]) {sh '''echo "$DOCKER_PASSWORD" | docker login $REGISTRY -u "$DOCKER_USERNAME" --password-stdin
docker push $REGISTRY/$DOCKERHUB_NAMESPACE/$APP_NAME:SNAPSHOT-$BUILD_NUMBER'''}}}}stage('push latest') {when {branch 'master'}steps {container('maven') {sh 'docker tag $REGISTRY/$DOCKERHUB_NAMESPACE/$APP_NAME:SNAPSHOT-$BUILD_NUMBER $REGISTRY/$DOCKERHUB_NAMESPACE/$APP_NAME:latest'sh 'docker push $REGISTRY/$DOCKERHUB_NAMESPACE/$APP_NAME:latest'}}}stage('deploy to dev') {steps {container('maven') {input(id: 'deploy-to-dev', message: 'deploy to dev?')withCredentials([kubeconfigContent(credentialsId : 'kubeconfig-id' ,variable : 'ADMIN_KUBECONFIG' ,)]) {sh 'mkdir -p ~/.kube/'sh 'echo "$ADMIN_KUBECONFIG" > ~/.kube/config'sh '''sed -i\'\' "s#REGISTRY#$REGISTRY#" deploy/cicd-demo-dev.yaml
sed -i\'\' "s#DOCKERHUB_NAMESPACE#$DOCKERHUB_NAMESPACE#" deploy/cicd-demo-dev.yaml
sed -i\'\' "s#APP_NAME#$APP_NAME#" deploy/cicd-demo-dev.yaml
sed -i\'\' "s#BUILD_NUMBER#$BUILD_NUMBER#" deploy/cicd-demo-dev.yaml
kubectl apply -f deploy/cicd-demo-dev.yaml'''}}}}stage('push with tag') {agent nonewhen {expression {params.TAG_NAME =~ /v.*/}}steps {input(message: 'release image with tag?', submitter: '')withCredentials([usernamePassword(credentialsId : 'gitlab-user-pass' ,passwordVariable : 'GIT_PASSWORD' ,usernameVariable : 'GIT_USERNAME' ,)]) {sh 'git config --global user.email "liugang@wolfcode.cn" 'sh 'git config --global user.name "xiaoliu" 'sh 'git tag -a $TAG_NAME -m "$TAG_NAME" 'sh 'git push http://$GIT_USERNAME:$GIT_PASSWORD@$GIT_REPO_URL/$GIT_ACCOUNT/k8s-cicd-demo.git --tags --ipv4'}container('maven') {sh 'docker tag $REGISTRY/$DOCKERHUB_NAMESPACE/$APP_NAME:SNAPSHOT-$BUILD_NUMBER $REGISTRY/$DOCKERHUB_NAMESPACE/$APP_NAME:$TAG_NAME'sh 'docker push $REGISTRY/$DOCKERHUB_NAMESPACE/$APP_NAME:$TAG_NAME'}}}stage('deploy to production') {agent nonewhen {expression {params.TAG_NAME =~ /v.*/}}steps {input(message: 'deploy to production?', submitter: '')container('maven') {sh '''sed -i\'\' "s#REGISTRY#$REGISTRY#" deploy/cicd-demo.yaml
sed -i\'\' "s#DOCKERHUB_NAMESPACE#$DOCKERHUB_NAMESPACE#" deploy/cicd-demo.yaml
sed -i\'\' "s#APP_NAME#$APP_NAME#" deploy/cicd-demo.yaml
sed -i\'\' "s#TAG_NAME#$TAG_NAME#" deploy/cicd-demo.yamlkubectl apply -f deploy/cicd-demo.yaml'''}}}}environment {REGISTRY = '108.1.1.1:8858'DOCKER_CREDENTIAL_ID = 'harbor-user-pass'GIT_REPO_URL = '108.1.1.1:28080'GIT_CREDENTIAL_ID = 'git-user-pass'KUBECONFIG_CREDENTIAL_ID = '804095f0-4bf5-4aed-b920-3f45a586bf52'DOCKERHUB_NAMESPACE = 'wolfcode'GITHUB_ACCOUNT = 'root'APP_NAME = 'k8s-cicd-demo'}parameters {string(name: 'BRANCH_NAME', defaultValue: 'master', description: '請選擇要發布的分支')string(name: 'TAG_NAME', defaultValue: 'snapshot', description: '標簽名稱,必須以 v 開頭,例如:v1、v1.0.0')}
}
參考資料:叩叮狼教育


可行性分析)


)
Vue3路由傳參大全)


)