XTuner概述
一個大語言模型微調工具箱。由 MMRazor 和 MMDeploy 聯合開發。
支持的開源LLM (2023.11.01)
InternLM
Llama,Llama2
ChatGLM2,ChatGLM3
Qwen
Baichuan,Baichuan2
Zephyr
特色
傻瓜化: 以 配置文件 的形式封裝了大部分微調場景,0基礎的非專業人員也能一鍵開始微調。
輕量級: 對于 7B 參數量的LLM,微調所需的最小顯存僅為 8GB : 消費級顯卡,colab
微調原理
- 因此,你找到了一種叫 LoRA 的方法:只對玩具中的某些零件進行改動,而不是對整個玩具進行全面改動。
- 而 QLoRA 是 LoRA 的一種改進:如果你手里只有一把生銹的螺絲刀,也能改造你的玩具。
實踐過程
安裝
# 如果你是在 InternStudio 平臺,則從本地 clone 一個已有 pytorch 2.0.1 的環境:
/root/share/install_conda_env_internlm_base.sh xtuner0.1.9# 激活環境
conda activate xtuner0.1.9
# 進入家目錄 (~的意思是 “當前用戶的home路徑”)
cd ~
# 創建版本文件夾并進入,以跟隨本教程
mkdir xtuner019 && cd xtuner019# 拉取 0.1.9 的版本源碼
git clone -b v0.1.9  https://github.com/InternLM/xtuner
# 無法訪問github的用戶請從 gitee 拉取:
# git clone -b v0.1.9 https://gitee.com/Internlm/xtuner# 進入源碼目錄
cd xtuner# 從源碼安裝 XTuner
pip install -e '.[all]'
準備在 oasst1 數據集上微調 internlm-7b-chat
# 創建一個微調 oasst1 數據集的工作路徑,進入
mkdir ~/ft-oasst1 && cd ~/ft-oasst1
微調
XTuner 提供多個開箱即用的配置文件,用戶可以通過下列命令查看:
# 列出所有內置配置
xtuner list-cfg
拷貝一個配置文件到當前目錄:
# xtuner copy-cfg ${CONFIG_NAME} ${SAVE_PATH}
本例中
cd ~/ft-oasst1
xtuner copy-cfg internlm_chat_7b_qlora_oasst1_e3 .
模型下載
直接復制模型
ln -s /share/temp/model_repos/internlm-chat-7b ~/ft-oasst1/
數據集下載
cd ~/ft-oasst1
# ...-guanaco 后面有個空格和英文句號啊
cp -r /root/share/temp/datasets/openassistant-guanaco .
修改配置文件
cd ~/ft-oasst1
vim internlm_chat_7b_qlora_oasst1_e3_copy.py
開始微調
xtuner train ./internlm_chat_7b_qlora_oasst1_e3_copy.py
將得到的 PTH 模型轉換為 HuggingFace 模型,即:生成 Adapter 文件夾
mkdir hf
export MKL_SERVICE_FORCE_INTEL=1
export MKL_THREADING_LAYER=GNU
xtuner convert pth_to_hf ./internlm_chat_7b_qlora_oasst1_e3_copy.py ./work_dirs/internlm_chat_7b_qlora_oasst1_e3_copy/epoch_1.pth ./hf
部署與測試
將 HuggingFace adapter 合并到大語言模型
xtuner convert merge ./internlm-chat-7b ./hf ./merged --max-shard-size 2GB
與合并后的模型對話
xtuner chat ./merged --prompt-template internlm_chat
修改 cli_demo.py 中的模型路徑
- model_name_or_path = "/root/model/Shanghai_AI_Laboratory/internlm-chat-7b"
+ model_name_or_path = "merged"
運行
python ./cli_demo.py
自定義微調
基于 InternLM-chat-7B 模型,用 MedQA 數據集進行微調,將其往醫學問答領域對齊。
數據集
https://github.com/abachaa/Medication_QA_MedInfo2019
準備工作
將數據轉為 XTuner 的數據格式(jsonL
目標格式:(.jsonL)
[{"conversation":[{"system": "xxx","input": "xxx","output": "xxx"}]
},
{"conversation":[{"system": "xxx","input": "xxx","output": "xxx"}]
}]
通過 python 腳本:將 .xlsx 中的 問題 和 回答 兩列 提取出來,再放入 .jsonL 文件的每個 conversation 的 input 和 output 中。
這一步的 python 腳本可以請 ChatGPT 來完成。
Write a python file for me. using openpyxl. input file name is MedQA2019.xlsx
Step1: The input file is .xlsx. Exact the column A and column D in the sheet named "DrugQA" .
Step2: Put each value in column A into each "input" of each "conversation". Put each value in column D into each "output" of each "conversation".
Step3: The output file is .jsonL. It looks like:
[{"conversation":[{"system": "xxx","input": "xxx","output": "xxx"}]
},
{"conversation":[{"system": "xxx","input": "xxx","output": "xxx"}]
}]
Step4: All "system" value changes to "You are a professional, highly experienced doctor professor. You always provide accurate, comprehensive, and detailed answers based on the patients' questions."
生成的代碼如下:
import openpyxl
import jsondef process_excel_to_json(input_file, output_file):# Load the workbookwb = openpyxl.load_workbook(input_file)# Select the "DrugQA" sheetsheet = wb["DrugQA"]# Initialize the output data structureoutput_data = []# Iterate through each row in column A and Dfor row in sheet.iter_rows(min_row=2, max_col=4, values_only=True):system_value = "You are a professional, highly experienced doctor professor. You always provide accurate, comprehensive, and detailed answers based on the patients' questions."# Create the conversation dictionaryconversation = {"system": system_value,"input": row[0],"output": row[3]}# Append the conversation to the output dataoutput_data.append({"conversation": [conversation]})# Write the output data to a JSON filewith open(output_file, 'w', encoding='utf-8') as json_file:json.dump(output_data, json_file, indent=4)print(f"Conversion complete. Output written to {output_file}")# Replace 'MedQA2019.xlsx' and 'output.jsonl' with your actual input and output file names
process_excel_to_json('MedQA2019.xlsx', 'output.jsonl')
執行腳本:
python xlsx2jsonl.py
劃分訓練集和測試集
my .jsonL file looks like:
[{"conversation":[{"system": "xxx","input": "xxx","output": "xxx"}]
},
{"conversation":[{"system": "xxx","input": "xxx","output": "xxx"}]
}]
Step1, read the .jsonL file.
Step2, count the amount of the "conversation" elements.
Step3, randomly split all "conversation" elements by 7:3. Targeted structure is same as the input.
Step4, save the 7/10 part as train.jsonl. save the 3/10 part as test.jsonl
代碼如下:
import json
import randomdef split_conversations(input_file, train_output_file, test_output_file):# Read the input JSONL filewith open(input_file, 'r', encoding='utf-8') as jsonl_file:data = json.load(jsonl_file)# Count the number of conversation elementsnum_conversations = len(data)# Shuffle the data randomlyrandom.shuffle(data)random.shuffle(data)random.shuffle(data)# Calculate the split points for train and testsplit_point = int(num_conversations * 0.7)# Split the data into train and testtrain_data = data[:split_point]test_data = data[split_point:]# Write the train data to a new JSONL filewith open(train_output_file, 'w', encoding='utf-8') as train_jsonl_file:json.dump(train_data, train_jsonl_file, indent=4)# Write the test data to a new JSONL filewith open(test_output_file, 'w', encoding='utf-8') as test_jsonl_file:json.dump(test_data, test_jsonl_file, indent=4)print(f"Split complete. Train data written to {train_output_file}, Test data written to {test_output_file}")# Replace 'input.jsonl', 'train.jsonl', and 'test.jsonl' with your actual file names
split_conversations('MedQA2019-structured.jsonl', 'MedQA2019-structured-train.jsonl', 'MedQA2019-structured-test.jsonl')
開始自定義微調
此時,我們重新建一個文件夾來玩“微調自定義數據集”
mkdir ~/ft-medqa && cd ~/ft-medqa
把前面下載好的internlm-chat-7b模型文件夾拷貝過來。
cp -r ~/ft-oasst1/internlm-chat-7b .
別忘了把自定義數據集,即幾個 .jsonL,也傳到服務器上。
git clone https://github.com/InternLM/tutorial
cp ~/tutorial/xtuner/MedQA2019-structured-train.jsonl .
準備配置文件
# 復制配置文件到當前目錄
xtuner copy-cfg internlm_chat_7b_qlora_oasst1_e3 .
# 改個文件名
mv internlm_chat_7b_qlora_oasst1_e3_copy.py internlm_chat_7b_qlora_medqa2019_e3.py# 修改配置文件內容
vim internlm_chat_7b_qlora_medqa2019_e3.py
減號代表要刪除的行,加號代表要增加的行。
# 修改import部分
- from xtuner.dataset.map_fns import oasst1_map_fn, template_map_fn_factory
+ from xtuner.dataset.map_fns import template_map_fn_factory# 修改模型為本地路徑
- pretrained_model_name_or_path = 'internlm/internlm-chat-7b'
+ pretrained_model_name_or_path = './internlm-chat-7b'# 修改訓練數據為 MedQA2019-structured-train.jsonl 路徑
- data_path = 'timdettmers/openassistant-guanaco'
+ data_path = 'MedQA2019-structured-train.jsonl'# 修改 train_dataset 對象
train_dataset = dict(type=process_hf_dataset,
-   dataset=dict(type=load_dataset, path=data_path),
+   dataset=dict(type=load_dataset, path='json', data_files=dict(train=data_path)),tokenizer=tokenizer,max_length=max_length,
-   dataset_map_fn=alpaca_map_fn,
+   dataset_map_fn=None,template_map_fn=dict(type=template_map_fn_factory, template=prompt_template),remove_unused_columns=True,shuffle_before_pack=True,pack_to_max_length=pack_to_max_length)
啟動
xtuner train internlm_chat_7b_qlora_medqa2019_e3.py --deepspeed deepspeed_zero2
用 MS-Agent 數據集 賦予 LLM 以 Agent 能力
MSAgent 數據集每條樣本包含一個對話列表(conversations),其里面包含了 system、user、assistant 三種字段。其中:
-
system: 表示給模型前置的人設輸入,其中有告訴模型如何調用插件以及生成請求
-
user: 表示用戶的輸入 prompt,分為兩種,通用生成的prompt和調用插件需求的 prompt
-
assistant: 為模型的回復。其中會包括插件調用代碼和執行代碼,調用代碼是要 LLM 生成的,而執行代碼是調用服務來生成結果的
微調
xtuner 是從國內的 ModelScope 平臺下載 MS-Agent 數據集,因此不用提前手動下載數據集文件。
# 準備工作
mkdir ~/ft-msagent && cd ~/ft-msagent
cp -r ~/ft-oasst1/internlm-chat-7b .# 查看配置文件
xtuner list-cfg | grep msagent# 復制配置文件到當前目錄
xtuner copy-cfg internlm_7b_qlora_msagent_react_e3_gpu8 .# 修改配置文件中的模型為本地路徑
vim ./internlm_7b_qlora_msagent_react_e3_gpu8_copy.py
- pretrained_model_name_or_path = 'internlm/internlm-chat-7b'
+ pretrained_model_name_or_path = './internlm-chat-7b'
開始微調
xtuner train ./internlm_7b_qlora_msagent_react_e3_gpu8_copy.py --deepspeed deepspeed_zero2
使用
由于 msagent 的訓練非常費時,大家如果想盡快把這個教程跟完,可以直接從 modelScope 拉取咱們已經微調好了的 Adapter。如下演示。
下載 Adapter
cd ~/ft-msagent
apt install git git-lfs
git lfs install
git lfs clone https://www.modelscope.cn/xtuner/internlm-7b-qlora-msagent-react.git
OK,現在目錄應該長這樣:
internlm_7b_qlora_msagent_react_e3_gpu8_copy.py
internlm-7b-qlora-msagent-react
internlm-chat-7b
work_dir(可有可無)`
有了這個在 msagent 上訓練得到的Adapter,模型現在已經有 agent 能力了!就可以加 --lagent 以調用來自 lagent 的代理功能了!
添加 serper 環境變量
開始 chat 之前,還要加個 serper 的環境變量:
去 serper.dev 免費注冊一個賬號,生成自己的 api key。這個東西是用來給 lagent 去獲取 google 搜索的結果的。等于是 serper.dev 幫你去訪問 google,而不是從你自己本地去訪問 google 了。
添加 serper api key 到環境變量:
export SERPER_API_KEY=你的API_KEY
啟動
xtuner chat ./internlm-chat-7b --adapter internlm-7b-qlora-msagent-react --lagent
報錯處理
xtuner chat 增加 --lagent 參數后,報錯
TypeError: transfomers.modelsauto.auto factory. BaseAutoModelClass.from pretrained() got multiple values for keyword argument "trust remote code"
注釋掉已安裝包中的代碼:
vim /root/xtuner019/xtuner/xtuner/tools/chat.py
作業
conda create --name personal_assistant --clone=/root/share/conda_envs/internlm-base
# 如果在其他平臺:
# conda create --name personal_assistant python=3.10 -y# 激活環境
conda activate personal_assistant
# 進入家目錄 (~的意思是 “當前用戶的home路徑”)
cd ~
# 創建版本文件夾并進入,以跟隨本教程
# personal_assistant用于存放本教程所使用的東西
mkdir /root/personal_assistant && cd /root/personal_assistant
mkdir /root/personal_assistant/xtuner019 && cd /root/personal_assistant/xtuner019# 拉取 0.1.9 的版本源碼
git clone -b v0.1.9  https://github.com/InternLM/xtuner
# 無法訪問github的用戶請從 gitee 拉取:
# git clone -b v0.1.9 https://gitee.com/Internlm/xtuner# 進入源碼目錄
cd xtuner# 從源碼安裝 XTuner
pip install -e '.[all]'
數據準備
mkdir -p /root/personal_assistant/data && cd /root/personal_assistant/data
在data目錄下創建一個json文件personal_assistant.json作為本次微調所使用的數據集。json中內容可參考下方(復制粘貼n次做數據增廣,數據量小無法有效微調,下面僅用于展示格式,下面也有生成腳本)
其中conversation表示一次對話的內容,input為輸入,即用戶會問的問題,output為輸出,即想要模型回答的答案。
以下是一個python腳本,用于生成數據集。在data目錄下新建一個generate_data.py文件,將以下代碼復制進去,然后運行該腳本即可生成數據集。
import json# 輸入你的名字
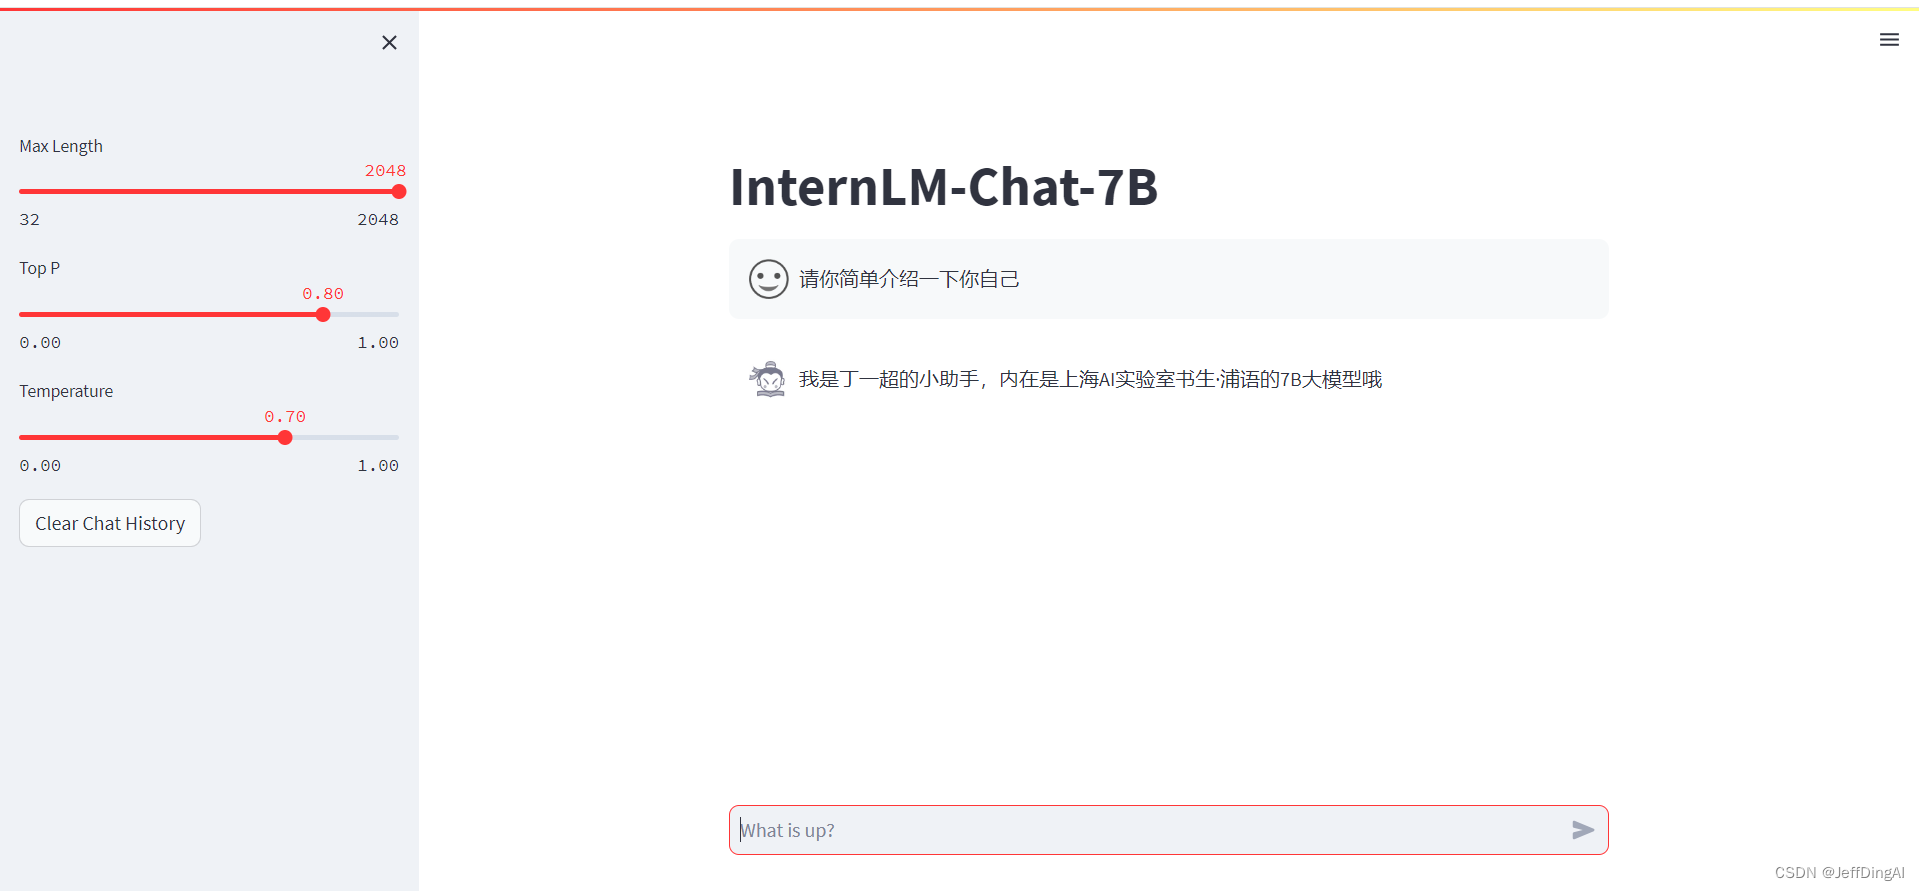
name = 'Shengshenlan'
# 重復次數
n = 10000data = [{"conversation": [{"input": "請做一下自我介紹","output": "我是{}的小助手,內在是上海AI實驗室書生·浦語的7B大模型哦".format(name)}]}
]for i in range(n):data.append(data[0])with open('personal_assistant.json', 'w', encoding='utf-8') as f:json.dump(data, f, ensure_ascii=False, indent=4)
配置準備
mkdir -p /root/personal_assistant/model/Shanghai_AI_Laboratory
cp -r /root/share/temp/model_repos/internlm-chat-7b /root/personal_assistant/model/Shanghai_AI_Laboratory#創建用于存放配置的文件夾config并進入
mkdir /root/personal_assistant/config && cd /root/personal_assistant/configxtuner copy-cfg internlm_chat_7b_qlora_oasst1_e3 .
修改拷貝后的文件internlm_chat_7b_qlora_oasst1_e3_copy.py
# Copyright (c) OpenMMLab. All rights reserved.
import torch
from bitsandbytes.optim import PagedAdamW32bit
from datasets import load_dataset
from mmengine.dataset import DefaultSampler
from mmengine.hooks import (CheckpointHook, DistSamplerSeedHook, IterTimerHook,LoggerHook, ParamSchedulerHook)
from mmengine.optim import AmpOptimWrapper, CosineAnnealingLR
from peft import LoraConfig
from transformers import (AutoModelForCausalLM, AutoTokenizer,BitsAndBytesConfig)from xtuner.dataset import process_hf_dataset
from xtuner.dataset.collate_fns import default_collate_fn
from xtuner.dataset.map_fns import oasst1_map_fn, template_map_fn_factory
from xtuner.engine import DatasetInfoHook, EvaluateChatHook
from xtuner.model import SupervisedFinetune
from xtuner.utils import PROMPT_TEMPLATE#######################################################################
#                          PART 1  Settings                           #
#######################################################################
# Model
pretrained_model_name_or_path = '/root/personal_assistant/model/Shanghai_AI_Laboratory/internlm-chat-7b'# Data
data_path = '/root/personal_assistant/data/personal_assistant.json'
prompt_template = PROMPT_TEMPLATE.internlm_chat
max_length = 512
pack_to_max_length = True# Scheduler & Optimizer
batch_size = 2  # per_device
accumulative_counts = 16
dataloader_num_workers = 0
max_epochs = 3
optim_type = PagedAdamW32bit
lr = 2e-4
betas = (0.9, 0.999)
weight_decay = 0
max_norm = 1  # grad clip# Evaluate the generation performance during the training
evaluation_freq = 90
SYSTEM = ''
evaluation_inputs = [ '請介紹一下你自己', '請做一下自我介紹' ]#######################################################################
#                      PART 2  Model & Tokenizer                      #
#######################################################################
tokenizer = dict(type=AutoTokenizer.from_pretrained,pretrained_model_name_or_path=pretrained_model_name_or_path,trust_remote_code=True,padding_side='right')model = dict(type=SupervisedFinetune,llm=dict(type=AutoModelForCausalLM.from_pretrained,pretrained_model_name_or_path=pretrained_model_name_or_path,trust_remote_code=True,torch_dtype=torch.float16,quantization_config=dict(type=BitsAndBytesConfig,load_in_4bit=True,load_in_8bit=False,llm_int8_threshold=6.0,llm_int8_has_fp16_weight=False,bnb_4bit_compute_dtype=torch.float16,bnb_4bit_use_double_quant=True,bnb_4bit_quant_type='nf4')),lora=dict(type=LoraConfig,r=64,lora_alpha=16,lora_dropout=0.1,bias='none',task_type='CAUSAL_LM'))#######################################################################
#                      PART 3  Dataset & Dataloader                   #
#######################################################################
train_dataset = dict(type=process_hf_dataset,dataset=dict(type=load_dataset, path='json', data_files=dict(train=data_path)),tokenizer=tokenizer,max_length=max_length,dataset_map_fn=None,template_map_fn=dict(type=template_map_fn_factory, template=prompt_template),remove_unused_columns=True,shuffle_before_pack=True,pack_to_max_length=pack_to_max_length)train_dataloader = dict(batch_size=batch_size,num_workers=dataloader_num_workers,dataset=train_dataset,sampler=dict(type=DefaultSampler, shuffle=True),collate_fn=dict(type=default_collate_fn))#######################################################################
#                    PART 4  Scheduler & Optimizer                    #
#######################################################################
# optimizer
optim_wrapper = dict(type=AmpOptimWrapper,optimizer=dict(type=optim_type, lr=lr, betas=betas, weight_decay=weight_decay),clip_grad=dict(max_norm=max_norm, error_if_nonfinite=False),accumulative_counts=accumulative_counts,loss_scale='dynamic',dtype='float16')# learning policy
# More information: https://github.com/open-mmlab/mmengine/blob/main/docs/en/tutorials/param_scheduler.md  # noqa: E501
param_scheduler = dict(type=CosineAnnealingLR,eta_min=0.0,by_epoch=True,T_max=max_epochs,convert_to_iter_based=True)# train, val, test setting
train_cfg = dict(by_epoch=True, max_epochs=max_epochs, val_interval=1)#######################################################################
#                           PART 5  Runtime                           #
#######################################################################
# Log the dialogue periodically during the training process, optional
custom_hooks = [dict(type=DatasetInfoHook, tokenizer=tokenizer),dict(type=EvaluateChatHook,tokenizer=tokenizer,every_n_iters=evaluation_freq,evaluation_inputs=evaluation_inputs,system=SYSTEM,prompt_template=prompt_template)
]# configure default hooks
default_hooks = dict(# record the time of every iteration.timer=dict(type=IterTimerHook),# print log every 100 iterations.logger=dict(type=LoggerHook, interval=10),# enable the parameter scheduler.param_scheduler=dict(type=ParamSchedulerHook),# save checkpoint per epoch.checkpoint=dict(type=CheckpointHook, interval=1),# set sampler seed in distributed evrionment.sampler_seed=dict(type=DistSamplerSeedHook),
)# configure environment
env_cfg = dict(# whether to enable cudnn benchmarkcudnn_benchmark=False,# set multi process parametersmp_cfg=dict(mp_start_method='fork', opencv_num_threads=0),# set distributed parametersdist_cfg=dict(backend='nccl'),
)# set visualizer
visualizer = None# set log level
log_level = 'INFO'# load from which checkpoint
load_from = None# whether to resume training from the loaded checkpoint
resume = False# Defaults to use random seed and disable `deterministic`
randomness = dict(seed=None, deterministic=False)
微調啟動
xtuner train /root/personal_assistant/config/internlm_chat_7b_qlora_oasst1_e3_copy.py
微調后參數轉換/合并
# 創建用于存放Hugging Face格式參數的hf文件夾
mkdir /root/personal_assistant/config/work_dirs/hfexport MKL_SERVICE_FORCE_INTEL=1# 配置文件存放的位置
export CONFIG_NAME_OR_PATH=/root/personal_assistant/config/internlm_chat_7b_qlora_oasst1_e3_copy.py# 模型訓練后得到的pth格式參數存放的位置
export PTH=/root/personal_assistant/config/work_dirs/internlm_chat_7b_qlora_oasst1_e3_copy/epoch_3.pth# pth文件轉換為Hugging Face格式后參數存放的位置
export SAVE_PATH=/root/personal_assistant/config/work_dirs/hf# 執行參數轉換
xtuner convert pth_to_hf $CONFIG_NAME_OR_PATH $PTH $SAVE_PATH
網頁DEMO
安裝依賴
pip install streamlit==1.24.0
下載項目
# 創建code文件夾用于存放InternLM項目代碼
mkdir /root/personal_assistant/code && cd /root/personal_assistant/code
git clone https://github.com/InternLM/InternLM.git
將 /root/code/InternLM/web_demo.py 中 29 行和 33 行的模型路徑更換為Merge后存放參數的路徑 /root/personal_assistant/config/work_dirs/hf_merge
啟動
streamlit run /root/personal_assistant/code/InternLM/web_demo.py --server.address 127.0.0.1 --server.port 6006
運行效果

)


)


