十六進制轉八進制c++代碼
Read: 8051 Microcontroller programming using Keil Uvision IDE
閱讀: 使用Keil Uvision IDE進行8051單片機編程
將HEX文件上傳到微控制器 (Uploading a HEX file to Microcontroller)
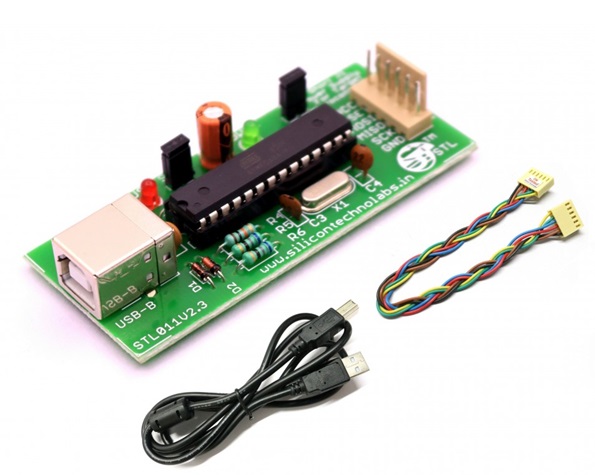
Once you have developed the hex code for the program which is to upload to the microcontroller, the next major task is to burn the hex code properly into the device. If the microcontroller has an inbuilt bootloader then it is possible to upload the code using the serial port. Mostly you will require a USBASP programmer to dump your code. The programmer is a hardware device that contains inbuilt software to assist in transferring of codes to a microcontroller via PC.
為要上傳到微控制器的程序開發十六進制代碼后,下一個主要任務是將十六進制代碼正確刻錄到設備中。 如果微控制器具有內置的引導程序,則可以使用串行端口上載代碼。 通常,您將需要USBASP程序員來轉儲代碼。 編程器是一種硬件設備,其中包含內置軟件,以幫助通過PC將代碼傳輸到微控制器。
Here, we will be using ATMEL 8051 AVR USB ISP Programmer for burning our required code.
在這里,我們將使用ATMEL 8051 AVR USB ISP編程器來刻錄所需的代碼。
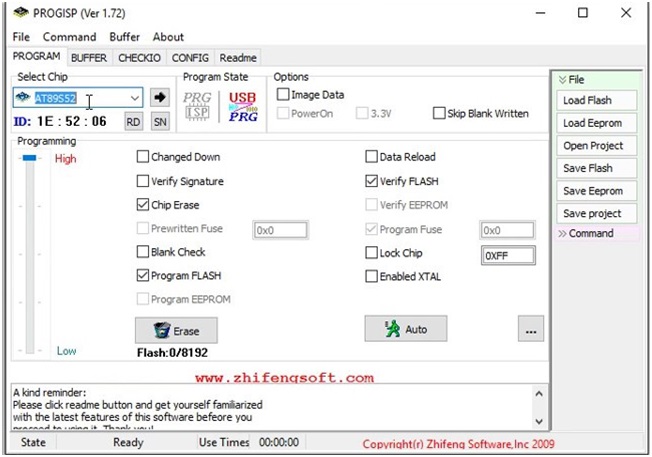
ProgISP (ProgISP)
It is a tool through which you can perform code uploading on all AVR chips, it also supports AT89S51, AT89S52.
它是您可以在所有AVR芯片上執行代碼上傳的工具,它還支持AT89S51,AT89S52。
Custom serial download programming.
自定義串行下載編程。
Supports custom programmed chips.
支持定制的編程芯片。
Supports high voltage programmers.
支持高壓編程器。
Project Management.
項目管理。
Standalone tool – No installation required.
獨立工具–無需安裝。
USB ISP編程器的功能 (Features of USB ISP Programmer)
Supports multiple platforms linux, Mac OS and Windows.
支持多種平臺的linux,Mac OS和Windows。
Jumper for 5V supply.
5V電源跳線。
Contains Header Pin for easy interface of various ISP header pin.
包含Header Pin,可輕松連接各種ISP Header引腳。
SCK option to support target with low clock speed.
SCK選項可支持低時鐘速度的目標。
將十六進制代碼上傳到微控制器的步驟 (Steps to upload HEX code to microcontroller)
Download ProgISP, which is a zip file. Extract it in a folder. No need to install it, it is a self-executable software, click on progisp.exe to launch it.
下載ProgISP,它是一個zip文件。 將其解壓縮到一個文件夾中。 無需安裝,它是可自行執行的軟件,單擊progisp.exe以啟動它。
USBASP should be connected to the AVR microcontroller development board using the 6 pin connectors. Make sure jumper J1 is connected.
應使用6針連接器將USBASP連接到AVR微控制器開發板。 確保已連接跳線J1。
Check the program state in the progisp interface, it should show colored icons of USB and ASP or else if it is faded then look for errors in connections, power supply or jumper connection.
在progisp界面中檢查程序狀態,它應顯示USB和ASP的彩色圖標,否則,如果其褪色,則查找連接,電源或跳線連接中的錯誤。
Select the type of chip you are working within our case it is AT89S52.
在我們的案例中,選擇要工作的芯片類型為AT89S52。
In the task, windows look for the following to be checked with a tick.
在任務中,窗口查找要打勾的項目。
- Verify Signature
- Chip Erase
- Program Flash
- Verify Flash
Click on load flash from the leftmost tab, this tab is used to load the hex file. Click on the tab and locate the hex file.
單擊最左側選項卡上的加載閃存,此選項卡用于加載十六進制文件。 單擊選項卡并找到十六進制文件。
Now click on Auto to begin the burning process. All the options which you have ticked from the task box will be performed during the process.
現在單擊自動開始刻錄過程。 您在任務框中打勾的所有選項將在此過程中執行。
Your code is successfully transferred to the microcontroller.
您的代碼已成功傳輸到微控制器。
In order to erase the code, untick all options from task box except Chip Erase.
為了清除該代碼,請取消選中任務框中除“芯片擦除”之外的所有選項。
翻譯自: https://www.includehelp.com/embedded-system/how-to-upload-hex-code-to-microcontrollers.aspx
十六進制轉八進制c++代碼


四、演示文稿題-日...)


方法的含義和update方法的區別)


方法和示例)
)


方法與示例)


函數與示例)
