avr計數
This type of counter may be also used in the EVM machines. A counter can be used to count the number of times a button is pressed. It can have many applications. The most widely used counter application is in EVM and also in customer feedback machines.
這種類型的計數器也可以在EVM機器中使用。 計數器可用于計算按下按鈕的次數。 它可以有很多應用。 最廣泛使用的計數器應用程序是在EVM中以及在客戶反饋機中。
CODE
碼
#include <avr/io.h>
#define F_CPU 1000000
#include <util/delay.h>
#define RS 0
#define EN 1
void lcd_comm	(char);
void lcd_data	(char);
void lcd_init	(void);
void lcd_string	(char*);
void lcd_num	(int n);
int main(void)
{
int c = 0;
DDRA = 0x00;
lcd_init();
lcd_comm(0x84);
lcd_string("COUNTER");
lcd_comm(0xC5);
lcd_data(c+48);
while(1)
{
if( (PINA & 0x01) == 1 )
{
c++;
lcd_comm(0xC5);
lcd_num(c);
while( (PINA & 0x01) == 1 );
}
}
}
void lcd_comm(char x){
PORTD = x;
PORTC &= ~(1<<RS);
PORTC |= 1<<EN;
_delay_ms(5);
PORTC &= ~(1<<EN);
}
void lcd_data(char x){
PORTD = x;
PORTC |= 1<<RS;
PORTC |= 1<<EN;
_delay_ms(5);
PORTC &= ~(1<<EN);
}
void lcd_init(void){
DDRD = 0xFF;
DDRC = 0x03;
lcd_comm(0x38);
lcd_comm(0x06);
lcd_comm(0x0E);
lcd_comm(0x01);
lcd_comm(0x80);
}
void lcd_string(char* p){
while(*p!='\0'){
lcd_data(*p);
p++;
}
}
void lcd_num(int n){
lcd_data((n/1000)+48);
n %= 1000;
lcd_data((n/100)+48);
n %= 100;
lcd_data((n/10)+48);
n %= 10;
lcd_data(n+48);
}
Explanation:
說明:
Firstly we have included all the header file that is required basically
首先,我們包含了所有基本需要的頭文件
At the initial condition, we have defined EN=1 and RS=0.
在初始條件下,我們定義了EN = 1和RS = 0 。
Next we have defined certain functions lcd_comm(char), lcd_data(char) and lcd_init(void) etc.
接下來,我們定義了某些函數lcd_comm(char) , lcd_data(char)和lcd_init(void)等。
Inside the int main(void) we have created a variable c which is an integer and initially it is equal to zero. It will remember the number of times we will press our push button.
在int main(void)內部,我們創建了一個變量c ,它是一個整數,最初它等于零。 它會記住我們按下按鈕的次數。
DDRA=0x00 says that we have connected a push button to PA0.
DDRA = 0x00表示我們已將按鈕連接到PA0 。
The
的
lcd_init(); will run the lcd_init function that we have defined below.
lcd_init(); 將運行下面定義的lcd_init函數。
The command
命令
0x84 is made our string(COUNTER) in between of the LCD display
0x84是我們在液晶顯示器之間的字符串(COUNTER)
Lcd_string("COUNTER") will print COUNTER.
Lcd_string(“ COUNTER”)將打印COUNTER。
Lcd_data(c+48) is used to write our string in ASCII code.
Lcd_data(c + 48)用于以ASCII代碼寫入我們的字符串。
Inside the while loop, we have written our condition if the button is pressed we add 1 to our variable c.
在while循環內部,如果按下按鈕,我們就寫了條件,我們在變量c中加了1。
The command 0xCS will overwrite the initial zero condition of our counter.
命令0xCS將覆蓋計數器的初始零條件。
Inside the void lcd_comm(char x), we have taken the variable as char x, which we have assigned to PORTD. In the next step we have masked the initial value of RS which was initially 0, and here we have made it 1. Next, we have made our Enable Pin high and then low by giving the time delay of 5ms in between.
在void lcd_comm(char x)內 ,我們將變量指定為char x ,并將其分配給PORTD 。 在下一步中,我們屏蔽了RS的初始值,該值最初為0,在這里我們將其設置為1。接下來,通過在5ms之間設置時間延遲,將使能引腳設為高電平,然后設為低電平。
Again for the next function, we would be giving the data to LCD through this. We have taken a variable x, and assigned to PORTD, again made RS pin 0 and also have done similarly the Enable pin high and then low by providing the time delay of 5ms. In this function lcd_init(void), we have written all the commands that are required for the LCD at the beginning. The DDRD=0xFF indicates all the data pins connected to the PORTD, and DDRC=0x03 is for the connection of the ENABLE Pin and R/S pin we connected to PORTC.
再次為下一個功能,我們將通過此將數據提供給LCD。 我們已將變量x分配給PORTD ,再次將其設為RS引腳0,并且通過提供5ms的時間延遲,同樣將Enable引腳設為高電平,然后設為低電平。 在此函數lcd_init(void)中 ,我們在一開始就編寫了LCD所需的所有命令。 DDRD = 0xFF表示連接到PORTD的所有數據引腳,而DDRC = 0x03用于連接我們連接到PORTC的ENABLE引腳和R / S引腳。
0x38 - as the LCD is in 8 bit mode.
0x38 -LCD處于8位模式。
0x06 - cursor shifts to the right.
0x06-光標向右移動。
0x0E - display ON and cursor ON.
0x0E-顯示打開,光標打開。
0x01 - clears the screen.
0x01-清除屏幕。
Ox80 – 0th row and 0th column.
Ox80 – 第 0行和第 0列。
The function lcd_string(char *p) is used to print the words and are simple strings, here we have used them to print the word COUNTER.
函數lcd_string(char * p)用于打印單詞,它們是簡單的字符串,這里我們使用它們來打印單詞COUNTER。
The void lcd_num(int n) function is used to display n which is equal to the number of times the button is pressed. Inside the function, we have defined three conditions for n to be a three digit number, a two digit number, and a single digit number. We have also used mod here so that we can get the accurate value of n.
void lcd_num(int n)函數用于顯示n ,該n等于按鈕被按下的次數。 在函數內部,我們為n定義了三個條件,即三個數字,兩個數字和一個數字。 我們在這里還使用了mod,以便獲得n的準確值。
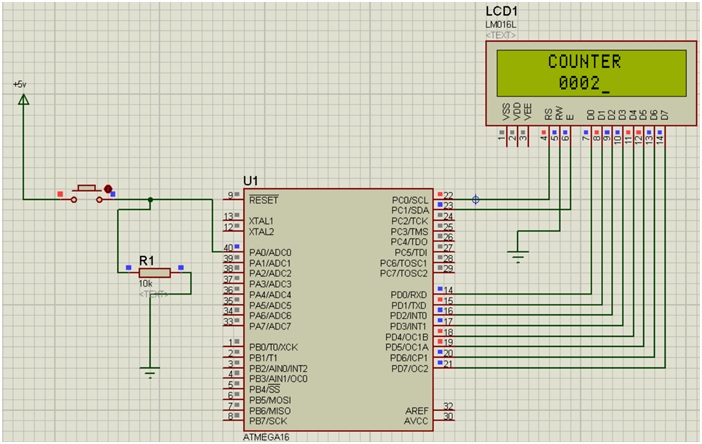
Simulation:
模擬:
Explanation:
說明:
Components required:
所需組件:
- 1 resistor
- 2 ground terminal
- LM016L i.e. our LCD
- Atmega16
- Push button
- Power terminal
Make the connections as shown above.
如上所示進行連接。
Double click on power terminal and edit its property to +5V.
雙擊電源端子,然后將其屬性編輯為+ 5V。
Connected the resistor after the push button such that the high unwanted current goes directly ti it.
在按鈕之后連接電阻,以使多余的高電流直接流過該電阻。
Double click the Atmega16 and debug the HEX file.
雙擊Atmega16并調試HEX文件。
Click on the Run Button and your counter will run and the no. if times you will press the button will appear on the screen.
單擊運行按鈕,您的計數器將運行,并且沒有。 如果您要按幾次,該按鈕將出現在屏幕上。
翻譯自: https://www.includehelp.com/embedded-system/create-counter-using-an-8-bits-lcd-avr.aspx
avr計數


![php 查看擴展 代碼,[擴展推薦] 使用 PHP Insights 在終端查看 PHP 項目代碼質量](http://pic.xiahunao.cn/php 查看擴展 代碼,[擴展推薦] 使用 PHP Insights 在終端查看 PHP 項目代碼質量)


| 使用Python的線性代數)
