cobbler介紹
Cobbler是一個Linux系統安裝的服務,可以通過網絡啟動(PXE)的方式來快速安裝、重裝物理服務器和虛擬機,同時還可以管理DHCP,DNS等。
Cobbler可以使用命令行方式管理,也提供了基于Web的界面管理工具(cobbler-web),還提供了API接口,可以方便二次開發使用。
Cobbler是較早前的kickstart的升級版,優點是比較容易配置,還自帶web界面比較易于管理。
官網:http://cobbler.github.io/
cobbler部署流程
第一個里程:安裝cobbler
更改yum源
[root@Cobbler ~]# curl -o /etc/yum.repos.d/CentOS-Base.repo http://mirrors.aliyun.com/repo/Centos-7.repo
[root@Cobbler ~]# curl -o /etc/yum.repos.d/epel.repo http://mirrors.aliyun.com/repo/epel-7.repo
[root@Cobbler ~]# yum -y install cobbler cobbler-web dhcp tftp-server pykickstart httpd python-django
第二個里程:安裝軟件
yum -y install cobbler cobbler-web dhcp  tftp-server pykickstart httpd
ps:因為系統默認安裝的django版本太低在,所以需要單獨拿出來安裝
wget https://bootstrap.pypa.io/get-pip.py
python get-pip.py
pip install django==1.8.9
systemctl start cobbler
systemctl start httpd
第三個里程:根據cobbler check命給出的提示一個一個進行修正
修改dhcp地址池
[root@Cobbler ks_mirror]# cat /etc/cobbler/dhcp.template
# ******************************************************************
# Cobbler managed dhcpd.conf file
#
# generated from cobbler dhcp.conf template ($date)
# Do NOT make changes to /etc/dhcpd.conf. Instead, make your changes
# in /etc/cobbler/dhcp.template, as /etc/dhcpd.conf will be
# overwritten.
#
# ******************************************************************ddns-update-style interim;allow booting;
allow bootp;ignore client-updates;
set vendorclass = option vendor-class-identifier;option pxe-system-type code 93 = unsigned integer 16;subnet 172.16.1.0 netmask 255.255.255.0 {option subnet-mask         255.255.255.0;range dynamic-bootp        172.16.1.100 172.16.1.254;default-lease-time         21600;max-lease-time             43200;next-server                $next_server;class "pxeclients" {match if substring (option vendor-class-identifier, 0, 9) = "PXEClient";if option pxe-system-type = 00:02 {filename "ia64/elilo.efi";} else if option pxe-system-type = 00:06 {filename "grub/grub-x86.efi";} else if option pxe-system-type = 00:07 {filename "grub/grub-x86_64.efi";} else if option pxe-system-type = 00:09 {filename "grub/grub-x86_64.efi";} else {filename "pxelinux.0";}}}
[root@Cobbler ~]# cobbler check
The following are potential configuration items that you may want to fix:
# 1與2需修改配置文件中的server與next_server,將其改成本機的IP地址即可,不能使用127.0.0.1
1 : The 'server' field in /etc/cobbler/settings must be set to something other tha
r kickstarting features will not work.  This should be a resolvable hostname or IPserver as reachable by all machines that will use it.2 : For PXE to be functional, the 'next_server' field in /etc/cobbler/settings mus
mething other than 127.0.0.1, and should match the IP of the boot server on the PX
#將tftp配置文件中的disable=yes改成disable=no
3 : change 'disable' to 'no' in /etc/xinetd.d/tftp
#使用cobbler get-loaders命令即可
4 : Some network boot-loaders are missing from /var/lib/cobbler/loaders, you may r
t-loaders' to download them, or, if you only want to handle x86/x86_64 netbooting,e that you have installed a *recent* version of the syslinux package installed andis message entirely.  Files in this directory, should you want to support all archuld include pxelinux.0, menu.c32, elilo.efi, and yaboot. The 'cobbler get-loaders'e easiest way to resolve these requirements.
#將rsyncd服務開啟,將設置成開機啟動
5 : enable and start rsyncd.service with systemctl
#忽略,歷史遺留問題
6 : debmirror package is not installed, it will be required to manage debian deplo
ositories
#修改settings中的默認始初密碼,使用命令chaenssl passwd -1 -salt,然后復制到配置文件中即可
7 : The default password used by the sample templates for newly installed machines
word_crypted in /etc/cobbler/settings) is still set to 'cobbler' and should be chaenssl passwd -1 -salt 'random-phrase-here' 'your-password-here'" to generate new o
#忽略,歷史遺留問題
8 : fencing tools were not found, and are required to use the (optional) power man
es. install cman or fence-agents to use themRestart cobblerd and then run 'cobbler sync' to apply changes.
第四個里程:重啟服務并載入修改好的配置
systemctl restart tftp.socket rsyncd.service cobblerd.service
cobbler sync
第五個里程:使用瀏覽器訪問
https://10.0.0.203/cobbler_web
賬號與密碼:cobller
第六個里程:導入鏡像文件

?
第七個里程:修改內核信息

?
第八個里程:添加自已寫好的KS配置文件
# Cobbler for Kickstart Configurator for CentOS 7
install
url --url=$tree
text
lang en_US.UTF-8
keyboard us
zerombr
bootloader --location=mbr --driveorder=sda --append="crashkernel=auto rhgb quiet"
#Network information
$SNIPPET('network_config')
#network --bootproto=dhcp --device=eth0 --onboot=yes --noipv6 --hostname=CentOS7
timezone --utc Asia/Shanghai
authconfig --enableshadow --passalgo=sha512
rootpw  --iscrypted $default_password_crypted
clearpart --all --initlabel
part /boot --fstype xfs --size 1024
part swap --size 1024
part / --fstype xfs --size 1 --grow
firstboot --disable
selinux --disabled
firewall --disabled
logging --level=info
reboot%pre
$SNIPPET('log_ks_pre')
$SNIPPET('kickstart_start')
$SNIPPET('pre_install_network_config')
# Enable installation monitoring
$SNIPPET('pre_anamon')
%end%packages
@^minimal
@compat-libraries
@core
@debugging
@development
bash-completion
chrony
dos2unix
kexec-tools
lrzsz
nmap
sysstat
telnet
tree
vim
wget
%end%post
systemctl disable postfix.service
%end
?
第九個里程:自定義系統(配置靜態IP與主機名)

?
指定KS文件 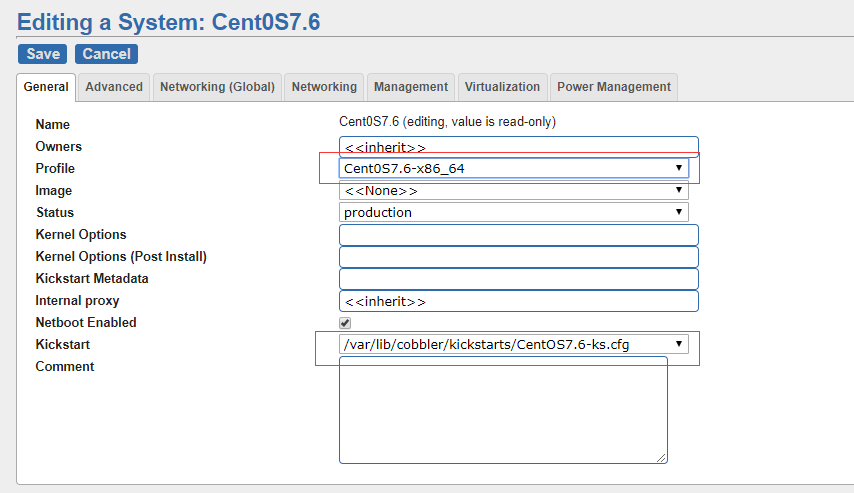
?
設置主機名、DNS與網關 
?
設置網卡IP地址,mac地址必須IP地址的MAC地址 
?
再點擊sync進行配置載入
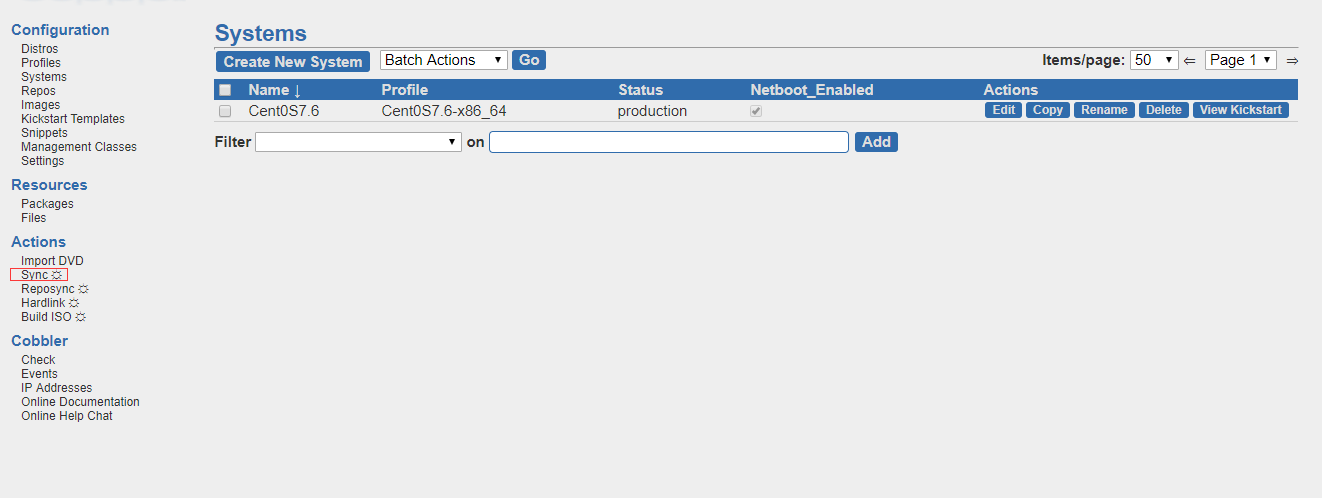
?


)

)
規范)


