由于實際生產環境需求,需要將LNMP環境中的openssl版本升級至目前最新版本openssl-1.1.0c,這玩意升級還真的不是一般的麻煩,由于它與系統各種服務都有相關的聯系,比如ssh服務等,因此,升級非常的繁瑣,所以今天將實際生產環境中升級的過程寫出來,供大家參考(100%生產環境)
1、整體環境
系統環境
[root@webserver ~]# **cat /etc/redhat-release**
CentOS release 6.5 (Final)
[root@webserver ~]# **uname -r**
2.6.32-431.el6.x86_64
LNMP版本
[root@webserver ~]# /application/nginx/sbin/nginx -v
nginx version: nginx/1.10.1
[root@webserver ~]# /application/mysql/bin/mysql -V
/application/mysql/bin/mysql ?Ver 14.14 Distrib 5.5.54, for Linux (x86_64) using ?EditLine wrapper
使用PHP 5.x 版本一直沒有升級成功,后面會介紹更高版本
2、LNMP環境編譯過程
nginx、mysql全部手工編譯安裝的,下面給出相關參數
nginx編譯過程:
[root@centos6 nginx-1.10.1]# ./configure --user=nginx \
--group=nginx --prefix=/application/nginx-1.10.1 \
--with-http_stub_status_module --with-http_ssl_module \
--with-pcre=/download/pcre-8.38
[root@centos6 nginx-1.10.1]# make && make install
[root@centos6 nginx-1.10.1]# ln -s /application/nginx-1.10.1 /application/nginx
[root@centos6 nginx-1.10.1]# /application/nginx/sbin/nginx
[root@centos6 nginx-1.10.1]# lsof -i :80
COMMAND ? PID ?USER ? FD ? TYPE DEVICE SIZE/OFF NODE NAME
nginx ? 16237 ?root ? ?6u ?IPv4 ?31404 ? ? ?0t0 ?TCP *:http (LISTEN)
nginx ? 16238 nginx ? ?6u ?IPv4 ?31404 ? ? ?0t0 ?TCP *:http (LISTEN)
[root@centos6 nginx-1.10.1]# cd ../
mysql編譯過程:
[root@centos6 download]# tar zxf cmake-2.8.8.tar.gz
[root@centos6 download]# cd cmake-2.8.8
[root@centos6 cmake-2.8.8]# useradd -s /sbin/nologin -M mysql
[root@centos6 cmake-2.8.8]# ./configure
CMake has bootstrapped. ?Now run gmake.
[root@centos6 cmake-2.8.8]# gmake
[root@centos6 cmake-2.8.8]# gmake install
[root@centos6 cmake-2.8.8]# cd ../
[root@centos6 download]# tar zxf mysql-5.5.54.tar.gz
[root@centos6 download]# cd mysql-5.5.54
[root@centos6 mysql-5.5.54]# cmake \
-DCMAKE_INSTALL_PREFIX=/application/mysql-5.5.54 \
-DNYSQL_DATADIR=/application/mysql-5.5.54/data \
-DNYSQL_UNIX_ADDR=/application/mysql-5.5.54/tmp/mysql.sock \
-DDEFAULT_CHARSET=gbk \
-DDEFAULT_COLLATION=gbk_chinese_ci \
-DENABLED_LOCAL_INFILE=ON \
-DWITH_INNOBASE_STORAGE_ENGINE=1 \
-DWITH_FEDERATED_STORAGE_ENGINE=1
[root@centos6 mysql-5.5.54]# make
[root@centos6 mysql-5.5.54]# make install
[root@centos6 mysql-5.5.54]# ln -s /application/mysql-5.5.54 /application/mysql
[root@centos6 mysql-5.5.54]# cp support-files/my-small.cnf /etc/my.cnf
cp: overwrite `/etc/my.cnf'? y
[root@centos6 mysql-5.5.54]# echo 'export PATH=/application/mysql/bin:$PATH'>>/etc/profile
[root@centos6 mysql-5.5.54]# source /etc/profile
[root@centos6 mysql-5.5.54]# tail -1 /etc/profile
export PATH=/application/mysql/bin:$PATH
[root@centos6 mysql-5.5.54]# which mysql
/application/mysql/bin/mysql
[root@centos6 mysql-5.5.54]# mkdir -p /application/mysql/data
[root@centos6 mysql-5.5.54]# chown -R mysql.mysql /application/mysql/data
[root@centos6 mysql-5.5.54]# chmod -R 1777 /tmp
[root@centos6 mysql-5.5.54]# /application/mysql/scripts/mysql_install_db
--basedir=/application/mysql
--datadir=/application/mysql/data --user=mysql
[root@centos6 mysql-5.5.54]# cp support-files/mysql.server /etc/init.d/mysqld
[root@centos6 mysql-5.5.54]# chmod 700 /etc/init.d/mysqld
[root@centos6 mysql-5.5.54]# /etc/init.d/mysqld start
Starting MySQL.Logging to '/application/mysql-5.5.54/data/centos6.5.err'.
. SUCCESS!
[root@centos6 mysql-5.5.54]# lsof -i :3306
COMMAND ? PID ?USER ? FD ? TYPE DEVICE SIZE/OFF NODE NAME
mysqld ?61589 mysql ? 10u ?IPv4 114206 ? ? ?0t0 ?TCP *:mysql (LISTEN)
[root@centos6 mysql-5.5.54]# mysql
Welcome to the MySQL monitor. ?Commands end with ; or \g.
Your MySQL connection id is 1
Server version: 5.5.54 Source distribution
Copyright (c) 2000, 2016, Oracle and/or its affiliates. All rights reserved.
Oracle is a registered trademark of Oracle Corporation and/or its
affiliates. Other names may be trademarks of their respective
owners.
Type 'help;' or '\h' for help. Type '\c' to clear the current input statement.
mysql> quit
Bye
[root@centos6 mysql-5.5.54]# chkconfig mysqld
[root@centos6 mysql-5.5.54]# cd ../
3、升級OPENSSL
[root@centos6 download]# tar zxf openssl-1.1.0c.tar.gz
[root@centos6 download]# cd openssl-1.1.0c
[root@centos6 openssl-1.1.0c]# ./config --prefix=/usr/local/openssl shared zlib-dynamic
[root@centos6 openssl-1.1.0c]# make
[root@centos6 openssl-1.1.0c]# make install
[root@centos6 openssl-1.1.0c]# cd ../
4、安裝PHP所需庫文件
[root@centos6 download]# wget http://ftp.gnu.org/pub/gnu/libiconv/libiconv-1.7.tar.gz
[root@centos6 download]# tar zxf libiconv-1.7.tar.gz
[root@centos6 download]# cd libiconv-1.7
[root@centos6 libiconv-1.7]# ./configure --prefix=/usr/local/libiconv
[root@centos6 libiconv-1.7]# make && make install
[root@centos6 libiconv-1.7]# cd ../
[root@centos6 download]# wget ftp://mcrypt.hellug.gr/pub/crypto/mcrypt/libmcrypt/libmcrypt-2.5.7.tar.gz
[root@centos6 download]# tar zxf libmcrypt-2.5.7.tar.gz
[root@centos6 download]# cd libmcrypt-2.5.7
[root@centos6 libmcrypt-2.5.7]# ./configure
[root@centos6 libmcrypt-2.5.7]# make && make install
[root@centos6 libmcrypt-2.5.7]# /sbin/ldconfig
[root@centos6 libmcrypt-2.5.7]# cd ?libltdl/
[root@centos6 libltdl]# ./configure --enable-ltdl-install
[root@centos6 libltdl]# make
[root@centos6 libltdl]# make install
[root@centos6 libltdl]# cd ../../
[root@centos6 download]# wget http://download.csdn.net/tag/mhash-0.9.9.9.tar.gz
[root@centos6 download]# tar zxf mhash-0.9.9.9.tar.gz
[root@centos6 download]# cd mhash-0.9.9.9
[root@centos6 mhash-0.9.9.9]# ./configure
[root@centos6 mhash-0.9.9.9]# make
[root@centos6 mhash-0.9.9.9]# make install
[root@centos6 mhash-0.9.9.9]# cd ../
[root@centos6 download]# rm -f /usr/lib/libmcrypt.\*
[root@centos6 download]# rm -f /usr/lib/libmhash\*
[root@centos6 download]# ln -s /usr/local/lib/libmcrypt.la /usr/lib/libmcrypt.la
[root@centos6 download]# ln -s /usr/local/lib/libmcrypt.so /usr/lib/libmcrypt.so
[root@centos6 download]# ln -s /usr/local/lib/libmcrypt.so.4 /usr/lib/libmcrypt.so.4
[root@centos6 download]# ln -s /usr/local/lib/libmcrypt.so.4.4.8 /usr/lib/libmcrypt.so.4.4.8
[root@centos6 download]# ln -s /usr/local/lib/libmhash.a /usr/lib/libmhash.a
[root@centos6 download]# ln -s /usr/local/lib/libmhash.la /usr/lib/libmhash.la
[root@centos6 download]# ln -s /usr/local/lib/libmhash.so /usr/lib/libmhash.so
[root@centos6 download]# ln -s /usr/local/lib/libmhash.so.2 /usr/lib/libmhash.so.2
[root@centos6 download]# ln -s /usr/local/lib/libmhash.so.2.0.1 /usr/lib/libmhash.so.2.0.1
[root@centos6 download]# ln -s /usr/local/bin/libmcrypt-config /usr/bin/libmcrypt-config
[root@centos6 download]# rm -f /usr/lib64/libmcrypt.\*
[root@centos6 download]# rm -f /usr/lib64/libmhash\*
[root@centos6 download]# ln -s /usr/local/lib64/libmcrypt.so /usr/lib64/libmcrypt.so
[root@centos6 download]# ln -s /usr/local/lib64/libmcrypt.la /usr/lib64/libmcrypt.la
[root@centos6 download]# ln -s /usr/local/lib64/libmcrypt.so.4 /usr/lib64/libmcrypt.so.4
[root@centos6 download]# ln -s /usr/local/lib64/libmcrypt.so.4.4.8 /usr/lib64/libmcrypt.so.4.4.8
[root@centos6 download]# ln -s /usr/local/lib64/libmhash.a /usr/lib64/libmhash.a
[root@centos6 download]# ln -s /usr/local/lib64/libmhash.la /usr/lib64/libmhash.la
[root@centos6 download]# ln -s /usr/local/lib64/libmhash.so /usr/lib64/libmhash.so
[root@centos6 download]# ln -s /usr/local/lib64/libmhash.so.2 /usr/lib64/libmhash.so.2
[root@centos6 download]# ln -s /usr/local/lib64/libmhash.so.2.0.1 /usr/lib64/libmhash.so.2.0.1
[root@centos6 download]# ln -s /usr/local/bin/libmcrypt-config /usr/bin/libmcrypt-config
[root@centos6 download]# wget http://download.csdn.net/tag/mcrypt-2.6.8.tar.gz
[root@centos6 download]# tar zxf mcrypt-2.6.8.tar.gz
[root@centos6 download]# cd mcrypt-2.6.8
[root@centos6 mcrypt-2.6.8]# /sbin/ldconfig
[root@centos6 mcrypt-2.6.8]# ./configure
[root@centos6 mcrypt-2.6.8]# make
[root@centos6 mcrypt-2.6.8]# make install
[root@centos6 mcrypt-2.6.8]# cd ../
5、編譯PHP
[root@centos6 download]# wget http://mirrors.sohu.com/php/php-7.1.0.tar.gz
[root@centos6 download]# tar zxf php-7.1.0.tar.gz
[root@centos6 php-7.1.0]#?./configure ?--prefix=/application/php-7.1.0
--with-config-file-path=/application/php-7.1.0/etc
--enable-fpm --enable-mbstring --enable-zip
--enable-bcmath --enable-pcntl --enable-ftp
--enable-intl --enable-exif --enable-calendar
--enable-sysvmsg --enable-sysvsem
--enable-sysvshm --enable-wddx --with-curl
--with-mcrypt --with-iconv --with-gd
--with-jpeg-dir=/usr --with-png-dir=/usr
--with-zlib-dir=/usr --with-xpm-dir=/usr
--with-freetype-dir=/usr --enable-gd-native-ttf
--enable-gd-jis-conv --with-gettext=/usr
--with-zlib=/usr --with-bz2=/usr
--with-recode=/usr --with-mysql
--with-mysqli --with-pdo-mysql**
--enable-sockets --disable-ipv6**
--with-fpm-user=nginx ?--with-fpm-group=nginx
--with-openssl=/usr/local/openssl
[root@centos6 php-7.1.0]# make
[root@centos6 php-7.1.0]# make install
[root@centos6 php-7.1.0]# cp sapi/fpm/init.d.php-fpm /etc/init.d/php-fpm
[root@centos6 php-7.1.0]# chmod 700 /etc/init.d/php-fpm
[root@centos6 php-7.1.0]# cp /application/php-7.1.0/etc/php-fpm.conf.default /application/php-7.1.0/etc/php-fpm.conf
[root@centos6 php-7.1.0]# cp /application/php-7.1.0/etc/php-fpm.d/www.conf.default /application/php-7.1.0/etc/php-fpm.d/www.conf.defau
[root@centos6 php-7.1.0]# cp /application/php-7.1.0/etc/php-fpm.d/www.conf.default /application/php-7.1.0/etc/php-fpm.d/www.conf.defa
[root@centos6 php-7.1.0]# cp /application/php-7.1.0/etc/php-fpm.d/www.conf.default /application/php-7.1.0/etc/php-fpm.d/www.conf
[root@centos6 php-7.1.0]# /etc/init.d/php-fpm start
[root@centos6 php-7.1.0]# ps -ef|grep php
root ? ? ?98304 ? ? ?1 ?0 00:04 ? ? ?00:00:00 php-fpm: master process (/application/php-7.1.0/etc/php-fpm.conf)
nginx ? ? 98305 ?98304 ?0 00:04 ? ? ? ? ?00:00:00 php-fpm: pool www
nginx ? ? 98306 ?98304 ?0 00:04 ? ? ? ? ?00:00:00 php-fpm: pool www
root ? ? ?98308 ? 1265 ?0 00:04 pts/0 ? ?00:00:00 grep php
6、查看phpinfo信息
沒升級這前openssl 的版本是
openssl-1.0.1e-48.el6_8.3.x86_64
升級之后查看下phpinfo的信息
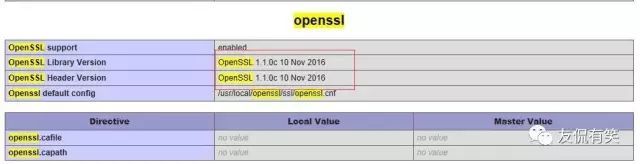
目前官網最新版本,升級成功
之前一直升級不成功就是因為php無法識別這個最新版本,phpinfo信息里仍然是舊版本,后面采用升級PHP 版本,才升級成功.
文章雖然是一篇舊文,現在的版本肯定用的比這個新了,但是,只是給大家提供一個思路,這里還建議大家慎重升級openssl版本,除非有必要,我們當時升級是因為與某廠有個視頻類的合作,必須升級它,否則無法對接API。
歡迎大家點贊、轉發分享支持
更多技術干貨文章、技術資源分享,職場面試等,請關注民工哥技術之路微信公眾號

)

)


![python做什么模型_主題模型初學者指南[Python]](http://pic.xiahunao.cn/python做什么模型_主題模型初學者指南[Python])


、dot()和 * 三種乘法運算的區別小計...)
