本次我們通過源碼介紹ApplicationContext容器初始化流程,主要介紹容器內bean的實例化和初始化過程。ApplicationContext是Spring推出的先進Ioc容器,它繼承了舊版本Ioc容器BeanFactory,并進一步擴展了容器的功能,增加了bean的自動識別、自動初始化等功能,同時引入了BeanFactoryPostProcessor、BeanPostProcessor等邏輯處理組件,目前我們使用的spring項目大部分都是基于ApplicationContext容器的。ApplicationContext容器在啟動階段便會調用所有bean的構建方法getBean(),所以當項目啟動好后,容器內所有對象都已被構建好了。
“我個人習慣”將spring容器啟動分為三個階段:(1)容器初始化階段、(2)Bean實例化(instantiation)階段、(3)Bean初始化(initialization)階段。
- 容器初始化階段:這個階段主要是通過某些工具類加載Configuration MetaData,并將相關信息解析成BeanDefinition注冊到BeanDefinitionRegistry中,即對象管理信息的收集。同時也會進行各種處理器的注冊、上下文的初始化、事件廣播的初始化等等準備工作。
- Bean實例化(instantiation)階段:這個階段主要是Bean的實例化,其實就是Bean對象的構造。不過此時構造出的對象,他們內部的依賴對象仍然沒有注入,只是通過反射(或Cglib)生成了具體對象的實例(執行構造函數),其實有點類似于我們手動new對象,new出的對象已經執行過了構造函數,并且內部的基本數據也已經準備好了,但如果內部還有其他對象的依賴,就需要后續的流程去主動注入。
- Bean初始化(initialization)階段:這個階段主要是對實例化好后的Bean進行依賴注入的過程。同時還會執行用戶自定義的一些初始化方法,注冊Bean的銷毀方法、緩存初始化好的Bean等。
接下來我們主要圍繞這三個階段通過Spring源碼來看容器初始化的具體過程(SpringBoot項目)。
一.容器初始化階段
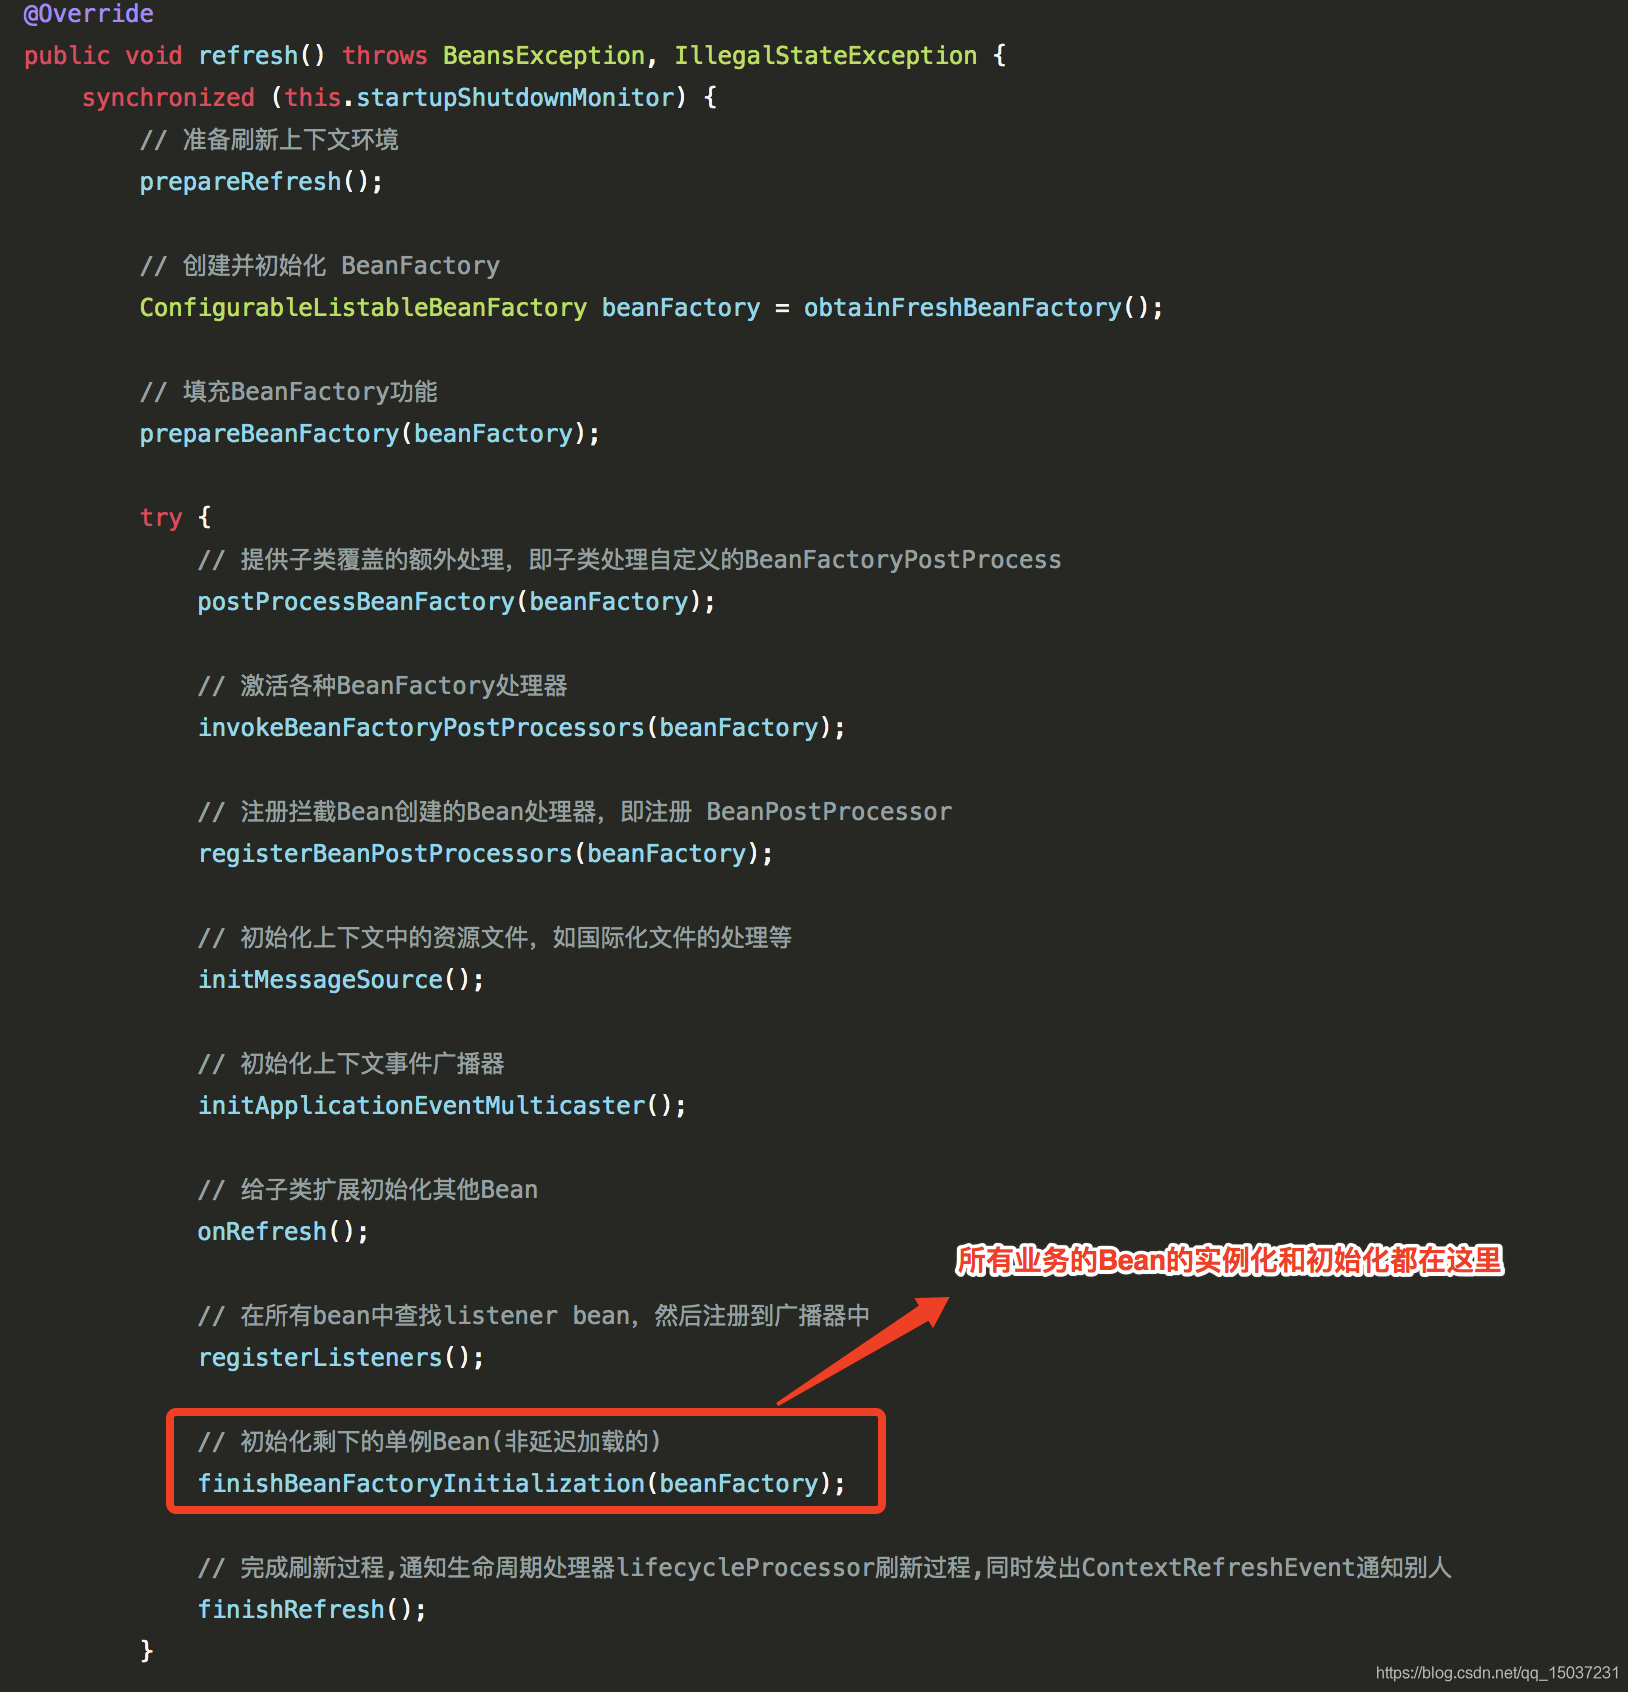
ApplicationContext在容器啟動時會自動幫我們構建好所有的Bean,所以當我們項目啟動好后,容器內所有對象都已經構建好了。其主要的邏輯都在refresh()函數中,所以我們也從這個函數開始看,下面是refresh()的主體邏輯。
我們簡單介紹下幾個重要函數:
- prepareRefresh():
初始化上下文環境,對系統的環境變量或者系統屬性進行準備和校驗,如環境變量中必須設置某個值才能運行,否則不能運行,這個時候可以在這里加這個校驗,重寫initPropertySources方法就好了。 - postProcessBeanFactory()、invokeBeanFactoryPostProcessors():
spring提供了一種叫做BeanFactoryPostProcessor的容器擴展機制,這種機制可以讓我們在Bean實例化前,對注冊到容器的BeanDefinition所保存的信息進行修改。上面兩個函數就主要是BeanFactoryPostProcessor的相關操作。值得一提的是我們經常會在properties文件中配置一些屬性值,然后通過${}的占位符去替換xml中的一些變量,這個過程就是BeanFactoryPostProcessor幫我實現的。 - registerBeanPostProcessors:
注冊BeanPostProcessor。BeanPostProcessor應該是大名鼎鼎的了,它和BeanFactoryPostProcessor相對應,BeanFactoryPostProcessor主要是對BeanDefinition進行相關操作,而BeanPostProcessor主要是插手Bean的構建過程。BeanPostProcessor是個接口,它有很多實現類,接下來我們會逐漸接觸到BeanPostProcessor的不同實現類。 - finishBeanFactoryInitialization:
初始化剩下的單例Bean(非延遲加載的)。上面的函數中構建了各種系統使用的Bean,而剩下的Bean都會在finishBeanFactoryInitialization中構建,這其中就包括我們在應用中聲明的各種業務Bean,Bean的實例化和初始化過程邏輯都在這個函數中。
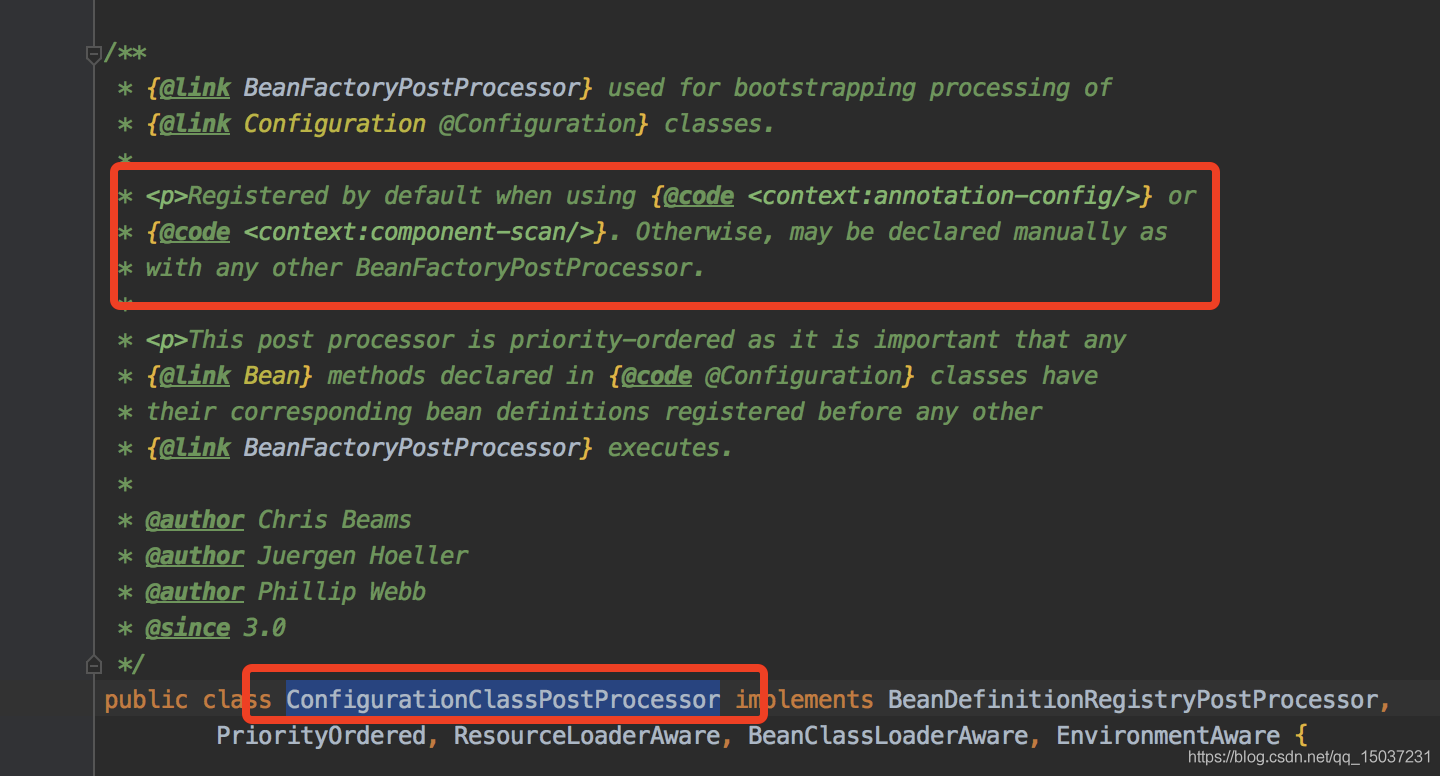
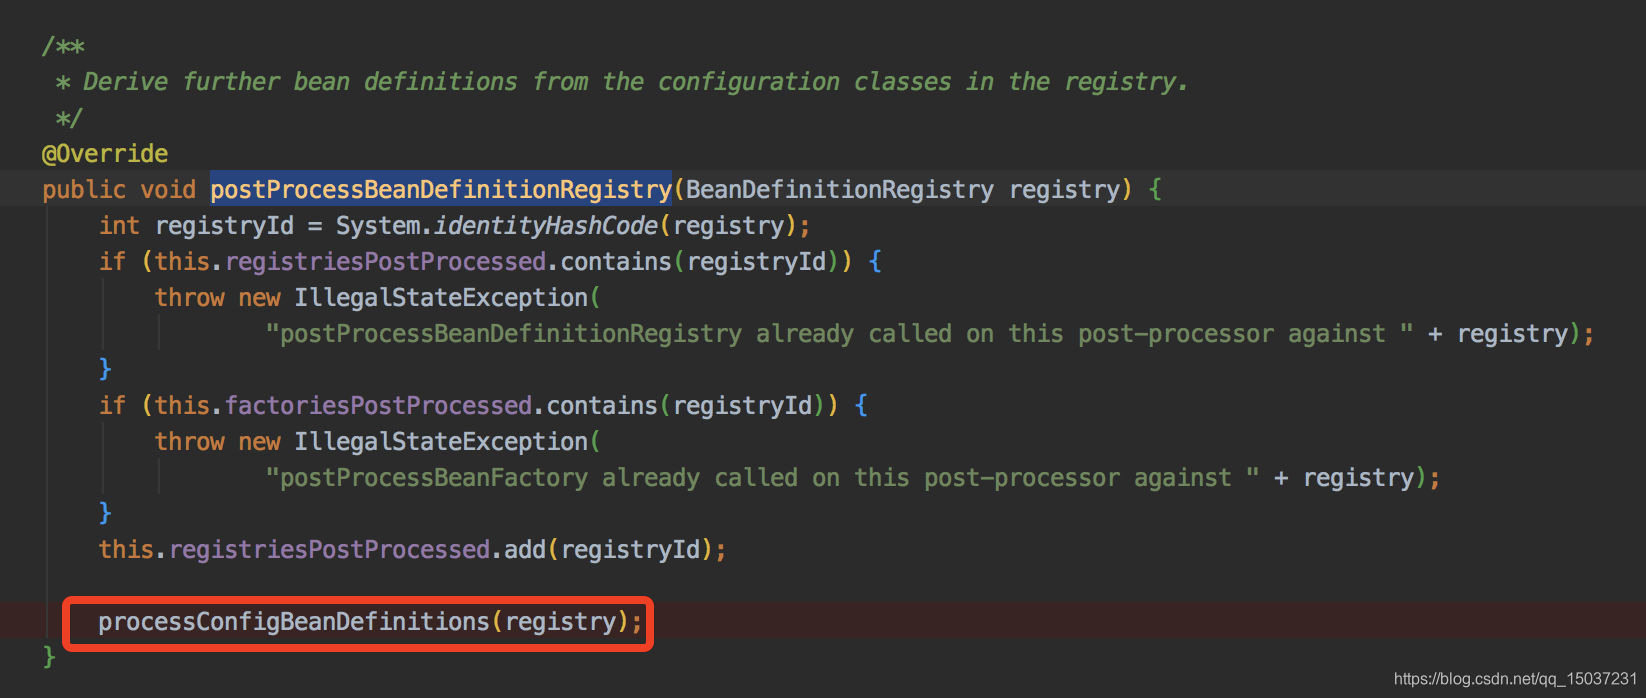
我想特別介紹下invokeBeanFactoryPostProcessors(beanFactory),我們都知道Spring會幫我們自動掃描出所有我們需要放入容器的Bean,其具體的實現就在這里。里面會執行所有的BeanFactoryPostProcessors,Spring幫我們定義了一個ConfigurationClassPostProcessor,它的函數postProcessBeanDefinitionRegistry會在這個階段被執行,里面會根據我們配置的scanning-path把我們所有使用注解(@Component、@Service等…)注釋的Bean解析成BeanDefinition,并記錄Bean的信息到容器中。

Spring容器的啟動階段就介紹到這里,因為具體的邏輯實在實在太繁雜,而我也就知道個梗概,有想要想要詳細了解的同學,可以一個一個方法的去學習了解下。接下來是我們本文的重點內容:bean的實例化和初始化過程。
二.Bean的實例化和初始化
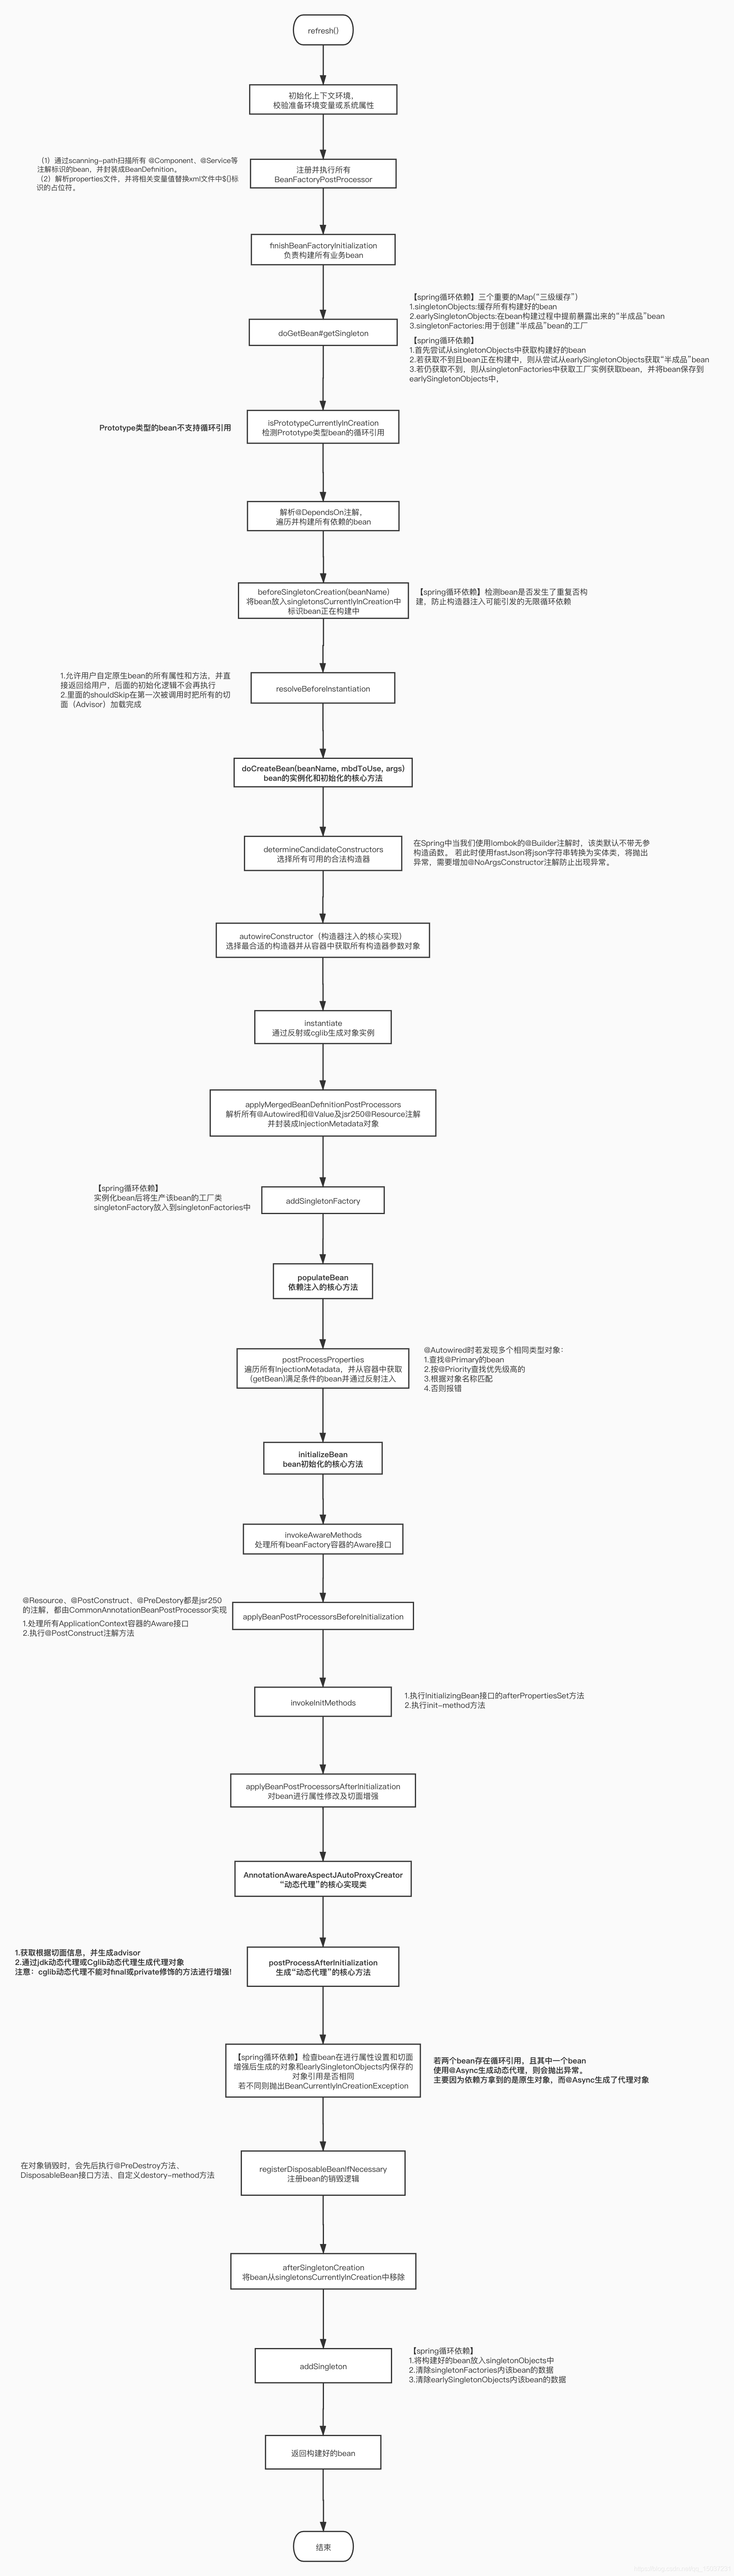
大家總是會錯誤的理解Bean的“實例化”和“初始化”過程,總會以為初始化就是對象執行構造函數生成對象實例的過程,其實不然,在初始化階段實際對象已經實例化出來了,初始化階段進行的是依賴的注入和執行一些用戶自定義的初始化邏輯。對于Bean的構建過程,網上有個非常經典的流程圖如下:
上面的流程圖并不是十分準確,但卻把整個bean的構建、使用、銷毀流程整體勾勒出來了,大家可以有個初步的整體的印象。實際上Bean的構建流程非常復雜,下面會從源碼角度講解,內容會很多也很龐雜,我把重要的方法和邏輯做了一個簡單的總結,讓大家可以從方法角度有個整體了解,接下來我們就開始從bean的實例化流程開始講起。
(1)Bean的實例化
我們接著上面從finishBeanFactoryInitialization函數看起,因為我們定義的業務Bean實例化和初始化都是在這個函數中實現的。我們進入finishBeanFactoryInitialization函數內部。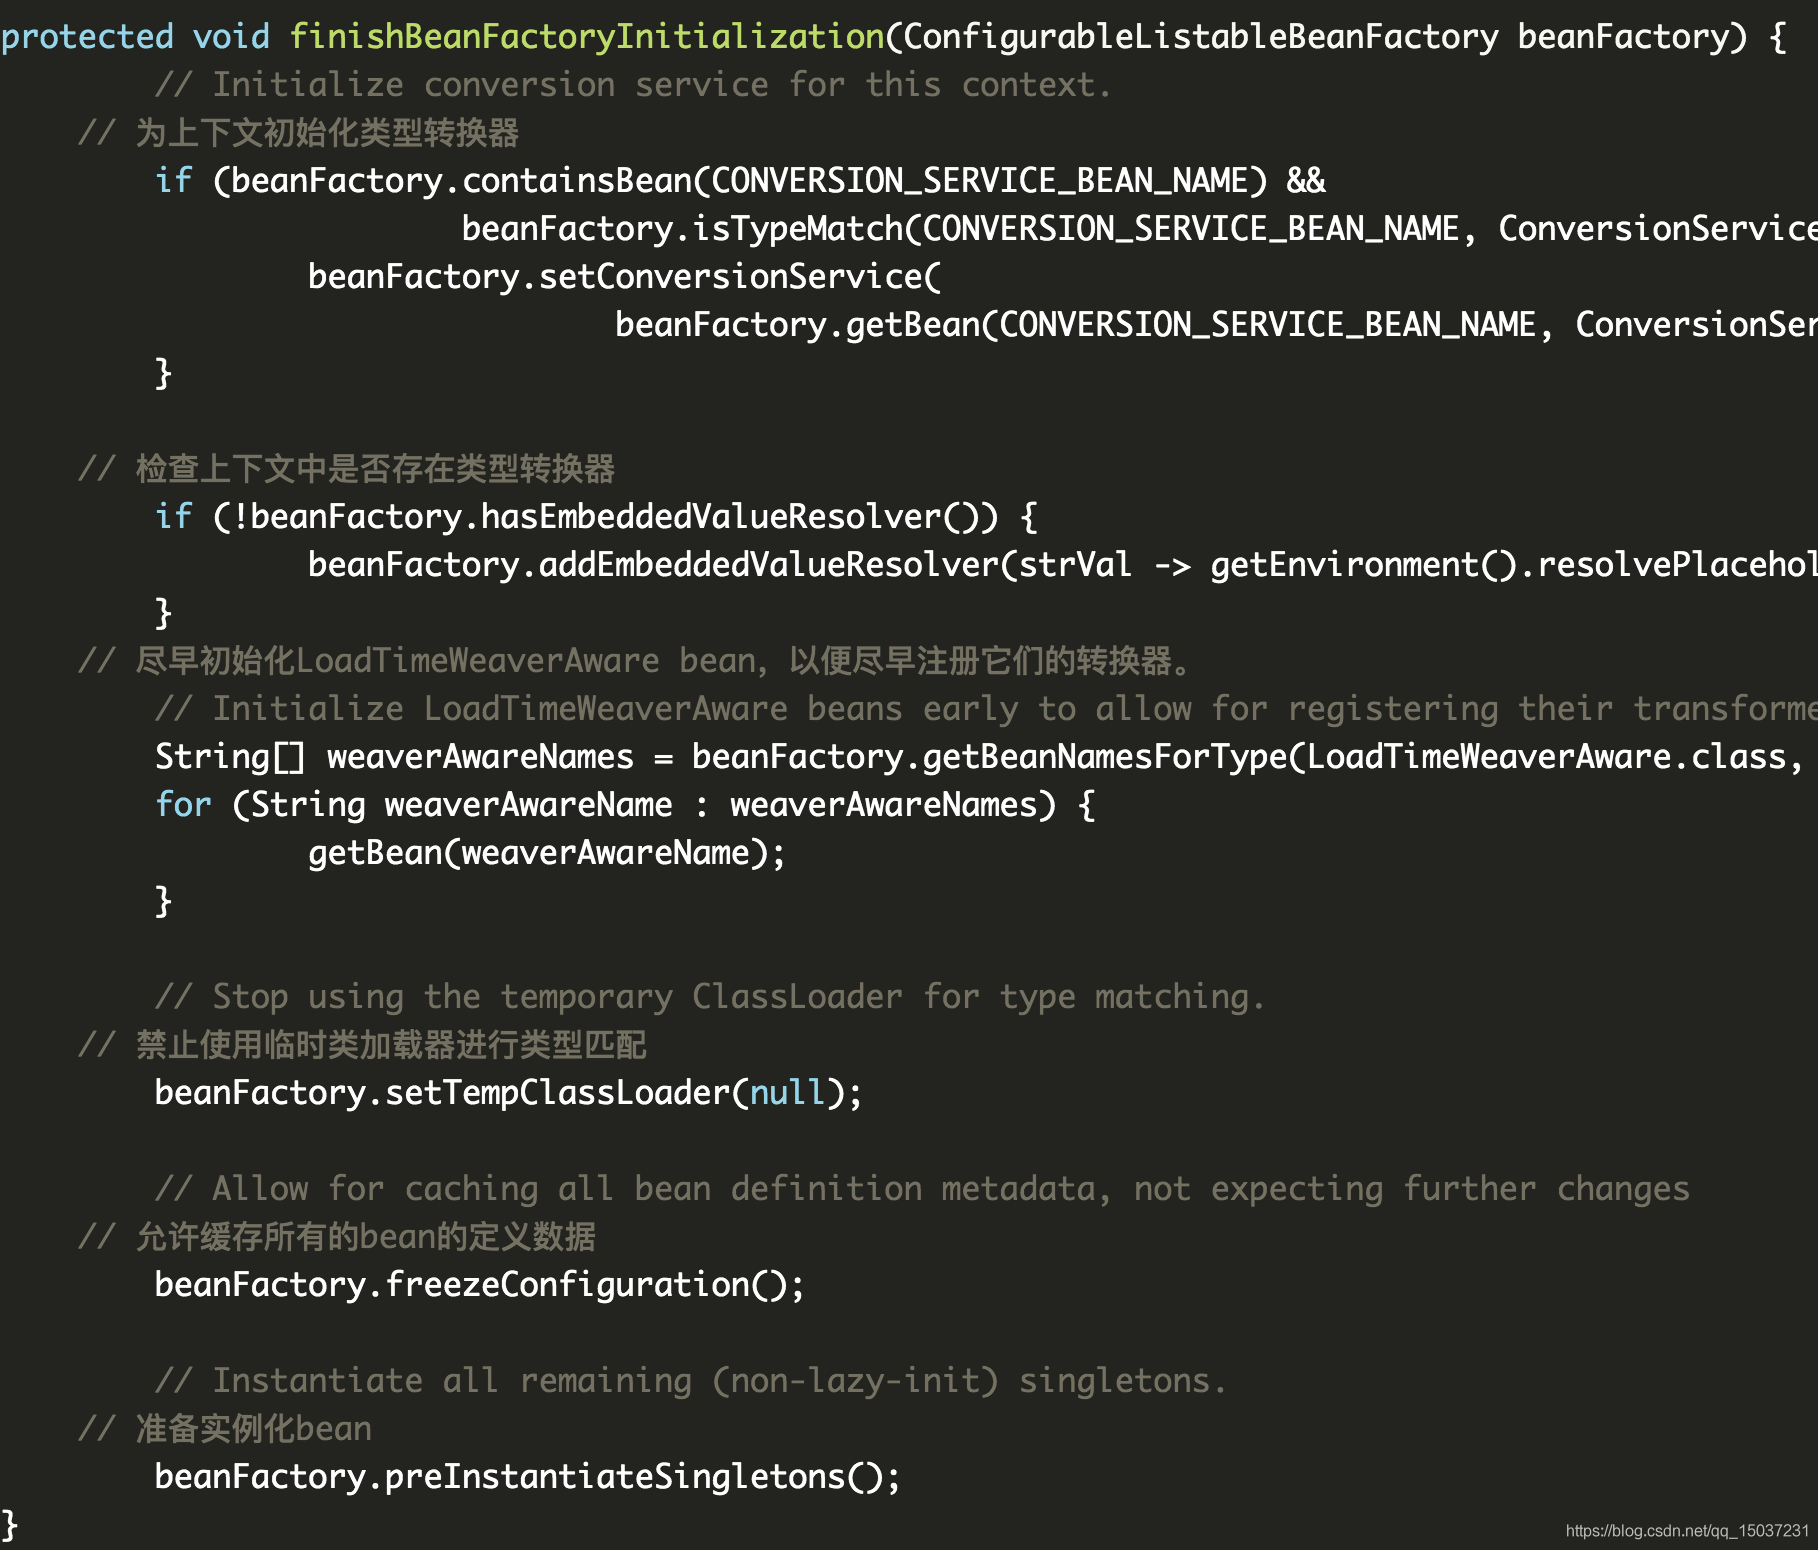 其中大部分的函數是Bean構建的準備邏輯,實際的構建邏輯在preInstantiateSingletons中,我們繼續往下,看preInstantiateSingletons函數。
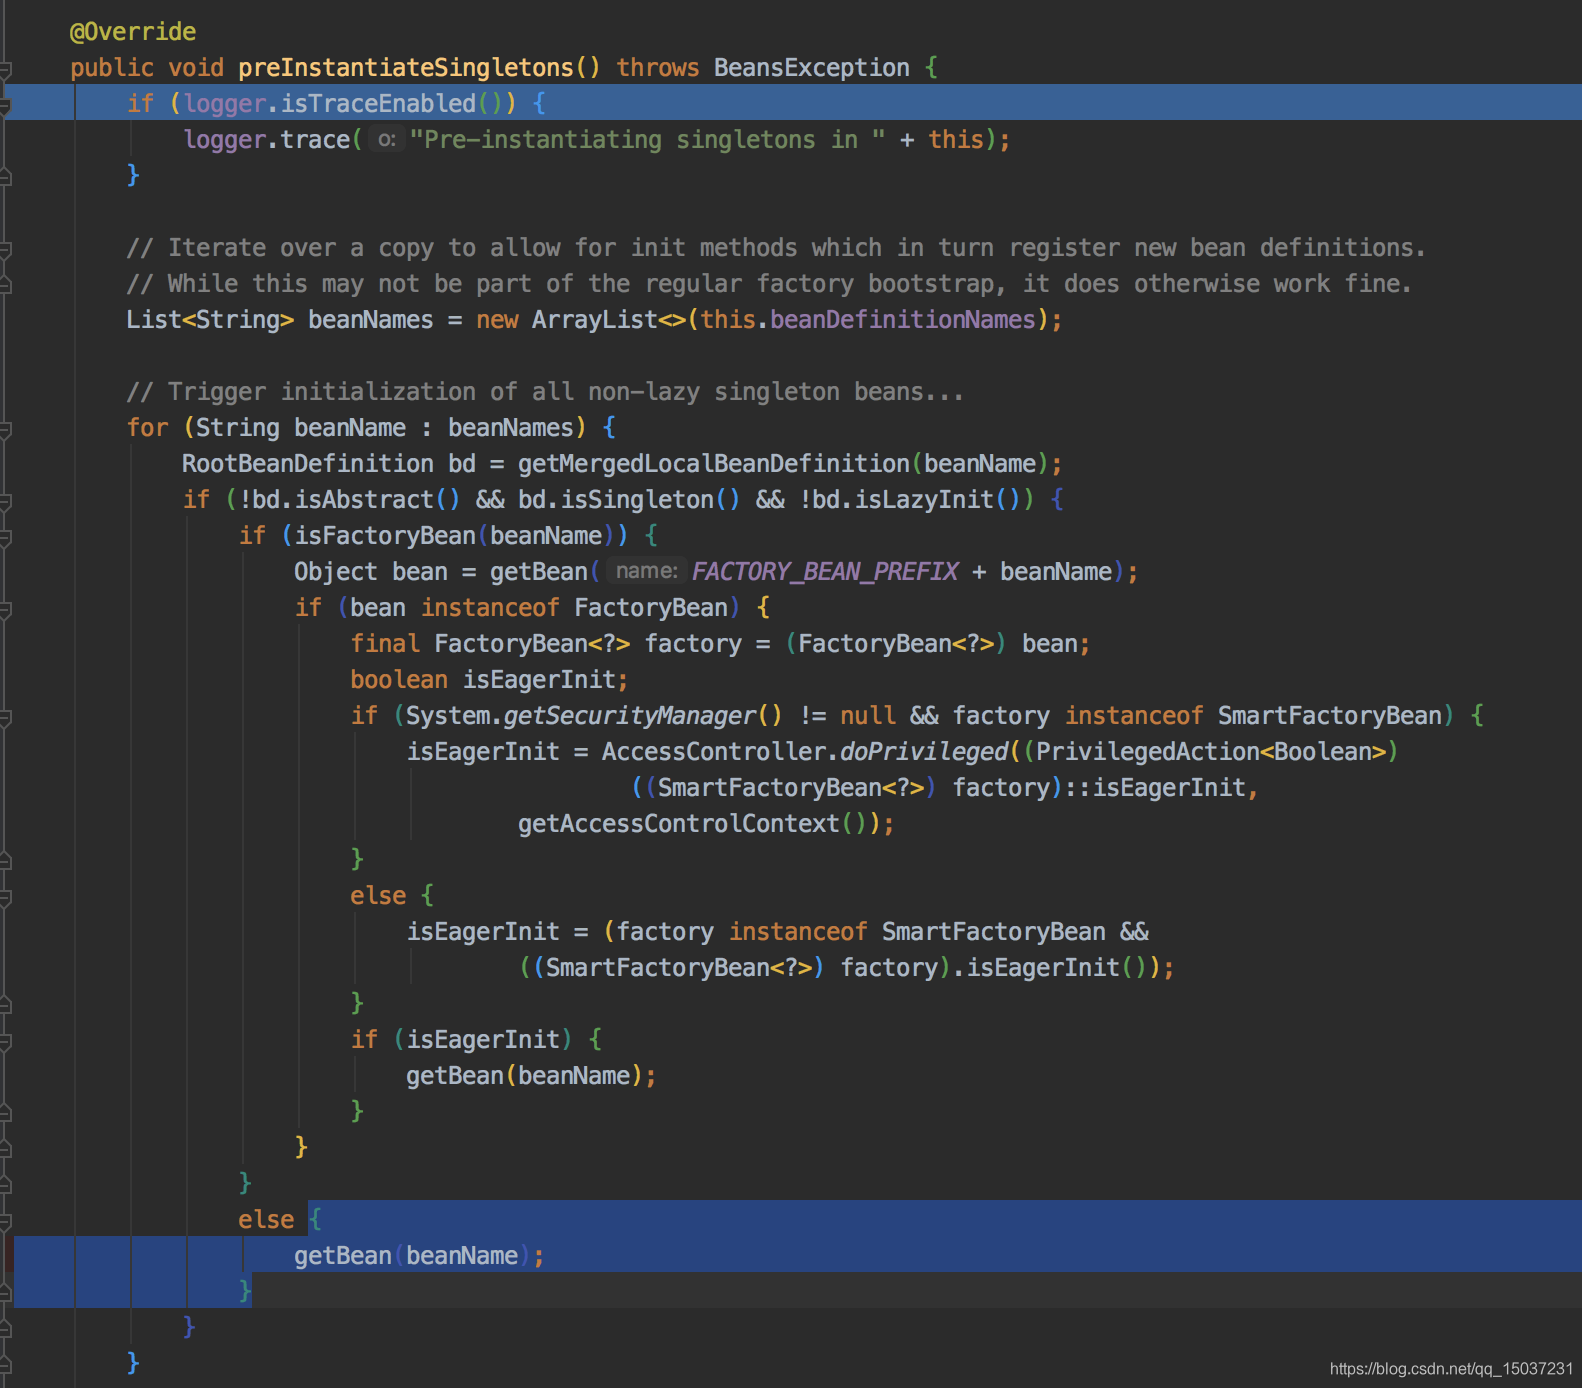
函數會先獲取所有需要構建的Bean名稱,之前提過在Spring容器啟動階段Bean的相關信息就會被封裝成BeanDefinition并注冊到容器中。通過bean的RootBeanDefinition判斷該bean是否為可構建的類型,很明顯可構建的Bean不能是抽象類,不能是接口,也不能是懶加載的bean。之后會判斷對象是不是FactoryBean,FactoryBean是一種特殊的Bean,需要特殊處理。
FactoryBean簡介
在我們平時的開發中經常會使用第三方庫相關類,為了避免接口和實現類的耦合,我們通常會使用工廠模式。提供一個工廠類來實例化具體接口實現類。主體對象只需要注入工廠類,具體接口實現類有變更時,我們只需變更工廠類,而主體類無需做任何改動。針對上面的場景,spring為我們提供了更方便的工具FactoryBean,當某些第三方庫不能直接注冊到spring容器時,就可以實現org.springframework.beans.factory.FactoryBean接口,給出自己的對象實例化邏輯。
針對FactoryBean而言,其主語是Bean,定語為Factory,它本身也只是一個bean而已,只不過這種類型的bean本身就是用來生產對象的工廠。下面是FactoryBean接口代碼,FactoryBean只定義了三個方法,getObject()返回我們需要生產的對象, getObjectType()返回生產對象的類型,isSingleton()用于標識該對象是否以單例形式存在于容器中。當我們從容器中獲取FactoryBean類型的Bean時,容器返回的是FactoryBean所“生產”的對象類型,而非FactoryBean實現本身。
public interface FactoryBean {
T getObject();
Class<?> getObjectType();
default boolean isSingleton();
}
然后我們進入getBean(beanName),我們的業務Bean就是通過這個函數構建的。
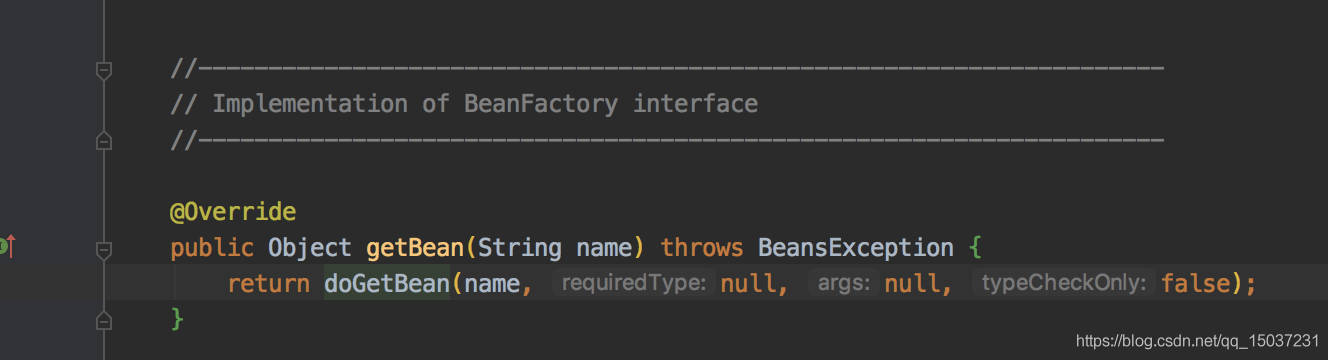
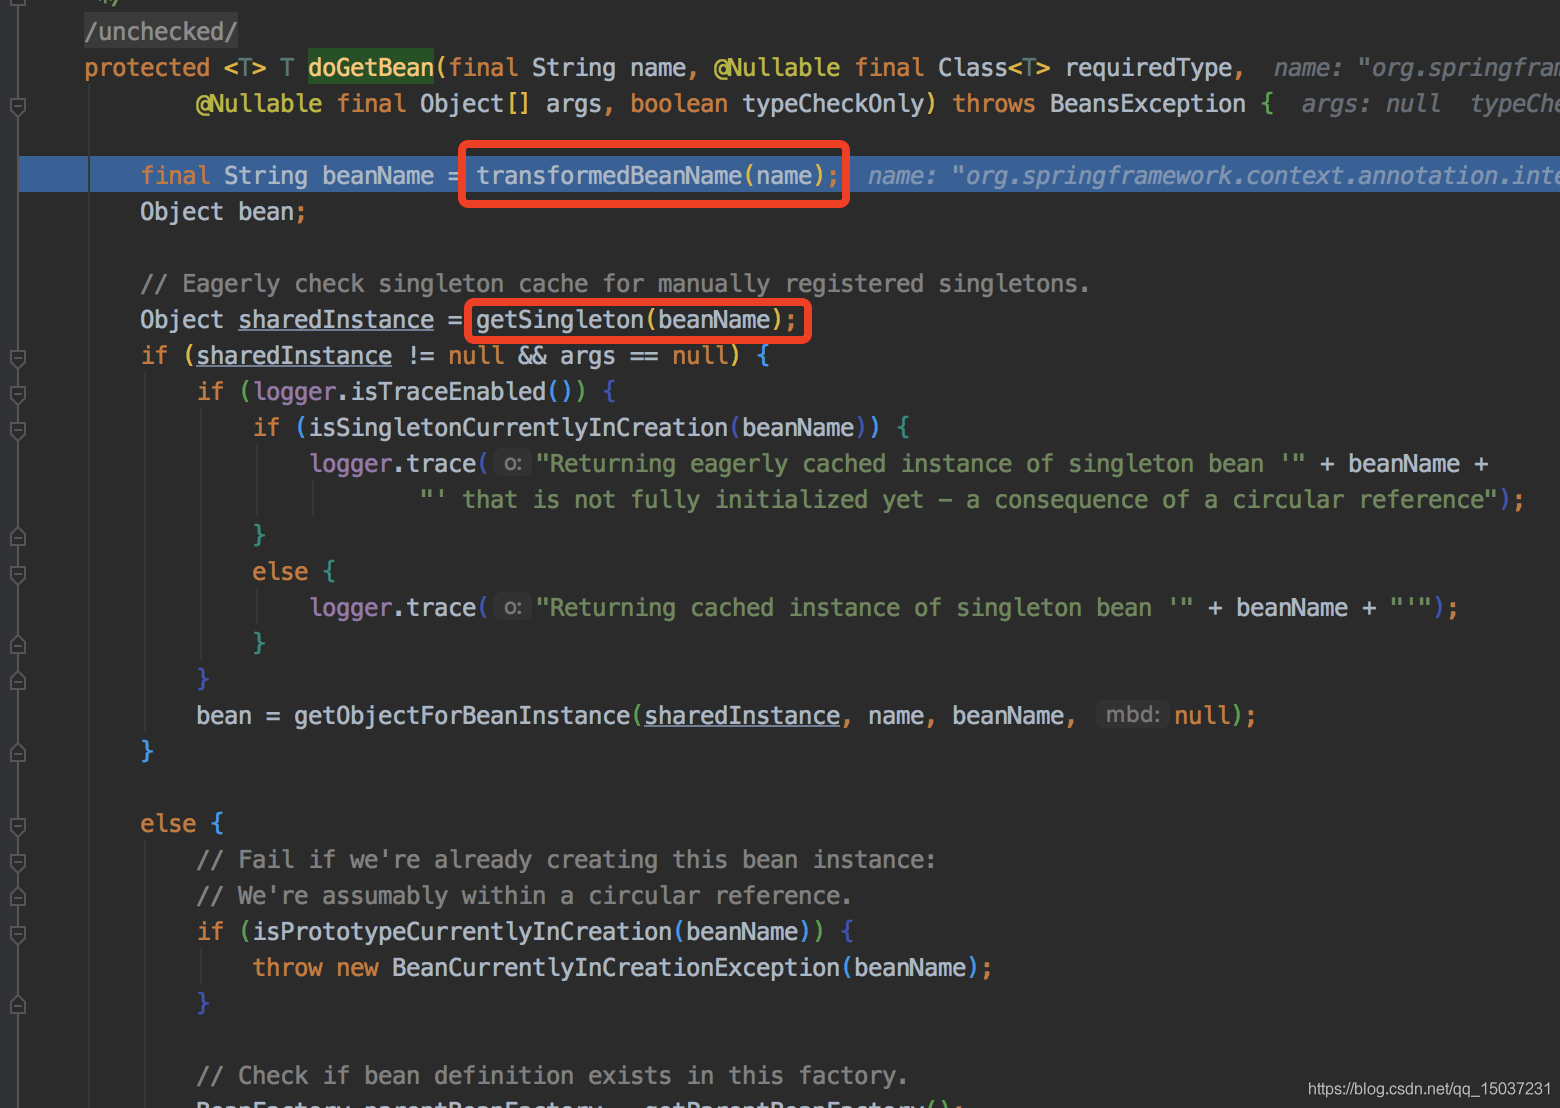
經過一次跳轉后我們來到了org.springframework.beans.factory.support.AbstractBeanFactory#doGetBean函數,這個函數還是蠻重要的,接下來我們詳細介紹下:
在函數內首先會將傳遞進來的name通過transformedBeanName()函數轉換成了beanName,這個函數主要有兩個功能:1: 特殊處理FactoryBean的名稱、2: 解決別名的問題。
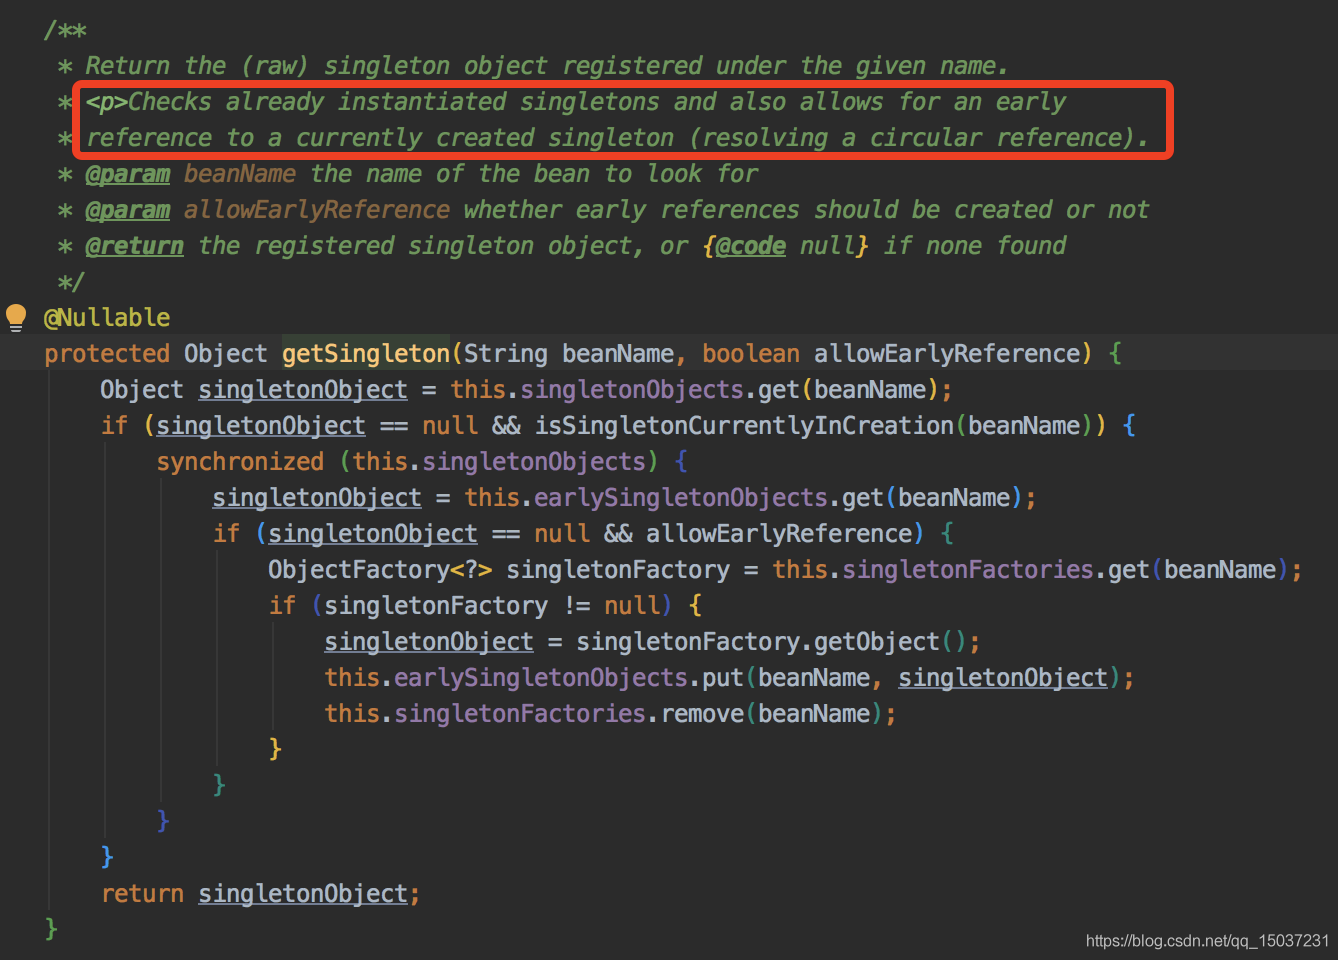
之后我們會看見getSingleton(beanName)函數,這個函數灰常重要,它是用來解決循環依賴的。舉個例子:有兩個Bean A和B,這兩個Bean間存在相互依賴。那么當容器構建A時,實例化好A后,容器會把尚未注入依賴的A暫時放入緩存中,然后去幫A注入依賴。這時容器發現A依賴于B,但是B還沒有構建好,那么就會先去構建B。容器在實例化好B時,同樣需要幫B注入依賴,此時B發現自己依賴A,在獲取A時就可以通過getSingleton(beanName)獲取尚未注入依賴的A引用,這樣就不會阻塞B的構建,B完成構建后就又可以注入到A中,這樣就解決了簡單的循環依賴問題。當然循環依賴的問題場景很多,出現的情景也不同,上面舉的例子只是最簡單的一種,后面會對常見的循環依賴問題進行總結。
在之后會通過isPrototypeCurrentlyInCreation(beanName)檢測Prototype類型的Bean是否已經正在構建。說到這里,我們首先需要明確的一點是:Prototype類型Bean不支持循環引用 (包括自用引用),而Singleton類型的bean是可以循環引用的 (包括自用引用),這里說的自我引用指的是自己注入自己。其實原因也不難理解,因為Prototype類型的bean是即取即用的,容器不會維護它的生命周期,更不會保存它的引用,那么就不會像Singleton類型的bean一樣,在容器中有一份緩存,其實Prototype類型bean也完全沒必要有緩存,畢竟容器無需維護它的生命周期。
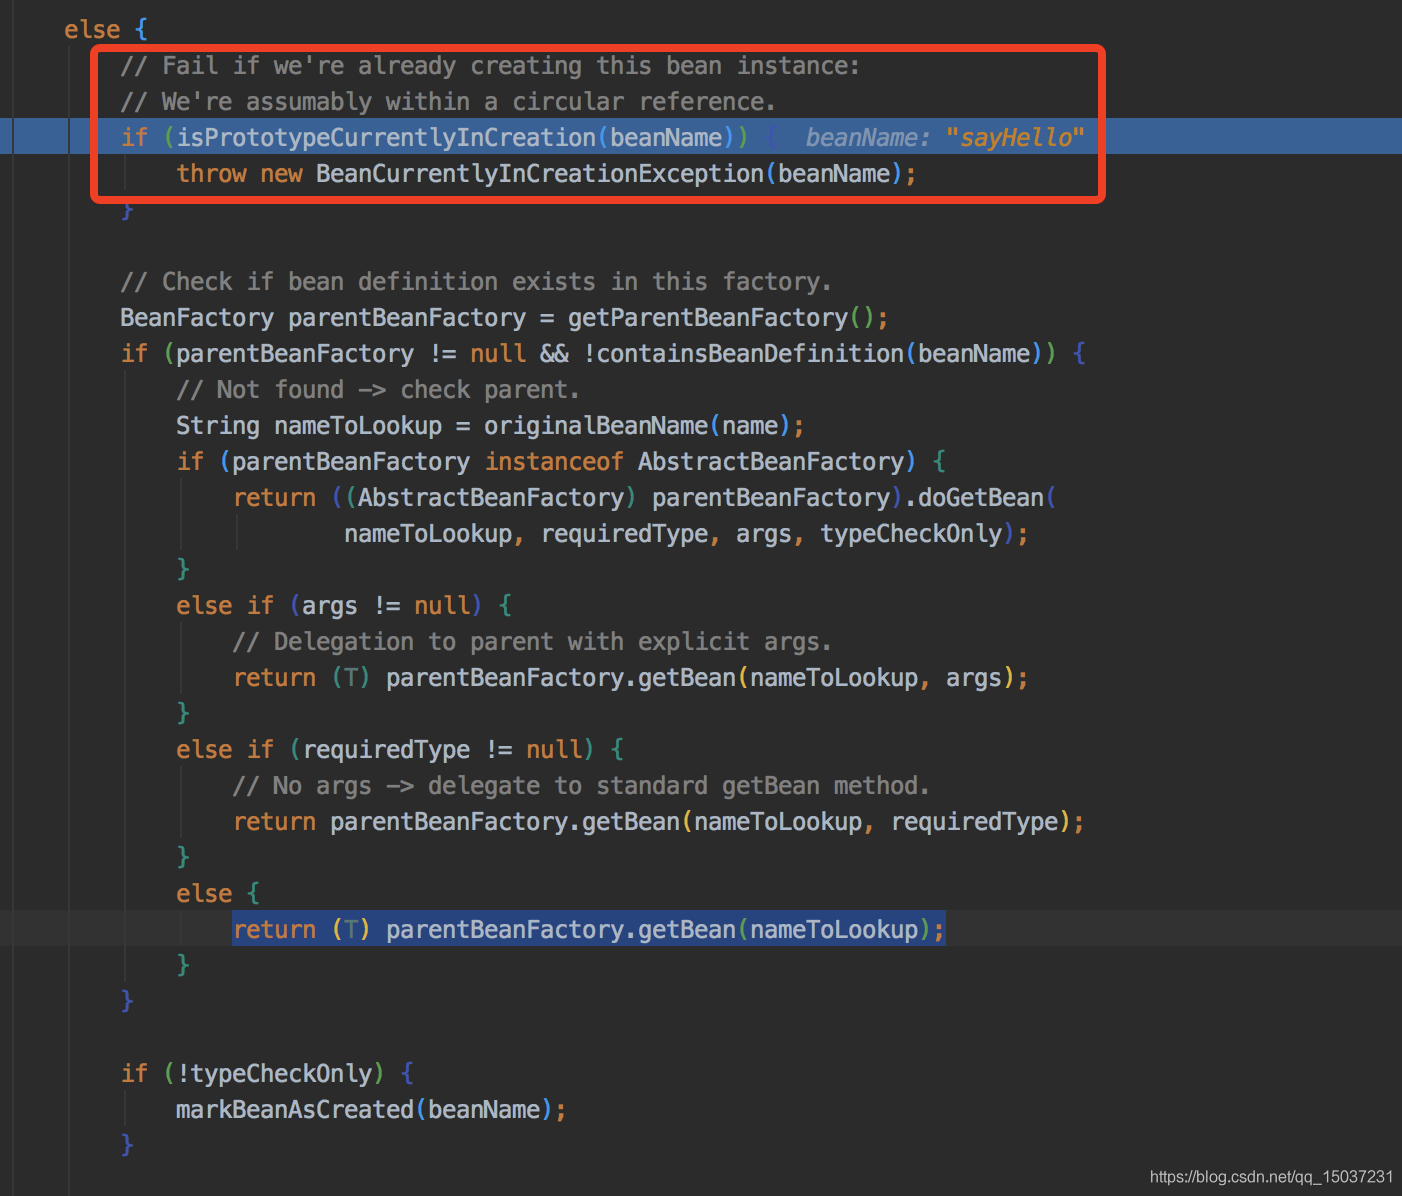
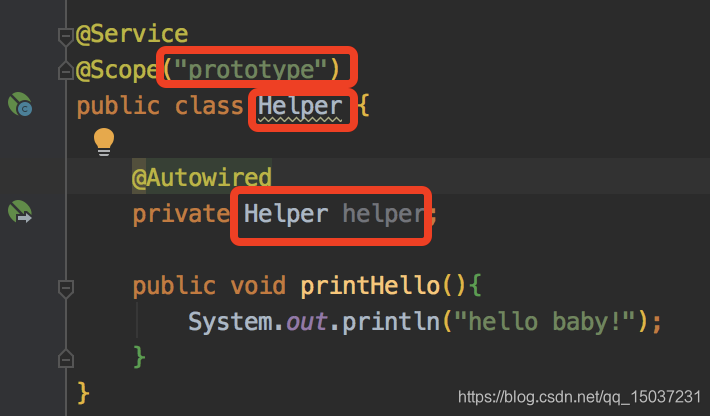
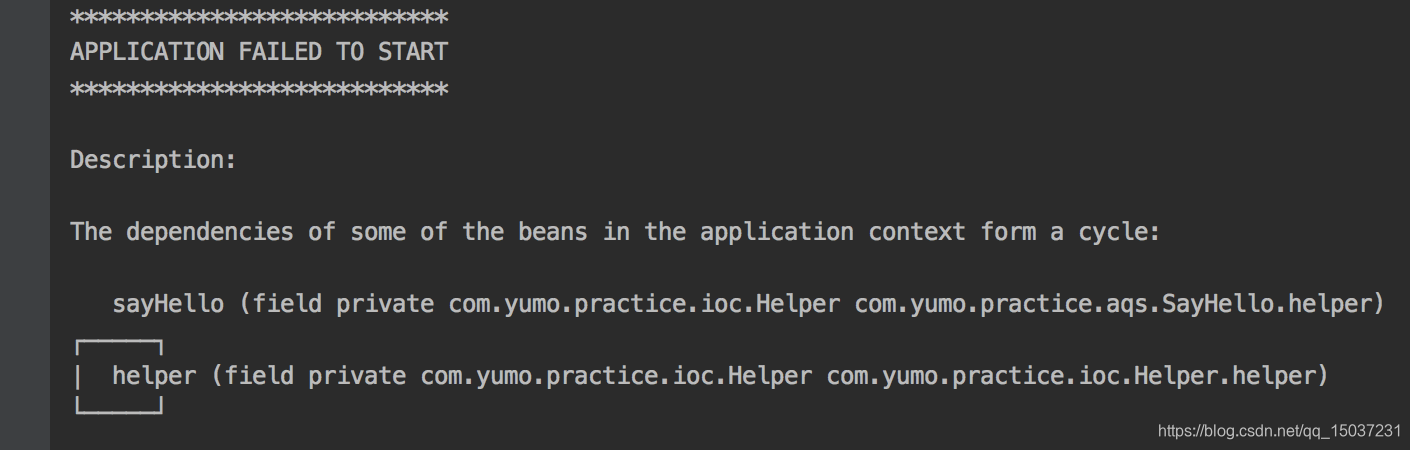
那么代碼執行到這里一但發現Prototype類型的bean已經在構建了,便說明出現了循環引用,便直接拋出異常。舉個小荔枝如下:
在spring容器中會根據bean定義的scope來創建實例對象,其中我們比較常用的scope定義有兩種即:singleton和prototype。
- singleton:
標記為singleton的bean在容器中只存在一個實例,所有對該對象的引用將共享這個實例。該實例從容器啟動構建好后,就一直存活到容器退出,與容器“幾乎”擁有相同的“壽命”。- prototype:
容器在接收到該類型對象的請求時,會每次都重新生成一個新的對象實例給請求方。當容器將對象實例返回給請求方后,容器就不再擁有當前返回對象的引用,請求方需要自己負責該對象后續生命周期的管理。有點類似于我們使用new創建對象,但區別在于我們用new創建的對像無法進行依賴注入,需要我們手動注入依賴,而prototype類型bean的實例化和依賴注入容器都會幫我們處理。有一點值得注意的是:當一個單例類型的bean引用一個prototype類型的bean時,prototype類型的bean也會變成單例。這主要是因為單例bean的依賴注入只會在容器啟動時執行一次。如果要解決這個問題,可以改為手動調用getBean方法,也可以使用@lookup注解。
再接下來的邏輯其實就比較清晰了,首先獲取Bean的定義信息,然后判斷下是否有DependsOn依賴的Bean,沒錯這里就是@DependsOn注解發揮作用的地方,如果我們的Bean在構建前必須要保證某個Bean已經構建好,那么我們就可以使用這個@DependsOn這個注解。我們可以看到實現邏輯其實很簡單,就是取出所有依賴的Bean,然后逐個調用getBean接口依次構建。在處理好依賴的Bean后,容器會根據Bean的類型進行構建,Bean主要有Singleton和Prototype兩種類型,當然還有很多我們不常用的類型,這里我們就不管了。因為一般我們使用的Bean都是Singleton類型的,所以我們就直接看Singleton類型bean的構建方法。
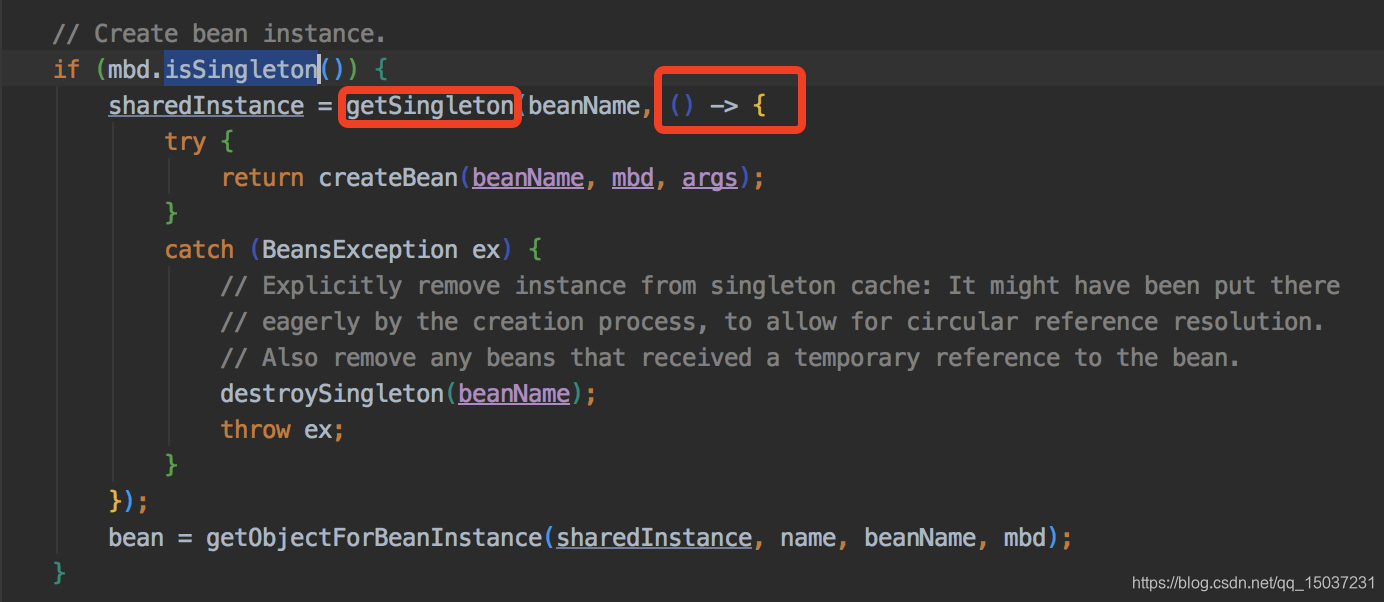
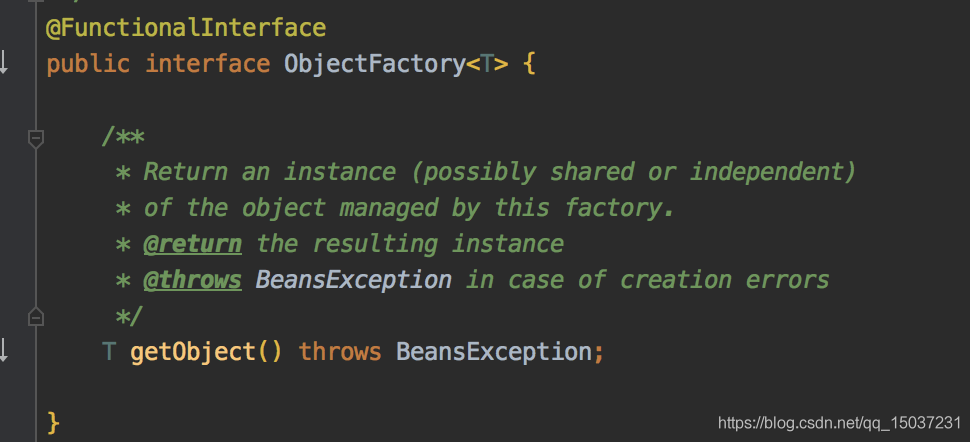
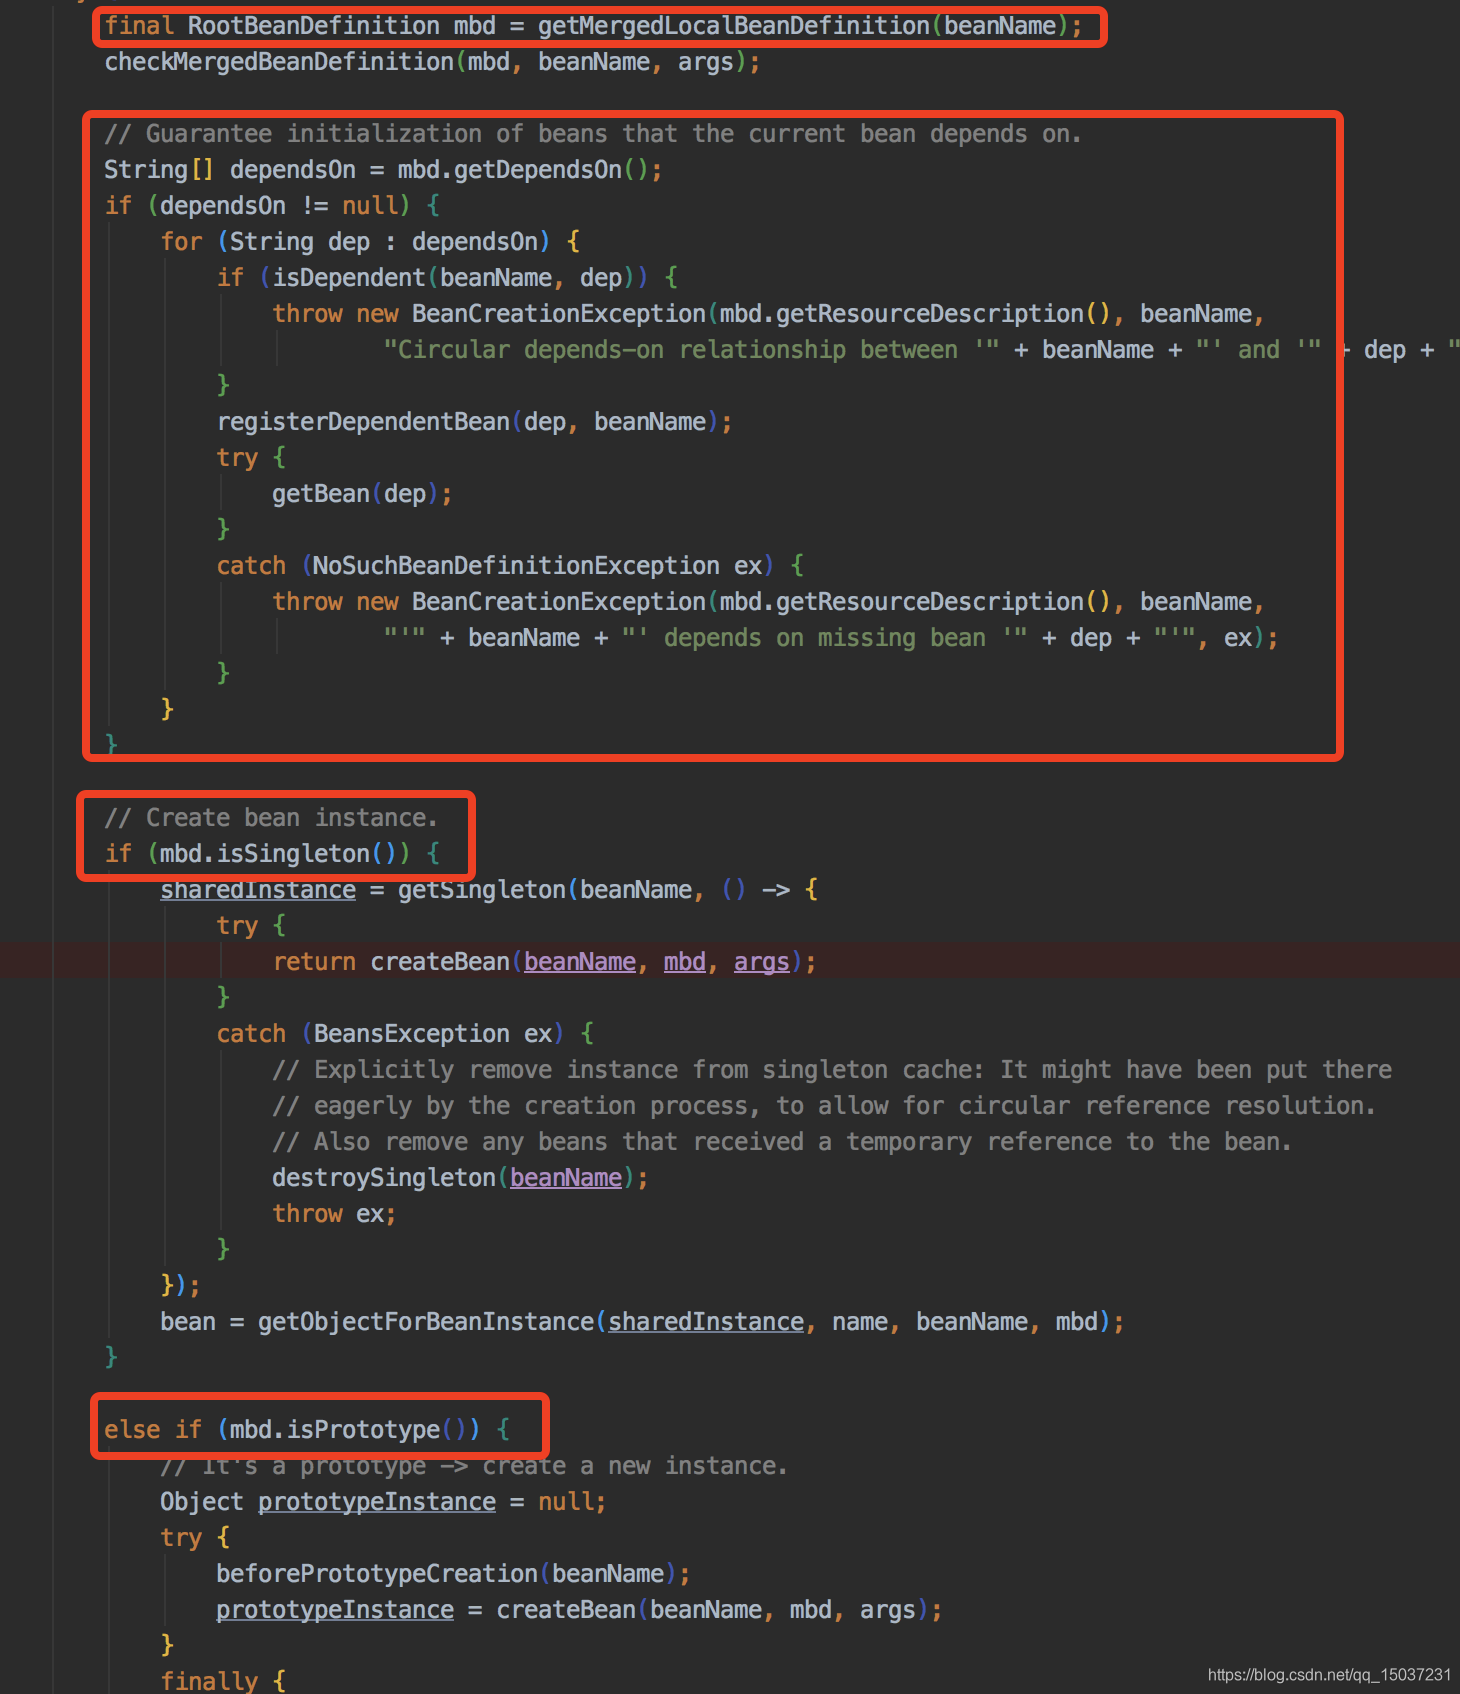 我們可以看到singleton類型bean的構建調用了DefaultSingletonBeanRegistry實現的getSingleton方法。該方法有兩個參數,第一個為bean的名字beanName,第二個為ObjectFactory<?> singletonFactory,是一個函數式接口,該函數式接口之后會在getSingleton方法中使用,該函數式接口的主要實現是createBean方法。
下面是DefaultSingletonBeanRegistry#getSingleton函數的實現代碼,其核心的四個函數為:
// 前置檢查,通過構建中bean集合(singletonsCurrentlyInCreation)來檢測該bean是否進行了重復構建,
// 可以防止構造器注入可能導致的循環引用問題
beforeSingletonCreation(beanName);
// 調用函數式接口ObjectFactory的具體實現邏輯,即上文中getSingleton方法的第二個參數,主要實現就是createBean方法
singletonFactory.getObject();
// 后置處理,將當前bean從構建中bean集合(singletonsCurrentlyInCreation)中移除。
afterSingletonCreation(beanName);
// 把結果存在singletonObjects中,并刪除一些用于處理循環引用的中間狀態
addSingleton(beanName, singletonObject);
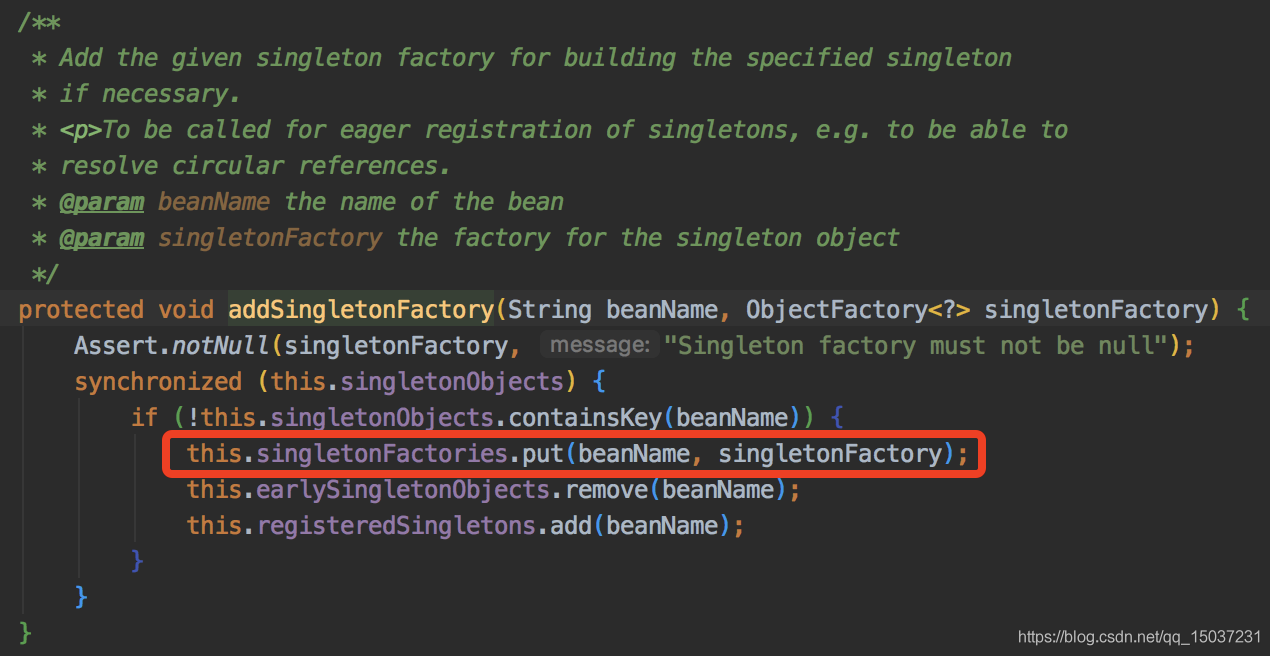
public Object getSingleton(String beanName, ObjectFactory<?> singletonFactory) {Assert.notNull(beanName, "Bean name must not be null");synchronized (this.singletonObjects) {// 查看單例bean是否已經構建好,凡是構建好的單例bean,都會存在Map<String, Object> singletonObjects里面Object singletonObject = this.singletonObjects.get(beanName);if (singletonObject == null) {// this.singletonsCurrentlyInDestruction是個boolean類型,記錄的是當前這個單例bean是否正在被銷毀,// 如果是true,代表單例bean已經執行了自身的destroy銷毀方法,或者有異常的時候執行了destroySingleton方法等情況if (this.singletonsCurrentlyInDestruction) {throw new BeanCreationNotAllowedException(beanName,"Singleton bean creation not allowed while singletons of this factory are in destruction " +"(Do not request a bean from a BeanFactory in a destroy method implementation!)");}if (logger.isDebugEnabled()) {logger.debug("Creating shared instance of singleton bean '" + beanName + "'");}// 前置檢查,通過構建中bean集合(singletonsCurrentlyInCreation)來檢測該bean是否進行了重復構建,// 可以防止構造器注入可能導致的循環引用問題beforeSingletonCreation(beanName);boolean newSingleton = false;// this.suppressedExceptions是個Set,這個Set里面存放著各種異常信息boolean recordSuppressedExceptions = (this.suppressedExceptions == null);// 如果此時suppressedExceptions為空,就new LinkedHashSet<>()來保存接下來可能發生的異常if (recordSuppressedExceptions) {this.suppressedExceptions = new LinkedHashSet<>();}try {// 調用ObjectFactory函數式方法singletonObject = singletonFactory.getObject();newSingleton = true;}catch (IllegalStateException ex) {// 看這個時候單例是否已經被創建了,如果是的話,不報錯,繼續執行singletonObject = this.singletonObjects.get(beanName);// 如果沒有被創建,報錯if (singletonObject == null) {throw ex;}}catch (BeanCreationException ex) {if (recordSuppressedExceptions) {// 把出現過的異常加進去for (Exception suppressedException : this.suppressedExceptions) {ex.addRelatedCause(suppressedException);}}throw ex;}finally {if (recordSuppressedExceptions) {this.suppressedExceptions = null;}// 后置處理,將當前bean從構建中bean集合(singletonsCurrentlyInCreation)中移除。afterSingletonCreation(beanName);}if (newSingleton) {// 把結果存在singletonObjects中,并刪除一些中間狀態addSingleton(beanName, singletonObject);}}return singletonObject;}}
接下來我們進入createBean(beanName, mbd, args)函數中,具體代碼如下所示:

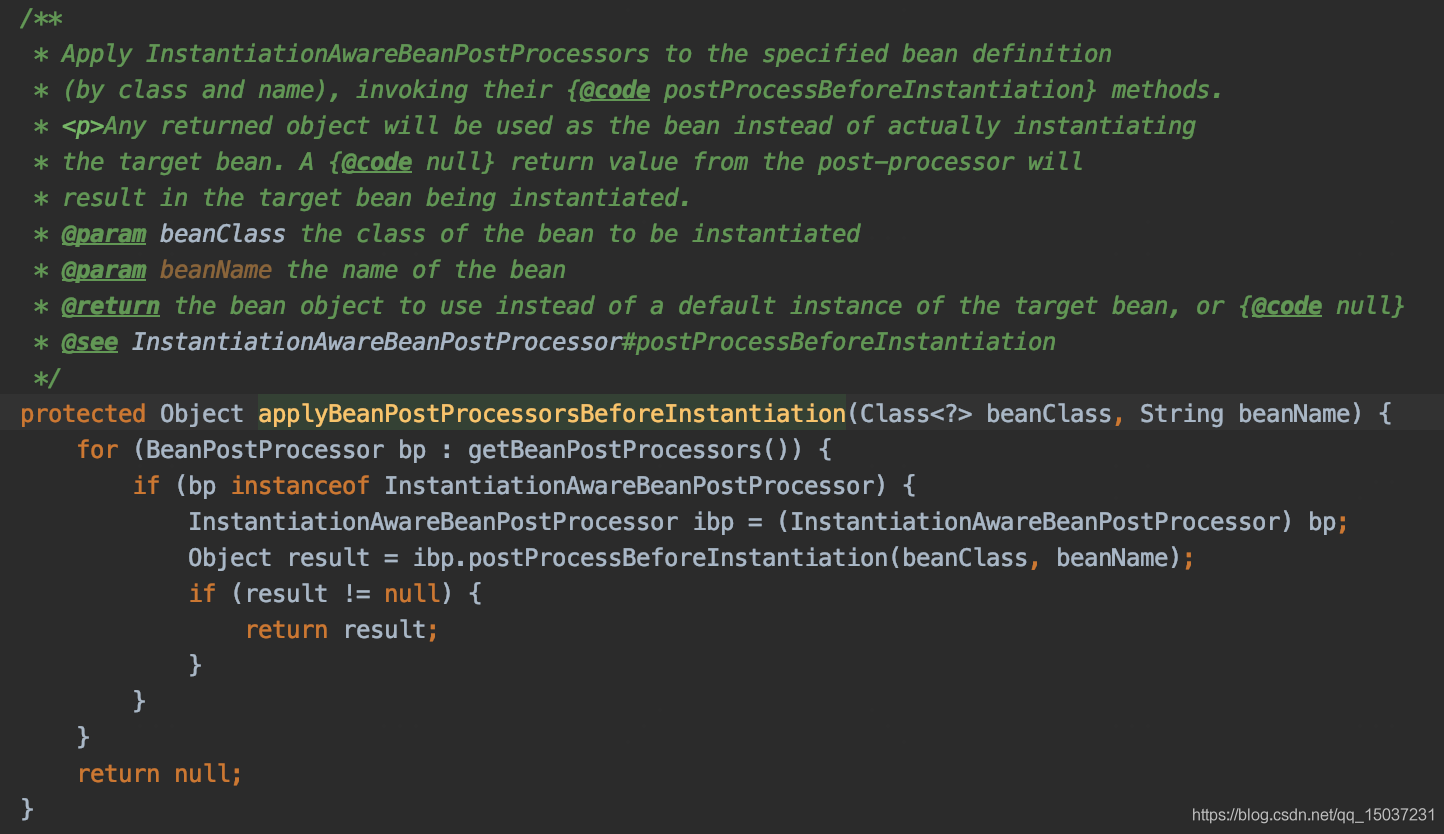
函數內首先做了些準備工作,包括:根據設置的class屬性和className解析class、對override屬性進行標記和驗證(這里需要注意的是Spring的配置里面根本沒有override-method之類的配置,但是在spring配置中存在lookup-method和replace-method,這兩個配置會被統一存放在beanDefinition中的methodOverrides屬性里,這個方法就是對這兩個配置做操作)。在這之后會執行resolveBeforeInstantiation函數,千萬不要被它上面的注釋誤導了,這個函數并不是用來生成我們 “通常意義” 上的動態代理的,我們 “通常意義” 上的動態代理實現在后面會有介紹。
我們可以看到resolveBeforeInstantiation里面實際上調用了applyBeanPostProcessorsBeforeInstantiation接口,在該接口里面會執行所有InstantiationAwareBeanPostProcessor的postProcessBeforeInstantiation方法。

 在這我們先介紹下InstantiationAwareBeanPostProcessor,大家應該都知道BeanPostProcessor接口,這個接口作用于Bean的構建過程,可以對Bean進行一些自定義的修改,比如屬性值的修改、構造器的選擇等等。而InstantiationAwareBeanPostProcessor接口繼承自BeanPostProcessor接口。新增了3個方法,其類圖如下:
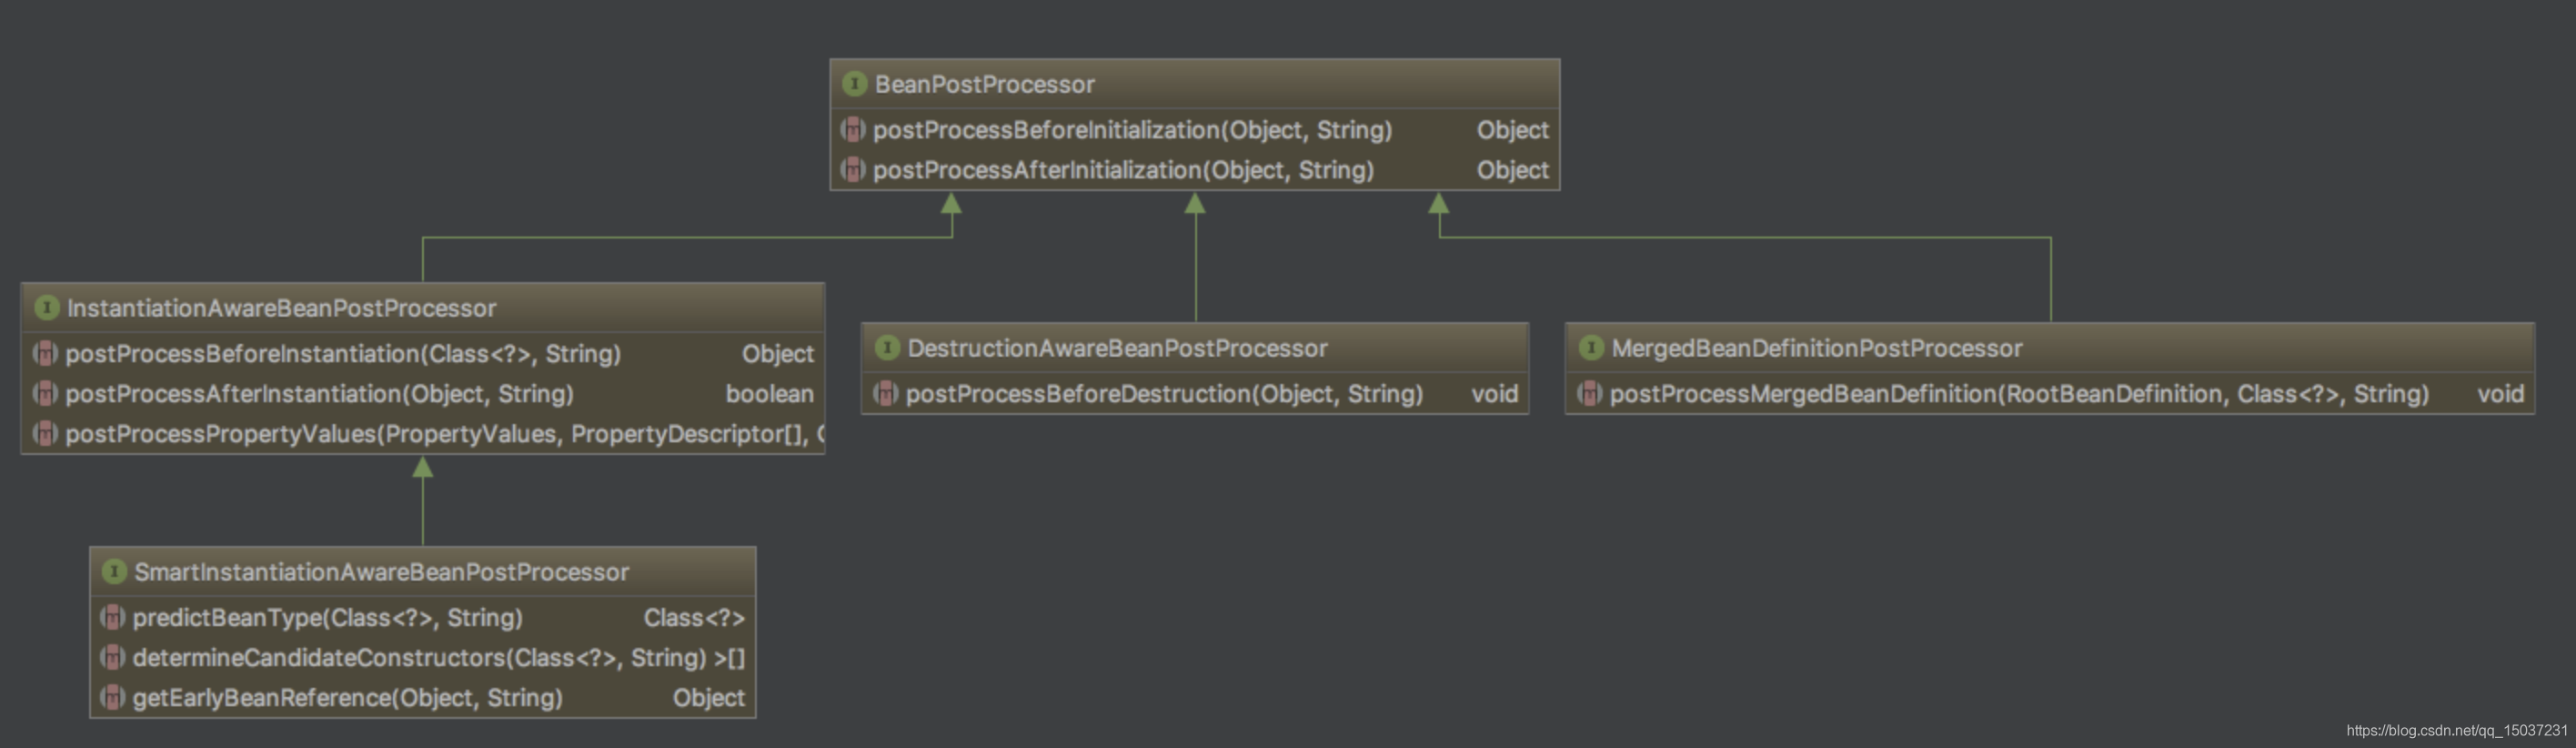
通過名字我們就可以知道,新增的3個接口中前兩個分別作用于Bean實例化前和實例化后,最后一個接口postProcessPropertyValues作用于Bean的初始化階段,主要用來設置對象屬性(依賴注入),其中我們最常用的注入依賴對象的@Autowired注解,就是通過實現這個接口來進行依賴注入的。
我們接著介紹applyBeanPostProcessorsBeforeInstantiation方法,我們可以看到該方法會找到所有InstantiationAwareBeanPostProcessor類型的BeanPostProcessor,然后調用其實現的postProcessBeforeInstantiation的方法。我們最常見的該方法的一個實現類是AbstractAutoProxyCreator,我們看下其具體實現:
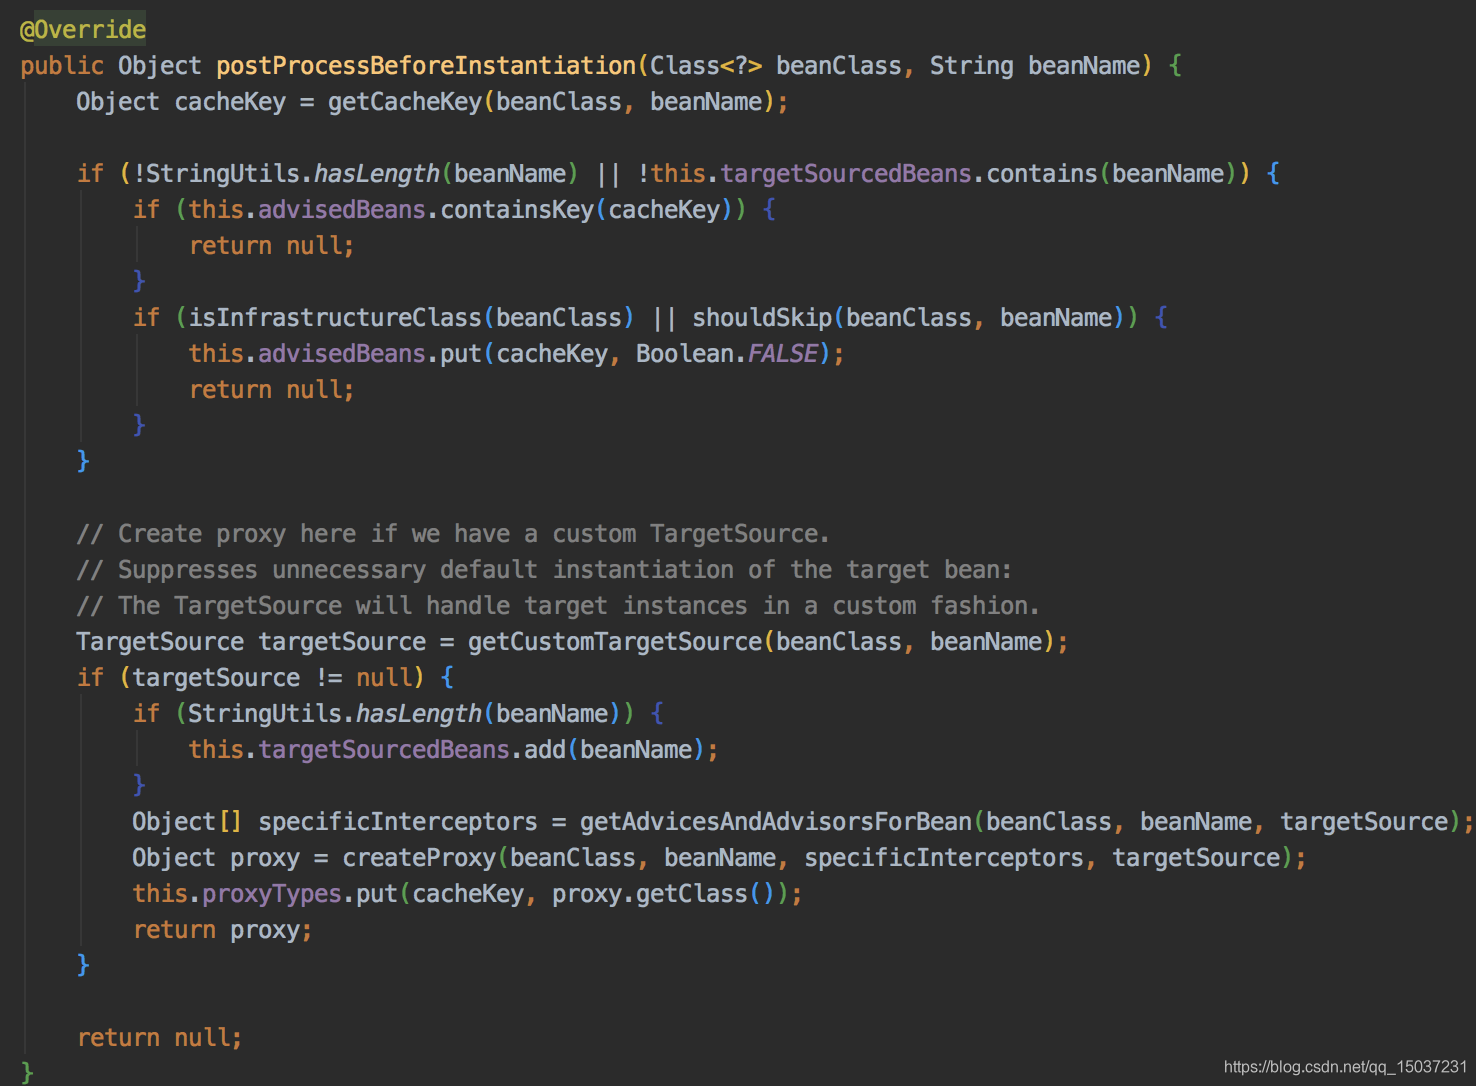
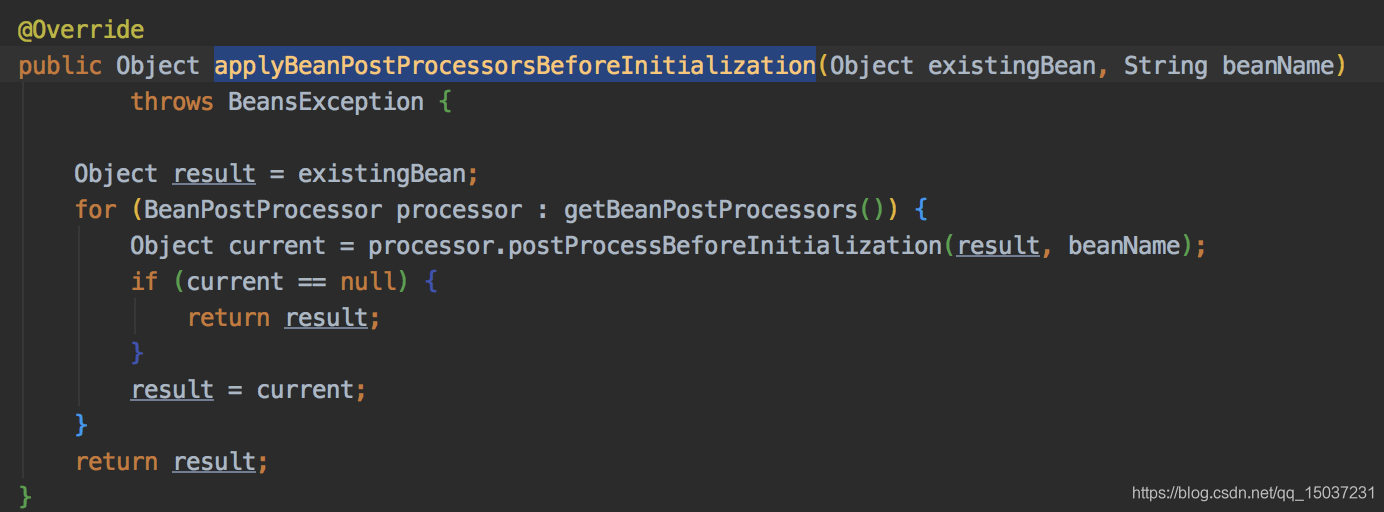
這里shouldSkip(beanClass, beanName)方法是一個很容易忽略的方法,但這個方法第一次被調用時把所有的切面(Advisor)加載完成。另外我們可以看到,如果我們有自定義的TargetSource,那么在這里就會直接創建代理對象。postProcessBeforeInstantiation()返回對象后,會對該對象執行所有BeanPostProcessor的postProcessorAfterInitialization()方法,最后直接返回對象給用戶。
TargetSource相當于代理中目標對象的容器。當方法調用穿過所有切面邏輯,到達調用鏈的終點時,本該調用目標對象的方法了。但此時Spring AOP做了點手腳,他并不是直接調用這個目標對象的方法,而是需要通過TargetSource的getTarget()方法獲取目標對象,然后再調用目標對象的相應方法。這種方式使得TargetSource擁有了目標對象的控制權,可以控制每次方法調用實際作用到的具體對象實例。
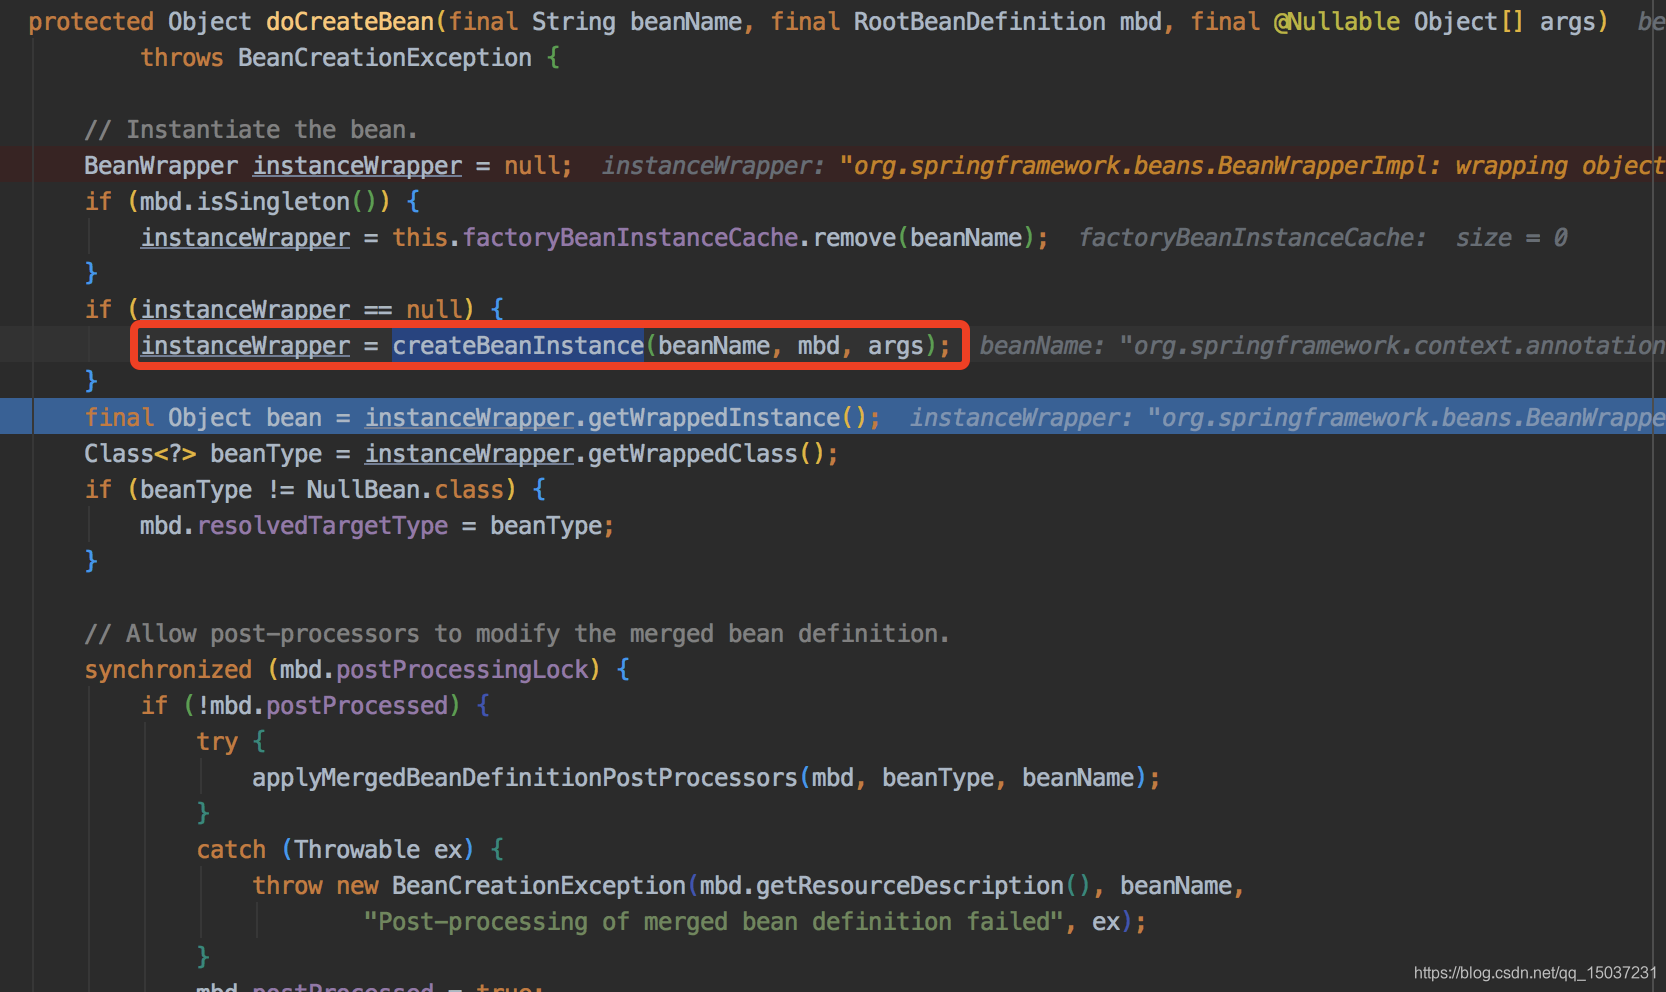
我們繼續往下走進入doCreateBean(beanName, mbdToUse, args)方法。在spring里有個有意思的現象:大部分核心功能的實際實現函數都是以do開頭的。現在我們走到了doCreateBean函數,通過名字我們就可以知道該函數用來構建Bean,而實際上Bean實例化和初始化的核心邏輯都在doCreateBean方法中,所以接下來的所有講解都是圍繞doCreateBean方法進行的。
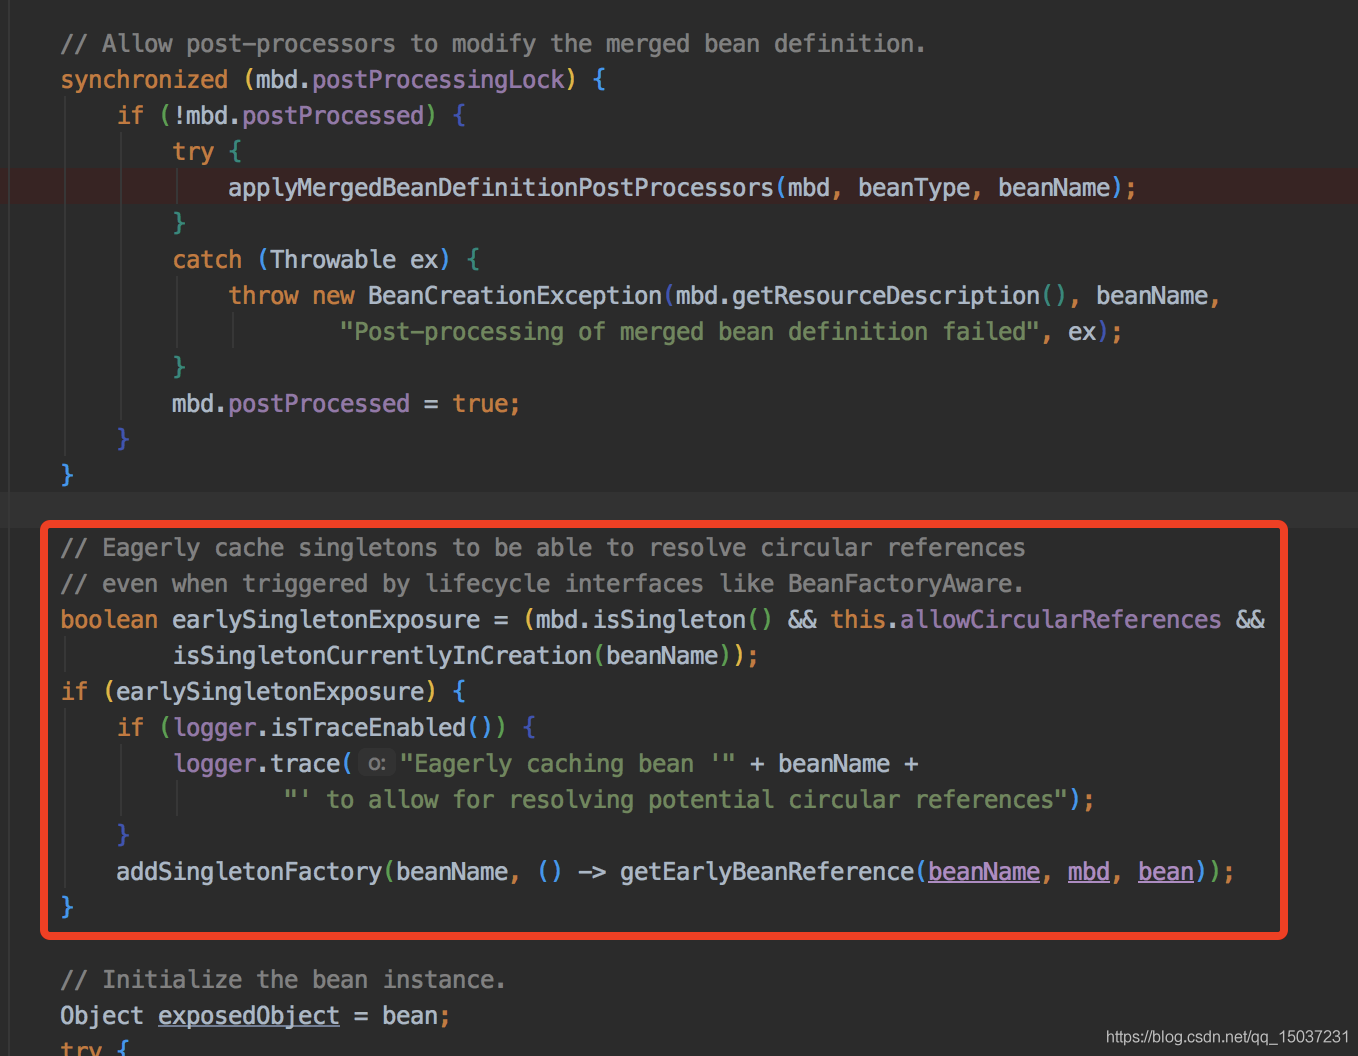
/*** Actually create the specified bean. Pre-creation processing has already happened* at this point, e.g. checking {@code postProcessBeforeInstantiation} callbacks.* <p>Differentiates between default bean instantiation, use of a* factory method, and autowiring a constructor.* @param beanName the name of the bean* @param mbd the merged bean definition for the bean* @param args explicit arguments to use for constructor or factory method invocation* @return a new instance of the bean* @throws BeanCreationException if the bean could not be created* @see #instantiateBean* @see #instantiateUsingFactoryMethod* @see #autowireConstructor*/protected Object doCreateBean(final String beanName, final RootBeanDefinition mbd, final @Nullable Object[] args)throws BeanCreationException {// Instantiate the bean.BeanWrapper instanceWrapper = null;if (mbd.isSingleton()) {// 用于處理factoryBeaninstanceWrapper = this.factoryBeanInstanceCache.remove(beanName);}if (instanceWrapper == null) {instanceWrapper = createBeanInstance(beanName, mbd, args);}final Object bean = instanceWrapper.getWrappedInstance();Class<?> beanType = instanceWrapper.getWrappedClass();if (beanType != NullBean.class) {mbd.resolvedTargetType = beanType;}// Allow post-processors to modify the merged bean definition.synchronized (mbd.postProcessingLock) {if (!mbd.postProcessed) {try {applyMergedBeanDefinitionPostProcessors(mbd, beanType, beanName);}catch (Throwable ex) {throw new BeanCreationException(mbd.getResourceDescription(), beanName,"Post-processing of merged bean definition failed", ex);}mbd.postProcessed = true;}}// Eagerly cache singletons to be able to resolve circular references// even when triggered by lifecycle interfaces like BeanFactoryAware.boolean earlySingletonExposure = (mbd.isSingleton() && this.allowCircularReferences &&isSingletonCurrentlyInCreation(beanName));if (earlySingletonExposure) {if (logger.isTraceEnabled()) {logger.trace("Eagerly caching bean '" + beanName +"' to allow for resolving potential circular references");}addSingletonFactory(beanName, () -> getEarlyBeanReference(beanName, mbd, bean));}// Initialize the bean instance.Object exposedObject = bean;try {populateBean(beanName, mbd, instanceWrapper);exposedObject = initializeBean(beanName, exposedObject, mbd);}catch (Throwable ex) {if (ex instanceof BeanCreationException && beanName.equals(((BeanCreationException) ex).getBeanName())) {throw (BeanCreationException) ex;}else {throw new BeanCreationException(mbd.getResourceDescription(), beanName, "Initialization of bean failed", ex);}}if (earlySingletonExposure) {Object earlySingletonReference = getSingleton(beanName, false);if (earlySingletonReference != null) {if (exposedObject == bean) {exposedObject = earlySingletonReference;}else if (!this.allowRawInjectionDespiteWrapping && hasDependentBean(beanName)) {String[] dependentBeans = getDependentBeans(beanName);Set<String> actualDependentBeans = new LinkedHashSet<>(dependentBeans.length);for (String dependentBean : dependentBeans) {if (!removeSingletonIfCreatedForTypeCheckOnly(dependentBean)) {actualDependentBeans.add(dependentBean);}}if (!actualDependentBeans.isEmpty()) {throw new BeanCurrentlyInCreationException(beanName,"Bean with name '" + beanName + "' has been injected into other beans [" +StringUtils.collectionToCommaDelimitedString(actualDependentBeans) +"] in its raw version as part of a circular reference, but has eventually been " +"wrapped. This means that said other beans do not use the final version of the " +"bean. This is often the result of over-eager type matching - consider using " +"'getBeanNamesOfType' with the 'allowEagerInit' flag turned off, for example.");}}}}// Register bean as disposable.try {registerDisposableBeanIfNecessary(beanName, bean, mbd);}catch (BeanDefinitionValidationException ex) {throw new BeanCreationException(mbd.getResourceDescription(), beanName, "Invalid destruction signature", ex);}return exposedObject;}
這個函數的主體邏輯如下:
- 實例化bean,并封裝進BeanWrapper中
- 執行所有MergedBeanDefinitionPostProcessor處理器
- 進行依賴注入
- 執行初始化邏輯,及對bean進行屬性修改及切面增強
- 注冊Bean的銷毀邏輯
- 返回構建好的bean
BeanWrapper相當于一個代理器,Spring委托BeanWrapper完成Bean屬性的填充工作。BeanWrapper繼承了PropertyAccessor和PropertyEditorRegistry。BeanWrapperImpl是BeanWrapper接口的默認實現,它會緩存Bean的內省結果而提高效率。BeanWrapper對bean實例的操作很方便,可以免去直接使用java反射API帶來的繁瑣。
factoryBean的處理邏輯忽略,接下來我們看createBeanInstance方法,該方法主要用來實例化bean,bean實例化的核心邏輯就在該方法中。
/*** Create a new instance for the specified bean, using an appropriate instantiation strategy:* factory method, constructor autowiring, or simple instantiation.* @param beanName the name of the bean* @param mbd the bean definition for the bean* @param args explicit arguments to use for constructor or factory method invocation* @return a BeanWrapper for the new instance* @see #obtainFromSupplier* @see #instantiateUsingFactoryMethod* @see #autowireConstructor* @see #instantiateBean*/protected BeanWrapper createBeanInstance(String beanName, RootBeanDefinition mbd, @Nullable Object[] args) {// Make sure bean class is actually resolved at this point.Class<?> beanClass = resolveBeanClass(mbd, beanName);// 確保class不為空,并且訪問權限為publicif (beanClass != null && !Modifier.isPublic(beanClass.getModifiers()) && !mbd.isNonPublicAccessAllowed()) {throw new BeanCreationException(mbd.getResourceDescription(), beanName,"Bean class isn't public, and non-public access not allowed: " + beanClass.getName());}Supplier<?> instanceSupplier = mbd.getInstanceSupplier();if (instanceSupplier != null) {return obtainFromSupplier(instanceSupplier, beanName);}if (mbd.getFactoryMethodName() != null) {return instantiateUsingFactoryMethod(beanName, mbd, args);}// Shortcut when re-creating the same bean...// 一個類可能有多個構造器,所以Spring得根據參數個數、類型確定需要調用的構造器// 在使用構造器創建實例后,Spring會將解析過后確定下來的構造器或工廠方法保存在緩存中,避免再次創建相同bean時再次解析boolean resolved = false;boolean autowireNecessary = false;if (args == null) {synchronized (mbd.constructorArgumentLock) {if (mbd.resolvedConstructorOrFactoryMethod != null) {resolved = true;autowireNecessary = mbd.constructorArgumentsResolved;}}}if (resolved) {if (autowireNecessary) {return autowireConstructor(beanName, mbd, null, null);}else {return instantiateBean(beanName, mbd);}}// Candidate constructors for autowiring?// 需要根據參數解析、確定構造函數Constructor<?>[] ctors = determineConstructorsFromBeanPostProcessors(beanClass, beanName);// 解析的構造器不為空 || 注入類型為構造函數自動注入 || bean定義中有構造器參數 || 傳入參數不為空if (ctors != null || mbd.getResolvedAutowireMode() == AUTOWIRE_CONSTRUCTOR ||mbd.hasConstructorArgumentValues() || !ObjectUtils.isEmpty(args)) {return autowireConstructor(beanName, mbd, ctors, args);}// Preferred constructors for default construction?ctors = mbd.getPreferredConstructors();if (ctors != null) {return autowireConstructor(beanName, mbd, ctors, null);}// No special handling: simply use no-arg constructor.return instantiateBean(beanName, mbd);}
上面方法的目的就是選出一個策略來實例化一個對象,那有什么策略呢? 這就看程序員是怎么配置的了,程序員可以配置工廠方法,指定構造方法,或者是程序員沒有做出任何干涉,讓Spring按自己的方式去實例化。
上面代碼的主要邏輯如下:
- 如果bean定義中存在 InstanceSupplier ,會使用這個回調接口創建對象(應該是3.X以后新加的,3.X的源碼中沒有)
- 根據配置的factoryMethodName或factory-method創建bean(通過工廠方法創建對象)
- 解析構造函數并進行實例化
通過回調接口或工廠方法創建對象的情況,我們接觸的比較少,我們這里主要介紹使用構造器創建bean實例。
因為一個類可能有多個構造函數,所以需要根據配置文件中配置的參數或傳入的參數確定最終調用的構造函數,因為判斷過程會比較消耗性能,所以Spring會將解析、確定好的構造函數緩存到BeanDefinition中的resolvedConstructorOrFactoryMethod字段中。在下次創建相同bean的時候,會直接從RootBeanDefinition中的屬性resolvedConstructorOrFactoryMethod緩存的值獲取,避免再次解析。
determineConstructorsFromBeanPostProcessors方法會幫我們選擇合適的構造器,我們進該方法中:
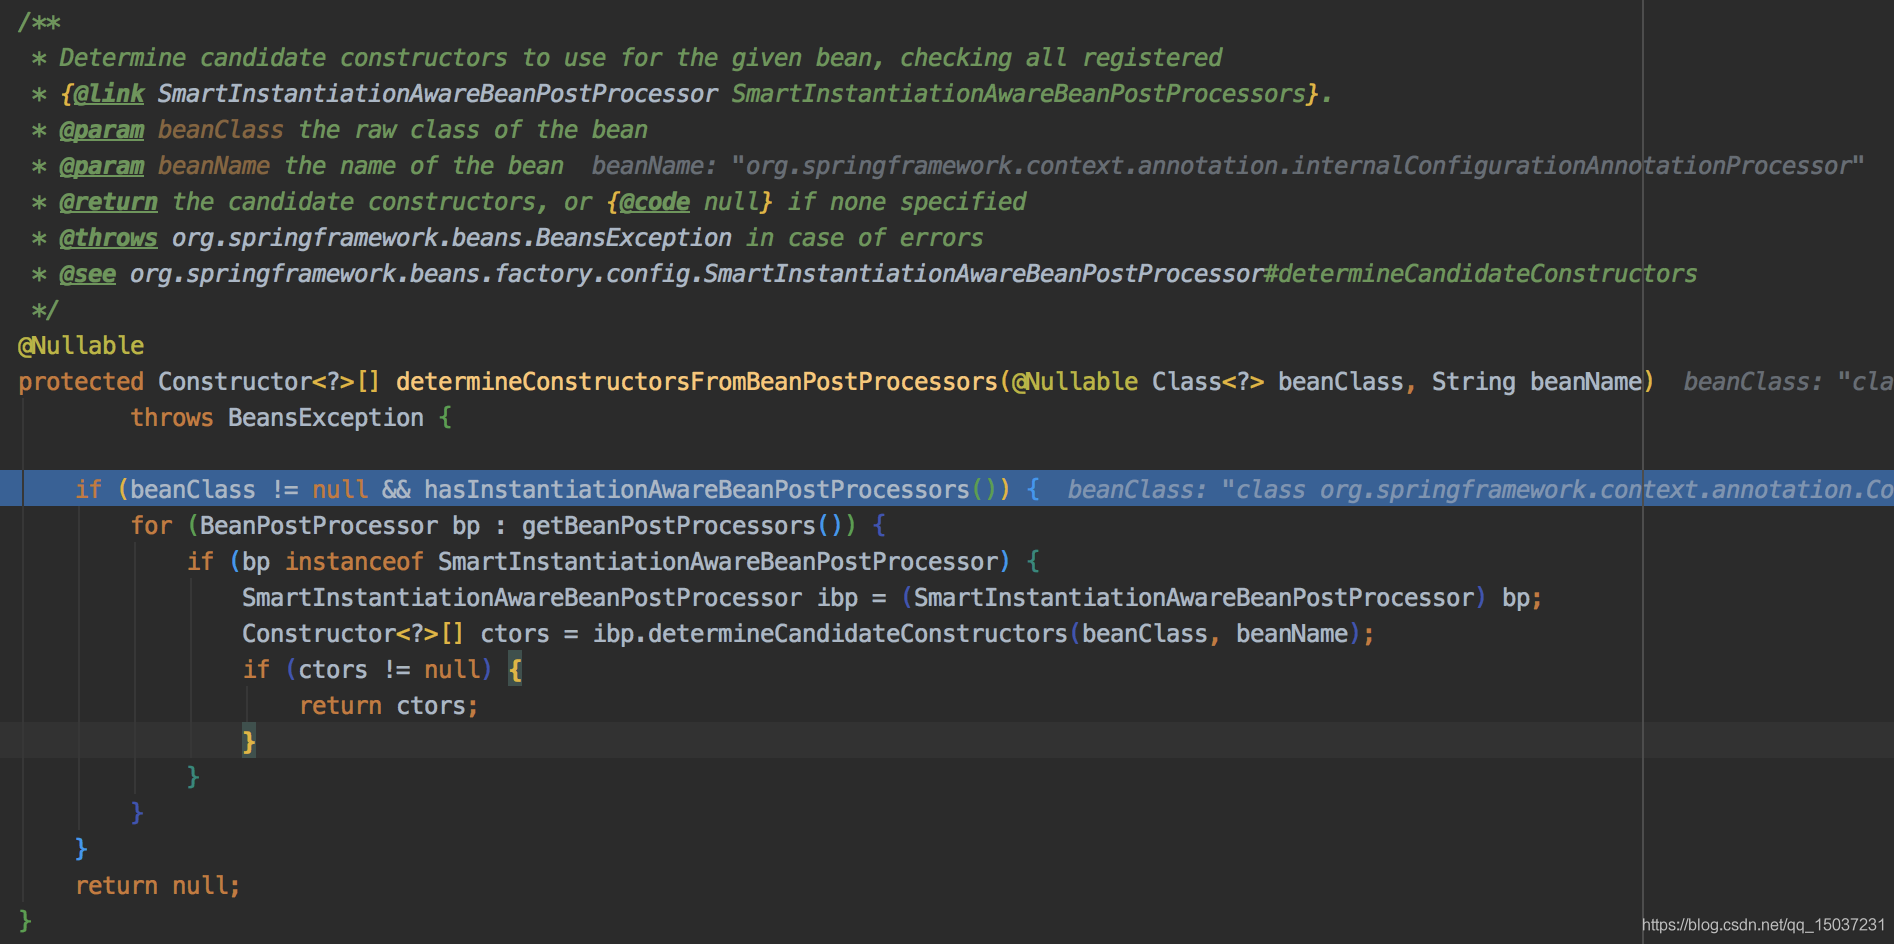
在這段代碼中會使用SmartInstantiationAwareBeanPostProcessor類型的BeanPostProcessor選擇合適的構造器,目前該功能主要由SmartInstantiationAwareBeanPostProcessor的子類AutowiredAnnotationBeanPostProcessor實現,下面是相關代碼。
@Override@Nullablepublic Constructor<?>[] determineCandidateConstructors(Class<?> beanClass, final String beanName)throws BeanCreationException {// Let's check for lookup methods here...if (!this.lookupMethodsChecked.contains(beanName)) {if (AnnotationUtils.isCandidateClass(beanClass, Lookup.class)) {try {Class<?> targetClass = beanClass;do {ReflectionUtils.doWithLocalMethods(targetClass, method -> {Lookup lookup = method.getAnnotation(Lookup.class);if (lookup != null) {Assert.state(this.beanFactory != null, "No BeanFactory available");LookupOverride override = new LookupOverride(method, lookup.value());try {RootBeanDefinition mbd = (RootBeanDefinition)this.beanFactory.getMergedBeanDefinition(beanName);mbd.getMethodOverrides().addOverride(override);}catch (NoSuchBeanDefinitionException ex) {throw new BeanCreationException(beanName,"Cannot apply @Lookup to beans without corresponding bean definition");}}});targetClass = targetClass.getSuperclass();}while (targetClass != null && targetClass != Object.class);}catch (IllegalStateException ex) {throw new BeanCreationException(beanName, "Lookup method resolution failed", ex);}}this.lookupMethodsChecked.add(beanName);}//先查找緩存Constructor<?>[] candidateConstructors = this.candidateConstructorsCache.get(beanClass);//若是緩存中沒有if (candidateConstructors == null) {// Fully synchronized resolution now...//同步此方法synchronized (this.candidateConstructorsCache) {candidateConstructors = this.candidateConstructorsCache.get(beanClass);//雙重判斷,避免多線程并發問題if (candidateConstructors == null) {Constructor<?>[] rawCandidates;try {//獲取此Bean的所有構造器rawCandidates = beanClass.getDeclaredConstructors();}catch (Throwable ex) {throw new BeanCreationException(beanName, "Resolution of declared constructors on bean Class [" +              beanClass.getName() + "] from ClassLoader [" + beanClass.getClassLoader() + "] failed", ex);}//最終適用的構造器集合List<Constructor<?>> candidates = new ArrayList<>(rawCandidates.length);//存放依賴注入的required=true的構造器Constructor<?> requiredConstructor = null;//存放默認構造器Constructor<?> defaultConstructor = null;Constructor<?> primaryConstructor = BeanUtils.findPrimaryConstructor(beanClass);int nonSyntheticConstructors = 0;for (Constructor<?> candidate : rawCandidates) {if (!candidate.isSynthetic()) {nonSyntheticConstructors++;}else if (primaryConstructor != null) {continue;}//查找當前構造器上的注解AnnotationAttributes ann = findAutowiredAnnotation(candidate);//若沒有注解if (ann == null) {Class<?> userClass = ClassUtils.getUserClass(beanClass);if (userClass != beanClass) {try {Constructor<?> superCtor =userClass.getDeclaredConstructor(candidate.getParameterTypes());ann = findAutowiredAnnotation(superCtor);}catch (NoSuchMethodException ex) {// Simply proceed, no equivalent superclass constructor found...}}}//若有注解if (ann != null) {//已經存在一個required=true的構造器了,拋出異常if (requiredConstructor != null) {throw new BeanCreationException(beanName, "Invalid autowire-marked constructor: " + candidate + ". Found constructor with 'required' Autowired annotation already: " + requiredConstructor);}//判斷此注解上的required屬性boolean required = determineRequiredStatus(ann);//若為trueif (required) {if (!candidates.isEmpty()) {throw new BeanCreationException(beanName, "Invalid autowire-marked constructors: " + candidates + ". Found constructor with 'required' Autowired annotation: " + candidate);}//將當前構造器加入requiredConstructor集合requiredConstructor = candidate;}//加入適用的構造器集合中candidates.add(candidate);}//如果該構造函數上沒有注解,再判斷構造函數上的參數個數是否為0else if (candidate.getParameterCount() == 0) {//如果沒有參數,加入defaultConstructor集合defaultConstructor = candidate;}}//適用的構造器集合若不為空if (!candidates.isEmpty()) {// Add default constructor to list of optional constructors, as fallback.//若沒有required=true的構造器if (requiredConstructor == null) {if (defaultConstructor != null) {//將defaultConstructor集合的構造器加入適用構造器集合candidates.add(defaultConstructor);}else if (candidates.size() == 1 && logger.isInfoEnabled()) {logger.info("Inconsistent constructor declaration on bean with name '" + beanName +"': single autowire-marked constructor flagged as optional - " +"this constructor is effectively required since there is no " +"default constructor to fall back to: " + candidates.get(0));}}//將適用構造器集合賦值給將要返回的構造器集合candidateConstructors = candidates.toArray(new Constructor<?>[0]);}//如果適用的構造器集合為空,且Bean只有一個構造器并且此構造器參數數量大于0else if (rawCandidates.length == 1 && rawCandidates[0].getParameterCount() > 0) {//就使用此構造器來初始化candidateConstructors = new Constructor<?>[] {rawCandidates[0]};}//如果構造器有兩個,且默認構造器不為空else if (nonSyntheticConstructors == 2 && primaryConstructor != null &&defaultConstructor != null && !primaryConstructor.equals(defaultConstructor)) {//使用默認構造器返回candidateConstructors = new Constructor<?>[] {primaryConstructor, defaultConstructor};}else if (nonSyntheticConstructors == 1 && primaryConstructor != null) {candidateConstructors = new Constructor<?>[] {primaryConstructor};}else {//上述都不符合的話,只能返回一個空集合了candidateConstructors = new Constructor<?>[0];}//放入緩存,方便下一次調用this.candidateConstructorsCache.put(beanClass, candidateConstructors);}}}//返回candidateConstructors集合,若為空集合返回nullreturn (candidateConstructors.length > 0 ? candidateConstructors : null);
}
上面的代碼首先會查看這個將被實例化的對象中有沒有添加了@Lookup注解的方法,有的話為這種方法生成代理。之后會循環遍歷所有的構造方法,以選取合適的構造方法。這里面的邏輯非常復雜,這里就不做介紹了。
這里順便提下,在Spring中當我們使用lombok的@Builder注解時,該類默認不帶無參構造函數。 若此時使用fastJson將json字符串轉換為實體類,將拋出異常,需要增加@NoArgsConstructor注解防止出現異常。
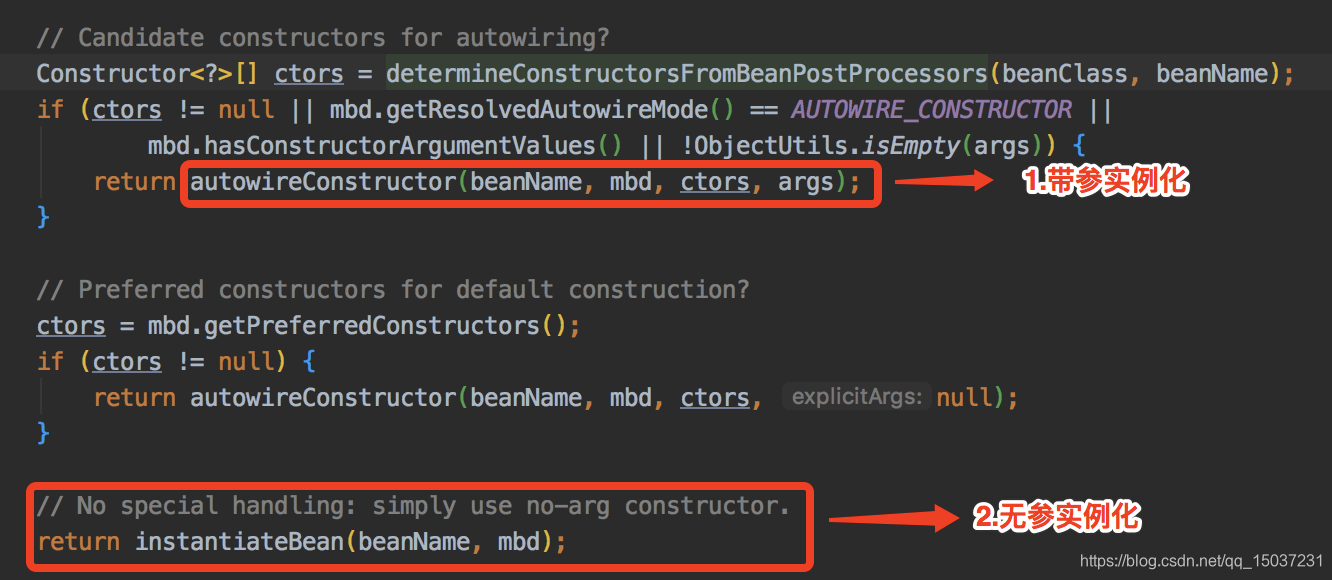
在選定好了構造參數后,我們接下來看對象的實例化過程,Spring的實例化可以分為 【帶參實例化】 及 【無參實例化】 。我們先來看下帶參實例化方法autowireConstructor:
/*** "autowire constructor" (with constructor arguments by type) behavior.* Also applied if explicit constructor argument values are specified,* matching all remaining arguments with beans from the bean factory.* <p>This corresponds to constructor injection: In this mode, a Spring* bean factory is able to host components that expect constructor-based* dependency resolution.* @param beanName the name of the bean* @param mbd the merged bean definition for the bean* @param chosenCtors chosen candidate constructors (or {@code null} if none)* @param explicitArgs argument values passed in programmatically via the getBean method,* or {@code null} if none (-> use constructor argument values from bean definition)* @return a BeanWrapper for the new instance*/public BeanWrapper autowireConstructor(String beanName, RootBeanDefinition mbd,@Nullable Constructor<?>[] chosenCtors, @Nullable Object[] explicitArgs) {BeanWrapperImpl bw = new BeanWrapperImpl();this.beanFactory.initBeanWrapper(bw);Constructor<?> constructorToUse = null;ArgumentsHolder argsHolderToUse = null;Object[] argsToUse = null;if (explicitArgs != null) {argsToUse = explicitArgs;}else {Object[] argsToResolve = null;synchronized (mbd.constructorArgumentLock) {constructorToUse = (Constructor<?>) mbd.resolvedConstructorOrFactoryMethod;if (constructorToUse != null && mbd.constructorArgumentsResolved) {// Found a cached constructor...argsToUse = mbd.resolvedConstructorArguments;if (argsToUse == null) {argsToResolve = mbd.preparedConstructorArguments;}}}if (argsToResolve != null) {argsToUse = resolvePreparedArguments(beanName, mbd, bw, constructorToUse, argsToResolve, true);}}if (constructorToUse == null || argsToUse == null) {// Take specified constructors, if any.Constructor<?>[] candidates = chosenCtors;if (candidates == null) {Class<?> beanClass = mbd.getBeanClass();try {candidates = (mbd.isNonPublicAccessAllowed() ?beanClass.getDeclaredConstructors() : beanClass.getConstructors());}catch (Throwable ex) {throw new BeanCreationException(mbd.getResourceDescription(), beanName,"Resolution of declared constructors on bean Class [" + beanClass.getName() +"] from ClassLoader [" + beanClass.getClassLoader() + "] failed", ex);}}if (candidates.length == 1 && explicitArgs == null && !mbd.hasConstructorArgumentValues()) {Constructor<?> uniqueCandidate = candidates[0];if (uniqueCandidate.getParameterCount() == 0) {synchronized (mbd.constructorArgumentLock) {mbd.resolvedConstructorOrFactoryMethod = uniqueCandidate;mbd.constructorArgumentsResolved = true;mbd.resolvedConstructorArguments = EMPTY_ARGS;}bw.setBeanInstance(instantiate(beanName, mbd, uniqueCandidate, EMPTY_ARGS));return bw;}}// Need to resolve the constructor.boolean autowiring = (chosenCtors != null ||mbd.getResolvedAutowireMode() == AutowireCapableBeanFactory.AUTOWIRE_CONSTRUCTOR);ConstructorArgumentValues resolvedValues = null;int minNrOfArgs;if (explicitArgs != null) {minNrOfArgs = explicitArgs.length;}else {ConstructorArgumentValues cargs = mbd.getConstructorArgumentValues();resolvedValues = new ConstructorArgumentValues();minNrOfArgs = resolveConstructorArguments(beanName, mbd, bw, cargs, resolvedValues);}AutowireUtils.sortConstructors(candidates);int minTypeDiffWeight = Integer.MAX_VALUE;Set<Constructor<?>> ambiguousConstructors = null;LinkedList<UnsatisfiedDependencyException> causes = null;for (Constructor<?> candidate : candidates) {Class<?>[] paramTypes = candidate.getParameterTypes();if (constructorToUse != null && argsToUse != null && argsToUse.length > paramTypes.length) {// Already found greedy constructor that can be satisfied ->// do not look any further, there are only less greedy constructors left.break;}if (paramTypes.length < minNrOfArgs) {continue;}ArgumentsHolder argsHolder;if (resolvedValues != null) {try {String[] paramNames = ConstructorPropertiesChecker.evaluate(candidate, paramTypes.length);if (paramNames == null) {ParameterNameDiscoverer pnd = this.beanFactory.getParameterNameDiscoverer();if (pnd != null) {paramNames = pnd.getParameterNames(candidate);}}argsHolder = createArgumentArray(beanName, mbd, resolvedValues, bw, paramTypes, paramNames,getUserDeclaredConstructor(candidate), autowiring, candidates.length == 1);}catch (UnsatisfiedDependencyException ex) {if (logger.isTraceEnabled()) {logger.trace("Ignoring constructor [" + candidate + "] of bean '" + beanName + "': " + ex);}// Swallow and try next constructor.if (causes == null) {causes = new LinkedList<>();}causes.add(ex);continue;}}else {// Explicit arguments given -> arguments length must match exactly.if (paramTypes.length != explicitArgs.length) {continue;}argsHolder = new ArgumentsHolder(explicitArgs);}int typeDiffWeight = (mbd.isLenientConstructorResolution() ?argsHolder.getTypeDifferenceWeight(paramTypes) : argsHolder.getAssignabilityWeight(paramTypes));// Choose this constructor if it represents the closest match.if (typeDiffWeight < minTypeDiffWeight) {constructorToUse = candidate;argsHolderToUse = argsHolder;argsToUse = argsHolder.arguments;minTypeDiffWeight = typeDiffWeight;ambiguousConstructors = null;}else if (constructorToUse != null && typeDiffWeight == minTypeDiffWeight) {if (ambiguousConstructors == null) {ambiguousConstructors = new LinkedHashSet<>();ambiguousConstructors.add(constructorToUse);}ambiguousConstructors.add(candidate);}}if (constructorToUse == null) {if (causes != null) {UnsatisfiedDependencyException ex = causes.removeLast();for (Exception cause : causes) {this.beanFactory.onSuppressedException(cause);}throw ex;}throw new BeanCreationException(mbd.getResourceDescription(), beanName,"Could not resolve matching constructor " +"(hint: specify index/type/name arguments for simple parameters to avoid type ambiguities)");}else if (ambiguousConstructors != null && !mbd.isLenientConstructorResolution()) {throw new BeanCreationException(mbd.getResourceDescription(), beanName,"Ambiguous constructor matches found in bean '" + beanName + "' " +"(hint: specify index/type/name arguments for simple parameters to avoid type ambiguities): " +ambiguousConstructors);}if (explicitArgs == null && argsHolderToUse != null) {argsHolderToUse.storeCache(mbd, constructorToUse);}}Assert.state(argsToUse != null, "Unresolved constructor arguments");bw.setBeanInstance(instantiate(beanName, mbd, constructorToUse, argsToUse));return bw;}上面代碼非常長,總體的功能邏輯如下:
- 確定實例化時構造器傳入的參數:
(1)如果調用getBean方式時傳入的參數不為空,則可以直接使用傳入的參數。
(2)否則嘗試從緩存中獲取參數。
(3)否則解析xml中配置的構造器參數。 - 確定使用的構造函數:
根據第一步中確定下來的參數,接下來的任務就是根據參數的個數、類型來確定最終調用的構造函數。首先是根據參數個數匹配,把所有構造函數根據參數個數升序排序,篩選出參數個數匹配的構造函數。因為配置文件中可以通過參數位置索引,也可以通過參數名稱來設定參數值,所以還需要解析參數的名稱。最后根據解析好的參數名稱、參數類型、實際參數就可以確定構造函數,并且將參數轉換成對應的類型。 - 構造函數不確定性的驗證。 因為有一些構造函數的參數類型為父子關系,所以Spring會做一次驗證。
- 如果條件符合(傳入參數為空),將解析好的構造函數、參數放入緩存。
- 根據實例化策略通過構造函數、參數實例化bean。
接下來我們看下對象的實例化策略。
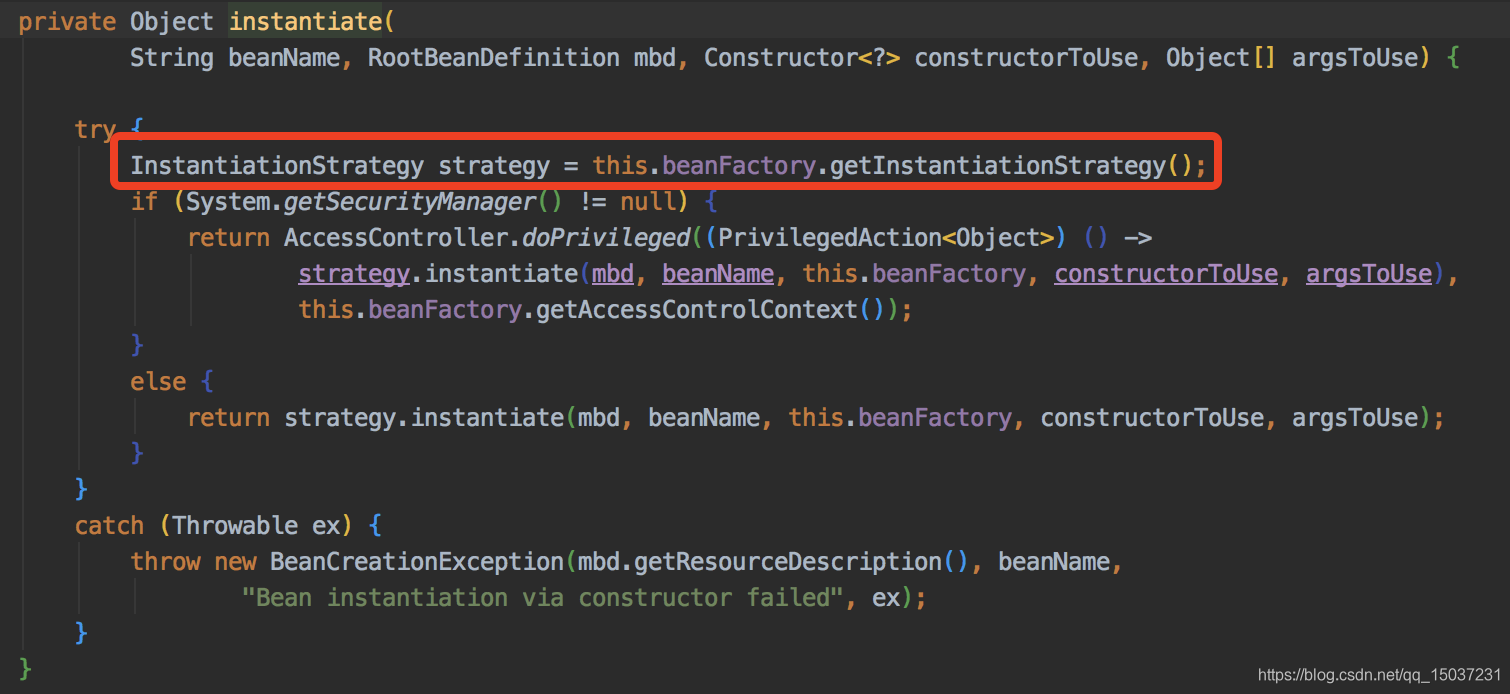
對象的實例化主要有兩種策略:SimpleInstantiationStrategy和CglibSubclassingInstantiationStrategy。其中SimpleInstantiationStrategy通過反射方式創建對象,而CglibSubclassingInstantiationStrategy通過Cglib來創建對象。接下來看下無參實例化的方法:
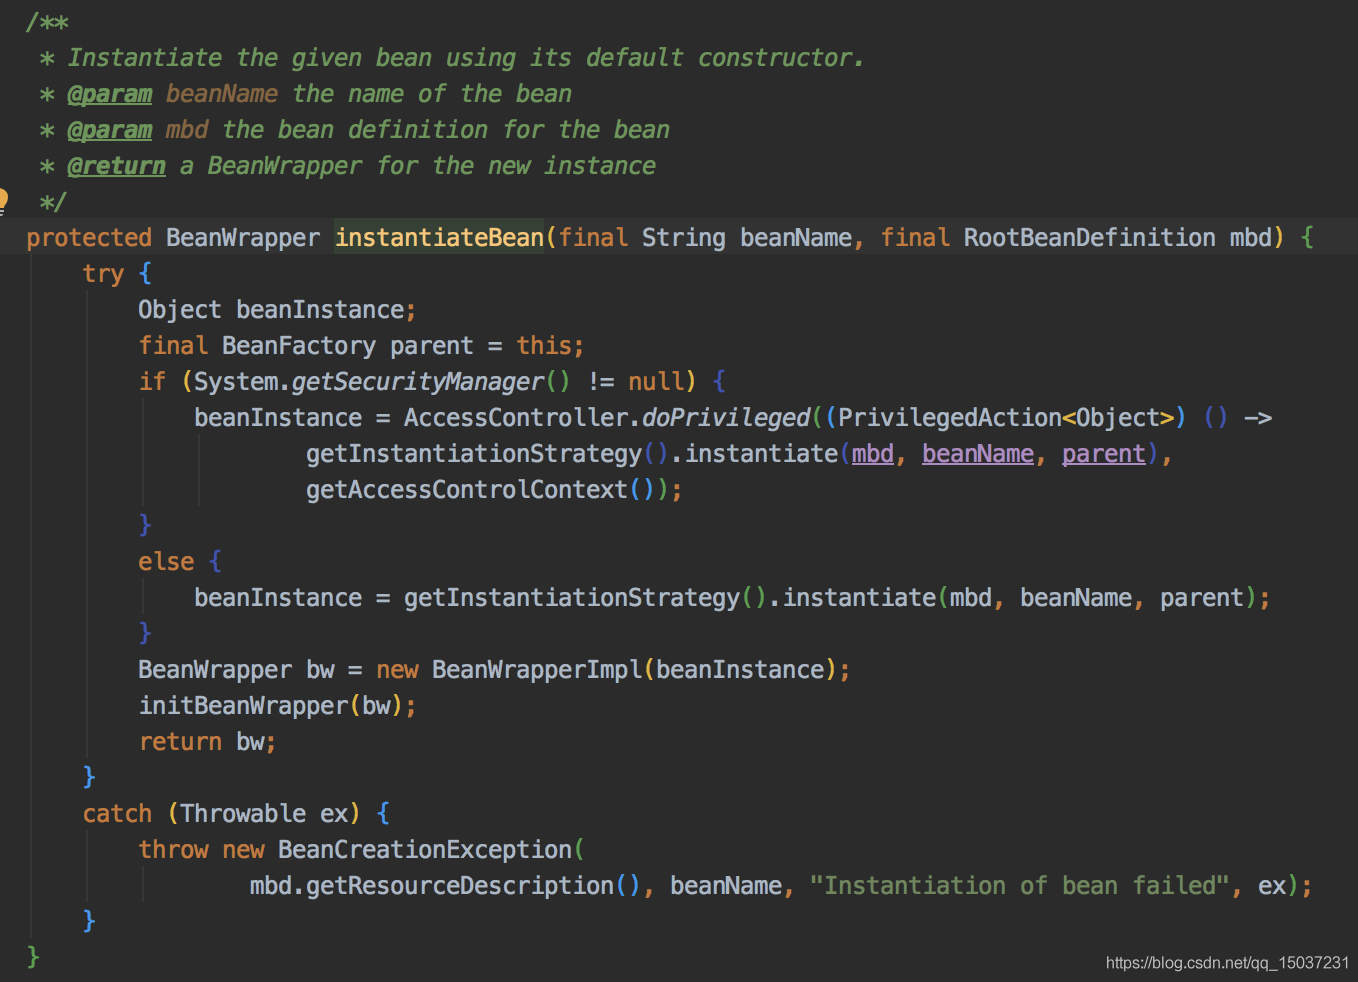
可以看到無參實例化的方法和帶有參數創建bean一樣,都是使用InstantiationStrategy來創建bean,但是因為沒有參數,所以也就沒有必要執行繁瑣的確定構造函數的代碼,只需要使用無參構造器進行實例化就行了。
到這里我們就把createBeanInstance的邏輯講完了,同時整個Bean的實例化流程也結束了。到此時,bean已經被實例化了出來,但屬性依賴還沒有注入,是一個純凈的原生對象。接下來spring會幫我們對bean進行依賴注入及功能增強等等等,那我們就一起進入bean的初始化流程吧!
(2)Bean的初始化
接著上面的邏輯我們繼續往下看,來看applyMergedBeanDefinitionPostProcessors方法。
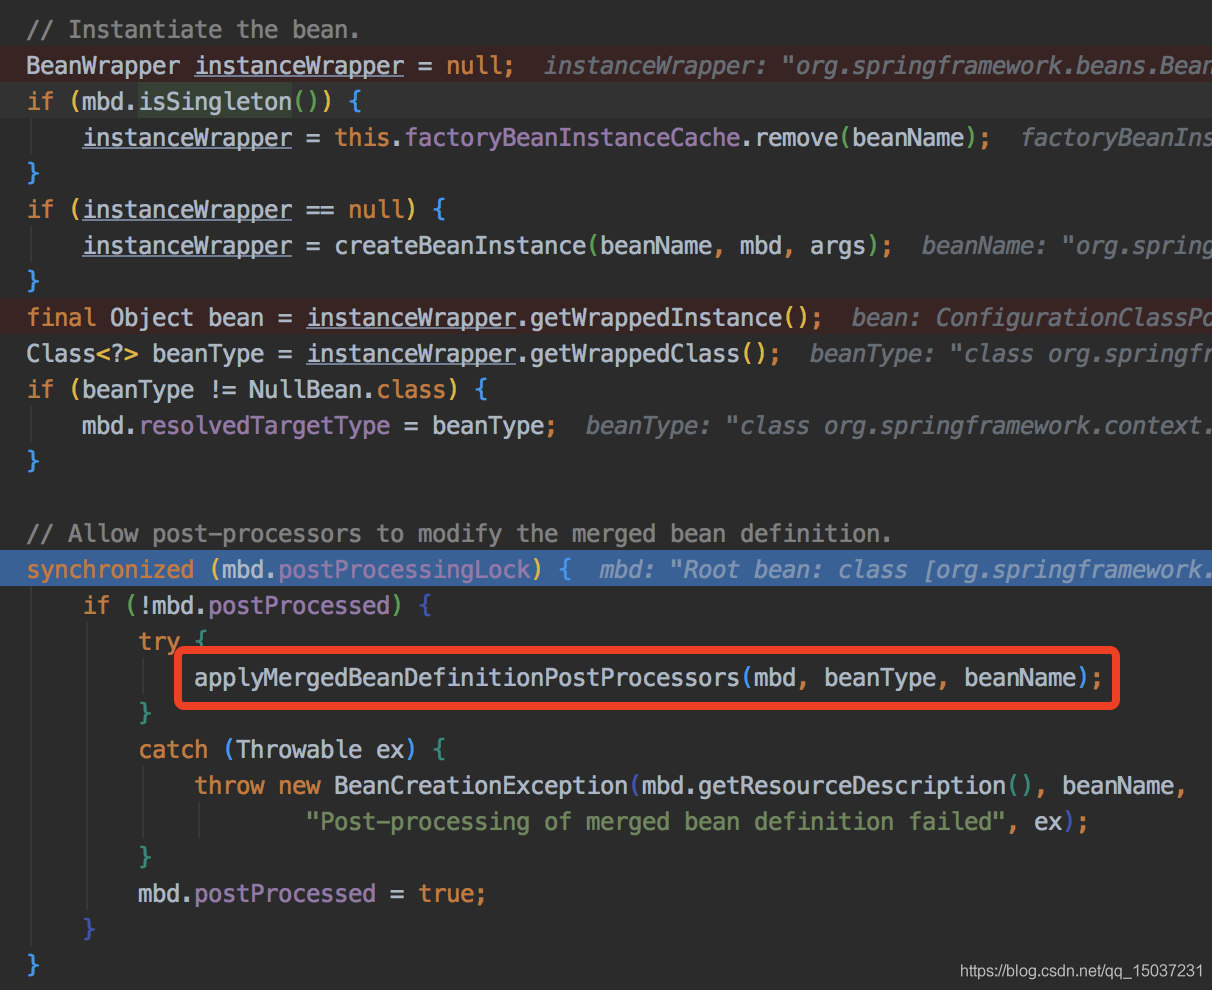
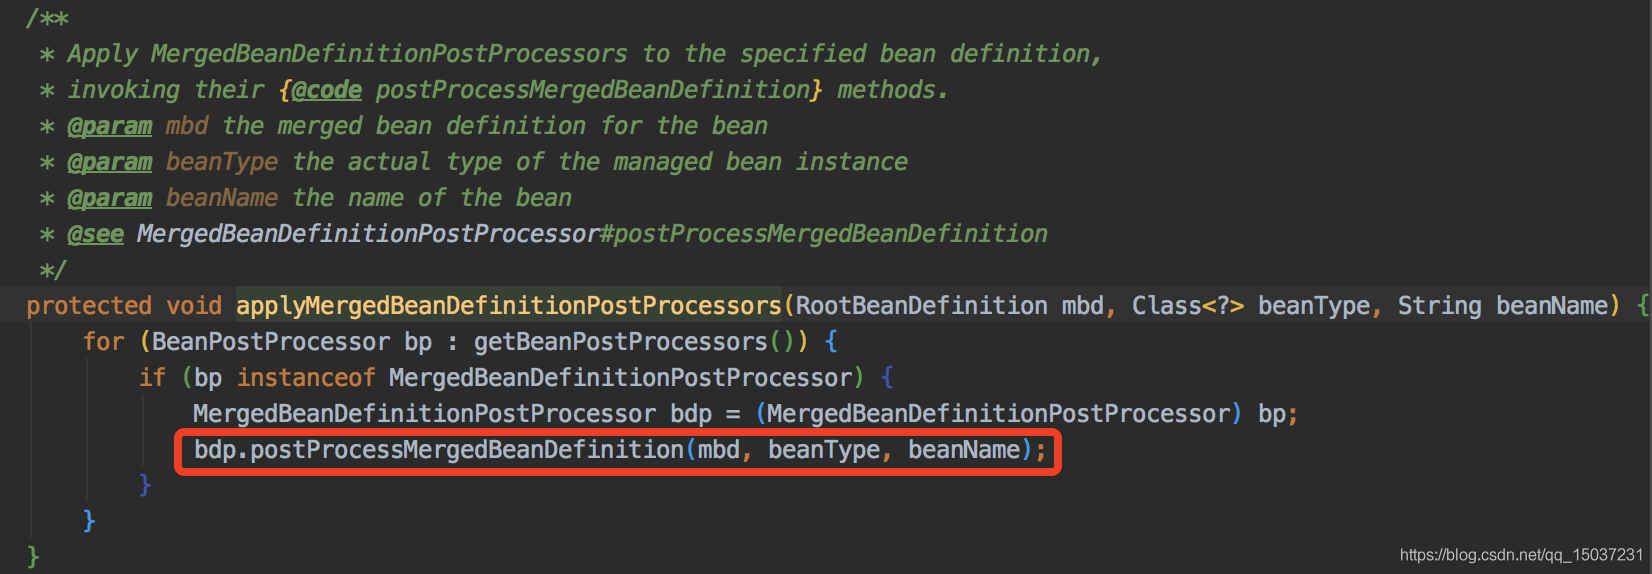
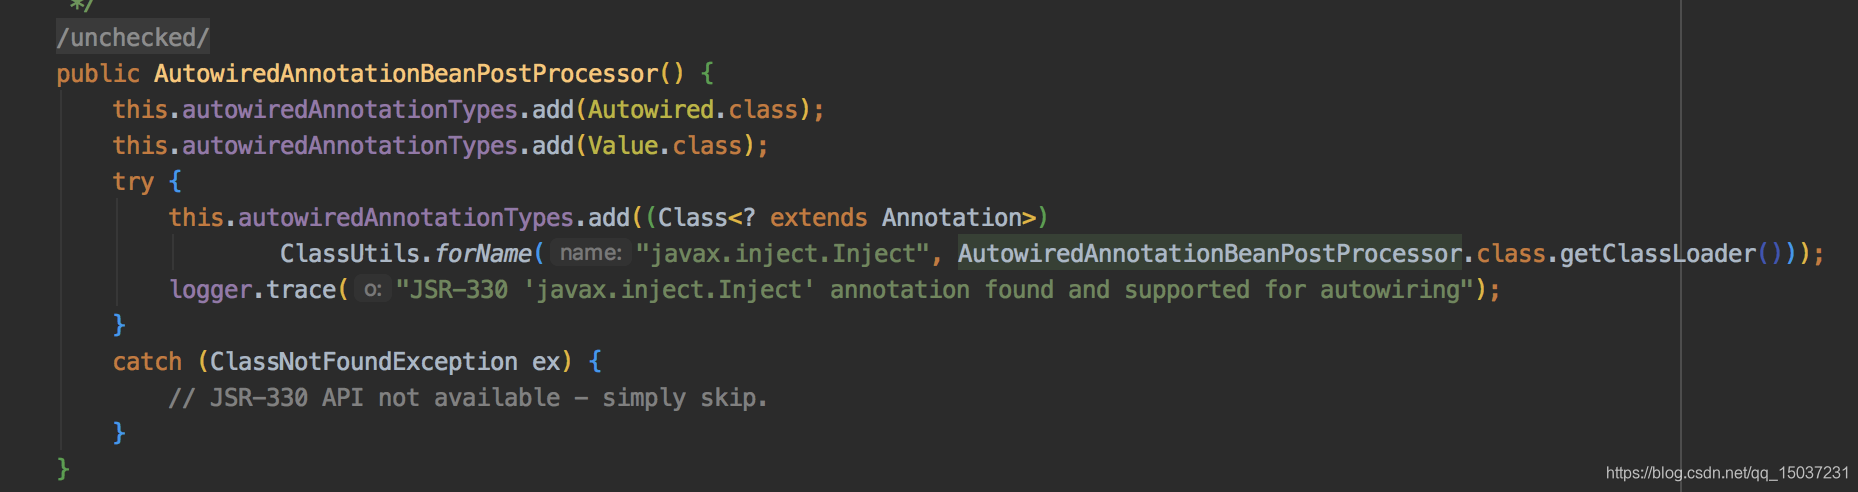
我們可以看到這個函數調用了所有MergedBeanDefinitionPostProcessor的MergedBeanDefinitionPostProcessor方法。MergedBeanDefinitionPostProcessor有很多實現類,其中AutowiredAnnotationBeanPostProcessor是一個非常重要的實現類。主要用來解析所有掃描類里面的@Autowired和@Value注解。其實現的主要方法如下:
 AutowiredAnnotationBeanPostProcessor在構造時就已經把@Autowired和@Value注解類加入到了autowiredAnnotationTypes集合中。 AutowiredAnnotationBeanPostProcessor會對bean進行注解掃描,如果掃描到了@Autowired和@Value注解,就會把對應的方法或者屬性封裝起來,最終封裝成InjectionMetadata對象。

看過了applyMergedBeanDefinitionPostProcessors后,我們繼續往下看addSingletonFactory方法,這個方法也是用來解決循環依賴問題的,這里的addSingletonFactory會將生產該對象的工廠類singletonFactory放入到名為singletonFactories的HashMap中,而工廠類singletonFactory的函數式方法實現,主要就是調用getEarlyBeanReference(beanName, mbd, bean)。上文提過當對象A和對象B存在循環依賴時,若對象A先開始構建,在進行依賴注入時發現依賴對象B,就去構建對象B,對象B在構建時發現需要注入對象A,此時就會從singletonFactories中獲取對象A的工廠singletonFactory實例,然后通過工廠實例獲取對象A的引用來完成注入。獲取的對象A引用最后會被保存到earlySingletonObjects(HashMap)中。

populateBean
我們接著看populateBean(beanName, mbd, instanceWrapper)方法,這個方法主要進行bean屬性的裝配工作,即依賴對象的注入。下面的邏輯看著很多,但其實很多邏輯都是為了處理舊版本XML屬性配置的,但當我們使用@Autowired時,很多邏輯并不會執行。例如下面的pvs是一個MutablePropertyValues實例,里面實現了PropertyValues接口,提供屬性的讀寫操作實現,同時可以通過調用構造函數實現深拷貝,但這個pvs主要是用來處理XML配置的屬性的,當我們使用@Autowired時,其值基本都是null或者為空。(深拷貝:從源對象完美復制出一個相同卻與源對象彼此獨立的目標對象,這里的相同是指兩個對象的狀態和動作相同,彼此獨立是指改變其中一個對象的狀態不會影響到另外一個對象。)
/*** Populate the bean instance in the given BeanWrapper with the property values* from the bean definition.* @param beanName the name of the bean* @param mbd the bean definition for the bean* @param bw the BeanWrapper with bean instance*/@SuppressWarnings("deprecation") // for postProcessPropertyValuesprotected void populateBean(String beanName, RootBeanDefinition mbd, @Nullable BeanWrapper bw) {if (bw == null) {if (mbd.hasPropertyValues()) {throw new BeanCreationException(mbd.getResourceDescription(), beanName, "Cannot apply property values to null instance");}else {// Skip property population phase for null instance.return;}}// Give any InstantiationAwareBeanPostProcessors the opportunity to modify the// state of the bean before properties are set. This can be used, for example,// to support styles of field injection.boolean continueWithPropertyPopulation = true;// 在進行依賴注入前,給InstantiationAwareBeanPostProcessors最后的機會根據用戶需求自定義修改Bean的屬性值// 如果此處返回了false,則后面不會再進行依賴注入。if (!mbd.isSynthetic() && hasInstantiationAwareBeanPostProcessors()) {for (BeanPostProcessor bp : getBeanPostProcessors()) {if (bp instanceof InstantiationAwareBeanPostProcessor) {InstantiationAwareBeanPostProcessor ibp = (InstantiationAwareBeanPostProcessor) bp;if (!ibp.postProcessAfterInstantiation(bw.getWrappedInstance(), beanName)) {continueWithPropertyPopulation = false;break;}}}}if (!continueWithPropertyPopulation) {return;}// pvs是一個MutablePropertyValues實例,實現了PropertyValues接口,我們配置的對象屬性值會被解析到PropertyValues中,// 然后通過BeanWrapper進行類型轉換并設置給對象,不過PropertyValues主要是用來處理xml配置的屬性值的,目前我們基本// 使用的都是@Autowired,所以這里的PropertyValues基本都是null。PropertyValues pvs = (mbd.hasPropertyValues() ? mbd.getPropertyValues() : null);// 這里的AUTOWIRE_BY_NAME、AUTOWIRE_BY_TYPE主要是針對XML配置的依賴bean自動綁定配置,即<bean>的autowire屬性。// 指的并不是我們使用的@Autowired,@Autowire并不會走下面這段邏輯,所以我們可以暫時不用看下面邏輯。int resolvedAutowireMode = mbd.getResolvedAutowireMode();if (resolvedAutowireMode == AUTOWIRE_BY_NAME || resolvedAutowireMode == AUTOWIRE_BY_TYPE) {MutablePropertyValues newPvs = new MutablePropertyValues(pvs);// Add property values based on autowire by name if applicable.if (resolvedAutowireMode == AUTOWIRE_BY_NAME) {autowireByName(beanName, mbd, bw, newPvs);}// Add property values based on autowire by type if applicable.if (resolvedAutowireMode == AUTOWIRE_BY_TYPE) {autowireByType(beanName, mbd, bw, newPvs);}pvs = newPvs;}boolean hasInstAwareBpps = hasInstantiationAwareBeanPostProcessors();// 是否進行依賴檢查,默認值就是None,所以此處返回false,表示不需要依賴檢查boolean needsDepCheck = (mbd.getDependencyCheck() != AbstractBeanDefinition.DEPENDENCY_CHECK_NONE);PropertyDescriptor[] filteredPds = null;if (hasInstAwareBpps) {if (pvs == null) {pvs = mbd.getPropertyValues();}for (BeanPostProcessor bp : getBeanPostProcessors()) {if (bp instanceof InstantiationAwareBeanPostProcessor) {InstantiationAwareBeanPostProcessor ibp = (InstantiationAwareBeanPostProcessor) bp;調用了InstantiationAwareBeanPostProcessor#postProcessPropertyValues方法,// 調用InstantiationAwareBeanPostProcessor#postProcessPropertyValues方法,該方法有兩個重要的實現:// AutowiredAnnotationBeanPostProcessor和CommonAnnotationBeanPostProcessor,前者會通過該方法注入// 所有@Autowired注解的對象,而后者通過該方法注入所有@Resource注解的對象。PropertyValues pvsToUse = ibp.postProcessProperties(pvs, bw.getWrappedInstance(), beanName);if (pvsToUse == null) {if (filteredPds == null) {filteredPds = filterPropertyDescriptorsForDependencyCheck(bw, mbd.allowCaching);}pvsToUse = ibp.postProcessPropertyValues(pvs, filteredPds, bw.getWrappedInstance(), beanName);if (pvsToUse == null) {return;}}pvs = pvsToUse;}}}if (needsDepCheck) {if (filteredPds == null) {filteredPds = filterPropertyDescriptorsForDependencyCheck(bw, mbd.allowCaching);}checkDependencies(beanName, mbd, filteredPds, pvs);}// 將pvs上所有的屬性填充到BeanWrapper對應的Bean實例中,前面說過了這里主要是用來填充XML配置的屬性,// 所以若我們使用@Autowired時pvs為null,這里并不會執行。if (pvs != null) {applyPropertyValues(beanName, mbd, bw, pvs);}}
我們接下來看postProcessPropertyValues方法,@Autowired和@Resource注解對象的注入就是通過該方法實現的,上面其實已經提過了他們的實現類分別為AutowiredAnnotationBeanPostProcessor和CommonAnnotationBeanPostProcessor。兩者的實現邏輯基本相同,我們這里僅介紹@Autowired的實現。
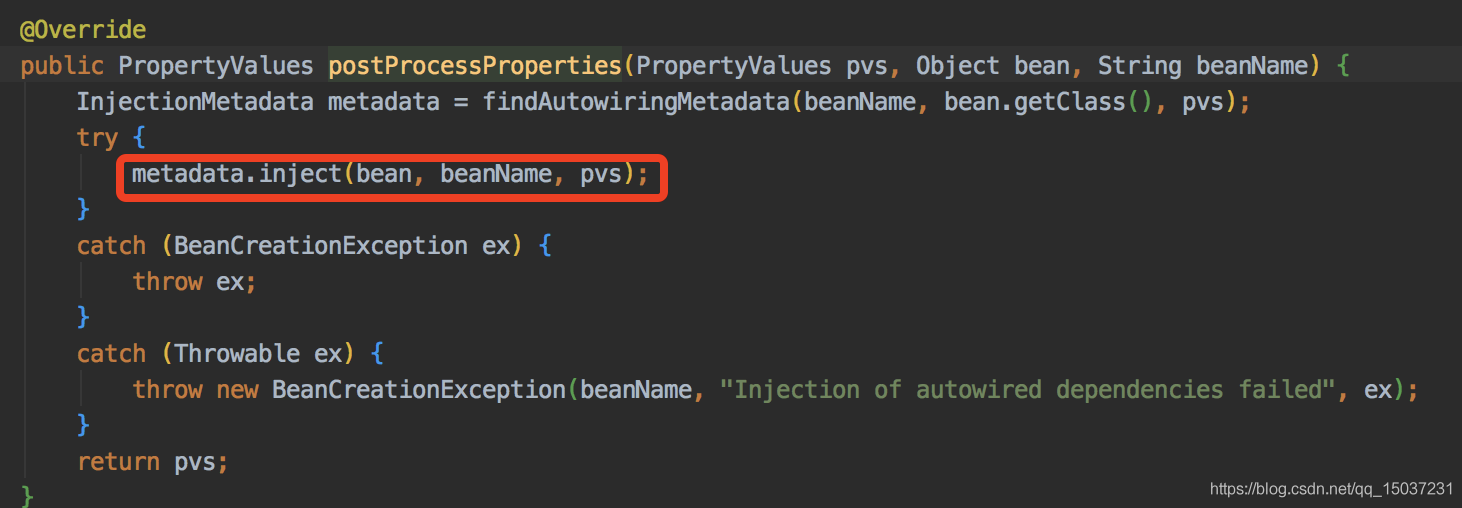
對象中@Autowired 注入點(字段或方法)都會被提前解析成元信息并保存到InjectionMetadata中。我們可以看到這里的邏輯:依次遍歷所有的注入點元信息 InjectedElement,進行屬性注入。(下圖中的checkedElements主要是為了防止重復注入)
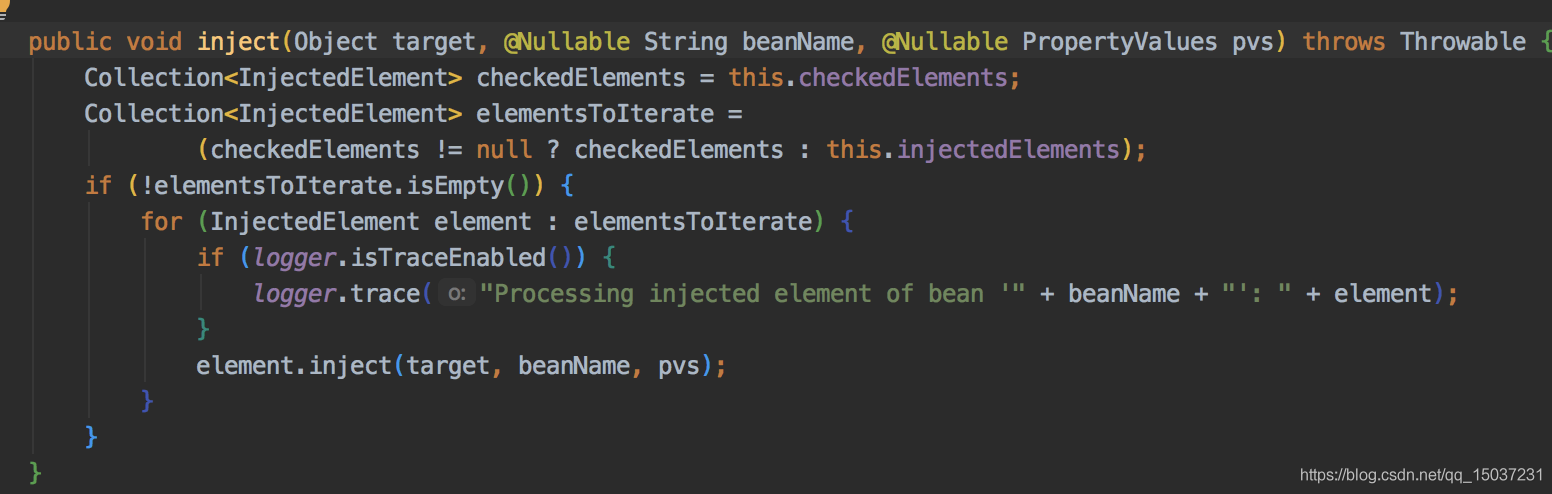
我們繼續跟進element.inject(target, beanName, pvs)方法,這個方法有兩個實現:AutowiredFieldElement和AutowiredMethodElement,他們分別用于處理屬性注入和方法注入,我們這里只看AutowiredFieldElement,兩者實現邏輯基本相同。
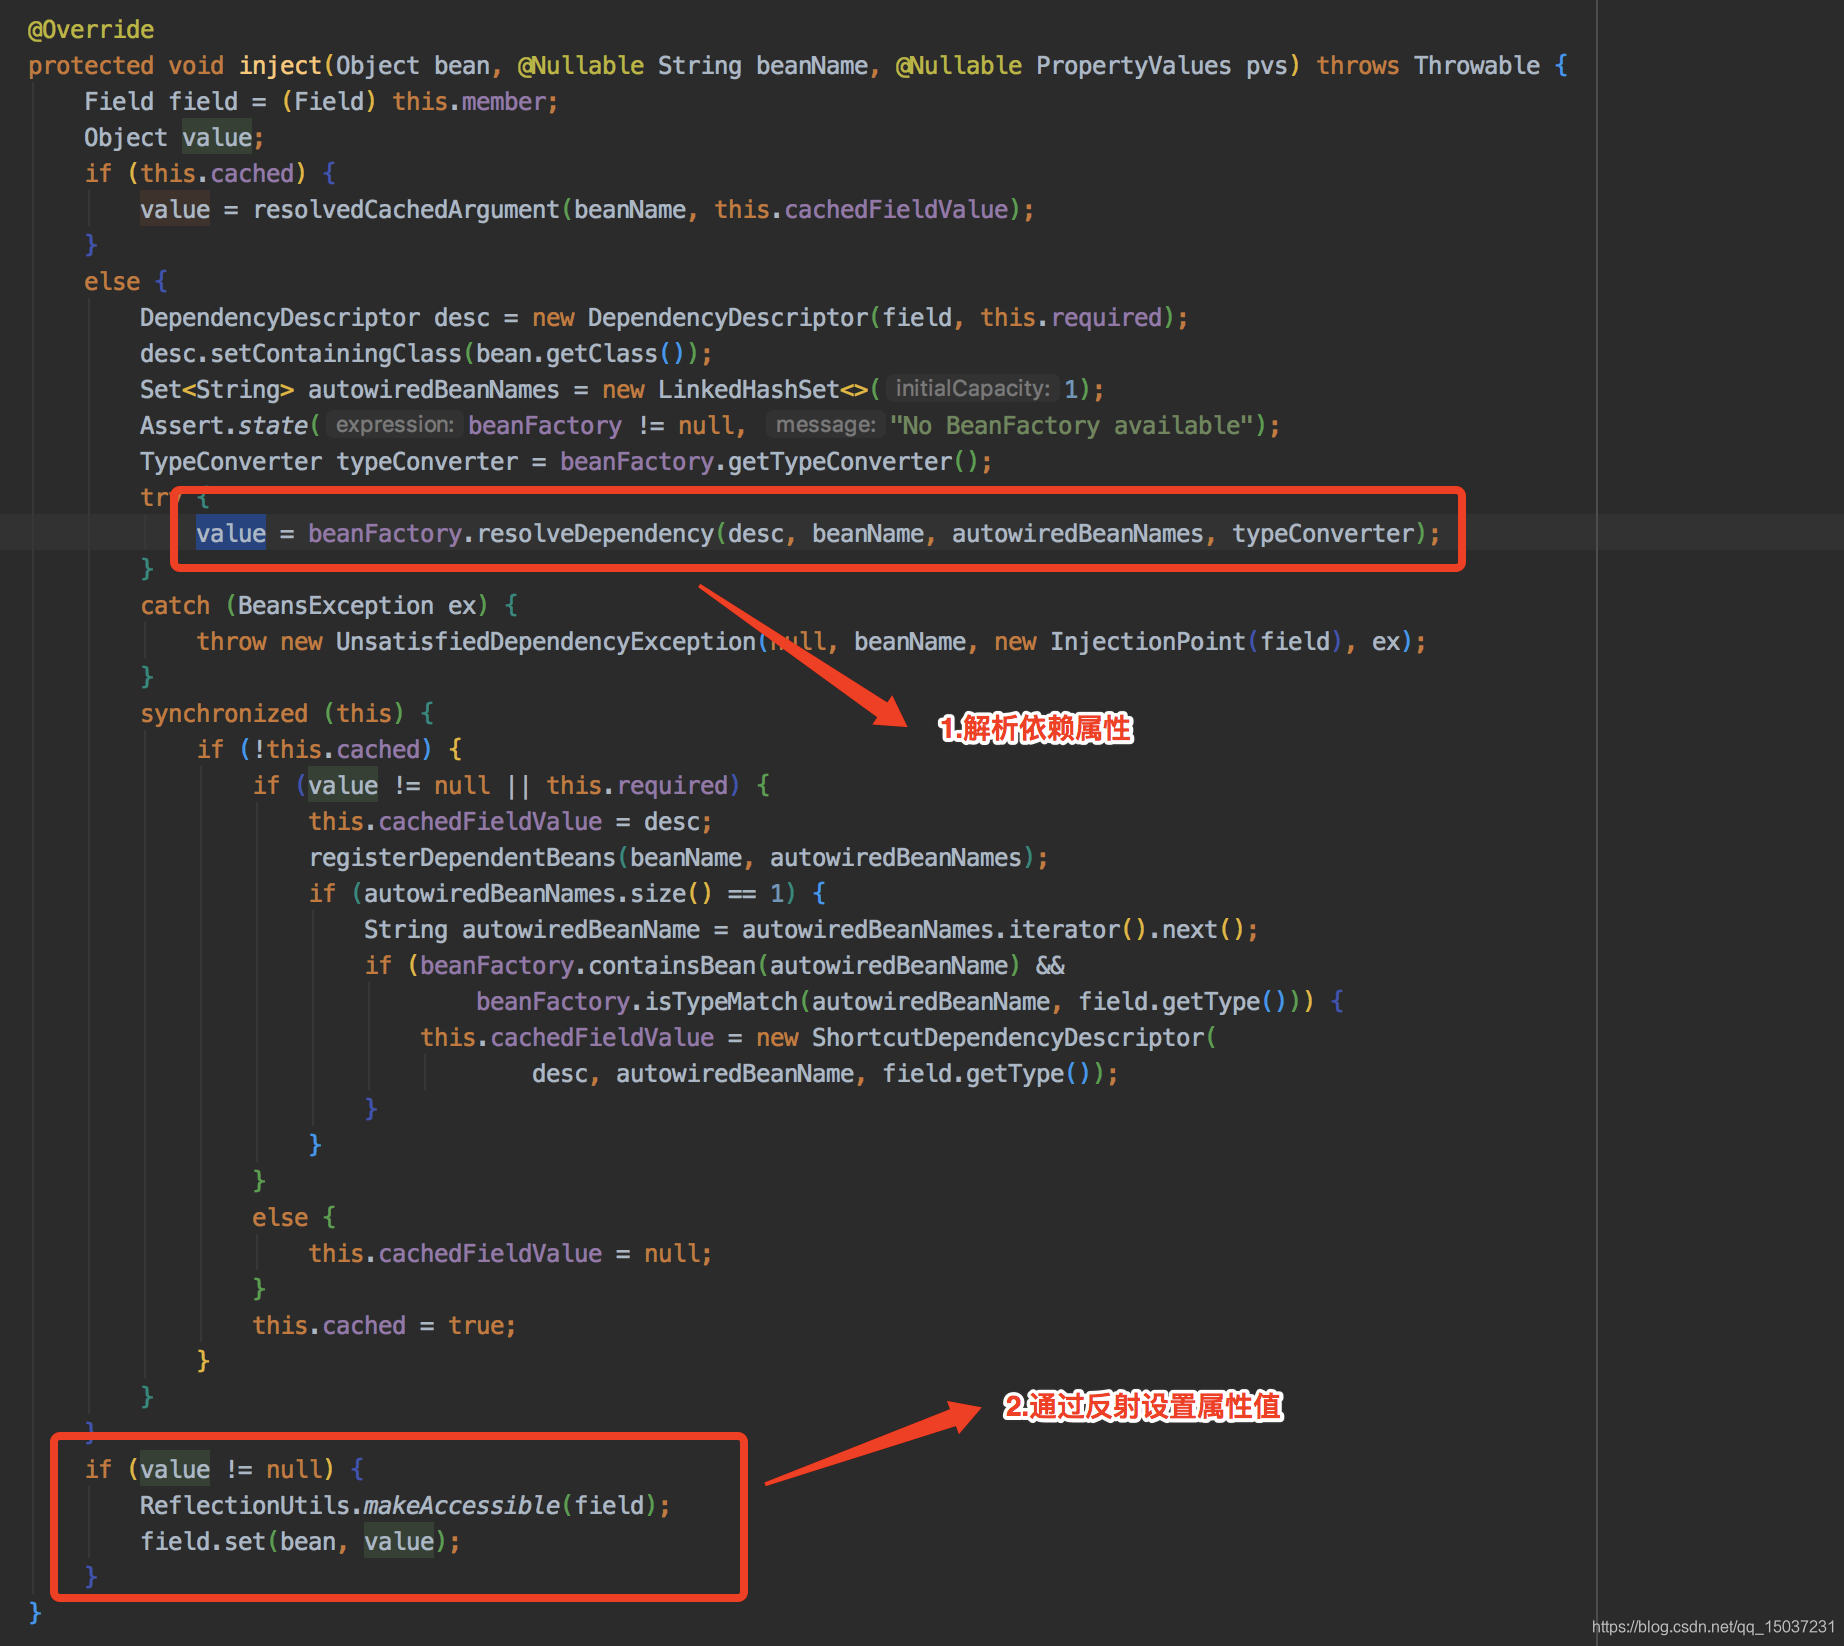
我們可以看到主體邏輯其實很簡單:首先解析依賴的屬性對象,然后通過反射設置屬性。其中beanFactory.resolveDependency()是Spring 進行依賴查找的核心 API。
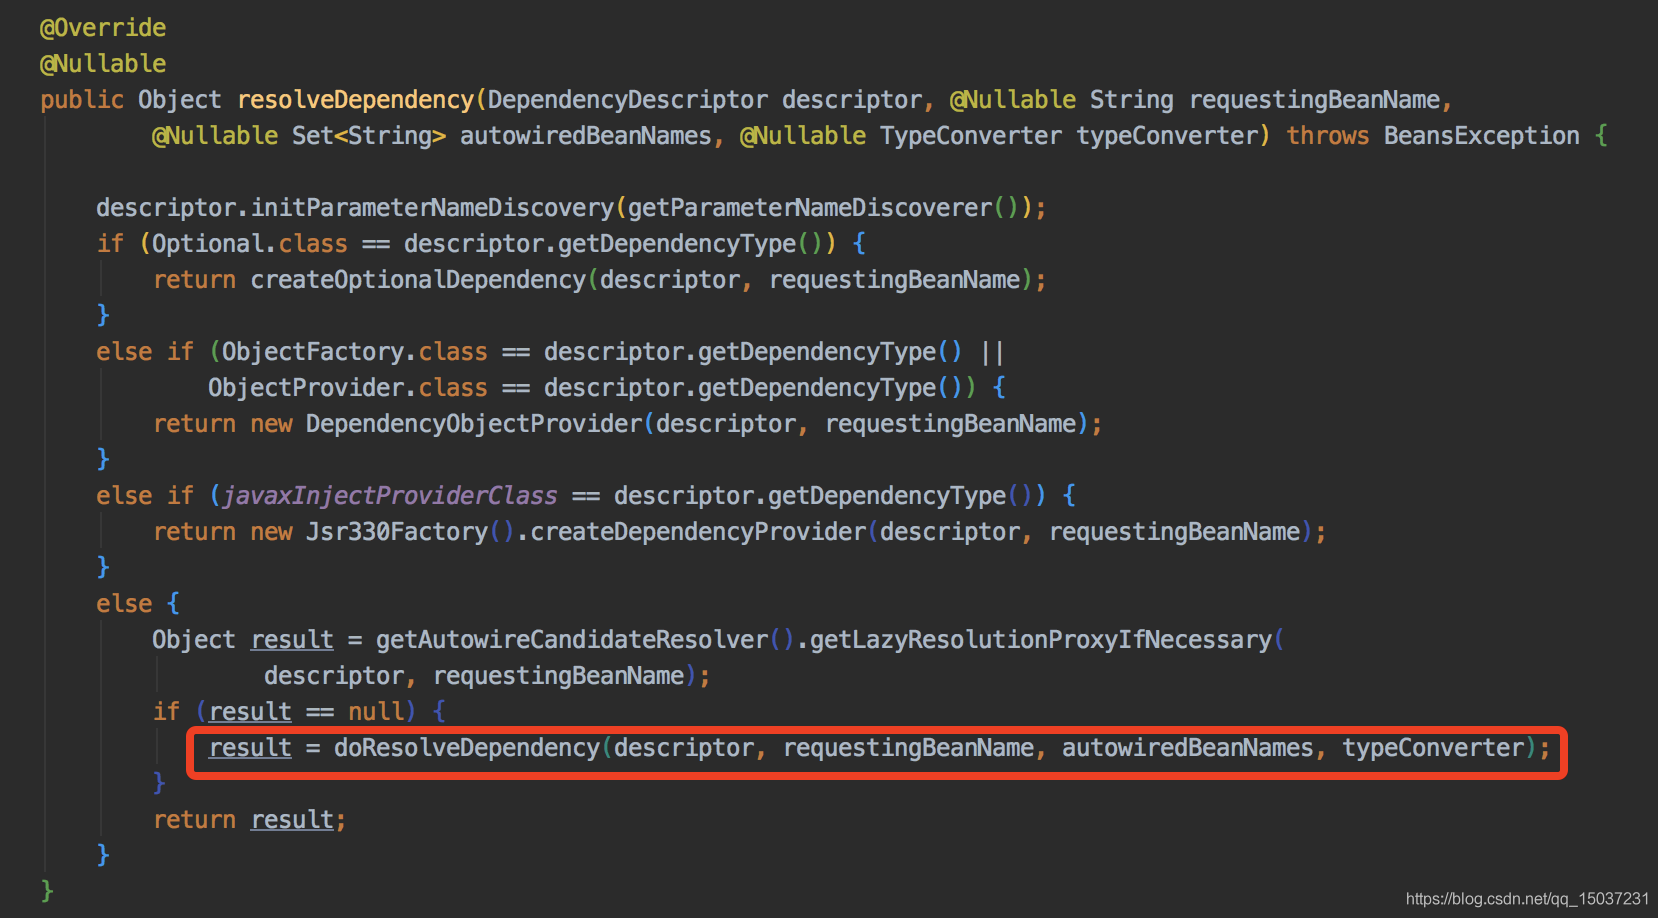
beanFactory.resolveDependency()的實際功能由doResolveDependency()函數實現,其主要功能為:
- 快速查找: @Autowired 注解處理場景。AutowiredAnnotationBeanPostProcessor 處理 @Autowired 注解時,如果注入的對象只有一個,會將該 bean 對應的名稱緩存起來,下次直接通過名稱查找會快很多。
- 注入指定值:@Value 注解處理場景。QualifierAnnotationAutowireCandidateResolver 處理 @Value 注解時,會讀取 @Value 對應的值進行注入。如果是 String 要經過三個過程:①占位符處理 -> ②EL 表達式解析 -> ③類型轉換,這也是一般的處理過程,BeanDefinitionValueResolver 處理 String 對象也是這個過程。
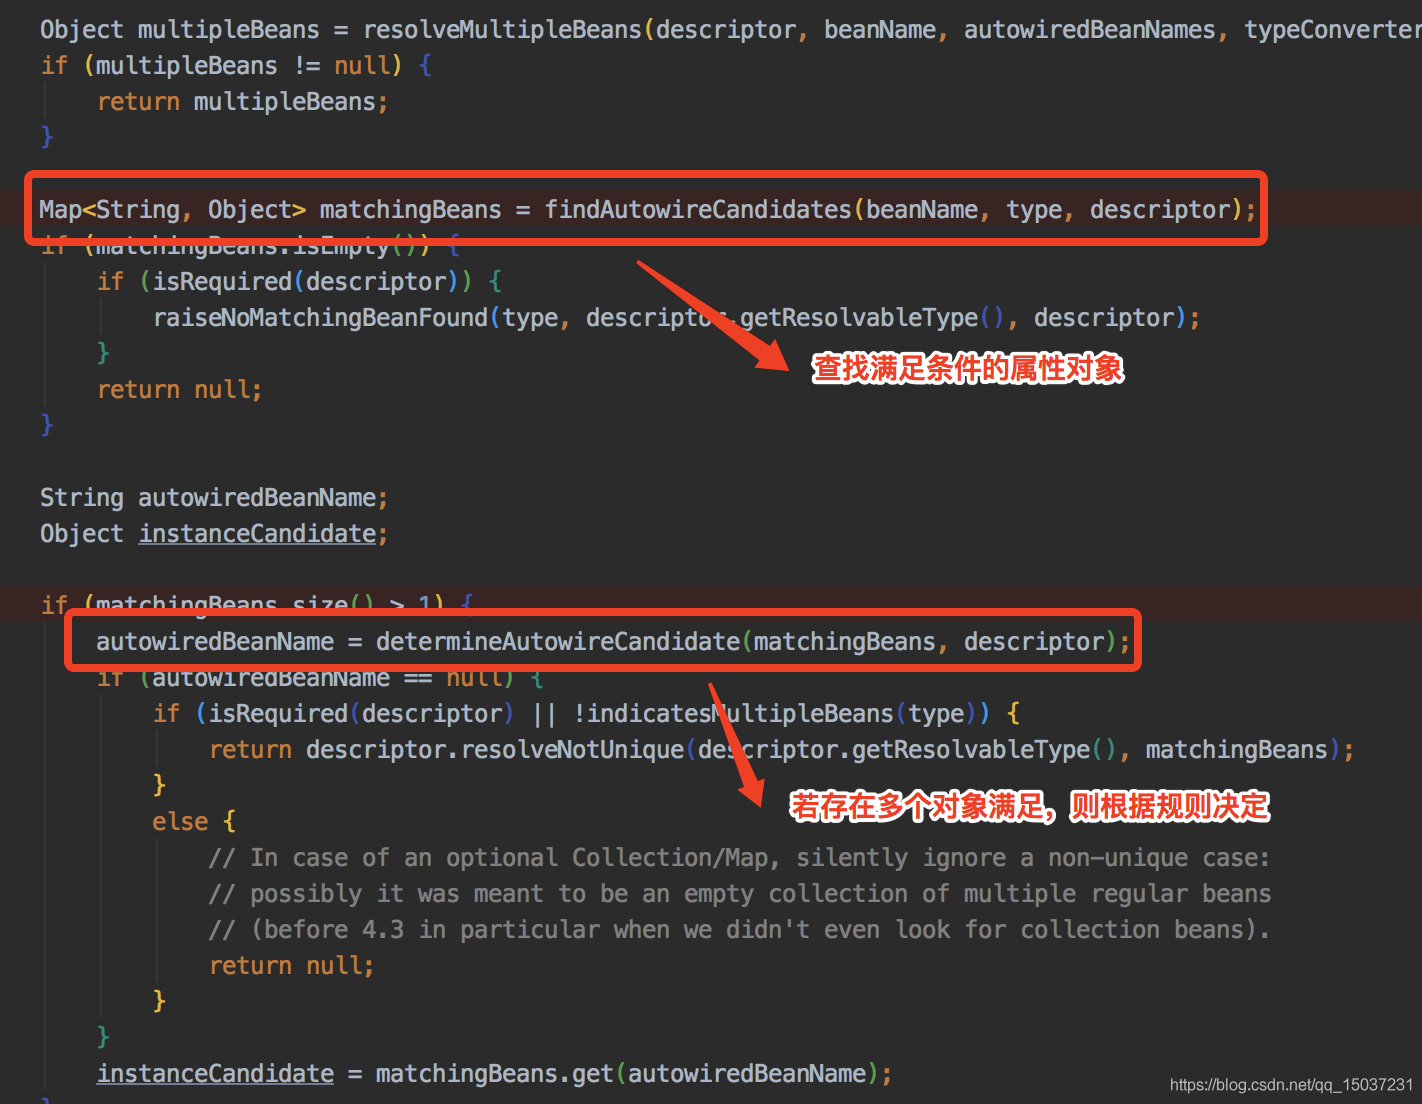
- 集合依賴查詢:直接全部委托給 resolveMultipleBeans 方法。
- 單個依賴查詢:先調用 findAutowireCandidates 查找所有可用的依賴,如果有多個依賴,則根據規則匹配: @Primary -> @Priority -> ③方法名稱或字段名稱。
public Object doResolveDependency(DependencyDescriptor descriptor, String beanName, Set<String> autowiredBeanNames, TypeConverter typeConverter) throws BeansException {InjectionPoint previousInjectionPoint = ConstructorResolver.setCurrentInjectionPoint(descriptor);try {// 1. 快速查找,根據名稱查找。AutowiredAnnotationBeanPostProcessor用到Object shortcut = descriptor.resolveShortcut(this);if (shortcut != null) {return shortcut;}// 2. 注入指定值,QualifierAnnotationAutowireCandidateResolver解析@Value會用到Class<?> type = descriptor.getDependencyType();Object value = getAutowireCandidateResolver().getSuggestedValue(descriptor);if (value != null) {if (value instanceof String) {// 2.1 占位符解析String strVal = resolveEmbeddedValue((String) value);BeanDefinition bd = (beanName != null && containsBean(beanName) ?getMergedBeanDefinition(beanName) : null);// 2.2 Spring EL 表達式value = evaluateBeanDefinitionString(strVal, bd);}TypeConverter converter = (typeConverter != null ? typeConverter : getTypeConverter());try {// 2.3 類型轉換return converter.convertIfNecessary(value, type, descriptor.getTypeDescriptor());} catch (UnsupportedOperationException ex) {return (descriptor.getField() != null ?converter.convertIfNecessary(value, type, descriptor.getField()) :converter.convertIfNecessary(value, type, descriptor.getMethodParameter()));}}// 3. 集合依賴,如 Array、List、Set、Map。內部查找依賴也是使用findAutowireCandidatesObject multipleBeans = resolveMultipleBeans(descriptor, beanName, autowiredBeanNames, typeConverter);if (multipleBeans != null) {return multipleBeans;}// 4. 單個依賴查詢Map<String, Object> matchingBeans = findAutowireCandidates(beanName, type, descriptor);// 4.1 沒有查找到依賴,判斷descriptor.requireif (matchingBeans.isEmpty()) {if (isRequired(descriptor)) {raiseNoMatchingBeanFound(type, descriptor.getResolvableType(), descriptor);}return null;}String autowiredBeanName;Object instanceCandidate;// 4.2 有多個,如何過濾if (matchingBeans.size() > 1) {// 4.2.1 @Primary -> @Priority -> 方法名稱或字段名稱匹配 autowiredBeanName = determineAutowireCandidate(matchingBeans, descriptor);// 4.2.2 根據是否必須,拋出異常。注意這里如果是集合處理,則返回nullif (autowiredBeanName == null) {if (isRequired(descriptor) || !indicatesMultipleBeans(type)) {return descriptor.resolveNotUnique(descriptor.getResolvableType(), matchingBeans);} else {return null;}}instanceCandidate = matchingBeans.get(autowiredBeanName);} else {// We have exactly one match.Map.Entry<String, Object> entry = matchingBeans.entrySet().iterator().next();autowiredBeanName = entry.getKey();instanceCandidate = entry.getValue();}// 4.3 到了這,說明有且僅有命中一個if (autowiredBeanNames != null) {autowiredBeanNames.add(autowiredBeanName);}// 4.4 實際上調用 getBean(autowiredBeanName, type)。但什么情況下會出現這種場景?if (instanceCandidate instanceof Class) {instanceCandidate = descriptor.resolveCandidate(autowiredBeanName, type, this);}Object result = instanceCandidate;if (result instanceof NullBean) {if (isRequired(descriptor)) {raiseNoMatchingBeanFound(type, descriptor.getResolvableType(), descriptor);}result = null;}if (!ClassUtils.isAssignableValue(type, result)) {throw new BeanNotOfRequiredTypeException(autowiredBeanName, type, instanceCandidate.getClass());}return result;} finally {ConstructorResolver.setCurrentInjectionPoint(previousInjectionPoint);}
}
上面代碼比較多,其中對我們來說比較重要的是findAutowireCandidates函數和determineAutowireCandidate函數。findAutowireCandidates函數主要用于根據類型查找依賴,大致可以分為三步:先查找內部依賴,再根據類型查找,最后沒有可注入的依賴則進行補償。其中@Qualifier注解就是在這個函數中處理的。
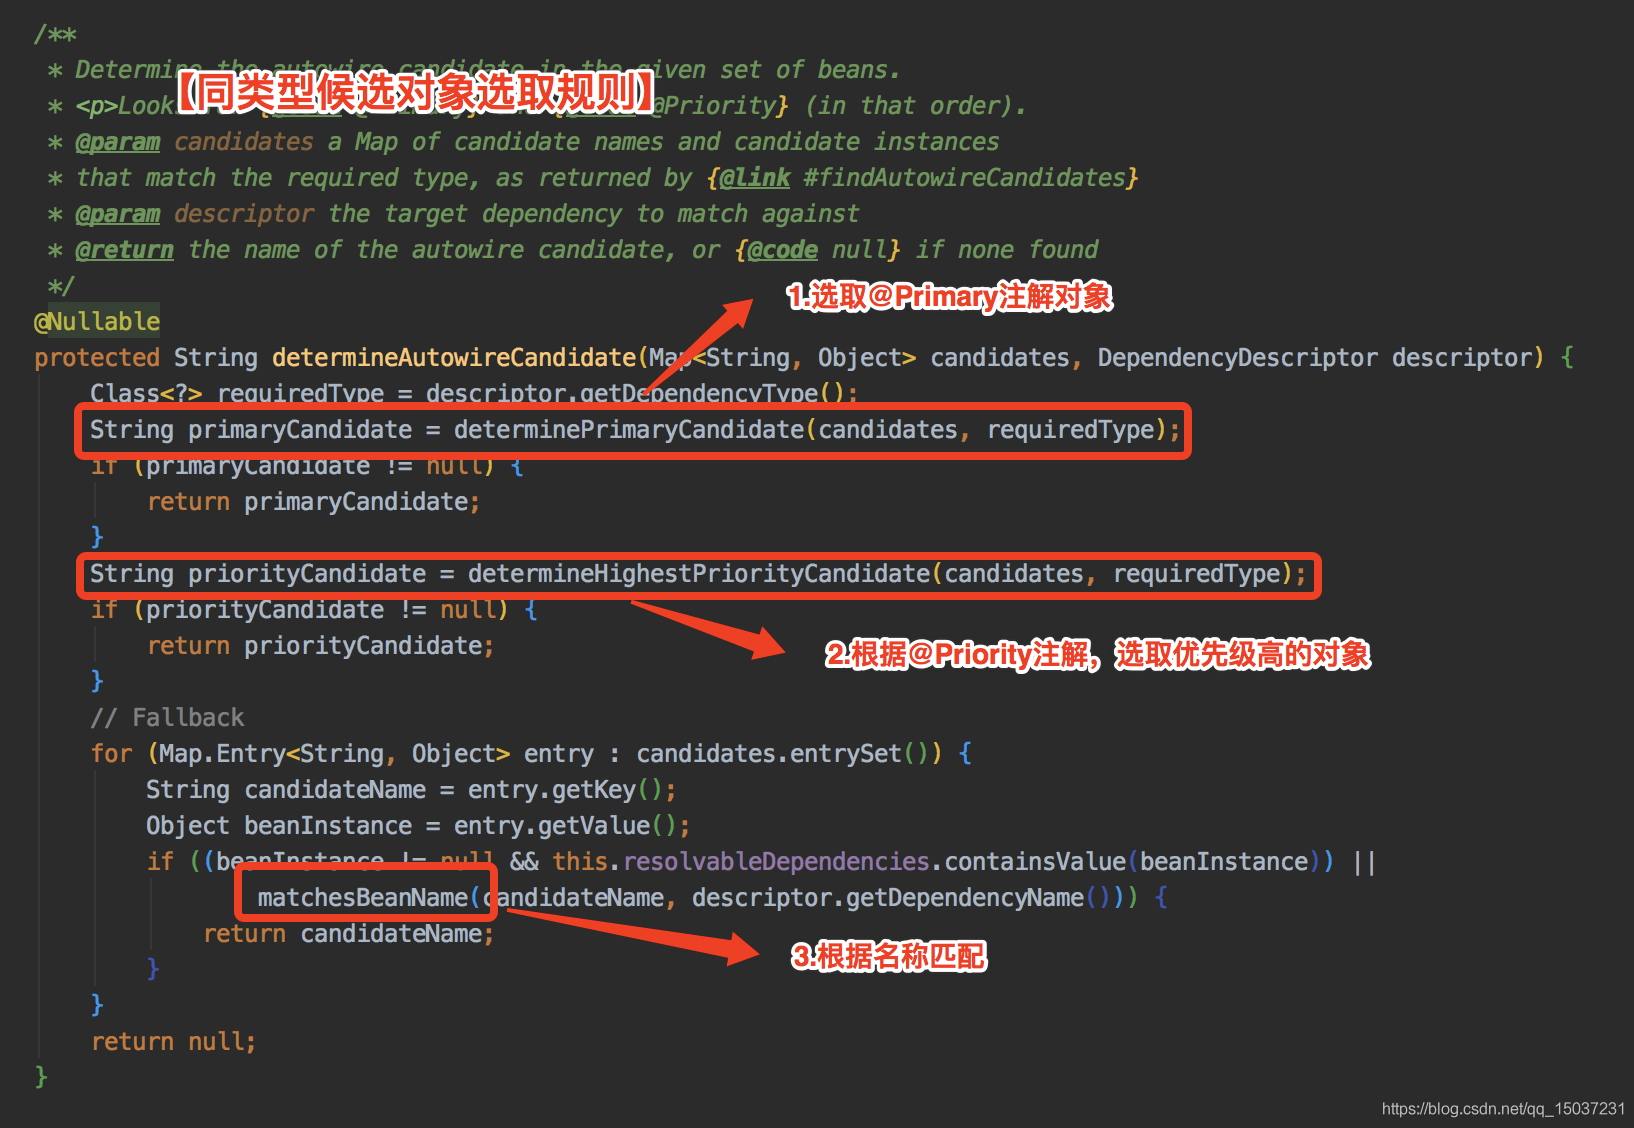
另外一個對我們比較重要的函數是determineAutowireCandidate()函數,其實這個函數就是當Spring發現有多個對象滿足@Autowired要求的對象類型時,選定注入對象的規則:先按 @Primary 查找,再按 @Priority,最后按方法名稱或字段名稱查找,直到只有一個 bean 為止。所以我們可以看出:在使用@Autowired注入對象時,會優先找到滿足要求類型的所有對象,若有多個對象,則會根據@Primary或@Priority過濾,若仍有多個對象,則最后根據對象名稱匹配。
當選定好依賴對象后,我們繼續往下走會進入descriptor.resolveCandidate方法。
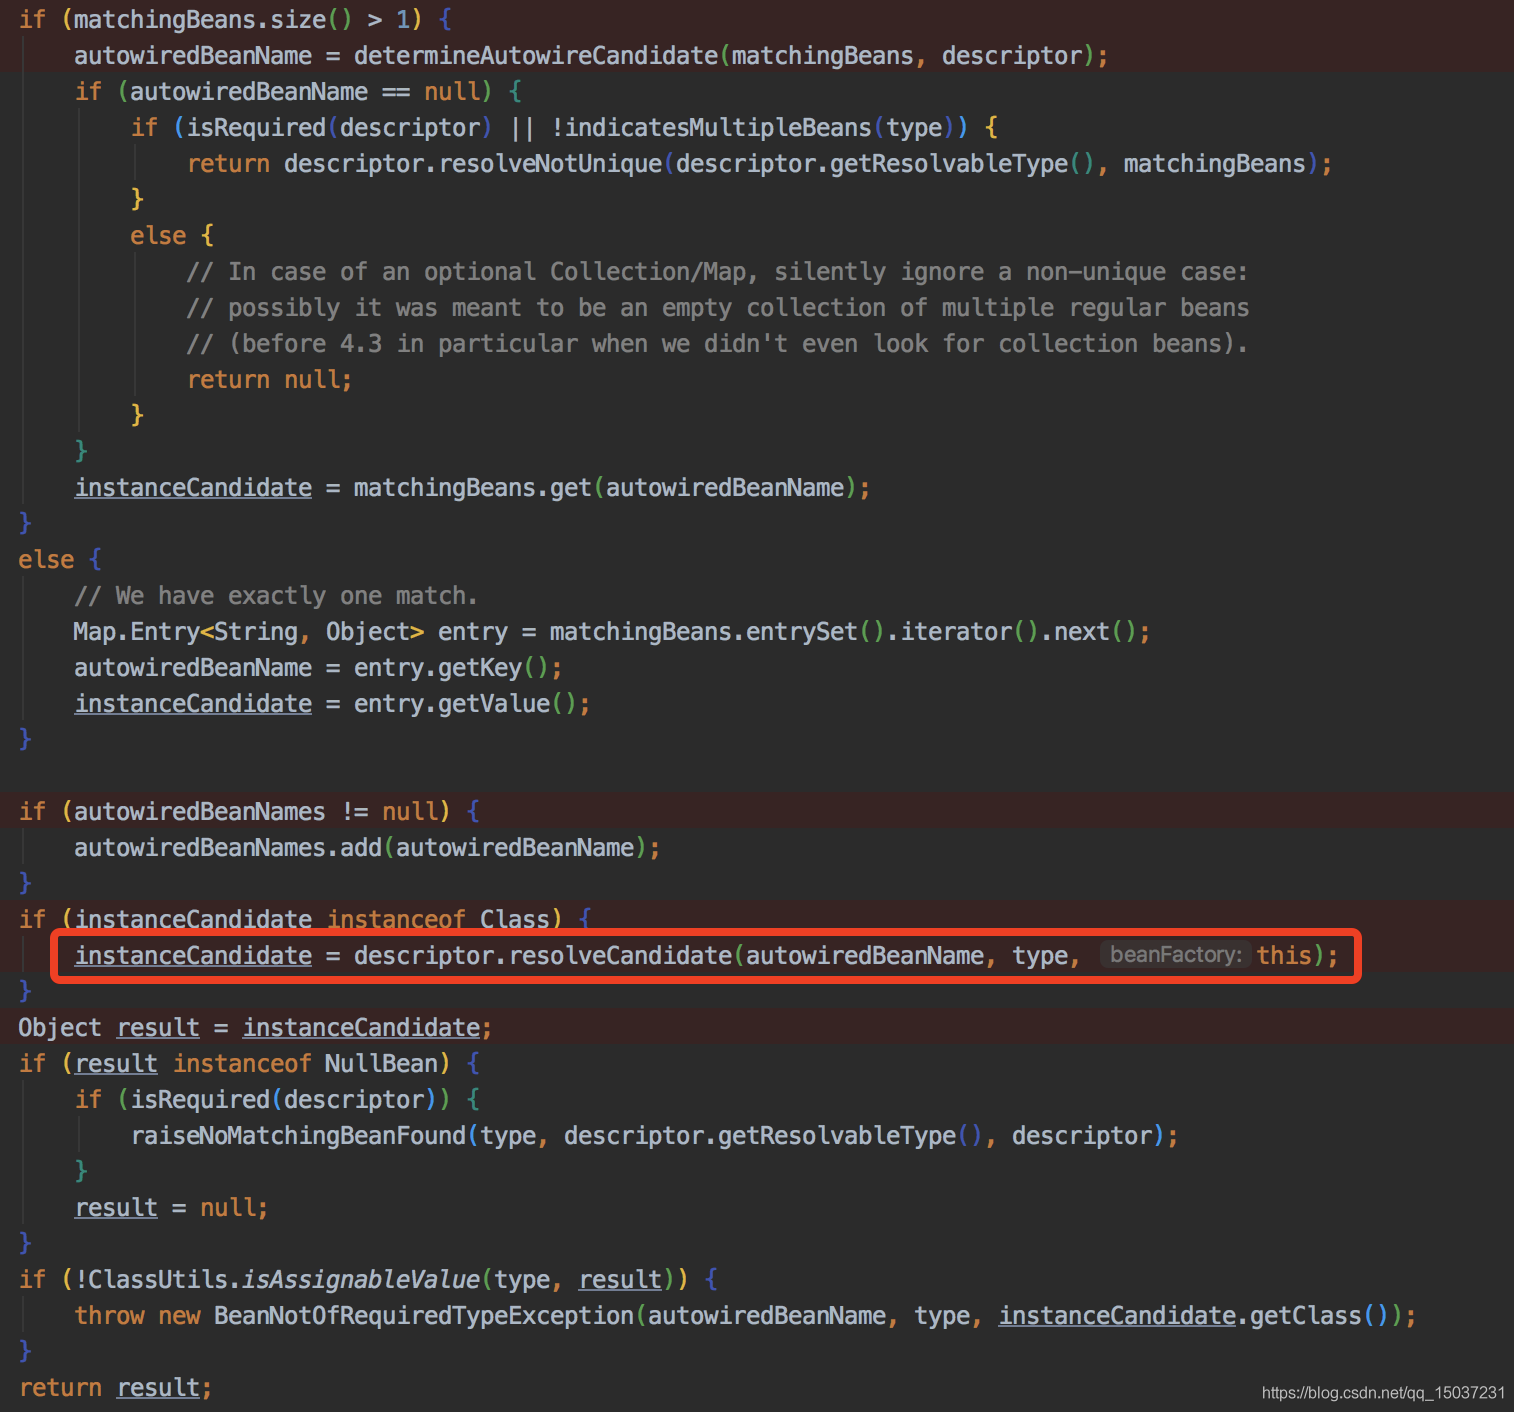

我們可以看到在descriptor.resolveCandidate方法中,其實還是調用了beanFactory.getBean(beanName)方法去問容器要該依賴對象,接下來若該對象還沒有構建,則又會開始構建該對象,直到依賴的所有對象都已構建好,然后進行屬性注入,并這其實就是Spring完成屬性注入的方式。
initializeBean
在對象實例化完成后且相關屬性和依賴設置完成后,接下來便是初始化過程了,初始化過程主要由 initializeBean函數實現,其主要邏輯如下:
- 檢查Aware相關接口并設置相關依賴
- 執行BeanPostProcessor的postProcessBeforeInitialization方法(此處會執行@PostConstruct注解方法,且部分Aware接口會在此處處理)
- 執行InitializingBean接口的afterPropertiesSet方法及init-method方法
- 執行BeanPostProcessor的postProcessBeforeInitialization方法
/*** Initialize the given bean instance, applying factory callbacks* as well as init methods and bean post processors.* <p>Called from {@link #createBean} for traditionally defined beans,* and from {@link #initializeBean} for existing bean instances.* @param beanName the bean name in the factory (for debugging purposes)* @param bean the new bean instance we may need to initialize* @param mbd the bean definition that the bean was created with* (can also be {@code null}, if given an existing bean instance)* @return the initialized bean instance (potentially wrapped)* @see BeanNameAware* @see BeanClassLoaderAware* @see BeanFactoryAware* @see #applyBeanPostProcessorsBeforeInitialization* @see #invokeInitMethods* @see #applyBeanPostProcessorsAfterInitialization*/protected Object initializeBean(final String beanName, final Object bean, @Nullable RootBeanDefinition mbd) {// 檢查Aware相關接口并設置相關依賴if (System.getSecurityManager() != null) {AccessController.doPrivileged((PrivilegedAction<Object>) () -> {invokeAwareMethods(beanName, bean);return null;}, getAccessControlContext());}else {invokeAwareMethods(beanName, bean);}// BeanPostProcessor前置處理(此處會執行@PostConstruct注解方法,且部分Aware接口會在此處處理)Object wrappedBean = bean;if (mbd == null || !mbd.isSynthetic()) {wrappedBean = applyBeanPostProcessorsBeforeInitialization(wrappedBean, beanName);}// 執行InitializingBean接口的afterPropertiesSet方法及init-method方法try {invokeInitMethods(beanName, wrappedBean, mbd);}catch (Throwable ex) {throw new BeanCreationException((mbd != null ? mbd.getResourceDescription() : null),beanName, "Invocation of init method failed", ex);}// BeanPostProcessor后置處理if (mbd == null || !mbd.isSynthetic()) {wrappedBean = applyBeanPostProcessorsAfterInitialization(wrappedBean, beanName);}return wrappedBean;}
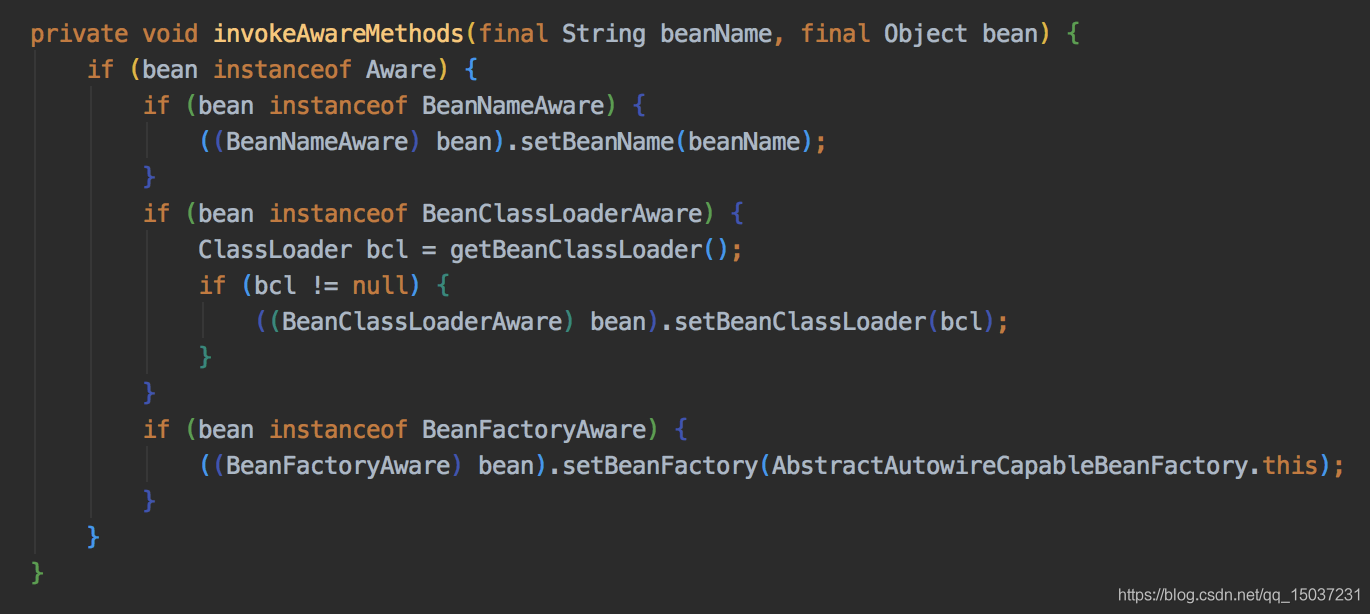
在初始化過程中,spring首先會檢查當前對象是否實現了一系列以Aware命名結尾的接口,如果是的話就將這些Aware接口定義中規定的依賴注入給當前對象實例。下面是invokeAwareMethods方法的源碼,涉及的BeanNameAware主要有三個:
- BeanNameAware:注入當前 bean 對應 beanName
- BeanClassLoaderAware:注入加載當前 bean的ClassLoader
- BeanFactoryAware:注入當前BeanFactory容器的引用
上面的三個Aware接口只是針對BeanFactory類型的容器而言,對于ApplicationContext類型的容器也存在幾個Aware相關接口,不過在檢測這些接口并設置相關依賴的實現機理上,與以上幾個接口處理方式有所不同,是在下面的applyBeanPostProcessorsBeforeInitialization方法中執行的,具體的實現類是ApplicationContextAwareProcessor。
我們接下來看BeanPostProcessor的postProcessBeforeInitialization方法,它的實現類有很多,除了ApplicationContextAwareProcessor外我們比較常用的還有InitDestroyAnnotationBeanPostProcessor,CommonAnnotationBeanPostProcessor便是繼承了該類用于處理@PostConstruct,在postProcessBeforeInitialization方法中@PostConstruct注解的方法會被執行,有興趣的同學可以研究下,這里就不詳細介紹了。
再接下來會執行InitializingBean接口的afterPropertiesSet方法及init-method方法,由invokeInitMethods方法實現,具體代碼如下圖。這里會檢查當前對象是否實現了InitializingBean接口,如果是,則會調用其afterPropertiesSet()方法進一調整對象實例的狀態。另外spring還提供了另一種方式來指定自定義的對象初始化操作,即init-method方法,這里也會處理。

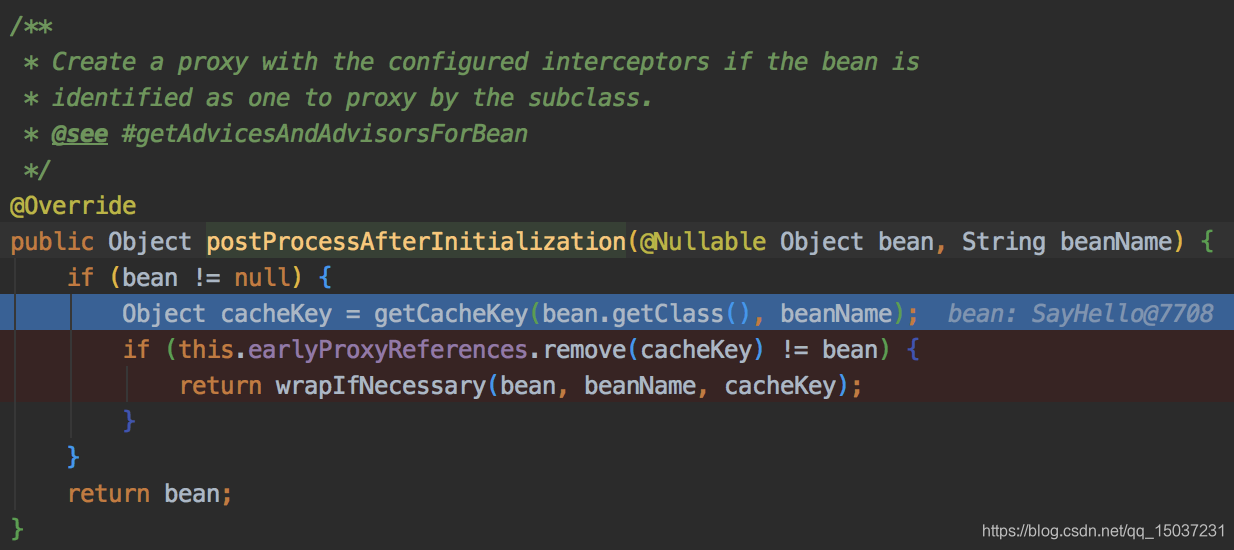
我們繼續往下看代碼wrappedBean = applyBeanPostProcessorsAfterInitialization(wrappedBean, beanName),生成代理對象的邏輯就在這里面。里面會執行BeanPostProcessor的postProcessAfterInitialization方法。
postProcessAfterInitialization方法有個重要的實現類AnnotationAwareAspectJAutoProxyCreator,該類便是動態代理的主要實現類,我們通常意義上的動態代理就是通過它實現的。下面的代碼便是AnnotationAwareAspectJAutoProxyCreator實現的postProcessAfterInitialization方法。
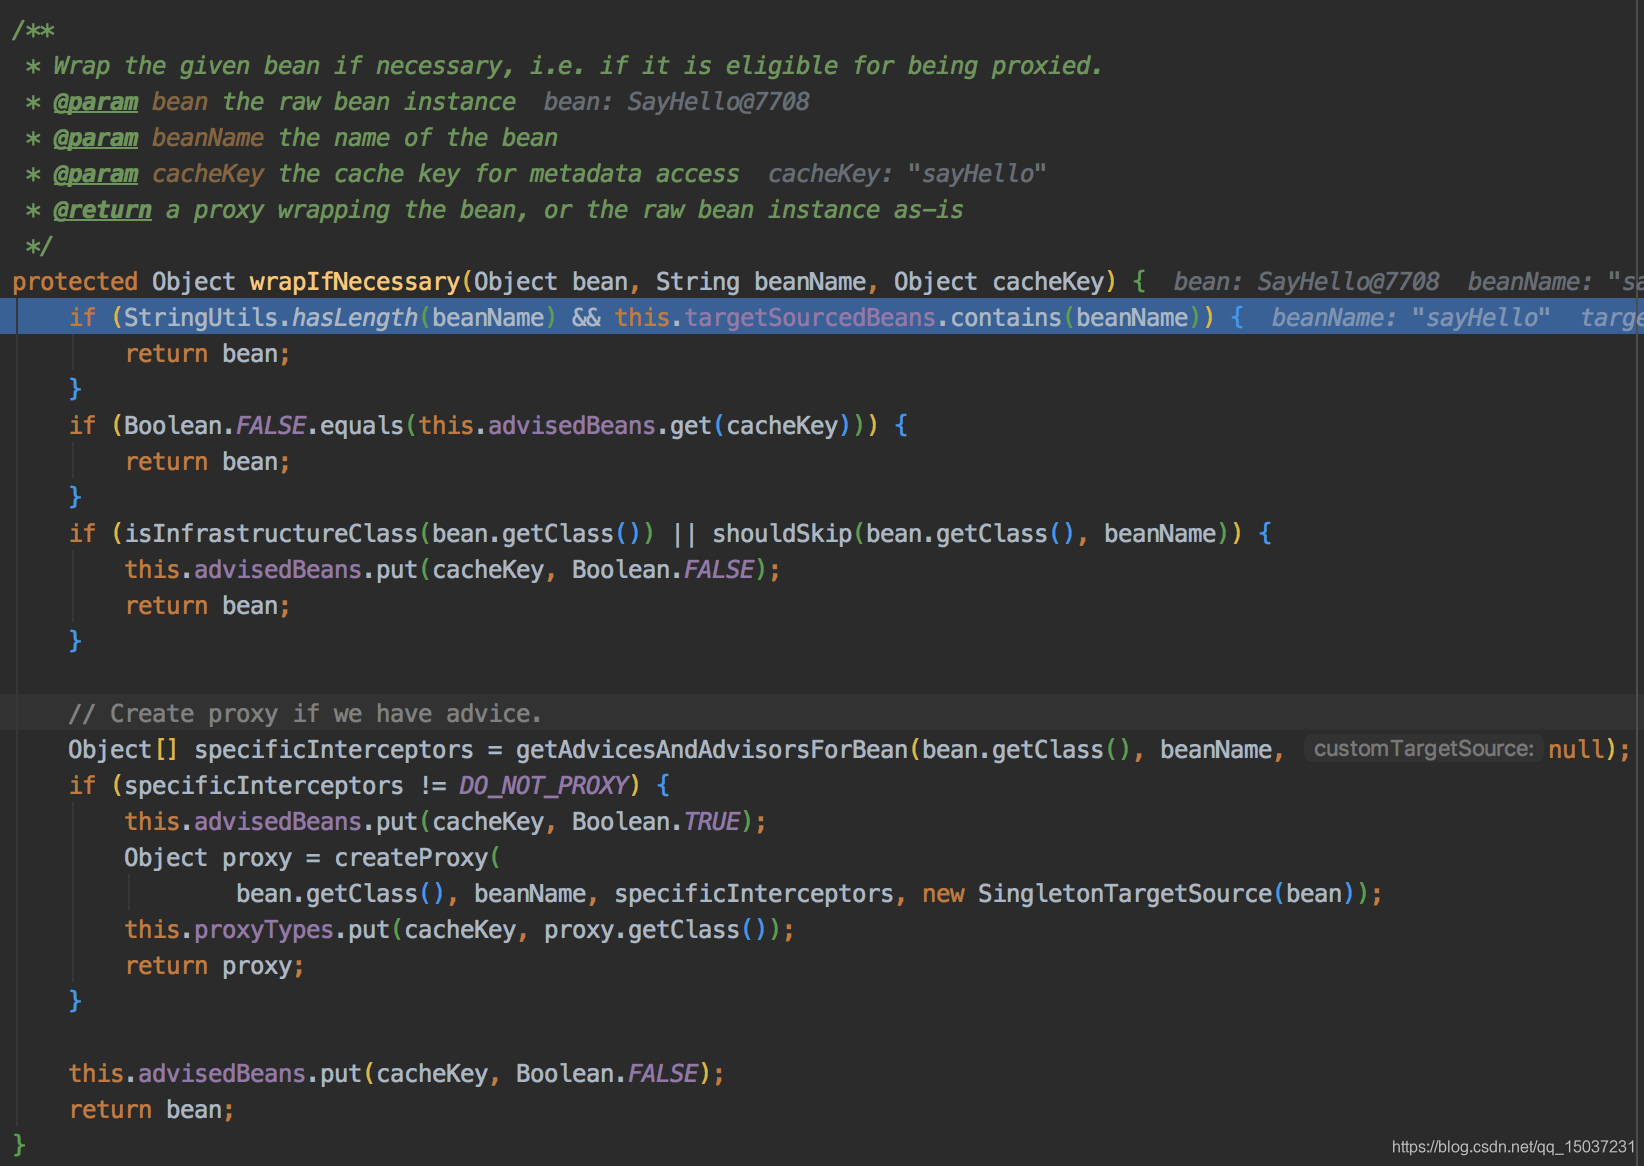 wrapIfNecessary中有2個和核心方法:
1.getAdvicesAndAdvisorsForBean獲取當前bean匹配的增強器
獲取所有增強器,也就是所有@Aspect注解的Bean
獲取匹配的增強器,也就是根據@Before,@After等注解上的表達式,與當前bean進行匹配
對匹配的增強器進行擴展和排序,就是按照@Order或者PriorityOrdered的getOrder的數據值進行排序,越小的越靠前
2.createProxy為當前bean創建代理
spring aop框架使用了AopProxy對不同代理機制進行適度的抽象,并提供了相應的AopProxy子類實現。目前spring aop框架提供了JDK動態代理和Cglib動態代理兩種AopProxy實現,實現類分別為JdkDynamicAopProxy和ObjenesisCglibAopProxy。不同AopProxy實現的實例化過程采用工廠模式進行封裝,即AopProxyFactory,AopProxyFactory會根據傳入的AdvisedSupport實例信息來決定生成什么類型的AopProxy實例,目前AopProxyFactory只有一個具體實現類即下面的DefaultAopProxyFactory。
public class DefaultAopProxyFactory implements AopProxyFactory, Serializable {@Overridepublic AopProxy createAopProxy(AdvisedSupport config) throws AopConfigException {// optimize:主要用于告知代理對象是否需要采取進一步的優化措施,默認值為false,當值為true時會使用cglib進行動態代理。// proxyTargetClass:是否使用基于類的代理即cglib動態代理,默認值為false。// hasNoUserSuppliedProxyInterfaces:是否存在用戶自定義代理接口,如果目標實現了接口,可以使用JDK代理(默認),如// 果目標對象沒有實現接口,則必須使用CGLIB庫。if (config.isOptimize() || config.isProxyTargetClass() || hasNoUserSuppliedProxyInterfaces(config)) {Class<?> targetClass = config.getTargetClass();if (targetClass == null) {throw new AopConfigException("TargetSource cannot determine target class: " +"Either an interface or a target is required for proxy creation.");}if (targetClass.isInterface() || Proxy.isProxyClass(targetClass)) {return new JdkDynamicAopProxy(config);}return new ObjenesisCglibAopProxy(config);}else {return new JdkDynamicAopProxy(config);}}/*** Determine whether the supplied {@link AdvisedSupport} has only the* {@link org.springframework.aop.SpringProxy} interface specified* (or no proxy interfaces specified at all).*/private boolean hasNoUserSuppliedProxyInterfaces(AdvisedSupport config) {Class<?>[] ifcs = config.getProxiedInterfaces();return (ifcs.length == 0 || (ifcs.length == 1 && SpringProxy.class.isAssignableFrom(ifcs[0])));}
}
jdk動態代理和cglib創建動態代理的區別如下:
| 類型 | jdk動態代理 | cglib動態代理 |
|---|---|---|
| 原理 | java動態代理是利用反射機制生成一個實現代理接口的匿名類,在調用具體方法前調用InvokeHandler來處理 | cglib動態代理是利用asm開源包,將代理對象類的class文件加載進來,通過修改其字節碼生成子類來處理 |
| 核心類 | Proxy創建代理利用反射機制生成一個實現代理接口的匿名類InvocationHandler方法攔截器接口,需要實現invoke方法 | net.sf.cglib.proxy.Enhancer:主要增強類,通過字節碼技術動態創建委托類的子類實例net.sf.cglib.proxy.MethodInterceptor:方法攔截器接口,需要實現intercept方法 |
| 局限性 | 只能代理實現了接口的類 | 不能對final修飾的類進行代理,也不能處理final或private修飾的方法,但是可以處理static方法 |

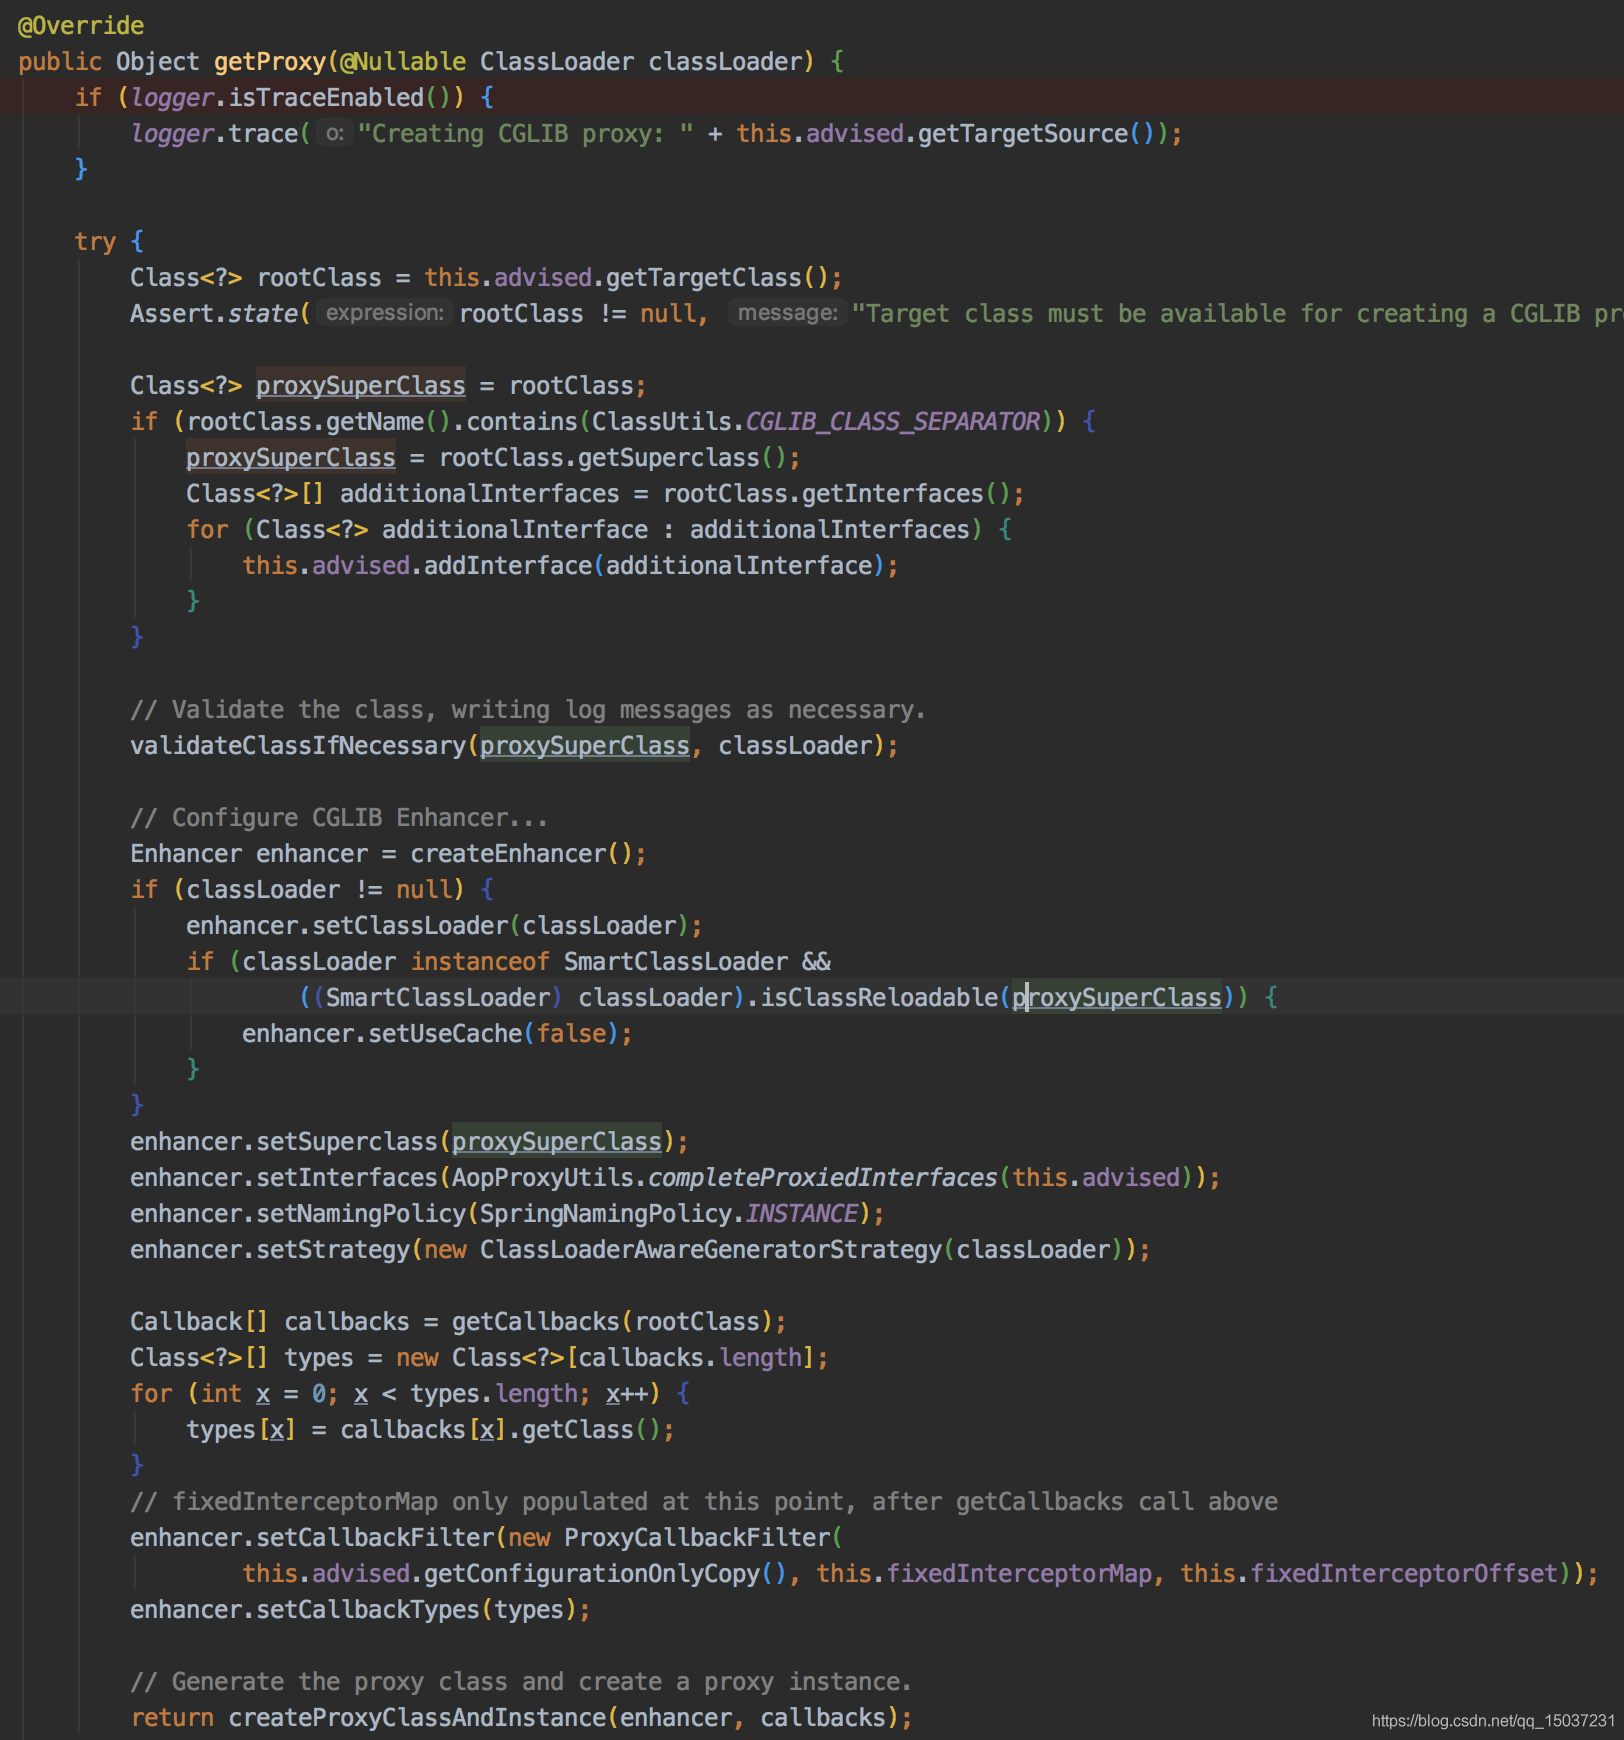
在創建好AopProxy實例后,便可以通過AopProxy實例創建動態代理,下面是CglibAopProxy#getProxy方法。主要是通過繼承的方式生成代理對象的子類,通過覆寫父類方法來完成代理。cglib不需要像jdk動態代理那樣要求代理類必須實現某個接口,同時性能也更好,但是使用cglib時一定要注意:cglib無法對final或private修飾的方法進行代理,但可以對static修飾的方法進行代理。
執行好applyBeanPostProcessorsAfterInitialization方法后,initializeBean方法的主體邏輯便執行完了,接下來我們繼續看doCreateBean的剩余邏輯。
這里的earlySingletonExposure部分邏輯也是用來處理循環依賴的。這部分主要檢查:bean在進行屬性設置和切面增強后生成的對象和earlySingletonObjects內保存的對象引用是否相同,若不相同則會拋出異常。earlySingletonObjects內保存的對象是在當前bean構建過程中提前暴露出的“半成品”對象引用。
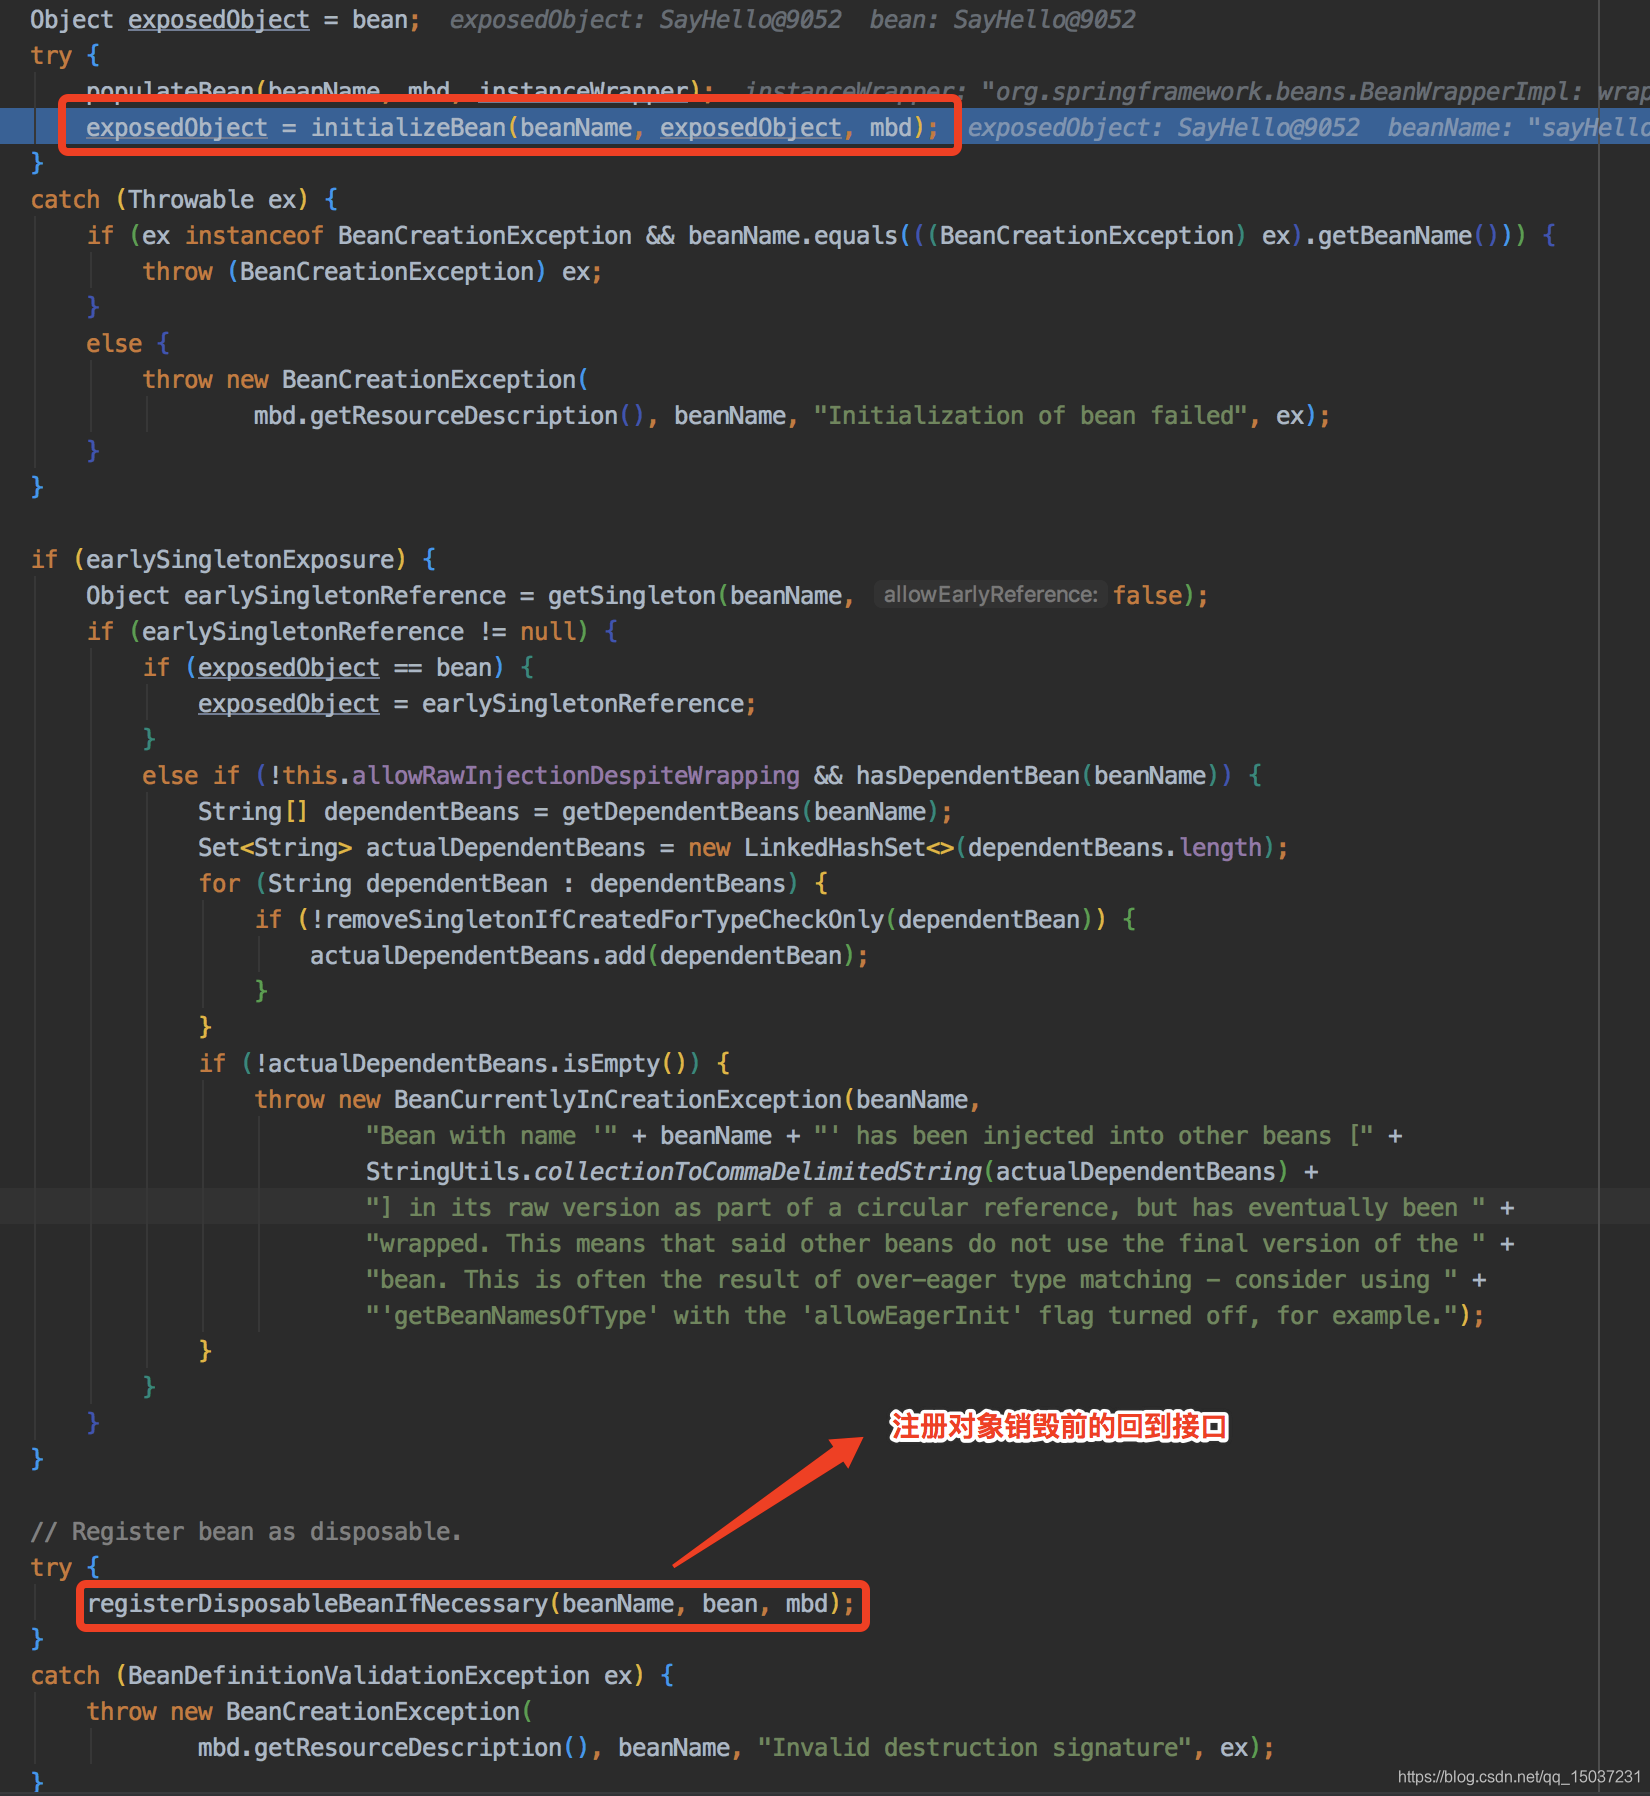
registerDisposableBeanIfNecessary
在進行好依賴注入及各種操作后,容器會檢查singleton類型的bean實例,看其(1)是否實現了DisposableBean接口、(2)是否實現了destory-method、(3)是否利用@PreDestroy標注了銷毀前需要執行的方法。如果滿足任意條件,就會為該bean實例注冊一個用于對象銷毀的回調,以便在這些singleton類型的對象實例在銷毀之前,執行銷毀邏輯。
/*** Add the given bean to the list of disposable beans in this factory,* registering its DisposableBean interface and/or the given destroy method* to be called on factory shutdown (if applicable). Only applies to singletons.* @param beanName the name of the bean* @param bean the bean instance* @param mbd the bean definition for the bean* @see RootBeanDefinition#isSingleton* @see RootBeanDefinition#getDependsOn* @see #registerDisposableBean* @see #registerDependentBean*/protected void registerDisposableBeanIfNecessary(String beanName, Object bean, RootBeanDefinition mbd) {AccessControlContext acc = (System.getSecurityManager() != null ? getAccessControlContext() : null);if (!mbd.isPrototype() && requiresDestruction(bean, mbd)) {if (mbd.isSingleton()) {// Register a DisposableBean implementation that performs all destruction// work for the given bean: DestructionAwareBeanPostProcessors,// DisposableBean interface, custom destroy method.registerDisposableBean(beanName,new DisposableBeanAdapter(bean, beanName, mbd, getBeanPostProcessors(), acc));}else {// A bean with a custom scope...Scope scope = this.scopes.get(mbd.getScope());if (scope == null) {throw new IllegalStateException("No Scope registered for scope name '" + mbd.getScope() + "'");}scope.registerDestructionCallback(beanName,new DisposableBeanAdapter(bean, beanName, mbd, getBeanPostProcessors(), acc));}}}
這些自定義的對象銷毀邏輯,在對象實例初始化完成,并注冊了相關的回調接口后,并不會馬上執行。回調方法注冊后,返回的對象即處于“可用”狀態,只有該對象不再被使用的時候,才會執行相關的自定義銷毀邏輯,此時通常也就是spring容器關閉的時候。在ApplicationContext容器中銷毀接口的回調主要是通過jvm的shutdownHook實現的,ApplicationContext容器通過registerShutdownHook()方法注冊jvm關閉的回調鉤子,保證在jvm退出前,這些singleton類型bean對象的自定義銷毀邏輯會被執行。下面是對象銷毀時銷毀回調接口的執行邏輯。到此為止整個doCreateBean()函數就執行完了,一個完整可用的Bean對象也被構建出來了。

Spring對循環依賴的處理
如果大家能夠一直讀到這里的話,會發現整個Bean的構建流程中穿插了很多Spring循環依賴的處理邏輯,我們在文章末尾總結下spring循環依賴問題。Spring 循環依賴有以下幾種情況:
- prototype類型bean不支持循環依賴,若出現循環依賴會拋出異常。
- singleton類型bean使用構造器注入時,不支持循環依賴,若出現循環依賴會拋出異常。
- singleton類型bean使用field注入(即@Autowired或@Resource注入)時,在沒有動態代理時支持循環依賴。當進行動態代理時分為兩種情況:(1)使用普通切面生成代理支持循環依賴、(2)使用@Async等注解生成代理則不支持循壞依賴。
(1)第一條原因:因為prototype類型bean的生命周期不由spring容器管理,屬于即產即用型,所以spring并不會持有bean的引用,更不會有bean的緩存,所以無法實現循環依賴(循環依賴的實現需要緩存bean)。
(2)第二條原因:使用構造器注入時,對象會在實例化階段選定合適的構造器,然后從容器獲取構造器的所有參數對象,使用的也是getBean()函數。假如對象A和對象B都使用構造器注入且存在互相依賴,那么當A在實例化時發現自己需要對象B,就調用getBean(B)獲取對象B。這時B開始構建且在實例化時發現自己需要對象A,同樣去調用getBean(A)獲取對象A。這樣就導致了死循環,對象A和對象B都沒辦法實例化,他們連個“半成品”對象都還沒生產出來,就阻塞在實例化階段了。
(2)第三條原因:其實這個主要是因為兩者生成動態代理的邏輯有所不同。在介紹具體原因前,我們需要先了解下spring中用于處理循環依賴的“三級緩存”。
【spring循環依賴】三個重要的Map(“三級緩存”)
- singletonObjects:緩存所有構建好的bean
- earlySingletonObjects:在bean構建過程中提前暴露出來的“半成品”bean
- singletonFactories:用于創建“半成品”bean的工廠
(1)singletonObjects:singletonObjects中存儲的都是完全構建好的bean,容器啟動后在項目代碼中我們通過getBean()從容器中獲取bean實例時,就是直接從該緩存中獲取,所以效率非常高,同時性能非常好。
(2)earlySingletonObjects:earlySingletonObjects主要保存在對象構建過程中提前暴露出來的“半成品”bean,是解決大部分循環依賴的關鍵。假設有兩個Bean A和B,這兩個Bean間存在相互依賴,且都不存在動態代理。那么當容器構建A時,實例化好A后,容器會把尚未注入依賴的A暫時放入earlySingletonObjects中,然后去幫A注入依賴。這時容器發現A依賴于B,但是B還沒有構建好,那么就會先去構建B。容器在實例化好B時,同樣需要幫B注入依賴,此時B發現自己依賴A,在獲取A時就可以從earlySingletonObjects中獲取尚未注入依賴的A引用,這樣就不會阻塞B的構建,B完成構建后就又可以注入到A中,這樣就解決了簡單的循環依賴問題。
(3)singletonFactories:singletonFactories用來保存創建“半成品”bean的工廠實例,在Bean實例化好后,并不會直接將尚未注入依賴的bean直接放入到earlySingletonObjects中,而是將能夠創建該“半成品”bean的工廠實例放入到singletonFactories中。這樣我們在對外暴露“半成品”bean時就可以加入一些自定義的特殊處理邏輯。例如下圖中普通切面代理就會在此處動些“手腳”。
有了上面的基礎知識后,我們就可以分析為什么在使用@Async注解時無法支持循環依賴了。
假設對象A使用@Aysnc注解且和對象B存在循環依賴:對象A實例化后進行依賴注入時,發現自己依賴對象B,就會通過getBean(B)獲取對象B。由于對象B尚未構建,就開始構建對象B,對象B實例化后注入依賴時發現依賴對象A,同樣通過getBean(A)獲取對象A。這時返回給對象B的是尚未注入依賴且還沒有代理的對象A。 對象B在構建完成會將引用返回給對象A,對象A繼續進行構建,在完成所有的依賴注入且執行完初始化方法后,會執行動態代理邏輯,這時@Aysnc代理實現類AsyncAnnotationBeanPostProcessor 為對象A生成了代理對象并將代理對象作為最終對象返回。這時就會導致最終生成的【代理后對象A】和對象B依賴的【原生對象A】并不是同一個對象,這種情況下spring會拋出異常。
由于普通切面代理實現類AnnotationAwareAspectJAutoProxyCreator做了些特殊的處理,所以不會出現上述問題。具體實現邏輯可以參照下面的時序圖。
 到此,我們本文的所有邏輯就講完了,完工大吉!繼續加油加油加油加油加油??!。


![[Swift]LeetCode916.單詞子集 | Word Subsets](http://pic.xiahunao.cn/[Swift]LeetCode916.單詞子集 | Word Subsets)


