文章目錄
- 編寫一個Windows程序
- 理解InitInstance
- InitInstance函數調用
- InitInstance的結構
- 理解MyRegisterClass
- MyRegisterClass函數調用
- MyRegisterClass的作用
- 揭露WinProc的秘密
- WinProc函數調用
- WinProc的大秘密
- 什么是游戲循環
- The Old WinMain
- 對持續性的需要
- 實時終止器
- WinMain和循環
- PeekMessage函數接口
- 將PeekMessage插到WinMain中
- 狀態驅動的游戲
- GameLoop項目
- 在Windows中繪制位圖
- 運行GameLoop程序
編寫一個Windows程序
這次創建一個標準窗口并在這個窗口上繪制文本和圖形。
DirectX SDK隨后章節有安裝步驟,還要配置C++編譯器,目前還未需要用到。
創建一個Win32項目,添加main.cpp。(創建過程參照第1章)
main.cpp源碼如下:
#include <windows.h>
#include <iostream>
using namespace std;
const string ProgramTitle = "Hello Windows";// The window event callback function
LRESULT CALLBACK WinProc(HWND hWnd, UINT message, WPARAM wParam, LPARAM lParam)
{RECT drawRect;PAINTSTRUCT ps;HDC hdc;switch (message){case WM_PAINT:{hdc = BeginPaint(hWnd, &ps); //start drawing for (int n = 0; n < 20; n++){int x = n * 20;int y = n * 20;drawRect = { x, y, x + 100, y + 20 };DrawText(hdc, ProgramTitle.c_str(), ProgramTitle.length(), &drawRect, DT_CENTER);}EndPaint(hWnd, &ps); //stop drawing}break;case WM_DESTROY:PostQuitMessage(0);break;}return DefWindowProc(hWnd, message, wParam, lParam);
}// Helper function to set up the window properties
ATOM MyRegisterClass(HINSTANCE hInstance)
{//set the new window's propertiesWNDCLASSEX wc;wc.cbSize = sizeof(WNDCLASSEX);wc.style = CS_HREDRAW | CS_VREDRAW;wc.lpfnWndProc = (WNDPROC)WinProc;wc.cbClsExtra = 0;wc.cbWndExtra = 0;wc.hInstance = hInstance;wc.hIcon = NULL;wc.hCursor = LoadCursor(NULL, IDC_ARROW);wc.hbrBackground = (HBRUSH)GetStockObject(WHITE_BRUSH);wc.lpszMenuName = NULL;wc.lpszClassName = ProgramTitle.c_str();wc.hIconSm = NULL;return RegisterClassEx(&wc);
}// Helper function to create the window and refresh it
bool InitInstance(HINSTANCE hInstance, int nCmdShow)
{//create a new windowHWND hWnd = CreateWindow(ProgramTitle.c_str(),        //window classProgramTitle.c_str(),        //title barWS_OVERLAPPEDWINDOW,         //window styleCW_USEDEFAULT, CW_USEDEFAULT, //position of window640, 480,                    //dimensions of the windowNULL,                        //parent window (not used)NULL,	                        //menu (not used)hInstance,                   //application instanceNULL);                       //window parameters (not used)//was there an error creating the window?if (hWnd == 0) return 0;//display the windowShowWindow(hWnd, nCmdShow);UpdateWindow(hWnd);return 1;
}// Entry point for a Windows program
int WINAPI WinMain(HINSTANCE hInstance, HINSTANCE hPrevInstance,LPSTR lpCmdLine, int nCmdShow)
{//create the windowMyRegisterClass(hInstance);if (!InitInstance(hInstance, nCmdShow)) return 0;// main message loopMSG msg;while (GetMessage(&msg, NULL, 0, 0)){TranslateMessage(&msg);DispatchMessage(&msg);}return msg.wParam;
}
運行結果:

理解InitInstance
InitInstance creates the program window.
Note that InitInstance is not a Windows function like WinMain, but simply a helper function.
The instance handle is a global variable used in the program to keep track of the main instance.
InitInstance函數調用
bool InitInstance( HINSTANCE hInstance, int nCmdShow )
-
HINSTANCE hInstance. The first parameter is passed by WinMain with the program instance that it receives from Windows. InitInstance will check this with the global instance to see whether the new instance needs to be killed. ()When this happens, the main instance of the program is set as the foreground window. To the user, it will seem as if running the program again just brought the original instance forward. -
int nCmdShow. The second parameter is passed to InitInstance by WinMain, which
receives the parameter from Windows.
The InitInstance function returns a bool value, which is either 1 (true) or 0 (false), and simply tells WinMain whether startup succeeded or failed.
InitInstance的結構
The whole point of InitInstance is to create the new window needed by this application and display it.
// Helper function to create the window and refresh it
bool InitInstance(HINSTANCE hInstance, int nCmdShow)
{//create a new windowHWND hWnd = CreateWindow(ProgramTitle.c_str(),        //window classProgramTitle.c_str(),        //title barWS_OVERLAPPEDWINDOW,         //window styleCW_USEDEFAULT, CW_USEDEFAULT, //position of window640, 480,                    //dimensions of the windowNULL,                        //parent window (not used)NULL,	                        //menu (not used)hInstance,                   //application instanceNULL);                       //window parameters (not used)//was there an error creating the window?if (hWnd == 0) return 0;//display the windowShowWindow(hWnd, nCmdShow);UpdateWindow(hWnd);return 1;
}// Entry point for a Windows program
int WINAPI WinMain(HINSTANCE hInstance, HINSTANCE hPrevInstance,LPSTR lpCmdLine, int nCmdShow)
{...//WinMain took this return value very seriously. If InitInstance doesn’t like something that is going on, WinMain will end the programif (!InitInstance(hInstance, nCmdShow)) return 0;...
}
The hWnd value is passed to these functions by the CreateWindow function. At the point of creation, the window existed in Windows but was not yet visible. UpdateWindow tells the new window to draw itself by sending a WM_PAINT message to the window handler.
Oddly enough, the program talks to itself quite often in this manner; this is common in Windows programming.
理解MyRegisterClass
MyRegisterClass is a very simple function that sets up the values for the main window class used by your program.
WinMain calls InitInstance and sets up the program window by calling MyRegisterClass.
MyRegisterClass函數調用
ATOM MyRegisterClass( HINSTANCE hInstance )
hInstance is the very same instance passed to InitInstance by WinMain. This variable gets around!
As you recall, hInstance stores the current instance of the running program, and is copied into a global variable in InitInstance.
The ATOM data type returned by MyRegisterClass is defined as a WORD, which is further defined as an unsigned short in one of the Windows header files.
MyRegisterClass的作用
Each member of the structure is defined in MyRegisterClass in order, so there is no need to list the struct.
These properties are pretty standard fare for a Windows program. The reason why we aren’t overly concerned is because we will replace the window when DirectX takes over.
So, who cares what special properties the window uses when it’s destined to be soon overrun with rendered output? But, at this early stage, it’s important to cover all the bases.
// Helper function to set up the window properties
ATOM MyRegisterClass(HINSTANCE hInstance)
{//set the new window's propertiesWNDCLASSEX wc;wc.cbSize = sizeof(WNDCLASSEX);/*The window style, wc.style, is set to CS_HREDRAW | CS_VREDRAW. The pipe symbol is a method for combining bits. - The CS_HREDRAW value causes the program window to be completely redrawn if a movement or size adjustment changes the width. - Likewise, CS_VREDRAW causes the window to be completely redrawn when the height is adjusted.*/wc.style = CS_HREDRAW | CS_VREDRAW;/*這參數很重要The variable, wc.lpfnWinProc, requires a little more explanation, as it is not simply a variable, but a pointer to a callback function. **This is of great importance, as without this value setting, messages will not be delivered to the program window (hWnd).** The callback window procedure is automatically called when a Windows message comes along with that hWnd value. This applies to all messages, including user input and window repaint. Any button presses, screen updates, or other events will go through this callback procedure. You may give this function any name you like, such as BigBadGameWindowProc, as long as it has a return value of LRESULT CALLBACK and the appropriate parameters.*/wc.lpfnWndProc = (WNDPROC)WinProc;/*The struct variables wc.cbClsExtra and wc.cbWndExtra should be set to zero most of the time. These values just add extra bytes of memory to a window instance, and you really do not need to use them.*/wc.cbClsExtra = 0;wc.cbWndExtra = 0;/*wc.hInstance is set to the hInstance parameter passed to MyRegisterClass. The main window needs to know what instance it is using. If you really want to confuse your program, set each new instance to point to the same program window. Now that would be funny! This should never happen because new instances of your game should be killed rather than being allowed to run.*/wc.hInstance = hInstance;/*wc.hIcon and wc.hCursor are pretty self-explanatory易懂. The LoadIcon function is normally used to load an icon image from a resource, and the MAKEINTRESOURCE macro returns a string value for the resource identifier. This macro is not something that is commonly used for a game (unless the game needs to run in a window).*/wc.hIcon = NULL;wc.hCursor = LoadCursor(NULL, IDC_ARROW);/*wc.hbrBackground is set to the handle for a brush used for drawing the background of the program window. The stock object, WHITE_BRUSH, is used by default. This may be a bitmap image, a custom brush, or any other color.*/wc.hbrBackground = (HBRUSH)GetStockObject(WHITE_BRUSH);/*wc.lpszMenuName is set to the name of the program menu, also a resource. I will not be using menus in the sample programs in this book.*/wc.lpszMenuName = NULL;/*wc.lpszClassName  gives the window a specific class name and is used for message handling, along with hWnd. This can also be hard coded to a string value.*/wc.lpszClassName = ProgramTitle.c_str();wc.hIconSm = NULL;/*MyRegisterClass calls the RegisterClassEx function. This function is passed the WNDCLASS variable, wc, that was set up with the window details. A return value of zero indicates failure. If the window is successfully registered with Windows, the value will be passed back to InitInstance.*/return RegisterClassEx(&wc);
}
揭露WinProc的秘密
WinProc is the window callback procedure that Windows uses to communicate events to
your program. A callback function is a function that gets called back.
Recall回想 that MyRegisterClass set up the WNDCLASS struct that was passed to RegisterClassEx. Once the class is registered, the window can then be created and displayed on the screen.
One of the fields in the struct, lpfnWinProc, is set to the name of a window callback procedure, typically called WinProc. This function will handle all of the messages sent to the main program window. As a result, WinProc will typically be the longest function in the main program source code file.

WinProc函數調用
LRESULT CALLBACK WinProc( HWND hWnd, UINT message, WPARAM wParam, LPARAM lParam)
You will want to get to know this function, because it is the key to initializing Direct3D.
The parameters are straightforward and represent the real “engine” of a windows program. Recall that this information was retrieved earlier by the GetMessage function in
WinMain.
Do not confuse InitInstance with WinProc, though. InitInstance is only run once to set the options, after which WinProc takes over, receiving and handling messages.
HWND hWnd. The first parameter is the window handle. Typically in a game, you will
create a new handle to a device context, known as an hDC, using the hWnd as a
parameter. Before DirectX came along, the window handle had to be retained
because it was used any time a window or control was referenced. In a DirectX
program, the window handle is used initially to create the window.UINT message. The second parameter is the message that is being sent to the window
callback procedure. The message could be anything, and you might not even need to use it. For this reason, there is a way to pass the message along to the default message
handler.n WPARAM wParamandLPARAM lParam. The last two parameters are value parameters
passed along with certain command messages. I’ll explain this in the next section.
WinProc的大秘密
// The window event callback function
LRESULT CALLBACK WinProc(HWND hWnd, UINT message, WPARAM wParam, LPARAM lParam)
{RECT drawRect;/*The PAINTSTRUCT variable, ps, is used in the WM_PAINT message handler to start and stop a screen update, sort of like unlocking and then locking the device context while making updates (so the screen is not garbled in the process). */PAINTSTRUCT ps;/*The variable, hdc, is also used in the WM_PAINT message handler to retrieve the device context of the program’s window.*/HDC hdc;switch (message){/*When you take the next step and start writing Direct3D code, **this will be the only message of concern**, as WM_PAINT is not needed in a Direct3D program.*/case WM_PAINT:{/*The BeginPaint function is called to lock the device context for an update (using the window handle and PAINTSTRUCT variables). BeginPaint returns the device context for the program window. This is necessary at every refresh because, although it is uncommon, the device context is not guaranteed to be constant while the program is running. (For instance, imagine that memory runs low and your program is filed away into virtual memory and then retrieved again—such an event would almost certainly generate a new device context.)*/hdc = BeginPaint(hWnd, &ps); //start drawing /*In the for loop, a rectangle object (of type RECT) called drawRect is set to draw a message on the window from the upper left down toward the bottom in a stair-like manner. */for (int n = 0; n < 20; n++){int x = n * 20;int y = n * 20;drawRect = { x, y, x + 100, y + 20 };/*DrawText prints text at the destination device context. The DT_CENTER parameter at the end tells DrawText to center the message at the top center of the passed rectangle.*/DrawText(hdc, ProgramTitle.c_str(), ProgramTitle.length(), &drawRect, DT_CENTER);}/*The last line of the paint message handler calls EndPaint to shut down the graphics system for that iteration of the message handler.*/EndPaint(hWnd, &ps); //stop drawing}break;/*The WM_DESTROY message identifier tells the window that it is time to shut down; your program should gracefully close down by removing objects from memory and then call the PostQuitMessage function to end the program. */case WM_DESTROY:PostQuitMessage(0);break;}return DefWindowProc(hWnd, message, wParam, lParam);
}
WM_PAINT is not called continuously, as in a real-time loop, but only when the window must be redrawn重畫. Therefore, WM_PAINT is not a suitable place to insert the screen refresh code for a game.
什么是游戲循環
There’s a lot more to Windows programming than we will cover in these pages but we’refocusing on just the limited code needed to get DirectX going. A real Windows application would have a menu, a status bar, a toolbar, and dialogs—which is why your average Windows programming book tends to be so long. I want to focus on game creation rather than spending many pages on the logistics of the operating system. What I’d really like to do is get away from the Windows code and come up with just a simple, run-of-the-mill main function, which is standard in C++ programs (but which is missing from Windows programs, which use winMain).
One way to do this is to put all of the basic Windows code (including winMain) inside one source code file (such as winmain.cpp) and then use another source code file (such as game.cpp) just for the game. Then, it would be a simple matter to call some sort of mainfunction from within winMain, and your “game code” would start running right after the program window is created. This is actually a standard practice on many systems and libraries,abstracting away the operating system and presenting the programmer with a standard interface.
The Old WinMain
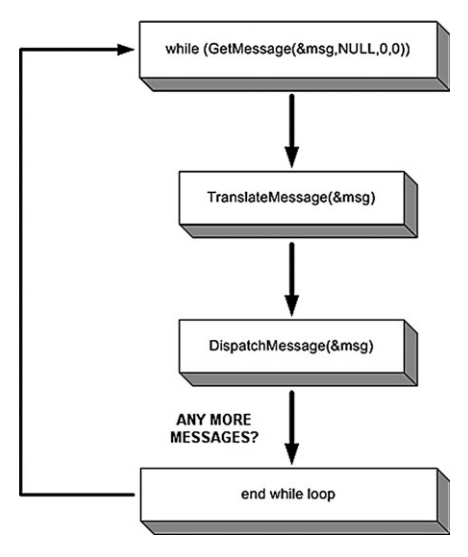
There’s just one problem with this version of WinMain: It doesn’t have a continuous loop, just a limited loop that processes any pending messages and then exits.
int WINAPI WinMain(HINSTANCE hInstance, HINSTANCE hPrevInstance,LPSTR lpCmdLine, int nCmdShow)
{//create the windowMyRegisterClass(hInstance);if (!InitInstance(hInstance, nCmdShow)) return 0;// main message loopMSG msg;while (GetMessage(&msg, NULL, 0, 0)){TranslateMessage(&msg);DispatchMessage(&msg);}return msg.wParam;
}
對持續性的需要
When you have 2D sprites or 3D models being rendered, with enemy characters moving around and with guns and explosions in the background, you need things to keep moving regardless of Windows messages! In short, listed above is a stodgy, inanimate version of WinMain that is totally unsuitable for a game. You need something that keeps on running regardless of whether there are event messages coming in.
The key to creating a real-time loop that keeps running all of the time regardless of what Windows is doing is modifying the while loop in WinMain. First of all, the while loop is conditional upon a message being present, while a game should keep running through the loop regardless of whether there’s a message. This definitely needs to be changed!
實時終止器
Notice how the main loop terminates if there are no messages, but will keep on processing any messages that are present.
What would happen if the main game loop were called from this version of WinMain? Well, once in a while the game loop would execute and things would be updated on the screen, but more often it would do nothing at all.
Why is that? Because this is an event-driven while loop, and we need a common, runof-the-mill procedural while loop that keeps going, and going, and going…regardless of what’s happening. A real-time game loop has to keep running non-stop until the game ends.
The Figure shows a new version of WinMain with a real-time game loop that doesn’t just loop through the events but keeps on going regardless of the events (such as mouse movement and key presses).

WinMain和循環
The key to making a real-time loop is modifying the while loop in WinMain so that it runs indefinitely, and then checking for messages inside the while loop. By indefinitely, I mean that the loop will keep running forever unless something interrupts the loop and causes it to exit (by calling exit or return inside the loop).
In addition to using an endless loop, there’s an alternative to calling the GetMessage function to detect event messages coming in. The alternate function is called PeekMessage. As the name implies, this function can look at incoming messages without necessarily retrieving them out of the message queue.(兩者區別)
Now, as you don’t want the message queue to fill up (wasting memory), you can use PeekMessage in place of GetMessage, regardless of whether there are messages. If there are messages, fine, go ahead and process them. Otherwise, just return control to the next line of code. As it turns out,
-
GetMessageis not very polite and doesn’t let us keep the game loop going unless a message is actually sitting in the message queue to be processed. -
PeekMessage, on the other hand, is polite and will just pass control on to the next statement if no message is waiting.
(MyNote:PeekMessage比較優雅,省內存。)
PeekMessage函數接口
BOOL PeekMessage(LPMSG lpMsg, //pointer to message structHWND hWnd, //window handleUINT wMsgFilterMin, //first messageUINT wMsgFilterMax, //last messageUINT wRemoveMsg); //removal flag
LPMSG lpMsg. This parameter is a pointer to the message structure that describes the
message (type, parameters, and so on).HWND hWnd. This is a handle to the window that is associated with the event.UINT wMsgFilterMin. This is the first message that has been received.UINT wMsgFilterMax. This is the last message that has been received.UINT wRemoveMsg. This is a flag that determines how the message will be handled after
it has been read.PM_NOREMOVE: to leave the message in the message queue,PM_REMOVE: to remove the message from the queue after it has been read.
將PeekMessage插到WinMain中
bool gameover = false;
while (!gameover)
{if (PeekMessage(&msg, NULL, 0, 0, PM_REMOVE)){//handle any event messagesTranslateMessage(&msg);DispatchMessage(&msg);}//process game loop (this is new)Game_Run();
}
you’ll notice that PeekMessage is now called instead of GetMessage, and you’ll recognize the PM_REMOVE parameter, which causes any event messages to be pulled out of the queue and processed.
In actuality, there are really no messages coming into a DirectX program (except perhaps WM_QUIT) because most of the processing takes place in the DirectX libraries.
在此基礎上添加游戲邏輯: Game_Init, Game_Run, and Game_End.
int WINAPI WinMain(HINSTANCE hInstance, HINSTANCE hPrevInstance,LPSTR lpCmdLine, int nCmdShow)
{MSG msg;MyRegisterClass(hInstance);if (!InitInstance(hInstance, nCmdShow)) return 0;//initialize the game <-----------------------------關注點1if (!Game_Init()) return 0;// main message loop bool gameover = false;while (!gameover){if (PeekMessage(&msg, NULL, 0, 0, PM_REMOVE)){//decode and pass messages on to WndProcTranslateMessage(&msg);DispatchMessage(&msg);}//process game loop <-----------------------------關注點2Game_Run();}//do cleanup <-----------------------------關注點3Game_End();//end programreturn msg.wParam;
}
狀態驅動的游戲
A frequent subject of debate among game programmers involves how to design a state system. Some argue that a game should be state-driven from the start, and all function calls should be abstracted in the extreme so that code is portable to other platforms.
For instance, some people write code wherein all the Windows code is hidden away, and they’ll then have a similar Mac or Linux version, at which point it’s possible to port much of the game to those platforms without too much difficulty. (MyNote:設計原則:將變的抽取,將不變的保留。)
It’s such a good habit to develop! Even while being stressed out over getting a game finished and pounding out code for 16 hours at a time, if you are a true professional, you’ll manage that while also sparing節約 some neurons for higher-level things, such as writing clean code.
(MyNote:寫干凈代碼,是不錯的目標。)
GameLoop項目
參考第1章創建Win32空項目工程。
The code I’ll present here will be the basis for all of the programs that will follow, with only very few changes to come.
創建main.cpp文件,內容代碼如下:
#include <windows.h>
#include <iostream>
#include <time.h>
using namespace std;const string APPTITLE = "Game Loop";
HWND window;
HDC device;
bool gameover = false;// Loads and draws a bitmap from a file and then frees the memory
// (not really suitable for a game loop but it's self contained)
void DrawBitmap(char *filename, int x, int y)
{//load the bitmap imageHBITMAP image = (HBITMAP)LoadImage(0, filename, IMAGE_BITMAP, 0, 0, LR_LOADFROMFILE);//read the bitmap's propertiesBITMAP bm;GetObject(image, sizeof(BITMAP), &bm);//create a device context for the bitmapHDC hdcImage = CreateCompatibleDC(device);SelectObject(hdcImage, image);//draw the bitmap to the window (bit block transfer)BitBlt(device,                  //destination device contextx, y,                    //x,y positionbm.bmWidth, bm.bmHeight, //size of source bitmaphdcImage,                //source device context0, 0,                    //upper-left source positionSRCCOPY);                //blit method//delete the device context and bitmapDeleteDC(hdcImage);DeleteObject((HBITMAP)image);
}// Startup and loading code goes here
bool Game_Init()
{//start up the random number generatorsrand(time(NULL));return 1;
}// Update function called from inside game loop
void Game_Run()
{if (gameover == true) return;//get the drawing surfaceRECT rect;GetClientRect(window, &rect);//draw bitmap at random locationint x = rand() % (rect.right - rect.left);int y = rand() % (rect.bottom - rect.top);DrawBitmap("c.bmp", x, y);
}// Shutdown code
void Game_End()
{//free the deviceReleaseDC(window, device);
}// Window callback function
LRESULT CALLBACK WinProc(HWND hWnd, UINT message, WPARAM wParam, LPARAM lParam)
{switch (message){case WM_DESTROY:gameover = true;PostQuitMessage(0);break;}return DefWindowProc(hWnd, message, wParam, lParam);
}// MyRegiserClass function sets program window properties
ATOM MyRegisterClass(HINSTANCE hInstance)
{//create the window class structureWNDCLASSEX wc;wc.cbSize = sizeof(WNDCLASSEX);//fill the struct with infowc.style = CS_HREDRAW | CS_VREDRAW;wc.lpfnWndProc = (WNDPROC)WinProc;wc.cbClsExtra = 0;wc.cbWndExtra = 0;wc.hInstance = hInstance;wc.hIcon = NULL;wc.hCursor = LoadCursor(NULL, IDC_ARROW);wc.hbrBackground = (HBRUSH)GetStockObject(BLACK_BRUSH);wc.lpszMenuName = NULL;wc.lpszClassName = APPTITLE.c_str();wc.hIconSm = NULL;//set up the window with the class inforeturn RegisterClassEx(&wc);
}// Helper function to create the window and refresh it
BOOL InitInstance(HINSTANCE hInstance, int nCmdShow)
{//create a new windowwindow = CreateWindow(APPTITLE.c_str(),              //window classAPPTITLE.c_str(),              //title barWS_OVERLAPPEDWINDOW,   //window styleCW_USEDEFAULT,         //x position of windowCW_USEDEFAULT,         //y position of window640,                   //width of the window480,                   //height of the windowNULL,                  //parent windowNULL,                  //menuhInstance,             //application instanceNULL);                 //window parameters//was there an error creating the window?if (window == 0) return 0;//display the windowShowWindow(window, nCmdShow);UpdateWindow(window);//get device context for drawingdevice = GetDC(window);return 1;
}// Entry point function
int WINAPI WinMain(HINSTANCE hInstance, HINSTANCE hPrevInstance, LPSTR lpCmdLine, int nCmdShow)
{MSG msg;//create windowMyRegisterClass(hInstance);if (!InitInstance(hInstance, nCmdShow)) return 0;//initialize the gameif (!Game_Init()) return 0;// main message loopwhile (!gameover){//process Windows eventsif (PeekMessage(&msg, NULL, 0, 0, PM_REMOVE)){TranslateMessage(&msg);DispatchMessage(&msg);}//process game loopGame_Run();}//free game resourcesGame_End();return msg.wParam;
}
在Windows中繪制位圖
The DrawBitmap function in this demo draws a bitmap. The function loads a bitmap file into memory, and then draws it at a random location on the window (using the window’s device context).
Be sure to copy the c.bmp file into the project folder (where the .vcxproj file is located) for this program.
You would never want to do this in a real game, because it loads the darned bitmap file every single time it goes through the loop! That’s insanely slow and wasteful, but it is okay for demonstration purposes
// Loads and draws a bitmap from a file and then frees the memory
// (not really suitable for a game loop but it's self contained)
void DrawBitmap(char *filename, int x, int y)
{//load the bitmap imageHBITMAP image = (HBITMAP)LoadImage(0, filename, IMAGE_BITMAP, 0, 0, LR_LOADFROMFILE);//read the bitmap's propertiesBITMAP bm;GetObject(image, sizeof(BITMAP), &bm);//create a device context for the bitmapHDC hdcImage = CreateCompatibleDC(device);SelectObject(hdcImage, image);//draw the bitmap to the window (bit block transfer)BitBlt(device,                  //destination device contextx, y,                    //x,y positionbm.bmWidth, bm.bmHeight, //size of source bitmaphdcImage,                //source device context0, 0,                    //upper-left source positionSRCCOPY);                //blit method//delete the device context and bitmapDeleteDC(hdcImage);DeleteObject((HBITMAP)image);
}
To draw the bitmap repeatedly, the Game_Run function passes the bitmap filename and a random x,y location (bound within the limits of the window’s width and height) to the DrawBitmap function:
// Update function called from inside game loop
void Game_Run()
{if (gameover == true) return;//get the drawing surfaceRECT rect;GetClientRect(window, &rect);//draw bitmap at random locationint x = rand() % (rect.right - rect.left);int y = rand() % (rect.bottom - rect.top);DrawBitmap("c.bmp", x, y);
}
運行GameLoop程序
You should see a window appear with an image drawn repeatedly in random locations on the window.
運行結果:

The Windows GDI—which is the system that provides you with window handles and device contexts and allows you to draw on windows to build a user interface (or a game that does not use DirectX)—is a step backward, to be blunt坦率.
Keep moving forward, covering only the aspects of Windows coding necessary to provide a footing for DirectX.
6-10)


:個人總結)
11-15)


:個人總結)

:單例模式)
)

》筆記(1 / 12):緒論)


》筆記(2 / 12):線性表)

