文章目錄
- LinearLayout :線性布局
- android:layout_gravity :控件的對齊方式
- android:layout_weight:權重
- RelativeLayout :相對布局
- 相對于父布局進行定位
- 相對于控件進行定位
- 邊緣對齊
- FrameLayout :幀布局
- Percent :百分比布局
- ConstraintLayout :約束布局
- 自定義控件
- 封裝復用的頁面
- 引入封裝好的布局
- 自定義控件
LinearLayout :線性布局
線性布局有水平、垂直兩種排列方式:
android:orientation="vertical":垂直方向排列,此時高度不可被指定為match_parent。android:orientation="horizontal":水平方向排列,此時不能將寬度指定為match_parent。
android:layout_gravity :控件的對齊方式
如果布局方式選擇 horizontal,之后設置 button1 為 top ;button2 為 center_vertical ; button3 為 bottom 。那么呈現效果如下:
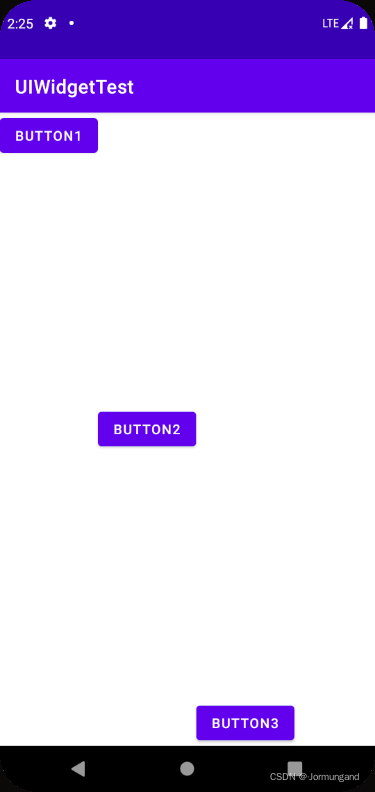
android:layout_weight:權重
vertical 垂直布局時,layout_weight 可以覆蓋 layout_height 屬性,根據權重來分配控件高度:
PS:通過上圖應該對 “android:orientation="vertical" :垂直方向排列,此時高度不可被指定為 match_parent。” 這句話有了深刻了解, match_parent 屬性會導致控件占滿整個屏幕……
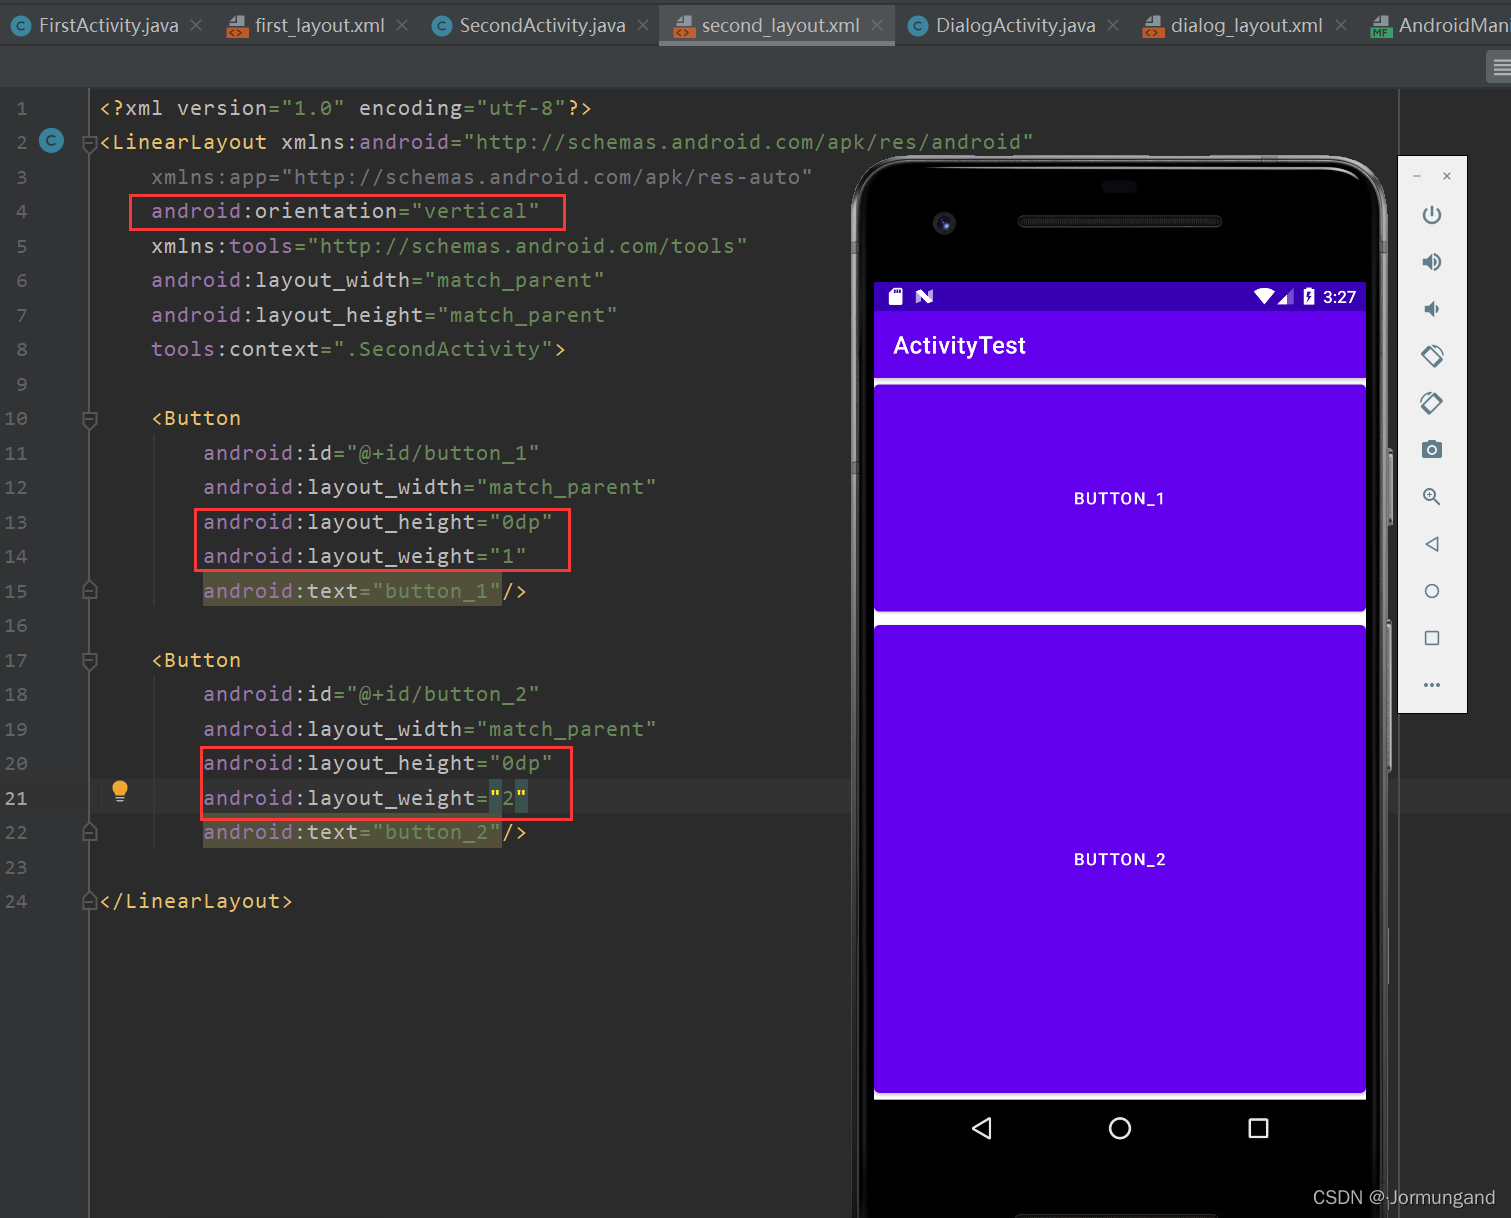
horizontal 水平布局時,layout_weight 可以覆蓋 layout_height 屬性,根據權重來分配控件高度:
RelativeLayout :相對布局
通過相對定位的方式可以使控件出現在布局的任何位置。
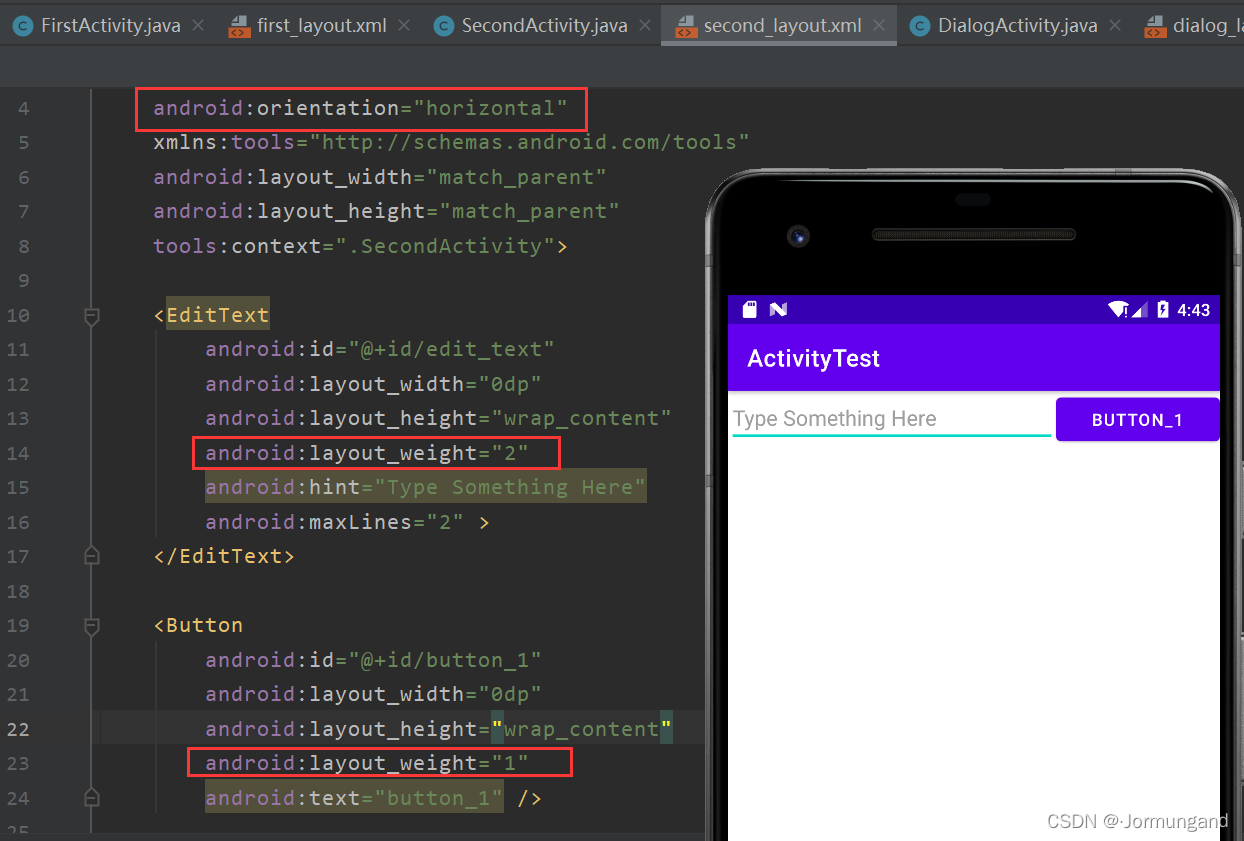
相對于父布局進行定位
關于位置的屬性:
- layout_alignParentLeft :處于父布局的左。
- layout_alignParentTop :處于父布局的上。
- layout_alignParentRight : 處于父布局的右。
- layout_alignParentBottom :處于父布局的下。
- layout_centerInParent :處于父布局的居中。
相對于控件進行定位
<?xml version="1.0" encoding="utf-8"?>
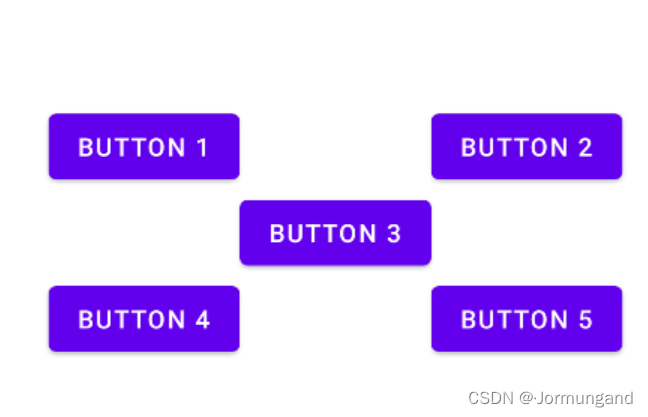
<RelativeLayout xmlns:android="http://schemas.android.com/apk/res/android"xmlns:tools="http://schemas.android.com/tools"android:layout_width="match_parent"android:layout_height="match_parent"tools:context=".SecondActivity"><Buttonandroid:id="@+id/button_1"android:layout_width="wrap_content"android:layout_height="wrap_content"android:layout_above="@id/button_3"android:layout_toLeftOf="@id/button_3"android:text="Button 1"/><Buttonandroid:id="@+id/button_2"android:layout_width="wrap_content"android:layout_height="wrap_content"android:layout_above="@id/button_3"android:layout_toRightOf="@id/button_3"android:text="Button 2"/><Buttonandroid:id="@+id/button_3"android:layout_width="wrap_content"android:layout_height="wrap_content"android:layout_centerInParent="true"android:text="Button 3"/><Buttonandroid:id="@+id/button_4"android:layout_width="wrap_content"android:layout_height="wrap_content"android:layout_below="@id/button_3"android:layout_toLeftOf="@id/button_3"android:text="Button 4"/><Buttonandroid:id="@+id/button_5"android:layout_width="wrap_content"android:layout_height="wrap_content"android:layout_below="@id/button_3"android:layout_toRightOf="@id/button_3"android:text="Button 5"/></RelativeLayout>
運行結果:
- layout_above :處于被引用控件之上。
- layout_below :處于被引用控件之下。
- layout_toLeftOf :處于被引用控件之左。
- layout_toRightOf :處于被引用控件之右。
通過 android:layout_centerInParent 定位 button 3 之后,以其為基準,定位其他四個 button 的位置。
邊緣對齊
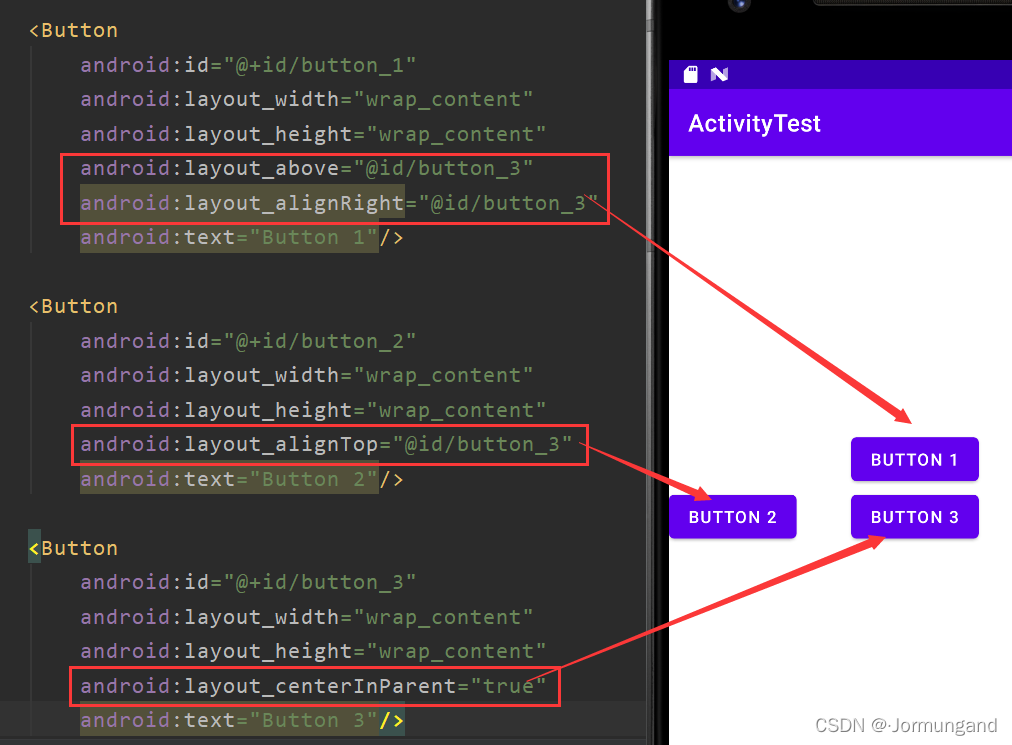
- layout_alignLeft :該控件左邊緣與被引用控件左邊緣對齊。
- layout_alignRight:該控件右邊緣與被引用控件右邊緣對齊。
- layout_alignTop :該控件頂部邊緣與被引用控件頂部邊緣對齊。
- layout_alignBottom :該控件底部邊緣與被引用控件底部邊緣對齊。
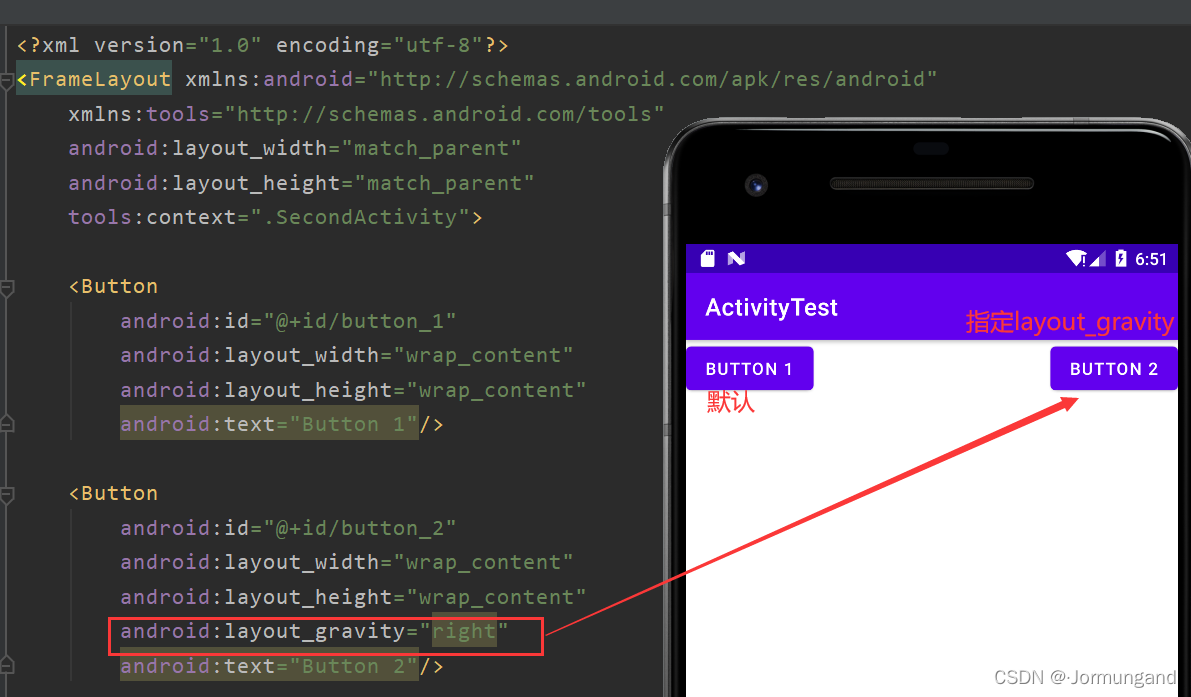
FrameLayout :幀布局
這種布局沒有方便的定位方式,所有的控件都默認的擺放在布局的左上角。但可以類似于 LinearLayout 中通過 layout_gravity 來指定控件在布局中的對齊方式:
Percent :百分比布局
layout_weight 屬性讓設計布局變得更方便,但可惜的是只有 LinearLayout 支持該功能,因此提供了 PercentFrameLayout 和 PercentRelativeLayout 分別解幀布局和相對布局的功能局限性。
具體來說,即可以不再使用 wrap_content 和 match_parent 等方式來指定控件大小,而是直接指定控件在布局中所占的百分比。
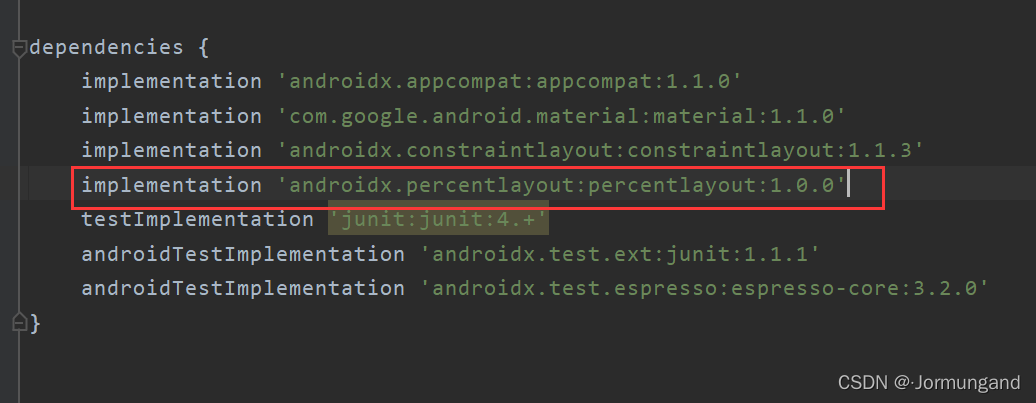
使用時,由于 Android 將百分比布局定義在了 support 庫中,因此只需在 app/build.gradle 文件中添加下面依賴,需要注意的是 support 庫在 Androidx 1.0.0 及更高版本中被 AndroidX 庫完全取代了……因此添加依賴時需如此實現:
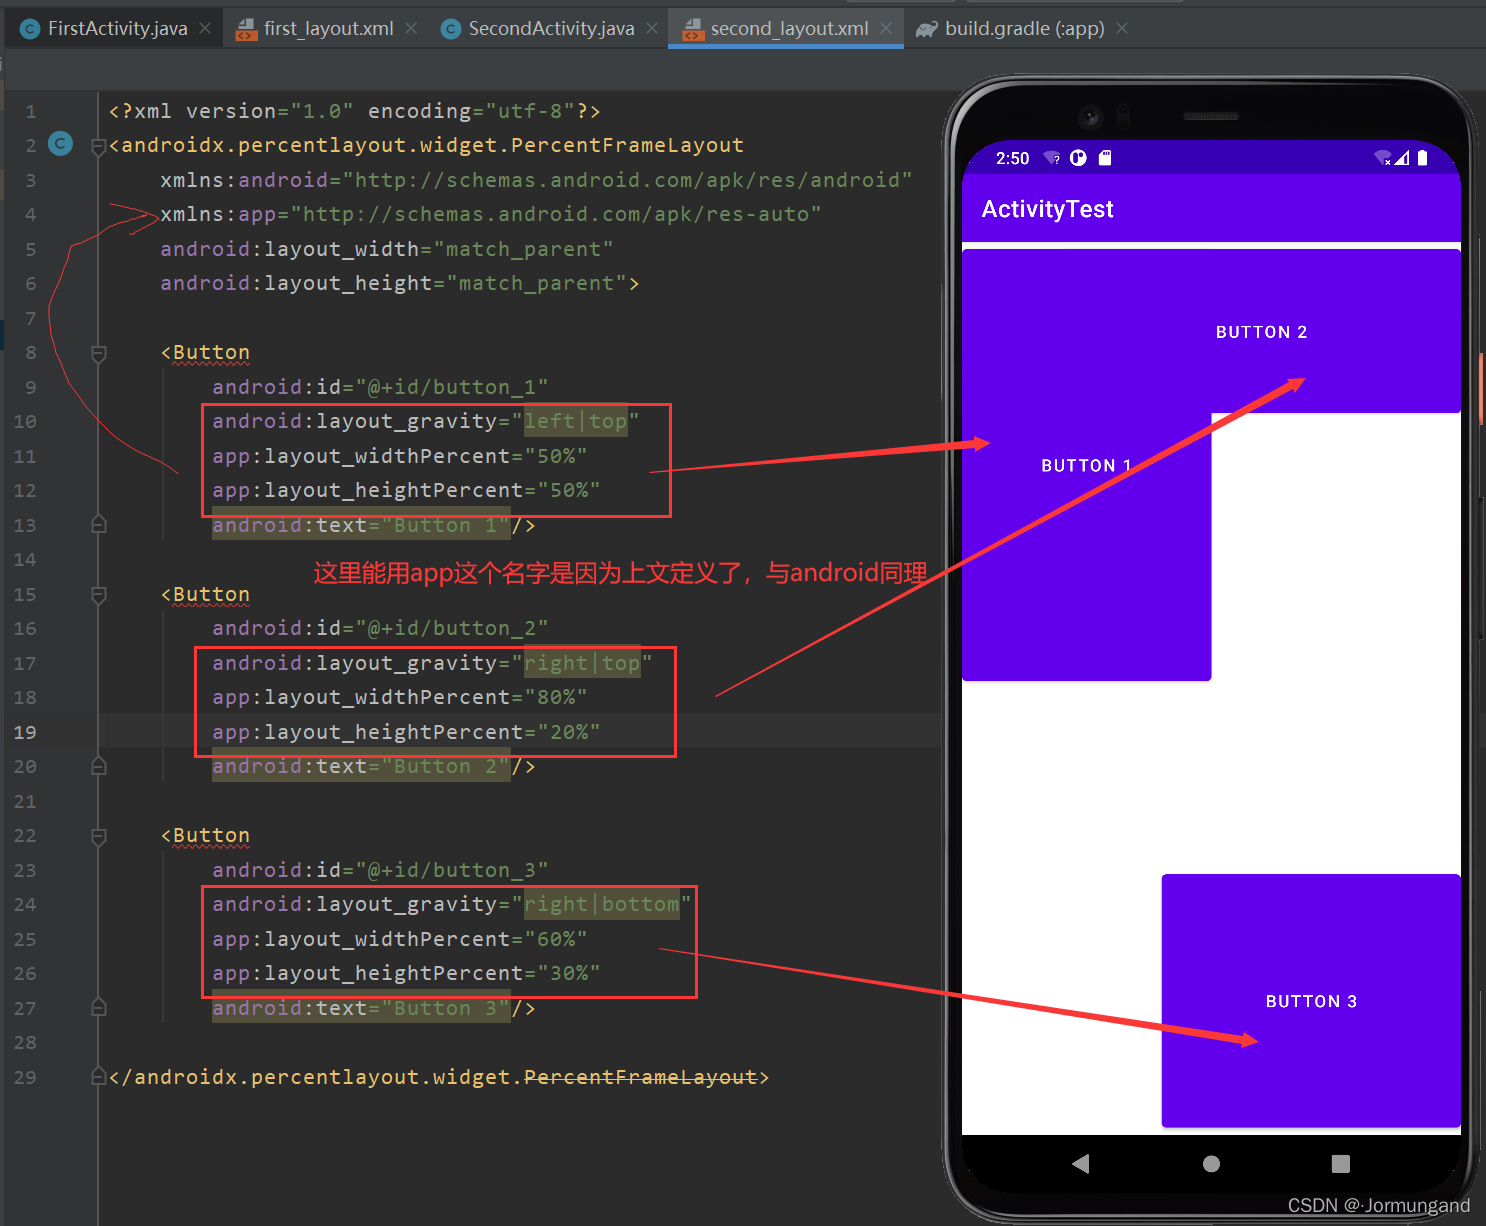
- 只用完整路徑
androidx.percentlayout.widget.PercentFrameLayout作為標簽名,因為百分比布局不像其他三個內置在系統中。 - 必須定義一個命名空間 app 才能使用百分比布局的自定義屬性。
- 使用
layout_widthPercent和layout_heightPercent兩個屬性來定義控件長款,值以百分比形式表示。 - 繼承自 FrameLayout ,因此所有控件默認擺放在左上角,可以借助
layout_gravity來避免控件重疊。
ConstraintLayout :約束布局
常被視作增強型的相對布局,ConstraintLayout 不僅可以解決 LinearLayout 常有的嵌套布局缺陷,還具備 RelativeLayout 的相對布局功能。
自定義控件
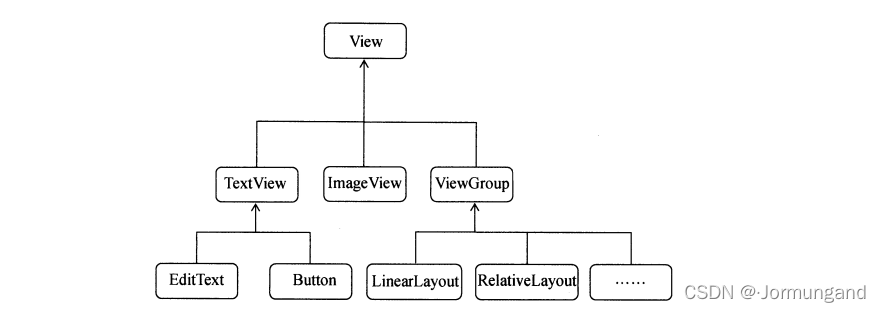
- 所有控件都是直接或者間接地繼承自 View 的,所有布局都是直接或間接繼承自 ViewGroup 的。
- View 是 Android 中最基本的一種 UI 組件,它可以在屏幕上繪制一塊矩形區域,響應這塊區域的各種事件,封裝好的各種控件其實就是在 View 的基礎之上添加了各自特有的功能。
- ViewGroup 是一種特殊的 View,可以包含很多的 子View 和 子ViewGroup,是一個放置控件和布局的容器。
封裝復用的頁面
在前端頁面中有許多重復使用頻率高的頁面,如導航欄、底部欄等,對于這些頁面,可以一次編撰代碼并封裝,之后多次調用以實現復用。
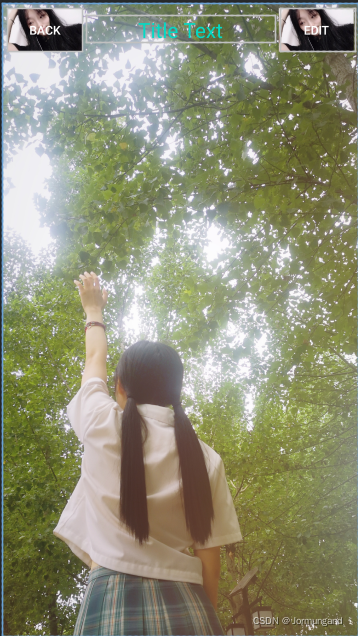
這里通過約束布局實現標題欄布局文件 title.xml :
<?xml version="1.0" encoding="utf-8"?>
<androidx.constraintlayout.widget.ConstraintLayout xmlns:android="http://schemas.android.com/apk/res/android"xmlns:app="http://schemas.android.com/apk/res-auto"android:layout_width="match_parent"android:layout_height="match_parent"android:background="@drawable/cmy4"><Buttonandroid:id="@+id/title_back"android:layout_width="0dp"android:layout_height="50dp"android:layout_margin="5dp"app:layout_constraintHorizontal_weight="1"android:background="@drawable/cmy1"android:text="Back"android:textColor="#fff"app:layout_constraintTop_toTopOf="parent"app:layout_constraintLeft_toLeftOf="parent"app:layout_constraintRight_toLeftOf="@id/title_text" /><TextViewandroid:id="@+id/title_text"android:layout_width="0dp"android:layout_height="wrap_content"android:gravity="center"android:text="Title Text"app:layout_constraintHorizontal_weight="2.5"android:textColor="@color/teal_200"android:textSize="24sp"app:layout_constraintTop_toTopOf="@id/title_back"app:layout_constraintBottom_toBottomOf="@id/title_back"app:layout_constraintLeft_toRightOf="@id/title_back"app:layout_constraintRight_toLeftOf="@id/title_edit" /><Buttonandroid:id="@+id/title_edit"android:layout_width="0dp"android:layout_height="50dp"android:layout_margin="5dp"app:layout_constraintHorizontal_weight="1"android:background="@drawable/cmy1"android:text="Edit"android:textColor="@color/white"app:layout_constraintTop_toTopOf="parent"app:layout_constraintLeft_toRightOf="@id/title_text"app:layout_constraintRight_toRightOf="parent" /></androidx.constraintlayout.widget.ConstraintLayout>
android:background 不生效
在 res/values/themes.xml 中:

修改為:

相對定位
通過形如 layout_constraintTop_toTopOf 的屬性來定位控件,該類屬性值可為 parent 從而與父布局相適配。舉兩個例子,上述代碼中:
title_back中app:layout_constraintLeft_toLeftOf="parent":意為將title_back的 左邊緣 約束到父布局的 左邊緣。title_edit中app:layout_constraintStart_toEndOf="@id/title_back":意為title_edit的 起始位置 即title_back的 結束位置。
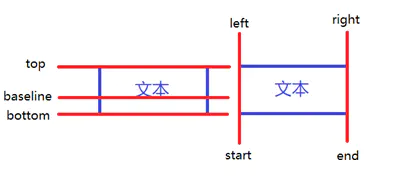
相對定位中的 layout_constraintBaseline_toBaselineOf 意為 文本基線 對齊。
對齊前: 對齊后:
對齊后:
通過相對布局實現居中:

用一張圖總結相對定位:
鏈
如果兩個或以上控件通過下圖的方式約束在一起,就可以認為是他們是一條鏈(圖為橫向的鏈,縱向同理):
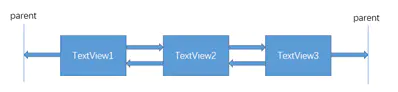
一條鏈的第一個控件是這條鏈的鏈頭,當所有控件的 高/寬度 都為 固定值/wrap_content 時,可以在 鏈頭 中通過設置 layout_constraintHorizontal_chainStyle 來改變 鏈的樣式:
- spread :展開元素 (默認);
- spread_inside :展開元素,但鏈的兩端貼近 parent;
- packed :鏈的元素將被打包在一起。

當所有控件的 高/寬度 都為 0dp 時,可以在 每個控件 中通過設置layout_constraintHorizontal_weight(constraintVertical為縱向)來改變 鏈的權重。
界面顯示:
引入封裝好的布局
- 在布局文件中加上一句
<include layout="@layout/title"/>; - 隱藏系統自帶的標題欄:
ActionBar actionBar = getSupportActionBar();
if (actionBar != null) actionBar.hide();
自定義控件
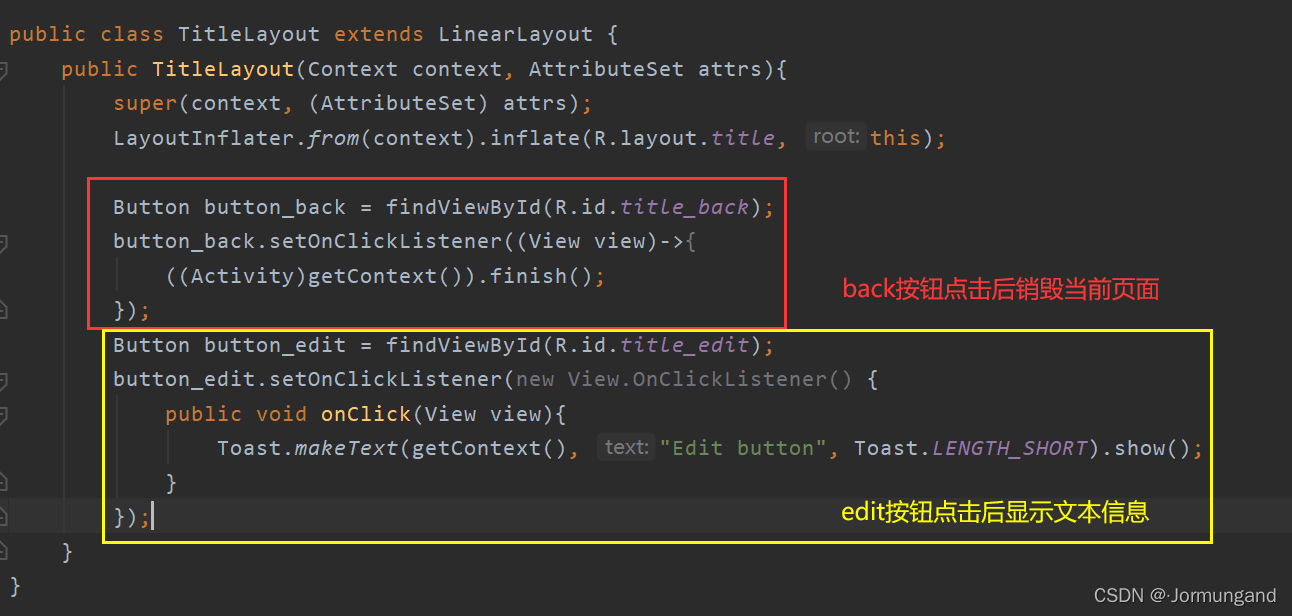
不光布局會被重復使用,某些控件其功能是固定的,比如返回按鈕,都是銷毀當前活動。因此也可以對其進行封裝復用,創建一個自定義類 TitleLayout.java 繼承 LinearLayout,并且重寫里面的構造方法:
public class TitleLayout extends LinearLayout {public TitleLayout(Context context, Attributes attrs){super(context, (AttributeSet) attrs);LayoutInflater.from(context).inflate(R.layout.title, this);}
}
此時,在布局中引入 TitleLayout 控件就會調用這個構造函數,因此使用 LayoutInflater 來實現動態加載,from() 方法可以構建出一個 LinearLayout 對象,然后調用 inflate 可以動態加載一個布局文件,里面傳入兩個參數:
- 加載布局文件的
id; - 參數一的父布局。
現在可以在其他 xml 文件中(比如 second_layout.xml)添加這個自定義控件:
<com.example.activitytest.TitleLayoutandroid:layout_width="match_parent"android:layout_height="match_parent"></com.example.activitytest.TitleLayout>
com.example.activitytest 是 TitleLayout 文件所在的完整路徑名。如此一來即可把 title 布局界面直接搬到 second_layout 布局中,那么 SecondActivity 其顯示的布局自然就是 title.xml 的樣子。
此時我們可以為布局中的控件注冊點擊事件:
| 滾動控件 ListView 與 RecyclerView)

| Fragment碎片詳解)
 | Fragment 的應用——新聞應用)

| 全局廣播與本地廣播)
 | 廣播 Broadcast 的應用——強制下線功能)
| 數據持久化)
| Android權限 與 內容提供器)

| 通知)
 | 權限和內容提供器的應用——調用相機和相冊)
 | 系統權限、MediaPlayer類 和 VideoView類 的應用——播放多媒體文件)
| 網絡)

| 服務)


