OpenDayLight(硼Boron版本)實戰開發入門
OpenDayLight[1](簡寫為ODL)的硼Boron(0.5.0)版本于2016-09-16 這幾天剛剛發布。作為一款開源SDN網絡控制器,依托于強大的社區支持以及豐富的功能特性,ODL成為了目前主流的SDN網絡控制器開發平臺。不僅為開發者提供了大量的網絡管理功能,而且藉由AD-SAL(API驅動的服務層)和MD-SAL(模型驅動的服務層), 給獨立的網絡應用提供了完善的二次開發接口。由于OpenDaylight架構的復雜性和多樣性,以及ODL上官方wiki文檔更新的比較緩慢,往往給開發者帶來很多的困難。
下面我們以最新的版本硼Boron為例,講解ODL的入門應用開發技術。
1. 介紹
1.1 ODL應用開發
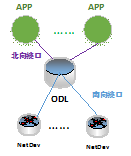
ODL做為網絡控制器, 將網絡設備和應用程序連接起來。通過南向接口(例如OpenFlow協議等)管理和控制實際的網絡物理設備, 通過北向接口(例如RESTConf形式的接口)向外部應用程序提供信息獲取和操作下發的功能。如下圖所示:

圖1-1 ODL和APP
對于南向接口, 設備廠商會比較關注; 應用開發主要集中于北向接口。本文我們只關注于北向接口的APP的開發。
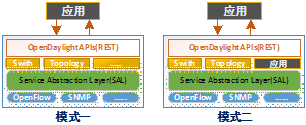
開發ODL的應用有兩種模式:如下圖所示
模式一 外部應用,應用通過ODL提供的RESTful接口使用ODL提供的全部功能
模式二 內部應用, 應用內嵌于ODL中, 同時向外部暴露RESTful接口以供外部程序調用

圖1-2 應用開發模式
采用RESTful接口的應用開發和傳統的開發模式類似,不再詳細說明。完全使用RESTful的方式,當業務邏輯復雜時,可能會導致調用RESTful接口過多影響性能而且開發復雜。另一方面, ODL提供的RESTful接口不一定能滿足業務邏輯要求, 此時,就需要模式二的ODL內部應用開發, 然后通過自定義的RESTful接口向外暴露功能。
1.2 OSGi簡介
OSGi[2]是采用Java語言的一種面向服務的組件模型, 它提供了模塊化為基礎開發應用的基本架構。模塊可以動態加載/卸載,向外暴露功能和隱藏內部實現細節等, 模塊在稱為容器的環境中運行。OSGi的實現有Apache Felix, Equinox , Spring DM 等.
OpenDaylight基于OSGi的實現Apache Karaf(Apache Felix的一個子項目)來構造系統。 模塊也稱為bundle, ODL的內部應用就是一個個的bundle, 它們放置在ODL目錄的system子目錄下, 以maven的存儲庫形式組織。借助于OSGi的架構, ODL中的內部應用可以動態加載和卸載, 系統具有很好的靈活性和可擴展性, 這對于大型系統而言是非常重要的。
模塊不僅向外提供接口, 而且需要使用其它模塊提供的功能, 也即模塊之間具有依賴性。因此ODL內部應用的開發除了專注于功能, 而且對不同的ODL生產版本,需要配置不同的依賴。
2. ODL之硼Boron版本應用開發
此部分內容主要來自于ODL的DOC。
2.1 開發環境搭建
開發環境配置如下:
1) 64位Linux系統,4G以上內存, 16G以上硬盤剩余空間(如果編譯ODL發行版的話)
2) JDK8, maven-3.3.x
3) 環境變量設置(設置JAVA_HOME, M2_HOME, PATH變量設置, MAVEN_OPTS選項設置等, 略)
export JAVA_HOME=…
export MAVEN_OPTS=”-Xmx1024m”
2.2 開發示例項目
0) 獲取ODL的maven配置文件(用于maven編譯時下載ODL的相應jar文件)
# cp ~/.m2/settings.xml ~/.m2/settings.xml.old
1) 用maven生成項目框架(設項目為hello)
# mvn archetype:generate -DarchetypeGroupId=org.opendaylight.controller \
-DarchetypeArtifactId=opendaylight-startup-archetype \
-DarchetypeRepository=https://nexus.opendaylight.org/content/repositories/public/ \
-DarchetypeCatalog=https://nexus.opendaylight.org/content/repositories/public/archetype-catalog.xml
(輸入如下內容)
Define value for property ‘groupId’: : org.bupt.siwind.hello
Define value for property ‘artifactId’: : hello
Define value for property ‘package’: org.bupt.siwind.hello: :
Define value for property ‘classPrefix’: Hello: :
Define value for property ‘copyright’: : BNRC, Inc.
或者輸入如下:
mvn archetype:generate -DarchetypeGroupId=org.opendaylight.controller \
-DarchetypeArtifactId=opendaylight-startup-archetype \
-DarchetypeVersion=1.2.0-Boron \
-DarchetypeRepository=https://nexus.opendaylight.org/content/repositories/public/ \
-DarchetypeCatalog=https://nexus.opendaylight.org/content/repositories/public/archetype-catalog.xml
上述步驟完成后, 在當前目錄下面會生成hello目錄, 即為我們的APP目錄.
2) 修改依賴項(針對硼Boron版本)
# cd hello (進入hello項目目錄)
# 依次打開文件: pom.xml, api/pom.xml, artifacts/pom.xml, features/pom.xml, impl/pom.xml, it/pom.xml, karaf/pom.xml, 修改內容(其中features/pom.xml修改多處)
按照下面列出的各自修改對應的依賴的版本號:
odlparent(odlparent-lite): 1.7.0-Boron
binding-parent: 0.9.0-Boron
mdsal.model: 0.9.0-Boron
mdsal: 1.4.0-Boron
restconf: 1.4.0-Boron
yangtools: 1.0.0-Boron
dlux: 0.4.0-Boron
config-parent: 0.5.0-Boron
mdsal-it-parent: 1.4.0-Boron
karaf-parent: 1.7.0-Boron
例如文件features/pom.xml, 修改后如下(藍色部分):
org.opendaylight.odlparent
features-parent
1.7.0-Boron
……
0.9.0-Boron
1.4.0-Boron
1.4.0-Boron
1.0.0-Boron
0.4.0-Boron
etc/opendaylight/karaf
3) 編譯和運行
#mvn clean install
#./karaf/target/assembly/bin/karaf
進入ODL控制臺,輸入如下命令可以看到結果:
opendaylight-user@root>feature:list -i | grep hello
opendaylight-user@root>log:display | grep Hello
4) 添加基于yang模型的RPC接口, 并編譯運行
添加接口并編譯的內容看ODL的文檔, 略.
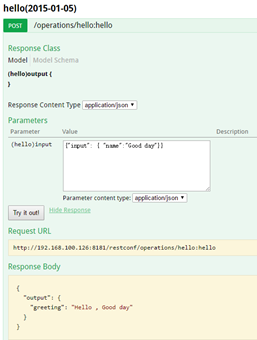
可以看到hello-world RPC接口, 輸入{“input”: { “name”:”Good day”}} , 可以看到結果。

圖21 hello RPC example
Curl訪問RPC驗證:
#curl –user “admin”:”admin” \
-H “Accept: application/json” \
-H “Content-type: application/json” \
-X POST –data “{‘hello:input’: { ‘name’:’Good day ODL’}}” \
2.3 安裝到ODL生產版本
有三種方法: 方法一為將當前生成hello項目的bundle拷貝到已經正常部署運行的ODL的硼版本上; 方法二為重新編譯一個包含hello項目的ODL發行版。
方法三(推薦)為拷貝項目的maven結構到生產環境ODL的system目錄下,然后在生產環境ODL的features-integration-index處添加自己項目的repository倉庫即可進行feature的安裝。
1) 方法一: 手動拷貝bundle
由于ODL以OSGi的方式組織, 因此項目hello也是一個OSGi的bundle. 在ODL中, bundle位于ODL發行版的目錄的system/子目錄下,????并且各個bundle以maven的包形式組織。我們hello項目正常編譯運行后, hello的bundle存在于當前hello目錄下面的karaf/target/assembly/system下面(其它很多bundle不要拷貝), 我們從此目錄拷貝hello自己的bundle到ODL的發行版即可。
i) 拷貝: 假設當前正常部署運行的ODL發行版位于: /home/guest/distribution-karaf-0.5.0-Boron
當前的hello項目位于/home/guest/bin/hello
那么拷貝命令如下:
#cp -Ru /home/guest/bin/hello/karaf/target/assembly/system/org/bupt /home/guest/distribution-karaf-0.5.0-Boron/system/org
ii) 查看hello的maven路徑:
#cd hello (進入hello項目目錄)
#cat ./karaf/target/assembly/etc/org.apache.karaf.features.cfg
查看這一行:featuresRepositories
在最后有hello的mvn路徑: “mvn:org.bupt.siwind.odl/hello-features/1.0.0-SNAPSHOT/xml/features”
iii) 運行ODL并添加和安裝hello的bundle:
#cd /home/guest/distribution-karaf-0.5.0-Boron
#./bin/karaf (啟動ODL運行, 或者以干凈模式啟動: ./bin/karaf clean)
#opendaylight@root> feature:repo-add
mvn:org.bupt.siwind.odl/hello-features/1.0.0-SNAPSHOT/xml/features
# opendaylight@root> feature:install odl-hello-ui
# opendaylight@root> feature:list | grep hello
# opendaylight@root> log:display | grep Hello
可以看到運行結果正常。
(移除bundle)
# opendaylight@root> feature:repo-remove mvn:org.bupt.siwind.odl/hello-features/1.0.0-SNAPSHOT/xml/features
2) 方法二: 編譯hello項目到ODL發行版中
i) 編譯ODL發行版:
#git tag
#git checkout release/boron (切換需要的版本)
#mvn mvn clean install
編譯成功后在當前目錄下的distribution-karaf\target下面有壓縮包形式的發行版:
distribution-karaf-0.5.0-Boron.tar.gz, distribution-karaf-0.5.0-Boron.zip
當前目錄下的distribution-karaf\target\assembly為解壓縮后的karaf執行版本
ii) 記錄hello項目的信息
# cat /features/pom.xml
(記錄hello-feature的版本等信息)
# cat /karaf/target/assembly/etc/org.apache.karaf.features.cfg
(記錄hello的mvn路徑: “mvn:org.bupt.siwind.odl/hello-features/1.0.0-SNAPSHOT/xml/features”)
iii) 添加hello的bundle信息
此步驟之前,確保hello編譯運行和測試例運行通過, 并且用mvn clean install 安裝其bundle到了.m2/repository下面。
在當前的distribution目錄下面, 修改如下兩個pom.xml文件
# vim features-index/pom.xml , 添加如下內容:
org.bupt.siwind.odl
hello-features
1.0.0-SNAPSHOT
features
xml
# vim features-index/src/main/resources/features.xml, 添加如下內容:
mvn:org.bupt.siwind.odl/hello-features/1.0.0-SNAPSHOT/xml/features
iv) 重新編譯發行版
#mvn clean install
3) 方法三(推薦),結合前述兩種方法,操作如下:
i) 拷貝: 在當前編譯運行成功項目的目錄” karaf/target/assembly/system/”下面是maven格式的倉庫,拷貝我們項目的maven倉庫內容到生成環境ODL的system目錄下。
例如:
#cp –R ?/home/guest/bin/hello/karaf/target/assembly/system/org/bupt? /home/guest/distribution-karaf-0.5.0-Boron/system/org
ii) 添加我們項目倉庫信息到ODL生成環境的” features-integration-index”xml文件下面。此文件路徑為:
“\system\org\opendaylight\integration\features-integration-index\\features-integration-index--features.xml”
例如: Boson-SR1的路徑為:
“system\org\opendaylight\integration\features-integration-index\0.5.1-Boron-SR1\features-integration-index-0.5.1-Boron-SR1-features.xml”
打開此文件,在末尾的標簽之前添加一行內容:
mvn:org.bupt.siwind.odl/hello-features/1.0.0-SNAPSHOT/xml/features
iii) 啟動生產環境ODL,安裝feature即可。
# /bin/karaf
# opendaylight@root> feature:install? xxxx

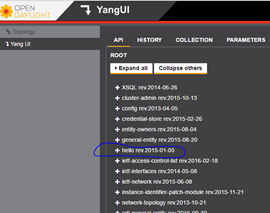
圖2-2 運行結果
3. 結論
本文介紹了目前2016最新的ODL硼Boron版本的應用開發基礎步驟, 其也適用于其它版本的開發, 以及介紹了一些OSGi相關的背景技術; 增加了將應用集成到發行版ODL的方法,和簡單的RPC接口示例。
4. FAQ
1) 不能在ODL發行版中正常加載hello項目
A:查看是否hello的各個pom.xml中定義的依賴版本符合當前運行的ODL發行版
2) 編譯ODL的integration/distribution發行版時, 某些依賴的bundle不能下載
A:查看報錯的是哪個bundle, 這里是ODL的倉儲, 用git自行下載此bundle源碼, 編譯到本機的.m2/repository中.
例如:
# cd {PROJECT}
# git checkout release/boron ? ?(切換指定版本)
# mvn clean install
References
[1] OpenDaylight:開源SDN平臺
[2] OSGi: The Dynamic Module System for Java[EB/OL]. https://www.osgi.org/.
贊過:
贊 正在加載……


