目錄
1、Kubernetes網絡組件
1.1、Flannel網絡組件
1.2、Calico 網絡插件
2、環境準備
2.1、主機初始化配置
2.2、部署docker環境
3、部署kubernetes集群
3.1、組件介紹
3.2、配置阿里云yum源
3.3、安裝kubelet kubeadm kubectl
3.4、配置init-config.yaml
3.5、安裝master節點
3.6、安裝node節點
3.7、部署Calico網絡插件
4、Calico網絡策略基礎
4.1、創建服務
4.2、啟用網絡隔離
4.3、測試網絡隔離
4.4、允許通過網絡策略進行訪問
5、Calico網絡策略進階
5.1、創建服務
5.2、拒絕所有入口流量
5.3、允許進入Nginx的流量
5.4、拒絕所有出口流量
5.5、允許DNS出口流量
5.6、允許出口流量到Nginx
1、Kubernetes網絡組件
????????隨著 Docker 容器化興起,云計算面對的挑戰越來越大,例如:網絡管理、存儲管理等。一個數據中心中基本上都有成百上千個容器,這么多的容器需要運維人員集中管理。而在云計算的世界中,計算是最基礎的,存儲是最重要的,網絡則是最復雜的。Kubernetes 網絡的實現不是集群內部自己實現,而是依賴于第三方網絡插件。本次主要介紹 Kubernetes網絡組件中的一個重要成員——Calico。
1.1、Flannel網絡組件
????????Flannel 是 CoreOS 團隊針對 Kubernetes 設計的一個網絡規劃服務。它的功能是讓集群中的不同節點主機創建的 Docker 容器都具有全集群唯一的虛擬 IP 地址。在默認的 Docker 配置中,每個節點上的 Docker 服務會分別負責所在節點容器的 IP 分配。這樣導致的問題是,不同節點上容器可能獲得相同的內網 IP 地址。
????????Flannel 的設計目的就是為集群中的所有節點重新規劃 IP 地址的使用規則,從而使得不同節點上的容器能夠獲得“同屬一個內網”且”不重復的”IP 地址,并讓屬于不同節點上的容器能夠直接通過內網 IP 地址通信。
????????Flannel 實質上是一種“覆蓋網絡(overlay network)”,也就是將 TCP 數據包裝在另一種網絡包里面進行路由轉發和通信,目前已經支持 UDP、VxLAN、AWS VPC 和 GCE 路由等數據轉發方式,默認的節點間數據通信方式是 UDP 轉發。

?
????????數據從源容器中發出后,經由所在主機的 docker0 虛擬網卡轉發到 flannel0 虛擬網卡,
這是個 P2P 的虛擬網卡,flanneld 服務監聽在網卡的另外一端。
????????Flannel 通過 Etcd 服務維護了一張節點間的路由表。源主機的 flanneld 服務將原本的數據內容 UDP 封裝后根據自己的路由表投遞給目的節點的 flanneld 服務,數據到達以后被解包,然后直接進入目的節點的 flannel0 虛擬網卡,之后被轉發到目的主機的 docker0 虛擬網卡,最后就像本機容器通信一下的有 docker0 路由到達目標容器。
1.2、Calico 網絡插件
????????Calico 是一種基于 BGP 的、純三層的、容器間互通的網絡方案。與 OpenStack、Kubenetes、AWS、GCE 等云平臺都能夠良好的集成。在虛擬化平臺中,如 OpenStack、Docker 等都需要實現 workloads 之間互連,但同時也需要對容器做隔離控制,就像在Internet 中的服務僅開放 80 端口、公有云的多租戶一樣,提供隔離和管控機制。
????????而在多數的虛擬化平臺實現中,通常使用二層隔離技術來實現容器的網絡,這些二層技術有一些弊端,比如需要依賴 VLAN、bridge 和隧道等技術。其中 bridge 帶來了復雜性,vlan 隔離和 tunnel 隧道則消耗更多的資源并對物理環境有要求,隨著網絡規模的增大,整體會變得越加復雜。我們嘗試把 Host 當作 Internet 中的路由器,同樣使用 BGP 同步路由,并使用 Iptables 來做安全訪問策略,最終設計出了 Calico 方案。
?
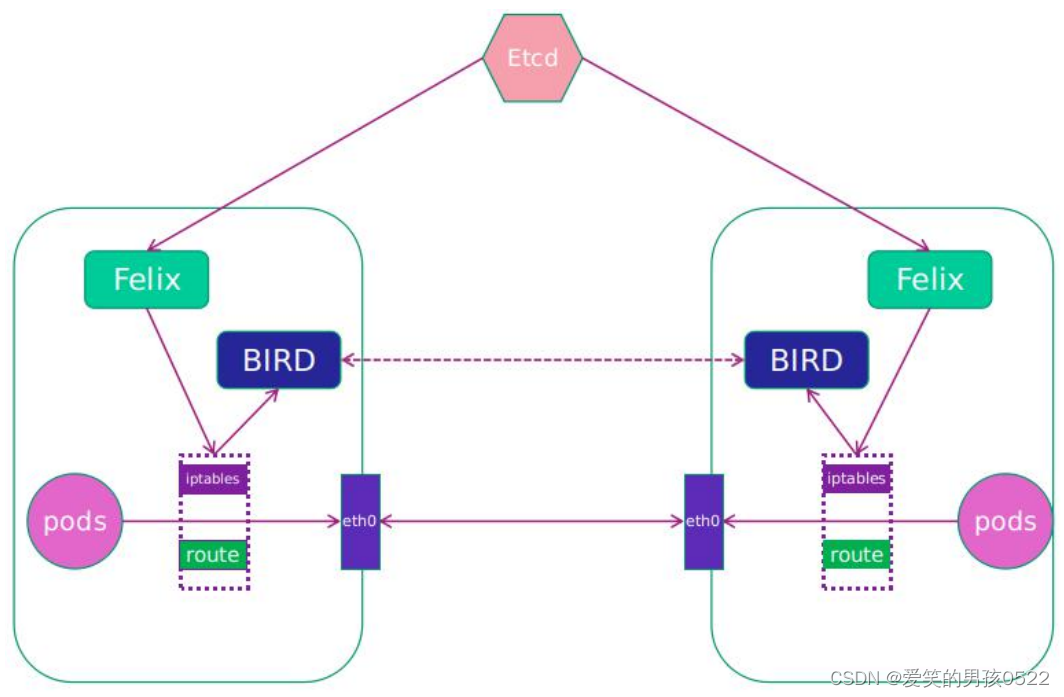
(1)Calico 網絡模型工作組件
- Felix:運行在每一臺?Host 的?agent 進程,主要負責網絡接口管理和監聽、路由、ARP管理、ACL 管理和同步、狀態上報等。
- etcd:分布式鍵值存儲,主要負責網絡元數據一致性,確保?Calico?網絡狀態的準確性,可以與 kubernetes 共用;
- BGP Client(BIRD):Calico 為每一臺?Host 部署一個?BGP Client,使用?BIRD 實現。BIRD 是一個單獨的持續發展的項目,實現了眾多動態路由協議比如 BGP、OSPF、RIP 等。在 Calico 的角色是監聽 Host 上由 Felix 注入的路由信息,然后通過 BGP 協議廣播告訴剩余 Host 節點,從而實現網絡互通。
- BGP Route Reflector:在大型網絡規模中,如果僅僅使用?BGP client 形成?mesh 全網互聯的方案就會導致規模限制,因為所有節點之間倆倆互聯,需要 N^2 個連接,為了解決這個規模問題,可以采用 BGP 的 Router Reflector 的方法,使所有 BGP Client僅與特定 RR 節點互聯并做路由同步,從而大大減少連接數。
- CalicoCtl:Calico 命令行管理工具。
(2)Calico 網絡 Node 之間兩種網絡
- IPIP
- 從字面來理解,就是把一個 IP 數據包又套在一個 IP 包里,即把 IP 層封裝到 IP 層的一個 tunnel。它的作用相當于一個基于 IP 層的網橋。一般來說,普通的網橋是基于 mac 層的,根本不需 IP,而這個 ipip 則是通過兩端的路由做一個 tunnel,把兩個本來不通的網絡通過點對點連接起來。
- BGP
- 邊界網關協議(Border Gateway Protocol, BGP)是互聯網上一個核心的去中心化自治路由協議。它通過維護 IP 路由表或‘前綴’表來實現自治系統(AS)之間的可達性,屬于矢量路由協議。BGP 不使用傳統的內部網關協議(IGP)的指標,而使用基于路徑、網絡策略或規則集來決定路由。因此,它更適合被稱為矢量性協議,而不是路由協議。BGP通俗的講就是講接入到機房的多條線路(如電信、聯通、移動等)融合為一體,實現多線單 IP,BGP 機房的優點:服務器只需要設置一個 IP 地址,最佳訪問路由是由網絡上的骨干路由器根據路由跳數與其它技術指標來確定的,不會占用服務器的任何系統。
-
2、環境準備
操作系統
IP地址
主機名
組件
CentOS7.5
192.168.2.116
k8s-master
kubeadm、kubelet、kubectl、docker-ce
CentOS7.5
192.168.2.117
k8s-node1
kubeadm、kubelet、kubectl、docker-ce
CentOS7.5
192.168.2.118
k8s-node2
kubeadm、kubelet、kubectl、docker-ce
注意:所有主機配置推薦CPU:2C+??Memory:2G+
?
2.1、主機初始化配置
所有主機配置禁用防火墻和selinux?
[root@localhost ~]# setenforce 0
[root@localhost ~]# iptables -F
[root@localhost ~]# systemctl stop firewalld
[root@localhost ~]# systemctl disable firewalld
[root@localhost ~]# systemctl stop NetworkManager
[root@localhost ~]# systemctl disable NetworkManager
[root@localhost ~]# sed -i '/^SELINUX=/s/enforcing/disabled/' /etc/selinux/config
配置主機名并綁定hosts,不同主機名稱不同
[root@localhost ~]# hostname k8s-master
[root@localhost ~]# bash
[root@k8s-master ~]# cat << EOF >> /etc/hosts
192.168.2.116 k8s-master
192.168.2.117 k8s-node1
192.168.2.118 k8s-node2
EOF[root@k8s-master ~]# scp /etc/hosts 192.168.2.117:/etc/
[root@k8s-master ~]# scp /etc/hosts 192.168.2.118:/etc/[root@localhost ~]# hostname k8s-node1
[root@localhost ~]# bash
[root@k8s-node1 ~]#[root@localhost ~]# hostname k8s-node2
[root@localhost ~]# bash
[root@k8s-node2 ~]#
主機配置初始化
[root@k8s-master ~]# yum -y install vim wget net-tools lrzsz[root@k8s-master ~]# swapoff -a
[root@k8s-master ~]# sed -i '/swap/s/^/#/' /etc/fstab[root@k8s-node01 ~]# cat << EOF >> /etc/sysctl.conf
net.bridge.bridge-nf-call-ip6tables = 1
net.bridge.bridge-nf-call-iptables = 1
EOF
[root@k8s-node01 ~]# modprobe br_netfilter
[root@k8s-node01 ~]# sysctl -p2.2、部署docker環境
三臺主機上分別部署 Docker 環境,因為 Kubernetes 對容器的編排需要 Docker 的支持。
[root@k8s-master ~]# wget -O /etc/yum.repos.d/CentOS-Base.repo http://mirrors.aliyun.com/repo/Centos-7.repo[root@k8s-master ~]# yum install -y yum-utils device-mapper-persistent-data lvm2使用 YUM 方式安裝 Docker 時,推薦使用阿里的 YUM 源。
[root@k8s-master ~]# yum-config-manager --add-repo https://mirrors.aliyun.com/docker-ce/linux/centos/docker-ce.repo[root@k8s-master ~]# yum clean all && yum makecache fast [root@k8s-master ~]# yum -y install docker-ce
[root@k8s-master ~]# systemctl start docker
[root@k8s-master ~]# systemctl enable docker
鏡像加速器(所有主機配置)
[root@k8s-master ~]# cat << END > /etc/docker/daemon.json
{"registry-mirrors":[ "https://nyakyfun.mirror.aliyuncs.com" ]
}
END
[root@k8s-master ~]# systemctl daemon-reload
[root@k8s-master ~]# systemctl restart docker
3、部署kubernetes集群
3.1、組件介紹
三個節點都需要安裝下面三個組件
- kubeadm:安裝工具,使所有的組件都會以容器的方式運行
- kubectl:客戶端連接K8S?API工具
- kubelet:運行在node節點,用來啟動容器的工具
3.2、配置阿里云yum源
????????使用 YUM 方式安裝 Kubernetes時,推薦使用阿里的 YUM 源。
????????準備好基礎環境和 Docker 環境,下面就開始通過 Kubeadm 來部署 Kubernetes 集群。首先,安裝 Kubelet、Kubeadm 和 Kubectl。
[root@k8s-master ~]# cat <<EOF > /etc/yum.repos.d/kubernetes.repo
[kubernetes]
name=Kubernetes
baseurl=https://mirrors.aliyun.com/kubernetes/yum/repos/kubernetes-el7-x86_64/
enabled=1
gpgcheck=1
repo_gpgcheck=1
gpgkey=https://mirrors.aliyun.com/kubernetes/yum/doc/yum-key.gpghttps://mirrors.aliyun.com/kubernetes/yum/doc/rpm-package-key.gpg
EOF[root@k8s-master ~]# ls /etc/yum.repos.d/backup Centos-7.repo CentOS-Media.repo CentOS-x86_64-kernel.repo docker-ce.repo kubernetes.repo3.3、安裝kubelet kubeadm kubectl
所有主機配置
[root@k8s-master ~]# yum install -y kubelet-1.20.0 kubeadm-1.20.0 kubectl-1.20.0
[root@k8s-master ~]# systemctl enable kubelet
????????kubelet 剛安裝完成后,通過 systemctl start kubelet 方式是無法啟動的,需要加入節點或初始化為 master 后才可啟動成功。
3.4、配置init-config.yaml
????????Kubeadm 提供了很多配置項,Kubeadm 配置在 Kubernetes 集群中是存儲在ConfigMap 中的,也可將這些配置寫入配置文件,方便管理復雜的配置項。Kubeadm 配內容是通過 kubeadm config 命令寫入配置文件的。
????????在master節點安裝,master 定于為192.168.2.116,通過如下指令創建默認的init-config.yaml文件:
[root@k8s-master ~]# kubeadm config print init-defaults > init-config.yamlinit-config.yaml配置
[root@k8s-master ~]# cat init-config.yaml
apiVersion: kubeadm.k8s.io/v1beta2
bootstrapTokens:
- groups:- system:bootstrappers:kubeadm:default-node-tokentoken: abcdef.0123456789abcdefttl: 24h0m0susages:- signing- authentication
kind: InitConfiguration
localAPIEndpoint:advertiseAddress: 192.168.2.116		//master節點IP地址bindPort: 6443
nodeRegistration:criSocket: /var/run/dockershim.sockname: k8s-master		//如果使用域名保證可以解析,或直接使用 IP 地址taints:- effect: NoSchedulekey: node-role.kubernetes.io/master
---
apiServer:timeoutForControlPlane: 4m0s
apiVersion: kubeadm.k8s.io/v1beta2
certificatesDir: /etc/kubernetes/pki
clusterName: kubernetes
controllerManager: {}
dns:type: CoreDNS
etcd:local:dataDir: /var/lib/etcd		//etcd 容器掛載到本地的目錄
imageRepository: registry.aliyuncs.com/google_containers	//修改為國內地址
kind: ClusterConfiguration
kubernetesVersion: v1.19.0
networking:dnsDomain: cluster.localserviceSubnet: 10.96.0.0/12podSubnet: 10.244.0.0/16 	//podSubnet 地址不能與主機物理地址設置為同一網段
scheduler: {}3.5、安裝master節點
master節點鏡像提取鏈接:https://pan.baidu.com/s/1BDLqfw_S08XDBAyvAtB1ug?pwd=gply?
提取碼:gply
拉取所需鏡像
[root@k8s-master ~]# kubeadm config images list --config init-config.yamlregistry.aliyuncs.com/google_containers/kube-apiserver:v1.20.0
registry.aliyuncs.com/google_containers/kube-controller-manager:v1.20.0
registry.aliyuncs.com/google_containers/kube-scheduler:v1.20.0
registry.aliyuncs.com/google_containers/kube-proxy:v1.20.0
registry.aliyuncs.com/google_containers/pause:3.2
registry.aliyuncs.com/google_containers/etcd:3.4.13-0
registry.aliyuncs.com/google_containers/coredns:1.7.0[root@k8s-master ~]# mkdir master [root@k8s-master ~]# cd master[root@k8s-master master]# rz -E
rz waiting to receive.[root@k8s-master master]# ls | while read line
> do
> docker load < $line
> done
安裝matser節點
[root@k8s-master master]# cd [root@k8s-master ~]# kubeadm init --config=init-config.yaml[init] Using Kubernetes version: v1.20.0
[preflight] Running pre-flight checks[WARNING IsDockerSystemdCheck]: detected "cgroupfs" as the Docker cgroup driver. The recommended driver is "systemd". Please follow the guide at https://kubernetes.io/docs/setup/cri/[WARNING SystemVerification]: this Docker version is not on the list of validated versions: 24.0.5. Latest validated version: 19.03
[preflight] Pulling images required for setting up a Kubernetes cluster
[preflight] This might take a minute or two, depending on the speed of your internet connection
[preflight] You can also perform this action in beforehand using 'kubeadm config images pull'
[certs] Using certificateDir folder "/etc/kubernetes/pki"
[certs] Generating "ca" certificate and key
[certs] Generating "apiserver" certificate and key
[certs] apiserver serving cert is signed for DNS names [k8s-master kubernetes kubernetes.default kubernetes.default.svc kubernetes.default.svc.cluster.local] and IPs [10.96.0.1 192.168.2.116]
[certs] Generating "apiserver-kubelet-client" certificate and key
[certs] Generating "front-proxy-ca" certificate and key
[certs] Generating "front-proxy-client" certificate and key
[certs] Generating "etcd/ca" certificate and key
[certs] Generating "etcd/server" certificate and key
[certs] etcd/server serving cert is signed for DNS names [k8s-master localhost] and IPs [192.168.2.116 127.0.0.1 ::1]
[certs] Generating "etcd/peer" certificate and key
[certs] etcd/peer serving cert is signed for DNS names [k8s-master localhost] and IPs [192.168.2.116 127.0.0.1 ::1]
[certs] Generating "etcd/healthcheck-client" certificate and key
[certs] Generating "apiserver-etcd-client" certificate and key
[certs] Generating "sa" key and public key
[kubeconfig] Using kubeconfig folder "/etc/kubernetes"
[kubeconfig] Writing "admin.conf" kubeconfig file
[kubeconfig] Writing "kubelet.conf" kubeconfig file
[kubeconfig] Writing "controller-manager.conf" kubeconfig file
[kubeconfig] Writing "scheduler.conf" kubeconfig file
[kubelet-start] Writing kubelet environment file with flags to file "/var/lib/kubelet/kubeadm-flags.env"
[kubelet-start] Writing kubelet configuration to file "/var/lib/kubelet/config.yaml"
[kubelet-start] Starting the kubelet
[control-plane] Using manifest folder "/etc/kubernetes/manifests"
[control-plane] Creating static Pod manifest for "kube-apiserver"
[control-plane] Creating static Pod manifest for "kube-controller-manager"
[control-plane] Creating static Pod manifest for "kube-scheduler"
[etcd] Creating static Pod manifest for local etcd in "/etc/kubernetes/manifests"
[wait-control-plane] Waiting for the kubelet to boot up the control plane as static Pods from directory "/etc/kubernetes/manifests". This can take up to 4m0s
[apiclient] All control plane components are healthy after 13.002529 seconds
[upload-config] Storing the configuration used in ConfigMap "kubeadm-config" in the "kube-system" Namespace
[kubelet] Creating a ConfigMap "kubelet-config-1.20" in namespace kube-system with the configuration for the kubelets in the cluster
[upload-certs] Skipping phase. Please see --upload-certs
[mark-control-plane] Marking the node k8s-master as control-plane by adding the labels "node-role.kubernetes.io/master=''" and "node-role.kubernetes.io/control-plane='' (deprecated)"
[mark-control-plane] Marking the node k8s-master as control-plane by adding the taints [node-role.kubernetes.io/master:NoSchedule]
[bootstrap-token] Using token: abcdef.0123456789abcdef
[bootstrap-token] Configuring bootstrap tokens, cluster-info ConfigMap, RBAC Roles
[bootstrap-token] configured RBAC rules to allow Node Bootstrap tokens to get nodes
[bootstrap-token] configured RBAC rules to allow Node Bootstrap tokens to post CSRs in order for nodes to get long term certificate credentials
[bootstrap-token] configured RBAC rules to allow the csrapprover controller automatically approve CSRs from a Node Bootstrap Token
[bootstrap-token] configured RBAC rules to allow certificate rotation for all node client certificates in the cluster
[bootstrap-token] Creating the "cluster-info" ConfigMap in the "kube-public" namespace
[kubelet-finalize] Updating "/etc/kubernetes/kubelet.conf" to point to a rotatable kubelet client certificate and key
[addons] Applied essential addon: CoreDNS
[addons] Applied essential addon: kube-proxyYour Kubernetes control-plane has initialized successfully!To start using your cluster, you need to run the following as a regular user:mkdir -p $HOME/.kubesudo cp -i /etc/kubernetes/admin.conf $HOME/.kube/configsudo chown $(id -u):$(id -g) $HOME/.kube/configAlternatively, if you are the root user, you can run:export KUBECONFIG=/etc/kubernetes/admin.confYou should now deploy a pod network to the cluster.
Run "kubectl apply -f [podnetwork].yaml" with one of the options listed at:https://kubernetes.io/docs/concepts/cluster-administration/addons/Then you can join any number of worker nodes by running the following on each as root:kubeadm join 192.168.2.116:6443 --token abcdef.0123456789abcdef \--discovery-token-ca-cert-hash sha256:ad01378122a860c8be7ace78f3abe732304e3334a15f0a72cf05f7ebb93ca313
根據提示操作
????????kubectl 默認會在執行的用戶家目錄下面的.kube 目錄下尋找config 文件。這里是將在初始化時[kubeconfig]步驟生成的admin.conf 拷貝到.kube/config
[root@k8s-master ~]#   mkdir -p $HOME/.kube
[root@k8s-master ~]#   sudo cp -i /etc/kubernetes/admin.conf $HOME/.kube/config
[root@k8s-master ~]#   sudo chown $(id -u):$(id -g) $HOME/.kube/config
????????Kubeadm 通過初始化安裝是不包括網絡插件的,也就是說初始化之后是不具備相關網絡功能的,比如 k8s-master 節點上查看節點信息都是“Not Ready”狀態、Pod 的 CoreDNS無法提供服務等。
3.6、安裝node節點
根據master安裝時的提示信息
[root@k8s-node1 ~]# kubeadm join 192.168.2.116:6443 --token abcdef.0123456789abcdef \
>     --discovery-token-ca-cert-hash sha256:ad01378122a860c8be7ace78f3abe732304e3334a15f0a72cf05f7ebb93ca313
[preflight] Running pre-flight checks[WARNING IsDockerSystemdCheck]: detected "cgroupfs" as the Docker cgroup driver. The recommended driver is "systemd". Please follow the guide at https://kubernetes.io/docs/setup/cri/[WARNING SystemVerification]: this Docker version is not on the list of validated versions: 24.0.5. Latest validated version: 19.03
[preflight] Reading configuration from the cluster...
[preflight] FYI: You can look at this config file with 'kubectl -n kube-system get cm kubeadm-config -o yaml'
[kubelet-start] Writing kubelet configuration to file "/var/lib/kubelet/config.yaml"
[kubelet-start] Writing kubelet environment file with flags to file "/var/lib/kubelet/kubeadm-flags.env"
[kubelet-start] Starting the kubelet
[kubelet-start] Waiting for the kubelet to perform the TLS Bootstrap...This node has joined the cluster:
* Certificate signing request was sent to apiserver and a response was received.
* The Kubelet was informed of the new secure connection details.Run 'kubectl get nodes' on the control-plane to see this node join the cluster.[root@k8s-master ~]# kubectl get nodes
NAME         STATUS     ROLES                  AGE     VERSION
k8s-master   NotReady   control-plane,master   8m44s   v1.20.0
k8s-node1    NotReady   <none>                 31s     v1.20.0
k8s-node2    NotReady   <none>                 31s     v1.20.0
????????前面已經提到,在初始化 k8s-master 時并沒有網絡相關配置,所以無法跟 node 節點通信,因此狀態都是“NotReady”。但是通過 kubeadm join 加入的 node 節點已經在k8s-master 上可以看到。
3.7、部署Calico網絡插件
calico.yaml文件提取鏈接:https://pan.baidu.com/s/1BQ4B6tDNL38ce3y_1k04oA?pwd=rb2u?
提取碼:rb2u
安裝 Calico 網絡插件。
[root@k8s-master ~]# rz -E            #上傳calico.yaml文件
rz waiting to receive.[root@k8s-master ~]#  kubectl apply -f calico.yaml
configmap/calico-config unchanged
customresourcedefinition.apiextensions.k8s.io/bgpconfigurations.crd.projectcalico.org configured
customresourcedefinition.apiextensions.k8s.io/bgppeers.crd.projectcalico.org configured
customresourcedefinition.apiextensions.k8s.io/blockaffinities.crd.projectcalico.org configured
customresourcedefinition.apiextensions.k8s.io/clusterinformations.crd.projectcalico.org configured
customresourcedefinition.apiextensions.k8s.io/felixconfigurations.crd.projectcalico.org configured
customresourcedefinition.apiextensions.k8s.io/globalnetworkpolicies.crd.projectcalico.org configured
customresourcedefinition.apiextensions.k8s.io/globalnetworksets.crd.projectcalico.org configured
customresourcedefinition.apiextensions.k8s.io/hostendpoints.crd.projectcalico.org configured
customresourcedefinition.apiextensions.k8s.io/ipamblocks.crd.projectcalico.org configured
customresourcedefinition.apiextensions.k8s.io/ipamconfigs.crd.projectcalico.org configured
customresourcedefinition.apiextensions.k8s.io/ipamhandles.crd.projectcalico.org configured
customresourcedefinition.apiextensions.k8s.io/ippools.crd.projectcalico.org configured
customresourcedefinition.apiextensions.k8s.io/kubecontrollersconfigurations.crd.projectcalico.org configured
customresourcedefinition.apiextensions.k8s.io/networkpolicies.crd.projectcalico.org configured
customresourcedefinition.apiextensions.k8s.io/networksets.crd.projectcalico.org configured
clusterrole.rbac.authorization.k8s.io/calico-kube-controllers configured
clusterrolebinding.rbac.authorization.k8s.io/calico-kube-controllers unchanged
clusterrole.rbac.authorization.k8s.io/calico-node configured
clusterrolebinding.rbac.authorization.k8s.io/calico-node unchanged
daemonset.apps/calico-node configured
serviceaccount/calico-node unchanged
deployment.apps/calico-kube-controllers configured
serviceaccount/calico-kube-controllers unchanged
poddisruptionbudget.policy/calico-kube-controllers created
查看node節點狀態。
[root@k8s-master ~]# kubectl get nodes
NAME         STATUS   ROLES                  AGE   VERSION
k8s-master   Ready    control-plane,master   26m   v1.20.0
k8s-node1    Ready    <none>                 18m   v1.20.0
k8s-node2    Ready    <none>                 18m   v1.20.0
查看所有pod狀態
[root@k8s-master ~]#  kubectl get pod --all-namespacesNAMESPACE     NAME                                       READY   STATUS    RESTARTS   AGE
kube-system   calico-kube-controllers-744cfdf676-xjz5f   1/1     Running   0          17m
kube-system   calico-node-92974                          1/1     Running   0          18m
kube-system   calico-node-fdwmf                          1/1     Running   0          18m
kube-system   calico-node-tprqg                          1/1     Running   0          18m
kube-system   coredns-7f89b7bc75-jkn49                   1/1     Running   0          40m
kube-system   coredns-7f89b7bc75-nlz64                   1/1     Running   0          40m
kube-system   etcd-k8s-master                            1/1     Running   0          40m
kube-system   kube-apiserver-k8s-master                  1/1     Running   0          40m
kube-system   kube-controller-manager-k8s-master         1/1     Running   0          40m
kube-system   kube-proxy-jcvgc                           1/1     Running   0          40m
kube-system   kube-proxy-nmhwm                           1/1     Running   0          32m
kube-system   kube-proxy-tg47v                           1/1     Running   0          32m
kube-system   kube-scheduler-k8s-master                  1/1     Running   0          40m
4、Calico網絡策略基礎
4.1、創建服務
創建命名空間。
[root@k8s-master ~]# kubectl create ns policy-demo
namespace/policy-demo created
在 policy-demo 命名空間中創建兩個副本的 Nginx Pod。
[root@k8s-master ~]# vim nginx-deployment.yaml
apiVersion: apps/v1
kind: Deployment
metadata:name: nginxnamespace: policy-demolabels:app: nginx
spec:replicas: 2selector:matchLabels:app: nginxtemplate:metadata:labels:app: nginxspec:containers:- name: nginximage: nginxports:- containerPort: 80[root@k8s-master ~]# kubectl apply -f nginx-deployment.yamldeployment.apps/nginx created[root@k8s-master ~]# kubectl get pod -n policy-demo
NAME                     READY   STATUS    RESTARTS   AGE
nginx-7848d4b86f-7bw9n   1/1     Running   0          84s
nginx-7848d4b86f-pcnsn   1/1     Running   0          84s
通過服務暴露 Nginx 的 80 端口。
[root@k8s-master ~]# kubectl expose --namespace=policy-demo deployment nginx --port=80service/nginx exposed[root@k8s-master ~]#  kubectl get all -n policy-demoNAME                         READY   STATUS    RESTARTS   AGE
pod/nginx-7848d4b86f-7bw9n   1/1     Running   0          2m10s
pod/nginx-7848d4b86f-pcnsn   1/1     Running   0          2m10sNAME            TYPE        CLUSTER-IP       EXTERNAL-IP   PORT(S)   AGE
service/nginx   ClusterIP   10.107.124.161   <none>        80/TCP    13sNAME                    READY   UP-TO-DATE   AVAILABLE   AGE
deployment.apps/nginx   2/2     2            2           2m10sNAME                               DESIRED   CURRENT   READY   AGE
replicaset.apps/nginx-7848d4b86f   2         2         2       2m10s
通過 busybox 的 Pod 去訪問 Nginx 服務。
[root@k8s-master ~]# kubectl run --namespace=policy-demo access --rm -ti --image busyboxIf you don't see a command prompt, try pressing enter.
/bin/sh
/ # If you don't see a command prompt, try pressing enter.
> / # wget -q nginx -O -
> <!DOCTYPE html>
> <html>
> <head>
> <title>Welcome to nginx!</title>
> <style>
>     body {
>         width: 35em;
>         margin: 0 auto;
>         font-family: Tahoma, Verdana, Arial, sans-serif;
>     }
> </style>
> </head>
> <body>
> <h1>Welcome to nginx!</h1>
> <p>If you see this page, the nginx web server is successfully installed and
> working. Further configuration is required.</p>
>
> <p>For online documentation and support please refer to
> <a href="http://nginx.org/">nginx.org</a>.<br/>
> Commercial support is available at
> <a href="http://nginx.com/">nginx.com</a>.</p>
>
> <p><em>Thank you for using nginx.</em></p>
> </body>
> </html>ctrl+pq退出4.2、啟用網絡隔離
????????在 policy-demo 命名空間中打開隔離。然后 Calico 將阻止連接到該命名空間中的 Pod。執行以下命令將創建一個 NetworkPolicy,該策略將對 policy-demo 名稱空間中的所有 Pod實現默認的拒絕行為。
[root@k8s-master ~]# kubectl create -f - <<EOF
> kind: NetworkPolicy
> apiVersion: networking.k8s.io/v1
> metadata:
>   name: default-deny
>   namespace: policy-demo
> spec:
>   podSelector:
>     matchLabels: {}
> EOF
networkpolicy.networking.k8s.io/default-deny created
4.3、測試網絡隔離
????????啟用網絡隔離后,所有對 Nginx 服務的訪問都將阻止。執行以下命令,嘗試再次訪問Nginx 服務,查看網絡隔離的效果。
[root@k8s-master ~]# kubectl run --namespace=policy-demo access --rm -ti --image busybox
If you don't see a command prompt, try pressing enter.
/ # wget -q --timeout=5 nginx -O -
wget: download timed out            #連接超時
4.4、允許通過網絡策略進行訪問
????????使用 NetworkPolicy 啟用對 Nginx 服務的訪問。設置允許從 accessPod 傳入的連接,但不能從其他任何地方傳入。創建 access-nginx 的網絡策略具體內容如下所示。
[root@k8s-master ~]# kubectl create -f - <<EOF
> kind: NetworkPolicy
> apiVersion: networking.k8s.io/v1
> metadata:
>   name: access-nginx
>   namespace: policy-demo
> spec:
>   podSelector:
>     matchLabels:
>       app: nginx
>   ingress:
>     - from:
>       - podSelector:
>           matchLabels:
>             run: access
> EOF
networkpolicy.networking.k8s.io/access-nginx created
?從 accessPod 訪問該服務。
[root@k8s-master ~]# kubectl run --namespace=policy-demo access --rm -ti --image busybox
If you don't see a command prompt, try pressing enter./ # wget -q --timeout=5 nginx -O -
<!DOCTYPE html>
<html>
<head>
<title>Welcome to nginx!</title>
<style>
html { color-scheme: light dark; }
body { width: 35em; margin: 0 auto;
font-family: Tahoma, Verdana, Arial, sans-serif; }
</style>
</head>
<body>
<h1>Welcome to nginx!</h1>
<p>If you see this page, the nginx web server is successfully installed and
working. Further configuration is required.</p><p>For online documentation and support please refer to
<a href="http://nginx.org/">nginx.org</a>.<br/>
Commercial support is available at
<a href="http://nginx.com/">nginx.com</a>.</p><p><em>Thank you for using nginx.</em></p>
</body>
</html>
5、Calico網絡策略進階
5.1、創建服務
刪除命令空間 policy-demo,創建新的命名空間 advanced-policy-demo。
[root@k8s-master ~]# kubectl delete ns policy-demonamespace "policy-demo" deleted[root@k8s-master ~]# kubectl create ns advanced-policy-demonamespace/advanced-policy-demo created使用 YAML 文件創建 Nginx 服務。
[root@k8s-master ~]# vim nginx-deployment.yamlapiVersion: apps/v1
kind: Deployment
metadata:name: nginxnamespace: advanced-policy-demo            #修改為advanced-policy-demolabels:app: nginx
spec:replicas: 2selector:matchLabels:app: nginxtemplate:metadata:labels:app: nginxspec:containers:- name: nginximage: nginxports:- containerPort: 80[root@k8s-master ~]# kubectl apply -f nginx-deployment.yamldeployment.apps/nginx created[root@k8s-master ~]# kubectl expose --namespace=advanced-policy-demo deployment nginx --port=80service/nginx exposed
驗證訪問權限并訪問百度測試外網連通性。
[root@k8s-master ~]# kubectl run --namespace=advanced-policy-demo access --rm -ti --image busybox /bin/shIf you don't see a command prompt, try pressing enter./ # wget -q --timeout=5 nginx -O -<!DOCTYPE html>
<html>
<head>
<title>Welcome to nginx!</title>
<style>
html { color-scheme: light dark; }
body { width: 35em; margin: 0 auto;
font-family: Tahoma, Verdana, Arial, sans-serif; }
</style>
</head>
<body>
<h1>Welcome to nginx!</h1>
<p>If you see this page, the nginx web server is successfully installed and
working. Further configuration is required.</p><p>For online documentation and support please refer to
<a href="http://nginx.org/">nginx.org</a>.<br/>
Commercial support is available at
<a href="http://nginx.com/">nginx.com</a>.</p><p><em>Thank you for using nginx.</em></p>
</body>
</html>/ # wget -q --timeout=5 www.baidu.com -O -<!DOCTYPE html>
<!--STATUS OK--><html> <head><meta http-equiv=content-type content=text/html;charset=utf-8><meta http-equiv=X-UA-Compatible content=IE=Edge><meta content=always name=referrer><link rel=stylesheet type=text/css href=http://s1.bdstatic.com/r/www/cache/bdorz/baidu.min.css><title>百度一下,你就知道</title></head> <body link=#0000cc> <div id=wrapper> <div id=head> <div class=head_wrapper> <div class=s_form> <div class=s_form_wrapper> <div id=lg> <img hidefocus=true src=//www.baidu.com/img/bd_logo1.png width=270 height=129> </div> <form id=form name=f action=//www.baidu.com/s class=fm> <input type=hidden name=bdorz_come value=1> <input type=hidden name=ie value=utf-8> <input type=hidden name=f value=8> <input type=hidden name=rsv_bp value=1> <input type=hidden name=rsv_idx value=1> <input type=hidden name=tn value=baidu><span class="bg s_ipt_wr"><input id=kw name=wd class=s_ipt value maxlength=255 autocomplete=off autofocus></span><span class="bg s_btn_wr"><input type=submit id=su value=百度一下 class="bg s_btn"></span> </form> </div> </div> <div id=u1> <a href=http://news.baidu.com name=tj_trnews class=mnav>新聞</a> <a href=http://www.hao123.com name=tj_trhao123 class=mnav>hao123</a> <a href=http://map.baidu.com name=tj_trmap class=mnav>地圖</a> <a href=http://v.baidu.com name=tj_trvideo class=mnav>視頻</a> <a href=http://tieba.baidu.com name=tj_trtieba class=mnav>貼吧</a> <noscript> <a href=http://www.baidu.com/bdorz/login.gif?login&tpl=mn&u=http%3A%2F%2Fwww.baidu.com%2f%3fbdorz_come%3d1 name=tj_login class=lb>登錄</a> </noscript> <script>document.write('<a href="http://www.baidu.com/bdorz/login.gif?login&tpl=mn&u='+ encodeURIComponent(window.location.href+ (window.location.search === "" ? "?" : "&")+ "bdorz_come=1")+ '" name="tj_login" class="lb">登錄</a>');</script> <a href=//www.baidu.com/more/ name=tj_briicon class=bri style="display: block;">更多產品</a> </div> </div> </div> <div id=ftCon> <div id=ftConw> <p id=lh> <a href=http://home.baidu.com>關于百度</a> <a href=http://ir.baidu.com>About Baidu</a> </p> <p id=cp>©2017 Baidu <a href=http://www.baidu.com/duty/>使用百度前必讀</a> <a href=http://jianyi.baidu.com/ class=cp-feedback>意見反饋</a> 京ICP證030173號 <img src=//www.baidu.com/img/gs.gif> </p> </div> </div> </div> </body> </html>
5.2、拒絕所有入口流量
設置網絡策略,要求 Nginx 服務拒絕所有入口流量。然后進行訪問權限的驗證。
[root@localhost ~]# kubectl create -f - <<EOF
> apiVersion: networking.k8s.io/v1
> kind: NetworkPolicy
> metadata:
> name: default-deny-ingress
> namespace: advanced-policy-demo
> spec:
> podSelector:
> matchLabels: {}
> policyTypes:
> - Ingress
> EOF
networkpolicy.networking.k8s.io/default-deny-ingress created[root@k8s-master ~]# kubectl run --namespace=advanced-policy-demo access --rm -ti --image busybox /bin/sh/ # wget -q --timeout=5 nginx -O -wget: download timed out/ # wget -q --timeout=5 www.baidu.com -O -<!DOCTYPE html>
<!--STATUS OK--><html> <head><meta http-equiv=content-type content=text/html;charset=utf-8><meta http-equiv=X-UA-Compatible content=IE=Edge><meta content=always name=referrer><link rel=stylesheet type=text/css href=http://s1.bdstatic.com/r/www/cache/bdorz/baidu.min.css><title>百度一下,你就知道</title></head> <body link=#0000cc> <div id=wrapper> <div id=head> <div class=head_wrapper> <div class=s_form> <div class=s_form_wrapper> <div id=lg> <img hidefocus=true src=//www.baidu.com/img/bd_logo1.png width=270 height=129> </div> <form id=form name=f action=//www.baidu.com/s class=fm> <input type=hidden name=bdorz_come value=1> <input type=hidden name=ie value=utf-8> <input type=hidden name=f value=8> <input type=hidden name=rsv_bp value=1> <input type=hidden name=rsv_idx value=1> <input type=hidden name=tn value=baidu><span class="bg s_ipt_wr"><input id=kw name=wd class=s_ipt value maxlength=255 autocomplete=off autofocus></span><span class="bg s_btn_wr"><input type=submit id=su value=百度一下 class="bg s_btn"></span> </form> </div> </div> <div id=u1> <a href=http://news.baidu.com name=tj_trnews class=mnav>新聞</a> <a href=http://www.hao123.com name=tj_trhao123 class=mnav>hao123</a> <a href=http://map.baidu.com name=tj_trmap class=mnav>地圖</a> <a href=http://v.baidu.com name=tj_trvideo class=mnav>視頻</a> <a href=http://tieba.baidu.com name=tj_trtieba class=mnav>貼吧</a> <noscript> <a href=http://www.baidu.com/bdorz/login.gif?login&tpl=mn&u=http%3A%2F%2Fwww.baidu.com%2f%3fbdorz_come%3d1 name=tj_login class=lb>登錄</a> </noscript> <script>document.write('<a href="http://www.baidu.com/bdorz/login.gif?login&tpl=mn&u='+ encodeURIComponent(window.location.href+ (window.location.search === "" ? "?" : "&")+ "bdorz_come=1")+ '" name="tj_login" class="lb">登錄</a>');</script> <a href=//www.baidu.com/more/ name=tj_briicon class=bri style="display: block;">更多產品</a> </div> </div> </div> <div id=ftCon> <div id=ftConw> <p id=lh> <a href=http://home.baidu.com>關于百度</a> <a href=http://ir.baidu.com>About Baidu</a> </p> <p id=cp>©2017 Baidu <a href=http://www.baidu.com/duty/>使用百度前必讀</a> <a href=http://jianyi.baidu.com/ class=cp-feedback>意見反饋</a> 京ICP證030173號 <img src=//www.baidu.com/img/gs.gif> </p> </div> </div> </div> </body> </html>
????????從上述命令執行結果中可以看出,對 Nginx 服務的入口訪問被拒絕,而仍然允許對出站 Internet 的出口訪問。
5.3、允許進入Nginx的流量
????????執行以下命令,創建一個 NetworkPolicy,設置允許流量從 advanced-policy-demo 命名空間中的任何 Pod 到 Nginx Pod。創建策略成功后,就可以訪問 Nginx 服務了。
[root@localhost ~]# kubectl create -f - <<EOF
> apiVersion: networking.k8s.io/v1
> kind: NetworkPolicy
> metadata:
>   name: access-nginx
>   namespace: advanced-policy-demo
> spec:
>   podSelector:
>     matchLabels:
>       app: nginx
>   ingress:
>     - from:
>       - podSelector:
>           matchLabels: {}
> EOF
networkpolicy.networking.k8s.io/access-nginx created[root@k8s-master ~]# kubectl run --namespace=advanced-policy-demo access --rm -ti --image busybox /bin/shIf you don't see a command prompt, try pressing enter./ # wget -q --timeout=5 nginx -O -<!DOCTYPE html>
<html>
<head>
<title>Welcome to nginx!</title>
<style>
html { color-scheme: light dark; }
body { width: 35em; margin: 0 auto;
font-family: Tahoma, Verdana, Arial, sans-serif; }
</style>
</head>
<body>
<h1>Welcome to nginx!</h1>
<p>If you see this page, the nginx web server is successfully installed and
working. Further configuration is required.</p><p>For online documentation and support please refer to
<a href="http://nginx.org/">nginx.org</a>.<br/>
Commercial support is available at
<a href="http://nginx.com/">nginx.com</a>.</p><p><em>Thank you for using nginx.</em></p>
</body>
</html>
?
5.4、拒絕所有出口流量
????????設置拒絕所有出口流量的網絡策略,該策略設置成功后,任何策略未明確允許的入站或出站流量都將被拒絕。
[root@localhost ~]#  kubectl create -f - <<EOF
> apiVersion: networking.k8s.io/v1
> kind: NetworkPolicy
> metadata:
>   name: default-deny-egress
>   namespace: advanced-policy-demo
> spec:
>   podSelector:
>     matchLabels: {}
>   policyTypes:
>   - Egress
> EOF
networkpolicy.networking.k8s.io/default-deny-egress created[root@k8s-master ~]# kubectl run --namespace=advanced-policy-demo access --rm -ti --image busybox /bin/shIf you don't see a command prompt, try pressing enter./ # nslookup nginx
;; connection timed out; no servers could be reached/ # wget -q --timeout=5 www.baidu.com -O -
wget: bad address 'www.baidu.com'
5.5、允許DNS出口流量
????????執行以下命令,在 kube-system 名稱空間上創建一個標簽。該標簽的 NetworkPolicy允許 DNS 從 advanced-policy-demo 名稱空間中的任何 Pod 到名稱空間 kube-system 的出站流量。
[root@localhost ~]# kubectl label namespace kube-system name=kube-systemnamespace/kube-system labeled[root@localhost ~]# kubectl create -f - <<EOF
> apiVersion: networking.k8s.io/v1
> kind: NetworkPolicy
> metadata:
>   name: allow-dns-access
>   namespace: advanced-policy-demo
> spec:
>   podSelector:
>     matchLabels: {}
>   policyTypes:
>   - Egress
>   egress:
>   - to:
>     - namespaceSelector:
>         matchLabels:
>           name: kube-system
>     ports:
>     - protocol: UDP
>       port: 53
> EOF
networkpolicy.networking.k8s.io/allow-dns-access created[root@k8s-master ~]# kubectl run --namespace=advanced-policy-demo access --rm -ti --image busybox /bin/sh
If you don't see a command prompt, try pressing enter.
/ # nslookup nginx
Server:		10.96.0.10
Address:	10.96.0.10:53*** Can't find nginx.svc.cluster.local: No answer
*** Can't find nginx.cluster.local: No answer
*** Can't find nginx.localdomain: No answer
*** Can't find nginx.advanced-policy-demo.svc.cluster.local: No answer
*** Can't find nginx.svc.cluster.local: No answer
*** Can't find nginx.cluster.local: No answer
*** Can't find nginx.localdomain: No answer/ # nslookup www.baidu.com
Server:		10.96.0.10
Address:	10.96.0.10:53Non-authoritative answer:
www.baidu.com	canonical name = www.a.shifen.com*** Can't find www.baidu.com: No answer
????????即使 DNS 出口流量被允許,但來自 Advanced-policy-demo 命名空間中所有 Pod 的所有其他出口流量仍被阻止。因此,來自 wget 調用的 HTTP 出口流量仍將失敗。
/ # wget -q --timeout=5 nginx -O -
wget: download timed out
5.6、允許出口流量到Nginx
????????執行以下命令,創建一個 NetworkPolicy,允許從 advanced-policy-demo 名稱空間中的任何 Pod到具有 app: nginx 相同名稱空間中標簽匹配的 Pod 的出站流量。
[root@localhost ~]# kubectl create -f - <<EOF
> apiVersion: networking.k8s.io/v1
> kind: NetworkPolicy
> metadata:
>   name: allow-egress-to-advance-policy-ns
>   namespace: advanced-policy-demo
> spec:
>   podSelector:
>     matchLabels: {}
>   policyTypes:
>   - Egress
>   egress:
>   - to:
>     - podSelector:
>         matchLabels:
>           app: nginx
> EOF
networkpolicy.networking.k8s.io/allow-egress-to-advance-policy-ns created[root@k8s-master ~]# kubectl run --namespace=advanced-policy-demo access --rm -ti --image busybox /bin/shIf you don't see a command prompt, try pressing enter./ # wget -q --timeout=5 nginx -O -
<!DOCTYPE html>
<html>
<head>
<title>Welcome to nginx!</title>
<style>
html { color-scheme: light dark; }
body { width: 35em; margin: 0 auto;
font-family: Tahoma, Verdana, Arial, sans-serif; }
</style>
</head>
<body>
<h1>Welcome to nginx!</h1>
<p>If you see this page, the nginx web server is successfully installed and
working. Further configuration is required.</p><p>For online documentation and support please refer to
<a href="http://nginx.org/">nginx.org</a>.<br/>
Commercial support is available at
<a href="http://nginx.com/">nginx.com</a>.</p><p><em>Thank you for using nginx.</em></p>
</body>
</html>/ # wget -q --timeout=5 www.baidu.com -O -
wget: download timed out
?
訪問百度超時,是因為它可以解決 DNS 匹配標簽以外的其他任何出口訪問 app: nginx
的 advanced-policy-demo 命名空間。


)

入門介紹篇:Maven基礎概念與其他構建工具:理解構建過程與Maven的多重作用,以及與敏捷開發的關系 ~)
——MDI窗口 QMdiArea QMdiSubWindow)


)


