最近安裝ldap看了不少教程,整理下用到的有用的資料,并把自己的搭建過程分享。
參考
-
ldap介紹:openLDAP入門與安裝
-
官方文檔:https://www.openldap.org/doc/admin22/schema.html
-
安裝配置:Centos7 搭建openldap完整詳細教程(真實可用)
-
bug解決:ldap運維中遇到的問題
-
schema自定義:導入schema到openLdap window文件轉為unix文件
1,安裝和配置
yum 安裝相關包
yum install -y openldap openldap-clients openldap-servers
拷貝數據庫配置文件
cp /usr/share/openldap-servers/DB_CONFIG.example /var/lib/ldap/DB_CONFIG
chown -R ldap. /var/lib/ldap/DB_CONFIG
啟動服務,先啟動服務,配置后面再進行修改
systemctl start slapd
systemctl enable slapd
#查看狀態
systemctl status slapd
修改配置
從openldap2.4.23版本開始,所有配置都保存在/etc/openldap/slapd.d目錄下的cn=config文件夾內,不再使用slapd.conf作為配置文件。配置文件的后綴為 ldif,ldap的配置在開頭都會有一行注釋,說明此為自動生成的文件,請勿編輯,需要使用ldapmodify命令進行修改。
設置用戶密碼,生成的加密密碼后面需要用到(ldap的加密是同樣的密碼加密后都不一樣)
slappasswd -s 123456
{SSHA}N158sFqO97cIPBV/eOW1b80oV4BIvlvW
開始修改,創建一個修改文件。
vim changepwd.ldif
添加內容
dn: olcDatabase={0}config,cn=config
changetype: modify
add: olcRootPW
olcRootPW: {SSHA}N158sFqO97cIPBV/eOW1b80oV4BIvlvW
然后執行,在執行下面的命令前,你可以先查看原本的/etc/openldap/slapd.d/olcDatabase={0}config文件,里面是沒有olcRootPW這個項的,執行命令后,你再看就會新增了olcRootPW項,而且內容是我們文件中指定的值加密后的字符串
ldapadd -Y EXTERNAL -H ldapi:/// -f changepwd.ldif
備注:如果/etc/openldap/slapd.d/下cn=config/olcDatabase={0}config文件已經存在olcRootPW 使用replace
changepwd.ldif內容:
dn: olcDatabase={0}config,cn=config
changetype: modify
replace: olcRootPW
olcRootPW: {SSHA}N158sFqO97cIPBV/eOW1b80oV4BIvlvW
ldapmodify -Y EXTERNAL -H ldapi:/// -f changepwd.ldif
導入配置
# 我們需要向 LDAP 中導入一些基本的 Schema。這些 Schema 文件位于 /etc/openldap/schema/ 目錄中,schema控制著條目擁有哪些對象類和屬性,可以自行選擇需要的進行導入,
# 依次執行下面的命令,導入基礎的一些配置,我這里將所有的都導入一下,其中core.ldif是默認已經加載了的,不用導入
ldapadd -Y EXTERNAL -H ldapi:/// -f /etc/openldap/schema/cosine.ldif
ldapadd -Y EXTERNAL -H ldapi:/// -f /etc/openldap/schema/nis.ldif
ldapadd -Y EXTERNAL -H ldapi:/// -f /etc/openldap/schema/inetorgperson.ldif
ldapadd -Y EXTERNAL -H ldapi:/// -f /etc/openldap/schema/collective.ldif
ldapadd -Y EXTERNAL -H ldapi:/// -f /etc/openldap/schema/corba.ldif
ldapadd -Y EXTERNAL -H ldapi:/// -f /etc/openldap/schema/duaconf.ldif
ldapadd -Y EXTERNAL -H ldapi:/// -f /etc/openldap/schema/dyngroup.ldif
ldapadd -Y EXTERNAL -H ldapi:/// -f /etc/openldap/schema/java.ldif
ldapadd -Y EXTERNAL -H ldapi:/// -f /etc/openldap/schema/misc.ldif
ldapadd -Y EXTERNAL -H ldapi:/// -f /etc/openldap/schema/openldap.ldif
ldapadd -Y EXTERNAL -H ldapi:/// -f /etc/openldap/schema/pmi.ldif
ldapadd -Y EXTERNAL -H ldapi:/// -f /etc/openldap/schema/ppolicy.ldif
修改域名
域名的信息保存在/etc/openldap/slapd.d/cn=config文件夾下
olcDatabase={1}monitor,cn=config配置中可以查看,不能直接修改。這邊使用命令修改。
創建一個changedomain.ldif修改文件。
vim changedomain.ldif
比如我域名是dc=sichuan,dc=cmcc ,用戶為cn=Manager,changedomain.ldif文件配置如下:
dn: olcDatabase={1}monitor,cn=config
changetype: modify
replace: olcAccess
olcAccess: {0}to * by dn.base="gidNumber=0+uidNumber=0,cn=peercred,cn=external,cn=auth" read by dn.base="cn=Manager,dc=sichuan,dc=cmcc" read by * nonedn: olcDatabase={2}hdb,cn=config
changetype: modify
replace: olcSuffix
olcSuffix: dc=sichuan,dc=cmccdn: olcDatabase={2}hdb,cn=config
changetype: modify
replace: olcRootDN
olcRootDN: cn=Manager,dc=sichuan,dc=cmccdn: olcDatabase={2}hdb,cn=config
changetype: modify
replace: olcRootPW
olcRootPW: {SSHA}7j4lLAvS1mToAZpIyefQdTYqCvL0hiVadn: olcDatabase={2}hdb,cn=config
changetype: modify
add: olcAccess
olcAccess: {0}to attrs=userPassword,shadowLastChange by dn="cn=Manager,dc=sichuan,dc=cmcc" write by anonymous auth by self write by * none
olcAccess: {1}to dn.base="" by * read
olcAccess: {2}to * by dn="cn=Manager,dc=sichuan,dc=cmcc" write by * read
執行:
ldapmodify -Y EXTERNAL -H ldapi:/// -f changedomain.ldif
創建組織單元
在dc=sichuan,dc=cmcc組織下 創建Account 和Role兩個組織單元:
新增cmcc.ldif文件
vim cmcc.ldif
dn: dc=sichuan,dc=cmcc
objectClass: domain
objectClass: top
o: cmcc
dc: sichuandn: ou=Account,dc=sichuan,dc=cmcc
objectClass: organizationalUnit
ou: Account
description: account for cmccdn: ou=Role,dc=sichuan,dc=cmcc
objectClass: organizationalUnit
ou: Role
description: role for cmcc
執行命令,添加配置, 這里要注意修改域名為自己配置的域名,然后需要輸入上面我們的密碼(123456)
ldapadd -x -D cn=Manager,dc=sichuan,dc=cmcc -W -f cmcc.ldif
2,schema自定義格式
schema,是一個標準,定義了ldap的對象和屬性,也就是ldap能夠存儲什么數據,數據有什么屬性等。
/etc/openldap/slapd.d/cn=config/cn=schema/文件夾保存了運行使用的schema文件,我們需要生成cmcc.schema放進來。
由于ldap中的對象不滿足現有需求,需要自定義對象和屬性。
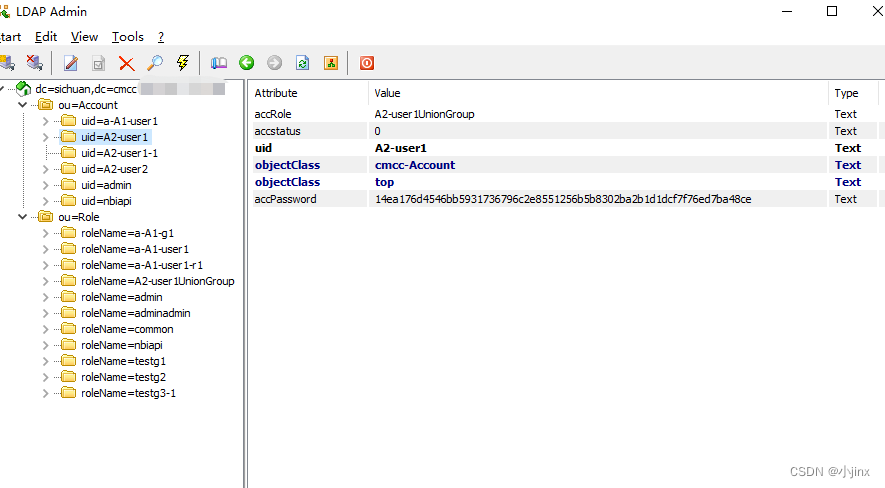
創建兩個對象cmcc-Account和cmcc-Role
cmcc-Account對象包含Uid,accPassword ,accRole , accstatus , accReserve1 , accReserve2 , accReserveList1 , accReserveList2屬性
cmcc-Role對象包含roleName, roleDesc, accReserve1 , accReserve2 , accReserveList1 , accReserveList2屬性
創建cmcc.schema文件
vim cmcc.schema
attributetype ( 1.3.6.1.4.1.79145.1.2.1.2 NAME 'accPassword' DESC 'accPassword' EQUALITY caseIgnoreMatch SUBSTR caseIgnoreSubstringsMatch SYNTAX 1.3.6.1.4.1.1466.115.121.1.15{32768} SINGLE-value ) attributetype ( 1.3.6.1.4.1.79145.1.2.1.3 NAME 'accRole' DESC 'accRole' EQUALITY caseIgnoreMatchSUBSTR caseIgnoreSubstringsMatch SYNTAX 1.3.6.1.4.1.1466.115.121.1.15{32768} ) attributetype ( 1.3.6.1.4.1.79145.1.2.1.4 NAME 'accstatus' DESC 'accstatus' EQUALITY caseIgnoreMatch SUBSTR caseIgnoreSubstringsMatch SYNTAX 1.3.6.1.4.1.1466.115.121.1.15{32768} SINGLE-value ) attributetype ( 1.3.6.1.4.1.79145.1.2.1.5 NAME 'accReserve1' DESC 'accReserve1' EQUALITY caseIgnoreMatch SUBSTR caseIgnoreSubstringsMatch SYNTAX 1.3.6.1.4.1.1466.115.121.1.15{32768} SINGLE-value ) attributetype ( 1.3.6.1.4.1.79145.1.2.1.6 NAME 'accReserve2' DESC 'accReserve2' EQUALITY caseIgnoreMatch SUBSTR caseIgnoreSubstringsMatch SYNTAX 1.3.6.1.4.1.1466.115.121.1.15{32768} SINGLE-value ) attributetype ( 1.3.6.1.4.1.79145.1.2.1.7 NAME 'accReserveList1' DESC 'accReserveList1' EQUALITY caseIgnoreMatch SUBSTR caseIgnoreSubstringsMatch SYNTAX 1.3.6.1.4.1.1466.115.121.1.15{32768} ) attributetype ( 1.3.6.1.4.1.79145.1.2.1.8 NAME 'accReserveList2' DESC 'accReserveList2' EQUALITY caseIgnoreMatch SUBSTR caseIgnoreSubstringsMatch SYNTAX 1.3.6.1.4.1.1466.115.121.1.15{32768} ) attributetype ( 1.3.6.1.4.1.79145.1.2.1.9 NAME 'roleName' DESC 'roleName' EQUALITY caseIgnoreMatch SUBSTR caseIgnoreSubstringsMatch SYNTAX 1.3.6.1.4.1.1466.115.121.1.15{32768} SINGLE-value ) attributetype ( 1.3.6.1.4.1.79145.1.2.1.10 NAME 'roleDesc' DESC 'roleDesc' EQUALITY caseIgnoreMatch SUBSTR caseIgnoreSubstringsMatch SYNTAX 1.3.6.1.4.1.1466.115.121.1.15{32768} SINGLE-value ) objectclass ( 1.3.6.1.4.1.79145.1.2.2.1 NAME 'cmcc-Account' DESC 'a cmcc-Account' SUP top STRUCTURAL MUST ( uID ) MAY ( accPassword $ accRole $ accstatus $ accReserve1 $ accReserve2 $ accReserveList1 $ accReserveList2 ) ) objectclass ( 1.3.6.1.4.1.79145.1.2.2.2 NAME 'cmcc-Role' DESC 'a cmcc-Role' SUP top STRUCTURAL MUST ( roleName ) MAY ( roleDesc $ accReserve1 $ accReserve2 $ accReserveList1 $ accReserveList2 ) )
將cmcc.schema文件放到/etc/openldap/schema
在tmp文件夾 創建schema文件夾
創建convert.conf文件,在末尾加入cmcc.schema
cd /tmp
mkdir schema
vim convert.conf
include /etc/openldap/schema/core.schema
include /etc/openldap/schema/collective.schema
include /etc/openldap/schema/corba.schema
include /etc/openldap/schema/cosine.schema
include /etc/openldap/schema/duaconf.schema
include /etc/openldap/schema/dyngroup.schema
include /etc/openldap/schema/inetorgperson.schema
include /etc/openldap/schema/java.schema
include /etc/openldap/schema/misc.schema
include /etc/openldap/schema/nis.schema
include /etc/openldap/schema/openldap.schema
include /etc/openldap/schema/ppolicy.schema
include	/etc/openldap/schema/cmcc.schema
生成ldap信息文件
slaptest -f /tmp/convert.conf -F /tmp/schema
給ldap添加生成的cmcc.ldif文件
cp /tmp/schema/cn\=config/cn\=schema/cn\=\{12\}cmcc.ldif /etc/openldap/slapd.d/cn\=config/cn\=schema/#給ldap 添加權限
cd /etc/openldap/slapd.d/cn=config/cn=schema/
chown ldap:ldap cn\=\{12}cmcc.ldif
重啟
ps aux | grep ldap
kill -9 pid//啟動
systemctl start slapd//狀態
systemctl status slapd
3,連接ldap數據庫效果
我使用的window版LdapAdmin.exe 連接的ldap。
查看自定義schema是否成功,可以點擊Tools->schema 查看object classes 和Attribue Types中是否存在。
登陸界面:
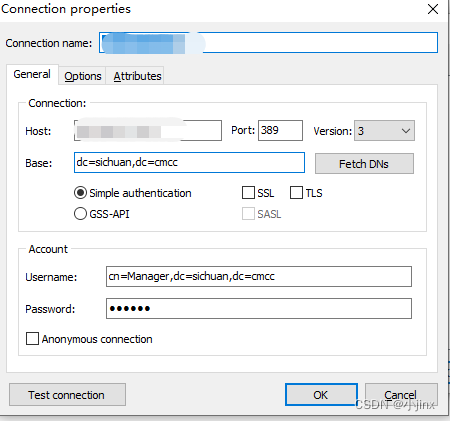
組織結構:

)

入門介紹篇:Maven基礎概念與其他構建工具:理解構建過程與Maven的多重作用,以及與敏捷開發的關系 ~)
——MDI窗口 QMdiArea QMdiSubWindow)


)


