目錄
1、Kubernetes高可用項目介紹
2、項目架構設計
2.1、項目主機信息
2.2、項目架構圖
2.3、項目實施思路
3、項目實施過程
3.1、系統初始化
3.2、配置部署keepalived服務
3.3、配置部署haproxy服務
3.4、配置部署Docker服務
3.5、部署kubelet kubeadm kubectl工具
3.6、部署Kubernetes Master
3.7、安裝集群網絡
3.8、添加master節點
3.9、加入Kubernetes Node
3.10、測試Kubernetes集群
1、Kubernetes高可用項目介紹
單master節點的可靠性不高,并不適合實際的生產環境。Kubernetes 高可用集群是保證 Master 節點中 API Server 服務的高可用。API Server 提供了 Kubernetes 各類資源對象增刪改查的唯一訪問入口,是整個 Kubernetes 系統的數據總線和數據中心。采用負載均衡(Load Balance)連接多個 Master 節點可以提供穩定容器云業務。
2、項目架構設計
2.1、項目主機信息
準備6臺虛擬機,3臺master節點,3臺node節點,保證master節點數為>=3的奇數。
硬件:2核CPU+、2G內存+、硬盤20G+
網絡:所有機器網絡互通、可以訪問外網
| 操作系統 | IP地址 | 角色 | 主機名 |
| CentOS7-x86-64 | 192.168.2.111 | master | k8s-master1 |
| CentOS7-x86-64 | 192.168.2.112 | master | k8s-master2 |
| CentOS7-x86-64 | 192.168.2.115 | master | k8s-master3 |
| CentOS7-x86-64 | 192.168.2.116 | node | k8s-node1 |
| CentOS7-x86-64 | 192.168.2.117 | node | k8s-node2 |
| CentOS7-x86-64 | 192.168.2.118 | node | k8s-node3 |
| 192.168.2.154 | VIP | master.k8s.io |
2.2、項目架構圖
多master節點負載均衡的kubernetes集群。官網給出了兩種拓撲結構:堆疊control plane node和external etcd node,本文基于第一種拓撲結構進行搭建。
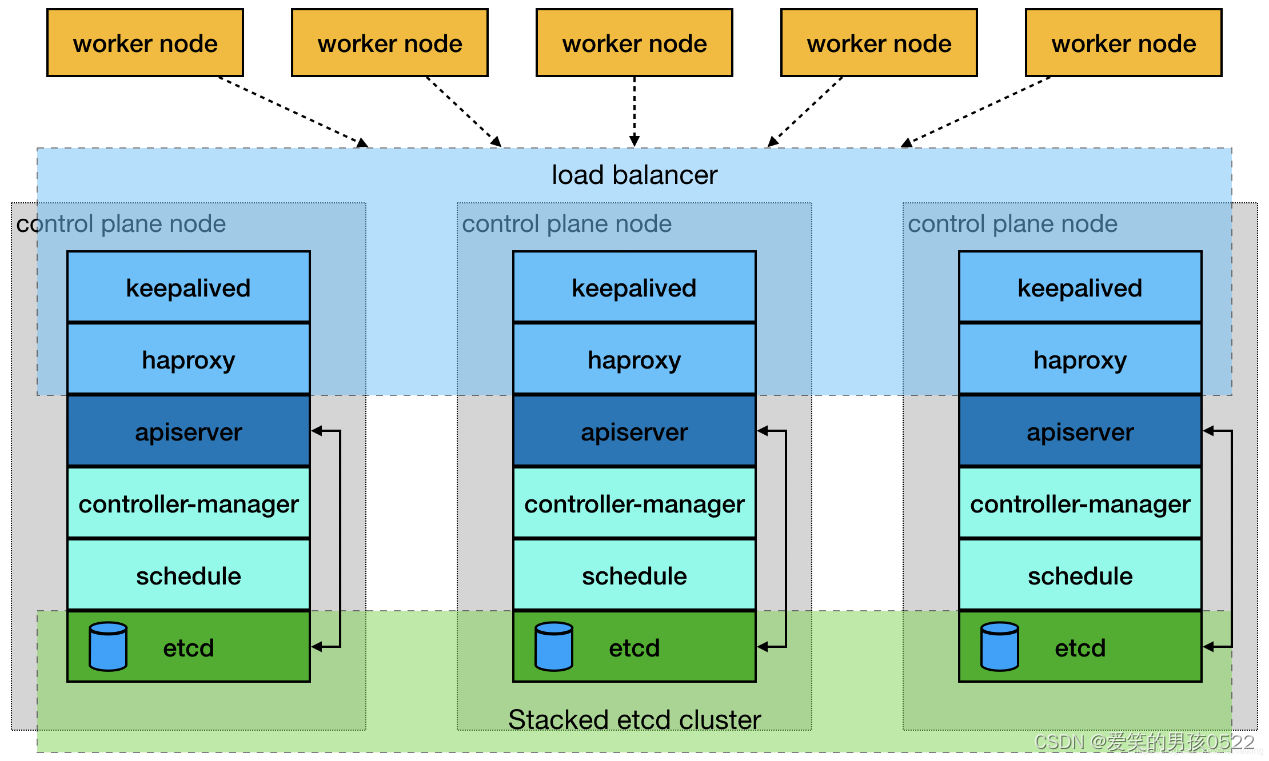
?????????????????????????????????????????????????????????(堆疊control plane node)
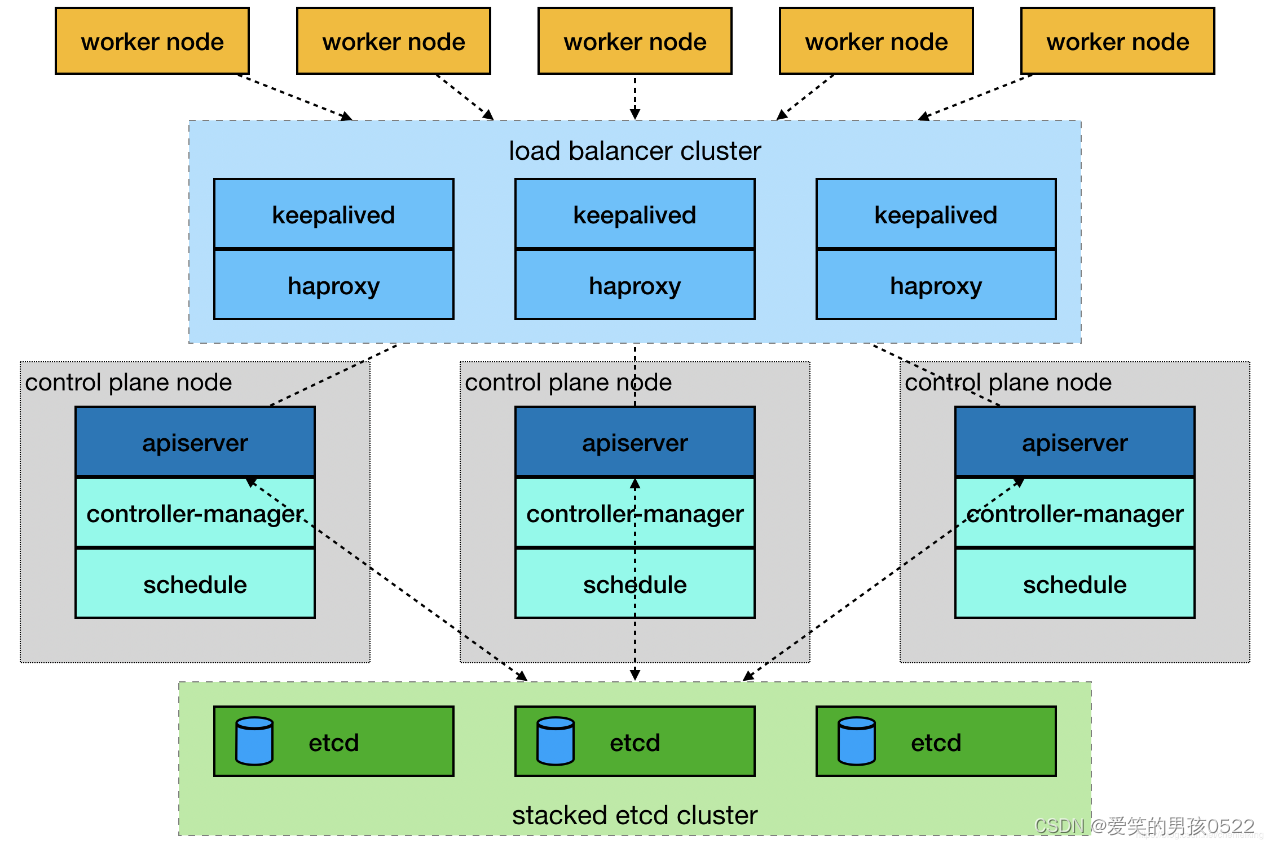
????????????????????????????????????????????????????????????(external etcd node)
2.3、項目實施思路
????????master節點需要部署etcd、apiserver、controller-manager、scheduler這4種服務,其中etcd、controller-manager、scheduler這三種服務kubernetes自身已經實現了高可用,在多master節點的情況下,每個master節點都會啟動這三種服務,同一時間只有一個生效。因此要實現kubernetes的高可用,只需要apiserver服務高可用。
????????keepalived是一種高性能的服務器高可用或熱備解決方案,可以用來防止服務器單點故障導致服務中斷的問題。keepalived使用主備模式,至少需要兩臺服務器才能正常工作。比如keepalived將三臺服務器搭建成一個集群,對外提供一個唯一IP,正常情況下只有一臺服務器上可以看到這個IP的虛擬網卡。如果這臺服務異常,那么keepalived會立即將IP移動到剩下的兩臺服務器中的一臺上,使得IP可以正常使用。
????????haproxy是一款提供高可用性、負載均衡以及基于TCP(第四層)和HTTP(第七層)應用的代理軟件,支持虛擬主機,它是免費、快速并且可靠的一種解決方案。使用haproxy負載均衡后端的apiserver服務,達到apiserver服務高可用的目的。
????????本文使用的keepalived+haproxy方案,使用keepalived對外提供穩定的入口,使用haproxy對內均衡負載。因為haproxy運行在master節點上,當master節點異常后,haproxy服務也會停止,為了避免這種情況,我們在每一臺master節點都部署haproxy服務,達到haproxy服務高可用的目的。由于多master節點會出現投票競選的問題,因此master節點的數據最好是單數,避免票數相同的情況。
3、項目實施過程
3.1、系統初始化
修改主機名(根據主機角色不同,做相應修改)所有機器
[root@localhost ~]# hostname k8s-master1
[root@localhost ~]# bash
關閉防火墻(所有機器)
[root@k8s-master1 ~]# systemctl stop firewalld
[root@k8s-master1 ~]# systemctl disable firewalld
關閉selinux(所有機器)
[root@k8s-master1 ~]#  sed -i 's/enforcing/disabled/' /etc/selinux/config
[root@k8s-master1 ~]# setenforce 0
關閉swap(所有機器)
[root@k8s-master1 ~]# swapoff -a
[root@k8s-master1 ~]# sed -ri 's/.*swap.*/#&/' /etc/fstab
主機名映射(所有機器)
[root@k8s-master1 ~]# cat >> /etc/hosts << EOF
192.168.2.111	master1.k8s.io	k8s-master1
192.168.2.112   master2.k8s.io  k8s-master2
192.168.2.115   master3.k8s.io  k8s-master3
192.168.2.116   node1.k8s.io  k8s-node1
192.168.2.117   node2.k8s.io  k8s-node2
192.168.2.118   node3.k8s.io  k8s-node3
192.168.2.154	master.k8s.io	k8s-vip
EOF
將橋接的IPv4流量傳遞到iptables的鏈(所有機器)
[root@k8s-master1 ~]# cat << EOF >> /etc/sysctl.conf
> net.bridge.bridge-nf-call-ip6tables = 1
> net.bridge.bridge-nf-call-iptables = 1
> EOF[root@k8s-master1 ~]# modprobe br_netfilter[root@k8s-master1 ~]# sysctl -p
net.bridge.bridge-nf-call-ip6tables = 1
net.bridge.bridge-nf-call-iptables = 1
時間同步(所有機器)
[root@k8s-master1 ~]# yum install ntpdate -y
[root@k8s-master1 ~]# ntpdate time.windows.com3.2、配置部署keepalived服務
安裝Keepalived(所有master主機)
[root@k8s-master1 ~]# yum install -y keepalivedk8s-master1節點配置
[root@k8s-master1 ~]# cat > /etc/keepalived/keepalived.conf <<EOF
! Configuration File for keepalived
global_defs {router_id k8s
}
vrrp_script check_haproxy {script "killall -0 haproxy"interval 3weight -2fall 10rise 2
}
vrrp_instance VI_1 {state BACKUPinterface ens33virtual_router_id 51priority 80advert_int 1authentication {auth_type PASSauth_pass 1111}
virtual_ipaddress {192.168.2.154
}
track_script {check_haproxy
}
}
EOF
k8s-master2節點配置
[root@k8s-master2 ~]# cat > /etc/keepalived/keepalived.conf <<EOF
! Configuration File for keepalived
global_defs {router_id k8s
}
vrrp_script check_haproxy {script "killall -0 haproxy"interval 3weight -2fall 10rise 2
}
vrrp_instance VI_1 {state BACKUPinterface ens33virtual_router_id 51priority 90advert_int 1authentication {auth_type PASSauth_pass 1111}
virtual_ipaddress {192.168.2.154
}
track_script {check_haproxy
}
}
EOF
k8s-master3節點配置
[root@k8s-master3 ~]# cat > /etc/keepalived/keepalived.conf <<EOF
! Configuration File for keepalived
global_defs {router_id k8s
}
vrrp_script check_haproxy {script "killall -0 haproxy"interval 3weight -2fall 10rise 2
}
vrrp_instance VI_1 {state BACKUPinterface ens33virtual_router_id 51priority 80advert_int 1authentication {auth_type PASSauth_pass 1111}
virtual_ipaddress {192.168.2.154
}
track_script {check_haproxy
}
}
EOF
啟動和檢查
所有master節點都要執行
[root@k8s-master1 ~]# systemctl start keepalived[root@k8s-master1 ~]# systemctl enable keepalivedCreated symlink from /etc/systemd/system/multi-user.target.wants/keepalived.service to /usr/lib/systemd/system/keepalived.service.
查看啟動狀態
[root@k8s-master1 ~]# systemctl status keepalived● keepalived.service - LVS and VRRP High Availability MonitorLoaded: loaded (/usr/lib/systemd/system/keepalived.service; enabled; vendor preset: disabled)Active: active (running) since 二 2023-08-15 14:17:36 CST; 58s agoMain PID: 8425 (keepalived)CGroup: /system.slice/keepalived.service├─8425 /usr/sbin/keepalived -D├─8426 /usr/sbin/keepalived -D└─8427 /usr/sbin/keepalived -D8月 15 14:17:38 k8s-master1 Keepalived_vrrp[8427]: Sending gratuitous ARP on ens33 for 19...54
8月 15 14:17:38 k8s-master1 Keepalived_vrrp[8427]: Sending gratuitous ARP on ens33 for 19...54
8月 15 14:17:38 k8s-master1 Keepalived_vrrp[8427]: Sending gratuitous ARP on ens33 for 19...54
8月 15 14:17:38 k8s-master1 Keepalived_vrrp[8427]: Sending gratuitous ARP on ens33 for 19...54
8月 15 14:17:43 k8s-master1 Keepalived_vrrp[8427]: Sending gratuitous ARP on ens33 for 19...54
8月 15 14:17:43 k8s-master1 Keepalived_vrrp[8427]: VRRP_Instance(VI_1) Sending/queueing g...54
8月 15 14:17:43 k8s-master1 Keepalived_vrrp[8427]: Sending gratuitous ARP on ens33 for 19...54
8月 15 14:17:43 k8s-master1 Keepalived_vrrp[8427]: Sending gratuitous ARP on ens33 for 19...54
8月 15 14:17:43 k8s-master1 Keepalived_vrrp[8427]: Sending gratuitous ARP on ens33 for 19...54
8月 15 14:17:43 k8s-master1 Keepalived_vrrp[8427]: Sending gratuitous ARP on ens33 for 19...54
Hint: Some lines were ellipsized, use -l to show in full.
啟動完成后在master1查看網絡信息
[root@k8s-master1 ~]# ip a s ens332: ens33: <BROADCAST,MULTICAST,UP,LOWER_UP> mtu 1500 qdisc pfifo_fast state UP group default qlen 1000link/ether 00:0c:29:14:f4:48 brd ff:ff:ff:ff:ff:ffinet 192.168.2.111/24 brd 192.168.2.255 scope global noprefixroute ens33valid_lft forever preferred_lft foreverinet 192.168.2.154/32 scope global ens33valid_lft forever preferred_lft foreverinet6 fe80::eeab:8168:d2bb:9c/64 scope link noprefixroute valid_lft forever preferred_lft forever
3.3、配置部署haproxy服務
所有master主機安裝haproxy
[root@k8s-master1 ~]# yum install -y haproxy????????每臺master節點中的配置均相同,配置中聲明了后端代理的每個master節點服務器,指定了haproxy的端口為16443,因此16443端口為集群的入口。
[root@k8s-master1 ~]# cat > /etc/haproxy/haproxy.cfg << EOF#-------------------------------
# Global settings
#-------------------------------
globallog       127.0.0.1 local2chroot    /var/lib/haproxypidfile   /var/run/haproxy.pidmaxconn   4000user      haproxygroup     haproxydaemonstats socket /var/lib/haproxy/stats
#--------------------------------
# common defaults that all the 'listen' and 'backend' sections will
# usr if not designated in their block
#--------------------------------
defaultsmode                httplog                 globaloption              httplogoption              dontlognulloption http-server-closeoption forwardfor   except 127.0.0.0/8option              redispatchretries             3timeout http-request  10stimeout queue         1m timeout connect       10stimeout client        1mtimeout server        1mtimeout http-keep-alive 10stimeout check           10smaxconn                 3000
#--------------------------------
# kubernetes apiserver frontend which proxys to the backends
#--------------------------------
frontend kubernetes-apiservermode              tcpbind              *:16443option            tcplogdefault_backend   kubernetes-apiserver
#---------------------------------
#round robin balancing between the various backends
#---------------------------------
backend kubernetes-apiservermode              tcpbalance           roundrobinserver            master1.k8s.io    192.168.2.111:6443 checkserver            master2.k8s.io    192.168.2.112:6443 checkserver            master3.k8s.io    192.168.2.115:6443 check
#---------------------------------
# collection haproxy statistics message
#---------------------------------
listen statsbind              *:1080stats auth        admin:awesomePasswordstats refresh     5sstats realm       HAProxy\ Statisticsstats uri         /admin?stats
EOF
啟動和檢查
所有master節點都要執行
[root@k8s-master1 ~]# systemctl start haproxy[root@k8s-master1 ~]# systemctl enable haproxyCreated symlink from /etc/systemd/system/multi-user.target.wants/haproxy.service to /usr/lib/systemd/system/haproxy.service.
查看啟動狀態
[root@k8s-master1 ~]# systemctl status haproxy● haproxy.service - HAProxy Load BalancerLoaded: loaded (/usr/lib/systemd/system/haproxy.service; enabled; vendor preset: disabled)Active: active (running) since 二 2023-08-15 14:25:01 CST; 40s agoMain PID: 8522 (haproxy-systemd)CGroup: /system.slice/haproxy.service├─8522 /usr/sbin/haproxy-systemd-wrapper -f /etc/haproxy/haproxy.cfg -p /run/haproxy.pid├─8523 /usr/sbin/haproxy -f /etc/haproxy/haproxy.cfg -p /run/haproxy.pid -Ds└─8524 /usr/sbin/haproxy -f /etc/haproxy/haproxy.cfg -p /run/haproxy.pid -Ds8月 15 14:25:01 k8s-master1 systemd[1]: Started HAProxy Load Balancer.
8月 15 14:25:01 k8s-master1 haproxy-systemd-wrapper[8522]: haproxy-systemd-wrapper: executing /usr/s...Ds
8月 15 14:25:01 k8s-master1 haproxy-systemd-wrapper[8522]: [WARNING] 226/142501 (8523) : config : 'o...e.
8月 15 14:25:01 k8s-master1 haproxy-systemd-wrapper[8522]: [WARNING] 226/142501 (8523) : config : 'o...e.
Hint: Some lines were ellipsized, use -l to show in full.
檢查端口
[root@k8s-master1 ~]# netstat -lntup|grep haproxy
tcp        0      0 0.0.0.0:1080            0.0.0.0:*               LISTEN      8524/haproxy
tcp        0      0 0.0.0.0:16443           0.0.0.0:*               LISTEN      8524/haproxy
udp        0      0 0.0.0.0:35139           0.0.0.0:*                           8523/haproxy
3.4、配置部署Docker服務
所有主機上分別部署 Docker 環境,因為 Kubernetes 對容器的編排需要 Docker 的支持。
[root@k8s-master1 ~]# wget -O /etc/yum.repos.d/CentOS-Base.repo http://mirrors.aliyun.com/repo/Centos-7.repo[root@k8s-master1 ~]# yum install -y yum-utils device-mapper-persistent-data lvm2使用 YUM 方式安裝 Docker 時,推薦使用阿里的 YUM 源。
[root@k8s-master1 ~]# yum-config-manager --add-repo https://mirrors.aliyun.com/docker-ce/linux/centos/docker-ce.repo
[root@k8s-master1 ~]# yum clean all && yum makecache fast [root@k8s-master1 ~]# yum -y install docker-ce
[root@k8s-master1 ~]# systemctl start docker
[root@k8s-master1 ~]# systemctl enable docker
鏡像加速器(所有主機配置)
[root@k8s-master1 ~]# cat << END > /etc/docker/daemon.json
> {
>         "registry-mirrors":[ "https://nyakyfun.mirror.aliyuncs.com" ]
> }
> END[root@k8s-master1 ~]# systemctl daemon-reload
[root@k8s-master1 ~]# systemctl restart docker
3.5、部署kubelet kubeadm kubectl工具
使用 YUM 方式安裝Kubernetes時,推薦使用阿里的yum。
所有主機配置
[root@k8s-master1 ~]# cat <<EOF > /etc/yum.repos.d/kubernetes.repo
> [kubernetes]
> name=Kubernetes
> baseurl=https://mirrors.aliyun.com/kubernetes/yum/repos/kubernetes-el7-x86_64/
> enabled=1
> gpgcheck=1
> repo_gpgcheck=1
> gpgkey=https://mirrors.aliyun.com/kubernetes/yum/doc/yum-key.gpg
>        https://mirrors.aliyun.com/kubernetes/yum/doc/rpm-package-key.gpg
> EOF[root@k8s-master1 ~]# ls /etc/yum.repos.d/
CentOS-Base.repo  docker-ce.repo  kubernetes.repo  test
安裝kubelet kubeadm kubectl
所有主機配置
[root@k8s-master1 ~]# yum install -y kubelet-1.20.0 kubeadm-1.20.0 kubectl-1.20.0
[root@k8s-master1 ~]# systemctl enable kubelet3.6、部署Kubernetes Master
在具有vip的master上操作。此處的vip節點為k8s-master1。
創建kubeadm-config.yaml文件
[root@k8s-master1 ~]# cat > kubeadm-config.yaml << EOF
apiServer:certSANs:- k8s-master1- k8s-master2- k8s-master3- master.k8s.io- 192.168.2.111- 192.168.2.112- 192.168.2.115- 192.168.2.154- 127.0.0.1extraArgs:authorization-mode: Node,RBACtimeoutForControlPlane: 4m0s
apiVersion: kubeadm.k8s.io/v1beta1
certificatesDir: /etc/kubernetes/pki
clusterName: kubernetes
controlPlaneEndpoint: "master.k8s.io:6443"
controllerManager: {}
dns:type: CoreDNS
etcd:local:dataDir: /var/lib/etcd
imageRepository: registry.aliyuncs.com/google_containers
kind: ClusterConfiguration
kubernetesVersion: v1.20.0
networking:dnsDomain: cluster.localpodSubnet: 10.244.0.0/16serviceSubnet: 10.1.0.0/16
scheduler: {}
EOF
查看所需鏡像信息
[root@k8s-master1 ~]# kubeadm config images list --config kubeadm-config.yamlW0815 15:10:40.624162   16024 common.go:77] your configuration file uses a deprecated API spec: "kubeadm.k8s.io/v1beta1". Please use 'kubeadm config migrate --old-config old.yaml --new-config new.yaml', which will write the new, similar spec using a newer API version.
registry.aliyuncs.com/google_containers/kube-apiserver:v1.20.0
registry.aliyuncs.com/google_containers/kube-controller-manager:v1.20.0
registry.aliyuncs.com/google_containers/kube-scheduler:v1.20.0
registry.aliyuncs.com/google_containers/kube-proxy:v1.20.0
registry.aliyuncs.com/google_containers/pause:3.2
registry.aliyuncs.com/google_containers/etcd:3.4.13-0
registry.aliyuncs.com/google_containers/coredns:1.7.0
上傳k8s所需的鏡像并導入(所有master主機)
所需鏡像提取鏈接:https://pan.baidu.com/s/1Y9WJfINsE-sdkhLuo96llA?pwd=99w6?
提取碼:99w6
[root@k8s-master1 ~]# mkdir master
[root@k8s-master1 ~]# cd master/
[root@k8s-master1 master]# rz -E
rz waiting to receive.[root@k8s-master1 master]# ls coredns_1.7.0.tar  kube-apiserver_v1.20.0.tar           kube-proxy_v1.20.0.tar      pause_3.2.tar
etcd_3.4.13-0.tar  kube-controller-manager_v1.20.0.tar  kube-scheduler_v1.20.0.tar[root@k8s-master1 master]# ls | while read line
> do
> docker load < $line
> done
225df95e717c: Loading layer  336.4kB/336.4kB
96d17b0b58a7: Loading layer  45.02MB/45.02MB
Loaded image: registry.aliyuncs.com/google_containers/coredns:1.7.0
d72a74c56330: Loading layer  3.031MB/3.031MB
d61c79b29299: Loading layer   2.13MB/2.13MB
1a4e46412eb0: Loading layer  225.3MB/225.3MB
bfa5849f3d09: Loading layer   2.19MB/2.19MB
bb63b9467928: Loading layer  21.98MB/21.98MB
Loaded image: registry.aliyuncs.com/google_containers/etcd:3.4.13-0
e7ee84ae4d13: Loading layer  3.041MB/3.041MB
597f1090d8e9: Loading layer  1.734MB/1.734MB
52d5280a7533: Loading layer  118.1MB/118.1MB
Loaded image: registry.aliyuncs.com/google_containers/kube-apiserver:v1.20.0
201617abe922: Loading layer  112.3MB/112.3MB
Loaded image: registry.aliyuncs.com/google_containers/kube-controller-manager:v1.20.0
f00bc8568f7b: Loading layer  53.89MB/53.89MB
6ee930b14c6f: Loading layer  22.05MB/22.05MB
2b046f2c8708: Loading layer  4.894MB/4.894MB
f6be8a0f65af: Loading layer  4.608kB/4.608kB
3a90582021f9: Loading layer  8.192kB/8.192kB
94812b0f02ce: Loading layer  8.704kB/8.704kB
3a478f418c9c: Loading layer  39.49MB/39.49MB
Loaded image: registry.aliyuncs.com/google_containers/kube-proxy:v1.20.0
aa679bed73e1: Loading layer  42.85MB/42.85MB
Loaded image: registry.aliyuncs.com/google_containers/kube-scheduler:v1.20.0
ba0dae6243cc: Loading layer  684.5kB/684.5kB
Loaded image: registry.aliyuncs.com/google_containers/pause:3.2
?使用kubeadm命令初始化k8s
[root@k8s-master1 ~]#  kubeadm init --config kubeadm-config.yaml
W0815 15:23:00.499793   16148 common.go:77] your configuration file uses a deprecated API spec: "kubeadm.k8s.io/v1beta1". Please use 'kubeadm config migrate --old-config old.yaml --new-config new.yaml', which will write the new, similar spec using a newer API version.
[init] Using Kubernetes version: v1.20.0
[preflight] Running pre-flight checks[WARNING IsDockerSystemdCheck]: detected "cgroupfs" as the Docker cgroup driver. The recommended driver is "systemd". Please follow the guide at https://kubernetes.io/docs/setup/cri/[WARNING SystemVerification]: this Docker version is not on the list of validated versions: 24.0.5. Latest validated version: 19.03
[preflight] Pulling images required for setting up a Kubernetes cluster
[preflight] This might take a minute or two, depending on the speed of your internet connection
[preflight] You can also perform this action in beforehand using 'kubeadm config images pull'
[certs] Using certificateDir folder "/etc/kubernetes/pki"
[certs] Generating "ca" certificate and key
[certs] Generating "apiserver" certificate and key
[certs] apiserver serving cert is signed for DNS names [k8s-master1 k8s-master2 k8s-master3 kubernetes kubernetes.default kubernetes.default.svc kubernetes.default.svc.cluster.local master.k8s.io] and IPs [10.1.0.1 192.168.108.165 192.168.2.111 192.168.2.112 192.168.2.115 192.168.2.154 127.0.0.1]
[certs] Generating "apiserver-kubelet-client" certificate and key
[certs] Generating "front-proxy-ca" certificate and key
[certs] Generating "front-proxy-client" certificate and key
[certs] Generating "etcd/ca" certificate and key
[certs] Generating "etcd/server" certificate and key
[certs] etcd/server serving cert is signed for DNS names [k8s-master1 localhost] and IPs [192.168.108.165 127.0.0.1 ::1]
[certs] Generating "etcd/peer" certificate and key
[certs] etcd/peer serving cert is signed for DNS names [k8s-master1 localhost] and IPs [192.168.108.165 127.0.0.1 ::1]
[certs] Generating "etcd/healthcheck-client" certificate and key
[certs] Generating "apiserver-etcd-client" certificate and key
[certs] Generating "sa" key and public key
[kubeconfig] Using kubeconfig folder "/etc/kubernetes"
[kubeconfig] Writing "admin.conf" kubeconfig file
[kubeconfig] Writing "kubelet.conf" kubeconfig file
[kubeconfig] Writing "controller-manager.conf" kubeconfig file
[kubeconfig] Writing "scheduler.conf" kubeconfig file
[kubelet-start] Writing kubelet environment file with flags to file "/var/lib/kubelet/kubeadm-flags.env"
[kubelet-start] Writing kubelet configuration to file "/var/lib/kubelet/config.yaml"
[kubelet-start] Starting the kubelet
[control-plane] Using manifest folder "/etc/kubernetes/manifests"
[control-plane] Creating static Pod manifest for "kube-apiserver"
[control-plane] Creating static Pod manifest for "kube-controller-manager"
[control-plane] Creating static Pod manifest for "kube-scheduler"
[etcd] Creating static Pod manifest for local etcd in "/etc/kubernetes/manifests"
[wait-control-plane] Waiting for the kubelet to boot up the control plane as static Pods from directory "/etc/kubernetes/manifests". This can take up to 4m0s
[apiclient] All control plane components are healthy after 7.002691 seconds
[upload-config] Storing the configuration used in ConfigMap "kubeadm-config" in the "kube-system" Namespace
[kubelet] Creating a ConfigMap "kubelet-config-1.20" in namespace kube-system with the configuration for the kubelets in the cluster
[upload-certs] Skipping phase. Please see --upload-certs
[mark-control-plane] Marking the node k8s-master1 as control-plane by adding the labels "node-role.kubernetes.io/master=''" and "node-role.kubernetes.io/control-plane='' (deprecated)"
[mark-control-plane] Marking the node k8s-master1 as control-plane by adding the taints [node-role.kubernetes.io/master:NoSchedule]
[bootstrap-token] Using token: s8zd78.koquhvbv0e767uqb
[bootstrap-token] Configuring bootstrap tokens, cluster-info ConfigMap, RBAC Roles
[bootstrap-token] configured RBAC rules to allow Node Bootstrap tokens to get nodes
[bootstrap-token] configured RBAC rules to allow Node Bootstrap tokens to post CSRs in order for nodes to get long term certificate credentials
[bootstrap-token] configured RBAC rules to allow the csrapprover controller automatically approve CSRs from a Node Bootstrap Token
[bootstrap-token] configured RBAC rules to allow certificate rotation for all node client certificates in the cluster
[bootstrap-token] Creating the "cluster-info" ConfigMap in the "kube-public" namespace
[kubelet-finalize] Updating "/etc/kubernetes/kubelet.conf" to point to a rotatable kubelet client certificate and key
[addons] Applied essential addon: CoreDNS
[addons] Applied essential addon: kube-proxyYour Kubernetes control-plane has initialized successfully!To start using your cluster, you need to run the following as a regular user:mkdir -p $HOME/.kubesudo cp -i /etc/kubernetes/admin.conf $HOME/.kube/configsudo chown $(id -u):$(id -g) $HOME/.kube/configAlternatively, if you are the root user, you can run:export KUBECONFIG=/etc/kubernetes/admin.confYou should now deploy a pod network to the cluster.
Run "kubectl apply -f [podnetwork].yaml" with one of the options listed at:https://kubernetes.io/docs/concepts/cluster-administration/addons/You can now join any number of control-plane nodes by copying certificate authorities
and service account keys on each node and then running the following as root:kubeadm join master.k8s.io:6443 --token s8zd78.koquhvbv0e767uqb \    #加入master時使用--discovery-token-ca-cert-hash sha256:e4fea2471e5bd54b18d703830aa87307f3c586ca882a809bb8e1f2fa335f78e6 \--control-plane Then you can join any number of worker nodes by running the following on each as root:kubeadm join master.k8s.io:6443 --token s8zd78.koquhvbv0e767uqb \      #加入node時使用--discovery-token-ca-cert-hash sha256:e4fea2471e5bd54b18d703830aa87307f3c586ca882a809bb8e1f2fa335f78e6
初始化中的錯誤:
[ERROR FileContent--proc-sys-net-bridge-bridge-nf-call-iptables]: /proc/sys/net/bridge/bridge-nf-call-iptables contents are not set to 1執行以下命令后重新執行初始化命令
echo "1" >/proc/sys/net/bridge/bridge-nf-call-iptables根據初始化的結果操作
[root@k8s-master1 ~]# mkdir -p $HOME/.kube
[root@k8s-master1 ~]# sudo cp -i /etc/kubernetes/admin.conf $HOME/.kube/config
[root@k8s-master1 ~]# sudo chown $(id -u):$(id -g) $HOME/.kube/config
查看集群狀態
[root@k8s-master1 ~]# kubectl get csWarning: v1 ComponentStatus is deprecated in v1.19+
NAME STATUS MESSAGE ERROR
scheduler Unhealthy Get "http://127.0.0.1:10251/healthz": dial tcp 127.0.0.1:10251: connect: connection refused
controller-manager Unhealthy Get "http://127.0.0.1:10252/healthz": dial tcp 127.0.0.1:10252: connect: connection refused
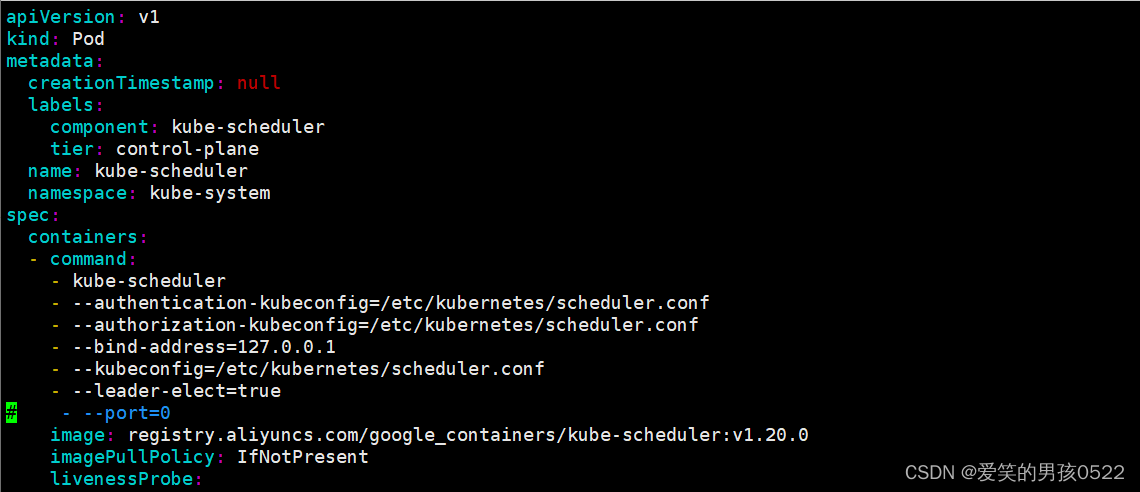
etcd-0 Healthy {"health":"true"} ????????注意:出現以上錯誤情況,是因為/etc/kubernetes/manifests/下的kube-controller-manager.yaml和kube-scheduler.yaml設置的默認端口為0導致的,解決方式是注釋掉對應的port即可
修改kube-controller-manager.yaml文件
[root@k8s-master1 ~]# vim /etc/kubernetes/manifests/kube-controller-manager.yaml

?修改kube-scheduler.yaml文件
[root@k8s-master1 ~]# vim /etc/kubernetes/manifests/kube-scheduler.yaml
?查看集群狀態
[root@k8s-master1 ~]# kubectl get cs
Warning: v1 ComponentStatus is deprecated in v1.19+
NAME                 STATUS    MESSAGE             ERROR
scheduler            Healthy   ok
controller-manager   Healthy   ok
etcd-0               Healthy   {"health":"true"}   [root@k8s-master1 ~]# kubectl get pods -n kube-system
NAME                                  READY   STATUS    RESTARTS   AGE
coredns-7f89b7bc75-bzbrr              0/1     Pending   0          29m
coredns-7f89b7bc75-wlx26              0/1     Pending   0          29m
etcd-k8s-master1                      1/1     Running   0          30m
kube-apiserver-k8s-master1            1/1     Running   0          30m
kube-controller-manager-k8s-master1   1/1     Running   1          2m30s
kube-proxy-nk87c                      1/1     Running   0          29m
kube-scheduler-k8s-master1            1/1     Running   0          3m19s
查看節點信息
[root@k8s-master1 ~]# kubectl get nodes
NAME          STATUS     ROLES                  AGE   VERSION
k8s-master1   NotReady   control-plane,master   30m   v1.20.0
3.7、安裝集群網絡
在k8s-master1節點執行
flannel所需文件提取鏈接:https://pan.baidu.com/s/1ywYDndOVFnCdLAqH8eHa3Q?pwd=5t95?
提取碼:5t95
[root@k8s-master1 ~]# docker load < flannel_v0.12.0-amd64.tar
256a7af3acb1: Loading layer  5.844MB/5.844MB
d572e5d9d39b: Loading layer  10.37MB/10.37MB
57c10be5852f: Loading layer  2.249MB/2.249MB
7412f8eefb77: Loading layer  35.26MB/35.26MB
05116c9ff7bf: Loading layer   5.12kB/5.12kB
Loaded image: quay.io/coreos/flannel:v0.12.0-amd64[root@k8s-master1 ~]# tar xf cni-plugins-linux-amd64-v0.8.6.tgz
[root@k8s-master1 ~]# cp flannel /opt/cni/bin/[root@k8s-master1 ~]#  kubectl apply -f kube-flannel.yml
podsecuritypolicy.policy/psp.flannel.unprivileged created
Warning: rbac.authorization.k8s.io/v1beta1 ClusterRole is deprecated in v1.17+, unavailable in v1.22+; use rbac.authorization.k8s.io/v1 ClusterRole
clusterrole.rbac.authorization.k8s.io/flannel created
Warning: rbac.authorization.k8s.io/v1beta1 ClusterRoleBinding is deprecated in v1.17+, unavailable in v1.22+; use rbac.authorization.k8s.io/v1 ClusterRoleBinding
clusterrolebinding.rbac.authorization.k8s.io/flannel created
serviceaccount/flannel created
configmap/kube-flannel-cfg created
daemonset.apps/kube-flannel-ds-amd64 created
daemonset.apps/kube-flannel-ds-arm64 created
daemonset.apps/kube-flannel-ds-arm created
daemonset.apps/kube-flannel-ds-ppc64le created
daemonset.apps/kube-flannel-ds-s390x created
再次查看節點信息:
[root@k8s-master1 ~]# kubectl get nodes
NAME          STATUS   ROLES                  AGE     VERSION
k8s-master1   Ready    control-plane,master   9m12s   v1.20.0
3.8、添加master節點
在k8s-master2和k8s-master3節點創建文件夾
[root@k8s-master2 ~]# mkdir -p /etc/kubernetes/pki/etcd[root@k8s-master3 ~]# mkdir -p /etc/kubernetes/pki/etcd在k8s-master1節點執行
從k8s-master1復制秘鑰和相關文件到k8s-master2和k8s-master3
[root@k8s-master1 ~]# scp /etc/kubernetes/admin.conf 192.168.2.112:/etc/kubernetes/
root@192.168.2.112's password:
admin.conf                                                                                                                                  100% 5569     8.0MB/s   00:00    [root@k8s-master1 ~]# scp /etc/kubernetes/admin.conf 192.168.2.115:/etc/kubernetes/
root@192.168.2.115's password:
admin.conf                                                                                                                                  100% 5569     7.9MB/s   00:00[root@k8s-master1 ~]# scp /etc/kubernetes/pki/{ca.*,sa.*,front-proxy-ca.*} 192.168.2.112://etc/kubernetes/pki/
root@192.168.2.112's password:
ca.crt                                                                                                                                     100% 1066     1.3MB/s   00:00
ca.key                                                                                                                                     100% 1679     2.2MB/s   00:00
sa.key                                                                                                                                     100% 1679     2.0MB/s   00:00
sa.pub                                                                                                                                     100%  451   832.0KB/s   00:00
front-proxy-ca.crt                                                                                                                         100% 1078   730.7KB/s   00:00
front-proxy-ca.key                                                                                                                         100% 1679     1.8MB/s   00:00    [root@k8s-master1 ~]# scp /etc/kubernetes/pki/{ca.*,sa.*,front-proxy-ca.*} 192.168.2.115://etc/kubernetes/pki/
root@192.168.2.115's password:
ca.crt                                                                                                                                     100% 1066     1.6MB/s   00:00
ca.key                                                                                                                                     100% 1679     1.1MB/s   00:00
sa.key                                                                                                                                     100% 1679     2.7MB/s   00:00
sa.pub                                                                                                                                     100%  451   591.4KB/s   00:00
front-proxy-ca.crt                                                                                                                         100% 1078     1.6MB/s   00:00
front-proxy-ca.key                                                                                                                         100% 1679     2.8MB/s   00:00    [root@k8s-master1 ~]# scp /etc/kubernetes/pki/etcd/ca.* 192.168.2.112:/etc/kubernetes/pki/etcd/
root@192.168.2.112's password:
ca.crt                                                                                                                                     100% 1058     1.6MB/s   00:00
ca.key                                                                                                                                     100% 1679     1.7MB/s   00:00    [root@k8s-master1 ~]# scp /etc/kubernetes/pki/etcd/ca.* 192.168.2.115:/etc/kubernetes/pki/etcd/
root@192.168.2.115's password:
ca.crt                                                                                                                                     100% 1058     1.8MB/s   00:00
ca.key                                                                                                                                     100% 1679     2.0MB/s   00:00
將其他master節點加入集群
注意:kubeadm init生成的token有效期只有1天,生成不過期token
[root@k8s-master1 ~]# kubeadm token create --ttl 0 --print-join-commandkubeadm join master.k8s.io:6443 --token h5z2qr.n6oeu18sutk0atkj     --discovery-token-ca-cert-hash sha256:4464f179679e97286f2b8efcf96a4da6374e2fc6b5e8fb1b9623f4975bf243b7 [root@k8s-master1 ~]# kubeadm token listTOKEN                     TTL         EXPIRES                     USAGES                   DESCRIPTION                                                EXTRA GROUPS
c76rob.ye2104dd4splb1cs   23h         2023-08-16T19:13:39+08:00   authentication,signing   <none>                                                     system:bootstrappers:kubeadm:default-node-token
h5z2qr.n6oeu18sutk0atkj   <forever>   <never>   authentication,signing   <none>                                                     system:bootstrappers:kubeadm:default-node-token
k8s-master2和k8s-master3都需要加入
[root@k8s-master2 ~]# kubeadm join master.k8s.io:6443 --token h5z2qr.n6oeu18sutk0atkj --discovery-token-ca-cert-hash sha256:4464f179679e97286f2b8efcf96a4da6374e2fc6b5e8fb1b9623f4975bf243b7 --control-plane[preflight] Running pre-flight checks[WARNING IsDockerSystemdCheck]: detected "cgroupfs" as the Docker cgroup driver. The recommended driver is "systemd". Please follow the guide at https://kubernetes.io/docs/setup/cri/[WARNING SystemVerification]: this Docker version is not on the list of validated versions: 24.0.5. Latest validated version: 19.03
[preflight] Reading configuration from the cluster...
[preflight] FYI: You can look at this config file with 'kubectl -n kube-system get cm kubeadm-config -o yaml'
[preflight] Running pre-flight checks before initializing the new control plane instance
[preflight] Pulling images required for setting up a Kubernetes cluster
[preflight] This might take a minute or two, depending on the speed of your internet connection
[preflight] You can also perform this action in beforehand using 'kubeadm config images pull'
[certs] Using certificateDir folder "/etc/kubernetes/pki"
[certs] Generating "apiserver" certificate and key
[certs] apiserver serving cert is signed for DNS names [k8s-master1 k8s-master2 k8s-master3 kubernetes kubernetes.default kubernetes.default.svc kubernetes.default.svc.cluster.local master.k8s.io] and IPs [10.1.0.1 192.168.108.166 192.168.2.111 192.168.2.112 192.168.2.115 192.168.2.154 127.0.0.1]
[certs] Generating "apiserver-kubelet-client" certificate and key
[certs] Generating "front-proxy-client" certificate and key
[certs] Generating "etcd/peer" certificate and key
[certs] etcd/peer serving cert is signed for DNS names [k8s-master2 localhost] and IPs [192.168.108.166 127.0.0.1 ::1]
[certs] Generating "etcd/server" certificate and key
[certs] etcd/server serving cert is signed for DNS names [k8s-master2 localhost] and IPs [192.168.108.166 127.0.0.1 ::1]
[certs] Generating "etcd/healthcheck-client" certificate and key
[certs] Generating "apiserver-etcd-client" certificate and key
[certs] Valid certificates and keys now exist in "/etc/kubernetes/pki"
[certs] Using the existing "sa" key
[kubeconfig] Generating kubeconfig files
[kubeconfig] Using kubeconfig folder "/etc/kubernetes"
[kubeconfig] Using existing kubeconfig file: "/etc/kubernetes/admin.conf"
[kubeconfig] Writing "controller-manager.conf" kubeconfig file
[kubeconfig] Writing "scheduler.conf" kubeconfig file
[control-plane] Using manifest folder "/etc/kubernetes/manifests"
[control-plane] Creating static Pod manifest for "kube-apiserver"
[control-plane] Creating static Pod manifest for "kube-controller-manager"
[control-plane] Creating static Pod manifest for "kube-scheduler"
[check-etcd] Checking that the etcd cluster is healthy
[kubelet-start] Writing kubelet configuration to file "/var/lib/kubelet/config.yaml"
[kubelet-start] Writing kubelet environment file with flags to file "/var/lib/kubelet/kubeadm-flags.env"
[kubelet-start] Starting the kubelet
[kubelet-start] Waiting for the kubelet to perform the TLS Bootstrap...
[etcd] Announced new etcd member joining to the existing etcd cluster
[etcd] Creating static Pod manifest for "etcd"
[etcd] Waiting for the new etcd member to join the cluster. This can take up to 40s
[upload-config] Storing the configuration used in ConfigMap "kubeadm-config" in the "kube-system" Namespace
[mark-control-plane] Marking the node k8s-master2 as control-plane by adding the labels "node-role.kubernetes.io/master=''" and "node-role.kubernetes.io/control-plane='' (deprecated)"
[mark-control-plane] Marking the node k8s-master2 as control-plane by adding the taints [node-role.kubernetes.io/master:NoSchedule]This node has joined the cluster and a new control plane instance was created:* Certificate signing request was sent to apiserver and approval was received.
* The Kubelet was informed of the new secure connection details.
* Control plane (master) label and taint were applied to the new node.
* The Kubernetes control plane instances scaled up.
* A new etcd member was added to the local/stacked etcd cluster.To start administering your cluster from this node, you need to run the following as a regular user:mkdir -p $HOME/.kubesudo cp -i /etc/kubernetes/admin.conf $HOME/.kube/configsudo chown $(id -u):$(id -g) $HOME/.kube/configRun 'kubectl get nodes' to see this node join the cluster.[root@k8s-master2 ~]# mkdir -p $HOME/.kube
[root@k8s-master2 ~]# sudo cp -i /etc/kubernetes/admin.conf $HOME/.kube/config
[root@k8s-master2 ~]# sudo chown $(id -u):$(id -g) $HOME/.kube/config
[root@k8s-master2 ~]# docker load < flannel_v0.12.0-amd64.tar
Loaded image: quay.io/coreos/flannel:v0.12.0-amd64[root@k8s-master1 ~]# kubectl get nodes
NAME STATUS ROLES AGE VERSION
k8s-master1 Ready control-plane,master 31m v1.20.0
k8s-master2 Ready control-plane,master 4m28s v1.20.0
k8s-master3 Ready control-plane,master 3m39s v1.20.0[root@k8s-master1 ~]# kubectl get pods --all-namespaces
NAMESPACE NAME READY STATUS RESTARTS AGE
kube-system coredns-7f89b7bc75-dwqf6 1/1 Running 0 31m
kube-system coredns-7f89b7bc75-ksztn 1/1 Running 0 31m
kube-system etcd-k8s-master1 1/1 Running 0 32m
kube-system etcd-k8s-master2 1/1 Running 0 4m32s
kube-system etcd-k8s-master3 1/1 Running 0 2m34s
kube-system kube-apiserver-k8s-master1 1/1 Running 0 32m
kube-system kube-apiserver-k8s-master2 1/1 Running 0 4m35s
kube-system kube-apiserver-k8s-master3 1/1 Running 0 2m41s
kube-system kube-controller-manager-k8s-master1 1/1 Running 1 30m
kube-system kube-controller-manager-k8s-master2 1/1 Running 0 4m36s
kube-system kube-controller-manager-k8s-master3 1/1 Running 0 2m52s
kube-system kube-flannel-ds-amd64-4zl22 1/1 Running 0 3m48s
kube-system kube-flannel-ds-amd64-lshgp 1/1 Running 0 27m
kube-system kube-flannel-ds-amd64-tsj6h 1/1 Running 0 4m37s
kube-system kube-proxy-b2vl6 1/1 Running 0 4m37s
kube-system kube-proxy-kgbxr 1/1 Running 0 31m
kube-system kube-proxy-t2v2f 1/1 Running 0 3m48s
kube-system kube-scheduler-k8s-master1 1/1 Running 1 30m
kube-system kube-scheduler-k8s-master2 1/1 Running 0 4m35s
kube-system kube-scheduler-k8s-master3 1/1 Running 0 2m55s
3.9、加入Kubernetes Node
直接在node節點服務器上執行k8s-master1初始化成功后的消息即可:
[root@k8s-node1 ~]# kubeadm join master.k8s.io:6443 --token h5z2qr.n6oeu18sutk0atkj --discovery-token-ca-cert-hash sha256:4464f179679e97286f2b8efcf96a4da6374e2fc6b5e8fb1b9623f4975bf243b7[preflight] Running pre-flight checks[WARNING IsDockerSystemdCheck]: detected "cgroupfs" as the Docker cgroup driver. The recommended driver is "systemd". Please follow the guide at https://kubernetes.io/docs/setup/cri/[WARNING SystemVerification]: this Docker version is not on the list of validated versions: 24.0.5. Latest validated version: 19.03
[preflight] Reading configuration from the cluster...
[preflight] FYI: You can look at this config file with 'kubectl -n kube-system get cm kubeadm-config -o yaml'
W0815 19:49:01.547785   10847 common.go:148] WARNING: could not obtain a bind address for the API Server: no default routes found in "/proc/net/route" or "/proc/net/ipv6_route"; using: 0.0.0.0
[kubelet-start] Writing kubelet configuration to file "/var/lib/kubelet/config.yaml"
[kubelet-start] Writing kubelet environment file with flags to file "/var/lib/kubelet/kubeadm-flags.env"
[kubelet-start] Starting the kubelet
[kubelet-start] Waiting for the kubelet to perform the TLS Bootstrap...This node has joined the cluster:
* Certificate signing request was sent to apiserver and a response was received.
* The Kubelet was informed of the new secure connection details.Run 'kubectl get nodes' on the control-plane to see this node join the cluster.[root@k8s-node1 ~]# docker load < flannel_v0.12.0-amd64.tar
256a7af3acb1: Loading layer [==================================================>]  5.844MB/5.844MB
d572e5d9d39b: Loading layer [==================================================>]  10.37MB/10.37MB
57c10be5852f: Loading layer [==================================================>]  2.249MB/2.249MB
7412f8eefb77: Loading layer [==================================================>]  35.26MB/35.26MB
05116c9ff7bf: Loading layer [==================================================>]   5.12kB/5.12kB
Loaded image: quay.io/coreos/flannel:v0.12.0-amd64
查看節點信息
[root@k8s-master1 ~]# kubectl get nodes
NAME          STATUS   ROLES                  AGE     VERSION
k8s-master1   Ready    control-plane,master   40m     v1.20.0
k8s-master2   Ready    control-plane,master   12m     v1.20.0
k8s-master3   Ready    control-plane,master   11m     v1.20.0
k8s-node1     Ready    <none>                 4m48s   v1.20.0
k8s-node2     Ready    <none>                 4m48s   v1.20.0
k8s-node3     Ready    <none>                 4m48s   v1.20.0
3.10、測試Kubernetes集群
所有node主機導入測試鏡像
測試鏡像提取鏈接:https://pan.baidu.com/s/1ebtV-o13GZ0ocOAyYPsvHA?pwd=n0gx?
提取碼:n0gx
[root@k8s-node1 ~]# docker load < nginx-1.19.tar 87c8a1d8f54f: Loading layer [==================================================>]   72.5MB/72.5MB
5c4e5adc71a8: Loading layer [==================================================>]   64.6MB/64.6MB
7d2b207c2679: Loading layer [==================================================>]  3.072kB/3.072kB
2c7498eef94a: Loading layer [==================================================>]  4.096kB/4.096kB
4eaf0ea085df: Loading layer [==================================================>]  3.584kB/3.584kB
Loaded image: nginx:latest[root@k8s-node1 ~]# docker tag nginx nginx:1.19.6
在Kubernetes集群中創建一個pod,驗證是否正常運行。
[root@k8s-master1 ~]# mkdir demo
[root@k8s-master1 ~]# cd demo/
[root@k8s-master1 demo]# vim nginx-deployment.yaml
apiVersion: apps/v1
kind: Deployment
metadata:name: nginx-deploymentlabels:app: nginx
spec:replicas: 3selector: matchLabels:app: nginxtemplate:metadata:labels:app: nginxspec:containers:- name: nginximage: nginx:1.19.6ports:- containerPort: 80
????????創建完 Deployment 的資源清單之后,使用 create 執行資源清單來創建容器。通過 get pods 可以查看到 Pod 容器資源已經自動創建完成。
[root@k8s-master1 demo]# kubectl create -f nginx-deployment.yamldeployment.apps/nginx-deployment created[root@k8s-master1 demo]# kubectl get pods
NAME                                READY   STATUS    RESTARTS   AGE
nginx-deployment-76ccf9dd9d-cmv2x   1/1     Running   0          3m48s
nginx-deployment-76ccf9dd9d-ld6q9   1/1     Running   0          3m36s
nginx-deployment-76ccf9dd9d-nddmx   1/1     Running   0          114s[root@k8s-master1 ~]# kubectl get pods -o wide
NAME                                READY   STATUS    RESTARTS   AGE     IP           NODE        NOMINATED NODE   READINESS GATES
nginx-deployment-76ccf9dd9d-cmv2x   1/1     Running   0          4m19s   10.244.5.3   k8s-node3   <none>           <none>
nginx-deployment-76ccf9dd9d-ld6q9   1/1     Running   0          4m7s    10.244.3.3   k8s-node1   <none>           <none>
nginx-deployment-76ccf9dd9d-nddmx   1/1     Running   0          2m25s   10.244.3.4   k8s-node1   <none>           <none>
創建Service資源清單
????????在創建的 nginx-service 資源清單中,定義名稱為 nginx-service 的 Service、標簽選擇器為 app: nginx、type 為 NodePort 指明外部流量可以訪問內部容器。在 ports 中定義暴露的端口庫號列表,對外暴露訪問的端口是 80,容器內部的端口也是 80。
[root@k8s-master1 demo]# vim nginx-service.yaml
kind: Service
apiVersion: v1
metadata:name: nginx-service
spec:selector:app: nginxtype: NodePortports:- protocol: TCPport: 80targetPort: 80[root@k8s-master1 demo]#  kubectl create -f nginx-service.yamlservice/nginx-service created[root@k8s-master1 demo]#  kubectl get svcNAME            TYPE        CLUSTER-IP    EXTERNAL-IP   PORT(S)        AGE
kubernetes      ClusterIP   10.1.0.1      <none>        443/TCP        60m
nginx-service   NodePort    10.1.117.38   <none>        80:31280/TCP   13s
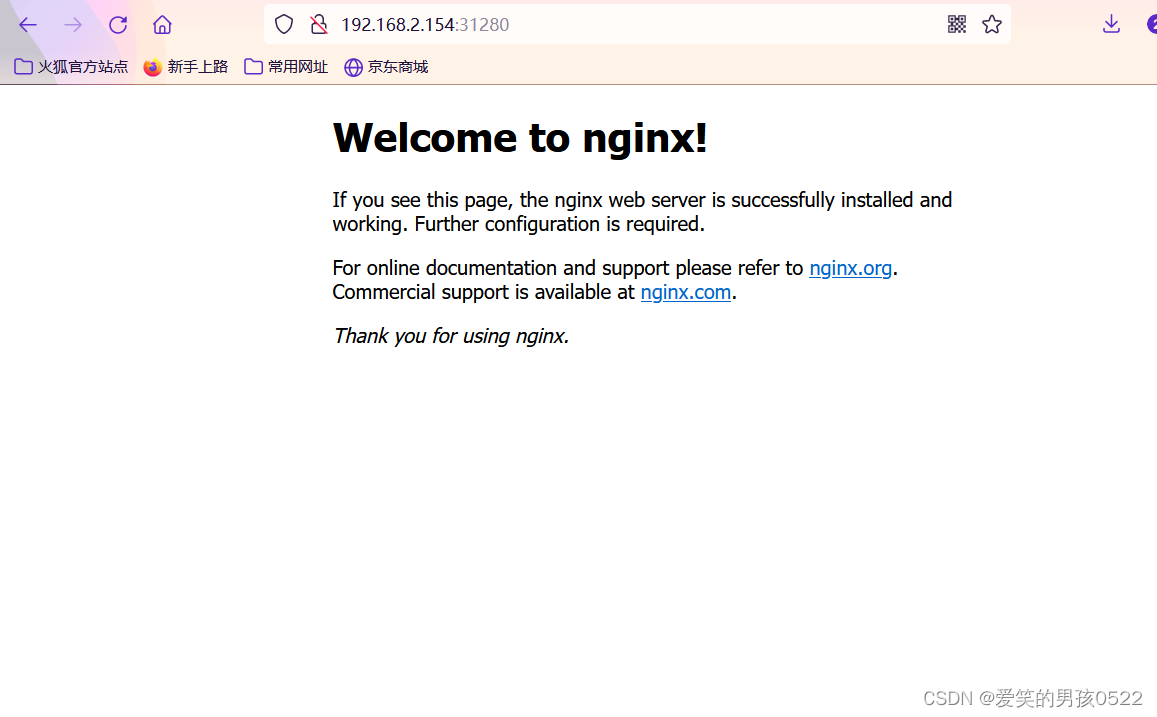
通過瀏覽器訪問nginx:http://master.k8s.io:31280?域名或者VIP地址
[root@k8s-master1 demo]# elinks --dump http://master.k8s.io:31280Welcome to nginx!If you see this page, the nginx web server is successfully installed andworking. Further configuration is required.For online documentation and support please refer to [1]nginx.org.Commercial support is available at [2]nginx.com.Thank you for using nginx.ReferencesVisible links1. http://nginx.org/2. http://nginx.com/
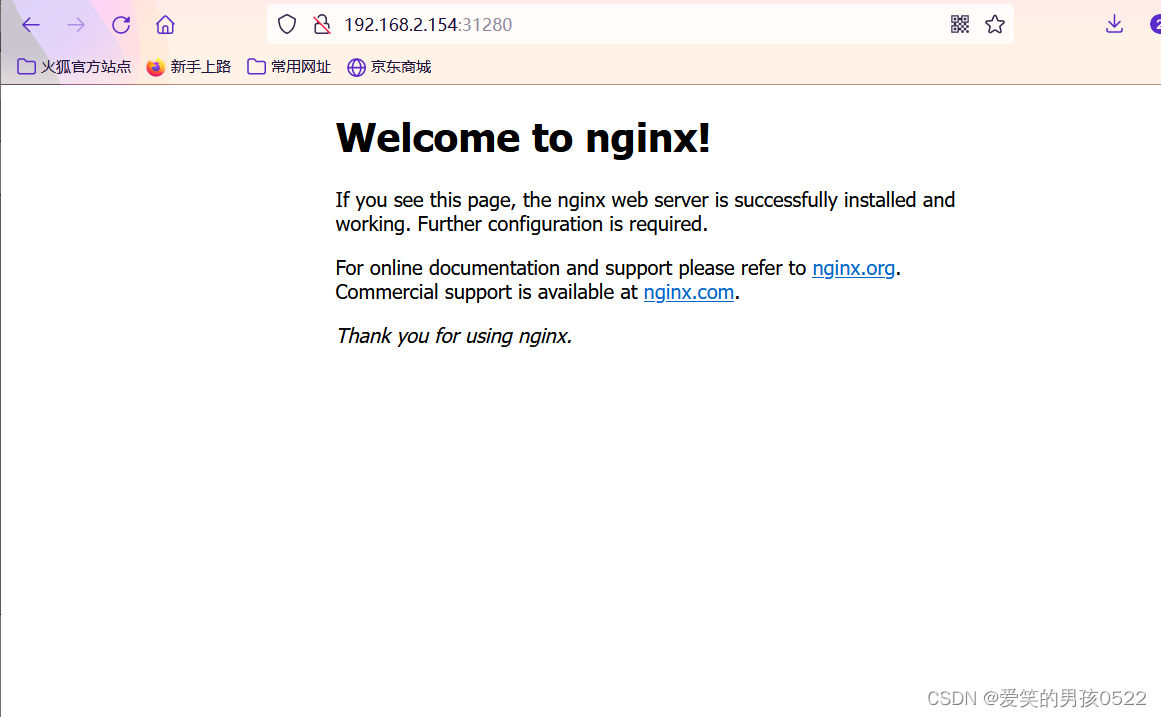
?掛起k8s-master1節點,刷新頁面還是能訪問nginx,說明高可用集群部署成功。

?
?檢查會發現VIP已經轉移到k8s-master2節點上
[root@k8s-master2 ~]# ip a s ens33
2: ens33: <BROADCAST,MULTICAST,UP,LOWER_UP> mtu 1500 qdisc pfifo_fast state UP group default qlen 1000link/ether 00:0c:29:e2:cd:b7 brd ff:ff:ff:ff:ff:ffinet 192.168.2.112/24 brd 192.168.2.255 scope global noprefixroute ens33valid_lft forever preferred_lft foreverinet 192.168.2.154/32 scope global ens33valid_lft forever preferred_lft foreverinet6 fe80::5a1c:3be9:c4a:453d/64 scope link noprefixroute valid_lft forever preferred_lft forever
至此Kubernetes企業級高可用環境完美實現。


)


