一、概述
本文主要記錄如何通過Gitlab CI/CD自動部署SpringBoot項目jar包。
二、前期準備
準備三臺 CentOS7服務器,分別部署以下服務:
| 序號 | 系統 | IP | 服務 |
|---|
| 1 | CentOS7 | 192.168.56.10 | Gitlab |
| 2 | CentOS7 | 192.168.56.11 | Runner (安裝Docker) |
| 3 | CentOS7 | 192.168.56.12 | SpringBoot 項目 jar 包(安裝jdk、maven等) |
上述服務也可以只用一臺CentOS7,將所有程序都部署在同一機器上,但是更建議分開部署;
三、總體架構圖
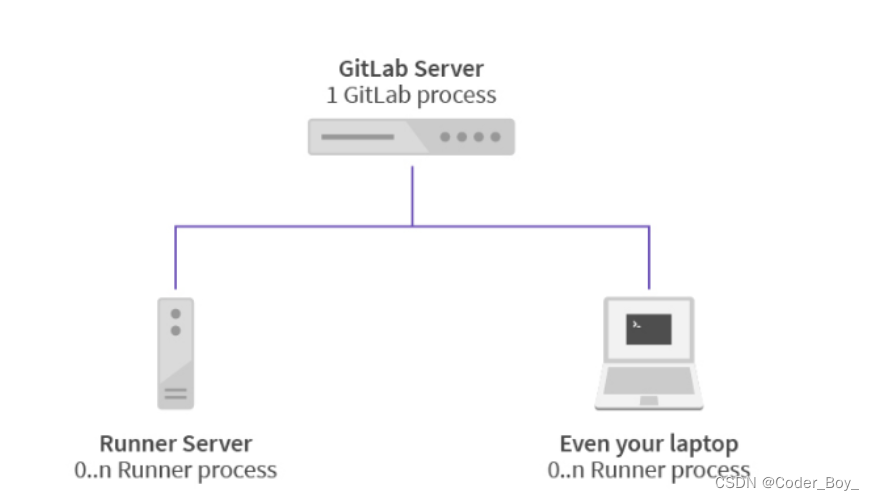
?
說明:
- Gitlab Server 用于部署Gitlab遠程倉庫,對CPU和內存要求比較高,建議4核CPU,4GB以上內存;
- Runner Server 用于部署執行.gitlab-ci.yml 文件中定義的 stage(階段);需要具有訪問 Gitlab 倉庫的權限,可以下載代碼,通過注冊方式(gitlab-runner register)實現;
- Your Laptop Server 用戶部署你的應用程序,這里就是SpringBoot的 jar 包,需要提前安裝 JDK 和 Maven 并配置好環境變量;
四、環境搭建
1、環境準備(可選)
三臺服務器執行以下命令:
| 1 2 3 | yum -y upgrade
yum -y install wget
yum -y install vim
|
2、Gitlab安裝
參考地址:
https://about.gitlab.com/install/#centos-7
CentOS8.1搭建Gitlab服務器詳細教程_Linux_腳本之家
(1)安裝并配置必要的依賴
| 1 2 3 4 5 6 7 | sudo yum install -y curl policycoreutils-python openssh-server
sudo systemctl enable sshd
sudo systemctl start sshd
sudo firewall-cmd --permanent --add-service=http
sudo firewall-cmd --permanent --add-service=https
sudo systemctl reload firewalld
|
(2)安裝郵件服務
| 1 2 3 | sudo yum install postfix
sudo systemctl enable postfix
sudo systemctl start postfix
|
(3)添加 gitlab 鏡像
參考地址:Index of /gitlab-ce/yum/el7/ | 清華大學開源軟件鏡像站 | Tsinghua Open Source Mirror
| 1 | wget https://mirrors.tuna.tsinghua.edu.cn/gitlab-ce/yum/el7/gitlab-ce-13.4.0-ce.0.el7.x86_64.rpm
|
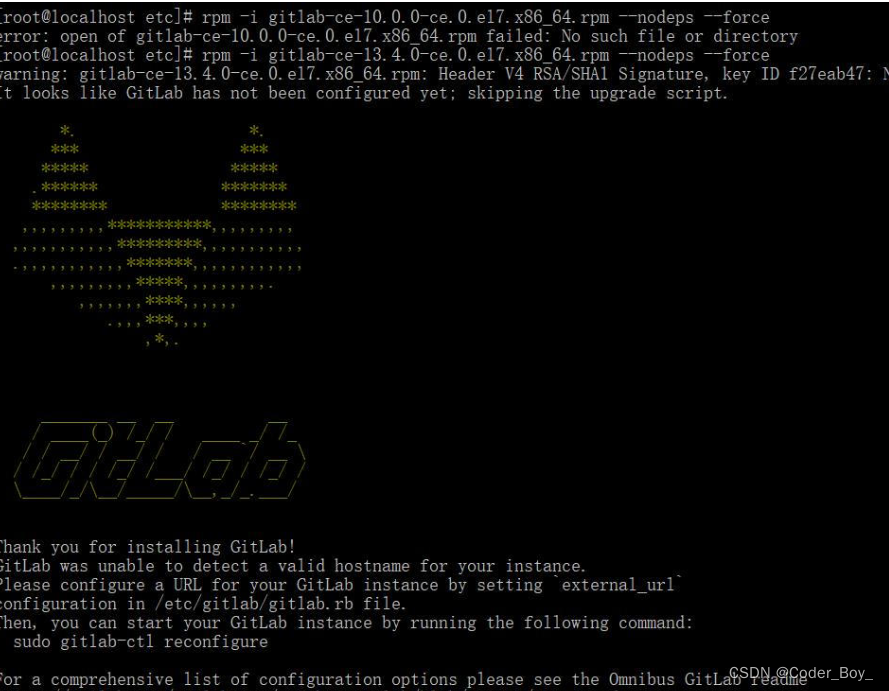
(4)安裝 gitlab 安裝命令
| 1 | rpm -i gitlab-ce-13.4.0-ce.0.el7.x86_64.rpm --nodeps --force
|
安裝成功后圖片:
?
(5)修改gitlab配置文件指定服務器ip和自定義端口
| 1 | vim? /etc/gitlab/gitlab.rb
|
(6)重置并啟動GitLab
| 1 2 | gitlab-ctl reconfigure
gitlab-ctl restart
|
提示 "ok: run:"表示啟動成功
(7)訪問 GitLab頁面
如果報502,等待一段時間后再刷新試試,一般1-2分鐘左右。
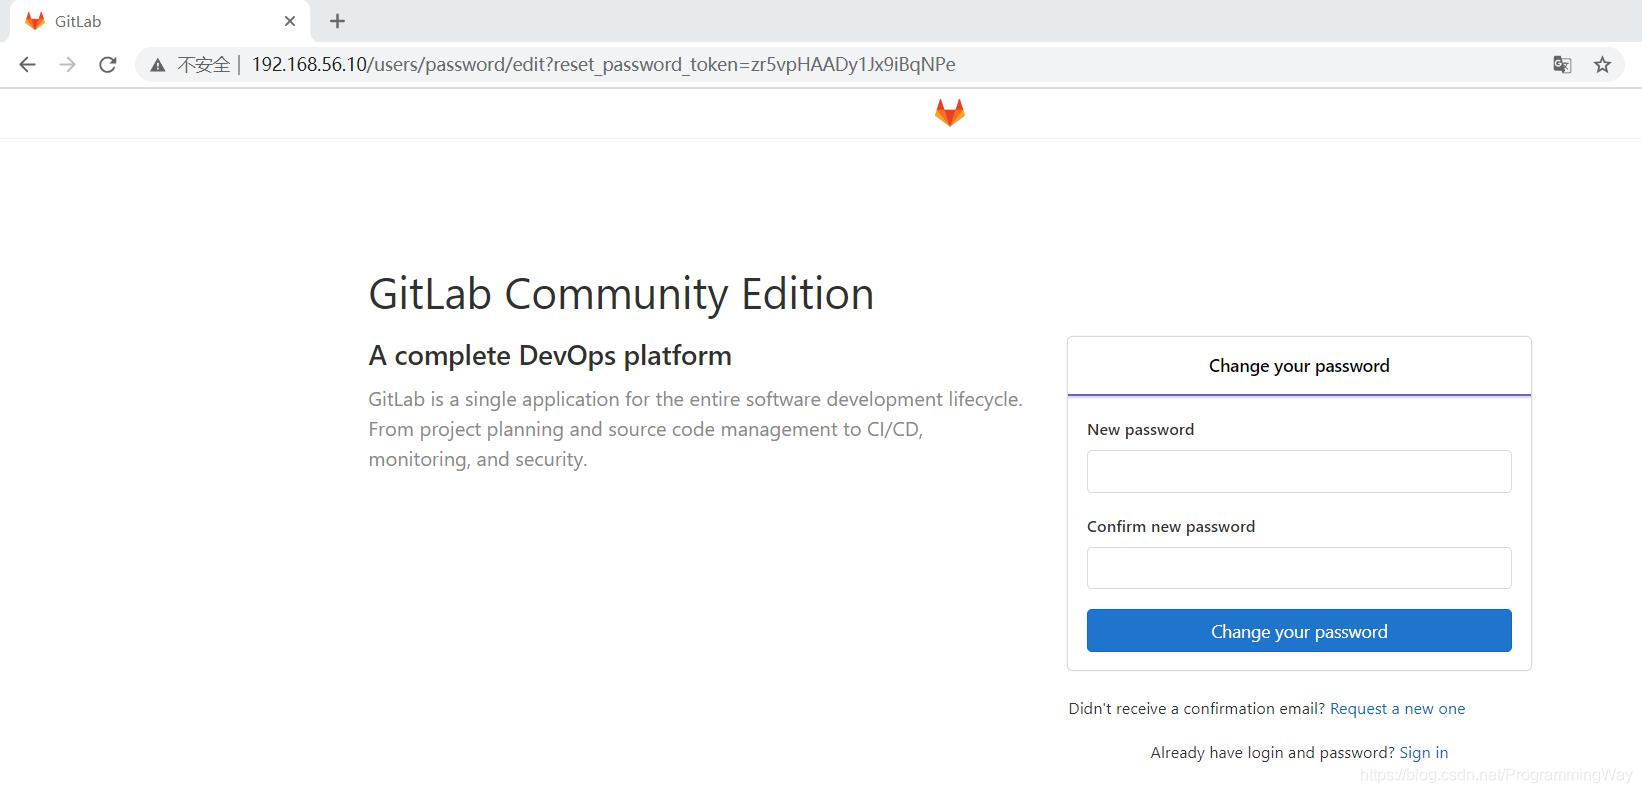
本文設置的賬號:root ,新密碼:11112222
3、安裝 Runner
參考官方文檔:https://docs.gitlab.com/runner/install/linux-manually.html#install-gitlab-runner-manually-on-gnulinux?中的 Using binary file Install
(1)下載一個二進制文件
| 1 | sudo curl -L --output /usr/local/bin/gitlab-runner https://gitlab-runner-downloads.s3.amazonaws.com/latest/binaries/gitlab-runner-linux-amd64
|
(2)修改執行權限
| 1 | sudo chmod a+x /usr/local/bin/gitlab-runner
|
(3)創建 GitLab CI 用戶
| 1 | sudo useradd --comment 'GitLab Runner' --create-home gitlab-runner --shell /bin/bash
|
(4)安裝并作為服務運行
| 1 2 | sudo gitlab-runner install --user=gitlab-runner --working-directory=/home/gitlab-runner
sudo gitlab-runner start
|
如果遇到提示 sudo: gitlab-runner: command not found,切換到 root 用戶,可以去掉 sudo 執行上面命令。
(5)注冊 Runner
參考地址:Registering runners | GitLab
執行 gitlab-runner register 命令:
| 1 2 3 4 5 6 7 8 9 10 11 12 13 14 15 16 17 18 19 20 21 22 23 | [root@localhost bin]# gitlab-runner register
Runtime platform??????????????????????????????????? arch=amd64 os=linux pid=21527 revision=4e1f20da version=13.4.0
Running in system-mode.
Please enter the gitlab-ci coordinator URL (e.g. https://gitlab.com/):
http://192.168.56.10/
Please enter the gitlab-ci token for this runner:
PwF1sZPX_zsB-xChSKjH
Please enter the gitlab-ci description for this runner:
[localhost.localdomain]: test ci cd desc
Please enter the gitlab-ci tags for this runner (comma separated):
my-tag,other-tag
Registering runner... succeeded???????????????????? runner=PwF1sZPX
Please enter the executor: ssh, virtualbox, parallels, shell, docker-ssh, docker+machine, docker-ssh+machine, kubernetes, custom, docker:
docker
Please enter the default Docker image (e.g. ruby:2.6):
maven:3.3.9-jdk-8
Runner registered successfully. Feel free to start it, but if it's running already the config should be automatically reloaded!
|
注:這里選擇的docker方式,所以服務器上還需要額外多安裝docker
參考:史上最全(全平臺)docker安裝方法! - 知乎
| 1 2 3 4 5 6 7 8 9 10 11 12 13 14 15 16 17 18 19 20 21 22 23 24 25 26 27 28 29 30 31 32 33 34 35 36 37 38 39 40 41 42 43 44 45 46 47 48 | #!/bin/bash
# 移除掉舊的版本
sudo yum remove docker \
??????????????????docker-client \
??????????????????docker-client-latest \
??????????????????docker-common \
??????????????????docker-latest \
??????????????????docker-latest-logrotate \
??????????????????docker-logrotate \
??????????????????docker-selinux \
??????????????????docker-engine-selinux \
??????????????????docker-engine
# 刪除所有舊的數據
sudo rm -rf /var/lib/docker
#? 安裝依賴包
sudo yum install -y yum-utils \
??device-mapper-persistent-data \
??lvm2
# 添加源,使用了阿里云鏡像
sudo yum-config-manager \
????--add-repo \
????http://mirrors.aliyun.com/docker-ce/linux/centos/docker-ce.repo
# 配置緩存
sudo yum makecache fast
# 安裝最新穩定版本的docker
sudo yum install -y docker-ce
# 配置鏡像加速器
sudo mkdir -p /etc/docker
sudo tee /etc/docker/daemon.json <<-'EOF'
{
??"registry-mirrors": ["http://hub-mirror.c.163.com"]
}
EOF
# 啟動docker引擎并設置開機啟動
sudo systemctl start docker
sudo systemctl enable docker
# 配置當前用戶對docker的執行權限
sudo groupadd docker
sudo gpasswd -a ${USER} docker
sudo systemctl restart docker
|
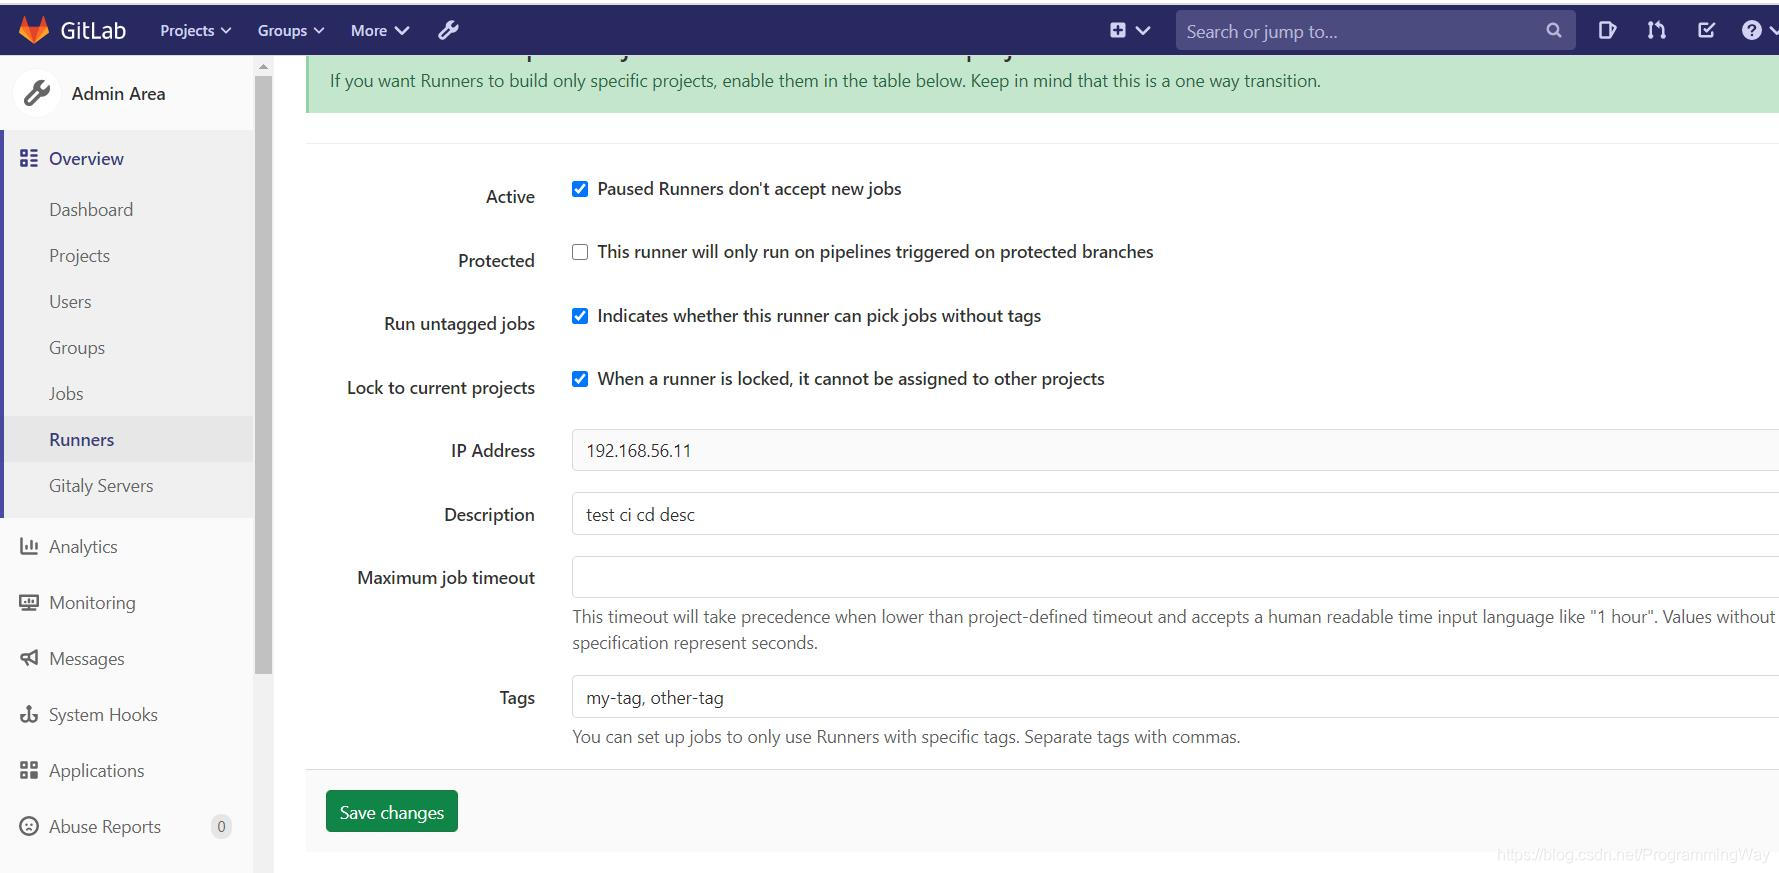
這里注冊一個全局共享的 Runner(管理員權限,復制服務器地址和 Token),所有項目都可以使用,或者也可以注冊項目級別單獨的 Runner (進入項目 Runner 設置頁面,復制地址和 Token)。
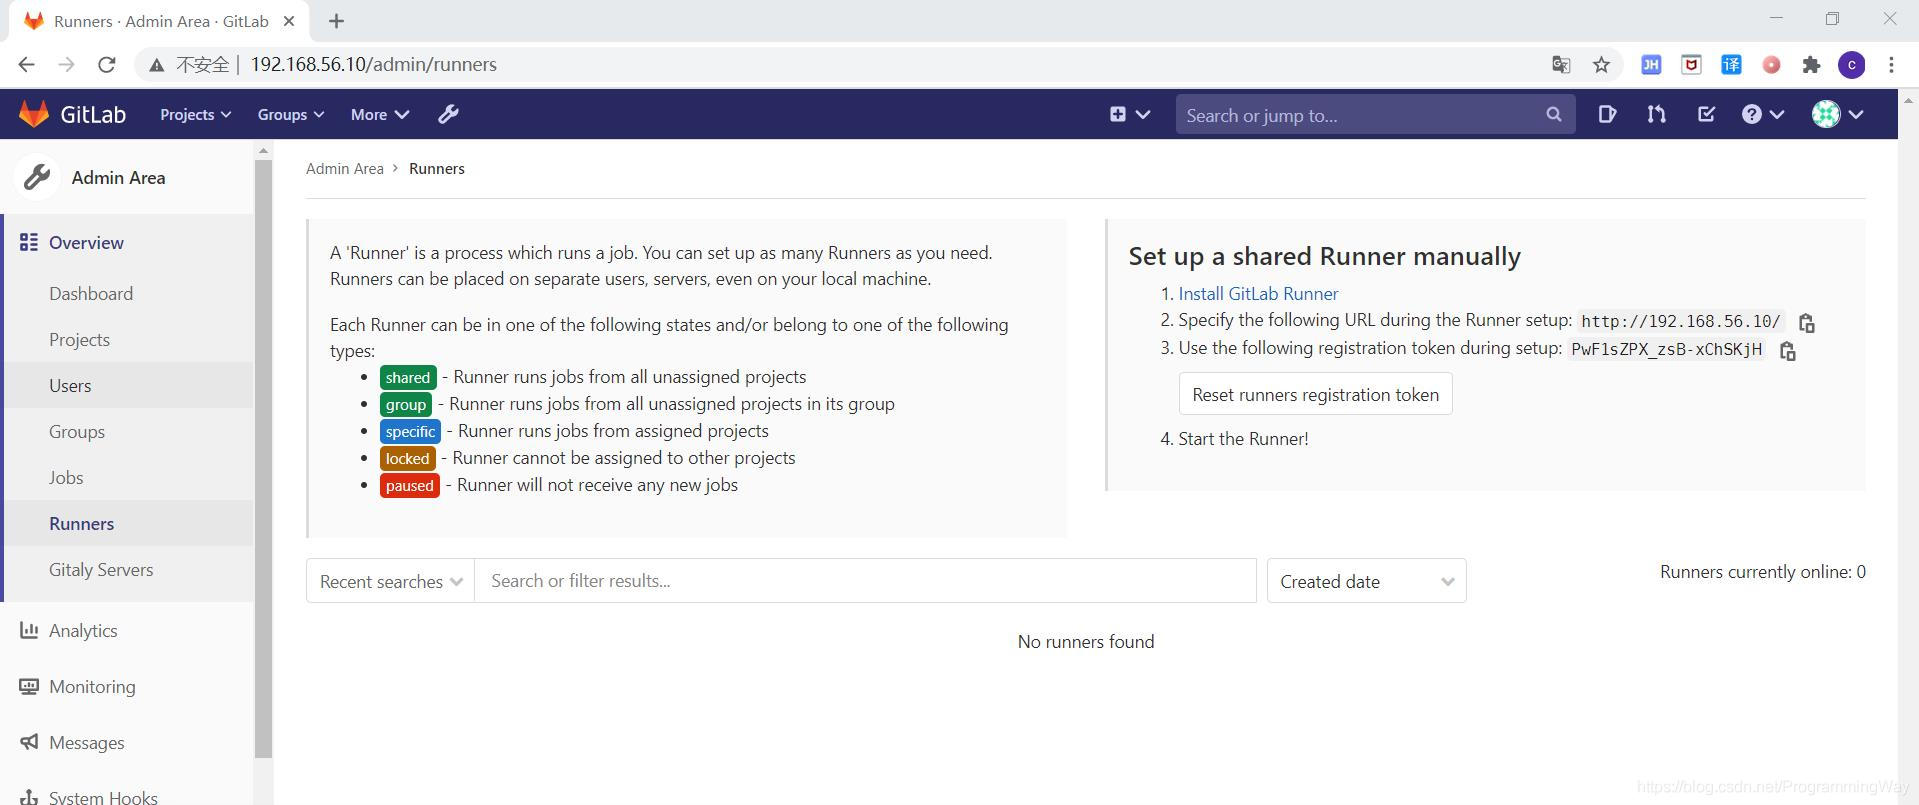
注冊成功后,Runner 列表可以查看到注冊的 Runner
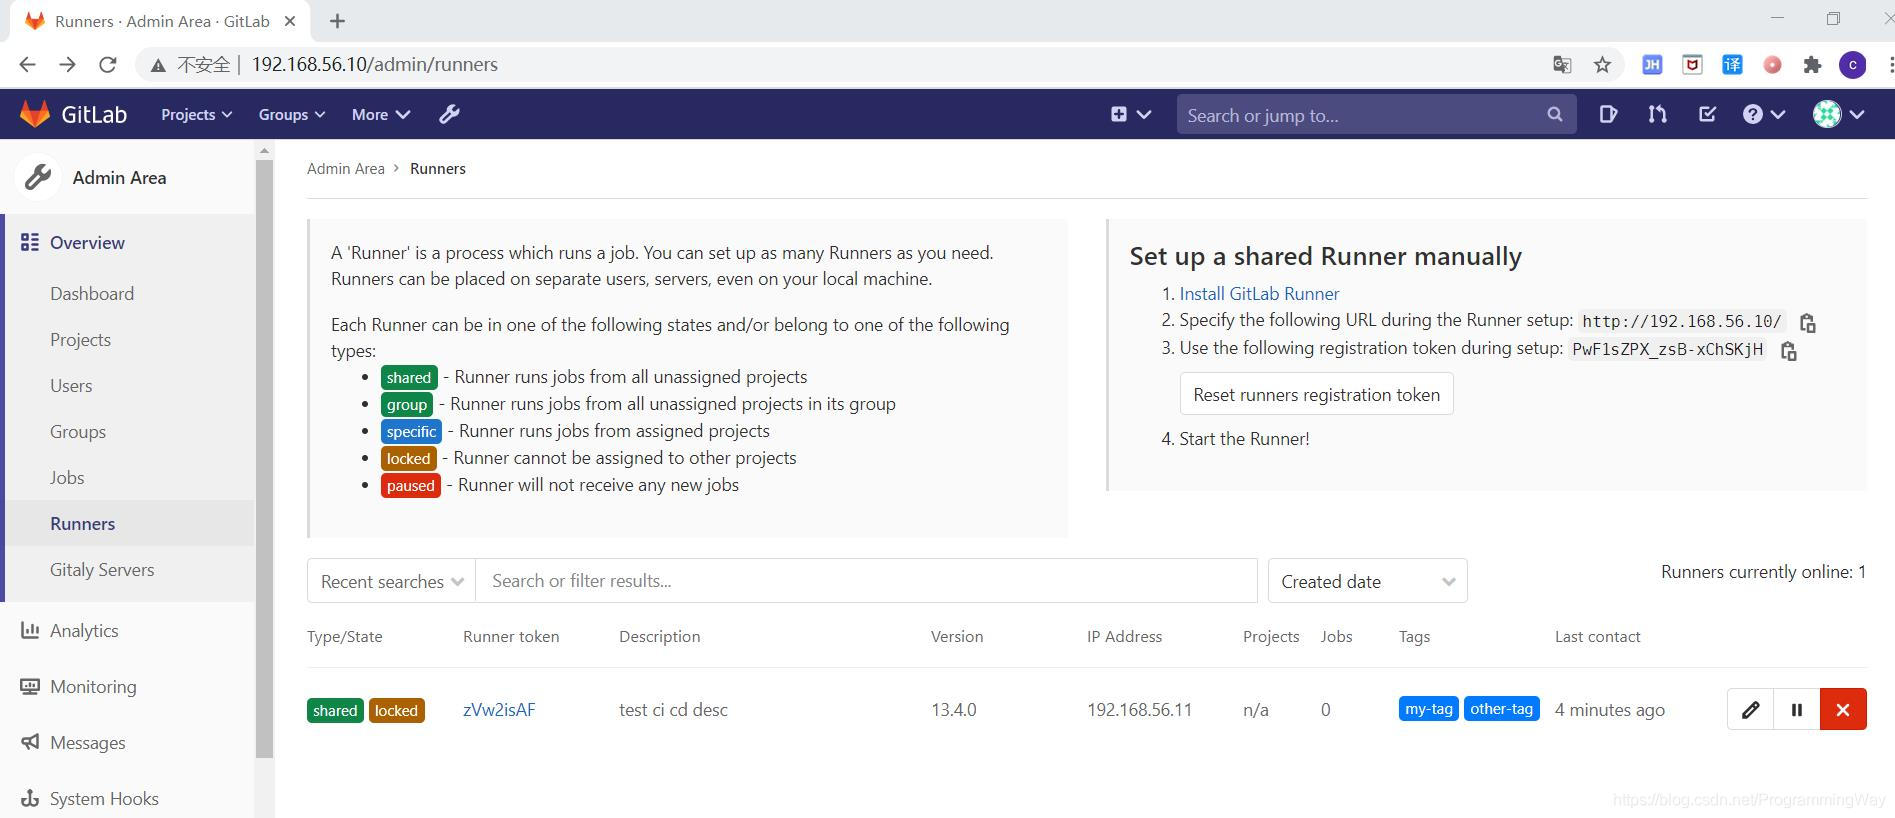
勾選:Run untagged jobs Indicates whether this runner can pick jobs without tags
4、安裝應用服務器環境
(1)允許用戶遠程登錄(可選)
| 1 2 3 4 5 6 7 | vi /etc/ssh/sshd_config
修改:
PasswordAuthentication yes?????????????????????
PermitRootLogin yes
重啟服務:
service sshd restart
|
(2)安裝JDK1.8
(1)下載地址:http://www.oracle.com/technetwork/java/javase/downloads/jdk8-downloads-2133151.html
(2)解壓
| 1 2 3 | tar -zxvf jdk-8u161-linux-x64.tar.gz
重命名:
mv jdk1.8.0_161 java1.8
|
(3)配置環境變量
| 1 2 3 4 5 6 7 8 9 10 | vi /etc/profile
添加以下內容:
export JAVA_HOME=/usr/local/java1.8
export PATH=$JAVA_HOME/bin:$PATH
export CLASSPATH=.:$JAVA_HOME/lib/dt.jar:$JAVA_HOME/lib/tools.jar
保存退出
source /etc/profile
java -version
|
(3) 安裝 Maven3.3.9
(1)下載地址:http://maven.apache.org/download.cgi
(2)解壓
| 1 2 3 4 | tar -zxvf apache-maven-3.3.9-bin.tar.gz
重命名:
mv apache-maven-3.3.9 maven-3.3.9
|
(3)配置環境變量
| 1 2 3 4 5 6 7 8 9 | vi /etc/profile
添加以下內容:
export MAVEN_HOME=/usr/local/maven-3.3.9
export PATH=$MAVEN_HOME/bin:$PATH
保存退出
source /etc/profile
mvn -v
|
五、創建 SpringBoot 項目
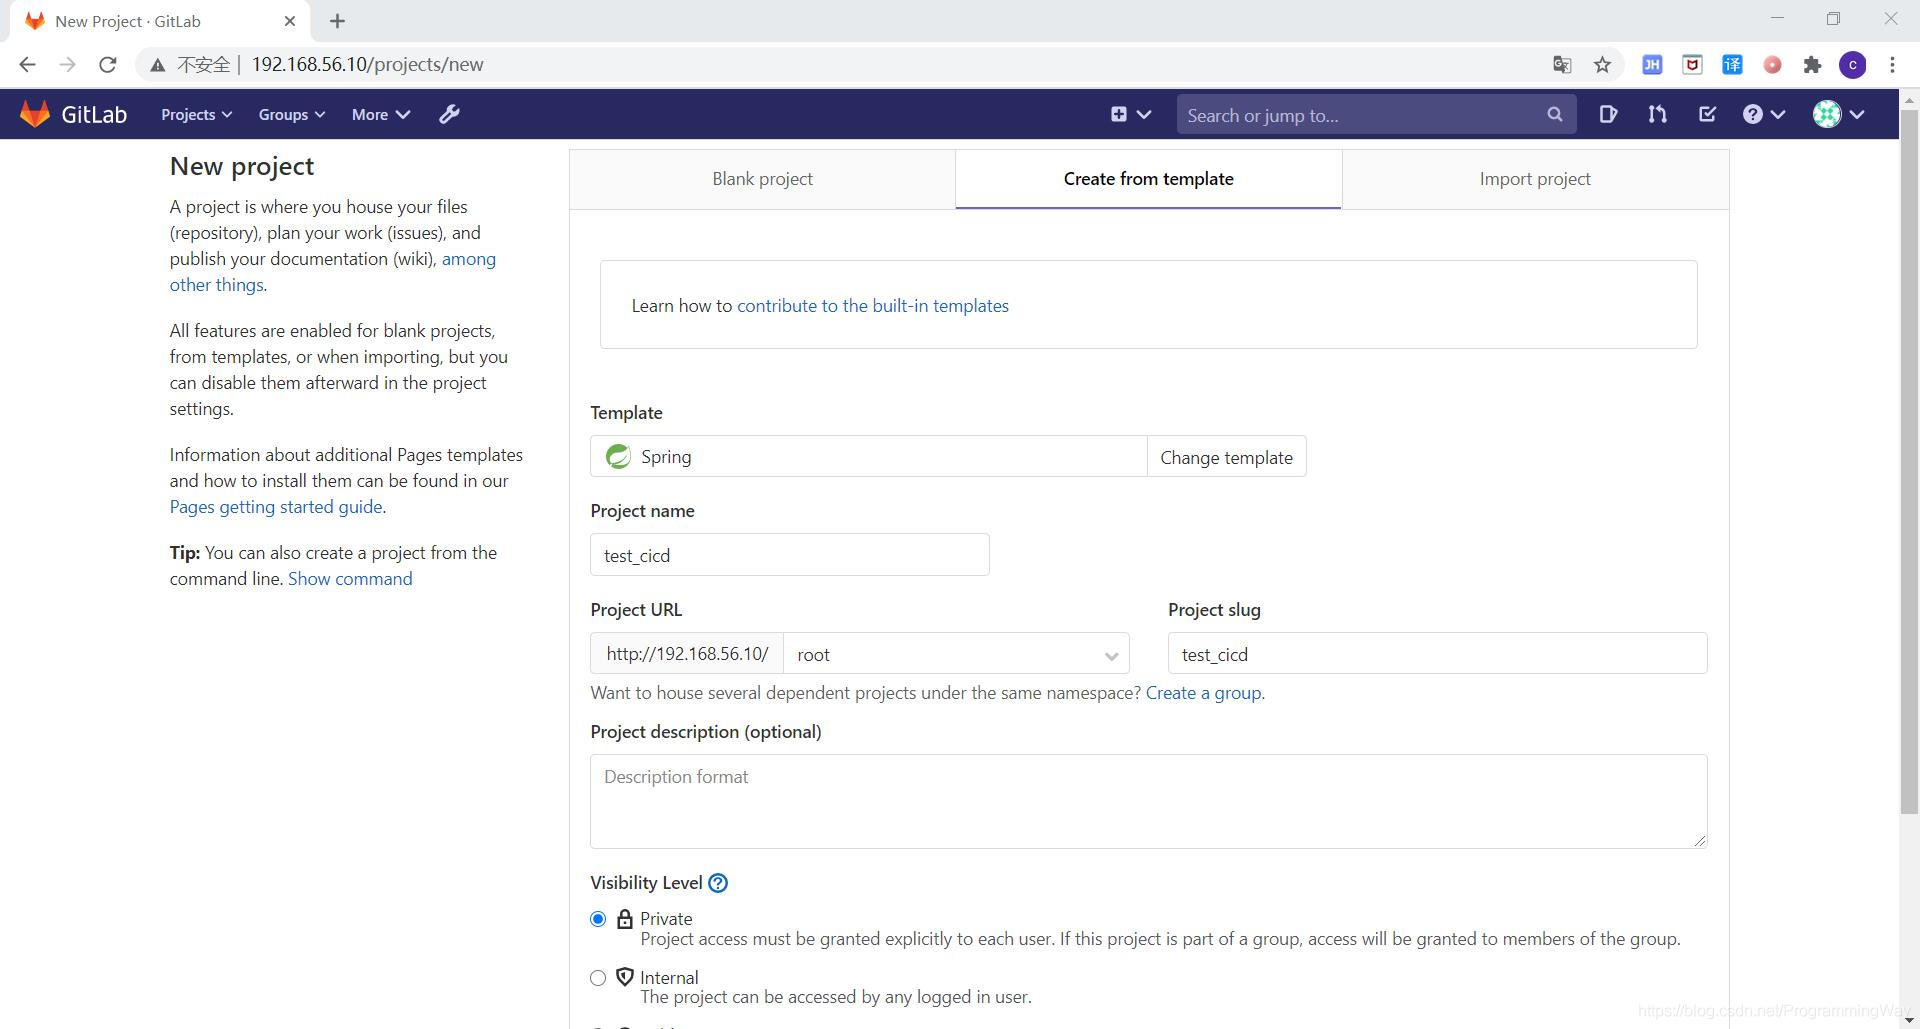
1、使用Gitlab Spring 模板快速創建一個 SpringBoot 項目;

如果報錯,刪除pom.xml中的這行
報這個錯的話:
[FATAL] Non-resolvable parent POM for com.example:demo:0.0.1-SNAPSHOT: Could not transfer artifact org.springframework.boot:spring-boot-starter-parent:pom:2.0.1.RELEASE from/to central (https://repo.maven.apache.org/maven2): Connect to repo.maven.apache.org:443 [repo.maven.apache.org/151.101.40.215] failed: Connection timed out (Connection timed out) and ‘parent.relativePath' points at wrong local POM @ line 14, column 10
修改版本
1.5.9.RELEASE
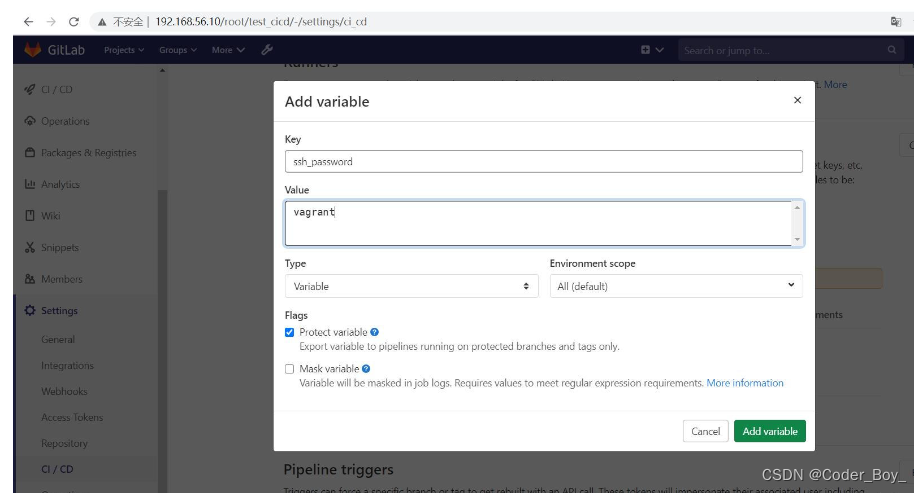
2、添加環境變量(登錄應用服務器密碼)
注: 其中 ssh_password 這個添加到環境變量中,取消勾選 Protect Branch (僅保護分支);修改和添加都是默認勾選,需要取消,否則,其他分支不能讀取到該變量;
?
先在應用服務器上創建一個目錄,用于上傳存放項目 jar 包:
添加 .gitlab-ci.yml 文件時,可以先再 CI/CD Pipeline 中 的 CI Lint 中檢驗 .gitlab-ci.yml 文件格式
| 1 2 3 4 5 6 7 8 9 10 11 12 13 14 15 16 17 18 19 20 21 22 23 24 25 26 27 28 29 30 31 32 33 34 35 36 37 38 39 40 41 | # 定義一些變量, 下面各階段會使用
variables:
??server_ip: 192.168.56.12
??jar_name: demo-0.0.1-SNAPSHOT.jar
??java_path: /usr/local/java1.8/bin
??upload_path: /usr/local/gitlab-project
# 定義執行的各個階段及順序
stages:
??- build
??- upload
??- deploy
# 使用 maven 鏡像打包項目
maven-build:
??stage: build
??image: maven:3.5.0-jdk-8
??script:
????- mvn package -B -Dmaven.test.skip=true
??cache:
????key: m2-repo
????paths:
??????- .m2/repository
??artifacts:
????paths:
??????- target/$jar_name
# 上傳生成的 jar 包到你的應用服務器,這里使用 ictu/sshpass 這個鏡像,是為了使用 sshpass 命令
upload-jar:
??stage: upload
??image: ictu/sshpass
??script:
????- ls -l target/
????- sshpass -p $ssh_password scp -o UserKnownHostsFile=/dev/null -o StrictHostKeyChecking=no target/$jar_name root@$server_ip:$upload_path/$jar_name
# 啟動 SpringBoot jar包
deploy-test:
??stage: deploy
??image: ictu/sshpass
??script:
????- sshpass -p $ssh_password ssh -o UserKnownHostsFile=/dev/null -o StrictHostKeyChecking=no root@$server_ip "nohup $java_path/java -jar $upload_path/$jar_name >/dev/null 2>&1 &"
|
這里使用了DockerHub上面的一個公共鏡像(ictu/sshpass),主要是想使用啟動自帶的sshpass命令執行scp和ssh命令。
如果一切順利的話,就會自動觸發 CI/CD ;失敗的話查看報錯信息,可使用 Debug 模式執行調試命令 。
| 1 2 3 4 5 | [root@localhost gitlab-project]# jps
22119 Jps
22073 demo-0.0.1-SNAPSHOT.jar
[root@localhost gitlab-project]# curl localhost:8080
Spring is here!
|

?
可能遇到的問題總結:
- 權限問題:可以先使用 root 用戶看看是不是權限問題導致,如果是的話,提升執行用戶的權限;并發問題:這里沒有修改 Runner 的并發數,可以修改同時可以進行的任務并發數;其他問題:讀取不到配置的環境變量,取消勾選僅保護分支的選項;
- 未執行job:沒有勾選未配置 tags 也執行選項;
六、總結
使用GitLab自帶的CICD功能部署SpringBoot項目非常方便,前期環境搭建可能需要花一點時間學習,但是后期部署項目可以省去很多人為操作失誤,對于小型團隊來說,Gitlab自帶的CICD功能比Jenkins更加簡單,總體思想步驟是:
搭建GitLab服務;搭建GitLab Runner服務;搭建應用服務;編寫gitlab-ci.yml;
對于SpringBoot項目來說,一般分為:
(1)maven 打包;
(2)上傳jar包;
(3)啟動jar包;


)
)


結果為什么是true)


?如何設置字體堆棧?)


