組件渲染的過程
template --> ast --> render --> vDom --> 真實的Dom --> 頁面
Runtime-Compiler和Runtime-Only的區別 - 簡書
編譯步驟
模板編譯是Vue中比較核心的一部分。關于 Vue 編譯原理這塊的整體邏輯主要分三個部分,也可以說是分三步,前后關系如下:
第一步:將模板字符串轉換成element ASTs( 解析器 parse)第二步:對 AST 進行靜態節點標記,主要用來做虛擬DOM的渲染優化(優化器 optimize)
第三步:使用element ASTs生成render函數代碼字符串(代碼生成器 generate)


?編譯后的AST結構
template 模板:
<div class="box"><p>{{name}}</p>
</div>
AST 抽象語法樹:
ast: {tag: "div" //  元素標簽名type: 1,  // 元素節點類型 1標簽 2包含字面量表達式的文本節點 3普通文本節點或注釋節點staticRoot: false, // 是否靜態根節點static: false,  // 是否靜態節點plain: true, parent: undefined,attrsList: [], // 標簽節點的屬性名和值的對象集合attrsMap: {}, // 和attrsList類似,不同在它是以鍵值對保存屬性名和值children: [{tag: "p"type: 1,staticRoot: false,static: false,plain: true,parent: {tag: "div", ...},attrsList: [],attrsMap: {},children: [{type: 2,text: "{{name}}",static: false,expression: "_s(name)"  // type為2時才有這個屬性,表示表達式的內容}]}]
}
generate,將AST轉換成可以直接執行的JavaScript字符串
with(this) {return _c('div', [_c('p', [_v(_s(name))]), _v(" "), _m(0)])
}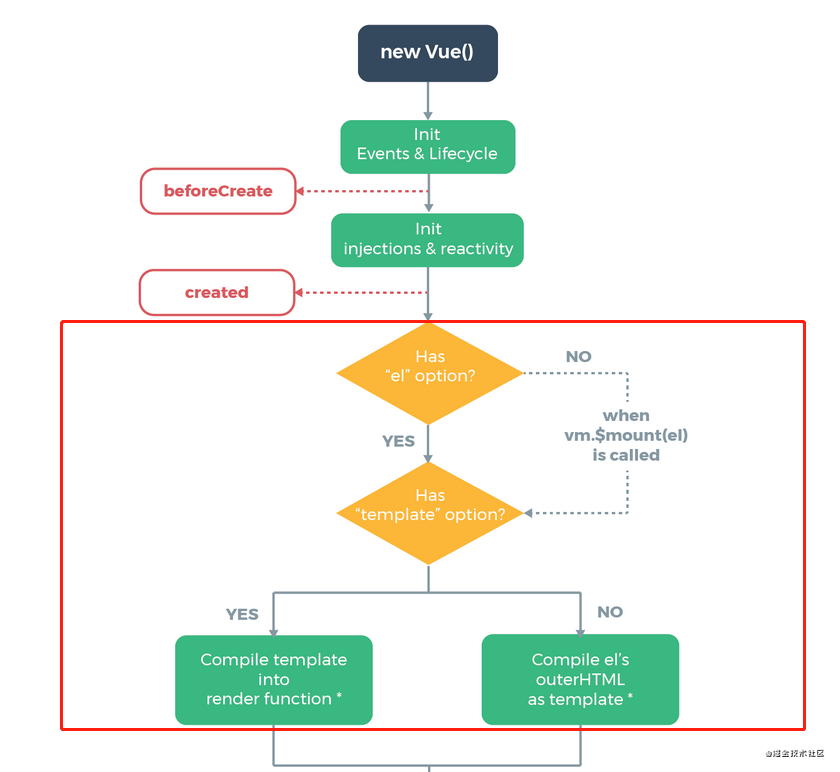
注意一:平常開發中 我們使用的是不帶編譯版本的 Vue 版本(runtime-only)直接在 options 傳入 template 選項 在開發環境報錯
注意二:這里傳入的 template 選項不要和.vue 文件里面的模板搞混淆了 vue 單文件組件的 template 是需要 vue-loader 進行處理的
我們傳入的 el 或者 template 選項最后都會被解析成 render 函數 這樣才能保持模板解析的一致性
以下代碼實現是在在entry-runtime-with-compiler.js里面,和runtime-only版本需要區分開
1、模板編譯入口
export function initMixin (Vue) {Vue.prototype._init = function (options) {const vm = this;vm.$options = options;initState(vm);// 如果有 el 屬性,進行模板渲染if (vm.$options.el) {vm.$mount(vm.$options.el)}}Vue.prototype.$mount = function (el) {const vm = this;const options = vm.$options;el = document.querySelector(el);// 不存在 render 屬性的幾種情況if (!options.render) {// 不存在 render 但存在 templatelet template = options.template;// 不存在 render 和 template 但是存在 el 屬性,直接將模板賦值到 el 所在的外層 html 結構 (就是 el 本身,并不是父元素)if (!template && el) {template = el.outerHTML;}// 最后把處理好的 template 模板轉化成 render 函數if (template) {const render = compileToFunctions(template);options.render = render;}}}
}- 先初始化狀態,initState(vm);
- 再在 initMixin 函數中,判斷是否有el,有則直接調用 vm.$mount(vm.$options.el) 進行模板渲染,沒有則手動調用;
- 在 Vue.prototype.$mount 方法中,判斷是否存在 render 屬性,存在則給 template 賦值,如果不存在 render 和 template 但存在 el 屬性,直接將模板賦值到 el 所在的外層 html 結構(就是el本身,并不是父元素);
- 通過?compileToFunctions 將處理好的?template 模板轉換成 render 函數。
咱們主要關心$mount 方法 最終將處理好的 template 模板轉成 render 函數
2、模板轉化核心方法 compileToFunctions
export function compileToFunctions (template) {// html → ast → render函數// 第一步 將 html 字符串轉換成 ast 語法樹let ast = parse(template);// 第二步 優化靜態節點if (mergeOptions.optimize !== false) {optimize(ast, options);}// 第三步 通過 ast 重新生成代碼let code = generate(ast);// 使用 with 語法改變作用域為 this, 之后調用 render 函數可以使用 call 改變 this,方便 code 里面的變量取值。let renderFn = new Function(`with(this){return ${code}}`);return renderFn;
}
html → ast → render函數
這里需要把 html 字符串變成 render 函數,分三步:
(1)parse函數 把 HTML 代碼轉成 AST 語法樹
? ? ? ? AST 是用來描述代碼本身形成的樹形結構,不僅可以描述 HTML,也可以描述 css 和 js 語法;很多庫都運用到了 AST,比如 webpack,babel,eslint 等
(2) optimize函數?優化靜態節點(主要用來做虛擬DOM的渲染優化)
? ? ? ? 先遍歷 AST,對 AST 進行靜態節點標記,(即節點永遠不會發生變化)并做出一些特殊的處理。例如:
- 移除靜態節點的 v-once 指令,因為它在這里沒有任何意義。
- 移除靜態節點的 key 屬性。因為靜態節點永遠不會改變,所以不需要 key 屬性。
- 將一些靜態節點合并成一個節點,以減少渲染的節點數量。例如相鄰的文本節點和元素節點可以被合并為一個元素節點。
(3)generate函數 通過 AST 重新生成代碼
最后生成的代碼需要和 render 函數一樣
類似這樣的結構:
_c('div',{id:"app"},_c('div',undefined,_v("hello"+_s(name)),_c('span',undefined,_v("world"))))- _c 代表?createElement 創建節點
- _v 代表 createTextVNode 創建文本節點
- _s 代表 toString 把對象解析成字符串
?
模板引擎的實現原理 ?with + new Function,使用 with 語法改變作用域為 this, 之后調用 render 函數可以使用 call 改變 this,方便 code 里面的變量取值。
parse函數,解析 html 并生成 ast
// src/compiler/parse.js// 以下為源碼的正則  對正則表達式不清楚的同學可以參考小編之前寫的文章(前端進階高薪必看 - 正則篇);
const ncname = `[a-zA-Z_][\\-\\.0-9_a-zA-Z]*`; //匹配標簽名 形如 abc-123
const qnameCapture = `((?:${ncname}\\:)?${ncname})`; //匹配特殊標簽 形如 abc:234 前面的abc:可有可無
const startTagOpen = new RegExp(`^<${qnameCapture}`); // 匹配標簽開始 形如 <abc-123 捕獲里面的標簽名
const startTagClose = /^\s*(\/?)>/; // 匹配標簽結束  >
const endTag = new RegExp(`^<\\/${qnameCapture}[^>]*>`); // 匹配標簽結尾 如 </abc-123> 捕獲里面的標簽名
const attribute = /^\s*([^\s"'<>\/=]+)(?:\s*(=)\s*(?:"([^"]*)"+|'([^']*)'+|([^\s"'=<>`]+)))?/; // 匹配屬性  形如 id="app"let root, currentParent; //代表根節點 和當前父節點
// 棧結構 來表示開始和結束標簽
let stack = [];
// 標識元素和文本type
const ELEMENT_TYPE = 1;
const TEXT_TYPE = 3;
// 生成ast方法
function createASTElement(tagName, attrs) {return {tag: tagName,type: ELEMENT_TYPE,children: [],attrs,parent: null,};
}// 對開始標簽進行處理
function handleStartTag({ tagName, attrs }) {let element = createASTElement(tagName, attrs);if (!root) {root = element;}currentParent = element;stack.push(element);
}// 對結束標簽進行處理
function handleEndTag(tagName) {// 棧結構 []// 比如 <div><span></span></div> 當遇到第一個結束標簽</span>時 會匹配到棧頂<span>元素對應的ast 并取出來let element = stack.pop();// 當前父元素就是棧頂的上一個元素 在這里就類似divcurrentParent = stack[stack.length - 1];// 建立parent和children關系if (currentParent) {element.parent = currentParent;currentParent.children.push(element);}
}// 對文本進行處理
function handleChars(text) {// 去掉空格text = text.replace(/\s/g, "");if (text) {currentParent.children.push({type: TEXT_TYPE,text,});}
}// 解析標簽生成ast核心
export function parse(html) {while (html) {// 查找<let textEnd = html.indexOf("<");// 如果<在第一個 那么證明接下來就是一個標簽 不管是開始還是結束標簽if (textEnd === 0) {// 如果開始標簽解析有結果const startTagMatch = parseStartTag();if (startTagMatch) {// 把解析好的標簽名和屬性解析生成asthandleStartTag(startTagMatch);continue;}// 匹配結束標簽</const endTagMatch = html.match(endTag);if (endTagMatch) {advance(endTagMatch[0].length);handleEndTag(endTagMatch[1]);continue;}}let text;// 形如 hello<div></div>if (textEnd >= 0) {// 獲取文本text = html.substring(0, textEnd);}if (text) {advance(text.length);handleChars(text);}}// 匹配開始標簽function parseStartTag() {const start = html.match(startTagOpen);if (start) {const match = {tagName: start[1],attrs: [],};//匹配到了開始標簽 就截取掉advance(start[0].length);// 開始匹配屬性// end代表結束符號>  如果不是匹配到了結束標簽// attr 表示匹配的屬性let end, attr;while (!(end = html.match(startTagClose)) &&(attr = html.match(attribute))) {advance(attr[0].length);attr = {name: attr[1],value: attr[3] || attr[4] || attr[5], //這里是因為正則捕獲支持雙引號 單引號 和無引號的屬性值};match.attrs.push(attr);}if (end) {//   代表一個標簽匹配到結束的>了 代表開始標簽解析完畢advance(1);return match;}}}//截取html字符串 每次匹配到了就往前繼續匹配function advance(n) {html = html.substring(n);}//   返回生成的astreturn root;
}
generate函數,把 ast 轉化成 render 函數結構
// src/compiler/codegen.jsconst defaultTagRE = /\{\{((?:.|\r?\n)+?)\}\}/g; //匹配花括號 {{  }} 捕獲花括號里面的內容function gen(node) {// 判斷節點類型// 主要包含處理文本核心// 源碼這塊包含了復雜的處理  比如 v-once v-for v-if 自定義指令 slot等等  咱們這里只考慮普通文本和變量表達式{{}}的處理// 如果是元素類型if (node.type == 1) {//   遞歸創建return generate(node);} else {//   如果是文本節點let text = node.text;// 不存在花括號變量表達式if (!defaultTagRE.test(text)) {return `_v(${JSON.stringify(text)})`;}// 正則是全局模式 每次需要重置正則的lastIndex屬性  不然會引發匹配buglet lastIndex = (defaultTagRE.lastIndex = 0);let tokens = [];let match, index;while ((match = defaultTagRE.exec(text))) {// index代表匹配到的位置index = match.index;if (index > lastIndex) {//   匹配到的{{位置  在tokens里面放入普通文本tokens.push(JSON.stringify(text.slice(lastIndex, index)));}//   放入捕獲到的變量內容tokens.push(`_s(${match[1].trim()})`);//   匹配指針后移lastIndex = index + match[0].length;}// 如果匹配完了花括號  text里面還有剩余的普通文本 那么繼續pushif (lastIndex < text.length) {tokens.push(JSON.stringify(text.slice(lastIndex)));}// _v表示創建文本return `_v(${tokens.join("+")})`;}
}// 處理attrs屬性
function genProps(attrs) {let str = "";for (let i = 0; i < attrs.length; i++) {let attr = attrs[i];// 對attrs屬性里面的style做特殊處理if (attr.name === "style") {let obj = {};attr.value.split(";").forEach((item) => {let [key, value] = item.split(":");obj[key] = value;});attr.value = obj;}str += `${attr.name}:${JSON.stringify(attr.value)},`;}return `{${str.slice(0, -1)}}`;
}// 生成子節點 調用gen函數進行遞歸創建
function getChildren(el) {const children = el.children;if (children) {return `${children.map((c) => gen(c)).join(",")}`;}
}
// 遞歸創建生成code
export function generate(el) {let children = getChildren(el);let code = `_c('${el.tag}',${el.attrs.length ? `${genProps(el.attrs)}` : "undefined"}${children ? `,${children}` : ""})`;return code;
}
code 字符串生成 render 函數
export function compileToFunctions (template) {let ast = parseHTML(template);let code = genCode(ast);// 將模板變成 render 函數,通過 with + new Function 的方式讓字符串變成 JS 語法來執行const render = new Function(`with(this){return ${code}}`);return render;
}
?https://juejin.cn/spost/7267858684667035704
Vue 模板 AST 詳解 - 文章教程 - 文江博客
滑動驗證頁面
手寫Vue2.0源碼(二)-模板編譯原理|技術點評_慕課手記
前端鯊魚哥 的個人主頁 - 文章 - 掘金
前端進階高薪必看-正則篇 - 掘金
從vue模板解析學習正則表達式


)


)

