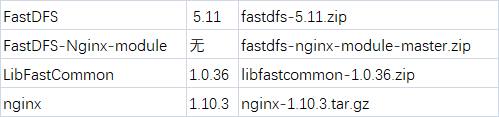
安裝清單如下:
一、安裝FastDFS
1. 安裝libfastcommon
先解壓安裝包到目錄
# unzip libfastcommon-1.0.36.zip
安裝編譯工具及環境(后面Nginx也會用到這些依賴環境)
# yum -y install gcc gcc+ gcc-c++ openssl openssl-devel pcre pcre-deve
# yum -y install pcre-devel openssl openssl-devel
# yum -y install zlib zlib-deve
編譯libfastcommon軟件并安裝
# ./make.sh && ./make.sh install
為libcommon 創建軟鏈接到/usr/local/lib目錄下
# ln -s /usr/lib64/libfastcommon.so /usr/local/lib/libfastcommon.so
# ln -s /usr/lib64/libfastcommon.so /usr/lib/libfastcommon.so
# ln -s /usr/lib64/libfdfsclient.so /usr/local/lib/libfdfsclient.so
# ln -s /usr/lib64/libfdfsclient.so /usr/lib/libfdfsclient.so
2. 安裝FastDFS
解壓安裝包
# tar -xvf FastDFS_v5.01.tar.gz
編譯并安裝
# cd FastDFS
# ./make.sh && ./make.sh install
安裝成功后,FastDFS會安裝在/etc/fdfs目錄下:
[root@localhost FastDFS]# ll /etc/fdfs/
total 56
-rw-r--r--. 1 root root  1461 Aug 13 06:39 client.conf
-rw-r--r--. 1 root root   858 Aug 13 06:39 http.conf
-rw-r--r--. 1 root root 31172 Aug 13 06:39 mime.types
-rw-r--r--. 1 root root  7535 Aug 13 06:39 storage.conf
-rw-r--r--. 1 root root  6990 Aug 13 06:39 tracker.conf
FastDFS安裝結束
二、安裝Tracker
1. 創建tracker工作目錄
此目錄用于保存tracker 的data和log
# mkdir -p /data/fastdfs_tracker
2.配置tracker
配置 /etc/fdfs目錄下tracker.conf
主要實現以下4個配置內容:
disabled=false
port=22122 #默認端口號
base_path=/data/fastdfs_tracker #我剛剛創建的目錄
http.server_port=8080 #默認端口是8080
bind_addr=0.0.0.0 #監聽地址
完整tracker.conf 文件信息如下:
disabled=false
bind_addr=0.0.0.0
port=22122
connect_timeout=30
network_timeout=60
base_path=/opt/fastdfs_tracker
max_connections=512
accept_threads=1
work_threads=4
min_buff_size=8KB
max_buff_size=128KB
store_lookup=2
store_group=group2
store_server=0
store_path=0
download_server=0
reserved_storage_space=10%
log_level=info
run_by_group=
run_by_user=
allow_hosts=*
sync_log_buff_interval=10
check_active_interval=120
thread_stack_size=64KB
storage_ip_changed_auto_adjust=true
storage_sync_file_max_delay=86400
storage_sync_file_max_time=300
use_trunk_file=false
slot_min_size=256
slot_max_size=16MB
trunk_file_size=64MB
trunk_create_file_advance=false
trunk_create_file_time_base=02:00
trunk_create_file_interval=86400
trunk_create_file_space_threshold=20G
trunk_init_check_occupying=false
trunk_init_reload_from_binlog=false
trunk_compress_binlog_min_interval=0
use_storage_id=false
storage_ids_filename=storage_ids.conf
id_type_in_filename=ip
store_slave_file_use_link=false
rotate_error_log=false
error_log_rotate_time=00:00
rotate_error_log_size=0
log_file_keep_days=0
use_connection_pool=false
connection_pool_max_idle_time=3600
http.server_port=8080
http.check_alive_interval=30
http.check_alive_type=tcp
http.check_alive_uri=/status.html
3. 將Tracker加入開機啟動項
# cp /usr/fastdfs/FastDFS/init.d/fdfs_trackerd /etc/init.d/
# chkconfig --add fdfs_trackerd
# chkconfig fdfs_trackerd on
啟動Tracker Server
# service fdfs_trackerd start
4. 查看一下tracker的端口監聽情況
# netstat -unltp|grep fdfs
三、安裝Storage
1. 配置storage工作目錄
由于storage還需要一個目錄用來存儲數據,因此多建了兩個目錄fastdfs_storage_data,fastdfs_storage
# mkdir -p /data/fastdfs_storage
# mkdir -p /data/fastdfs_storage_data
2. 配置storage文件
修改 /etc/fdfs 目錄下 storage.conf 文件
修改要點如下:
disabled=false
group_name=group1 #組名,根據實際情況修改
port=23000 #設置storage的端口號,同一個組的storage端口號必須一致
base_path=/data/fastdfs_storage #設置storage數據文件和日志目錄
store_path_count=1 #存儲路徑個數,需要和store_path個數匹配
store_path0=/data/fastdfs_storage_data #實際文件存儲路徑
tracker_server=192.168.78.132:22122 #我CentOS7的ip地址
file_distribute_path_mode=1 # 存儲方式 0:輪詢 1:Hash
http.server_port=8888 #設置 http 端口號
完整信息如下:
disabled=false
group_name=group1
bind_addr=0.0.0.0
client_bind=true
port=23000
connect_timeout=30
network_timeout=60
heart_beat_interval=30
stat_report_interval=60
base_path=/opt/fastdfs_storage
max_connections=256
buff_size=256KB
accept_threads=1
work_threads=4
disk_rw_separated=true
disk_reader_threads=1
disk_writer_threads=1
sync_wait_msec=50
sync_interval=0
sync_start_time=00:00
sync_end_time=23:59
write_mark_file_freq=500
store_path_count=1
store_path0=/opt/fastdfs_storage_data
subdir_count_per_path=256
tracker_server=192.168.78.132:22122
log_level=info
run_by_group=
run_by_user=
allow_hosts=*
file_distribute_path_mode=0
file_distribute_rotate_count=100
fsync_after_written_bytes=0
sync_log_buff_interval=10
sync_binlog_buff_interval=10
sync_stat_file_interval=300
thread_stack_size=512KB
upload_priority=10
if_alias_prefix=
check_file_duplicate=0
file_signature_method=hash
key_namespace=FastDFS
keep_alive=0
use_access_log=false
rotate_access_log=false
access_log_rotate_time=00:00
rotate_error_log=false
error_log_rotate_time=00:00
rotate_access_log_size=0
rotate_error_log_size=0
log_file_keep_days=0
file_sync_skip_invalid_record=false
use_connection_pool=false
connection_pool_max_idle_time=3600
http.domain_name=
http.server_port=8888
3. 將Storage加入開機啟動項
# cp /usr/fastdfs/FastDFS/init.d/fdfs_storaged /etc/init.d/
# chkconfig --add fdfs_storaged
# chkconfig fdfs_storaged on
啟動Storage Server(默認產生255*255個目錄)
# service fdfs_storaged start
4. 查看一下Storage的端口監聽情況
# netstat -unltp | grep fdfs
5. 校驗整合
到這里,fastdfs的東西都已安裝完成,最后我們還要確定一下,storage是否注冊到了tracker中去。
查看命令:
# /usr/local/bin/fdfs_monitor /etc/fdfs/storage.conf
成功后可以看到:
ip_addr =?192.168.78.132 ACTIVE
四、測試
1. 配置客戶端
修改 /etc/fdfs/目錄下的client.conf 文件
修改要點為:
base_path=/data/fastdfs_tracker #tracker服務器文件路徑
tracker_server=192.168.78.132:22122 #tracker服務器IP地址和端口號
http.tracker_server_port=8080 # tracker 服務器的 http端口號,必須和tracker的設置對應起來
完整client.conf 文件信息如下:
connect_timeout=30
network_timeout=60
base_path=/data/fastdfs_tracker
tracker_server=192.168.78.132:22122
log_level=info
use_connection_pool = false
connection_pool_max_idle_time = 3600
load_fdfs_parameters_from_tracker=false
use_storage_id = false
storage_ids_filename = storage_ids.conf
http.tracker_server_port=8080
2. 模擬上傳
從個人用戶目錄上傳一個圖片,進行測試
# /usr/local/bin/fdfs_upload_file /etc/fdfs/client.conf /df.png
group1/M00/73/38/wKhOhFt0uRqAIWxDAAAQKuWUya0709.png
組名:group1
磁盤:M00
目錄:73/38
文件名稱:wKhOhFt0uRqAIWxDAAAQKuWUya0709.jpg
定位上傳的文件位置如下:
[root@localhost FastDFS]# ll /data/fastdfs_storage_data/data/73/38
total 8
-rw-r--r--. 1 root root 4138 Aug 15 16:36 wKhOhFt0uRqAIWxDAAAQKuWUya0709.png
實際文件存儲路徑下有創建好的多級目錄。data下有256個1級目錄,每級目錄下又有256個2級子目錄,總共65536個文件,新寫的文件會以hash的方式被路由到其中某個子目錄下,然后將文件數據直接作為一個本地文件存儲到該目錄中。
如果要訪問剛上傳的圖片,我們得需要結合nginx來實現
五、安裝Nginx并實現配置
1. 安裝Nginx依賴環境
第一步已經安裝完成。
2. 安裝nginx并添加fastdfs-nginx-module
解壓nginx和fastdfs-nginx-module
# tar -xvf nginx-1.14.0.tar.gz
# tar -xvf fastdfs-nginx-module_v1.16.tar.gz
解壓后進入nginx目錄編譯安裝nginx,并添加fastdfs-nginx-module
# ./configure --prefix=/usr/local/nginx --add-module=/usr/fastdfs/fastdfs-nginx-module/src #解壓后fastdfs-nginx-module所在的位置
之后進行編譯和安裝
# make && make isntall
安裝成功后,nginx會安裝在/usr/local/nginx,安裝后查看
[root@localhost nginx-1.14.0]# ll /usr/local/nginx/
total 16
drwxr-xr-x. 2 root root 4096 Aug 15 16:57 conf
drwxr-xr-x. 2 root root 4096 Aug 15 16:57 html
drwxr-xr-x. 2 root root 4096 Aug 15 16:57 logs
drwxr-xr-x. 2 root root 4096 Aug 15 16:57 sbin
3. 配置Storage Nginx
修改Nginx 目錄下 conf 的配置文件nginx.conf,新增location信息,具體如下:
server {listen       9991;server_name  localhost;location / {root   html;index  index.html index.htm;}location ~/group1/M00 {root /data/fastdfs_storage_data;ngx_fastdfs_module;}error_page   500 502 503 504  /50x.html;location = /50x.html {root   html;}
}
需要把fastdfs-nginx-module安裝目錄中src目錄下的mod_fastdfs.conf也拷貝到/etc/fdfs目錄下:
# cp /usr/fastdfs/fastdfs-nginx-module/src/mod_fastdfs.conf /etc/fdfs/
對剛剛拷貝的mod_fastdfs.conf文件進行修改:
base_path=/data/fastdfs_storage #保存日志目錄
tracker_server=192.168.78.132:22122 #tracker服務器的IP地址以及端口號
storage_server_port=23000 #storage服務器的端口號
url_have_group_name = true #文件 url 中是否有 group 名
store_path0=/data/fastdfs_storage_data #存儲路徑
group_count = 1 #設置組的個數
在文件的最后,設置group
[group1]
group_name=group1
storage_server_port=23000
store_path_count=1
store_path0=/data/fastdfs_storage_data
創建M00至storage存儲目錄的符號連接:
ln -s /data/fastdfs_storage_data/data/ /data/fastdfs_storage_data/data/M00
啟動Nginx:
# /usr/local/nginx/sbin/nginx
訪問Nginx是否啟動
[root@localhost fdfs]# curl localhost:9991
<!DOCTYPE html>
<html>
<head>
<title>Welcome to nginx!</title>
<style>body {width: 35em;margin: 0 auto;font-family: Tahoma, Verdana, Arial, sans-serif;}
</style>
</head>
<body>
<h1>Welcome to nginx!</h1>
<p>If you see this page, the nginx web server is successfully installed and
working. Further configuration is required.</p><p>For online documentation and support please refer to
<a href="http://nginx.org/">nginx.org</a>.<br/>
Commercial support is available at
<a href="http://nginx.com/">nginx.com</a>.</p><p><em>Thank you for using nginx.</em></p>
</body>
</html>
4. 配置Tracker Nginx
在nginx.conf 文件添加一個虛擬機
upstream fdfs_group1{server 127.0.0.1:9991;
}
server {listen 80;server_name localhost;location /group1/M00 {proxy_pass http://fdfs_group1;
    }error_page 500 502 503 504 /50x.htmllocation = /50x.html {root html;}
}
完整nginx.conf配置文件如下:
worker_processes  1;events {worker_connections  1024;
}http {include       mime.types;default_type  application/octet-stream;#log_format  main  '$remote_addr - $remote_user [$time_local] "$request" '#                  '$status $body_bytes_sent "$http_referer" '#                  '"$http_user_agent" "$http_x_forwarded_for"';#access_log  logs/access.log  main;sendfile        on;#tcp_nopush     on;keepalive_timeout  65;#gzip  on;server {listen       9991;server_name  localhost;location / {root   html;index  index.html index.htm;}location ~/group1/M00 {root /data/fastdfs_storage_data;ngx_fastdfs_module;}error_page   500 502 503 504  /50x.html;location = /50x.html {root   html;}}upstream fdfs_group1{server 127.0.0.1:9991;}server {listen 80;server_name localhost;location /group1/M00 {proxy_pass http://fdfs_group1;
        }error_page 500 502 503 504 /50x.html;location = /50x.html {root html;}}
}
將Nginx重新啟動
# /usr/local/nginx/sbin/nginx -s reload
訪問Nginx是否已經啟動
[root@localhost conf]# curl localhost:9991
<!DOCTYPE html>
<html>
<head>
<title>Welcome to nginx!</title>
<style>body {width: 35em;margin: 0 auto;font-family: Tahoma, Verdana, Arial, sans-serif;}
</style>
</head>
<body>
<h1>Welcome to nginx!</h1>
<p>If you see this page, the nginx web server is successfully installed and
working. Further configuration is required.</p><p>For online documentation and support please refer to
<a href="http://nginx.org/">nginx.org</a>.<br/>
Commercial support is available at
<a href="http://nginx.com/">nginx.com</a>.</p><p><em>Thank you for using nginx.</em></p>
</body>
</html>
5. HTTP訪問圖片資源
http://192.168.78.132/group1/M00/AD/73/wKhOhFt0xNmAN7XbAAAQKuWUya0565.png
再次爆出BUG!)


~帶音頻)
--創建第一個Flask程序)


)

