16 Aug: My second article: From Scripts To Prediction API
8月16日:我的第二篇文章: 從腳本到預測API
As advanced beginners, we know quite a lot: EDA, ML concepts, model architectures etc…… We can write a big Jupyter Notebook, click “Restart & Run All” and generate state-of-art results. OK, what next? How can others use/reproduce/scale your results?
作為高級初學者,我們了解很多:EDA,ML概念,模型體系結構等……我們可以編寫一個大型的Jupyter Notebook,單擊“重新啟動并全部運行”并生成最新的結果。 好,接下來呢? 其他人如何使用/復制/縮放結果?
In this article, I will show you how I convert a Jupyter Notebook from Kaggle on the Wine dataset to scripts, share some engineering practices that we can adapt easily and bring benefits right away.
在本文中,我將向您展示如何將Jupyter Notebook從Wine數據集上的Kaggle轉換為腳本,分享一些我們可以輕松適應并立即帶來收益的工程實踐。
For each of them, there is much more to dig in but we will only surface with the basics, show the benefits, and explain the thought process! The goal is to minimize the probability that the engineers roll their eyes when they talk to you.
對于他們每個人,還有很多需要挖掘的東西,但是我們只會浮現基礎知識,展示收益并解釋思想過程! 目的是最大程度地降低工程師與您交談時翻白眼的可能性。
Jupyter筆記本 (Jupyter Notebook)
Jupyter Notebook is nice for exploration and prototype but we cannot stay there forever. No engineers [Or no one] wants to read your code and rewrite it. Even you are fortunate enough to have engineering resources, it just slows the whole process down🙁
Jupyter Notebook非常適合用于探索和原型制作,但我們不能永遠呆在那里。 沒有工程師(或者沒有人)想要閱讀您的代碼并重寫它。 即使您幸運地擁有工程資源,也只會減慢整個過程的速度🙁
Somehow we need to adapt engineering practices, make it reproducible, automatable, and deployable! The first step is to convert the notebook to scripts and it is the main theme of this article!
我們需要以某種方式適應工程實踐,使其可重現,自動化和可部署! 第一步是將筆記本轉換為腳本,這是本文的主題!
>>>GitHub repo<<<
>>> GitHub存儲庫<<<
All credits of this great notebook in repo go to the original creator!
回購中這款出色筆記本的全部功勞歸原始創建者所有!
腳本:ipynb-> .py (Scripts: ipynb -> .py)
Why script? Why can’t we just use the interactive notebook when it is working fine? Let me propose some scenarios to justify why it may be a good idea to use scripts beyond exploration!
為什么要腳本? 為什么不能在交互式筆記本正常工作時使用它? 讓我提出一些方案來證明為什么使用腳本而不是探索可能是一個好主意!
- If you want to run 20 big models in parallel, will you open 20 notebooks? 如果要并行運行20個大型型號,是否可以打開20個筆記本?
- Suppose you are willing to open 20 notebooks, how will you configure the hyperparameters? Go to each notebook and find related cells? 假設您愿意打開20個筆記本,那么如何配置超參數? 轉到每個筆記本并找到相關的單元格?
- Suppose you manually configure 20 notebooks, how will you analyze the results? Go to each notebook? 假設您手動配置20個筆記本,將如何分析結果? 轉到每個筆記本?
- Suppose you can handle 20 notebooks for the first 3 steps, what if you have a great idea but you need to experiment with 200 sets of hyperparameters, are you willing to repeat steps 1–3? 假設您可以在前三個步驟中處理20個筆記本,如果您有個好主意,但需要試驗200套超參數,您是否愿意重復步驟1-3?
- Suppose you find a bug in the original notebook and need to rerun everything, are you willing to repeat steps 1–3? 假設您在原始筆記本中發現了一個bug,并且需要重新運行所有內容,是否愿意重復步驟1-3?
If you answer YES to all, then this article is NOT for you, bye and have a good day 😊
如果您對所有人的回答都是“是”,那么本文不適合您,再見,祝您愉快
The way I structure the pipeline is to break it down into etl.py, train.py, and predict.py. Each script has its responsibility and tries to be as atomic as possible such that they can be developed by individual teammates as long as the responsibility is clear.
我結構管道的方法是把它分解成etl.py,train.py和predict.py。 每個腳本都有其責任,并且要盡可能地原子化,以便只要責任明確,就可以由單個隊友開發。
etl.py: convert the raw data, do some transformation, create train.csv and test.csv under data folder [train_test_split]
etl.py :轉換原始數據,進行一些轉換,在數據文件夾[train_test_split]下創建train.csv和test.csv
train.py: use data in train.csv, export a model to model folder [model.fit(X, y)]
train.py :使用train.csv中的數據,將模型導出到模型文件夾[model.fit(X,y)]
predict.py: use data in test.csv and trained model, export the predictions, and evaluate [model.predict(X, y)]
predict.py:在test.csv使用數據和訓練模型,導出的預測,并評估[model.predict(X,Y)]
# File structure
.
├── README.md
├── __init__.py
├── autoformat.sh
├── data
│   ├── predict.csv
│   ├── test.csv
│   ├── train.csv
│   └── winequality.csv
├── log
│   ├── etl.log
│   ├── predict.log
│   └── train.log
├── model
│   └── model.pkl
├── notebook
│   └── prediction-of-quality-of-wine.ipynb
├── requirement.txt
└── scripts
    ├── config.yml
    ├── etl.py
    ├── predict.py
    ├── test_train.py
    ├── test_utility.py
    ├── train.py
    └── utility.py
If I mess up something, I will not try to figure out why [imagine state mutation in Jupyter because you random run the cells], I will just run the script again and see.
如果我搞砸了,我將不會嘗試找出原因(在Jupyter中想象狀態突變,因為您隨機運行單元格),我將再次運行腳本并查看。
# Run in command line, as simple as this :)$ python3 ./scripts/etl.py
$ python3 ./scripts/train.py
$ python3 ./scripts/predict.py
Great, we can load and run the scripts in the command line! But as we mentioned in the scenarios above [№2], how can we configure the hyperparameters then ?_?
太好了,我們可以在命令行中加載和運行腳本! 但是,正如我們在上述[№2]的場景中提到的那樣,那么如何配置超參數?
配置文件作為輸入:單擊 (Config file as input: click)
The principle is to try not to touch the code, I have created another config.yml to contain all the configurations and load them via click. In this way, every new model is just another configuration, this ensures the reproductivity and avoids manually changing the code [and introduce bugs 🙁 ].
原理是盡量不要碰代碼,我創建了另一個config.yml來包含所有配置,并通過click加載它們。 這樣,每個新模型都只是另一種配置,這確保了可重復性,并且避免了手動更改代碼[并引入錯誤🙁]。
# config.yml example, I only use this to configure the scripts
etl:
  raw_data_file: "data/winequality.csv"
  processed_path: "data"
  test_size: 0.2
  random_state: 42train:
  processed_train: "data/train.csv"
  ensemble_model: "RandomForestClassifier"
  model_config: {n_estimators: 300}
  model_path: "model/model.pkl"predict:
  model_path: "model/model.pkl"
  processed_test: "data/test.csv"
  predicted_file: "data/predict.csv"
  export_result: True
Inside the script, I created a utility function to parse the configuration file
在腳本內部,我創建了一個實用程序函數來解析配置文件
def parse_config(config_file):
    with open(config_file, "rb") as f:
        config = yaml.safe_load(f)
    return config
Then we can load the configurations to the scripts in an extensible way!
然后,我們可以以可擴展的方式將配置加載到腳本中!
@click.command()@click.argument("config_file", type=str, default="scripts/config.yml")
def etl(config_file):
    config = parse_config(config_file)
    raw_data_file = config["etl"]["raw_data_file"]
    processed_path = Path(config["etl"]["processed_path"]).......DO SOMETHING.......
If we have 20 models with a similar architecture, we can just prepare 20 configurations, that’s it
如果我們有20個具有相似架構的模型,那么我們只需準備20個配置即可
無打印:正在記錄 (No print: logging)
We can now combine the script and configuration in the command line environment! How can I get the outputs? In the Jupyter world, I will print and see but it means I need to scan through a long long notebook, what if I have many models? Is there any concrete way to collect the outputs in a file?
現在,我們可以在命令行環境中結合腳本和配置! 如何獲得輸出? 在Jupyter的世界中,我將進行打印和查看,但這意味著我需要瀏覽一個很長的筆記本,如果我有很多型號怎么辦? 有什么具體方法可以將輸出收集到文件中?
Let print go, learn logging! Logging module in Python does what its name suggests, do logging in Python. We can define and log the things we are interested in, for example, which stage of the script [for debug], a summary of the metrics [for evaluation], I extracted a piece from model prediction and evaluation as an example
放手打印,學習日志記錄 ! Python中的日志記錄模塊按照其名稱的含義執行操作,在Python中進行日志記錄。 我們可以定義并記錄我們感興趣的事物,例如,腳本的哪個階段[用于調試],度量的摘要[用于評估],我從模型預測和評估中提取了一部分作為示例
This piece of code will generate the log similar to the one below
這段代碼將生成類似于以下內容的日志
Learn more about logging from this article! https://www.machinelearningplus.com/python/python-logging-guide/
從本文中了解有關日志記錄的更多信息! https://www.machinelearningplus.com/python/python-logging-guide/
Aside:
在旁邊:
Logging is great but still if we have 100 experiments, we will get 100 log files 🙁 Even they are concrete, we may not want to read them one by one, is there any better way to evaluate? Below are some potential solutions:
日志記錄很好,但是如果我們有100個實驗,我們將獲得100個日志文件🙁即使它們是具體的,我們也可能不想一一閱讀,有沒有更好的評估方法? 以下是一些可能的解決方案:
- Yet another script, utilize grep or regex, parse and extract the key information [but what if someone changes the format or spelling!?] 還有一個腳本,利用grep或regex,解析并提取關鍵信息[但是如果有人更改格式或拼寫該怎么辦!?]
Yet another tool, checkout MLFlow or ModelDB! [Logging is only one of the features of both products]
另一個工具,簽出MLFlow或ModelDB ! [記錄只是這兩種產品的功能之一]
再現性問題:Conda env (Reproducibility matters: Conda env)
Yo, things seem good now! I can push to GitHub and my friends/colleagues can clone and run in their computer 😊
喲,現在看來情況不錯! 我可以推送到GitHub,而我的朋友/同事可以克隆并在他們的計算機中運行😊
Oh wait……..their computer……..what if we are using different versions? It is common because every package has many versions, eg: sklearn. The APIs / interfaces may change over time [and breaks the code 🙁 ], how can we ensure we are using the same package?
哦等等.....他們的電腦.....如果我們使用的是其他版本? 這很常見,因為每個軟件包都有許多版本,例如: sklearn 。 API /接口可能會隨時間變化[并破壞代碼🙁],我們如何確保使用相同的程序包?
Short answer: Conda env, check out Matt’s article
簡短答案:Conda env,請查看Matt的文章
I list out some useful commands below, just enough for our needs
我在下面列出了一些有用的命令,足以滿足我們的需求
# In terminal# Create the environment
$ conda create — name YOU_CHANGE_THIS python=3.7 -y# Activate it
$ conda activate YOU_CHANGE_THIS# Install the needed package
$ pip install –r requirements.txt# # ## # ## # ## # ## # ## # ##
# # # Do your development # # #
# # ## # ## # ## # ## # ## # ### Deactivate and back to normal environment
$ conda deactivate# This will remove the environment, do it when you finish the project?
$ conda remove –name YOU_CHANGE_THIS –all
*in requirements.txt, you should always specify the version! If you don’t specify it, it will try to download the latest one, but your latest maybe not my latest and lose the whole point of using Conda env
*在requirements.txt中,您應始終指定版本! 如果您不指定它,它將嘗試下載最新版本,但是您的最新版本可能不是我的最新版本,從而失去了使用Conda env的全部意義。
# this is what I have inside requirements.txt
pytest==5.3.5
pandas==1.0.1
Click==7.0
scikit-learn==0.22.1
black==19.10b0
isort==4.3.21
PyYAML==5.2
不要破壞您以前的代碼:pytest (Don’t break your previous code: pytest)
In the software / ML world, change is the constant, we change something whenever we work. But how can we ensure the new change doesn’t break the existing one [especially those you wrote a few months before]?
在軟件/ ML世界中,變化是不變的,只要我們工作,我們都會進行更改。 但是我們如何確保新的變更不會破壞現有的變更(尤其是您幾個月前寫的變更)?
Unit tests are here to help 😊 We can write the test cases for each function to ensure they have the expected behavior. Unit tests cannot prove program correctness but they can safeguard the scenarios you listed!
單元測試可為您提供幫助😊我們可以為每個功能編寫測試用例,以確保它們具有預期的行為。 單元測試不能證明程序的正確性,但是可以保護您列出的方案!
For example, the code below asserts the type and output dimension are as expected. It seems silly and simple but if your load_data function becomes more complex, you will appreciate something safeguard you all the way [especially if you want to change something, don’t ask me how I know]!
例如,下面的代碼斷言類型和輸出維符合預期。 看起來很愚蠢和簡單,但是如果您的load_data函數變得更加復雜,您將一路欣賞一些可以保護您的方法[特別是如果您想更改某些內容,請不要問我怎么知道]!
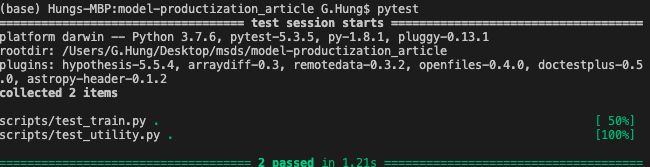
To run the unit test, simply run pytest in the terminal and you should see the output like this
要運行單元測試,只需在終端中運行pytest ,您應該會看到這樣的輸出
Cool, we can run pytest before we push to GitHub and try to maintain a workable program! But human isn’t reliable, what if we forget to run pytest before push and break the code!? How can we protect ourselves from this situation?
太酷了,我們可以在推送到GitHub并嘗試維護可行的程序之前運行pytest! 但是人類是不可靠的,如果我們忘記在推送和破壞代碼之前運行pytest呢? 在這種情況下,我們如何保護自己?
如果可能,不要依靠人:持續集成 (If possible, don’t rely on human: Continuous Integration)
What if the program itself can run the unit tests automatically when we push/create pull request? Then it can stop the merge if it cannot pass the tests! If you heard of continuous integration, this is part of the feature! Popular products in the market are CircleCI / TravisCI / jenkins, but I am lazy, I don’t want to do any extra configuration work if not needed so we will use relatively new GitHub Action for that 😊
如果在推送/創建請求請求時程序本身可以自動運行單元測試該怎么辦? 如果無法通過測試,則可以停止合并! 如果您聽說過持續集成,那么這就是該功能的一部分! 市場上流行的產品是CircleCI / TravisCI / jenkins,但是我很懶,如果不需要,我不想做任何額外的配置工作,因此我們將為此使用相對較新的GitHub Action。
In the past, I think the engineers are so smart, how can they remember the syntax and come up with a script like this [it is simple already] on their own? Don’t think in that way, most people just copy & modify the template as I do [there is a template called Publish Python package under CI workflows in GitHub Actions]
過去,我認為工程師是如此聰明,他們如何才能記住語法并獨自提出這樣的腳本(已經很簡單)? 不要以這種方式思考,大多數人都像我一樣復制和修改模板[GitHub Actions中CI工作流下有一個名為Publish Python package的模板]
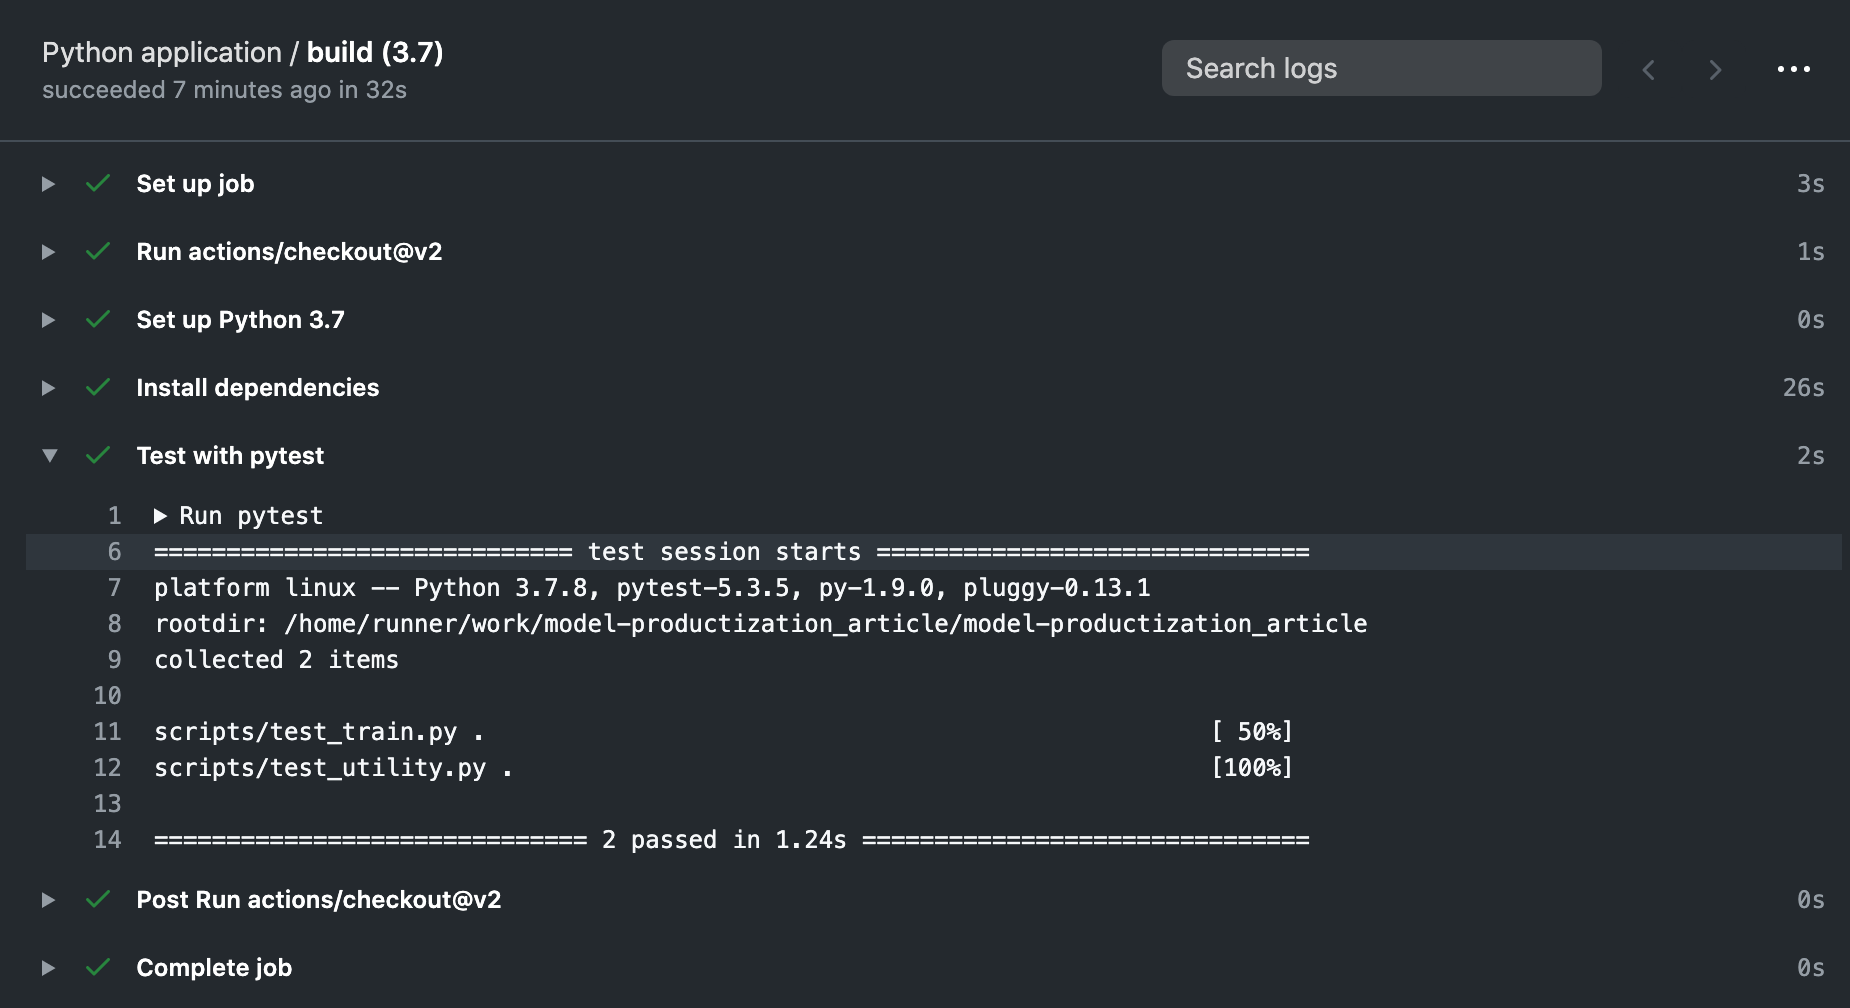
Now you see it! The scripts, package versions, and pytest work together to ensure the package versions are right and the program is workable! They will safeguard us when we develop incrementally, they will say NO if the code breaks the unit tests. If we find a bug, we can include that as another test case to ensure we don’t commit the same mistake twice!
現在您看到了! 腳本,軟件包版本和pytest可以一起使用,以確保軟件包版本正確且程序可行! 當我們逐步開發時,它們將保護我們,如果代碼破壞了單元測試,他們將拒絕。 如果發現錯誤,可以將其作為另一個測試用例,以確保我們不會兩次犯相同的錯誤!
Can you do the same in Jupyter Notebook with the same level of confidence?
您可以在Jupyter Notebook中以相同的置信度執行相同的操作嗎?
Code Style matters: black, isort
代碼樣式很重要:黑色,isoort
Have you heard of pep8? It is the style convention to write Python, there are many (good) points but honestly, please don’t test me on that, my brain cannot remember them all!
您聽說過pep8嗎? 這是編寫Python的樣式慣例,有很多(好的)要點,但是老實說,請不要對此進行測試,我的大腦無法記住所有這些內容!
I remember in one of my classes, my professor requires us to use pycodestyle it is a tool to check the code style, then I got these messages and fix them one by one. For example:
我記得在我的一堂課中,我的教授要求我們使用pycodestyle這是一種檢查代碼樣式的工具,然后我得到了這些消息并逐一修復。 例如:
$ pycodestyle --first optparse.py
optparse.py:69:11: E401 multiple imports on one line
optparse.py:77:1: E302 expected 2 blank lines, found 1
optparse.py:88:5: E301 expected 1 blank line, found 0
I think it is a good tool but kind of incomplete, if you can find my problems, why don’t you just correct that for me and save my time?
我認為這是一個很好的工具,但還不完善,如果您能找到我的問題,為什么不為我改正一下以節省時間呢?
Simply run this and the script will do the rest!# If you get permission error, you can try
# chmod +rx autoformat.sh
$ ./autoformat.sh
結論 (Conclusions)
Things are good for local now! I can push them to GitHub and my friends can clone and run it in their computer
事情現在對當地人有好處! 我可以將他們推送到GitHub,而我的朋友可以在他們的計算機中克隆并運行它
BUT! We know the important (bad) messages usually start with BUT/HOWEVER, eg: job application rejections 🙁
但! 我們知道重要的(壞的)消息通常以BUT / HOWEVER開頭,例如:作業申請被拒絕🙁
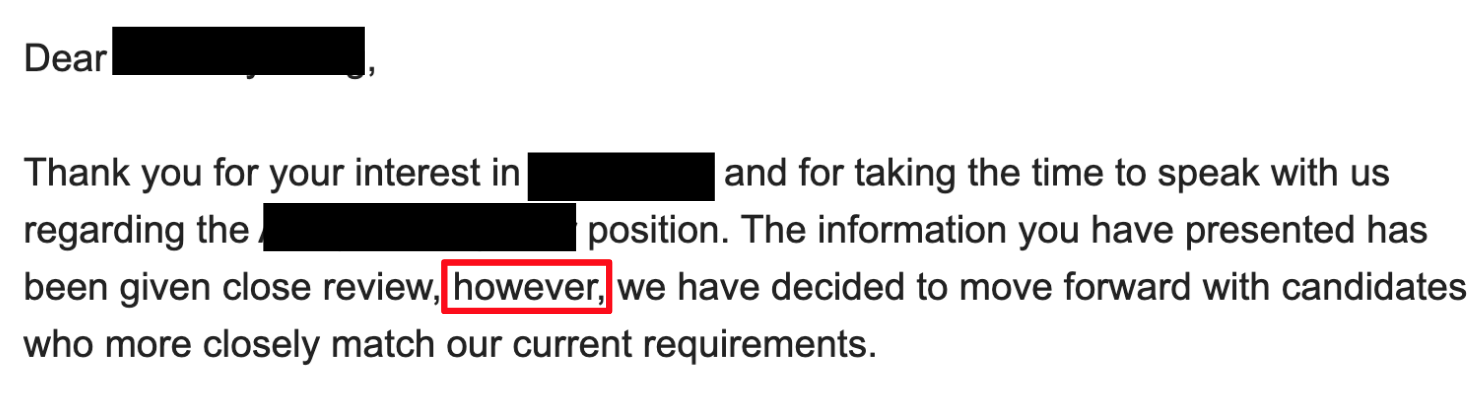
BUT what if we want to productionalize the model ?_?
但是,如果我們要對模型進行生產化怎么辦?
Q: Firstly, what it means by productionalize?
問:首先,生產化意味著什么?
A: In a narrow sense, it means model consumption, I give you the input, you return me the output [maybe in JSON form], eg: web endpoint / API. We need to have a server [another computer] to host the models and endpoints, I don’t want to use my computer to host it or the whole product will rely on my poor Macbook🙁
答:從狹義上講,這意味著模型消耗,我給您輸入,您將輸出返回給我[也許以JSON形式],例如:Web端點/ API。 我們需要有一個服務器[另一臺計算機]主辦的模型和終點,我不想用我的電腦主機,或整個產品將依靠我那可憐的MacBook🙁
I highlighted two words above and they are exactly the challenges
我在上面強調了兩個詞,而這恰恰是挑戰
1.How to find another computer to host the models?
1.如何找到另一臺計算機來托管模型?
Short answer: Either buy a computer OR rent one from cloud provider [eg: AWS, Azure, GCP], then we can claim we know CLOUD COMPUTING 😊
簡短的答案:要么購買一臺計算機,要么向云提供商租用一臺計算機(例如:AWS,Azure,GCP),那么我們可以聲稱我們知道云計算COMP
2.What if another computer isn’t MacOS, how can I ensure my code is working there?
2.如果另一臺計算機不是MacOS,該怎么辦?
Short answer: Docker
簡短答案:Docker
To wrap up, we:
最后,我們:
a. start from a Jupyter Notebook
b. Code conversion [ipynb to .py]
c. Make the scripts configurable [Click]
d. Include logging [logging]
e. Make sure the local environment is the same [Conda env]
f. Include unit test and basic CI [pytest, GitHub Action]
g. Autoformat the script style [black, isort]
I hope file tree structure with annotations can show you the code evolution, don’t be scared by many folders because they are developed step-by-step, if you understand the thought process, it is pretty straightforward!
我希望帶有注釋的文件樹結構可以向您顯示代碼的演變過程,不要被許多文件夾嚇到,因為它們是一步一步開發的,如果您了解思想過程,那就非常簡單了!
.
├── README.md
├── __init__.py
├── .github/workflows         [f]
├── autoformat.sh             [g]
├── data
│   ├── predict.csv           [b]
│   ├── test.csv              [b]
│   ├── train.csv             [b]
│   └── winequality.csv
├── log
│   ├── etl.log               [d]
│   ├── predict.log           [d]
│   └── train.log             [d]
├── model
│   └── model.pkl             [b]
├── notebook
│   └── prediction-of-quality-of-wine.ipynb [a]
├── requirement.txt           [e]
└── scripts
    ├── config.yml            [c]
    ├── etl.py                [b, c]
    ├── predict.py            [b, c]
    ├── test_train.py         [f]
    ├── test_utility.py       [f]
    ├── train.py              [b, c]
    └── utility.py
Something we mentioned but didn’t elaborate:
我們提到但未詳細說明的內容:
-> Databricks’s MLFlow / VertaAI’s ModelDB
-> Databricks的MLFlow / VertaAI的ModelDB
Something we can discuss more:
我們可以討論更多的內容:
- Model deployment in cloud [AWS] 云中的模型部署[AWS]
- Containerization [Docker] 容器化[Docker]
Now we have built a solid foundation, these scripts are in the form that we can reuse it further! Imagine how can you do this with Jupyter Notebook?
現在我們已經建立了堅實的基礎,這些腳本的形式可以進一步重用! 想象一下如何使用Jupyter Notebook做到這一點?
I understand what it feels like when someone said you should try ABC / XYZ but they don’t explain why or how to evolve from scratch, I hope this article can contribute a little bit :)
我了解有人說您應該嘗試ABC / XYZ,但他們沒有解釋為什么或如何從頭開始發展時的感覺,我希望本文能有所作為:)
If this article is useful, you can leave some comments
如果本文有用,則可以留下一些評論
OR you can star my repo!
或者你可以給我的倉庫加注星號!
OR my LinkedIn [Welcome but please leave a few words to indicate you are not zombie]!
或我的LinkedIn (歡迎使用,請留下幾句話以表明您不是僵尸)!
I learned most of these things from my internship @ Manifold AI
我從實習中獲得了大部分這些東西,這是在Manifold AI
翻譯自: https://towardsdatascience.com/from-jupyter-notebook-to-sc-582978d3c0c
本文來自互聯網用戶投稿,該文觀點僅代表作者本人,不代表本站立場。本站僅提供信息存儲空間服務,不擁有所有權,不承擔相關法律責任。 如若轉載,請注明出處:http://www.pswp.cn/news/388877.shtml 繁體地址,請注明出處:http://hk.pswp.cn/news/388877.shtml 英文地址,請注明出處:http://en.pswp.cn/news/388877.shtml
如若內容造成侵權/違法違規/事實不符,請聯系多彩編程網進行投訴反饋email:809451989@qq.com,一經查實,立即刪除!相關文章

【EasyNetQ】- 使用Future Publish調度事件

Java這些多線程基礎知識你會嗎?

MySQL set names 命令_mysql set names 命令和 mysql 字符編碼問題

設置Proxy Server和SQL Server實現數據庫安全

Python django解決跨域請求的問題

加勒比海兔_加勒比海海洋物種趨勢

mysql 查出相差年數_MySQL計算兩個日期相差的天數、月數、年數

tornado 簡易教程

如果你的電腦是通過代理上網的.就要用端口映射

人口密度可視化_使用GeoPandas可視化菲律賓的人口密度

Unity - Humanoid設置Bip骨骼導入報錯
)
python3openpyxl無法打開文件_Python3 處理excel文件(openpyxl庫)

Kubernetes - - k8s - v1.12.3 OpenLDAP統一認證


srpg 勝利條件設定_英雄聯盟獲勝條件
![[Egret][文檔]遮罩](http://pic.xiahunao.cn/[Egret][文檔]遮罩)
[Egret][文檔]遮罩

clob類型字段最大存儲長度_請教oracle的CLOB字段的最大長度?

機器學習 綜合評價_PyCaret:機器學習綜合
