深度學習算法原理
You just got a new drone and you want it to be super smart! Maybe it should detect whether workers are properly wearing their helmets or how big the cracks on a factory rooftop are.
您剛剛擁有一架新無人機,并希望它變得超級聰明! 也許它應該檢測出工人是否正確地戴好頭盔或工廠屋頂上的裂縫有多大。
In this blog post, we’ll look at the basic methods of object detection (Exhaustive Search, R-CNN, Fast R-CNN and Faster R-CNN) and try to understand the technical details of each model. The best part? We’ll do all of this without any formula, allowing readers with all levels of experience to follow along!
在這篇博客文章中,我們將研究對象檢測的基本方法(窮舉搜索,R-CNN,Fast R-CNN和Faster R-CNN),并嘗試了解每種模型的技術細節。 最好的部分? 我們將在沒有任何公式的情況下完成所有這些工作,讓具有各種經驗的讀者可以跟隨!
Finally, we will follow this post with a second one, where we will take a deeper dive into Single Shot Detector (SSD) networks and see how this can be deployed… on a drone.
最后,我們將在第二篇文章之后繼續討論,我們將更深入地研究Single Shot Detector(SSD)網絡,并了解如何在無人機上進行部署。
我們進入物體檢測的第一步 (Our First Steps Into Object Detection)
它是一只鳥嗎? 是飛機嗎? —圖像分類 (Is It a Bird? Is It a Plane?— Image Classification)
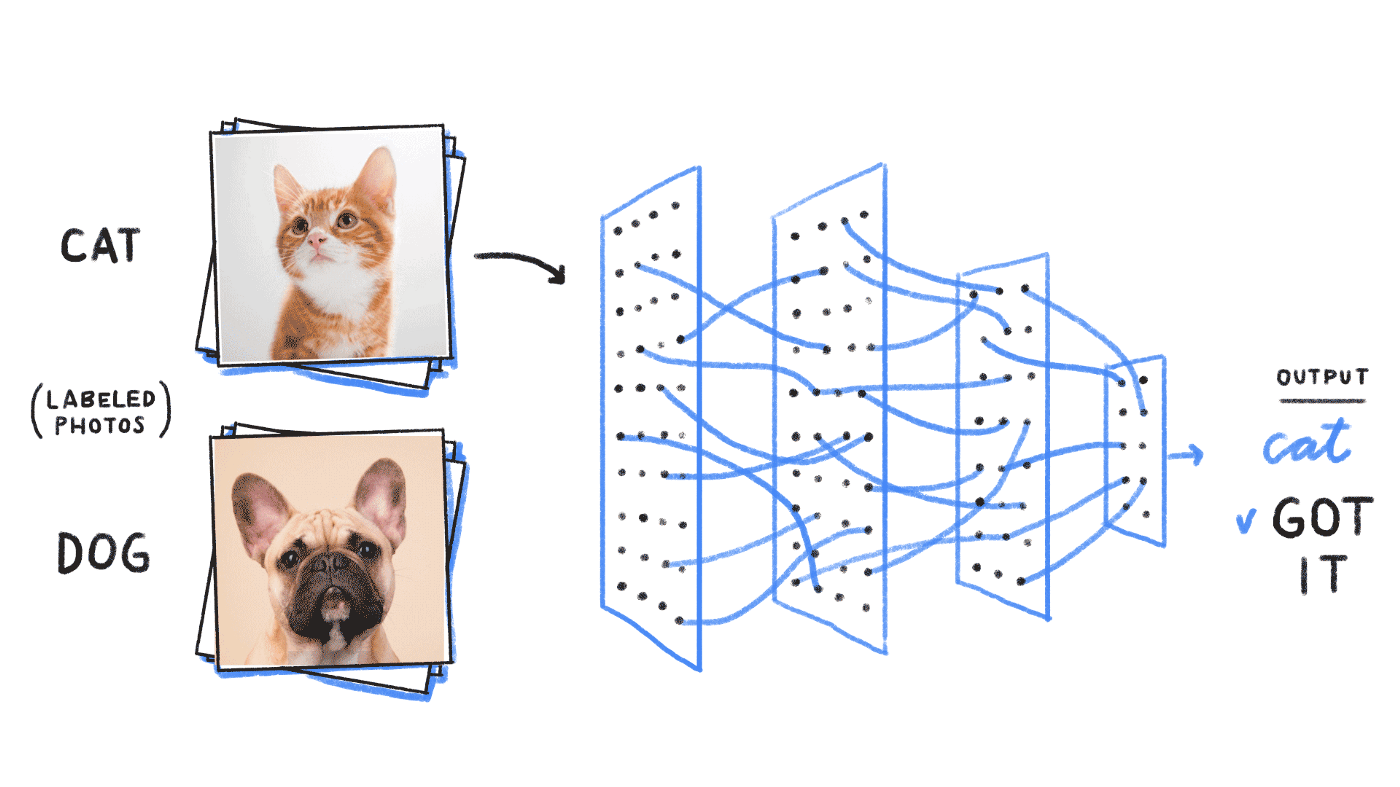
Object detection (or recognition) builds on image classification. Image classification is the task of — you guessed it—classifying an image (via a grid of pixels like shown above) into a class category. For a refresher on image classification, we refer the reader to this post.
對象檢測(或識別)基于圖像分類。 圖像分類是您的任務(您猜對了),將圖像(通過如上所示的像素網格)分類為類類別。 有關圖像分類的復習,請向讀者介紹該帖子 。
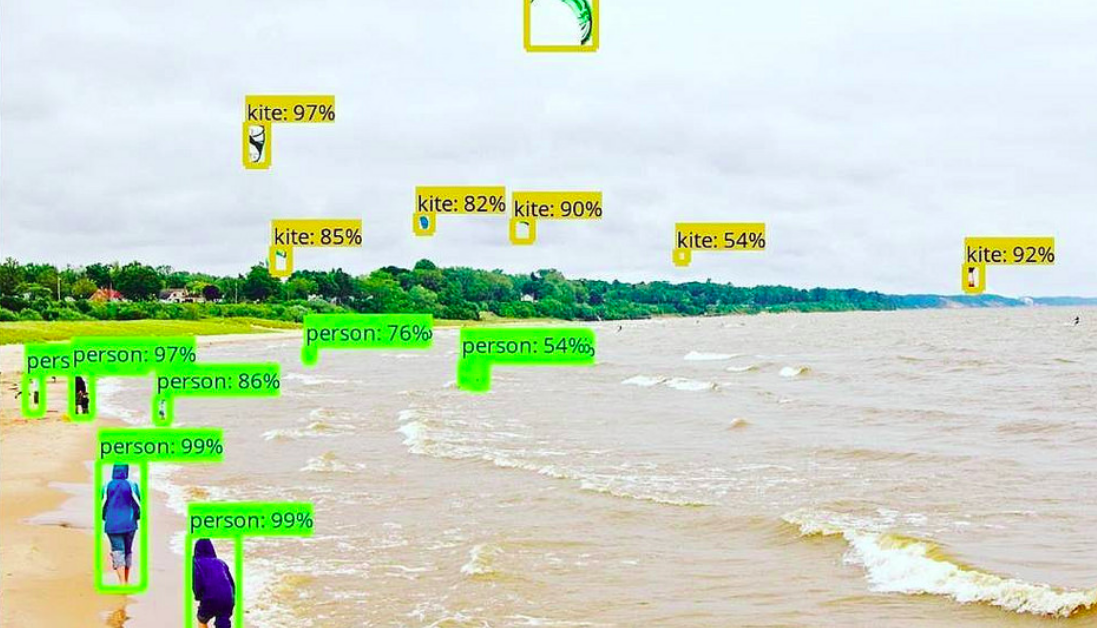
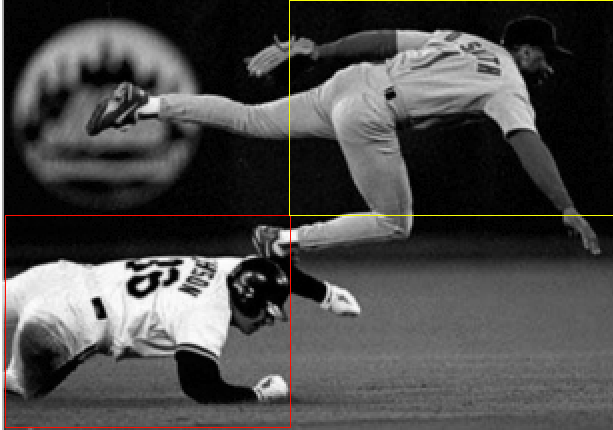
Object recognition is the process of identifying and classifying objects inside an image, which looks something like this:
對象識別是對圖像中的對象進行識別和分類的過程,如下所示:
In order for the model to be able to learn the class and the position of the object in the image, the target has to be a five-dimensional label (class, x, y, width, length).
為了使模型能夠學習圖像中對象的類別和位置,目標必須是五維標簽(類別,x,y,寬度,長度)。
對象檢測方法的內部工作 (The Inner Workings of Object Detection Methods)
一種計算昂貴的方法:窮舉搜索 (A Computationally Expensive Method: Exhaustive Search)
The simplest object detection method is using an image classifier on various subparts of the image. Which ones, you might ask? Let’s consider each of them:
最簡單的對象檢測方法是在圖像的各個子部分上使用圖像分類器。 您可能會問哪些? 讓我們考慮其中的每個:
1. First, take the image on which you want to perform object detection.
1.首先,拍攝要在其上執行對象檢測的圖像。
2. Then, divide this image into different sections, or “regions”, as shown below:
2.然后,將該圖像劃分為不同的部分或“區域”,如下所示:
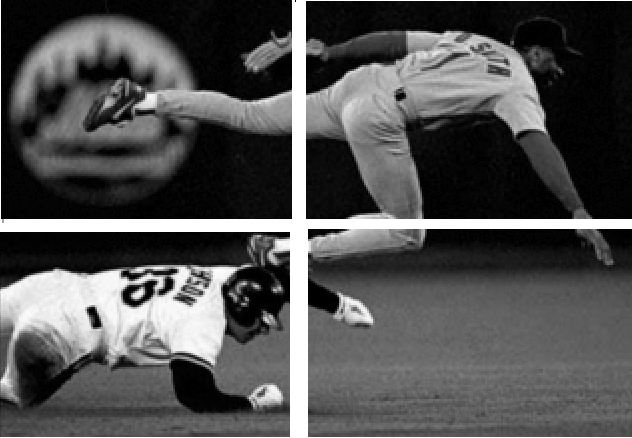
3. Consider each region as an individual image.
3.將每個區域視為一個單獨的圖像。
4. Classify each image using a classic image classifier.
4.使用經典圖像分類器對每個圖像進行分類。
5. Finally, combine all the images with the predicted label for each region where one object has been detected.
5.最后,針對檢測到一個物體的每個區域,將所有圖像與預測標簽合并。
One problem with this method is that objects can have different aspect ratios and spatial locations, which can lead to unnecessarily expensive computations of a large number of regions. It presents too big of a bottleneck in terms of computation time to be used for real-life problems.
該方法的一個問題是對象可能具有不同的縱橫比和空間位置,這可能導致大量區域的不必要的昂貴計算。 就計算時間而言,它存在太大的瓶頸,無法用于實際問題。
區域提案方法和選擇性搜索 (Region Proposal Methods and Selective Search)
A more recent approach is to break down the problem into two tasks: detect the areas of interest first and then perform image classification to determine the category of each object.
最近的一種方法是將問題分解為兩個任務:首先檢測感興趣的區域,然后執行圖像分類以確定每個對象的類別。
The first step usually consists in applying region proposal methods. These methods output bounding boxes that are likely to contain objects of interest. If the object has been properly detected in one of the region proposals, then the classifier should detect it as well. That’s why it’s important for these methods to not only be fast, but also to have a very high recall.
第一步通常包括應用區域提議方法 。 這些方法輸出可能包含感興趣對象的邊界框。 如果在區域建議之一中已正確檢測到對象,則分類器也應將其檢測到。 這就是為什么這些方法不僅要快速而且要具有很高的召回率很重要的原因。
These methods also use a clever architecture where part of the image preprocessing is the same for the object detection and for the classification tasks, making them faster than simply chaining two algorithms. One of the most frequently used region proposal methods is selective search:
這些方法還使用了一種聰明的體系結構,其中對于對象檢測和分類任務,圖像預處理的一部分是相同的,這使得它們比簡單地鏈接兩個算法更快。 選擇區域搜索是最常用的區域提議方法之一:
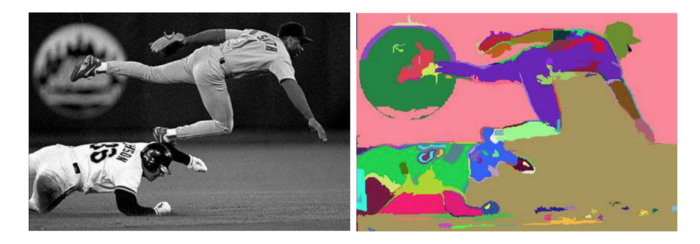
Its first step is to apply image segmentation, as shown here:
第一步是申請 圖像分割 ,如下所示:
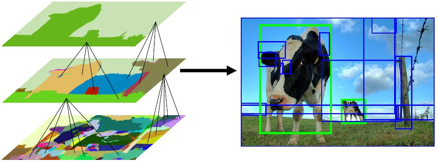
From the image segmentation output, selective search will successively:
從圖像分割輸出中,選擇性搜索將依次進行:
- Create bounding boxes from the segmented parts and add them to the list of region proposals. 從分割的零件中創建邊界框,并將其添加到區域投標列表中。
- Combine several small adjacent segments to larger ones based on four types of similarity: color, texture, size, and shape. 根據四種相似度:顏色,紋理,大小和形狀,將幾個相鄰的小片段合并為較大的片段。
- Go back to step one until the section covers the entire image. 返回第一步,直到該部分覆蓋了整個圖像。
Now that we understand how selective search works, let’s introduce some of the most popular object detection algorithms that leverage it.
現在我們了解了選擇性搜索的工作原理,讓我們介紹一些利用它的最受歡迎的對象檢測算法。
第一個目標檢測算法:R-CNN (A First Object Detection Algorithm: R-CNN)
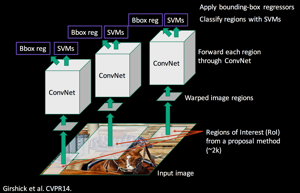
Ross Girshick et al. proposed Region-CNN (R-CNN) which allows the combination of selective search and CNNs. Indeed, for each region proposal (2000 in the paper), one forward propagation generates an output vector through a CNN. This vector will be fed to a one-vs-all classifier (i.e. one classifier per class, for instance one classifier where labels = 1 if the image is a dog and 0 if not, a second one where labels = 1 if the image is a cat and 0 if not, etc), SVM is the classification algorithm used by R-CNN.
Ross Girshick等 。 提議的Region-CNN(R-CNN),它允許選擇性搜索和CNN結合使用。 實際上,對于每個區域提議(本文中為2000),一個前向傳播都會通過CNN生成輸出矢量。 該向量將被饋送給全對一分類器 (即,每個類別一個分類器,例如,一個分類器,如果圖像是狗,則標簽= 1,否則為0;如果圖像是狗,則第二標簽,標簽= 1一個cat,如果不是則為0,等等), SVM是R-CNN使用的分類算法。
But how do you label the region proposals? Of course, if it perfectly matches our ground truth we can label it as 1, and if a given object is not present at all, we can then label it 0 for this object. What if a part of an object is present in the image? Should we label the region as 0 or 1? To make sure we are training our classifier on regions that we can realistically have when predicting an image (and not only perfectly matching regions), we are going to look at the intersection over union (IoU) of the boxes predicted by the selective search and the ground truth:
但是,您如何標記區域提案? 當然,如果它完全符合我們的基本事實,則可以將其標記為1,如果根本不存在給定的對象,則可以將該對象標記為0。 如果圖像中存在物體的一部分怎么辦? 我們應該將區域標記為0還是1? 為了確保我們在分類器上訓練我們在預測圖像時可以實際擁有的區域(不僅是完全匹配的區域),我們將研究選擇性搜索和預測的框的相交交點 (IoU)基本事實:
The IoU is a metric represented by the area of overlap between the predicted and the ground truth boxes divided by their area of union. It rewards successful pixel detection and penalizes false positives in order to prevent algorithms from selecting the whole image.
IoU是一個度量標準,由預測的和基本的真實框之間的重疊面積除以它們的并集面積表示。 它獎勵成功的像素檢測并懲罰誤報,以防止算法選擇整個圖像。

Going back to our R-CNN method, if the IoU is lower than a given threshold (0.3), then the associated label would be 0.
回到我們的R-CNN方法,如果IoU低于給定的閾值(0.3),則關聯的標簽將為0。
After running the classifier on all region proposals, R-CNN proposes to refine the bounding box (bbox) using a class-specific bbox regressor. The bbox regressor can fine-tune the position of the bounding box boundaries. For example, if the selective search has detected a dog but only selected half of it, the bbox regressor, which is aware that dogs have four legs, will ensure that the whole body is selected.
在所有區域建議上運行分類器后,R-CNN建議使用特定于類的bbox回歸變量來優化邊界框(bbox)。 bbox回歸器可以微調邊界框邊界的位置。 例如,如果選擇性搜索已檢測到一條狗,但只選擇了其中一半,則bbox回歸器會知道狗有四條腿,它將確保整個身體都被選中。
Also thanks to the new bbox regressor prediction, we can discard overlapping proposals using non-maximum suppression (NMS). Here, the idea is to identify and delete overlapping boxes of the same object. NMS sorts the proposals per classification score for each class and computes the IoU of the predicted boxes with the highest probability score with all the other predicted boxes (of the same class). It then discards the proposals if the IoU is higher than a given threshold (e.g., 0.5). This step is then repeated for the next best probabilities.
同樣,由于有了新的bbox回歸預測,我們可以使用非最大抑制 (NMS)丟棄重疊的提案。 這里的想法是識別并刪除同一對象的重疊框。 NMS對每個類別的每個分類分數對建議進行排序,并計算所有其他(相同類別的)預測方框與最高概率分數的預測方框的IoU。 然后,如果IoU高于給定的閾值(例如0.5),它將丟棄建議。 然后針對下一個最佳概率重復此步驟。

To sum up, R-CNN follows the following steps:
綜上所述,R-CNN遵循以下步驟:
- Create region proposals from selective search (i.e, predict the parts of the image that are likely to contain an object). 通過選擇性搜索創建區域建議(即,預測圖像中可能包含對象的部分)。
- Run these regions through a pre-trained model and then a SVM to classify the sub-image. 通過預先訓練的模型運行這些區域,然后通過SVM對子圖像進行分類。
- Run the positive prediction through a bounding box prediction which allows for a better box accuracy. 通過邊界框預測來運行正向預測,這樣可以提高框的準確性。
- Apply an NMS when predicting to get rid of overlapping proposals. 預測擺脫重疊的提案時,請應用NMS。
There are, however, some issues with R-CNN:
但是,R-CNN存在一些問題:
- This method still needs to classify all the region proposals which can lead to computational bottlenecks — it’s not possible to use it for a real-time use case. 該方法仍然需要對所有可能導致計算瓶頸的區域提議進行分類-不可能將其用于實時用例。
- No learning happens at the selective search stage, which can lead to bad region proposals for certain types of datasets. 在選擇性搜索階段不會學習,這可能會導致針對某些類型的數據集提出錯誤的區域建議。
邊際改進:快速R-CNN (A Marginal Improvement: Fast R-CNN)
Fast R-CNN — as its name indicates — is faster than R-CNN. It is based on R-CNN with two differences:
快速R-CNN(顧名思義)比R-CNN快。 它基于R-CNN,但有兩個區別:
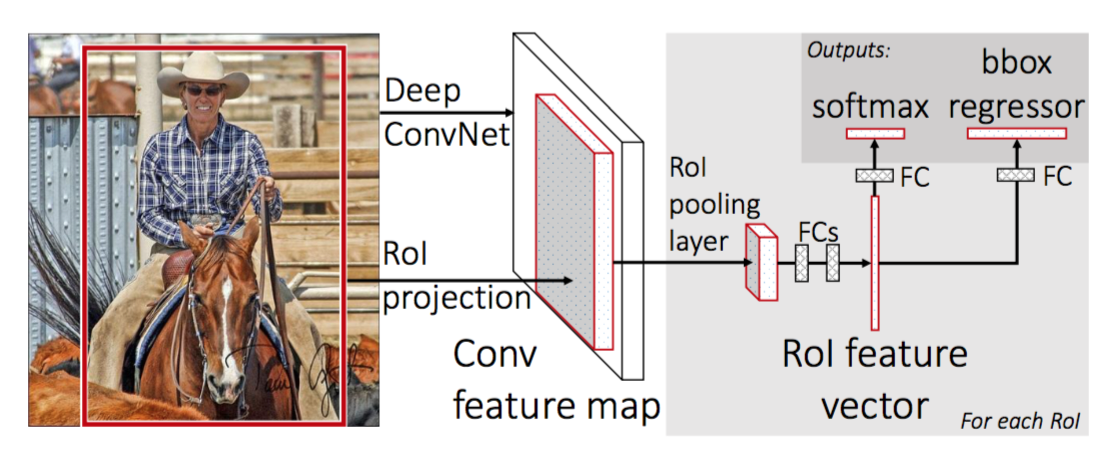
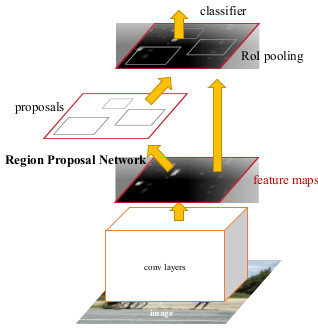
Instead of feeding the CNN for every region proposal, you feed the CNN only once by taking the whole image to generate a convolutional feature map (take a vector of pixels and transform it into another vector using a filter which will give you a convolutional feature map — you can find more info here). Next, the region of proposals are identified with selective search and then they are reshaped into a fixed size using a Region of Interest pooling (RoI pooling) layer to be able to use as an input of the fully connected layer.
無需為每個區域提案提供CNN,只需通過獲取整個圖像以生成卷積特征圖即可獲取CNN (獲取像素矢量,并使用過濾器將其轉換為另一個矢量,這將為您提供卷積特征圖—您可以在此處找到更多信息)。 接下來,通過選擇性搜索來確定提案區域,然后使用興趣區域池( RoI池 )層將其重塑為固定大小,以用作完全連接層的輸入。
Fast-RCNN uses the softmax layer instead of SVM in its classification of region proposals which is faster and generates a better accuracy.
Fast-RCNN在區域提案分類中使用softmax層而不是SVM ,這樣可以更快并產生更好的準確性。
Here is the architecture of the network:
這是網絡的體系結構:
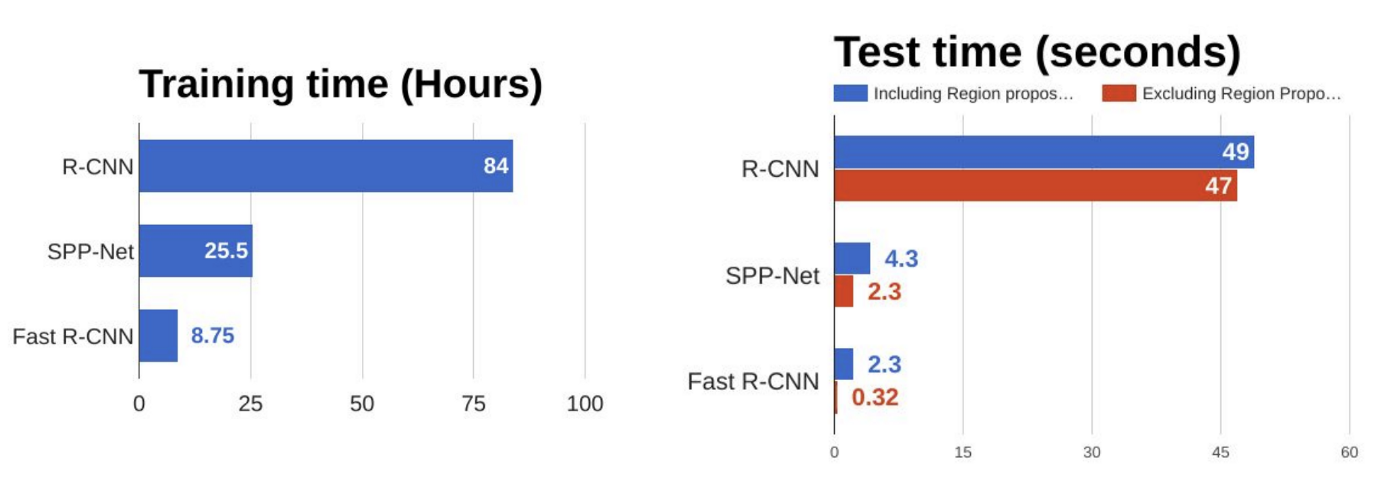
As we can see in the figure below, Fast R-CNN is way faster at training and testing than R-CNN. However, a bottleneck still remains due to the selective search method.
如下圖所示,快速R-CNN在訓練和測試方面比R-CNN快得多。 但是,由于選擇搜索方法,仍然存在瓶頸。
R-CNN可以獲得多快? —更快的R-CNN (How Fast Can R-CNN Get? — FASTER R-CNN)
While Fast R-CNN was a lot faster than R-CNN, the bottleneck remains with selective search as it is very time consuming. Therefore, Shaoqing Ren et al. came up with Faster R-CNN to solve this and proposed to replace selective search by a very small convolutional network called Region Proposal Network (RPN) to find the regions of interest.
盡管快速R-CNN比R-CNN快很多,但選擇性搜索仍然存在瓶頸,因為這非常耗時。 因此, 邵少任等 。 提出了Faster R-CNN來解決此問題,并建議用一個稱為區域提議網絡 (RPN)的非常小的卷積網絡來代替選擇搜索,以找到感興趣的區域。
In a nutshell, RPN is a small network that directly finds region proposals.
簡而言之,RPN是一個直接查找區域提議的小型網絡。
One naive approach to this would be to create a deep learning model which outputs x_min, y_min, x_max, and x_max to get the bounding box for one region proposal (so 8,000 outputs if we want 2,000 regions). However, there are two fundamental problems:
一種簡單的方法是創建一個深度學習模型,該模型輸出x_min,y_min,x_max和x_max來獲取一個區域建議的邊界框(因此,如果我們要2,000個區域,則需要8,000個輸出)。 但是,存在兩個基本問題:
- The images can have very different sizes and ratios, so to create a model correctly predicting raw coordinates can be tricky. 圖像的大小和比例可能非常不同,因此要創建一個模型來正確預測原始坐標可能會很棘手。
- There are some coordinate ordering constraints in our prediction (x_min < x_max, y_min < y_max). 我們的預測中有一些坐標排序約束(x_min <x_max,y_min <y_max)。
To overcome this, we are going to use anchors:
為了克服這個問題,我們將使用錨點:
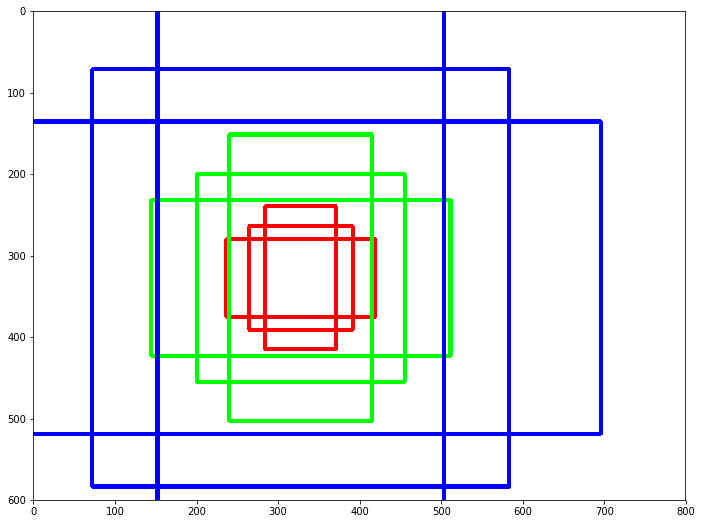
Anchors are predefined boxes of different ratios and scales all over the image. For example, for a given central point, we usually start with three sets of sizes (e.g., 64px, 128px, 256px) and three different width/height ratios (1/1, ?, 2/1). In this example, we would end up having nine different boxes for a given pixel of the image (the center of our boxes).
錨點是預定義的框,它們具有不同的比例,并在整個圖像上縮放。 例如,對于給定的中心點,我們通常以三組尺寸(例如64px,128px,256px)和三種不同的寬高比(1 / 1、1 / 2、2 / 1)開始。 在此示例中,對于圖像的給定像素(框的中心),我們最終將擁有九個不同的框。
So how many anchors would I have in total for one image?
那么一張圖像總共要有多少個錨?
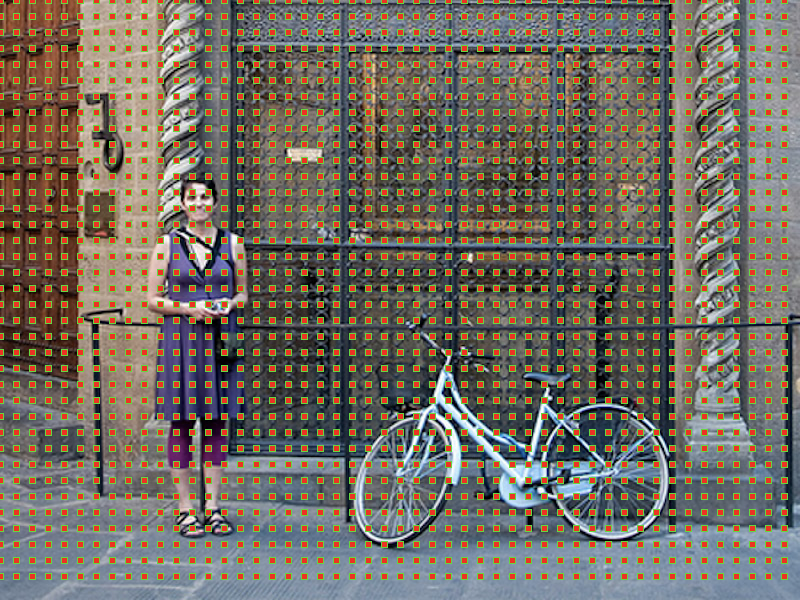
It is paramount to understand that we are not going to create anchors on the raw images, but on the output feature maps on the last convolutional layer. For instance, it’s false to say that for a 1,000*600 input image we would have one anchor per pixel so 1,000*600*9 = 5,400,000 anchors. Indeed, since we are going to create them on the feature map, there is a subsampling ratio to take into account (which is the factor reduction between the input and the output dimension due to strides in our convolutional layer).
理解我們不會在原始圖像上創建錨點而是在最后一個卷積層上的輸出要素圖上創建錨點至關重要。 例如,對于1,000 * 600輸入的圖像,我們每個像素只有一個錨,因此1,000 * 600 * 9 = 5,400,000個錨是錯誤的。 確實,由于我們將在特征圖上創建它們,因此需要考慮一個子采樣率(這是由于卷積層中的步幅而導致的輸入和輸出尺寸之間的因數減少)。
In our example, if we take this ratio to be 16 (like in VGG16) we would have nine anchors per spatial position of the feature map so “only” around 20,000 anchors (5,400,000 / 162). This means that two consecutive pixels in the output features correspond to two points which are 16 pixels apart in the input image. Note that this down sampling ratio is a tunable parameter of Faster R-CNN.
在我們的示例中,如果我們將該比率設為16(例如在VGG16中),則特征圖的每個空間位置將具有9個錨,因此“僅”大約20,000個錨(5,400,000 /162)。 這意味著輸出要素中的兩個連續像素對應于輸入圖像中相隔16個像素的兩個點。 請注意,此下采樣率是Faster R-CNN的可調參數。
The remaining question now is how to go from those 20,000 anchors to 2,000 region proposals (taking the same number of region proposals as before), which is the goal of our RPN.
現在剩下的問題是如何從這20,000個錨點到2,000個區域提案(采用與以前相同數量的區域提案),這是我們RPN的目標。
如何訓練區域提案網絡 (How to Train the Region Proposal Network)
To achieve this, we want our RPN to tell us whether a box contains an object or is a background, as well as the accurate coordinates of the object. The output predictions are probability of being background, probability of being foreground, and the deltas Dx, Dy, Dw, Dh which are the difference between the anchor and the final proposal).
為了實現這一點,我們希望RPN告訴我們盒子是否包含對象或背景,以及對象的準確坐標。 輸出預測是作為背景的概率,作為前景的概率以及增量Dx,Dy,Dw,Dh(這是錨點與最終建議之間的差)。
- First, we will remove the cross-boundary anchors (i.e. the anchors which are cut due to the border of the image) — this left us with around 6,000 images. 首先,我們將刪除跨邊界錨點(即由于圖像邊框而被剪切的錨點),這使我們獲得了大約6,000張圖像。
- We need to label our anchors positive if either of the two following conditions exist: 如果存在以下兩個條件之一,則需要將錨標記為正:
→ The anchor has the highest IoU with a ground truth box among all the other anchors.
→與其他所有錨點相比,該錨點具有最高的IoU,并帶有地面真理框。
→ The anchor has at least 0.7 of IoU with a ground truth box.
→錨點至少有0.7的IoU,并帶有地面真相框。
- We need to label our anchors negative if its IoU is less than 0.3 with all ground truth boxes. 如果所有地面真值框的IoU小于0.3,我們需要將錨標記為負。
We disregard all the remaining anchors.
我們 忽略所有剩余的錨點。
- We train the binary classification and the bounding box regression adjustment. 我們訓練二進制分類和邊界框回歸調整。
Finally, a few remarks about the implementation:
最后,關于實現的一些說明:
- We want the number of positive and negative anchors to be balanced in our mini batch. 我們希望在迷你批中平衡正錨和負錨的數量。
- We use a multi-task loss, which makes sense since we want to minimize either loss — the error of mistakenly predicting foreground or background and also the error of accuracy in our box. 我們使用多任務損失,這是有道理的,因為我們要最大程度地減少損失(錯誤地預測前景或背景的誤差以及盒子中的準確性誤差)。
- We initialize the convolutional layer using weights from a pre-trained model. 我們使用來自預訓練模型的權重來初始化卷積層。
如何使用地區提案網絡 (How to Use the Region Proposal Network)
- All the anchors (20,000) are scored so we get new bounding boxes and the probability of being a foreground (i.e., being an object) for all of them. 對所有錨點(20,000)進行了評分,因此我們得到了新的邊界框,并獲得了所有邊界框的前景(即,成為對象)的可能性。
- Use non-maximum suppression (see the R-CNN section) 使用非最大抑制(請參閱“ R-CNN”部分)
- Proposal selection: Finally, only the top N proposals sorted by score (with N=2,000, we are back to our 2,000 region proposals) are kept. 提案選擇:最后,僅保留按得分排序的前N個提案(N = 2,000,我們回到了2,000個區域提案)。
We finally have our 2,000 proposals like in the previous methods. Despite appearing more complex, this prediction step is way faster and more accurate than the previous methods.
像以前的方法一樣,我們終于有了2,000個提案。 盡管看起來更復雜,但此預測步驟比以前的方法更快,更準確。
The next step is to create a similar model as in Fast R-CNN (i.e. RoI pooling, and a classifier + bbox regressor), using RPN instead of selective search. However, we don’t want to do exactly as before, i.e. take the 2,000 proposals, crop them, and pass them through a pre-trained base network. Instead, reuse the existing convolutional feature map. Indeed, one of the advantages of using an RPN as a proposal generator is to share the weights and CNN between the RPN and the main detector network.
下一步是使用RPN而不是選擇性搜索來創建與Fast R-CNN中類似的模型(即RoI池和分類器+ bbox回歸器)。 但是,我們不想像以前那樣做,即拿出2,000個提案,將其裁剪,然后通過預先訓練的基礎網絡傳遞。 相反,請重用現有的卷積特征圖 。 確實,使用RPN作為提議生成器的優點之一是在RPN和主檢測器網絡之間共享權重和CNN。
- The RPN is trained using a pre-trained network and then fine-tuned. 使用預訓練網絡對RPN進行訓練,然后進行微調。
- The detector network is trained using a pre-trained network and then fine-tuned. Proposal regions from the RPN are used. 使用預訓練網絡對探測器網絡進行訓練,然后進行微調。 使用RPN中的提案區域。
- The RPN is initialized using the weights from the second model and then fine-tuned—this is going to be our final RPN model). RPN使用第二個模型中的權重進行初始化,然后進行微調(這將成為我們最終的RPN模型)。
- Finally, the detector network is fine-tuned (RPN weights are fixed). The CNN feature maps are going to be shared amongst the two networks (see next figure). 最后,對探測器網絡進行微調(RPN權重是固定的)。 CNN功能圖將在兩個網絡之間共享(請參見下圖)。
To sum up, Faster R-CNN is more accurate than the previous methods and is about 10 times faster than Fast-R-CNN, which is a big improvement and a start for real-time scoring.
綜上所述,Faster R-CNN比以前的方法更準確,比Fast-R-CNN快10倍,這是一個很大的進步,并且是實時評分的起點。

Even still, region proposal detection models won’t be enough for an embedded system since these models are heavy and not fast enough for most real-time scoring cases — the last example is about five images per second.
即便如此,區域提議檢測模型對于嵌入式系統還是不夠的,因為這些模型很笨重,并且對于大多數實時評分情況而言不夠快-最后一個例子是每秒約五張圖像。
In our next post, we will discuss faster methods like SSD and real use cases with image detection from drones.
在我們的下一篇文章中,我們將討論更快的方法,例如SSD和從無人機進行圖像檢測的實際用例。
We’re excited to be working on this topic for Dataiku DSS — check out the additional resources below to learn more:
我們很高興能為Dataiku DSS致力于這個主題-請查看以下其他資源以了解更多信息:
Object Detection plugin for Dataiku DSS projects,
Dataiku DSS項目的對象檢測插件 ,
a NATO challenge we won at Dataiku using Object Detection algorithm.
我們使用對象檢測算法在Dataiku贏得了北約挑戰 。
翻譯自: https://medium.com/data-from-the-trenches/the-nuts-and-bolts-of-deep-learning-algorithms-for-object-detection-60dfc5e015d4
深度學習算法原理
本文來自互聯網用戶投稿,該文觀點僅代表作者本人,不代表本站立場。本站僅提供信息存儲空間服務,不擁有所有權,不承擔相關法律責任。 如若轉載,請注明出處:http://www.pswp.cn/news/387891.shtml 繁體地址,請注明出處:http://hk.pswp.cn/news/387891.shtml 英文地址,請注明出處:http://en.pswp.cn/news/387891.shtml
如若內容造成侵權/違法違規/事實不符,請聯系多彩編程網進行投訴反饋email:809451989@qq.com,一經查實,立即刪除!相關文章

【python】numpy庫linspace相同間隔采樣 詳解
)
Spring整合JMS——基于ActiveMQ實現(一)

軟件本地化 pdf_軟件本地化與標準翻譯

CentOS7+CDH5.14.0安裝全流程記錄,圖文詳解全程實測-8CDH5安裝和集群配置

node.js安裝部署測試

數據庫不停機導數據方案_如何計算數據停機成本
)
luogu4159 迷路 (矩陣加速)

社群系統ThinkSNS+ V2.2-V2.3升級教程
)
BZOJ4881 線段游戲(二分圖+樹狀數組/動態規劃+線段樹)

activemq部署安裝

python初學者_面向初學者的20種重要的Python技巧


什么是 DDoS 攻擊?

nginx 并發過十萬


長春南關區凈月大街附近都有哪些課后班?

dev中文本框等獲取焦點事件

數據科學家數據分析師_使您的分析師和數據科學家在數據處理方面保持一致

