前言
在APP中啟動相冊選擇器或者拍照上傳圖片這些功能是非常常見的。對于Ionic2,我們只能通過cordova插件實現調用原生的功能。下面將簡單的封裝一個選擇相冊或拍照上傳圖片的ImgService服務。具體如下。
Cordova準備
下載安裝所需的Cordovar插件:?
Image Picker(相冊選擇)
ionic plugin add https://github.com/Telerik-Verified-Plugins/ImagePicker- 1
Camera(拍照)
ionic plugin add cordova-plugin-camera- 1
Transfer(上傳文件)
ionic plugin add cordova-plugin-file-transfer- 1
ImgService服務的實現
通過顯示ActionSheet組件,讓用戶選擇上傳圖片的方式,如從相冊選擇或者拍照。具體如下:
/*** Created by admin on 2016/10/21.*/
import { Injectable } from "@angular/core";
import { ActionSheetController } from "ionic-angular";
import { Camera, ImagePicker, Transfer } from "ionic-native";
import { NoticeService } from "./notice.service";@Injectable()
export class ImgService {// 參考:https://github.com/driftyco/ionic-native/blob/master/src/plugins/camera.ts// 調用相機時傳入的參數private cameraOpt = {quality: 50,destinationType: 1, // Camera.DestinationType.FILE_URI,sourceType: 1, // Camera.PictureSourceType.CAMERA,encodingType: 0, // Camera.EncodingType.JPEG,mediaType: 0, // Camera.MediaType.PICTURE,allowEdit: true,correctOrientation: true};// 調用相冊時傳入的參數private imagePickerOpt = {maximumImagesCount: 1,//選擇一張圖片width: 800,height: 800,quality: 80};//imgPath: string = ''; //圖片路徑fileTransfer: Transfer;upload: any = {url: 'http://xxx/',           //接收圖片的urlfileKey: 'image',  //接收圖片時的keyheaders: {'Accept': 'text/html,application/xhtml+xml,application/xml;q=0.9,image/webp,*/*;q=0.8' //不加入 發生錯誤!!},params: {},        //需要額外上傳的參數success: (data) => {}, //圖片上傳成功后的回調error: (err) => {},   //圖片上傳失敗后的回調listen: () => {}   //監聽上傳過程};constructor(private actionSheetCtrl: ActionSheetController,private noticeSer: NoticeService) {}showPicActionSheet() {this.useASComponent();}// 使用ionic中的ActionSheet組件private useASComponent() {let actionSheet = this.actionSheetCtrl.create({title: '選擇',buttons: [{text: '拍照',handler: () => {this.startCamera();}},{text: '從手機相冊選擇',handler: () => {this.openImgPicker();}},{text: '取消',role: 'cancel',handler: () => {}}]});actionSheet.present();}// 使用原生的ActionSheet組件/*private useNativeAS() {let buttonLabels = ['拍照', '從手機相冊選擇'];ActionSheet.show({'title': '選擇','buttonLabels': buttonLabels,'addCancelButtonWithLabel': 'Cancel',//'addDestructiveButtonWithLabel' : 'Delete'}).then((buttonIndex: number) => {if(buttonIndex == 1) {this.startCamera();} else if(buttonIndex == 2) {this.openImgPicker();}});}*/// 啟動拍照功能private startCamera() {Camera.getPicture(this.cameraOpt).then((imageData) => {this.uploadImg(imageData);}, (err) => {this.noticeSer.showToast('ERROR:' + err); //錯誤:無法使用拍照功能!});}// 打開手機相冊private openImgPicker() {let temp = '';ImagePicker.getPictures(this.imagePickerOpt).then((results) => {for (var i = 0; i < results.length; i++) {temp = results[i];}this.uploadImg(temp);}, (err) => {this.noticeSer.showToast('ERROR:' + err); //錯誤:無法從手機相冊中選擇圖片!});/*let str = '{"status":1,"msg":"提示:圖片上傳成功!","data":"http:\/\/192.168.1.20\/image\/580af6bcc4d40580af6bcc4d45.jpg"}';let res = JSON.parse(str);this.upload.success(res);*/}// 上傳圖片private uploadImg(path: string) {if(!path) {return;}this.fileTransfer = new Transfer();let options: any;options = {fileKey: this.upload.fileKey,headers: this.upload.headers,params: this.upload.params};this.fileTransfer.upload(path, this.upload.url, options).then((data) => {if(this.upload.success) {this.upload.success(JSON.parse(data.response));}}, (err) => {if(this.upload.error) {this.upload.error(err);} else {this.noticeSer.showToast('錯誤:上傳失敗!');}});}// 停止上傳stopUpload() {if(this.fileTransfer) {this.fileTransfer.abort();}}
}- 1
- 2
- 3
- 4
- 5
- 6
- 7
- 8
- 9
- 10
- 11
- 12
- 13
- 14
- 15
- 16
- 17
- 18
- 19
- 20
- 21
- 22
- 23
- 24
- 25
- 26
- 27
- 28
- 29
- 30
- 31
- 32
- 33
- 34
- 35
- 36
- 37
- 38
- 39
- 40
- 41
- 42
- 43
- 44
- 45
- 46
- 47
- 48
- 49
- 50
- 51
- 52
- 53
- 54
- 55
- 56
- 57
- 58
- 59
- 60
- 61
- 62
- 63
- 64
- 65
- 66
- 67
- 68
- 69
- 70
- 71
- 72
- 73
- 74
- 75
- 76
- 77
- 78
- 79
- 80
- 81
- 82
- 83
- 84
- 85
- 86
- 87
- 88
- 89
- 90
- 91
- 92
- 93
- 94
- 95
- 96
- 97
- 98
- 99
- 100
- 101
- 102
- 103
- 104
- 105
- 106
- 107
- 108
- 109
- 110
- 111
- 112
- 113
- 114
- 115
- 116
- 117
- 118
- 119
- 120
- 121
- 122
- 123
- 124
- 125
- 126
- 127
- 128
- 129
- 130
- 131
- 132
- 133
- 134
- 135
- 136
- 137
- 138
- 139
- 140
- 141
- 142
- 143
- 144
- 145
- 146
- 147
- 148
- 149
- 150
- 151
- 152
- 153
- 154
- 155
- 156
- 157
- 158
- 159
- 160
- 161
- 162
- 163
- 164
- 165
- 166
- 167
- 168
- 169
- 170
- 171
- 172
注:這里自定義了一個NoticeService服務,主要用于統一toast的顯示。如下:
/*** Created by Administrator on 2016/10/10 0010.*/
import { Injectable }     from '@angular/core';
import { ToastController } from 'ionic-angular';@Injectable()
export class NoticeService {static TOAST_POS_BOTTOM: string = 'bottom';static TOAST_POS_MIDDLE: string = 'middle';constructor(private toastCtrl: ToastController) {}// 顯示 toast提示showToast(message: string, position: string = NoticeService.TOAST_POS_BOTTOM) {let toast = this.toastCtrl.create({message: message,duration: 1500,position: position});toast.present();return toast;}/*showNoticeByToast(code: Number, msg: string) {let m = '';if(code == 1) {m = '提示:' + msg + '!';} else {m = '錯誤' + code + ':' + msg + '!';}return this.showToast(m);}*/showNoticeByToast(code: Number, msg: string) {let m = '';if(msg && msg.length > 0) {if(msg.charAt(msg.length - 1) == '!' || msg.charAt(msg.length - 1) == '!') {msg = msg.substr(0, msg.length - 1);}}if(code == 1) {m = '提示:' + msg + '!';} else {m = '錯誤' + code + ':' + msg + '!';}return this.showToast(m);}
}- 1
- 2
- 3
- 4
- 5
- 6
- 7
- 8
- 9
- 10
- 11
- 12
- 13
- 14
- 15
- 16
- 17
- 18
- 19
- 20
- 21
- 22
- 23
- 24
- 25
- 26
- 27
- 28
- 29
- 30
- 31
- 32
- 33
- 34
- 35
- 36
- 37
- 38
- 39
- 40
- 41
- 42
- 43
- 44
- 45
- 46
- 47
- 48
- 49
- 50
- 51
- 52
- 53
- 54
- 55
ImgService服務的使用
使用ImgService服務,需要在對應的Page頁面中的構造方法中進行注入。如:
constructor(private notiSer: NotiService,private imgSer: ImgService) {}- 1
- 2
- 3
使用ImgService服務,需要我們先進行初始化,如:
// 初始化上傳圖片的服務private initImgSer() {this.imgSer.upload.url = ''; // 上傳圖片的url,如果同默認配置的url一致,那無須再設置this.imgSer.upload.success = (data) => {//上傳成功后的回調處理};this.imgSer.upload.error = (err) => {this.noticeSer.showToast('錯誤:頭像上傳失敗!');};}- 1
- 2
- 3
- 4
- 5
- 6
- 7
- 8
- 9
- 10
正式使用:
this.initImgSer();
this.imgSer.showPicActionSheet();- 1
- 2
示例效果
Android顯示效果如下:?
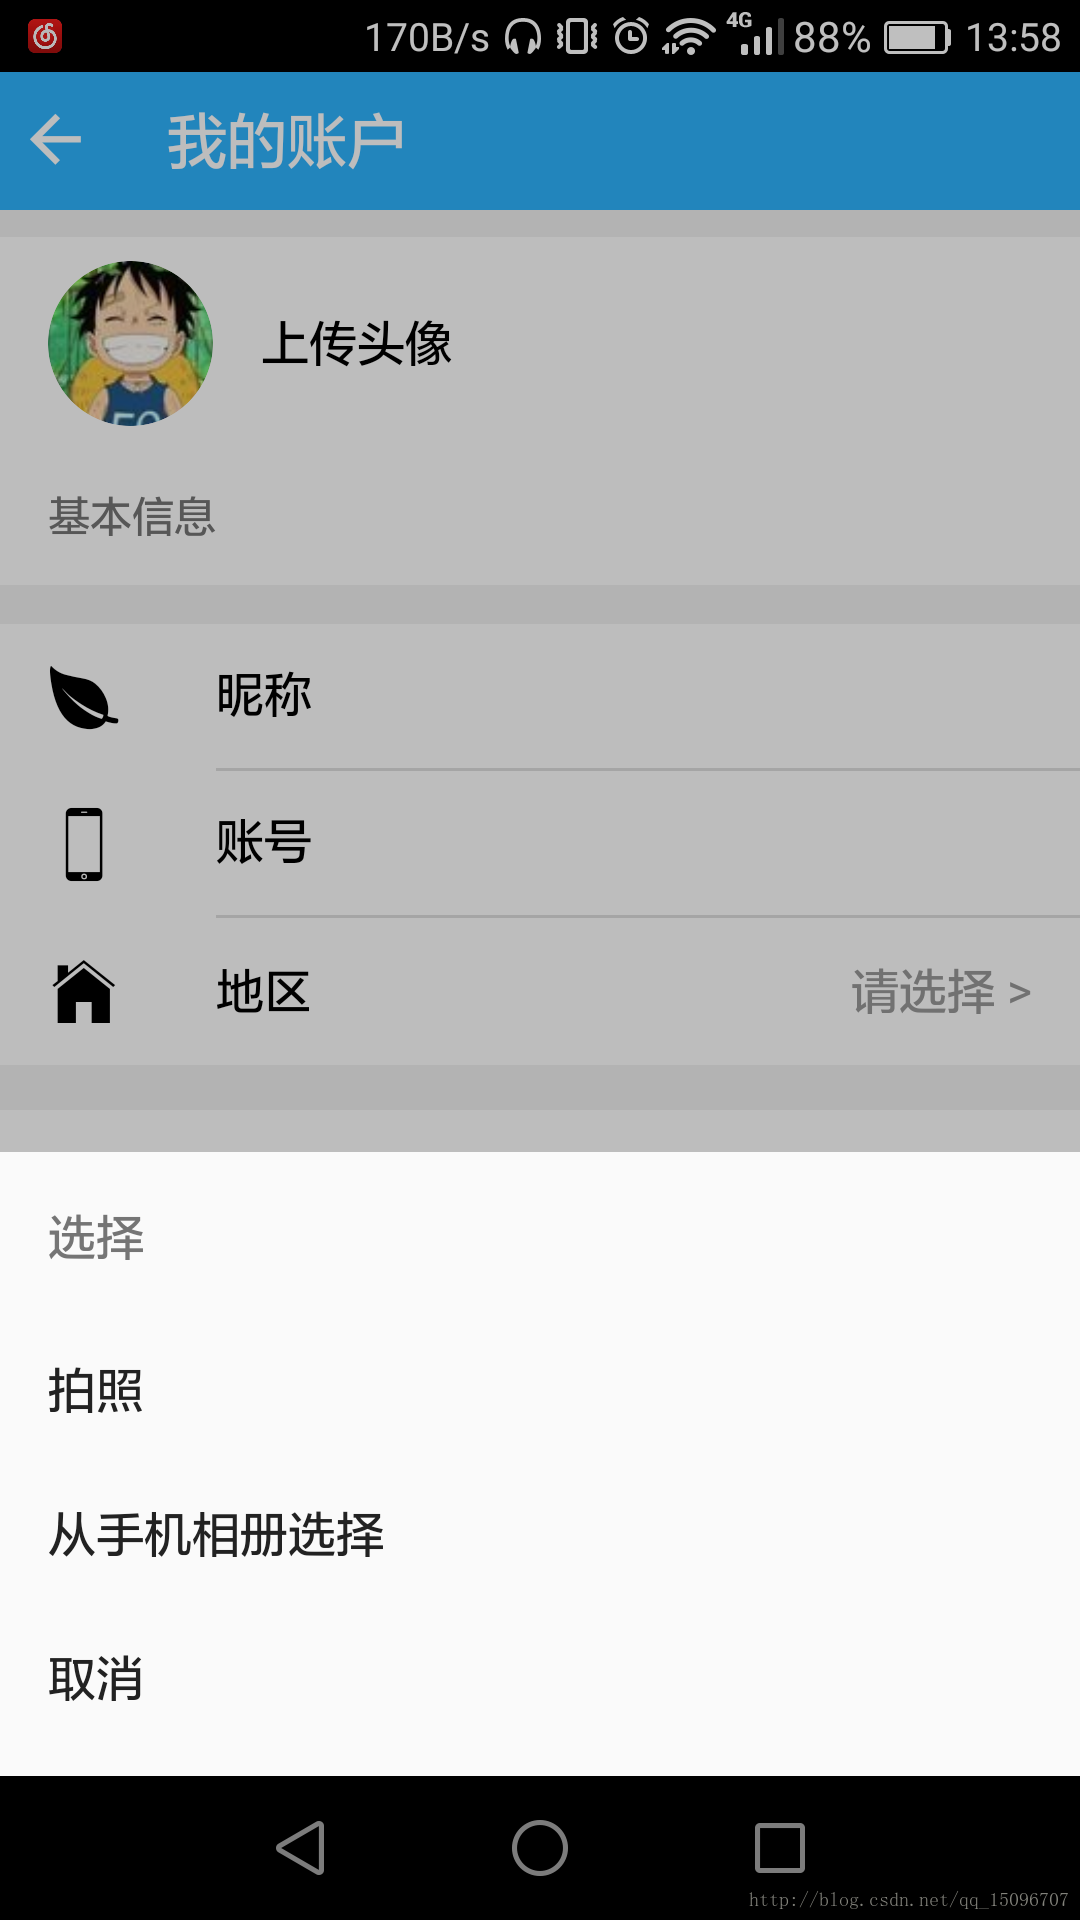
相冊選擇器的漢化
在打開相冊選擇器的過程中,我們可能會發現其相冊選擇器的“取消”或“確定”按鈕是英文顯示的。但是BOSS可能會要求我們修改為中文,這時又要傷一下腦筋咯。?
解決(針對Anroid來說,ios應該也是一樣滴):在項目的plugins目錄下找到com.synconset.imagepicker文件夾,進入src/android/Library/res目錄,創建values-zh文件夾,在values-zh文件夾中創建multiimagechooser_strings_zh.xml文件,內容如下:
<?xml version="1.0" encoding="utf-8"?>
<resources><string name="multi_app_name">圖片選擇器</string><string name="free_version_label">免費版本 - 剩余圖片: %d</string><string name="error_database">打開相冊出現錯誤.</string><string name="requesting_thumbnails">請稍后...</string><string name="processing_images_header">圖像選擇</string><string name="processing_images_message">這可能是一個短暫的瞬間的時間.</string><string name="maximum_selection_count_error_header">Auswahllimit erreicht</string><string name="maximum_selection_count_error_message">Sie k?nnen maximal %d Bilder auf einmal ausw?hlen.</string><string name="discard">取消</string><string name="done">確定</string>
</resources>- 1
- 2
- 3
- 4
- 5
- 6
- 7
- 8
- 9
- 10
- 11
- 12
- 13
修改plugins/com.synconset.imagepicker/plugin.xml文件,找到android區域,增加如下語句:
<source-file src="src/android/Library/res/values-zh/multiimagechooser_strings_zh.xml" target-dir="res/values-zh"/>
需要的插件(ionic 官網 native中均有):
$ ionic cordova plugin add cordova-plugin-file $ npm install --save @ionic-native/file $ ionic cordova plugin add cordova-plugin-file-transfer $ npm install --save @ionic-native/file-transfer $ ionic cordova plugin add cordova-plugin-camera $ npm install --save @ionic-native/camera $ ionic cordova plugin add cordova-plugin-telerik-imagepicker --variable PHOTO_LIBRARY_USAGE_DESCRIPTION="需要訪問您的相冊" $ npm install --save @ionic-native/image-picker
- 1
刪除項目platforms文件夾下的android平臺,重新添加平臺打包運行即可。


 錯誤)


