Plongez dans Lyon網站終于上線了。 我們與 Danka 團隊和 Nico Icecream 共同努力,打造了一個令我們特別自豪的流暢的沉浸式網站。
這個網站是專為 ONLYON Tourism 和會議而建,旨在展示里昂最具標志性的活動場所。觀看簡短的介紹視頻后,用戶可以進入城市的交互式風景如畫的地圖,所有場館都建模為 3D 對象。 每個建筑物都可以點擊,進入一個詳細說明位置信息的專用頁面。

推薦:用 NSDT編輯器 快速搭建可編程3D場景。
1、打造沉浸式體驗
主要網站導航體驗依賴于卡通般的 WebGL 場景,其中包含大量景觀元素、云彩、動畫車輛、波光粼粼的河流,當然還有建筑物。
總而言之,它由 63 個幾何圖形、48 個紋理、32234 個三角形(以及一些后期處理魔法)組成。 當你處理大量對象時,必須組織代碼架構并使用一些技巧來優化性能。

2、3D場景
所有模型均由才華橫溢的 3D 藝術家 Nicolas Dufoure(又名 Icecream)在 3ds Max 中創建,然后使用 Blender 導出為 GTLF 對象。如果你有一些現成的3D模型可以利用,那么可以使用這個在線3D格式轉換工具將它們轉換成GLTF模型,這會節省不少時間。
2.1 藝術指導和視覺構成
Nico 和 Danka 團隊從地圖的早期迭代開始了項目的創作過程,并很快確定了低多邊形和豐富多彩的藝術方向。

與客戶品牌調色板相匹配的早期地圖迭代之一
我們知道必須添加兩打可點擊的建筑物,因此我們必須在視覺構圖、導航便利性和性能之間找到適當的平衡。
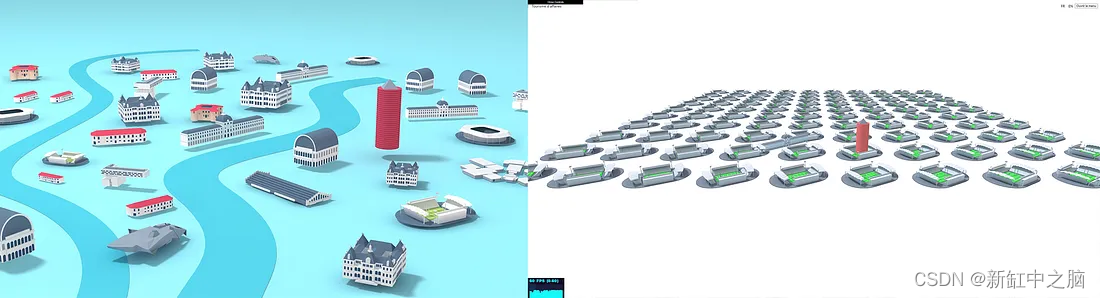
左:第一個場景合成測試渲染,右:早期 webgl 壓力測試
為了將繪制的三角形數量保持在最低限度,我們還很快決定限制場景左側和右側遠側的 3D 對象的數量。 但過了一段時間,我們意識到我們實際上必須阻止用戶看到這些區域。
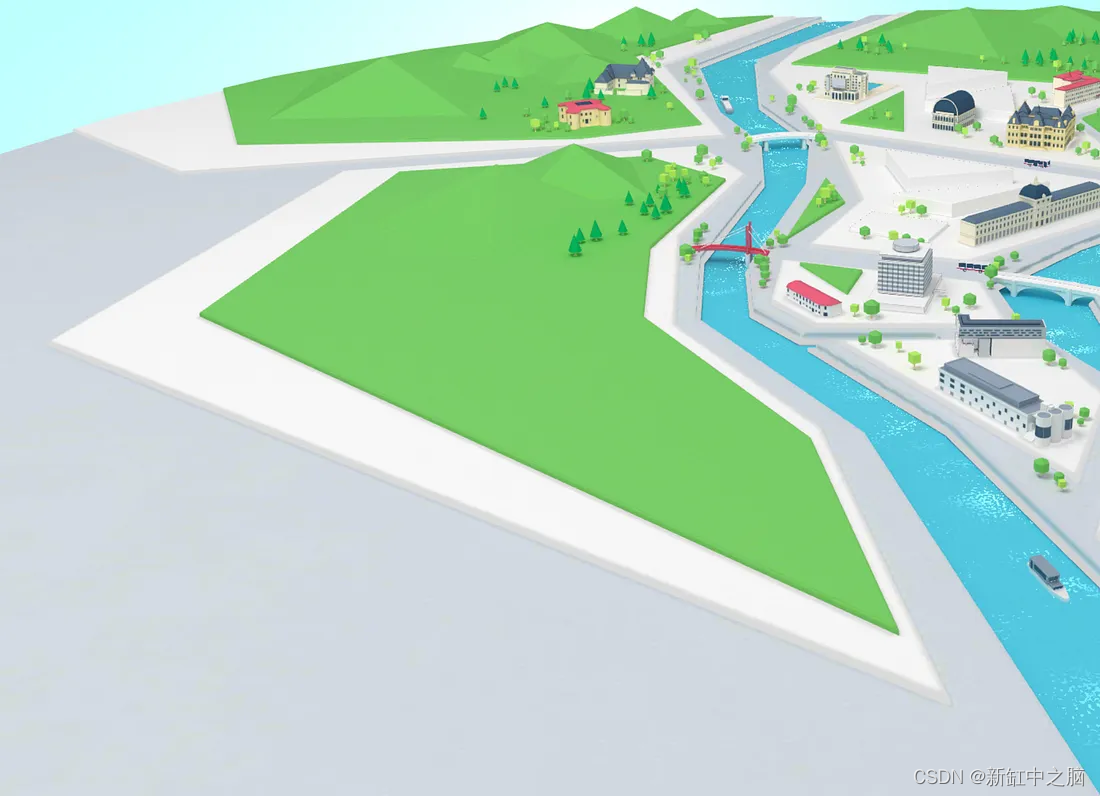
這個地方看起來很空,不是嗎?
2.2 相機操作
為了避免平移、縮放和動畫之間的任何沖突,我很早就決定從頭開始編寫相機控件的代碼。 事實證明這非常方便,因為之后為相機可能的位置添加閾值并不困難。
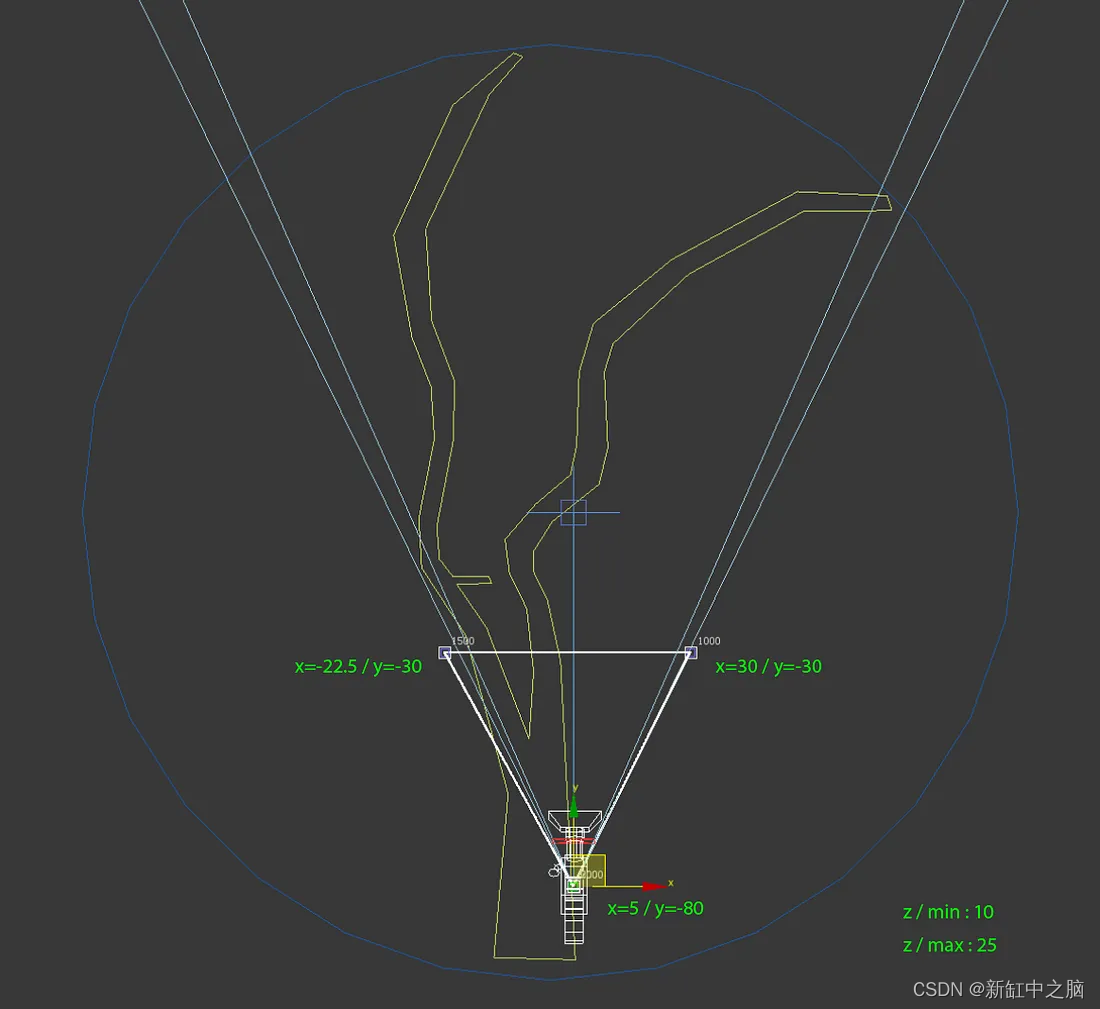
白色三角形代表我們實際的相機范圍
這樣,我們成功地限制了相機的移動,同時仍然允許用戶探索所有地圖重要區域。
2.3 烘焙和壓縮紋理
為了節省大量 GPU 工作負載,Nico 和我同意的另一件事是用全局照明和陰影烘焙所有紋理。
當然,這意味著更多的建模工作,如果你的場景需要頻繁更改,這可能會很煩人。 但它減輕了 GPU 的大量計算負擔(光照陰影、陰影貼圖……),在我們的例子中,這絕對是值得的。

3D場景建模概述
當處理如此數量的紋理(通常為 1024x1024、2048x2048 甚至 4096x4096 像素寬)時,你應該考慮的另一件事是使用基礎壓縮紋理。
如果你從未聽說過,基礎紋理基本上比 jpeg/png 紋理占用更少的 GPU 內存。 當它們從 CPU 上傳到 GPU 時,它們還可以降低主線程瓶頸。
你可以在這里非常輕松地生成基礎紋理。
3、代碼架構和組織
當需要處理如此多的資源時,組織代碼的最佳方法是創建幾個 javascript 類(或函數,當然取決于你)并將它們組織在目錄和文件中。
通常,我是這樣組織該項目的文件和文件夾的:
webgl
|-- data
|   |-- objects.js
|   |-- otherObjects.js
|-- shaders
|   |-- customShader.js
|   |-- anotherShader.js
|-- CameraController.js
|-- GroupRaycaster.js
|-- ObjectsLoader.js
|-- WebGLExperience.js
- data文件夾包含單獨文件中的 javascript 對象以及所有信息
- shaders文件夾包含單獨文件中的所有項目自定義著色器
- CameraController.js:處理所有相機移動和控制的類
- GroupRaycaster.js:處理所有“交互式”對象光線投射的類
- ObjectsLoader.js:加載所有場景對象的類
- WebGLExperience.js:初始化渲染器、相機、場景、后處理并處理所有其他類的主類
當然,你可以自由地以不同的方式組織它。 例如,有些人喜歡為渲染器、場景和相機創建單獨的類。
3.1 核心的概念代碼摘錄
那么讓我們進入代碼本身吧!
以下是一些文件實際外觀的詳細示例。
Obects.js :
import { customFragmentShader } from "../shaders/customShader";const sceneObjects = [{subPath: "path/to/",gltf: "object1.gltf"},{subPath: "anotherPath/to/",gltf: "object2.gltf",fragmentShader: customFragmentShader,uniforms: {uTime: {value: 0,}}}
];export default sceneObjects;
ObjectsLoader.js:
import { LoadingManager } from "three";import { GLTFLoader } from "three/examples/jsm/loaders/GLTFLoader";
import { BasisTextureLoader } from "three/examples/jsm/loaders/BasisTextureLoader";export default class ObjectsLoader {constructor({renderer, // our threejs rendererbasePath = '/', // common base path for all your assetsonLoading = () => {}, // onLoading callbackonComplete = () => {} // onComplete callback}) {this.renderer = renderer;this.basePath = basePath;this.loadingManager = new LoadingManager();this.basisLoader = new BasisTextureLoader(this.loadingManager);// you can also host those files locally if you wantthis.basisLoader.setTranscoderPath("/node_modules/three/examples/js/libs/basis/");this.basisLoader.detectSupport(this.renderer);this.loadingManager.addHandler(/\.basis$/i, this.basisLoader);this.loader = new GLTFLoader(this.loadingManager);this.loader.setPath(this.basePath);this.onLoading = onLoading;this.onComplete = onComplete;this.objects = [];this.state = {objectsLoaded: 0,totalObjects: 0,isComplete: false,};this.loadingManager.onProgress = (url, itemsLoaded, itemsTotal) => {const percent = Math.ceil((itemsLoaded / itemsTotal) * 100);// loading callbackthis.onLoading && this.onLoading(percent);if(percent === 100 && !this.state.isComplete) {this.state.isComplete = true;this.isLoadingComplete();}};this.loadingManager.onError = (url) => {console.warn('>>> error while loading: ', url);};}loadObject({object,parent, // could be our main scene or a grouponSuccess = () => {} // callback for each object loaded if needed}) {if(!object || !object.gltf) return;if('requestIdleCallback' in window) {window.requestIdleCallback(() => {this.startLoading({object,parent,onSuccess});});}else {this.startLoading({object,parent,onSuccess});}}startLoading({object,parent,onSuccess}) {this.state.totalObjects++;// if object has a subpathif(object.subPath) {this.loader.setPath(this.basePath + object.subPath);}this.loader.load(object.gltf, (gltf) => {const sceneObject = {gltf,};// ... do whatever you want with your gltf scene here// ... like using a ShaderMaterial if object.fragmentShader is defined for example!parent.add(gltf.scene);this.objects.push(sceneObject);onSuccess && onSuccess(sceneObject);// check if we've load everythingthis.state.objectsLoaded++;this.isLoadingComplete();}, (xhr) => {},(error) => {console.warn( 'An error happened', error );this.state.objectsLoaded++;this.isLoadingComplete();});}isLoadingComplete() {if(this.state.isComplete && this.state.objectsLoaded === this.state.totalObjects) {setTimeout(() => {this.onComplete && this.onComplete();}, 0);}}
}
WebGLExperience.js:
import {WebGLRenderer,Scene,sRGBEncoding,Group
} from "three";import ObjectsLoader from "./ObjectsLoader";
import CameraController from "./CameraController";
import GroupRaycaster from "./GroupRaycaster";import sceneObjects from "./data/objects";/***
Project architecture example:
webgl
|-- data
|   |-- objects.js
|   |-- otherObjects.js
|-- shaders
|   |-- customShader.js
|   |-- anotherShader.js
|-- CameraController.js
|-- GroupRaycaster.js
|-- ObjectsLoader.js
|-- WebGLExperience.js
*/export default class WebGLExperience {constructor({// add params here if neededcontainer = document.body,}) {this.container = container;// update on resizethis.width = window.innerWidth;this.height = window.innerHeight;this.initRenderer();this.initScene();this.initCamera();this.loadObjects();this.initRaycasting();}/*** EVENTS CALLBACKS ***/onLoading(callback) {if(callback) {this.onLoadingCallback = callback;}return this;}onComplete(callback) {if(callback) {this.onCompleteCallback = callback;}return this;}/*** THREEJS SETUP ***/initRenderer() {this.renderer = new WebGLRenderer({antialias: true,alpha: true,});// important when dealing with GLTFs!this.renderer.outputEncoding = sRGBEncoding;this.renderer.setSize( this.width, this.height );this.renderer.setClearColor( 0xffffff, 1 );this.renderer.outputEncoding = sRGBEncoding;// append the canvasthis.container.appendChild( this.renderer.domElement );}initScene() {// scenethis.scene = new Scene();}initCamera() {// creates the camera and handles the controls & movementsthis.cameraController = new CameraController({webgl: this,});this.camera = this.cameraController.camera;}/*** RAYCASTING ***/initRaycasting() {this.raycaster = new GroupRaycaster({camera: this.camera,width: this.width,height: this.height,onMouseEnteredObject: (object) => {// raycasted object mouse enter event},onMouseLeavedObject: (object) => {// raycasted object mouse leave event},onObjectClicked: (object) => {// raycasted object mouse click event}});}/*** LOAD OBJECTS ***/loadObjects() {this.objectsLoader = new ObjectsLoader({renderer: this.renderer,basePath: '/assets/', // whateveronLoading: (percent) => {console.log(percent);// callbackthis.onLoadingCallback && this.onLoadingCallback(percent);},onComplete: () => {// loading complete...console.log("loading complete!");// callbackthis.onCompleteCallback && this.onCompleteCallback();}});// create a new group where we'll add all our objectsthis.objectGroup = new Group();this.scene.add(this.objectGroup);// load the objectssceneObjects.forEach(object => {this.objectsLoader.loadObject({object,parent: this.objectGroup,onSuccess: (loadedObject) => {console.log(loadedObject);}});});}/*** RENDERING ***/// ...other methods to handle rendering, interactions, etc.
}
3.2 與 Nextjs / React 集成
由于該項目使用 Nextjs,我們需要在 React 組件內實例化我們的 WebGLExperience 類。
我們只需創建一個 WebGLCanvas 組件并將其放在路由器外部,以便它始終位于 DOM 中。
WebGLCanvas.jsx:
import React, {useRef, useState, useEffect} from 'react';
import WebGLExperience from '../../webgl/WebGLExperience';import styles from './WebGLCanvas.module.scss';export default function WebGLCanvas() {const container = useRef();const [ webglXP, setWebglXP ] = useState();// set up webgl context on inituseEffect(() => {const webgl = new WebGLExperience({container: container.current,});setWebglXP(webgl);}, []);// now we can watch webglXP inside a useEffect hook// and do what we want with it// (watch for events callbacks for example...)useEffect(() => {if(webglXP) {webglXP.onLoading((percent) => {console.log('loading', percent);}).onComplete(() => {// do what you want (probably dispatch a context event)});}}, [webglXP]);return (<div className="WebGLCanvas" ref={container} />);
};
4、自定義著色器
顯然我必須為這個網站從頭開始編寫一些自定義著色器。
以下是最有趣的一些細分。
4.1 著色器塊
如果你仔細查看上面的示例代碼,會發現我允許每個對象在需要時使用自己的自定義著色器。
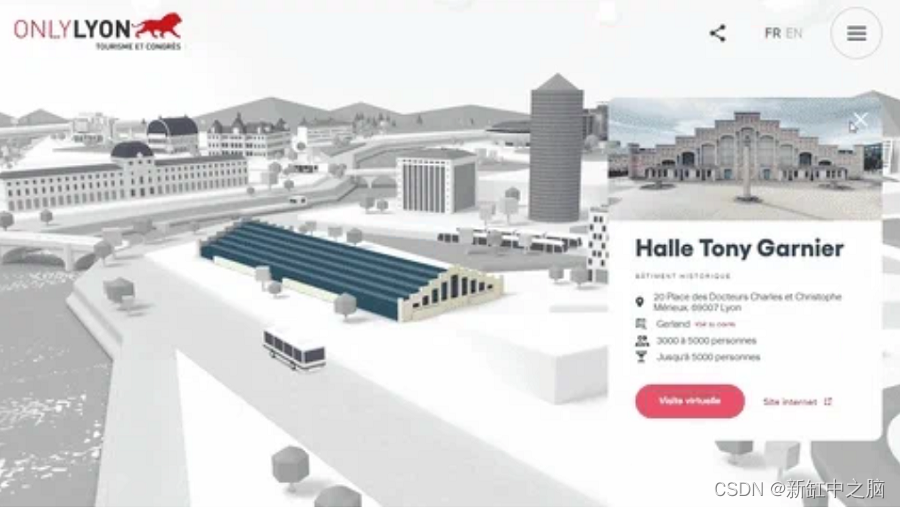
事實上,場景中的每個網格體都使用 ShaderMaterial,因為當你單擊建筑物時,灰度濾鏡將應用于所有其他場景網格體:

應用了灰度濾鏡的位置頁面屏幕截圖
這種效果的實現要歸功于這段超級簡單的 glsl 代碼:
const grayscaleChunk = `vec4 textureBW = vec4(1.0);textureBW.rgb = vec3(gl_FragColor.r * 0.3 + gl_FragColor.g * 0.59 + gl_FragColor.b * 0.11);gl_FragColor = mix(gl_FragColor, textureBW, uGrayscale);
`;
由于所有對象都必須遵守此行為,因此我將其實現為“著色器塊”,就像 Three.js 最初在內部構建自己的著色器的方式一樣。
例如,使用的最基本場景的網格片段著色器如下所示:
varying vec2 vUv;uniform sampler2D map;
uniform float uGrayscale;void main() {gl_FragColor = texture2D(map, vUv);#include <grayscale_fragment>
}
然后我們只獲取材質的 onBeforeCompile 方法的一部分:
material.onBeforeCompile = shader => {shader.fragmentShader = shader.fragmentShader.replace("#include <grayscale_fragment>",grayscaleChunk);
};
這樣,如果我必須調整灰度效果,我只需修改一個文件,它就會更新我的所有片段著色器。
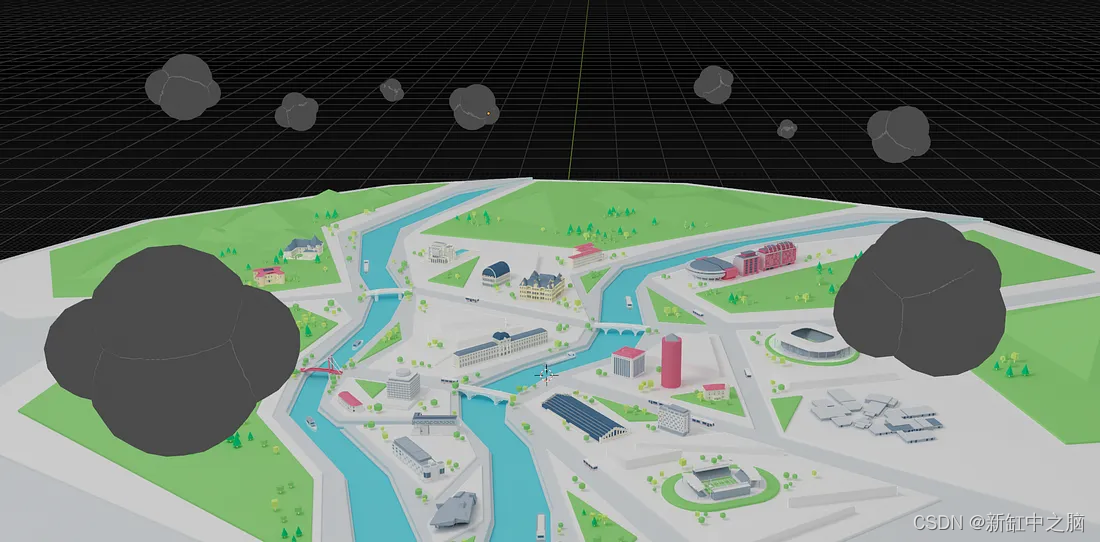
4.2 云
正如我上面提到的,我們決定不在場景中放置任何真實的燈光。 但由于云層正在(緩慢)移動,因此需要對其應用某種動態閃電。
為此,我需要做的第一件事是將頂點世界位置和法線傳遞給片段著色器:
varying vec3 vNormal;
varying vec3 vWorldPos;void main() {vec4 mvPosition = modelViewMatrix * vec4(position, 1.0);gl_Position = projectionMatrix * mvPosition;vWorldPos = (modelMatrix * vec4(position, 1.0)).xyz;vNormal = normal;
}
然后在片段著色器中,我使用它們根據一些uniforms計算漫反射閃電:
varying vec3 vNormal;
varying vec3 vWorldPos;uniform float uGrayscale;uniform vec3 uCloudColor; // emissive color
uniform float uRoughness; // material roughness
uniform vec3 uLightColor; // light color
uniform float uAmbientStrength; // ambient light strength
uniform vec3 uLightPos; // light world space position// get diffusion based on material's roughness
// see https://learnopengl.com/PBR/Theory
float getRoughnessDiff(float diff) {float diff2 = diff * diff;float r2 = uRoughness * uRoughness;float r4 = r2 * r2;float denom = (diff2 * (r4 - 1.0) + 1.0);denom = 3.141592 * denom * denom;return r4 / denom;
}void main() {// ambient lightvec3 ambient = uAmbientStrength * uLightColor;// get light diffusionfloat diff = max(dot(normalize((uLightPos - vWorldPos)), vNormal), 0.0);// apply roughnessfloat roughnessDiff = getRoughnessDiff(diff);vec3 diffuse = roughnessDiff * uLightColor;vec3 result = (ambient + diffuse) * uCloudColor;gl_FragColor = vec4(result, 1.0);#include <grayscale_fragment>
}
這是一種從頭開始應用基本閃電陰影的廉價方法,而且結果足夠令人信服。
4.3 水中倒影
我花更多時間寫的片段著色器無疑是波光粼粼的水。
起初,我愿意采用與 Bruno Simon 在 Madbox 網站上所做的類似的方法,但他使用額外的網格和一組自定義 UV 來實現。
由于 Nico 已經忙于所有建模工作,我決定嘗試另一種方法。 我為自己創建了一個額外的紋理來計算波的方向:
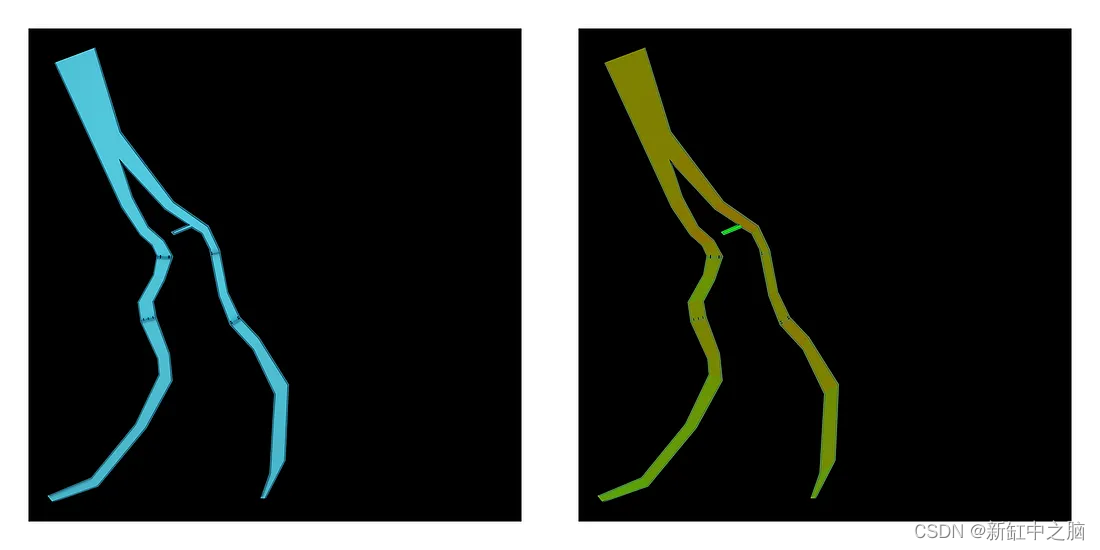
左:水紋理,右:水流方向紋理
這里,水流方向被編碼在綠色通道中:50% 的綠色表示水流直行,60% 的綠色表示水稍微向左流動,40% 表示水稍微向右流動,等等 在…
為了創建波浪,我使用了帶有閾值的 2D perlin 噪聲。 我使用了其他一些 2D 噪聲來確定水會發光的區域,使它們向相反的方向移動,瞧!
varying vec2 vUv;uniform sampler2D map;
uniform sampler2D tFlow;
uniform float uGrayscale;
uniform float uTime;uniform vec2 uFrequency;
uniform vec2 uNaturalFrequency;
uniform vec2 uLightFrequency;
uniform float uSpeed;
uniform float uLightSpeed;
uniform float uThreshold;
uniform float uWaveOpacity;// see https://gist.github.com/patriciogonzalezvivo/670c22f3966e662d2f83#classic-perlin-noise
// for cnoise functionvec2 rotateVec2ByAngle(float angle, vec2 vec) {return vec2(vec.x * cos(angle) - vec.y * sin(angle),vec.x * sin(angle) + vec.y * cos(angle));
}void main() {vec4 flow = texture2D(tFlow, vUv);float sideStrength = flow.g * 2.0 - 1.0;vec2 wavesUv = rotateVec2ByAngle(sideStrength * PI, vUv) * uFrequency;float mainFlow = uTime * uSpeed * (1.0 - sideStrength);float sideFlow = uTime * sideStrength * uSpeed;wavesUv.x -= sideFlow;wavesUv.y += mainFlow;// make light areas travel towards the userfloat waveLightStrength = cnoise(wavesUv);// make small waves with noisevec2 naturalNoiseUv = rotateVec2ByAngle(sideStrength * PI, vUv * uNaturalFrequency);float naturalStrength = cnoise(naturalNoiseUv);// apply a threshold to get small waves moving towards the userfloat waveStrength = step(uThreshold, clamp(waveLightStrength - naturalStrength, 0.0, 1.0));// a light mowing backward to improve overall effectfloat light = cnoise(vUv * uLightFrequency + vec2(uTime * uLightSpeed));// get our final waves colorsvec4 color = vec4(1.0);color.rgb = mix(vec3(0.0), vec3(1.0), 1.0 - step(waveStrength, 0.01));// exagerate effectfloat increasedShadows = pow(abs(light), 1.75);color *= uWaveOpacity * increasedShadows;// mix with original texturevec4 text = texture2D(map, vUv);gl_FragColor = text + color;#include <grayscale_fragment>
}
如果你想測試一下,這里有一個 Shadertoy 上的演示。
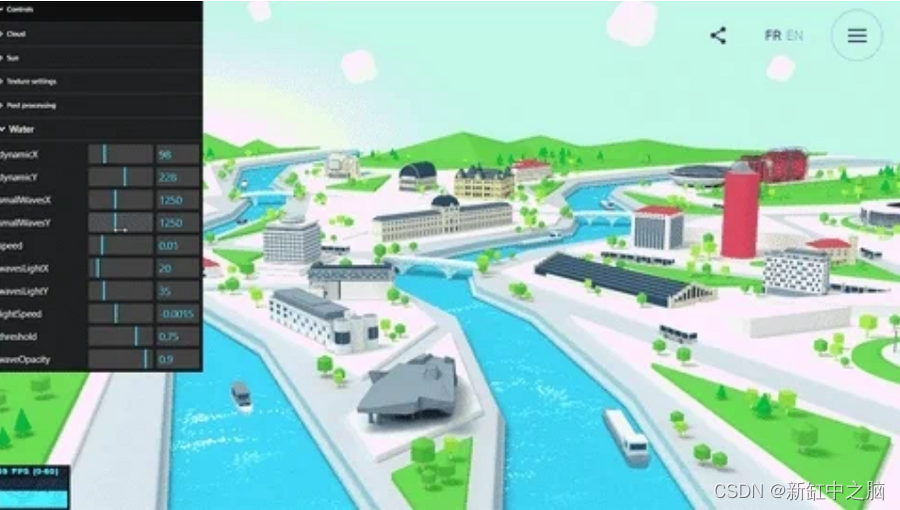
為了幫助我調試這個問題,我使用了 GUI 來實時調整所有值并找到最有效的值(當然,我已經使用該 GUI 來幫助我調試很多其他事情) 。
4.4 后期處理
最后有一個使用 Threejs 內置 ShaderPass 類應用的后處理通道。 它處理出現的動畫,在某個位置聚焦時在相機移動上添加一點魚眼,并負責小級別校正(亮度、對比度、飽和度和曝光)。
在放大/縮小動畫期間應用輕微的后處理變形效果
PostFXShader.js:
const PostFXShader = {uniforms: {'tDiffuse': { value: null },'deformationStrength': { value: 0 },'showScene': { value: 0 },// color manipulations'brightness': { value: 0 },'contrast': { value: 0.15 },'saturation': { value: 0.1 },'exposure': { value: 0 },},vertexShader: /* glsl */`varying vec2 vUv;void main() {vUv = uv;gl_Position = projectionMatrix * modelViewMatrix * vec4( position, 1.0 );}`,fragmentShader: `varying vec2 vUv;uniform sampler2D tDiffuse;uniform float showScene;uniform float deformationStrength;uniform float brightness;uniform float contrast;uniform float saturation;uniform float exposure;vec3 adjustBrightness(vec3 color, float value) {return color + value;}vec3 adjustContrast(vec3 color, float value) {return 0.5 + (1.0 + value) * (color - 0.5);}vec3 adjustExposure(vec3 color, float value) {return color * (1.0 + value);}vec3 adjustSaturation(vec3 color, float value) {// https://www.w3.org/TR/WCAG21/#dfn-relative-luminanceconst vec3 luminosityFactor = vec3(0.2126, 0.7152, 0.0722);vec3 grayscale = vec3(dot(color, luminosityFactor));return mix(grayscale, color, 1.0 + value);}void main() {vec2 texCoords = vUv;vec2 normalizedCoords = texCoords * 2.0 - 1.0;float distanceToCenter = distance(normalizedCoords, vec2(0.0));vec2 distortedCoords = normalizedCoords * (1.0 - distanceToCenter * deformationStrength);vec2 offset = normalizedCoords * sin(distanceToCenter * 3.0 - showScene * 3.0) * (1.0 - showScene) * 0.1;texCoords = (distortedCoords + 1.0) * 0.5 + offset;vec4 texture = texture2D(tDiffuse, texCoords);float showEffect = clamp(showScene - length(offset) * 10.0 / sqrt(2.0), 0.0, 1.0);vec4 grayscale = vec4(1.0);grayscale.rgb = vec3(texture.r * 0.3 + texture.g * 0.59 + texture.b * 0.11);texture.rgb = mix(grayscale.rgb, texture.rgb, showEffect);texture.a = showEffect * 0.9 + 0.1;texture.rgb *= texture.a;texture.rgb = adjustBrightness(texture.rgb, brightness);texture.rgb = adjustContrast(texture.rgb, contrast);texture.rgb = adjustExposure(texture.rgb, exposure);texture.rgb = adjustSaturation(texture.rgb, saturation);gl_FragColor = texture;}`
};export { PostFXShader };
在某些時候,我們還嘗試添加散景通道,但它對性能要求太高,因此我們很快就放棄了它。
5、使用 Spector 進行調試
你始終可以通過安裝spector.js擴展并檢查WebGL上下文來深入查看使用的所有著色器。
如果你從未聽說過,spector.js 適用于每個 WebGL 網站。 如果想檢查一些 WebGL 效果是如何實現的,它總是超級方便!
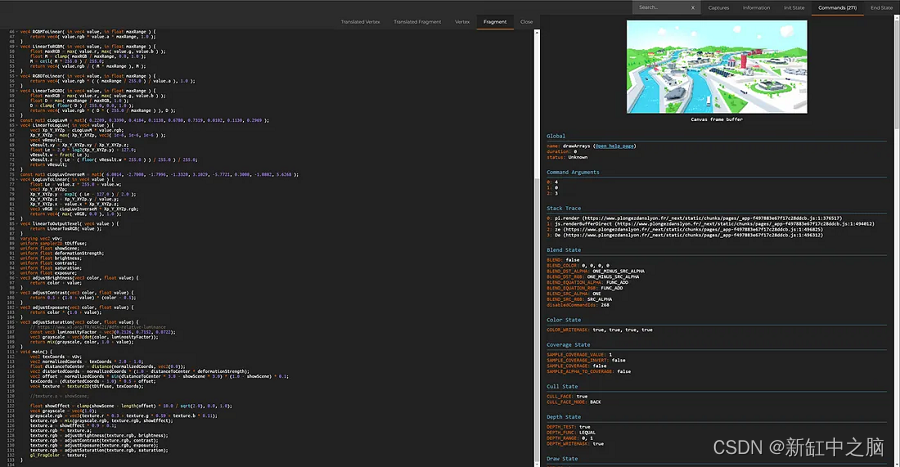
使用spector.js 調試片段著色器
6、性能優化
我使用了一些技巧來優化體驗性能。 以下是最重要的兩個:
首先,這應該成為一種習慣:僅在需要時渲染場景。
這可能聽起來很愚蠢,但它仍然經常被低估。 如果你的場景被覆蓋層、頁面或其他任何東西隱藏,就不要繪制它!
renderScene() {if(this.state.shouldRender) this.animate();
}
我使用的另一個技巧是根據用戶 GPU 和屏幕尺寸來調整場景的像素比。
這個想法是首先使用 detector-gpu 檢測用戶的 GPU。 一旦我們獲得了 GPU 估計的 fps,我們就會使用實際屏幕分辨率來計算實際條件下該 fps 測量值的增強估計。 然后,我們可以根據每次調整大小時的這些數字來調整渲染器像素比:
setGPUTier() {// GPU test(async () => {this.gpuTier = await getGPUTier({glContext: this.renderer.getContext(),});this.setImprovedGPUTier();})();
}// called on resize as well
setImprovedGPUTier() {const baseResolution = 1920 * 1080;this.gpuTier.improvedTier = {fps: this.gpuTier.fps * baseResolution / (this.width * this.height)};this.gpuTier.improvedTier.tier = this.gpuTier.improvedTier.fps >= 60 ? 3 :this.gpuTier.improvedTier.fps >= 30 ? 2 :this.gpuTier.improvedTier.fps >= 15 ? 1 : 0;this.setScenePixelRatio();
}
另一種常見的方法是持續監控給定時間段內的平均 FPS,并根據結果調整像素比。
其他優化包括使用或不使用多重采樣渲染目標,具體取決于 GPU 和 WebGL2 支持(使用 FXAA 通道作為后備)、使用鼠標事件發射器、觸摸和調整大小事件、使用 gsap 股票代碼作為應用程序的唯一 requestAnimationFrame 循環等 。
7、結束語
總而言之,我們在構建家鄉的交互式地圖時度過了一段愉快的時光。
正如我們所見,打造像這樣的沉浸式 WebGL 體驗(需要實時渲染很多內容)并不困難。 但它確實需要一些組織和一個包含多個文件的干凈代碼庫,可以輕松調試、添加或刪除功能。
通過該架構,還可以非常輕松地添加或刪除場景對象(因為這只是編輯 Javascript 對象的問題),從而在需要時可以方便地進行進一步的站點更新。
原文鏈接:WebGL旅游網站案例研究 — BimAnt


 P2P方式(對等方式))


的開發嗎?)
:Clickhouse Integration系列表引擎)

![Java并發編程(六)線程池[Executor體系]](http://pic.xiahunao.cn/Java并發編程(六)線程池[Executor體系])


