思路分析以及代碼
思路1:使用findContours函數,設置輪廓為最外部RETR_EXTERNAL,結果發現結果仍然是所有輪廓。
思路2:先二值化,然后進行閉操作,然后canny,得到的輪廓確實比之前少很多,但是有個缺點:瓶子的邊緣由于二值化的影響失真了。
 原圖 原圖 | 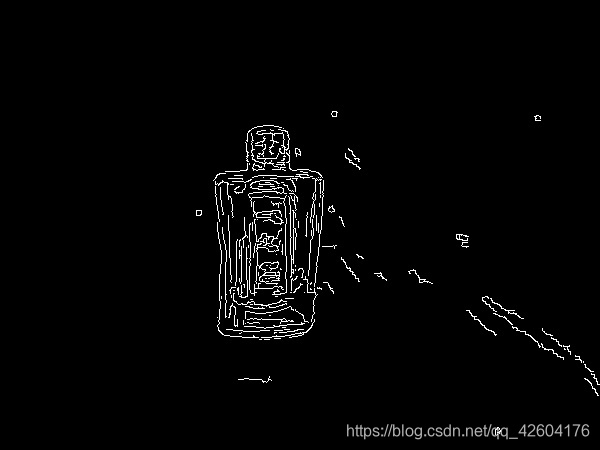 直接canny得到的圖 直接canny得到的圖 | 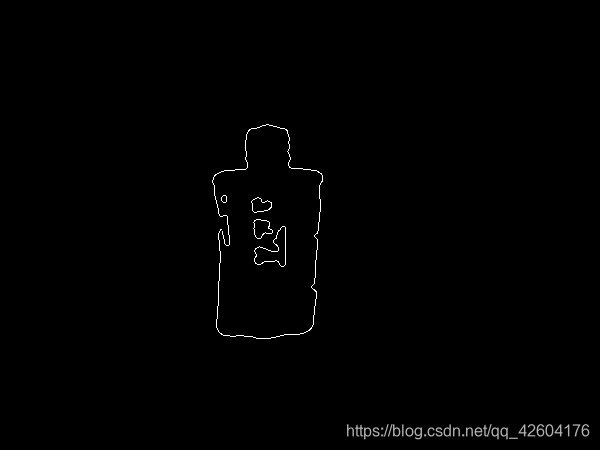 二值化后canny圖 二值化后canny圖 |
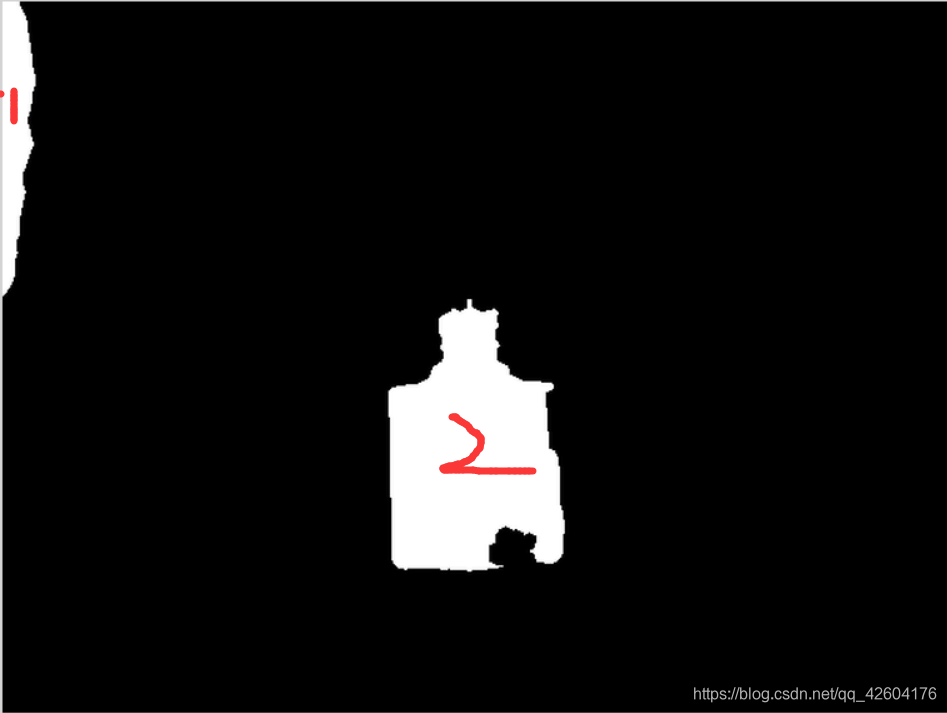
思路3:先二值化,然后進行閉操作,然后填充較小的黑色區域,然后再進行腐蝕操作,得到了比原本瓶子要小一圈的mask,然后對canny后的圖進行去輪廓操作(mask區域為黑),這樣或許就可以了。
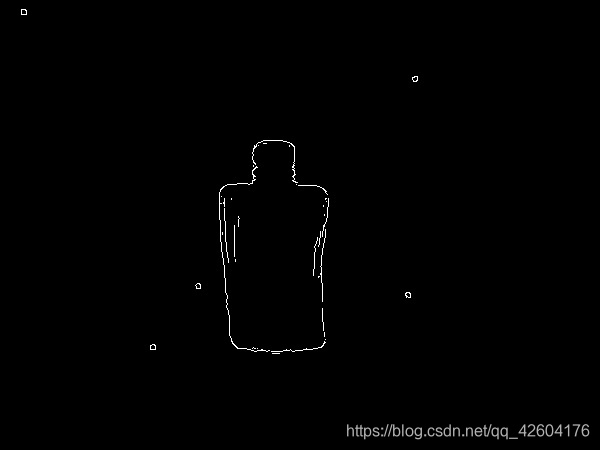 | 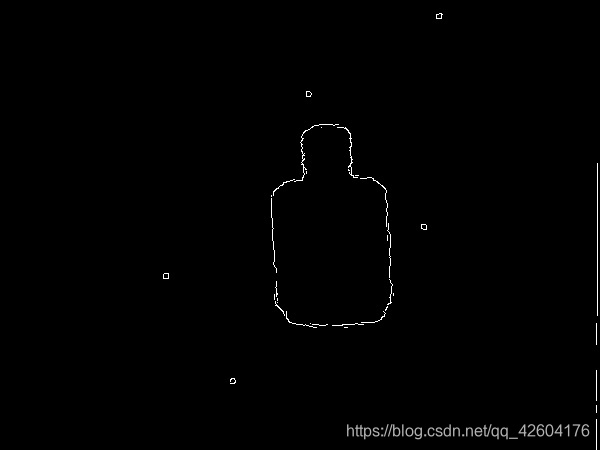 |
結果:確實好很多,但是有兩張圖片的沒有結果,觀察:有一個是因為孔洞填充選取的點有問題,還有一個 debug發現也是孔洞填充出現了問題。暫時現將大棕瓶區別對待。因為他的大津二值化結果有點特殊。
驗證結果,發現效果確實比直接模板匹配canny后的好,但是仍然會有誤判,發現誤判主要出現在將大一點的瓶子的某部分識別成小瓶子,所以需要從瓶子像素多少來進行限制,規則是:不能識別成像素比模板瓶子像素少的類別。
所要做的:總結出模板圖中瓶子像素值,得到每張測試圖的瓶子像素(這里使用mask2的像素個數需要用連通域來進行甄別是否為,比實際瓶子要小)
空洞填充函數
輸入:待處理圖像的二值圖
參數:背景顏色(黑還是白) 漫水填充的起始點(填充的是背景,一般選擇(0,0))
輸出:填充后的二值圖
void My_hole_filling(Mat& srcImage, Mat& dstImage,int color,Point &startPoint)
{// Floodfill from point (0, 0) 以點(0,0)為種子點,進行漫水填充/*int x = startPoint.x;int y = startPoint.y;*///srcImage.at<char>(x, y)if ( color== 255)		//背景為白{srcImage = ~srcImage;}Mat im_floodfill = srcImage.clone();floodFill(im_floodfill, startPoint, Scalar(255));//255// Invert floodfilled image 反轉圖像Mat im_floodfill_inv;bitwise_not(im_floodfill, im_floodfill_inv);// Combine the two images to get the foreground. 獲得前景dstImage = (srcImage | im_floodfill_inv);dstImage = ~dstImage;
}
獲取瓶子外輪廓的函數
輸入:原圖灰度圖 canny閾值 輸出:輪廓圖 mask2圖
void get_external_Contours_function(Mat& srcImage, Mat& dstImage,Mat& dstmask, int canny_thred)
{//模糊化降噪blur(srcImage, srcImage, Size(5, 5));Mat mask;//大津二值化threshold(srcImage, mask, 100, 255, THRESH_OTSU);//閉操作int Abs_offset = 2;Mat element = getStructuringElement(MORPH_ELLIPSE, Size(Abs_offset * 2 + 1, Abs_offset * 2 + 1), Point(Abs_offset, Abs_offset));	//返回的是內核矩陣morphologyEx(mask, mask, MORPH_CLOSE, element);//孔洞填充Point startpoint = Point(40,40);My_hole_filling(mask, mask, 0, startpoint);//將mask縮小一圈Mat mask2;Mat element_erode = getStructuringElement(MORPH_ELLIPSE, Size(Abs_offset * 2 + 1, Abs_offset * 2 + 1), Point(Abs_offset, Abs_offset));	//返回的是內核矩陣morphologyEx(mask, mask2, MORPH_DILATE, element_erode);dstmask = mask2;//mask2就是我們的掩膜//對模糊后的灰度圖進行canny檢測Canny(srcImage, dstImage, canny_thred, canny_thred * 2, 3);//將在mask2內的所有為白的像素置為黑int height = dstImage.rows;int width = dstImage.cols;for (int j = 0; j < height; j++){for (int i = 0; i < width; i++){if (mask2.at<uchar>(j, i) == 0 && dstImage.at<uchar>(j, i) == 255){dstImage.at<uchar>(j, i) = 0;}}}
}
連通域測試代碼,找出mask2中面積最大的連通域的像素個數
int main()
{cv::Mat srcMat = imread("D:\\opencv_picture_test\\視覺項目resize后的圖片夾\\測試圖片夾\\測試圖\\10+麻點.jpg",1);//cv::Mat srcMat = imread("D:\\opencv_picture_test\\視覺項目resize后的圖片夾\\測試圖片夾\\測試圖\\大棕瓶.jpg", 1);//cv::Mat srcMat = imread("D:\\opencv_picture_test\\視覺項目resize后的圖片夾\\測試圖片夾\\均衡化前的測試圖\\方肩+肩薄.jpg", 1);Mat dstMat;Mat mask2;int thred = 40;//轉換成灰度cvtColor(srcMat, dstMat, COLOR_BGR2GRAY);get_external_Contours_function(dstMat, dstMat, mask2, thred);//觀察連通域個數,同時選出最大的那個連通域,之前對mask2進行反色mask2 = 255 - mask2;Mat lableMat;Mat statsMat;Mat centerMat;int nComp = cv::connectedComponentsWithStats(mask2,lableMat,statsMat,centerMat,8,CV_32S);//找出連通域像素個數最多的那個,然后記錄下像素個數int max_pixels = 0;int max_pixels_label = 0;if (nComp == 1) max_pixels = statsMat.at<int>(1, 4);else{//找到像素點最多的連通域標記vector<int > pixels_nums;for (int i = 1; i < nComp; i++){pixels_nums.push_back(statsMat.at<int>(i, 4));	//將連通域面積入vector}//找到最大的值并且返回它在vector的位置auto maxPosition = max_element(pixels_nums.begin(), pixels_nums.end());max_pixels = *maxPosition;max_pixels_label = maxPosition - pixels_nums.begin();}cout <<"連通域個數(算上背景)="<< nComp << endl;cout << "max_pixels = " << max_pixels << endl;cout << endl;imshow("die_on_chip", dstMat);waitKey(0);return 0;
}
結果:
 |  |
獲取地址成功
D:/opencv_picture_test/視覺項目resize后的圖片夾/測試圖片夾/測試圖\10+波紋.jpg
0 max_pixels = 14347
D:/opencv_picture_test/視覺項目resize后的圖片夾/測試圖片夾/測試圖\10+麻點.jpg
1 max_pixels = 13617
D:/opencv_picture_test/視覺項目resize后的圖片夾/測試圖片夾/測試圖\10+氣泡+瓶口破裂.jpg
2 max_pixels = 13368
D:/opencv_picture_test/視覺項目resize后的圖片夾/測試圖片夾/測試圖\10.jpg
3 max_pixels = 14335
D:/opencv_picture_test/視覺項目resize后的圖片夾/測試圖片夾/測試圖\10_2.jpg
4 max_pixels = 12677
D:/opencv_picture_test/視覺項目resize后的圖片夾/測試圖片夾/測試圖\11.jpg
5 max_pixels = 11718
D:/opencv_picture_test/視覺項目resize后的圖片夾/測試圖片夾/測試圖\12.jpg
6 max_pixels = 12413
D:/opencv_picture_test/視覺項目resize后的圖片夾/測試圖片夾/測試圖\13+炸口.jpg
7 max_pixels = 8002
D:/opencv_picture_test/視覺項目resize后的圖片夾/測試圖片夾/測試圖\14.jpg
8 max_pixels = 8870
D:/opencv_picture_test/視覺項目resize后的圖片夾/測試圖片夾/測試圖\2+料紋.jpg
9 max_pixels = 18144
D:/opencv_picture_test/視覺項目resize后的圖片夾/測試圖片夾/測試圖\3.jpg
10 max_pixels = 16658
D:/opencv_picture_test/視覺項目resize后的圖片夾/測試圖片夾/測試圖\3_2.jpg
11 max_pixels = 15836
D:/opencv_picture_test/視覺項目resize后的圖片夾/測試圖片夾/測試圖\4+厚底.jpg
12 max_pixels = 17636
D:/opencv_picture_test/視覺項目resize后的圖片夾/測試圖片夾/測試圖\4+厚底2.jpg
13 max_pixels = 16468
D:/opencv_picture_test/視覺項目resize后的圖片夾/測試圖片夾/測試圖\4+炸肩.jpg
14 max_pixels = 15504
D:/opencv_picture_test/視覺項目resize后的圖片夾/測試圖片夾/測試圖\5+脖夾料.jpg
15 max_pixels = 19443
D:/opencv_picture_test/視覺項目resize后的圖片夾/測試圖片夾/測試圖\5+肩薄.jpg
16 max_pixels = 18623
D:/opencv_picture_test/視覺項目resize后的圖片夾/測試圖片夾/測試圖\5+氣泡.jpg
17 max_pixels = 19209
D:/opencv_picture_test/視覺項目resize后的圖片夾/測試圖片夾/測試圖\5+炸口.jpg
18 max_pixels = 20063
D:/opencv_picture_test/視覺項目resize后的圖片夾/測試圖片夾/測試圖\5+皺紋氣泡.jpg
19 max_pixels = 19552
D:/opencv_picture_test/視覺項目resize后的圖片夾/測試圖片夾/測試圖\6.jpg
20 max_pixels = 14913
D:/opencv_picture_test/視覺項目resize后的圖片夾/測試圖片夾/測試圖\6_2.jpg
21 max_pixels = 15616
D:/opencv_picture_test/視覺項目resize后的圖片夾/測試圖片夾/測試圖\6_3.jpg
22 max_pixels = 15653
D:/opencv_picture_test/視覺項目resize后的圖片夾/測試圖片夾/測試圖\7+厚底.jpg
23 max_pixels = 15158
D:/opencv_picture_test/視覺項目resize后的圖片夾/測試圖片夾/測試圖\7+厚底2.jpg
24 max_pixels = 13383
D:/opencv_picture_test/視覺項目resize后的圖片夾/測試圖片夾/測試圖\8.jpg
25 max_pixels = 14950
D:/opencv_picture_test/視覺項目resize后的圖片夾/測試圖片夾/測試圖\8_2.jpg
26 max_pixels = 15271
D:/opencv_picture_test/視覺項目resize后的圖片夾/測試圖片夾/測試圖\9.jpg
27 max_pixels = 13192
統計每個瓶子的像素個數(取最小的再減去2000作為標準)
| 判斷序列 | 像素個數 |
|---|---|
| 1 | 暫不統計 |
| 2 | 18144 |
| 3 | 15836 |
| 4 | 15504 |
| 5 | 18623 |
| 6 | 14913 |
| 7 | 13383 |
| 8 | 14950 |
| 9 | 13192 |
| 10(A) | 12677 |
| 11(B) | 11718 |
| 12? | 12413 |
| 13(D) | 8002 |
| 14(E) | 8870 |
實現思路:獲取測試圖后,得到其mask2像素個數。與pixels_num_criterion[ ]中的元素相比較。
記錄下滿足(test_mask_pxiels>=pixels_num_criterion[i]-pixels_num_sub)的序號i,放入新的vector:prepare_template_num然后用序號屬于其中的模板去匹配。
代碼好像有點問題,存個檔,明天檢查一下:
//將測試圖轉換成與模板圖相匹配的函數
//輸入:測試圖 canny算子閾值 輸出:外輪廓圖
//返回值:該測試圖mask2中的瓶子像素個數
int test_covertTo_Outer_contour(Mat& srcImg, Mat& dstImg, int thred)
{//這里我們批量處理Mat mask2;//int thred = 40;//轉換成灰度cvtColor(srcImg, dstImg, COLOR_BGR2GRAY);get_external_Contours_function(dstImg, dstImg, mask2, thred);//觀察連通域個數,同時選出最大的那個連通域,之前對mask2進行反色mask2 = 255 - mask2;Mat lableMat;Mat statsMat;Mat centerMat;int nComp = cv::connectedComponentsWithStats(mask2,lableMat,statsMat,centerMat,8,CV_32S);//找出連通域像素個數最多的那個,然后記錄下像素個數int max_pixels = 0;int max_pixels_label = 0;if (nComp == 1) max_pixels = statsMat.at<int>(1, 4);else{//找到像素點最多的連通域標記vector<int > pixels_nums;//0是背景for (int i = 1; i < nComp; i++){pixels_nums.push_back(statsMat.at<int>(i, 4));	//將連通域面積入vector}//找到最大的值并且返回它在vector的位置,然后還需要+1才是在連通域label中的位置auto maxPosition = max_element(pixels_nums.begin(), pixels_nums.end());max_pixels = *(maxPosition);max_pixels_label = (maxPosition - pixels_nums.begin() + 1);}return max_pixels;
}
int main()
{//改變控制臺字體顏色system("color 02");//******************************************【0】獲取測試文件夾路徑和模板文件夾路徑********************************************************////獲取測試文件夾路徑和模板文件夾路徑cv::String path_test = "D:/opencv_picture_test/視覺項目resize后的圖片夾/測試圖片夾/測試圖/";        cv::String path_template = "D:/opencv_picture_test/視覺項目resize后的圖片夾/模板圖片夾/template外輪廓/";    cout << "獲取地址成功" << endl;//******************************************【1】加載模板圖像********************************************************////創建模板vectorvector<Mat>tempMat;//插入模板元素Mat srcImage;std::vector<cv::String> temp_filenames;cv::glob(path_template, temp_filenames);                 //opencv里面用來讀取指定路徑下文件名的一個很好用的函數for (int i = 0; i < temp_filenames.size(); i++){srcImage = cv::imread(temp_filenames[i],0);tempMat.push_back(srcImage);cout << temp_filenames[i] << endl;}//獲取模板數目int tempMat_Nums = tempMat.size();//******************************************【2】加載測試圖像********************************************************////創建測試vectorvector<Mat>testMat;//插入測試元素std::vector<cv::String> test_filenames;cv::glob(path_test, test_filenames);                 //opencv里面用來讀取指定路徑下文件名的一個很好用的函數for (int i = 0; i < test_filenames.size(); i++){srcImage = cv::imread(test_filenames[i]);testMat.push_back(srcImage);//cout << test_filenames[i] << endl;}//獲取測試圖數目int testMat_Nums = testMat.size();//******************************************【3】對每張測試圖進行模板匹配********************************************************//for (int j = 0;j < testMat_Nums;j++){cout <<"第"<< j <<"張測試圖片的測試"<< endl;Mat resultMat;Mat CompareMat;Mat dispMat;//將測試圖轉換成與模板圖相匹配的類型int test_mask_pxiels = 0;test_mask_pxiels=test_covertTo_Outer_contour(testMat[j], CompareMat, 40);cout << "test_mask_pxiels" << test_mask_pxiels << endl;int match_method = TM_CCORR_NORMED;		//經過試錯發現此參數較好。//用每個模板去匹配測試圖,并且找出每次結果的最佳匹配值,將值存入vector中vector<double>goodval;vector<Point>goodlock;int matchnum = 0;Point matchLoc;vector<int>prepare_template_num;cout << "可能的模板序號" << endl;for (int i = 0;i < 14;i++){if (test_mask_pxiels >= (pixels_num_criterion[i] - pixels_num_sub)){//將符合規則的模板序號導入vector中prepare_template_num.push_back(i);cout << i <<" ";}}cout << endl;for (int x = 0;x < prepare_template_num.size();x++){cout << prepare_template_num[x] << " ";}cout << endl;for (int i = 0;i < tempMat_Nums;i++){//采用模板與目標圖像像素與各自圖像的平均值計算dot product,正值越大匹配度越高,負值越大圖像的區別越大,但如果圖像沒有明顯的特征(即圖像中的像素值與平均值接近)則返回值越接近0;matchTemplate(CompareMat, tempMat[i], resultMat, match_method);//不歸一化,因為不同模板歸一化后的最佳值皆為1,無法比較//normalize(resultMat, resultMat, 0, 1, NORM_MINMAX, -1, Mat());	//歸一化double minVal; double maxVal; Point minLoc; Point maxLoc;	//定義最大值最小值以及它們的位置變量minMaxLoc(resultMat, &minVal, &maxVal, &minLoc, &maxLoc, Mat());	//從結果矩陣中找到匹配度最大以及最小的值并且確定其位置//對于方法SQDIFF和SQDIFF_NORMED兩種方法來講,越小的值就有著更高的匹配結果//而其余的方法則是數值越大匹配效果越好if (match_method == TM_SQDIFF || match_method == TM_SQDIFF_NORMED){//將不符合像素數目規則的模板的可能性置1vector<int>::iterator result = find(prepare_template_num.begin(), prepare_template_num.end(), i); //查找該模板是否食欲符合規則的模板if (result == prepare_template_num.end()) //沒找到{minVal = 1;}goodlock.push_back(minLoc);goodval.push_back(minVal);}else{//將不符合像素數目規則的模板的可能性置0vector<int>::iterator result = find(prepare_template_num.begin(), prepare_template_num.end(), i); //查找該模板是否食欲符合規則的模板if (result == prepare_template_num.end()) //沒找到{maxVal = 0;}goodlock.push_back(maxLoc);goodval.push_back(maxVal);}show_probability(i, maxVal);//cout << i << "  " << maxVal << endl;}//找到goodval中最佳的一組if (match_method == TM_SQDIFF || match_method == TM_SQDIFF_NORMED){auto goodPosition = min_element(goodval.begin(), goodval.end());matchnum = distance(begin(goodval), goodPosition);}else{auto goodPosition = max_element(goodval.begin(), goodval.end());matchnum = distance(begin(goodval), goodPosition);}show_text(matchnum, test_filenames[j]);matchLoc = goodlock[matchnum];testMat[j].copyTo(dispMat);//以最佳匹配點為中心繪制與模板相同大小的框rectangle(dispMat, matchLoc, Point(matchLoc.x + tempMat[matchnum].cols, matchLoc.y + tempMat[matchnum].rows), Scalar::all(255), 2, 8, 0);namedWindow("testMat", WINDOW_NORMAL);//WINDOW_NORMAL允許用戶自由伸縮imshow("testMat", dispMat);waitKey(30);}return 0;
}
函數與示例)

)
函數與示例)


函數與示例)


方法)


)
