目錄
一、實驗規劃
1、規劃表
2、安裝前宿主機檢查
1.配置主機名
2.制作ssh免密(VM1中執行)
?3.修改hosts 文件
4. 修改內核相關參數
5.加載模塊
6.?清空iptables、關閉防火墻、關閉交換空間、禁用selinux
7.?安裝ipvs與時鐘同步
8.配置docker的yum源、安裝docker及開機自啟
?3、安裝kubeadm、kubelet、kubectl
4、部署master節點
1.生成yaml文件及初始化集群
2.?拉取網絡組件配置文件 - calico
3.部署calico
4.錯誤處理
5、worker節點加入集群
6、k8s自動部署環境腳本?
7、worker端運行kubectl?
一、實驗規劃
1、規劃表
| 設備 | 主機名 | IP | 角色 |
| 虛擬機1(VM1) | K8s01 | 192.168.248.20 | Master |
| 虛擬機2(VM2) | K8s02 | 192.168.248.21 | Node |
| 虛擬機3(VM3) | K8s03 | 192.168.248.22 | Node |
默認已自行配置過IP地址,配置IP方式有很多:netplan、nmtui、nmcli、networking等方式?
2、安裝前宿主機檢查
1.配置主機名
VM1執行
[root@localhost ~]# hostnamectl set-hostname k8s01VM2執行
[root@localhost ~]# hostnamectl set-hostname k8s02VM3執行
[root@localhost ~]# hostnamectl set-hostname k8s03配置完成后,退出當前連接的遠程終端,重新登錄自動生效
2.制作ssh免密(VM1中執行)
[root@k8s01 ~]# ssh-keygen -t rsa -f ~/.ssh/id_rsa -N ''    #生成公鑰
#-t rsa指定使用RSA算法生成密鑰對
#-f ~/.ssh/id_rsa指定將私鑰保存在~/.ssh/id_rsa文件中
#-N ''設置空密碼以保護私鑰文件[root@k8s01 ~]# ls /root/.ssh/  #查看公私鑰是否生成
id_rsa  id_rsa.pub[root@k8s01 ~]# for i in 192.168.248.{20..22}; do ssh-copy-id root@$i; done #將私鑰拷貝給需要遠程的主機
?3.修改hosts 文件
echo -e "192.168.248.20 k8s01
192.168.248.21 k8s02
192.168.248.22 k8s03" >> /etc/hosts
4. 修改內核相關參數
echo -e "net.ipv4.ip_forward = 1
vm.swappiness = 0
net.bridge.bridge-nf-call-ip6tables = 1
net.bridge.bridge-nf-call-iptables = 1
fs.may_detach_mounts = 1" > /etc/sysctl.d/k8s.conf
#net.ipv4.ip_forward:將IPv4轉發功能開啟,允許系統作為路由器轉發IP數據包
#net.bridge.bridge-nf-call-ip6tables = 1: 允許通過網橋的IPV6數據包進行iptables規則的處理
#net.bridge.bridge-nf-call-iptables = 1:  允許通過網橋的IPV4數據包進行iptables規則的處理
#fs.may_detach_mounts = 1: 在卸載文件系統時允許解除掛載
5.加載模塊
echo -e "#!/bin/bash
modprobe -- br_netfilter
modprobe -- ip_vs
modprobe -- ip_vs_rr
modprobe -- ip_vs_wrr
modprobe -- ip_vs_sh
modprobe -- nf_conntrack_ipv4
" >> /etc/sysconfig/modules/ipvs.modules
#br_netfilter:      加載br_netfilter內核模塊,它是用于網橋與網絡層之間的過濾器。
#ip_vs:            加載ip_vs內核模塊,它提供IPVS(IP Virtual Server)功能,用于實現負載均衡。
#ip_vs_rr:         加載ip_vs_rr內核模塊,它是IPVS中的一種負載均衡調度算法,使用輪詢方式進行負載均衡。
#ip_vs_wrr:        加載ip_vs_wrr內核模塊,它是IPVS中的一種負載均衡調度算法,使用加權輪詢方式進行負載均衡。
#ip_vs_sh:         加載ip_vs_sh內核模塊,它是IPVS中的一種負載均衡調度算法,使用哈希方式進行負載均衡。
#nf_conntrack_ipv4:加載nf_conntrack_ipv4內核模塊,它是IPv4連接跟蹤模塊,用于跟蹤網絡連接狀態chmod 755 /etc/sysconfig/modules/ipvs.modules && bash /etc/sysconfig/modules/ipvs.modules &&  lsmod | grep -E "ip_vs|nf_conntrack_ipv4" > /dev/null
6.?清空iptables、關閉防火墻、關閉交換空間、禁用selinux
iptables -F
sed -i 's/SELINUX=enforcing/SELINUX=disabled/g' /etc/selinux/config
systemctl disable --now firewalld > /dev/null
swapoff -a
sed -i 's@/dev/mapper/centos-swap@#/dev/mapper/centos-swap@g' /etc/fstab
7.?安裝ipvs與時鐘同步
yum install -y ipset ipvsadm bash-completion sshpass
yum install -y chrony –y > /dev/null
systemctl enable --now chronyd
sleep 20
chronyc sources
8.配置docker的yum源、安裝docker及開機自啟
yum install wget -y
wget -O /etc/yum.repos.d/docker-ce.repo https://download.docker.com/linux/centos/docker-ce.repo
sed -i 's+download.docker.com+mirrors.tuna.tsinghua.edu.cn/docker-ce+' /etc/yum.repos.d/docker-ce.repo
yum install --setopt=obsoletes=0 docker-ce-18.06.3.ce-3.el7 -y
mkdir -p /etc/docker
echo -e '{"registry-mirrors": ["https://u6xekpvk.mirror.aliyuncs.com"]
}' > /etc/docker/daemon.json #替換鏡像加速器
systemctl daemon-reload && systemctl restart docker && systemctl enable docker
sleep 3
systemctl status docker
?3、安裝kubeadm、kubelet、kubectl
yum install -y kubelet-1.19.16 kubeadm-1.19.16 kubectl-1.19.16
systemctl enable kubelet --now
4、部署master節點
1.生成yaml文件及初始化集群
kubeadm config print init-defaults --component-configs KubeletConfiguration --component-configs KubeProxyConfiguration > kubeadm.yaml #生成kubeadm的yaml文件
sed -i "/advertiseAddress:/ s/:.*/: ${MASTER_IP}/" /root/kubeadm.yaml
sed -i "/imageRepository:/ s%:.*%: registry.aliyuncs.com/google_containers%" /root/kubeadm.yaml
sed -i "/serviceSubnet:/ a \ \ podSubnet: 10.244.0.0/16" /root/kubeadm.yaml
sed -i '/mode: ""/ c mode: "ipvs"' /root/kubeadm.yaml
kubeadm config images pull --config /root/kubeadm.yaml
kubeadm init --config kubeadm.yaml | tee k8s.txt
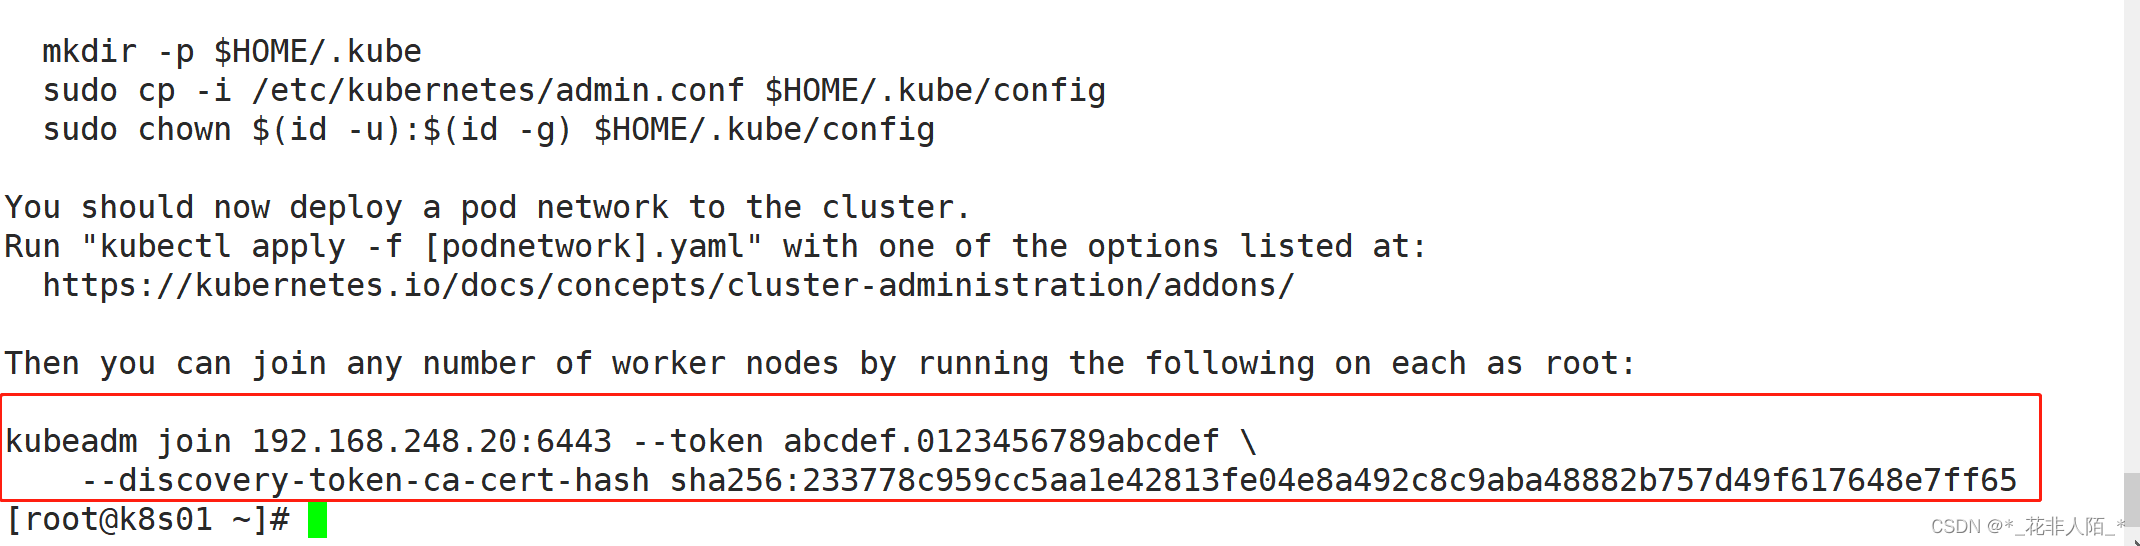
#出現如下內容說明初始化成功
"To start using your cluster, you need to run the following as a regular user:mkdir -p $HOME/.kubesudo cp -i /etc/kubernetes/admin.conf $HOME/.kube/configsudo chown $(id -u):$(id -g) $HOME/.kube/configYou should now deploy a pod network to the cluster.
Run "kubectl apply -f [podnetwork].yaml" with one of the options listed at:https://kubernetes.io/docs/concepts/cluster-administration/addons/Then you can join any number of worker nodes by running the following on each as root:kubeadm join 192.168.248.20:6443 --token abcdef.0123456789abcdef \--discovery-token-ca-cert-hash sha256:233778c959cc5aa1e42813fe04e8a492c8c9aba48882b757d49f617648e7ff65"#修改YAML文件
eval `sed -n '/mkdir/ s/ //p' /root/k8s.txt`
eval `sed -n "/sudo cp/ s/ //p" /root/k8s.txt`
eval `sed -n "/sudo chown/ s/ //p" /root/k8s.txt`
curl https://docs.projectcalico.org/archive/v3.20/manifests/calico.yaml -O
kubectl apply -f calico.yaml此為worker節點假如集群的命令
?根據提示內容命令,添加環境變量
mkdir -p $HOME/.kube
sudo cp -i /etc/kubernetes/admin.conf $HOME/.kube/config
sudo chown $(id -u):$(id -g) $HOME/.kube/config
2.?拉取網絡組件配置文件 - calico
curl https://docs.projectcalico.org/archive/v3.20/manifests/calico.yaml -O3.部署calico
kubectl apply -f calico.yaml
kubectl get pods -A #當所有pod都為runing 1/1時表示部署完成
4.錯誤處理
pod狀態一直處于”ContainerCreating“ 或其它狀態,通過如下命令強制刪除pod,刪除后會自動創建新的pod
kubectl delete -n kube-system pods 容器ID --force --grace-period=05、worker節點加入集群
kubeadm join 192.168.248.20:6443 --token abcdef.0123456789abcdef \--discovery-token-ca-cert-hash sha256:233778c959cc5aa1e42813fe04e8a492c8c9aba48882b757d49f617648e7ff65"
#注意!!!使用init時生成出來的提示命令
6、k8s自動部署環境腳本?
自動部署單master節點 + 雙worker腳本
7、worker端運行kubectl?
加入完成后,系統提示使用命令“kubectl get node”查看集群狀態,輸入命令后,系統會有以下報錯:
[root@k8s02 ~]# kubectl get nodes
The connection to the server localhost:8080 was refused - did you specify the right host or port?
使用以下命令將master節點的admin.conf文件拷貝到當前節點
[root@k8s02 ~]# mkdir -p $HOME/.kube
[root@k8s02 ~]# scp root@192.168.248.20:/etc/kubernetes/admin.conf $HOME/.kube/config
[root@k8s02 ~]# chown $(id -u):$(id -g) $HOME/.kube/config
:GETH MCAL配置及代碼實戰(以太網))


)


入門)


