一、走馬燈的作用
走馬燈是一種常見的網頁交互組件,可以展示多張圖片或者內容,通過自動播放或者手動切換的方式,讓用戶能夠方便地瀏覽多張圖片或者內容。
本次實現的不是輪播圖而是像傳送帶一樣的無限滾動的形式。
二、需求梳理
走馬燈可設置一下屬性:
- 滾動速度
- 滾動方向
- 一屏要顯示項的個數
- 容器的寬度
- 要展示的數據
- 自定義展示項
三、實現思路
3.1 首先確定一下我們的dom元素
wrap>list>item*n
- 最外層wrap用于限制顯示區域的寬度,超過寬度就隱藏。
- list 用于滾動顯示數據,所以我們的動畫加在這個元素上。
- item 用于放置展示項。
3.2 實現無限滾動的動畫
我們用keyframes關鍵幀動畫來做。
但是要滾動多少距離才能實現無限滾動呢?
1.計算動畫滾動距離
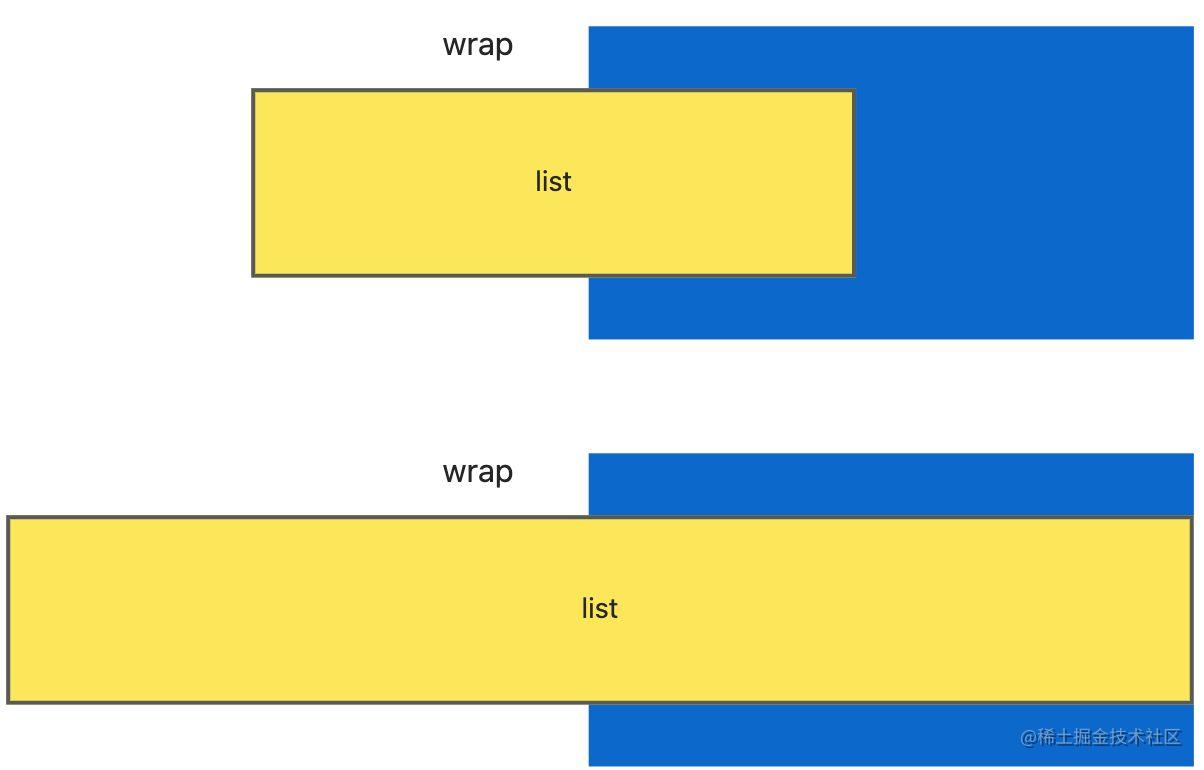
從上面的圖中我們可以看到當list的寬度<wrap的寬度(containerWidth)時,會出現滾動后出現空白的情況。那么第二張圖,list的寬度>=wrap的兩倍,就能在向左滾動完list的一半后,不會出現空白,而且為了給人一種無限滾動的效果,list的前后兩部分數據要保持一致。
所以滾動的距離 = 展示數據的個數 * 每項的寬度,而為了無限滾動效果,我們還需要對原始數據進行處理。
分為以下幾種情況:
- 數據個數>= 一屏展示個數(showNum)
此時重復兩次原始數據就能得到滾動數據
- 數據個數< 一屏展示個數
首先我們要保證沒有空白,那要如何填充呢?只填充到=showNum,行不行呢?
我們可以看一下:
比如說原始數據為[1,2,3],填充完再進行重復則為 [1,2,3,1,1,2,3,1],這樣會出現1這一項連續出現了。
所以最好的方式是直接填充原始數據直到>=showNum,所以最終我們得到的滾動數據是[1,2,3,1,2,3 ,1,2,3,1,2,3]
2.插入動畫
因為我們的動畫是根據傳入的變量得來的,所以不能直接寫在樣式文件里,我們通過在useEffect里插入樣式表對象的方式來實現。
四、完整代碼
組件代碼
import { ReactElement, useEffect } from "react";
import * as React from "react";
import "./index.less";
import { ItemProps } from "./demo";
interface Props {Item: (item: ItemProps) => ReactElement;showNum: number;speed: number;containerWidth: number;data: Array<any>;hoverStop?: boolean;direction?: "left" | "right";
}
const fillArray = (arr: any[], length: number): any[] => {const result: any[] = [];while (result.length < length) {result.push(...arr);}return result.concat(result);
};function AutoplayCarousel({Item,showNum,speed,containerWidth,data,hoverStop = false,direction = "left"
}: Props) {const showData = fillArray(data, showNum);const length = showData.length;const itemWidth = containerWidth / showNum;useEffect(() => {// 創建一個新的樣式表對象const style = document.createElement("style");// 定義樣式表的內容let start = "0";let end = `-${(itemWidth * length) / 2}`;if (direction === "right") {start = end;end = "0";}style.innerText = `@keyframes templates-partner-moving {0% {transform: translateX(${start}px);}100% {transform: translateX(${end}px);}}`;if (hoverStop) {style.innerText += `.list:hover {/*鼠標經過后,動畫暫停*/animation-play-state: paused !important;}`;}// 將樣式表插入到文檔頭部document.head.appendChild(style);// 組件卸載時清除樣式表return () => document.head.removeChild(style) as any;}, []);return (<div style={{ width: `${containerWidth}px` }} className="wrap"><divclassName="list"style={{width: `${itemWidth * length}px`,animation: `templates-partner-moving ${(length / showNum / 2) * speed}s infinite linear`}}>{showData.map((item) => (<div style={{ width: `${itemWidth}px` }}><Item {...item} /></div>))}</div></div>);
}export default AutoplayCarousel;
demo代碼
import React from "react";
import AutoplayCarousel from "./index";
const data = new Array(5).fill(0).map((item, index) => {return { num: index };
});
console.log("data", data);
export interface ItemProps {num: number;
}
const itemStyle = {border: "1px solid #ccc",background: "#fff",height: "50px",color: "red",marginRight: "15px"
};
function Demo() {const Item = (item: ItemProps) => {return <div style={itemStyle}>{item.num}</div>;};return (<AutoplayCarouselItem={Item}containerWidth={500}showNum={5}speed={8}data={data}/>);
}export default Demo;
樣式代碼
* {margin: 0;padding: 0;
}.wrap {overflow: hidden;.list {position: relative;top: 0px;left: 0px;height: 100%;display: flex;}
}

)


)


)

)


