這本書的主要內容都是以react v0.12為主,ES5語法,筆記中將會使用react v0.14和RS6。
第1章 react簡介
1.本質上是一個狀態機,它以精簡的模型管理復雜的隨著時間而變化的狀態。
2.它不是model-view-controller,它是mvc中的v(view),用來渲染視圖。
3.React運用虛擬的dom實現了一個強大的渲染系統。
4.(1)React就像高性能3d游戲引擎,以渲染函數為基礎。這些函數讀入當前的狀態,將其轉換為目標頁面上的一個虛擬表現。只要react被告知狀態有變化,它就會重新運行這些函數,計算頁面的一個新的虛擬表現,接著自動化把結果轉換成必要的dom更新來反應新的表現。
4.(2)乍一看,這種方式應該比通常的javascript方案(按需更新每一個元素要慢),但react確實是這么做的:它是用了非常高效的算法,計算出虛擬頁面當前版本和新版間的差異,基于這些差異對dom進行必要的最少更新。
5.所以說react贏就贏在了:
- 最小化了重繪,
- 并避免了不必要的dom操作,
- 這兩點都是公認的性能瓶頸。
6.react的虛擬表示差異算法,不但能夠把這些問題的影響降到最低。 ,還能簡化應用的維護成本。當用戶輸入或者有其他更新導致狀態改變時,我們只要簡單的通知react狀態改變了,它就能自動化地處理剩下的事情。我們無須深入到詳細的過程之中。
7.react在整個應用中只使用單個事件處理器,并且會把所有的事件委托到這個處理器上。這一點也提升了react的性能。因為如果有很多時間處理器也會導致性能問題。
第2章 JSX
什么是JSX
JSX即JavaScript XML——一種在React組件內部構建標簽的類XML語法。
與以往在JavaScript中嵌入HTML標簽的幾種方案相比,JSX有如下幾點明顯的特征:
- JSX是一種句法變換——每一個JSX節點都對應著一個JavaScript函數
- JSX既不提供也不需要運行時庫。
- JSX并沒有改變會添加JavaScript的語義——它只是簡單的函數調用而已。
使用JSX前
React.DOM.h1({className: 'question'}, 'Question'); // v0.11React.createElement('h1', {className: 'question'}, 'Question'); // v0.12使用JSX之后
<h1 className="question">Queations</h1>;使用JSX的好處
- 允許使用熟悉的語法來定義html元素樹
- 提供更佳語義化且易懂的標簽
- 程序結構更容易被直觀化
- 抽象了react element的創建過程
- 可以隨時掌控html標簽以及生成這些標簽的代碼
- 是原生的javascript
定義一個自定義組件
const React = require('react');
const ReactDOM = require('react-dom');
class Divider extends React.Component {render() {return (<div classNams="divider"><h2>Questions</h2><hr/></div>)}
}
ReactDOM.render(<Divider></Divider>,document.getElementById('init')
);
使用動態值
JSX將兩個花括號之間的內容{。。。}渲染為動態值。
簡單值:
var text = "Questions"
class Divider extends React.Component {render() {return (<div classNams="divider"><h2>{text}</h2><hr/></div>)}
}
ReactDOM.render(<Divider></Divider>,document.getElementById('init')
);
復雜邏輯使用函數求值:
class Date extends React.Component {
    dataToString = (d) => {return [d.getFullYear(),d.getMonth + 1,d.getDate()].join('-')}render() {return (<h2>{this.dataToString(new Date())}</h2>)}
}
ReactDOM.render(<Date></Date>,document.getElementById('init')
);
react通過將數組中的每一個元素渲染為一個節點的方式對數組進行自動求值。
var text = ['hello', 'world']
class Hello extends React.Component {render() {return (<h2>{text}</h2>)}
}
ReactDOM.render(<Hello></Hello>,document.getElementById('init')
);
// 渲染為 <h2>helloworld</h2>
子節點
將上面介紹過的例子改寫為:
const React = require('react');
const ReactDOM = require('react-dom');
class Divider extends React.Component {render() {return (<div classNams="divider"><h2>{this.props.children}</h2><hr/></div>)}
}
ReactDOM.render(<Divider>Questions</Divider>,document.getElementById('init')
);
注意,后面的示例中我們不會再寫
const React = require('react');const ReactDOM = require('react-dom');ReactDOM.render(<Divider>Questions</Divider>,document.getElementById('init'));這幾行代碼。
React將開始標簽與結束標簽之間的所有子節點保存在一個名為this.props.children的特殊組件屬性中。在上面的例子中,this.props.children == ["Questions"]
條件判斷
if/else邏輯很難用HTML標簽來表達,直接往JSX中加入if語句會渲染出無效的JavaScript:
// 這是錯誤的示范
<div className={if(isComplete) { 'is-complete' }}>。。。</div>
而解決的辦法就是使用以下某種方法:
- 使用三目運算符
- 設置一個變量并在屬性中引用
- 將邏輯轉化到函數中
- 使用&&運算符
使用三目運算符
render(){return(<div className={this.state.isComplete ? 'is-complete' : ''}>...</div>)
}
使用變量
getIsComplete = () => {return this.state.isComplete ? 'is-complete' : '';
}
render(){var isComplete = this.getIsComplete();return(<div className={isComplete}>...</div>)
}
使用函數
getIsComplete = () => {return this.state.isComplete ? 'is-complete' : '';
}
render(){return(<div className={this.getIsComplete()}>...</div>)
}
使用邏輯與(&&)運算符
render(){return(<div className={this.state.isComplete && 'is-complete'}>...</div>)
}
非dom屬性值
key
- 通過給組件設置一個獨一無二的鍵,并確保它在一個渲染周期中保持一致,使得react能夠更智能地決定應該重用一個組件,還是銷毀并重新創建一個組件,進而提升渲染性能。
ref
- ref允許父組件在render方法之外保持對子組件的一個引用
- 在jsx中,你可以通過在屬性中設置期望的引用名來定義一個引用。
render () {return (<div><input ref="myInput" .../></div>);
}
接著就可以在組件中的任何地方使用this.refs.myInput獲取這個引用了(不是真實的dom,是react在需要時用來創建dom的一個描述對象。若要訪問真實的節點,則可以使用:this.refs.myInput.getDOMNode() )
dangerouslySetInnerHTML(隨時可能發生變化)
render () {var htmlString = {__html: "<span>an html string</span>"}return (<div dangerouslySetInnerHTML={htmlString}></div>);
}
事件
在jsx中,捕獲一個事件就像給組件的方法設置一個屬性一樣簡單。
handleClick = (event) => {//...
}
render () {return (<div onClick={this.handleClick.bind(this)}></div>);
}
注釋
jsx的本質就是javascript,所以可以在標簽內添加原生的js注釋。 注釋可以用以下2種形式添加:
- 1.當做一個元素的子節點
- 2.內聯在元素的屬性中
1.作為子節點:
<!-- 子節點形式的注釋只需要簡單地包裹在花括號內即可,并且可以跨多行。-->
<div>{/* 這是注釋內容 */}<input type="text" name="" value="" placeholder="">
</div>
2.作為內聯屬性
// 內聯的注釋可以有兩種形式。首先,可以使用多行注釋:
<div><input/*這是多行注釋內容!*/type="text" placeholder="address" />
</div>// 其次也可以使用單行注釋
<div><inputtype="text"  // 這是單行注釋placeholder="address" />
</div>
特殊屬性
- htmlFor (for)
- 由于jsx會轉換為js,所以有些關鍵詞我們不能用,比如這個。
<label htmlFor="for-text" ...>- className (class)
<div className={classes} ...>樣式
簡單的駝峰屬性命名即可
render () {var styles = {borderColor: "#888",borderThinkness: "1px"};return (<div style={styles}></div>);
}
如果需要添加瀏覽器前綴瑞 -webkit-、-ms- 大駝峰(除了 ms ), 如:
var divStyle = {WebkitTransition: 'all', // 'W' 是大寫msTransition: 'all'      // 'ms' 為小寫
};
沒有jsx的react
所有的jsx標簽最后都會被轉換為原生的javascript。因此jsx對于react來說并不是必需的。然而,jsx確實減少了一部分復雜性。如果你不打算在react中使用jsx,那么在react中創建元素時需要知道以下三點:
- 1.定義組件類
- 2.創建一個為組件類產生實例的工廠
- 3.使用工廠來創建ReactElement實例
page 19.
第3章 組件的生命周期
React為每個組件提供了生命周期鉤子函數去響應不同的時刻:
- 1.實例化(創建時)
- 2.活動期(存在期)
- 3.銷毀時(被銷毀)
生命周期方法
react組件以簡潔的生命周期api來單單提供你所需要的方法(而不是所有方法)。
實例化
一個實例初次被創建所調用的生命周期方法和其他各個后續實例被創建時所調用的方法略有不同。
所以:當你首次使用一個組件類時,有如下調用順序:
- getDefaultProps
- getInitialState
- componentWillMount
- render
- componentDidMount
而該組件類的所有后續應用,將會如下:
- getDefaultProps
- componentWillMount
- render
- componentDidMount
??區別在于后續的不必執行:getInitialState函數,其余函數如常。(有待進一步理解)
React在ES6的實現中去掉了getInitialState這個hook函數,規定state在constructor中實現,如下:
class App extends React.Component {constructor(props) {super(props);this.state = {};}...}Babel的Blog上還有一種實現方法,即直接使用賦值語句:
Class App extends React.Component {
constructor(props) {super(props);
}state = {}
...}
存在期
隨著應用狀態的改變,以及組件逐漸受到影響,依次調用如下方法:
- componentWillReceiveProps
- shouldComponentUpdate
- componentWillUpdate
- render
- componentDidUpdate
銷毀&清理期
最后,組件被使用完后,componentWillUnmount方法將會被調用,目的是給這個實例提供清理自身的機會。
接下來,應該具體的理解 p24~30的內容(各個時期的各個函數的具體運作)。這里不過多闡述以增加篇幅,只理清思路即可。
我認為這段內容,應該是react的第一塊關鍵內容,乃設計之精心之處,應多多揣摩,爛熟于胸。
由于原書的內容是基于ES5的,下面的章節對使用ES6時的生命周期進行講解:
第二章 - ES6版 React組件生命周期小結
下面所寫的,只適合前端的React。(React也支持后端渲染,而且和前端有點小區別,不過我沒用過。)
相關函數
簡單地說,React Component通過其定義的幾個函數來控制組件在生命周期的各個階段的動作。
在ES6中,一個React組件是用一個class來表示的(具體可以參考官方文檔),如下:
// 定義一個TodoList的React組件,通過繼承React.Component來實現
class TodoList extends React.Component {...
}
這幾個生命周期相關的函數如下:
constructor(props, context)構造函數,在創建組件的時候調用一次。
componentWillMount()在組件掛載之前調用一次。如果在這個函數里面調用setState,本次的render函數可以看到更新后的state,并且只渲染一次。
componentDidMount()在組件掛載之后調用一次。這個時候,子主鍵也都掛載好了,可以在這里使用refs。
componentWillReceiveProps(nextProps)props是父組件傳遞給子組件的。父組件發生render的時候子組件就會調用componentWillReceiveProps(不管props有沒有更新,也不管父子組件之間有沒有數據交換)。
shouldComponentUpdate(nextProps, nextState)組件掛載之后,每次調用setState后都會調用shouldComponentUpdate判斷是否需要重新渲染組件。默認返回true,需要重新render。在比較復雜的應用里,有一些數據的改變并不影響界面展示,可以在這里做判斷,優化渲染效率。
componentWillUpdate(nextProps, nextState)shouldComponentUpdate返回true或者調用forceUpdate之后,componentWillUpdate會被調用。
componentDidUpdate()除了首次render之后調用componentDidMount,其它render結束之后都是調用componentDidUpdate。
componentWillMount、componentDidMount和componentWillUpdate、componentDidUpdate可以對應起來。區別在于,前者只有在掛載的時候會被調用;而后者在以后的每次更新渲染之后都會被調用。
ReactElement render()render是一個React組件所必不可少的核心函數(上面的其它函數都不是必須的)。記住,不要在render里面修改state。
componentWillUnmount()組件被卸載的時候調用。一般在componentDidMount里面注冊的事件需要在這里刪除。
更新方式
在react中,觸發render的有4條路徑。
以下假設shouldComponentUpdate都是按照默認返回true的方式。
- 首次渲染Initial Render
- 調用this.setState (并不是一次setState會觸發一次render,React可能會合并操作,再一次性進行render)
- 父組件發生更新(一般就是props發生改變,但是就算props沒有改變或者父子組件之間沒有數據交換也會觸發render)
- 調用this.forceUpdate
下面是我對React組件四條更新路徑地總結:
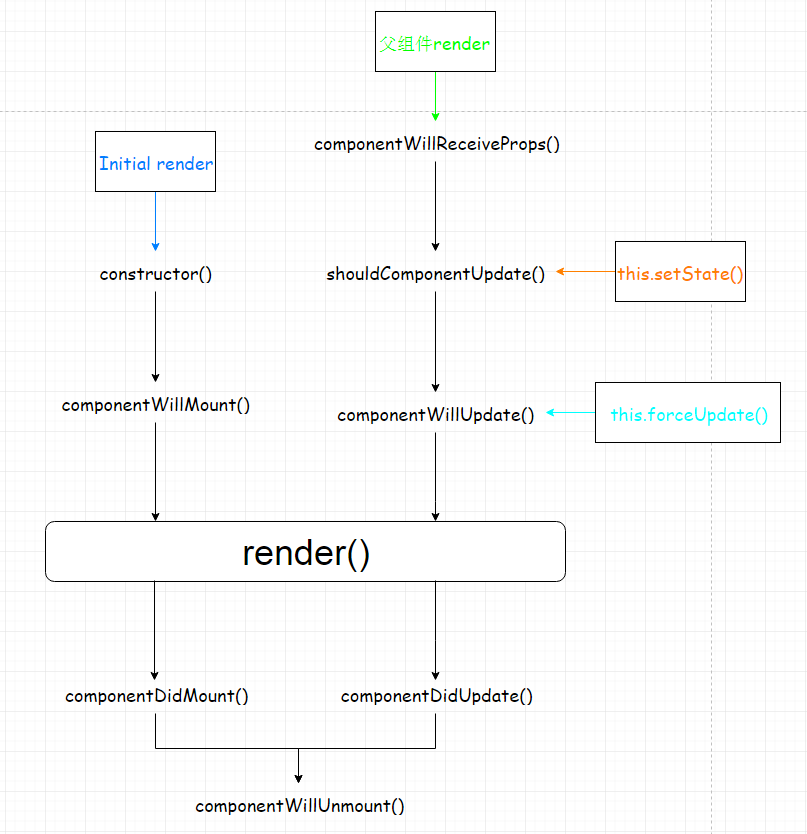
注意,如果在shouldComponentUpdate里面返回false可以提前退出更新路徑。
一個React組件生命周期的測試例子
代碼比較簡單,沒有邏輯,只是在每個相關函數里面alert一下。
點擊鏈接來試試這個例子。
源碼
const React = require('react');
const ReactDOM = require('react-dom');
class LifeCycle extends React.Component {constructor(props) {super(props);alert("Initial render");alert("constructor");this.state = {str: "hello"};}componentWillMount() {alert("componentWillMount");}componentDidMount() {alert("componentDidMount");}componentWillReceiveProps(nextProps) {alert("componentWillReceiveProps");}shouldComponentUpdate() {alert("shouldComponentUpdate");return true;        // 記得要返回true}componentWillUpdate() {alert("componentWillUpdate");}componentDidUpdate() {alert("componentDidUpdate");}componentWillUnmount() {alert("componentWillUnmount");}setTheState() {let s = "hello";if (this.state.str === s) {s = "HELLO";}this.setState({str: s});}forceItUpdate() {this.forceUpdate();}render() {alert("render");return(<div><span>{"Props:"}<h2>{parseInt(this.props.num)}</h2></span><br /><span>{"State:"}<h2>{this.state.str}</h2></span></div>);}
}class Container  extends React.Component {constructor(props) {super(props);this.state = {num: Math.random() * 100};}propsChange() {this.setState({num: Math.random() * 100});}setLifeCycleState() {this.refs.rLifeCycle.setTheState();}forceLifeCycleUpdate() {this.refs.rLifeCycle.forceItUpdate();}unmountLifeCycle() {// 這里卸載父組件也會導致卸載子組件React.unmountComponentAtNode(document.getElementById("container"));}parentForceUpdate() {this.forceUpdate();}render() {return (<div><a href="javascript:;" className="weui_btn weui_btn_primary" onClick={this.propsChange.bind(this)}>propsChange</a><a href="javascript:;" className="weui_btn weui_btn_primary" onClick={this.setLifeCycleState.bind(this)}>setState</a><a href="javascript:;" className="weui_btn weui_btn_primary" onClick={this.forceLifeCycleUpdate.bind(this)}>forceUpdate</a><a href="javascript:;" className="weui_btn weui_btn_primary" onClick={this.unmountLifeCycle.bind(this)}>unmount</a><a href="javascript:;" className="weui_btn weui_btn_primary" onClick={this.parentForceUpdate.bind(this)}>parentForceUpdateWithoutChange</a><LifeCycle ref="rLifeCycle" num={this.state.num}></LifeCycle></div>);}
}ReactDOM.render(<Container></Container>,document.getElementById('init')
);
示例解讀:
??所有的彈窗都是在子組件中的
- 首次加載:Initial render、constructor、componentWillMount、render、componentDidMount
- 改變父的state:componentWillReceiveProps、shouldComponentUpdate、componentWillUpdate、render、componentDidUpdate
- 改變子的state:shouldComponentUpdate、componentWillUpdate、render、componentDidUpdate
- 父forceUpdate:componentWillReceiveProps、shouldComponentUpdate、componentWillUpdate、render、componentDidUpdate(和2一樣)
- 子forceUpdate:componentWillUpdate、render、componentDidUpdate
- 卸載父:componentWillUnmount


)
)

功能使用)


)
)

路由 —— 通過 HTML 導航)


)

)
)
