原文作者:Sarathlal Saseendran
原文鏈接:https://www.c-sharpcorner.com/article/jwt-authentication-and-authorization-in-net-6-0-with-identity-framework/
翻譯:沙漠盡頭的狼(谷歌翻譯加持)
介紹
微軟于 2021 年 11 月發布了 .NET 6.0。我已經在 C# Corner[1] 上寫了幾篇關于 JWT 身份認證的文章。由于 .NET 6.0 進行了一些重大更改,因此我決定寫一篇關于使用 .NET 6.0 版本進行 JWT 身份認證的文章。我們將使用微軟 Identity 框架來存儲用戶和角色信息。
Authentication(身份認證)是驗證用戶憑據的過程,而Authorization(授權)是檢查用戶訪問應用程序中特定模塊的權限的過程。在本文中,我們將了解如何通過實現 JWT 身份認證來保護 ASP.NET Core Web API 應用程序。我們還將了解如何在 ASP.NET Core 中使用授權來提供對應用程序各種功能的訪問。我們將用戶憑據存儲在 SQL Server 數據庫中(注:您可以使用MySQL、PostgreSQL等其他關系型數據庫),我們將使用 EF Core 框架和 Identity 框架進行數據庫操作。
JSON Web Token (JWT) 是一個開放標準 (RFC 7519),它定義了一種緊湊且自包含的方式,使用JSON 對象用于在各方之間安全地傳輸信息。此信息可以驗證和信任,因為它是數字簽名的。JWT 可以使用密鑰(使用HMAC算法)或使用RSA或ECDSA的公鑰/私鑰對進行簽名。
在其緊湊的形式中,JSON Web Tokens 由三部分組成,由點 (.) 分隔,它們是:
Header(標題 )
Payload(有效載荷 )
Signature(簽名 )
因此,JWT 格式通常如下所示:
xxxx.yyyy.zzzz有關 JSON Web token的更多詳細信息,請參閱下面的鏈接。
https://jwt.io/introduction/[2]
使用 Visual Studio 2022 創建 ASP.NET Core Web API
我們需要 Visual Studio 2022 來創建 .NET 6.0 應用程序。我們可以從 Visual Studio 2022 中選擇 ASP.NET Core Web API 模板。
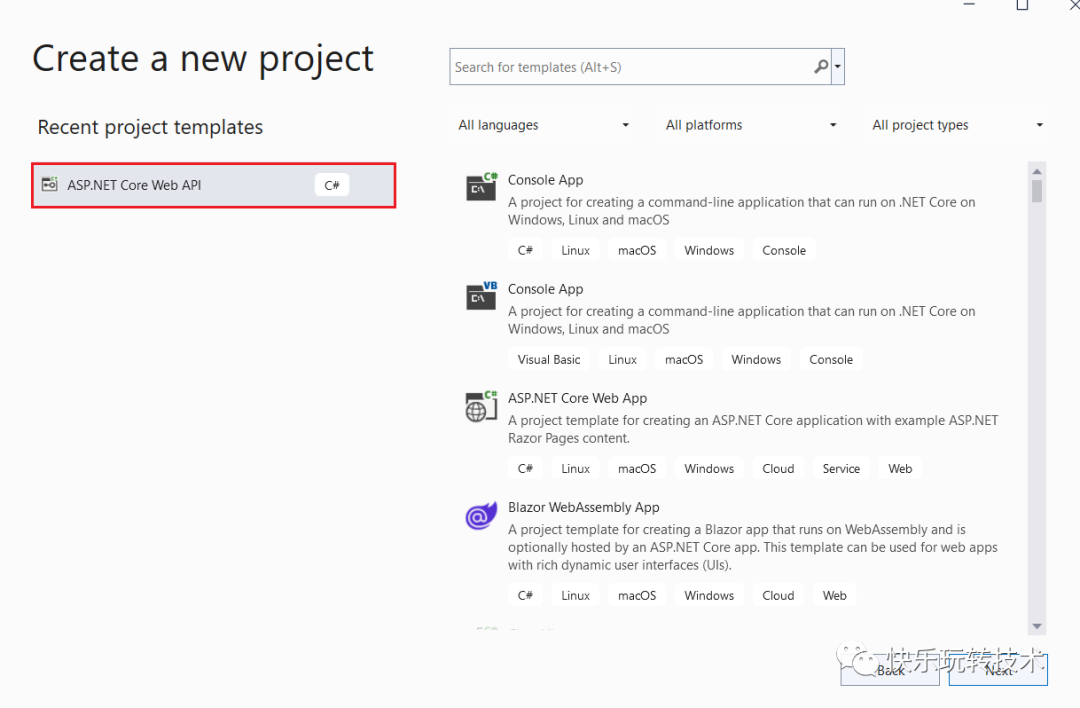
我們可以為我們的項目起一個合適的名稱并選擇 .NET 6.0 框架。
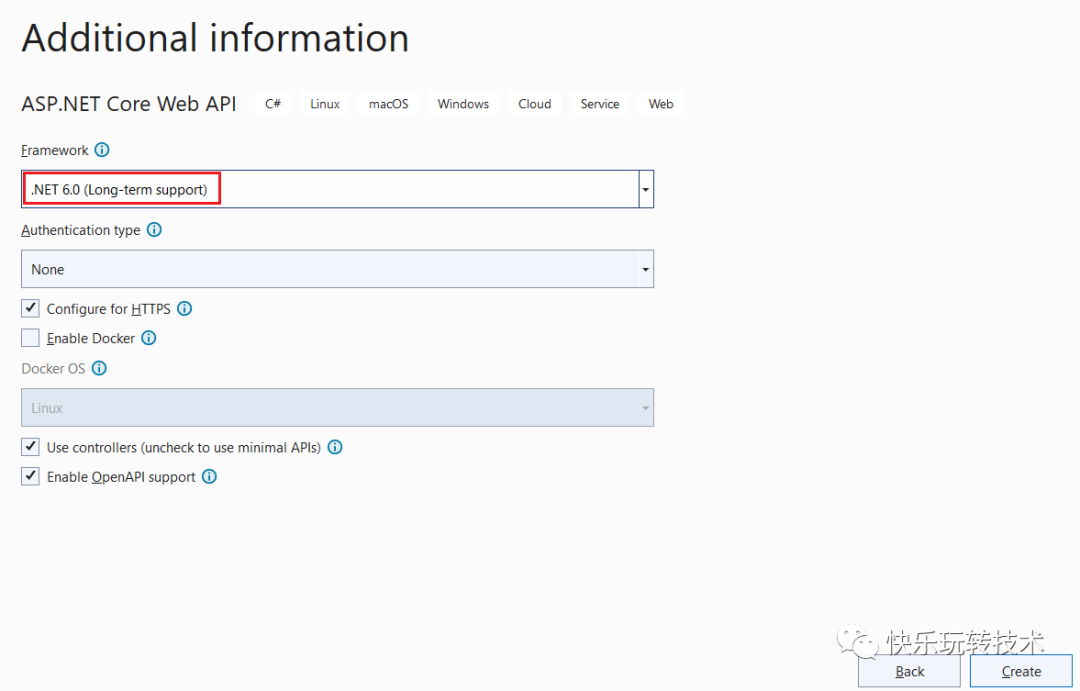
我們的新項目將在隨后創建。
我們必須將以下 4 個庫安裝到新項目中。
Microsoft.EntityFrameworkCore.SqlServer
Microsoft.EntityFrameworkCore.Tools
Microsoft.AspNetCore.Identity.EntityFrameworkCore
Microsoft.AspNetCore.Authentication.JwtBearer
您可以使用 NuGet 包管理器來安裝上述包。
我們可以使用以下值更改 appsettings.json。它具有用于 JWT 身份認證的數據庫連接詳細信息和其他詳細信息。
appsettings.json
{"Logging":?{"LogLevel":?{"Default":?"Information","Microsoft.AspNetCore":?"Warning"}},"AllowedHosts":?"*","ConnectionStrings":?{"ConnStr":?"Data?Source=(localdb)\\MSSQLLocalDB;Initial?Catalog=JWTAuthDB;Integrated?Security=True;ApplicationIntent=ReadWrite;MultiSubnetFailover=False"},"JWT":?{"ValidAudience":?"http://localhost:4200","ValidIssuer":?"http://localhost:5000","Secret":?"JWTAuthenticationHIGHsecuredPasswordVVVp1OH7Xzyr"}
}
我們可以創建一個新文件夾 Auth 并在 Auth 文件夾下創建 ApplicationDbContext 類并添加以下代碼。我們將在 Auth 文件夾下添加所有與身份認證相關的類。
ApplicationDbContext.cs
using?Microsoft.AspNetCore.Identity.EntityFrameworkCore;
using?Microsoft.AspNetCore.Identity;
using?Microsoft.EntityFrameworkCore;namespace?IdentityDemo.Auth
{public?class?ApplicationDbContext?:?IdentityDbContext<IdentityUser>{public?ApplicationDbContext(DbContextOptions<ApplicationDbContext>?options)?:?base(options){}protected?override?void?OnModelCreating(ModelBuilder?builder){base.OnModelCreating(builder);}}
}
創建一個靜態類 UserRoles 并添加以下值。
UserRoles.cs
namespace?IdentityDemo.Auth
{public?static?class?UserRoles{public?const?string?Admin?=?"Admin";public?const?string?User?=?"User";}
}
我們添加了兩個常量值 Admin 和 User 作為角色。您可以根據需要添加任意數量的角色。
創建類 RegisterModel, 新用戶注冊時使用。
RegisterModel.cs
using System.ComponentModel.DataAnnotations;namespace IdentityDemo.Auth
{public class RegisterModel{[Required(ErrorMessage = "用戶名不能為空")] public string? Username { get; set; }[EmailAddress][Required(ErrorMessage = "郵件不能為空")]public string? Email { get; set; }[Required(ErrorMessage = "密碼不能為空")] public string? Password { get; set; }}
}
創建類 LoginModel 用于用戶登錄。
LoginModel.cs
using?System.ComponentModel.DataAnnotations;namespace?IdentityDemo.Auth
{public?class?LoginModel{[Required(ErrorMessage?=?"用戶名不能為空")]?public?string??Username?{?get;?set;?}[Required(ErrorMessage?=?"密碼不能為空")]?public?string??Password?{?get;?set;?}}
}
我們可以創建一個 Response 類,用于在用戶注冊和用戶登錄后返回響應值。如果請求失敗,它也會返回錯誤消息。
Response.cs
namespace?IdentityDemo.Auth
{public?class?Response{public?string??Status?{?get;?set;?}public?string??Message?{?get;?set;?}}
}
我們可以在 Controllers 文件夾中創建一個 API 控制器 AuthenticateController 并添加以下代碼。
AuthenticateController.cs
using?IdentityDemo.Auth;
using?Microsoft.AspNetCore.Identity;
using?Microsoft.AspNetCore.Mvc;
using?Microsoft.IdentityModel.Tokens;
using?System.IdentityModel.Tokens.Jwt;
using?System.Security.Claims;
using?System.Text;namespace?IdentityDemo.Controllers
{[Route("api/[controller]")][ApiController]public?class?AuthenticateController?:?ControllerBase{private?readonly?UserManager<IdentityUser>?_userManager;private?readonly?RoleManager<IdentityRole>?_roleManager;private?readonly?IConfiguration?_configuration;public?AuthenticateController(UserManager<IdentityUser>?userManager,RoleManager<IdentityRole>?roleManager,IConfiguration?configuration){_userManager?=?userManager;_roleManager?=?roleManager;_configuration?=?configuration;}[HttpPost][Route("login")]public?async?Task<IActionResult>?Login([FromBody]?LoginModel?model){var?user?=?await?_userManager.FindByNameAsync(model.Username);if?(user?!=?null?&&?await?_userManager.CheckPasswordAsync(user,?model.Password)){var?userRoles?=?await?_userManager.GetRolesAsync(user);var?authClaims?=?new?List<Claim>{new?Claim(ClaimTypes.Name,?user.UserName),new?Claim(JwtRegisteredClaimNames.Jti,?Guid.NewGuid().ToString()),};foreach?(var?userRole?in?userRoles){authClaims.Add(new?Claim(ClaimTypes.Role,?userRole));}var?token?=?GetToken(authClaims);return?Ok(new{token?=?new?JwtSecurityTokenHandler().WriteToken(token),expiration?=?token.ValidTo});}return?Unauthorized();}[HttpPost][Route("register")]public?async?Task<IActionResult>?Register([FromBody]?RegisterModel?model){var?userExists?=?await?_userManager.FindByNameAsync(model.Username);if?(userExists?!=?null)return?StatusCode(StatusCodes.Status500InternalServerError,new?Response?{?Status?=?"Error",?Message?=?"用戶已經存在!"?});IdentityUser?user?=?new(){Email?=?model.Email,SecurityStamp?=?Guid.NewGuid().ToString(),UserName?=?model.Username};var?result?=?await?_userManager.CreateAsync(user,?model.Password);if?(!result.Succeeded)return?StatusCode(StatusCodes.Status500InternalServerError,new?Response{Status?=?"Error",?Message?=?"創建用戶失敗!請檢查后再重試。"});return?Ok(new?Response?{?Status?=?"Success",?Message?=?"新增用戶成功!"?});}[HttpPost][Route("register-admin")]public?async?Task<IActionResult>?RegisterAdmin([FromBody]?RegisterModel?model){var?userExists?=?await?_userManager.FindByNameAsync(model.Username);if?(userExists?!=?null)return?StatusCode(StatusCodes.Status500InternalServerError,new?Response?{?Status?=?"Error",?Message?=?"用戶已經存在!"?});IdentityUser?user?=?new(){Email?=?model.Email,SecurityStamp?=?Guid.NewGuid().ToString(),UserName?=?model.Username};var?result?=?await?_userManager.CreateAsync(user,?model.Password);if?(!result.Succeeded)return?StatusCode(StatusCodes.Status500InternalServerError,new?Response{Status?=?"Error",?Message?=?"創建用戶失敗!請檢查后再重試。"});if?(!await?_roleManager.RoleExistsAsync(UserRoles.Admin))await?_roleManager.CreateAsync(new?IdentityRole(UserRoles.Admin));if?(!await?_roleManager.RoleExistsAsync(UserRoles.User))await?_roleManager.CreateAsync(new?IdentityRole(UserRoles.User));if?(await?_roleManager.RoleExistsAsync(UserRoles.Admin)){await?_userManager.AddToRoleAsync(user,?UserRoles.Admin);}if?(await?_roleManager.RoleExistsAsync(UserRoles.Admin)){await?_userManager.AddToRoleAsync(user,?UserRoles.User);}return?Ok(new?Response?{?Status?=?"Success",?Message?=?"新增用戶成功!"?});}private?JwtSecurityToken?GetToken(List<Claim>?authClaims){var?authSigningKey?=?new?SymmetricSecurityKey(Encoding.UTF8.GetBytes(_configuration["JWT:Secret"]));var?token?=?new?JwtSecurityToken(issuer:?_configuration["JWT:ValidIssuer"],audience:?_configuration["JWT:ValidAudience"],expires:?DateTime.Now.AddHours(3),claims:?authClaims,signingCredentials:?new?SigningCredentials(authSigningKey,?SecurityAlgorithms.HmacSha256));return?token;}}
}
我們在控制器類中添加了三個方法 login、register 和 register-admin``。register 和 register-admin 幾乎相同,但 register-admin 方法將用于創建具有 Admin 角色的用戶。在 login 方法中,我們在成功登錄后返回了一個 JWT token。
在 .NET 6.0 中,微軟刪除了 Startup 類(注:您可以恢復繼續使用這種方式),只保留了 Program 類。我們必須在 Program 類中定義所有依賴注入和其他配置。
Program.cs
using?IdentityDemo.Auth;
using?Microsoft.AspNetCore.Authentication.JwtBearer;
using?Microsoft.AspNetCore.Identity;
using?Microsoft.EntityFrameworkCore;
using?Microsoft.IdentityModel.Tokens;
using?System.Text;var?builder?=?WebApplication.CreateBuilder(args);
ConfigurationManager?configuration?=?builder.Configuration;//?Add?services?to?the?container.//?For?Entity?Framework
builder.Services.AddDbContext<ApplicationDbContext>(options?=>?options.UseSqlServer(configuration.GetConnectionString("ConnStr")));//?For?Identity
builder.Services.AddIdentity<IdentityUser,?IdentityRole>().AddEntityFrameworkStores<ApplicationDbContext>().AddDefaultTokenProviders();//?Adding?Authentication
builder.Services.AddAuthentication(options?=>
{options.DefaultAuthenticateScheme?=?JwtBearerDefaults.AuthenticationScheme;options.DefaultChallengeScheme?=?JwtBearerDefaults.AuthenticationScheme;options.DefaultScheme?=?JwtBearerDefaults.AuthenticationScheme;
})//?Adding?Jwt?Bearer
.AddJwtBearer(options?=>
{options.SaveToken?=?true;options.RequireHttpsMetadata?=?false;options.TokenValidationParameters?=?new?TokenValidationParameters(){ValidateIssuer?=?true,ValidateAudience?=?true,ValidAudience?=?configuration["JWT:ValidAudience"],ValidIssuer?=?configuration["JWT:ValidIssuer"],IssuerSigningKey?=?new?SymmetricSecurityKey(Encoding.UTF8.GetBytes(configuration["JWT:Secret"]))};
});builder.Services.AddControllers();
//?Learn?more?about?configuring?Swagger/OpenAPI?at?https://aka.ms/aspnetcore/swashbuckle
builder.Services.AddEndpointsApiExplorer();
builder.Services.AddSwaggerGen();var?app?=?builder.Build();//?Configure?the?HTTP?request?pipeline.
if?(app.Environment.IsDevelopment())
{app.UseSwagger();app.UseSwaggerUI();
}app.UseHttpsRedirection();//?Authentication?&?Authorization
app.UseAuthentication();
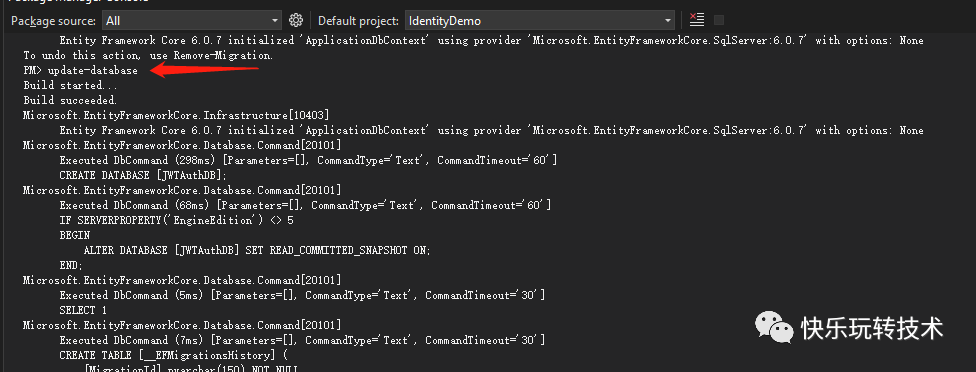
app.UseAuthorization();app.MapControllers();app.Run();我們必須在運行應用程序之前創建所需的數據庫和表。由于我們使用的是實體框架(EF Core),我們可以使用下面的數據庫遷移命令和包管理器控制臺來創建一個遷移腳本:
add-migration Initial

使用以下命令創建數據庫和表:
update-database
如果您使用 SQL Server 對象資源管理器檢查數據庫,您可以看到在數據庫內部創建了以下數據庫表:
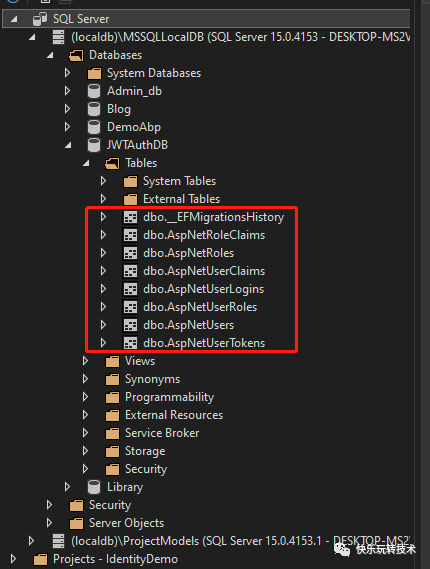
在數據庫遷移過程中,為 User、Role 和 Claims 創建了 7 張表。這是用于 Identity框架。
ASP.NET Core Identity 是一個會員系統,允許您向應用程序添加登錄功能。用戶可以創建帳戶并使用用戶名和密碼登錄,也可以使用外部登錄提供程序,例如 Facebook、Google、Microsoft Account、Twitter 等。
您可以將 ASP.NET Core Identity 配置為使用 SQL Server 數據庫來存儲用戶名、密碼和配置文件數據。或者,你可以使用自己的持久化存儲將數據存儲在另一個其他持久化存儲中,例如 Azure 表存儲。
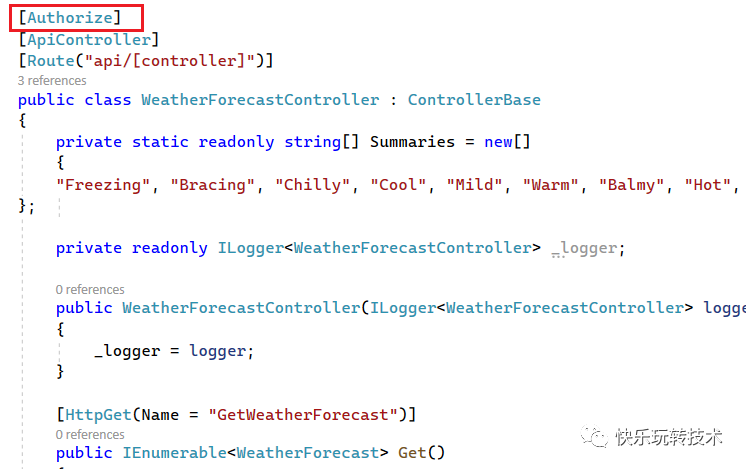
我們可以在 WeatherForecast 控制器中添加 Authorize 屬性。
我們可以運行應用程序并嘗試從 Postman 工具訪問WeatherForecastController中的 get 方法。
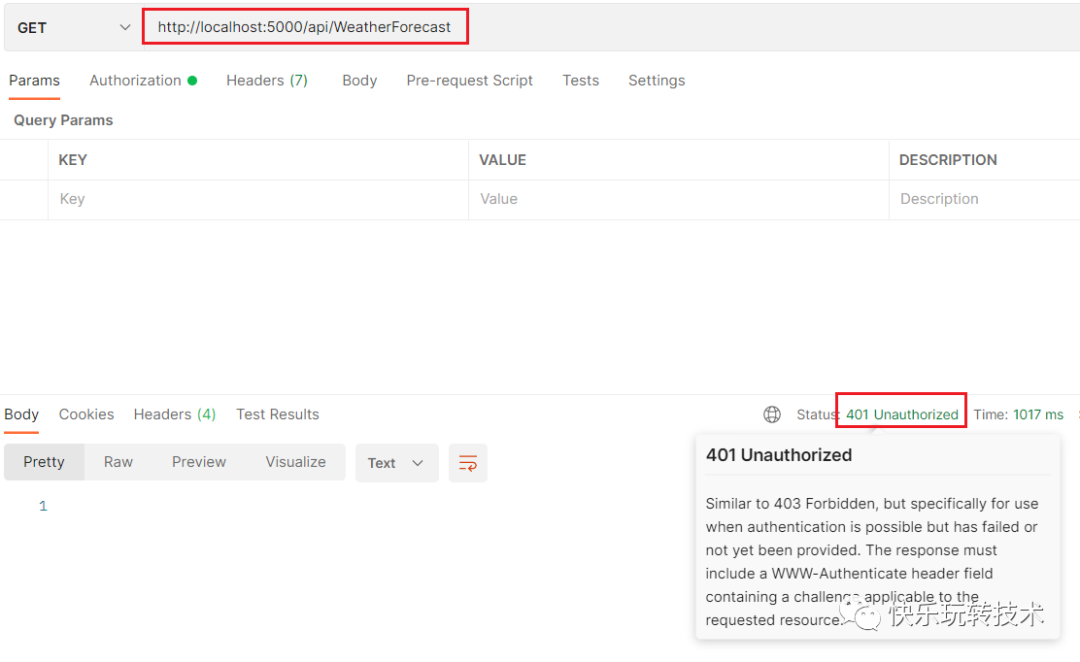
我們收到了 401 未經授權的錯誤。因為,我們已經為整個控制器添加了 Authorize 屬性。我們必須通過請求頭提供一個有效的token來訪問這個控制器和控制器內的方法。
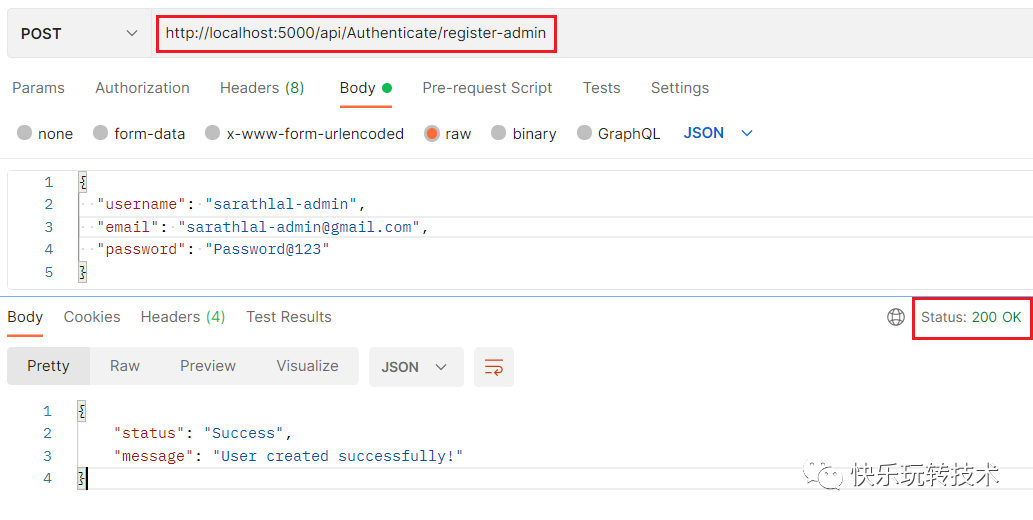
我們可以在AuthenticateController中使用注冊方法創建一個新用戶。
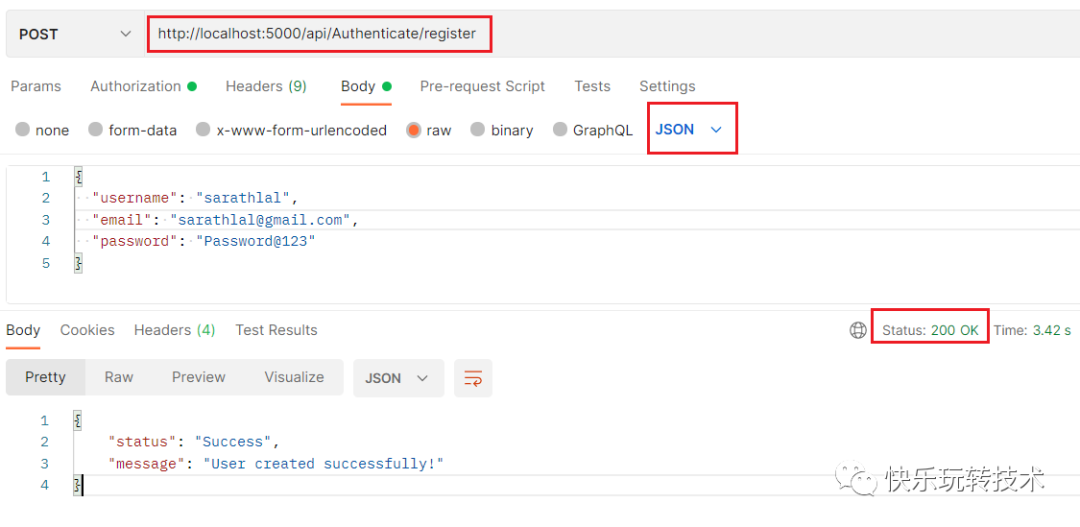
我們以原始 JSON 格式提供了輸入數據。
我們可以使用上述用戶憑據登錄并獲取有效的 JWT token。
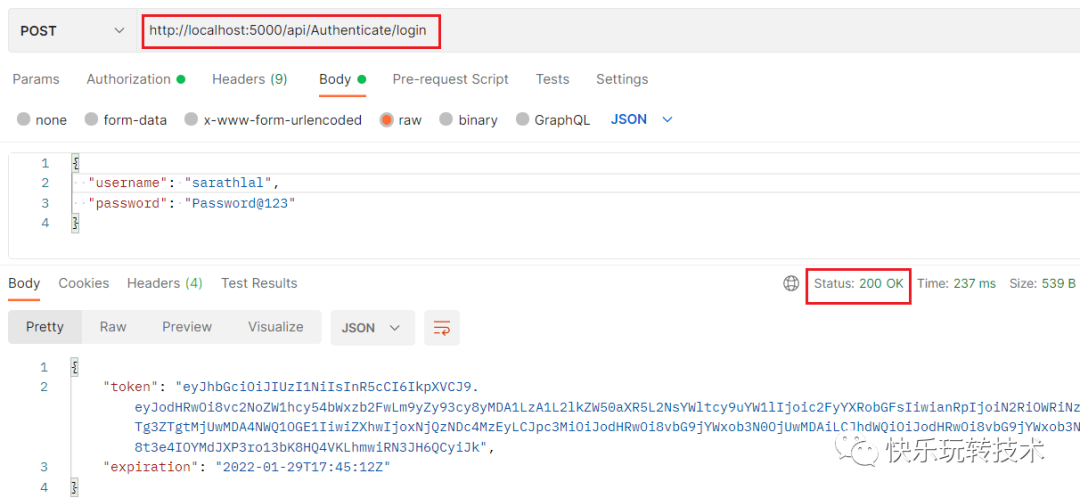
使用上述憑據成功登錄后,我們收到了一個token。
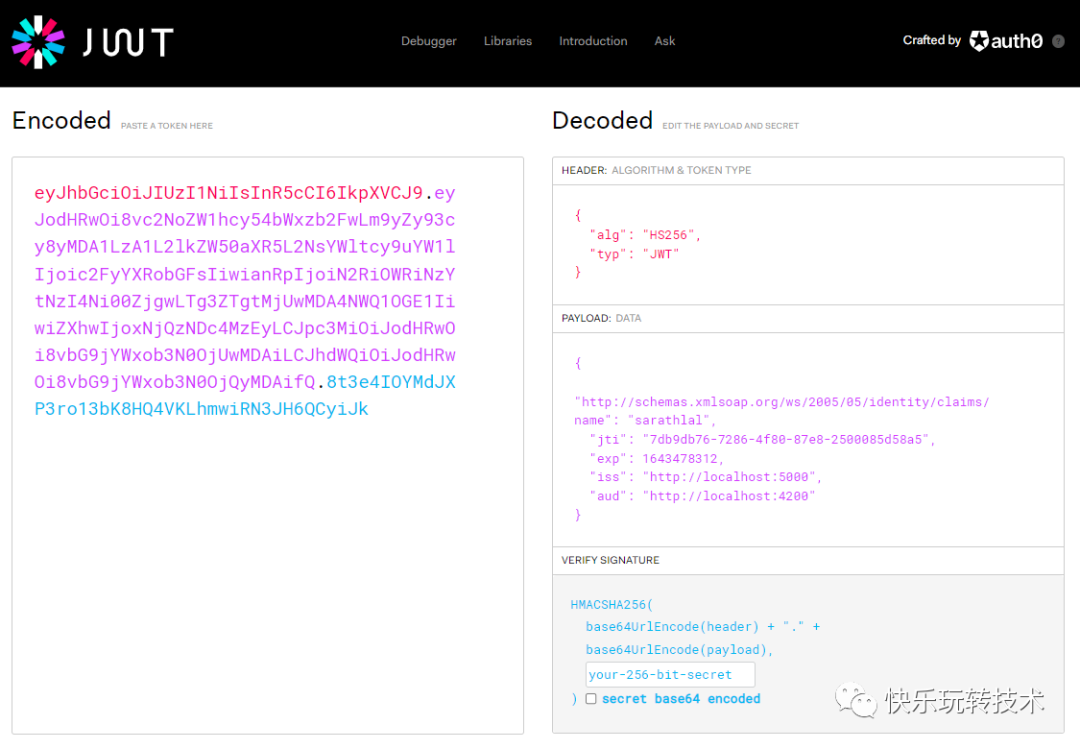
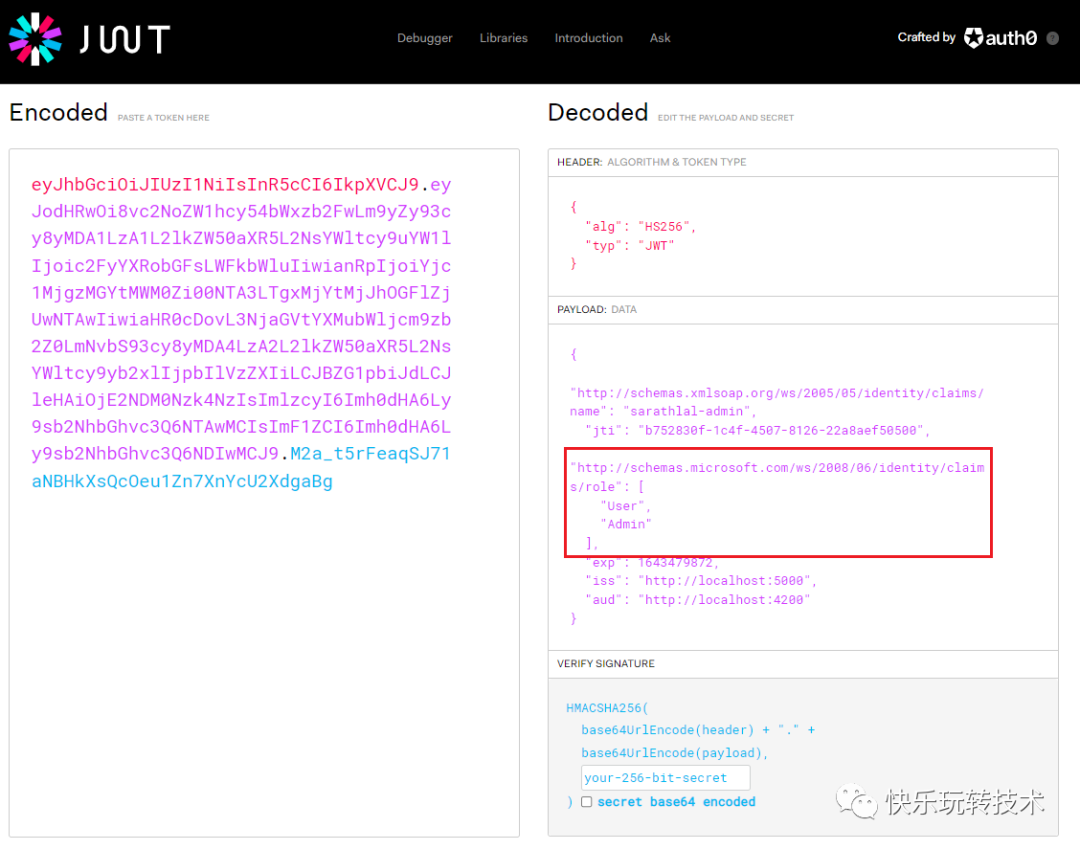
我們可以使用https://jwt.io[3]站點 解碼token并查看聲明和其他信息。
我們可以在授權選項卡中將上述token值作為Bearer token傳遞,并再次調用WeatherForecastController的 get 方法。
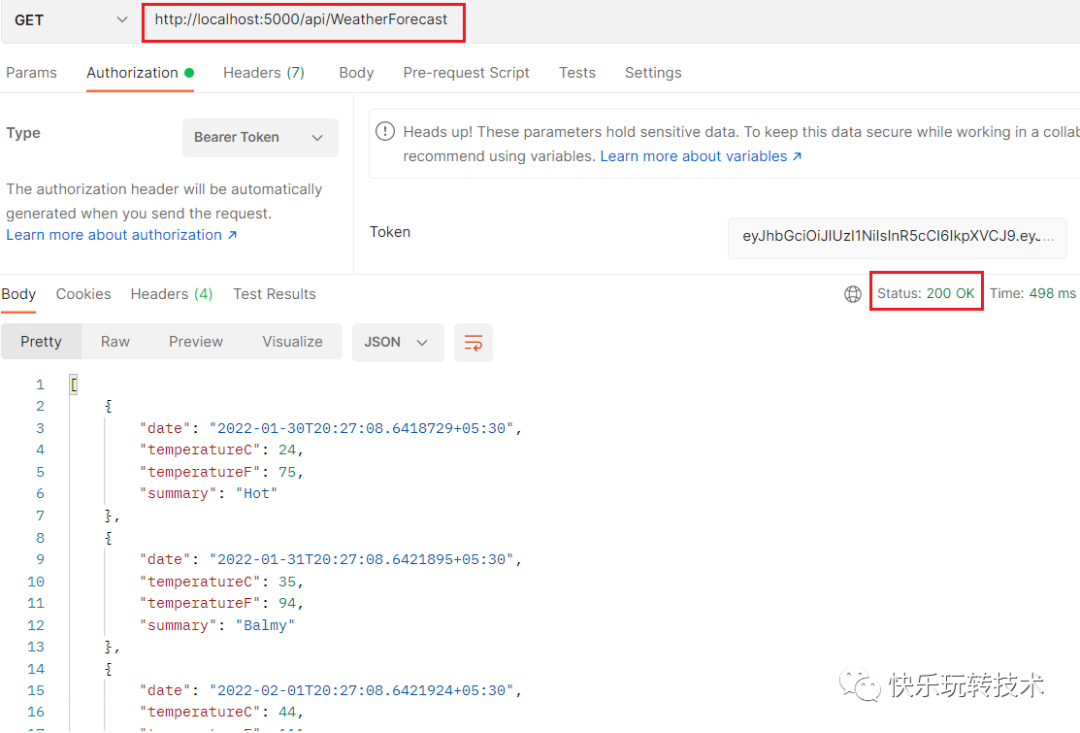
這一次,我們成功地接收到了來自控制器的值。
我們可以使用基于角色的授權來更改WeatherForecastController。
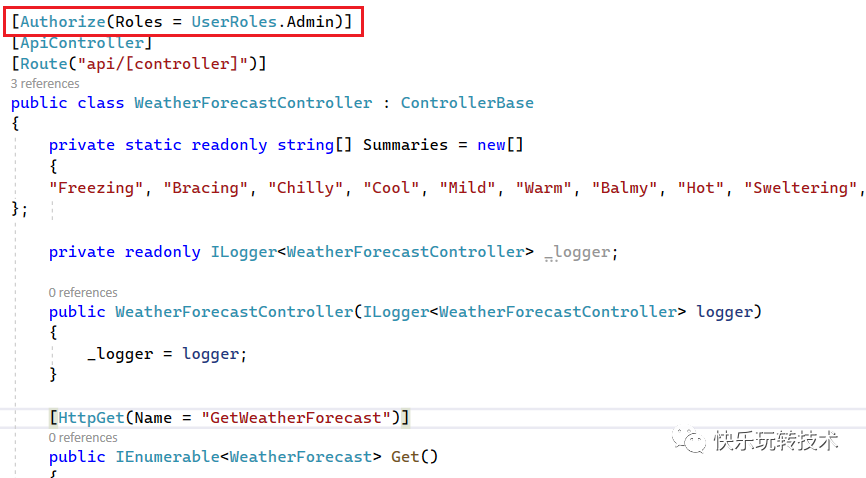
現在,只有具有管理員(Admin)角色的用戶才能訪問此控制器和方法。
我們可以嘗試在 Postman 工具中再次使用相同的token訪問WeatherForecastController。
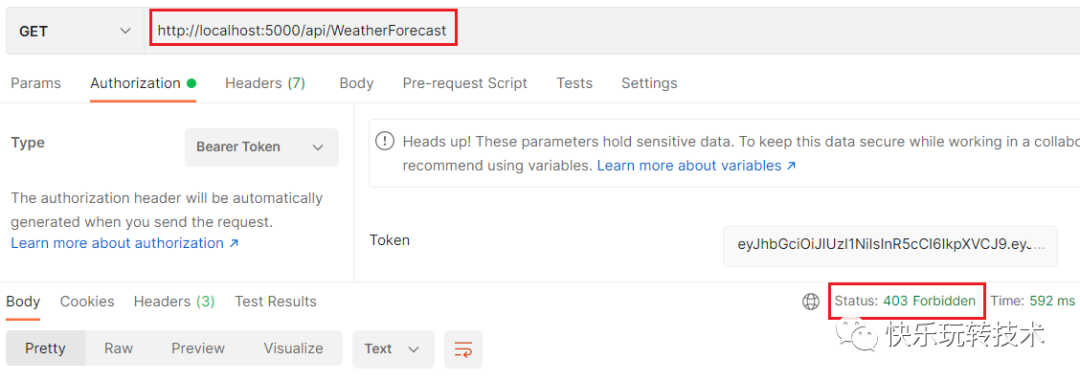
我們現在收到了 403 拒絕錯誤而不是 401。即使我們傳遞了一個有效的token,我們也沒有足夠的權限來訪問控制器。要訪問此控制器,用戶必須具有Admin角色權限。當前用戶是普通用戶,沒有任何Admin角色權限。
我們可以創建一個具有Admin角色權限的新用戶。我們已經在AuthenticateController中有一個方法register-admin用于相同的目的。
我們可以使用這些新的用戶憑據登錄并獲得一個新的token。如果您對token進行解碼,您可以看到角色已添加到token中。
我們可以使用這個token而不是舊token來訪問WeatherForecastController。
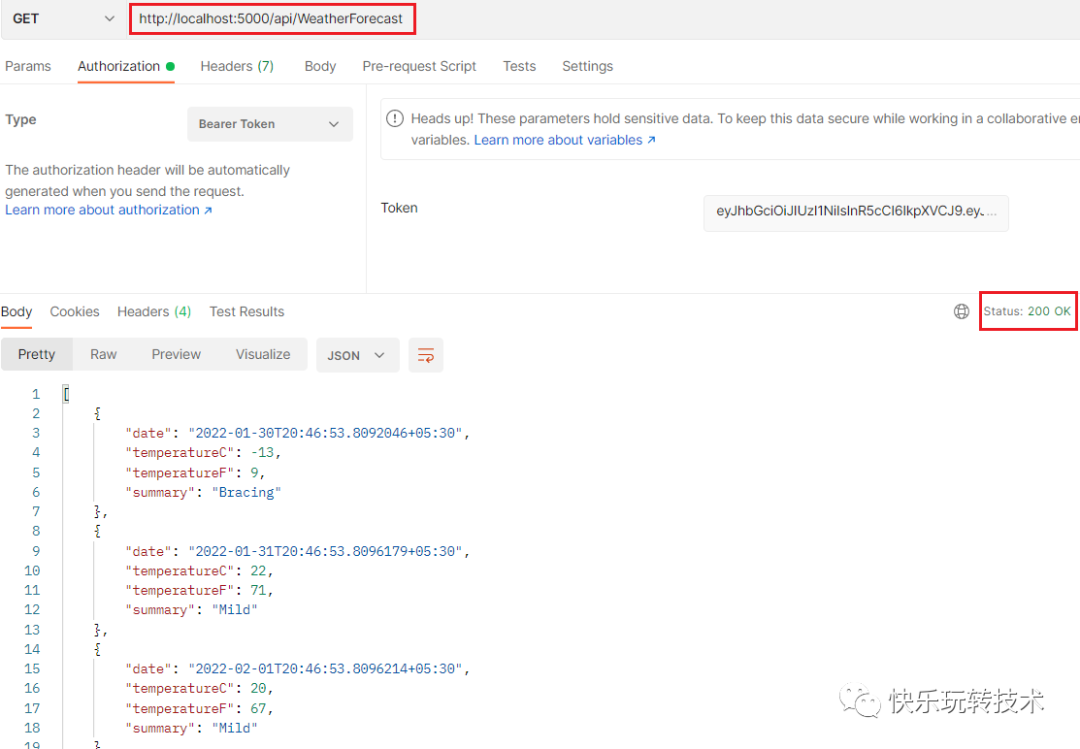
現在我們已經成功地從WeatherForecastController中獲取了數據。
結論
在這篇文章中,我們了解了如何在 .NET 6.0 ASP.NET Core Web API 應用程序中創建 JSON Web token,并使用此token進行身份認證和授權。我們創建了兩個用戶,一個沒有任何角色,一個有Admin角色。我們在控制器級別應用了身份認證和授權,并看到了這兩個用戶的不同行為。
本文源碼:IdentityDemo[4]
參考資料
[1]
C# Corner: https://www.c-sharpcorner.com/
[2]https://jwt.io/introduction/: https://jwt.io/introduction/
[3]https://jwt.io: https://jwt.io
[4]IdentityDemo: https://github.com/dotnet9/ASP.NET-Core-Test/tree/master/src/IdentityDem

簡介)

JavaScript 互操作 —— 更新 document title)


)


——應用服務和數據服務分離)


![[轉]硬核 | Redis 布隆(Bloom Filter)過濾器原理與實戰](http://pic.xiahunao.cn/[轉]硬核 | Redis 布隆(Bloom Filter)過濾器原理與實戰)