流分類
| 字節流 | 字符流 | |
輸入流 | InputStream | Reader |
輸出流 | OutputStream | Writer |
??
? ?
?
?
?InputStream:BufferedInputStream、DataInputStream、ObjectInputStream
OutputStream:BufferedOutputStream、DataOutputStream、ObjectOutputStream、PrintStream
標準流:
?? ??? ???? System.in? 、System.out 、System.err
?? ??? ??? ?
?? ??? ??? ?重定向標準輸入流、標準輸出流、標準錯誤輸出流
Reader:InputStreamReader、FileReader、BufferedReader、LineNumberReader
?Writer:OutputStreamWriter、FileWriter、BufferedWriter、PrintWriter
字節流和字符流的區別
(1)讀寫單位不同:字節流以字節(8bit)為單位,字符流以字符為單位,根據碼表映射字符,一次可能讀多個字節。
(2)處理對象不同:字節流能處理所有類型的數據(如圖片、avi等),而字符流只能處理字符類型的數據。
(3)字節流在操作的時候本身是不會用到緩沖區的,是文件本身的直接操作的;而字符流在操作的時候下后是會用到緩沖區的,是通過緩沖區來操作文件,我們將在下面驗證這一點。
輸入流和輸出流的區別
(1)對輸入流只能進行讀操作,對輸出流只能進行寫操作,程序中需要根據待傳輸數據的不同特性而使用不同的流。
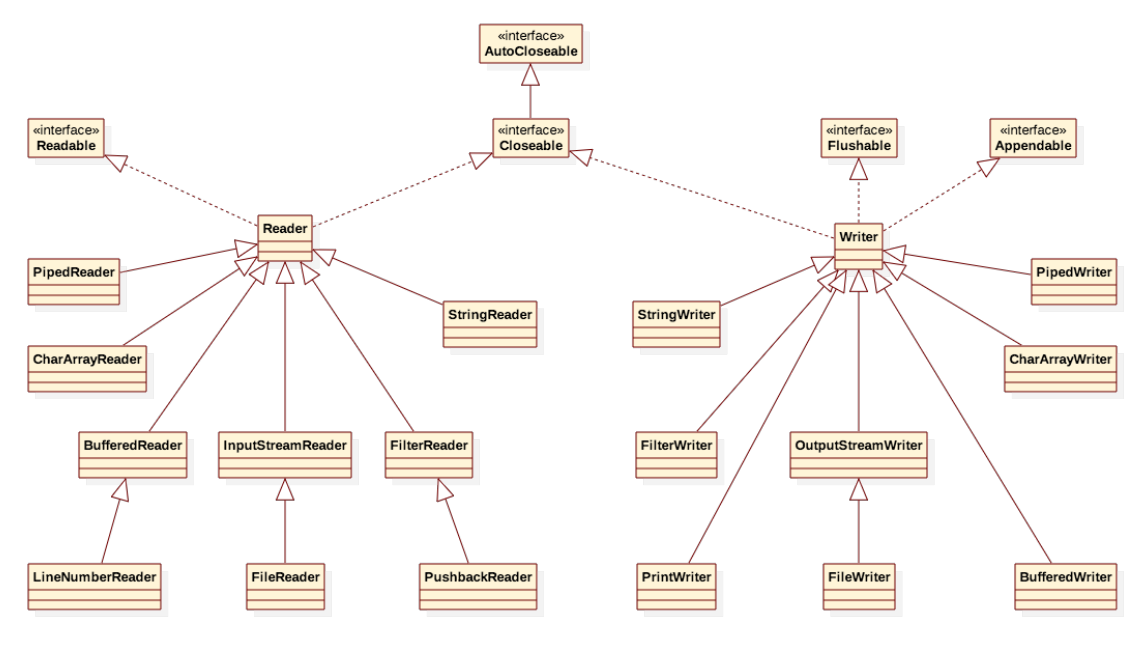
字節流結構圖
字節流常用類
1、FileInputStream和FileOutputStream
FileInputStream測試案例一:
package ecut.streams;import java.io.FileInputStream;
import java.io.IOException; import java.io.InputStream; public class FileInputStreamTest1 { public static void main(String[] args) throws IOException { // 創建一個用來讀取JavaAdvanced.txt文件的輸入流 InputStream in = new FileInputStream( "JavaAdvanced.txt" );//需要拋出FileNotFoundException // 聲明一個變量用來記錄讀取到的單個字節 int b ; // 每循環以次讀取一個字節,并將讀取到的字節賦值給 變量 n ,當到達流末尾時返回-1。 //read()需要拋出IOException,IOException是FileNotFoundException的父類。 while( ( b = in.read() ) != -1 ) { //(char)b將讀取到的字節轉換成字符類型,以便于在控制臺中輸出后查看 char c = (char) b ; // 將每個字節對應的字符輸出到控制臺上(?件中的換?符號會當作換行處理,因此輸出時不需要帶換行) System.out.print(c );//中文可能會亂碼  } in.close(); } }
運行結果:
1?File and Stream :InputStream : BufferedInputStream ?DataInputStream ?ObjectInputStreamOuputStream : BufferedOuputStream ?DataOutputStream ?PrintStream ?ObjectOutputStreamReader : InputStreamReader ?FileReader ?BufferedReader ?LineNumberReaderWriter : OutputStreamWriter ?FileWriter ?BufferdWriter ?PrintWriter..............
6?Proxy : ??£?7?java.lang.annotation.Annotation
FileInputStream測試案例二:
package ecut.streams;import java.io.FileInputStream;
import java.io.IOException; import java.io.InputStream; /** * FileInputStream 用于讀取諸如圖像數據之類的原始字節流,字節流不擅長讀字符文件擅長 字節文件,要讀取字符流,請考慮使用 FileReader。 */ public class FileInputStreamTest2 { public static void main(String[] args) throws IOException { // 創建一個用來讀取JavaAdvanced.txt文件的輸入流 InputStream in = new FileInputStream( "JavaAdvanced.txt" );//1388byte //false 不支持mark方法( 在此輸入流中標記當前的位置)和reset方法(將此流重新定位到最后一次對此輸入流調用 mark 方法時的位置。)因為沒有緩沖區。  System.out.print( in.markSupported()); // 聲明?個變量?來統計讀取到的字節數 int n ; // 聲明并創建一個數組?來保存讀取到的字節 byte[] bytes = new byte[ 100 ]; // 從 輸入流中 讀取 字節 到 數組中,并返回 實際讀取到的 字節數,當到達流末尾時返回-1 while( ( n = in.read( bytes ) ) != -1 ) { // 將 bytes 數組中的 [ 0 , n ) 之間的字節根據 平臺默認編碼構造字符串對象 //不要調用String(byte bytes[])構造方法,若調用此構造方法最后一次會有12個byte讀到之前的內容。 String s = new String( bytes , 0 , n ); // 將本次讀取到的字符串輸出到控制臺(文件中的換行符號會當作換行處理,因此輸出時不需要帶換行)  System.out.print( s ); } in.close(); } }
運行結果:
false1、File and Stream :InputStream : BufferedInputStream 、DataInputStream 、ObjectInputStreamOuputStream : BufferedOuputStream 、DataOutputStream 、PrintStream 、ObjectOutputStreamReader : InputStreamReader 、FileReader 、BufferedReader 、LineNumberReaderWriter : OutputStreamWriter 、FileWriter 、BufferdWriter 、PrintWriterNIO : 1.4 ~ 1.6 Buffer : ByteBuffer 、CharBuffer 、MappedByteBufferCharset : Channel : FileChannel1.7 :java.nio.file : Path 、Paths 、Files2、Thread java.lang.Runnablejava.lang.Thread 線程調度: 優先級、sleep 、join 、yeild 、精靈線程線程同步: 同步代碼塊 、同步方法線程通信: 數據傳遞 ��協調運行( notify 、 wait )定時任務.............. 7、java.lang.annotation.Annotation FileOutputStream測試案例一:
package ecut.streams;import java.io.FileOutputStream;
import java.io.IOException; import java.io.OutputStream; public class FileOutputStreamTest1 { public static void main(String[] args) throws IOException { OutputStream out = new FileOutputStream( "abc.txt" );//默認創建到在當前工程底下 //eclipse環境下所有的當前路徑除了java.lang.Class 類的 getResourceAsStream 方法是類路徑底下都是當前工程底下 for( int i = 'A' ; i<= 'Z' ; i++ ){ out.write( i );//寫出的是字節,打開的時候eclipse文本工具將字節轉換成了字符文件的  } out.close(); } }
運行結果:
在當前工程下新增了acb.txt文件,文件內的內容是ABCDEFGHIJKLMNOPQRSTUVWXYZ
FileOutputStream測試案例二:
package ecut.streams;import java.io.FileOutputStream;
import java.io.IOException; import java.io.OutputStream; public class FileOutputStreamTest2 { public static void main(String[] args) throws IOException { // 創建文件輸出流 OutputStream out = new FileOutputStream( "abc.txt" ); // 聲明一個字符串,這個字符串中的內容將被輸出到指定文件中 String s = "今天好熱,熱死了" ; System.out.println( s.length() );//8 //byte[] bytes = s.getBytes("GBK"); //16 // 根據平臺默認字符集將給定的字符串編碼為 byte 序列(一個byte數組) byte[] bytes = s.getBytes(); //24  System.out.println( bytes.length ); // 將 bytes 數組中的 [ 0 , 0 + 15 ) 之間的字節寫出 今天好熱, out.write( bytes , 0 , 15 ); out.close();// 關閉文件輸出流  } }
運行結果:
acb.txt文件內的內容變為 今天好熱,
文件復制測試案例:
package ecut.streams;import java.io.FileInputStream;
import java.io.FileOutputStream; import java.io.IOException; import java.io.InputStream; import java.io.OutputStream; public class CopyFile { public static void main(String[] args) throws IOException { InputStream in = new FileInputStream( "D:/JavaAdvancedTutorial_01_Files_and_Streams.pdf" ); OutputStream out = new FileOutputStream( "JavaAdvancedTutorial_01_Files_and_Streams.pdf") ; long start = System.currentTimeMillis() ; // 程序執行到 當前行對應的時間 (毫秒) int n ; final byte[] bytes = new byte[ 1 << 20 ]; // 1024 : 1 < 10 ; 反復利用緩沖區 while( ( n = in.read(bytes) ) != -1 ){ out.write( bytes , 0 , n ); } long end = System.currentTimeMillis() ; // 程序執行到 當前行對應的時間 (毫秒) long duration = end - start ; System.out.println( "復制文件用時: " + duration + "ms." ); out.close();//后開的先關 in.close();//先開的后關  } }
運行結果如下:
復制文件用時: 80ms.
當前工程多了文件JavaAdvancedTutorial_01_Files_and_Streams.pdf
2、BufferedInputStream和BufferedOutputStream
BufferedInputStream測試案例一:
package ecut.streams;import java.io.BufferedInputStream;
import java.io.FileInputStream; import java.io.IOException; import java.io.InputStream; public class BufferedInputStreamTest1 { public static void main(String[] args) throws IOException { // 創建一個文件輸入流 InputStream in = new FileInputStream("./src/ecut/streams/BufferedInputStreamTest1.java"); // 創建字節緩沖輸入流。BufferedInputStream 內部有一個 默認 容量是 8192 字節數組 用來緩存 讀取到的內容 BufferedInputStream bis = new BufferedInputStream(in); // 聲明一個變量用來記錄讀取到的字節數 int n; // 聲明并創建一個數組用來存儲被讀取到的字節 byte[] bytes = new byte[8192]; // 從字節緩沖輸入流中讀取數據到 字節數組中,并記錄讀取到的實際字節數,當到達流末尾時返回 -1 while ((n = bis.read(bytes)) != -1) { // 將讀取到的有效字節構造成字符串 String s = new String(bytes, 0, n); System.out.print(s); } bis.close();// 關閉字節緩沖輸人流 in.close();// 關閉字節輸入流  } }
部分源碼:
private static int DEFAULT_BUFFER_SIZE = 8192;public BufferedInputStream(InputStream in) { this(in, DEFAULT_BUFFER_SIZE); } public BufferedInputStream(InputStream in, int size) { super(in); if (size <= 0) { throw new IllegalArgumentException("Buffer size <= 0"); } buf = new byte[size]; } protected FilterInputStream(InputStream in) { this.in = in; } BufferedInputStream 是具有緩沖功能的字節輸入流。
每個 BufferedInputStream 對象內部都有一個字節數組用來緩存讀取到的字節。
BufferedInputStream 是一個過濾流(包裝流),它繼承自 FilterInputStream 類。
運行結果如下:
package ecut.streams;

import java.io.BufferedInputStream;
import java.io.FileInputStream;
import java.io.IOException;
import java.io.InputStream;

public class BufferedInputStreamTest1 {

?? ?public static void main(String[] args) throws IOException {
?? ??? ?// 創建一個文件輸入流
?? ??? ?InputStream in = new FileInputStream("./src/ecut/streams/BufferedInputStreamTest1.java");

?? ??? ?// 創建字節緩沖輸入流。BufferedInputStream 內部有一個 默認 容量是 8192 字節數組 用來緩存 讀取到的內容
?? ??? ?BufferedInputStream bis = new BufferedInputStream(in);
?? ??? ?// 聲明一個變量用來記錄讀取到的字節數
?? ??? ?int n;
?? ??? ?// 聲明并創建一個數組用來存儲被讀取到的字節
?? ??? ?byte[] bytes = new byte[8192];
?? ??? ?// 從字節緩沖輸入流中讀取數據到 字節數組中,并記錄讀取到的實際字節數,當到達流末尾時返回 -1
?? ??? ?while ((n = bis.read(bytes)) != -1) {
?? ??? ??? ?// 將讀取到的有效字節構造成字符串
?? ??? ??? ?String s = new String(bytes, 0, n);
?? ??? ??? ?System.out.print(s);
?? ??? ?}

?? ??? ?bis.close();// 關閉字節緩沖輸人流
?? ??? ?in.close();// 關閉字節輸入流

?? ?}
?? ?
}
BufferedInputStream測試案例二:
package ecut.streams;import java.io.BufferedInputStream;
import java.io.FileInputStream; import java.io.IOException; import java.io.InputStream; /** * markSupported() 、mark( readlimit ) 、reset() */ public class BufferedInputStreamTest2 { public static void main(String[] args) throws IOException { InputStream in = new FileInputStream( "./src/ecut/streams/BufferedInputStreamTest2.java" ); // BufferedInputStream 內部有一個 默認 容量是 8192 字節數組 用來緩存 讀取到的內容 BufferedInputStream bis = new BufferedInputStream( in ); int b ; while( ( b = bis.read( ) ) != -1 ) { char ch = (char) b ; System.out.print( ch ); if( ch == 'w'){ //在此輸入流中標記當前的位置。 bis.mark( 24250 ); // 在 當前位置處留下標記 ( markpos = pos ; )readlimit意義不大,注意clean flip rewind 三個方法。  } } System.out.println( "\n~~~~~~~~~~~~~~~~~~~~~~~~" ); //將此流重新定位到最后一次對此輸入流調用 mark 方法時的位置 bis.reset(); // 回到 做標記的位置 while( ( b = bis.read( ) ) != -1 ) { char ch = (char) b ; System.out.print( ch ); } bis.close(); in.close(); } }
運行結果如下:
package ecut.streams;

import java.io.BufferedInputStream;
import java.io.FileInputStream;
import java.io.IOException;
import java.io.InputStream;

/**
?* markSupported() ?mark( readlimit ) ?reset()
?*/
public class BufferedInputStreamTest2 {

?? ?public static void main(String[] args) throws IOException {
?? ??? ?
?? ??? ?InputStream in = new FileInputStream( "./src/ecut/streams/BufferedInputStreamTest2.java" );
?? ??? ?
?? ??? ?// BufferedInputStream ?é¨?????a é?è?¤ ??1é?ˉ 8192 ?-è?°?? ?¨?¥???- èˉ???°????1
?? ??? ?BufferedInputStream bis = new BufferedInputStream( in );
?? ??? ?
?? ??? ?int b ;
?? ??? ?while( ( b = bis.read( ) ) != -1 ) {
?? ??? ??? ?char ch = (char) b ;
?? ??? ??? ?System.out.print( ch );
?? ??? ??? ?if( ch == 'w'){
?? ??? ??? ??? ? //?¨?-¤è??¥?μ??-??è?°??????????
?? ??? ??? ??? ?bis.mark( 24250 ); // ?¨ ?????????¤?????è?° ( markpos = pos ; )readlimit??1???¤§???3¨?clean flip rewind ????a?1?3?
?? ??? ??? ?}
?? ??? ?}
?? ??? ?
?? ??? ?System.out.println( "\n~~~~~~~~~~~~~~~~~~~~~~~~" );
?? ??? ? //?°?-¤?μé?°?????°????????ˉ1?-¤è??¥?μè°?¨ mark ?1?3????????
?? ??? ?bis.reset(); // ??° ???è?°??????
?? ??? ?
?? ??? ?while( ( b = bis.read( ) ) != -1 ) {
?? ??? ??? ?char ch = (char) b ;
?? ??? ??? ?System.out.print( ch );
?? ??? ?}
?? ??? ?
?? ??? ?bis.close();
?? ??? ?in.close();
?? ??? ?

?? ?}

}

~~~~~~~~~~~~~~~~~~~~~~~~
hile( ( b = bis.read( ) ) != -1 ) {
?? ??? ??? ?char ch = (char) b ;
?? ??? ??? ?System.out.print( ch );
?? ??? ?}
?? ??? ?
?? ??? ?bis.close();
?? ??? ?in.close();
?? ??? ?

?? ?}

}
BufferedOutputStream測試案例:
package ecut.streams;import java.io.BufferedOutputStream;
import java.io.FileOutputStream; import java.io.IOException; import java.io.OutputStream; public class BufferedOuputStreamTest { public static void main(String[] args) throws IOException { OutputStream out = new FileOutputStream("buffer.txt"); // 內部有一個 默認是 8192 大小的字節數組 BufferedOutputStream bos = new BufferedOutputStream(out); byte[] bytes = "i am sinaean !".getBytes(); // 好像并沒有直接寫磁盤減少對磁盤的讀寫次數,實際上最終還是將傳入的out流一個字節一個字節的寫出并沒有提高多少效率 bos.write(bytes); // 將 字節內容 寫入 BufferedOutputStream 內部的緩沖區 ( byte 數組默認 // 大小是 8192) // bos.flush(); // 將 緩沖區中的內容 刷出 到 底層輸出流  bos.close(); // close 操作導致將 最后寫入到 緩沖區的內容 刷出  out.close(); } }
BufferedOutputStream 是具有緩沖功能的字節輸出流。
每個 BufferedOutputStream 對象內部都有一個字節數組用來緩存將要輸出的字節。
BufferedOutputStream 是一個過濾流(包裝流),它繼承自 FilterOutputStream 類。
部分源碼:
public void write(byte b[]) throws IOException {write(b, 0, b.length); } public void write(byte b[], int off, int len) throws IOException { if ((off | len | (b.length - (len + off)) | (off + len)) < 0) throw new IndexOutOfBoundsException(); for (int i = 0; i < len; i++) { write(b[off + i]); } } public void write(int b) throws IOException { out.write(b); } @SuppressWarnings("try") public void close() throws IOException { try (OutputStream ostream = out) { flush(); } } 運行結果如下:
當前工程多了文件buffer.txt
3、DataInputStream和DataOutputStream
DataOutputStream測試案例:
package ecut.streams;import java.io.DataOutputStream;
import java.io.FileOutputStream; import java.io.IOException; import java.io.OutputStream; import java.util.Arrays; /** * DataOutput 接口 用于將 任意 Java 基本類型轉換為一系列字節,并將這些字節寫入二進制流 * DataOutputStream 類 實現了 DataOutput 接口 */ public class DataOutputStreamTest { public static void main(String[] args) throws IOException{ OutputStream out = new FileOutputStream( "binary.data" );//讀寫都是二進制數據  DataOutputStream oos = new DataOutputStream( out ); final byte[] nameBytes = new byte[32] ; // 假設一個人的姓名最多占32字節  String name = "張三豐" ; byte[] bytes1 = name.getBytes(); System.arraycopy( bytes1 , 0 , nameBytes , 0 , bytes1.length ); oos.write( nameBytes ); // 將 nameBytes 數組 32 個字節 寫入到 數據輸出流中 // char 占 2 個字節 ( byte ) char gender = '男' ; // char類型的范圍\u0000 ~ \uFFFF oos.writeChar( gender ); // 將一個 字符 對應的 2 個字節寫入到 數據輸出流 // boolean 占 1 個 bit ( 寫出到文件后占 1 個字節 ) boolean married = false ; oos.writeBoolean( married ); // 將一個 boolean 值 對應的 1 個字節寫入到 數據輸出流  System.out.println( "~~~~~~~~~~~~~~~~~~~~~" ); name = "滅絕" ; byte[] bytes2 = name.getBytes(); Arrays.fill( nameBytes , (byte)0 );//nemeBytes上次的時候占了9個字節“張三豐”,放入滅絕時候會變成滅絕豐因此需要還原一下數組 System.arraycopy( bytes2 , 0 , nameBytes , 0 , bytes2.length ); oos.write( nameBytes ); gender = '女' ; oos.writeChar( gender ); married = false ; oos.writeBoolean( married ); oos.close(); out.close(); } }
運行結果如下:
當前工程多了文件binary.data
DataInputStream測試案例:
package ecut.streams;import java.io.DataInputStream;
import java.io.FileInputStream; import java.io.IOException; import java.io.InputStream; public class DataInputStreamTest { public static void main(String[] args) throws IOException { InputStream in = new FileInputStream( "binary.data" ); DataInputStream dis = new DataInputStream( in ); final int size = dis.available(); final int unit = 35 ; final int n = size / unit ; // final byte b = 0 ; final byte[] nameBytes = new byte[32] ; for( int i = 0 ; i < n ; i++ ){ dis.read( nameBytes ); // 讀取 32 個字節到 數組中  String name = new String( nameBytes ); System.out.println( name.trim() ); char gender = dis.readChar(); // 讀取 2 個字節構造成 char 類型  System.out.println( gender ); boolean married = dis.readBoolean() ; // 讀取 1 個字節 構造成 booolean 類型數值  System.out.println( married ); } dis.close(); in.close(); } }
運行結果如下:
張三豐
男
false
滅絕
女
fals
4、ObjectInputStream和ObjectOutputStream
序列化和反序列化:
序列化將 :JVM 中的 Java 對象轉換為字節序列的過程稱為對象的序列化( Serialization )。
反序列化:把字節序列恢復為 JVM 中的 Java 對象的過程稱為對象的反序列化( Deserialization )。

在 Java 中可以通過實現 Serializable 或 Externalizable 接?口來?支持序列化操作,也可以?自定義序列化
源碼:
package java.io;
public interface Serializable {
/** 序列化接?沒有?法或字段,僅?于標識可序列化的語義 */ }
?類通過實現 java.io.Serializable 接?口以啟?用其序列化功能,未實現此接?口的類將?無法使其任何狀態序列化或反序列化
實現 Serializable 接?口通常需要添加?一個 serialVersionUID 屬性,每個類的該屬性取值應盡量量與其它類的該屬性值不不同。
ObjectOutputStream實現了接口ObejectOutput
ObejectOutput繼承DataOutput(ObjectOutput 擴展 DataOutput 接?以包含對象的寫入操作
DataOutput 包括基本類型的輸出?方法,ObjectOutput 擴展了該接?,以包含對象、數組和 String 的輸出?方法)
DataOutputStream是DataOutput的實現類
ObjectOutputStream測試案例:
package ecut.streams;import java.io.Serializable;
import java.util.Date;public class Student implements Serializable {private static final long serialVersionUID = 6570982037942763733L;//用于鑒別類,相當于身份證private Integer id;private String name;private char gender;private transient Date birthdate ;//被transient修飾的都不支持序列化操作public Student() {super();}public Student(Integer id, String name, char gender) {super();this.id = id;this.name = name;this.gender = gender;}public Integer getId() {return id;}public void setId(Integer id) {this.id = id;}public String getName() {return name;}public void setName(String name) {this.name = name;}public char getGender() {return gender;}public void setGender(char gender) {this.gender = gender;}public Date getBirthdate() {return birthdate;}public void setBirthdate(Date birthdate) {this.birthdate = birthdate;}}
package ecut.streams;import java.io.FileOutputStream;
import java.io.IOException;
import java.io.ObjectOutputStream;
import java.io.OutputStream;
import java.util.Calendar;
import java.util.Date;public class SerializationTest {public static void main(String[] args) throws IOException {Calendar c = Calendar.getInstance();c.set( 1996 , 4 , 11 );//1996.5.11 月份從Date birthdate = c.getTime();// 創建一個可以輸出到本地操作系統中指定文件的文件輸出流(字節輸出流)OutputStream out = new FileOutputStream( "student.ser" );//ObjectOutputStream處理流包裝流/** 創建一個 可以將 JVM 中的指定對象 轉換成 字節序列的流 ( 它只轉換,不負責最終輸出 )*/ObjectOutputStream oos = new ObjectOutputStream( out );//ObjectOutputStream實現了接口ObejectOutput,ObejectOutput繼承DataOutput
        Student s = new Student( 100 , "張三豐" , '男' );s.setBirthdate( birthdate );// 將一個 支持 序列化的 類的對象 ,轉換成 字節序列 寫入 ObjectOuputStream 中
        oos.writeObject( s );oos.close();out.close();}}
運行結果如下:
當前工程底下增加文件student.ser
ObjectInputStream測試案例:
package ecut.streams;import java.io.FileInputStream;
import java.io.IOException;
import java.io.InputStream;
import java.io.ObjectInputStream;public class DeserializationTest {public static void main(String[] args) throws IOException, ClassNotFoundException {// 讀取指定文件中的字節序列的 字節輸入流InputStream in = new FileInputStream("student.ser");/** 創建一個 可以將 字節序列 轉換成 JVM 中的對象的 輸入流 ( 轉換流 ) */ObjectInputStream ois = new ObjectInputStream(in);// 從 ObjectInputStream 中讀取字節序列并 "重構" 成 JVM 中的對象Object o = ois.readObject();// ClassNotFoundExceptionSystem.out.println(o);// ecut.streams.Student@119d7047// instanceof用于安全轉換,判斷o是不是Student類型if (o instanceof Student) {Student s = (Student) o;System.out.println(s.getName());System.out.println(s.getBirthdate());//被transient修飾的都不支持序列化操作}ois.close();in.close();}}
運行結果如下:
ecut.streams.Student@119d7047
張三豐
null
serialVersionUID 用于鑒別類,相當于身份證,只改變serialVersionUID不改變student.ser會拋出java.io.InvalidClassException,版本號不同就是不同的類
5、PrintStream
部分源碼:
public
class FilterOutputStream extends OutputStream {protected OutputStream out;
.....................
public class PrintStream extends FilterOutputStreamimplements Appendable, Closeable
{private final boolean autoFlush;private boolean trouble = false;private Formatter formatter;private BufferedWriter textOut;private OutputStreamWriter charOut;
.......................
PrintStream 類繼承了 FilterOutputStream 類 并 實現了 Appendable 接口,PrintStream 內部通過 OutputStreamWriter 將字節流轉換成字符流,通過 BufferedWriter 將所要打印的內容緩存,從而支持 append 操作,與其它流不同,PrintStream 永遠不會拋出 IOException(內部有checkError方法,異常情況僅設置可通過 checkError 方法測試的內部標志)。盡管 PrintStream 和 PrintWriter 都是 打印流,但是 應該盡量使用 PrintStream 除非是在 Servlet 中 才使用 PrintWriter ,否則盡量使用 PrintStream。
PrintStream測試案例:
package ecut.streams;import java.io.FileNotFoundException;
import java.io.PrintStream;
import java.io.UnsupportedEncodingException;
//過濾流
public class PrintStreamTest {public static void main(String[] args) throws FileNotFoundException, UnsupportedEncodingException {PrintStream ps = new PrintStream( "print.txt" , "UTF-8" );ps.println( true );ps.print( 'A' );ps.println( "Z" ) ;ps.append( '東' );ps.append( "華理工" );//實現了Appendable接口
        ps.println();ps.close();}}
運行結果如下:
在當前工程底下增加print.txt。
6、標準流
標準輸入流測試案例:
package ecut.streams;import java.io.BufferedReader;
import java.io.IOException;
import java.io.InputStream;
import java.io.InputStreamReader;
import java.util.Scanner;public class StandardInputStreamTest {public static void main(String[] args) throws IOException {InputStream in = System.in ;// 標準輸入流 ( 默認是讀取 鍵盤輸入 )/*Scanner s = new Scanner(in);String str;while((str = s.nextLine())!=null){System.out.print(str);}s.close();*/// 將 字節輸入流 包裝成 字符輸入流InputStreamReader reader = new InputStreamReader( in );// 將 "字符輸入流" 包裝成 "帶有緩沖功能的字符輸入流"BufferedReader br = new BufferedReader( reader );String s ;System.out.println( "請輸入數據: " );while( ( s = br.readLine() ) != null ) {System.out.println( "你輸入的是: " + s );System.out.println( "請輸入數據: " );}br.close();reader.close();in.close();}}
運行結果如下:
請輸入數據:
ddddd
你輸入的是: ddddd
請輸入數據:
fdjfj
你輸入的是: fdjfj
請輸入數據:
fdf
你輸入的是: fdf
請輸入數據:
vvvvv
你輸入的是: vvvvv
請輸入數據: 你輸入的是:
請輸入數據: d
你輸入的是:    d
請輸入數據:
vvv
你輸入的是: vvv
請輸入數據:
標準輸出流錯誤輸出流測試案例:
package ecut.streams;public class StandardOutputStreamTest {public static void main(String[] args) {System.out.println( "Standard OutputStream" );System.err.println( "Standard Error OutputStream" );}}
運行結果如下:
Standard OutputStreamStandard Error OutputStream
部分源碼:
public final static PrintStream out = null;public static void setOut(PrintStream out) {checkIO();setOut0(out);}
private static native void setOut0(PrintStream out);
System 類中 setOut 方法的實現:調用了一個私有的本地方方法這個本地方法完成流的重新分配。由虛擬機完成最底層的方法去修改。
重定向標準輸入流測試案例:
package ecut.streams;import java.io.FileNotFoundException;
import java.io.PrintStream;public class RedirectStandardStreamTest {public static void main(String[] args) throws FileNotFoundException {// 將標準輸入流的默認輸出位置保存起來final PrintStream defaultOut = System.out ;// 創建一個可以向指定文件中輸出內容的打印流PrintStream out = new PrintStream( "standard.txt" );// 這句將輸出到控制臺中System.out.println( "redirect...." ); // 重定向 "標準" 輸出流到指定的打印流
        System.setOut( out );// 這句將輸出到指定的打印流中System.out.println( "hello , print stream ." ); // 這句將輸出到指定的打印流中System.out.println( "back..." ); // 將 標準輸出流 改回默認的輸出位置
        System.setOut( defaultOut );// 這句將輸出到控制臺中System.out.println( "i am back." ); }}
運行結果如下:
redirect....
i am back.
當前工程底下增加了文件standard.txt,內容是
hello , print stream .
back...
字符流結構圖
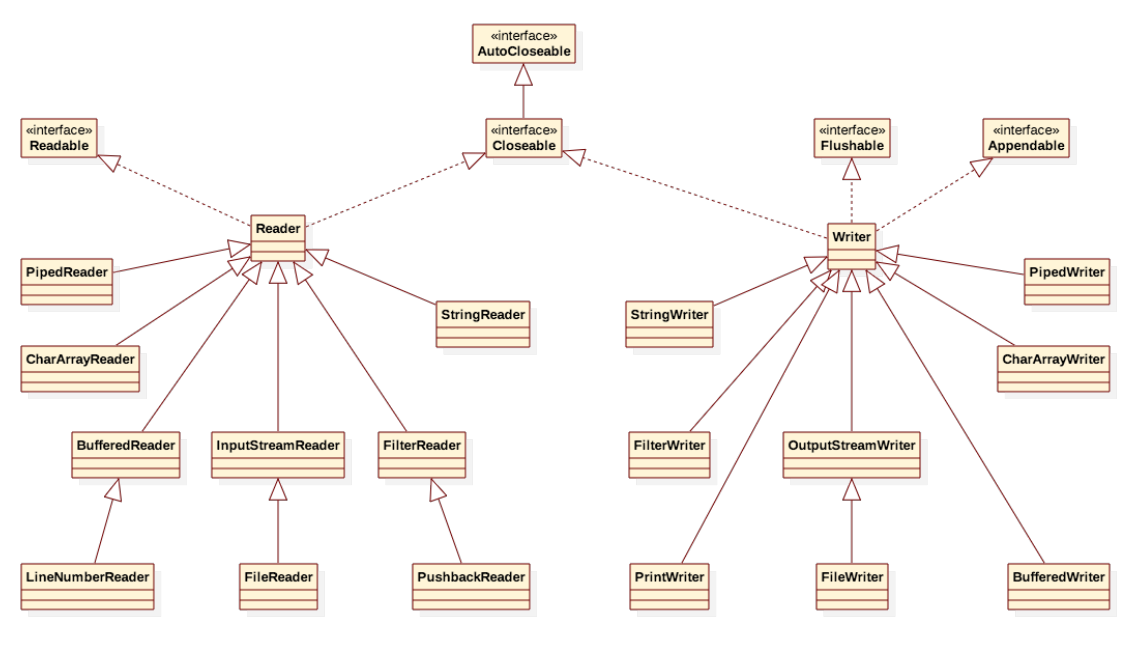
?字符流常用類
1、InputStreamReader和OutputStreamWriter
InputStreamReader是一個轉換流可以將字節輸入轉換為字符輸入
InputStreamReader測試案例:
package ecut.streams;import java.io.FileInputStream;
import java.io.IOException;
import java.io.InputStream;
import java.io.InputStreamReader;
import java.io.Reader;public class InputStreamReaderTest {public static void main(String[] args) throws IOException {// 創建一個讀取指定文件的 字節輸入流 InputStream in = new FileInputStream( "JavaAdvanced.txt" );// 一個字節字節的圖會出現亂碼現象/*int n ;byte[] bytes = new byte[ 32 ];while( ( n = in.read( bytes ) ) != -1 ){String s = new String( bytes , 0 , n ) ;System.out.print( s );}*/// 將 字節輸入流  包裝成 字符輸入流Reader reader = new  InputStreamReader( in , "UTF-8" );//實現AutoCloseable(1.7出現的)最好指定編碼格式/*int ch ;while( ( ch = reader.read() ) != -1 ){char c = (char) ch ;System.out.print( c );}*/int n ;char[] chars = new char[100] ;while( ( n = reader.read( chars ) ) != -1 ){String s = new String( chars , 0 , n );System.out.print( s );}in.close();}}
運行結果如下:
1、File and Stream :InputStream : BufferedInputStream 、DataInputStream 、ObjectInputStreamOuputStream : BufferedOuputStream 、DataOutputStream 、PrintStream 、ObjectOutputStreamReader : InputStreamReader 、FileReader 、BufferedReader 、LineNumberReaderWriter : OutputStreamWriter 、FileWriter 、BufferdWriter 、PrintWriterNIO :  1.4 ~ 1.6 Buffer :  ByteBuffer 、CharBuffer 、MappedByteBufferCharset : Channel : FileChannel1.7 :java.nio.file : Path 、Paths 、Files2、Thread java.lang.Runnablejava.lang.Thread 線程調度: 優先級、sleep 、join 、yeild 、精靈線程線程同步: 同步代碼塊 、同步方法線程通信: 數據傳遞 、協調運行( notify 、 wait )定時任務

....................
OutputStreamWriter可以將以字符為單位的輸出數據轉換成字節輸出流。
OutputStreamWriter測試案例:
package ecut.streams;import java.io.FileOutputStream;
import java.io.IOException;
import java.io.OutputStream;
import java.io.OutputStreamWriter;
import java.io.Writer;public class OutputStreamWriterTest {public static void main(String[] args) throws IOException {// 創建一個可以輸出到指定文件的 字節輸出流OutputStream out = new FileOutputStream( "utf8.txt" );// 將 字符輸出流 按照指定的 字符編碼 轉換成 字節輸出流Writer w = new OutputStreamWriter( out , "UTF-8" );// 寫出 字符串 中的字符,OutputStreamWriter 會將每個字符 根據指定的編碼轉換成字節序列w.write( "今天天氣孬" );w.close();out.close();}}
運行結果如下:
當前工程下增加了文件utf8.txt。
2、FileReader和FileWriter
FileReader測試案例:
package ecut.streams;import java.io.FileWriter;
import java.io.IOException;
import java.io.Writer;public class FileWriterTest {public static void main(String[] args) throws IOException {Writer w = new FileWriter( "file.txt" , true );w.append( "hello" );w.write( "world." );w.write( '\n' );w.close();}}
Writer w = new FileWriter( "file.txt" , true );和InputStreamReaderTest中的InputStream in = new FileInputStream( "JavaAdvanced.txt" );Reader reader = new InputStreamReader( in , "UTF-8" );
一樣。
運行結果如下:
1、File and Stream :InputStream : BufferedInputStream 、DataInputStream 、ObjectInputStreamOuputStream : BufferedOuputStream 、DataOutputStream 、PrintStream 、ObjectOutputStreamReader : InputStreamReader 、FileReader 、BufferedReader 、LineNumberReaderWriter : OutputStreamWriter 、FileWriter 、BufferdWriter 、PrintWriterNIO : 1.4 ~ 1.6 Buffer : ByteBuffer 、CharBuffer 、MappedByteBufferCharset : Channel : FileChannel1.7 :java.nio.file : Path 、Paths 、Files2、Thread java.lang.Runnablejava.lang.Thread 線程調度: 優先級、sleep 、join 、yeild 、精靈線程..................
FileWriter測試案例:
package ecut.streams;import java.io.FileWriter;
import java.io.IOException;
import java.io.Writer;public class FileWriterTest {public static void main(String[] args) throws IOException {Writer w = new FileWriter( "file.txt" , true );//指定是否追加
        w.append( "hello" );w.write( "world." );w.write( '\n' );w.close();}}
運行結果如下:
當前工程下新增文件file.txt。
字符編碼轉換測試案例:
package ecut.streams;import java.io.File;
import java.io.FileInputStream;
import java.io.FileOutputStream;
import java.io.IOException;
import java.io.InputStream;
import java.io.InputStreamReader;
import java.io.OutputStream;
import java.io.OutputStreamWriter;public class EncodingConverter {public static void main(String[] args) throws IOException {final File source = new File( "gbk.txt" );final String sourceEncoding = "GBK" ;InputStream in = new FileInputStream( source );InputStreamReader reader = new InputStreamReader( in , sourceEncoding ) ;final File dest = new File( "dest.txt" );final String destEncoding = "UTF-8" ;OutputStream out = new FileOutputStream( dest );OutputStreamWriter writer = new OutputStreamWriter( out ,  destEncoding );int n ;char[] chars = new char[ 100 ];while( ( n = reader.read( chars ) ) != -1 ){writer.write( chars ,  0 ,  n );writer.flush();}writer.close();out.close();reader.close();in.close();}}
運行結果如下:
當前工程下新增文件dest.txt。
3、BufferedReader和BufferedWriter
BufferedReader測試案例:
package ecut.streams;import java.io.BufferedReader;
import java.io.FileReader;
import java.io.IOException;
import java.io.Reader;/*** 因為 BufferedReader 有緩沖區,因此支持 mark 和 reset 操作* 注意自己指定 緩沖區 大小*/
public class BufferedReaderTest {public static void main(String[] args) throws IOException {// 創建一個可以讀取指定文件內容的字符輸入流Reader reader = new FileReader( "./src/ecut/streams/BufferedReaderTest.java" )  ;// 將指定的字符輸入流包裝成 字符緩沖輸入流BufferedReader br = new BufferedReader( reader );/*int ch ;// 每次讀取一個字符,連換行符 ( \n 或 10 ) 也要讀取while( ( ch = br.read() ) != -1 ){System.out.print( (char) ch );}*/// 聲明一個變量用來接收從緩沖輸入流中讀取到的字符串
        String s ; // 從字符緩沖輸入流中讀取一行數據( 遇到換行符即停止),當到達流末尾時返回 nullwhile( ( s = br.readLine() ) != null ) {// 將讀取到的字符串輸出到控制臺
            System.out.println( s );}br.close();reader.close();}}
BufferedReader 類內部采用 char 數組(默認大小為8192)來緩存讀入的字符。
BufferedReader 從字符輸入流中讀取文本,緩沖各個字符,從而實現字符、數組和行的高效讀取
BufferedReader 類幾乎重寫了 Reader 中的所有方法,另外增加了 readLine 方法
運行結果如下:
package ecut.streams;

import java.io.BufferedReader;
import java.io.FileReader;
import java.io.IOException;
import java.io.Reader;

/**
?* 因為 BufferedReader 有緩沖區,因此支持 mark 和 reset 操作
?* 注意自己指定 緩沖區 大小
?*/
public class BufferedReaderTest {

?? ?public static void main(String[] args) throws IOException {
?? ??? ?// 創建一個可以讀取指定文件內容的字符輸入流
?? ??? ?Reader reader = new FileReader( "./src/ecut/streams/BufferedReaderTest.java" )? ;
?? ??? ?// 將指定的字符輸入流包裝成 字符緩沖輸入流
?? ??? ?BufferedReader br = new BufferedReader( reader );
?? ??? ?
?? ??? ?/*
?? ??? ?int ch ;
?? ??? ?// 每次讀取一個字符,連換行符 ( \n 或 10 ) 也要讀取
?? ??? ?while( ( ch = br.read() ) != -1 ){
?? ??? ??? ?System.out.print( (char) ch );
?? ??? ?}*/
?? ??? ?// 聲明一個變量用來接收從緩沖輸入流中讀取到的字符串
?? ??? ?String s ;
?? ??? ?// 從字符緩沖輸入流中讀取一行數據( 遇到換行符即停止),當到達流末尾時返回 null
?? ??? ?while( ( s = br.readLine() ) != null ) {
?? ??? ??? ?// 將讀取到的字符串輸出到控制臺
?? ??? ??? ?System.out.println( s );
?? ??? ?}
?? ??? ?
?? ??? ?br.close();
?? ??? ?
?? ??? ?reader.close();
?? ??? ?
?? ?}

}
BufferedWriter測試案例:
package ecut.streams;import java.io.BufferedWriter;
import java.io.FileWriter;
import java.io.IOException;
import java.io.Writer;public class BufferdWriterTest {public static void main(String[] args) throws IOException {Writer writer = new FileWriter( "writer.txt" );BufferedWriter bw = new BufferedWriter( writer );bw.write( "hello" );//bw.flush();
        bw.close();writer.close();}}
BufferedWriter 類內部采用 char 數組(默認大小為8192)來緩存將要被輸出的字符。
BufferedWriter 將文本寫入字符輸出流,緩沖各個字符,從而提供單個字符、數組和字符串的高效寫入。
BufferedWriter 類另外增加了 newLine 方法,用來向輸出緩沖區中寫入一個行分隔符。
運行結果如下:
當前工程下新增文件writer.txt。
4、LineNumberReader
LineNumberReader測試案例:
package ecut.streams;import java.io.FileReader;
import java.io.IOException;
import java.io.LineNumberReader;
import java.io.Reader;public class LineNumberReaderTest {public static void main(String[] args) throws IOException{Reader reader = new FileReader( "./src/ecut/streams/LineNumberReaderTest.java" )  ;LineNumberReader br = new LineNumberReader( reader );String s ; // 每次讀取一行內容 ( 遇到換行符即停止 )while( ( s = br.readLine() ) != null ) {System.out.println( br.getLineNumber() + " : " + s );}br.close();reader.close();}}
運行結果如下:
1 : package ecut.streams;
2 :
3 : import java.io.FileReader;
4 : import java.io.IOException;
5 : import java.io.LineNumberReader;
6 : import java.io.Reader;
7 :
8 : public class LineNumberReaderTest {
9 :
10 : ?? ?public static void main(String[] args) throws IOException{
11 : ?? ??? ?
12 : ?? ??? ?Reader reader = new FileReader( "./src/ecut/streams/LineNumberReaderTest.java" )? ;
13 : ?? ??? ?
14 : ?? ??? ?LineNumberReader br = new LineNumberReader( reader );
15 : ?? ??? ?
16 : ?? ??? ?String s ;
17 : ?? ??? ?// 每次讀取一行內容 ( 遇到換行符即停止 )
18 : ?? ??? ?while( ( s = br.readLine() ) != null ) {
19 : ?? ??? ??? ?System.out.println( br.getLineNumber() + " : " + s );
20 : ?? ??? ?}
21 : ?? ??? ?
22 : ?? ??? ?br.close();
23 : ?? ??? ?
24 : ?? ??? ?reader.close();
25 :
26 : ?? ?}
27 :
28 : }
5、PrintWriter
PrintWriter測試案例:
package ecut.streams;import java.io.FileNotFoundException;
import java.io.PrintWriter;
import java.io.UnsupportedEncodingException;public class PrintWriterTest {public static void main(String[] args) throws FileNotFoundException, UnsupportedEncodingException {PrintWriter pw = new PrintWriter( "pw.txt" , "UTF-8");pw.append( "hello , " );pw.println( " world " );pw.print( '!' );pw.close();}}
盡管 PrintStream 和 PrintWriter 都是 打印流,但是 應該盡量使用 PrintStream除非是在 Servlet 中 才使用 PrintWriter ,否則盡量使用 PrintStream。
運行結果如下:
當前工程下新增文件pw.txt。
RandomAccessFile類
RandomAccessFile不是流但是可以讀寫文件,?沒有繼承 InputStream 、OutputStream 、Reader 、Writer ,但是 RandomAccessFile 實現了 DataOutput , DataInput , Closeable。
RandomAccessFile測試案例:
package ecut.streams;import java.io.IOException;
import java.io.RandomAccessFile;
import java.util.Arrays;public class RandomAccessFileTest1 {public static void main(String[] args) throws IOException {final byte b = 0 ;final byte[] nameBytes = new byte[32] ;String name = "" ;char gender ;boolean married = false ; // 表示是否結婚的變量 ( JVM 中 boolean 占 1 個 位 ( 1 bit ) )
        String filename = "student.data" ;String mode = "rw" ;//     打開以便讀取和寫入RandomAccessFile raf = new RandomAccessFile( filename , mode );raf.setLength( 70 );raf.seek( 35 ); // 將 文件指針 調整到 35
        name = "奧斯特洛夫斯基" ;byte[] bytes = name.getBytes(); // 長度是 21Arrays.fill( nameBytes ,  b );//將數組填充為初始狀態System.arraycopy( bytes , 0 , nameBytes,  0 , bytes.length );//bytes拷貝到nameBytesraf.write( nameBytes ); // 寫出一個 長度為 32 字節的數組
        gender = '男' ;raf.writeChar( gender ); // 寫出一個 字符 占 2 個字節
        married = true ;raf.writeBoolean( married ); // 寫出一個 boolean 值,占 1 字節long pointer = raf.getFilePointer() ; // 獲得  "文件指針" 的 當前位置System.out.println( "pointer :" + pointer );System.out.println( "~~~~~~~~~~~~~~~~~~~~~~~~~~~~");raf.seek( 35 );raf.read( nameBytes );  // 讀取 32 個字節到數組中name = new String( nameBytes ).trim() ;gender = raf.readChar(); // 讀取 2 個字節 并重構成 char 類數值
        married = raf.readBoolean() ; // 讀取 1 個字節,并根據這個字節中的那一個位重構 boolean 數值
        System.out.println( name + " , " + gender + " , " + married ) ;pointer = raf.getFilePointer() ; // 獲得  "文件指針" 的 當前位置System.out.println( "pointer :" + pointer );raf.close();}}
RandomAccessFile 類的實例支持對隨機訪問文件的讀取和寫入,任意訪問文件的行為類似存儲在文件系統中的一個大型 byte 數組,存在指向該隱含數組的光標或索引,稱為文件指針,可以通過getFilePointer()來獲取它或用seek()來設置它輸入操作從文件指針開始讀取字節,并隨著對字節的讀取而前移此文件指針,如果是讀寫模式,也可以從文件指針開始寫入字節,并隨著對字節的寫入而前移此文件指針。如果此類中的所有讀取例程在讀取所需數量的字節之前已到達文件末尾,則拋出 EOFException(是一種 IOException)。
運行結果如下:
pointer :70
~~~~~~~~~~~~~~~~~~~~~~~~~~~~
奧斯特洛夫斯基 , 男 , true
pointer :70
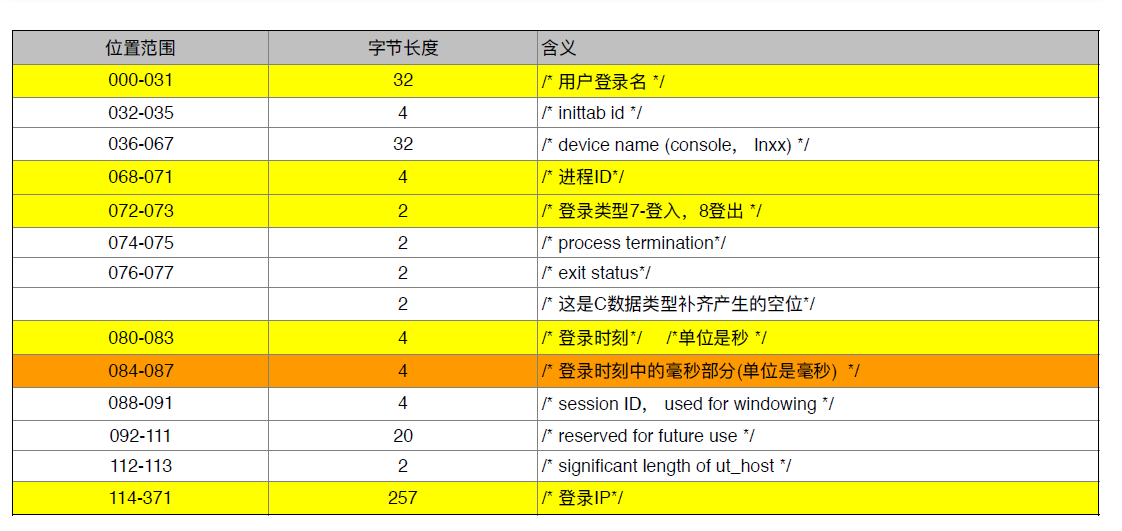
mywtmpx文件是 Unix 系統中記錄每個用戶登入、登出等數據的日志文件,該文件中 每 372 個字節表格一個用戶的記錄,每 372 個字節的含義如上表示。
用RandomAccessFile讀取wtmpx 文件測試案例:
package ecut.streams;import java.io.IOException;
import java.io.PrintStream;
import java.io.RandomAccessFile;public class RandomAccessFileTest2 {public static void main(String[] args) throws IOException {PrintStream ps = new PrintStream( "mywtmpx.txt" );RandomAccessFile raf = new RandomAccessFile( "mywtmpx" ,  "r" ) ;final long size = raf.length() ;  // 獲得文件大小final int unit = 372 ; // 指定每條記錄所占的字節數final long n = size / unit ; // 計算總記錄數System.out.println( "總記錄數: " + n  );final byte[] nameBytes = new byte[32] ;final byte[] ipBytes = new byte[257] ;long start = System.currentTimeMillis() ; for( long i = 0 ; i < n ; i++ ){raf.seek( i * unit );raf.read( nameBytes ) ; // 32String name = new String( nameBytes ).trim() ;ps.append( name );ps.append( " , " ) ;raf.seek( raf.getFilePointer() + 36 ) ; //raf.skipBytes( 36 );int pid = raf.readInt() ; // 4 ps.append( pid + "" );ps.append( " , " ) ;short type = raf.readShort() ; // 2 ps.append( type + "" );ps.append( " , " ) ;raf.seek( raf.getFilePointer() + 6 ) ; // 6int s = raf.readInt() ; // 4int ms = raf.readInt() ; // 4 long time = s * 1000L + ms ;ps.append( time + "" );ps.append( " , " ) ;raf.seek( raf.getFilePointer() + 26 ) ; // 26
            raf.read( ipBytes ) ;String ip = new String( ipBytes ).trim() ;ps.println( ip );}long end = System.currentTimeMillis();System.out.println( "解析時間: " + ( end - start )  );raf.close();ps.close();}}
運行結果如下:
當前工程下新增文件mywtmpx.txt。
NIO(new input/output)
?jdk1.4開始提供的:(nio)
?? ?java.nio:Buffer
?? ?java.nio.channels:Channel 、Selector
?? ?java.nio.charset:Charset
?jdk1.7開始提供:(nio 2)
?? ?java.nio.file:Path、 Paths、File
?? ?Java.nio.attribute:BasicFileAttributes
1、Charset
Charset測試案例一:
package ecut.streams.nio;import java.nio.ByteBuffer;
import java.nio.CharBuffer;
import java.nio.charset.Charset;
import java.util.Arrays;public class CharsetTest1 {public static void main(String[] args) {// Java 語言中默認采用 UNICODE 來表示 字符char ch = '東' ; // 2 字節
        Charset cs = Charset.defaultCharset() ; // 獲得 默認的 字符編碼 對應的 Charset 對象System.out.println( "當前編碼: " + cs.displayName()  );// 將 字符串 按照 當前的字符編碼集 來【編碼】成相應的 字節序列ByteBuffer buffer = cs.encode( ch + "" );byte[] bytes = buffer.array();System.out.println(  Arrays.toString( bytes ) );System.out.println( "~~~~~~~~~~~~~~~~~~~~~~" );// 將 指定的字節序列(字節緩沖區) 按照 當前的字符編碼集 【解碼】成 字符 ( 字符緩沖區 )CharBuffer charBuffer = cs.decode( buffer );System.out.println( charBuffer );}}
運行結果如下:
當前編碼: UTF-8
[-28, -72, -100]
~~~~~~~~~~~~~~~~~~~~~~
東
Charset測試案例二:
package ecut.streams.nio;import java.nio.charset.Charset;
import java.util.Iterator;
import java.util.Map.Entry;
import java.util.Set;
import java.util.SortedMap;public class CharsetTest2 {public static void main(String[] args) {// 構造從規范 charset 名稱到 charset 對象的有序映射。SortedMap<String, Charset> charsets = Charset.availableCharsets();Set< Entry<String, Charset> > entries = charsets.entrySet();Iterator< Entry<String, Charset> > itor =  entries.iterator();while( itor.hasNext() ){Entry<String, Charset> entry = itor.next();System.out.print( entry.getKey() );System.out.print( " , " );System.out.println( entry.getValue() );}}}
運行結果如下:
Big5 , Big5
Big5-HKSCS , Big5-HKSCS
........
x-windows-874 , x-windows-874
x-windows-949 , x-windows-949
x-windows-950 , x-windows-950
x-windows-iso2022jp , x-windows-iso2022jp
Charset測試案例三:
package ecut.streams.nio;import java.nio.charset.Charset;public class CharsetTest3 {public static void main(String[] args) {String charsetName = "UTF-8" ;// 通知是否支持指定的 charset。boolean support = Charset.isSupported( charsetName ) ;System.out.println( support );if( support ){// 返回指定 charset 的 charset 對象。Charset charset = Charset.forName( charsetName );System.out.println( charset );}}}
運行結果如下:
true
UTF-8
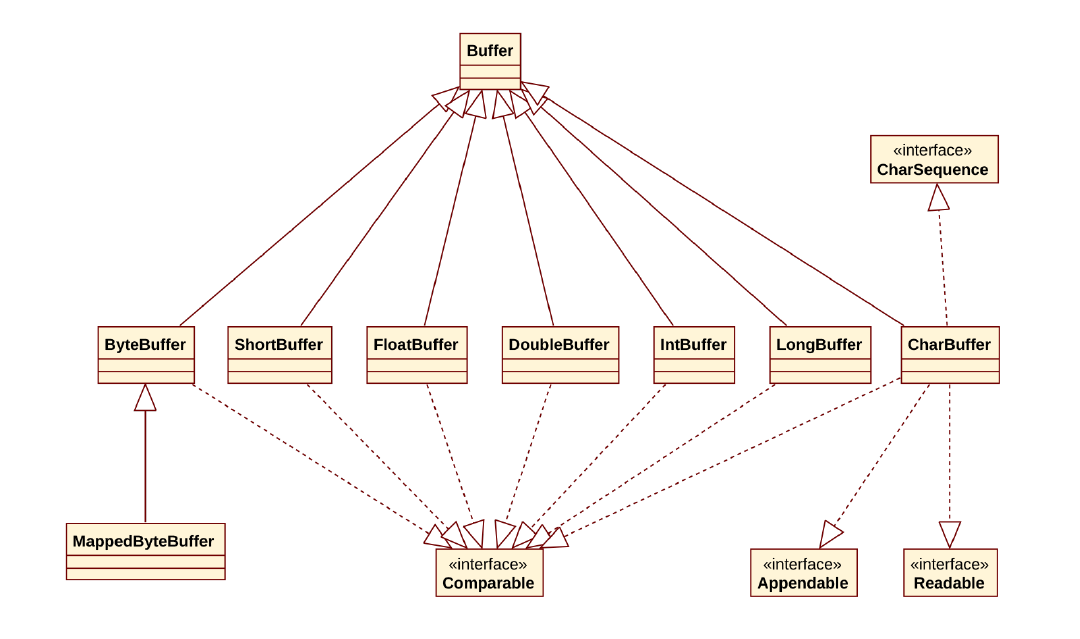
2、Buffer
部分源碼:
public abstract class Buffer {/*** The characteristics of Spliterators that traverse and split elements* maintained in Buffers.*/static final int SPLITERATOR_CHARACTERISTICS =Spliterator.SIZED | Spliterator.SUBSIZED | Spliterator.ORDERED;// Invariants: mark <= position <= limit <= capacityprivate int mark = -1;private int position = 0;private int limit;private int capacity;
  .............................
public abstract class CharBufferextends Bufferimplements Comparable<CharBuffer>, Appendable, CharSequence, Readable
{// These fields are declared here rather than in Heap-X-Buffer in order to// reduce the number of virtual method invocations needed to access these// values, which is especially costly when coding small buffers.//
    final char[] hb;                  // Non-null only for heap buffersfinal int offset;boolean isReadOnly;
...................................
XxxBuffer里面的數組就是xxx類型。
Buffer中定義的屬性:
?? ??? ?
?? ??? ?capacity表示緩沖區容量??? 緩沖區的容量 是它所包含的元素的數量。緩沖區的容量不能為負并且不能更改。
?? ??? ?
?? ??? ?limit表示緩沖區的限制??? 緩沖區的限制 是第一個不應該讀取或寫入的元素的索引。緩沖區的限制不能為負,并且不能大于其容量。
?? ??? ?
?? ??? ?position表示緩沖區的當前位置??? 緩沖區的位置 是下一個要讀取或寫入的元素的索引。緩沖區的位置不能為負,并且不能大于其限制。
?? ??? ?
?? ??? ?mark 表示緩沖區的標志位置
?? ??? ?
Buffer中定義的方法:
?? ??? ?
?? ??? ?int capacity()返回此緩沖區的容量
?? ??? ?
?? ??? ?int limit()返回此緩沖區的限制位置
?? ??? ?
?? ???? Buffer limit(int newLimit) 設置此緩沖區的限制。
?? ??? ?
?? ???? int position()返回此緩沖區的位置
?? ??? ?
?? ???? Buffer position(int newPosition)設置此緩沖區的位置。
?? ??? ?
?? ???? Buffer mark() 將緩沖區中的當前位置作為標記位置(做標記)
?? ??? ?
?? ???? Buffer reset() 將此緩沖區的當前位置重置為以前標記的位置(回到從前做標記的地方)
?Buffer 類中定義的對緩沖區進行控制的方法
?? ?
?? ???? Buffer flip() 反轉緩沖區("鎖定"緩沖區中的有效數據)
?? ??? ?
?? ???? Buffer clear() "清除"緩沖區(將緩沖區的狀態調整到初始狀態,并沒有清除緩沖區的數據)
?? ??? ?
?? ???? Buffer rewind() 重繞此緩沖區("倒帶")
CharBuffer類繼承了Buffer類的所有方法,并在內部提供了一個char數組來緩沖字符,可以調用allocate方法來獲取實例。
CharBuffer測試案例一:
package ecut.streams.nio;import java.nio.CharBuffer;public class CharBufferTest1 {public static void main(String[] args) {// 獲得 CharBuffer 實例CharBuffer buffer = CharBuffer.allocate( 10 );show( buffer );buffer.put( 'A' );buffer.put( 'B' );buffer.put( 'C' ) ;show( buffer );// 判斷 從 當前位置 到限制位置 之間是否有元素可以讀取
        System.out.println( buffer.hasRemaining() );// 獲得 從當前位置 到 限制位置 之間的 元素個數
        System.out.println( buffer.remaining() );System.out.println( buffer );// 重新設置 限制位置 為 當前位置
        buffer.limit( buffer.position() ) ;// 將 當期位置 設置為 開始位置buffer.position( 0 ) ;System.out.println( buffer.toString() );show( buffer );//相對 get 方法。讀取此緩沖區當前位置的字符,然后該位置遞增。 char ch = buffer.get();System.out.println( ch );show( buffer );ch = buffer.get();System.out.println( ch );show( buffer );ch = buffer.get();System.out.println( ch );show( buffer );}public static void show( CharBuffer buffer ) {System.out.print( "position : " + buffer.position() );System.out.print( " , " );System.out.print( "limit : " + buffer.limit() );System.out.print( " , " );System.out.println( "capacity : " + buffer.capacity() );}}
運行結果如下:
position : 0 , limit : 10 , capacity : 10
position : 3 , limit : 10 , capacity : 10
true
7ABC
position : 0 , limit : 3 , capacity : 10
A
position : 1 , limit : 3 , capacity : 10
B
position : 2 , limit : 3 , capacity : 10
C
position : 3 , limit : 3 , capacity : 10
CharBuffer測試案例二:
package ecut.streams.nio;import java.nio.CharBuffer;public class CharBufferTest2 {public static void main(String[] args) {// 獲得 CharBuffer 實例CharBuffer buffer = CharBuffer.allocate( 10 );show( buffer );buffer.put( 'A' );buffer.put( 'B' );buffer.put( 'C' ) ;show( buffer );buffer.flip(); // 1、limit = position ; 2、position = 0 ;  3、mark = -1;
        System.out.println( buffer );show( buffer );buffer.clear(); // 1、 position = 0; 2、limit = capacity; 3、 mark = -1;
        System.out.println( buffer );show( buffer ) ; }public static void show( CharBuffer buffer ) {System.out.print( "position : " + buffer.position() );System.out.print( " , " );System.out.print( "limit : " + buffer.limit() );System.out.print( " , " );System.out.println( "capacity : " + buffer.capacity() );}}
部分源碼:
      public final Buffer clear() {position = 0;// 1、將當前位置調整到起始位置limit = capacity;// 2、并將當前位置更改為容量對應的數值mark = -1;// 3、清楚標記
    }public final Buffer flip() {limit = position;// 1、將當前位置當做限制位置position = 0;// 2、并將當前位置調整到起始位置mark = -1;// 3、清除標記}
運行結果如下:
position : 0 , limit : 10 , capacity : 10
position : 3 , limit : 10 , capacity : 10
ABC
position : 0 , limit : 3 , capacity : 10
ABC
CharBuffer測試案例三:
package ecut.streams.nio;import java.nio.CharBuffer;public class CharBufferTest3 {public static void main(String[] args) {// 獲得 CharBuffer 實例CharBuffer buffer = CharBuffer.allocate( 10 );show( buffer );buffer.put( 'A' );buffer.put( 'B' );buffer.put( 'C' ) ;show( buffer );buffer.flip(); // 1、limit = position ; 2、position = 0 ;  3、mark = -1;for( int i = buffer.position() , n = buffer.limit() ; i < n ; i++ ){char ch = buffer.get();System.out.println( ch );}System.out.println( "~~~~~~~~~~~~~~~~~" );show( buffer );buffer.rewind(); // "倒帶"
        show( buffer );for( int i = buffer.position() , n = buffer.limit() ; i < n ; i++ ){char ch = buffer.get();System.out.println( ch );}}public static void show( CharBuffer buffer ) {System.out.print( "position : " + buffer.position() );System.out.print( " , " );System.out.print( "limit : " + buffer.limit() );System.out.print( " , " );System.out.println( "capacity : " + buffer.capacity() );}}
部分源碼:
public final Buffer rewind() {position = 0;//1、將當前位置調整到起始位置 mark = -1;//2、清除標記return this;}
運行結果如下:
position : 0 , limit : 10 , capacity : 10
position : 3 , limit : 10 , capacity : 10
A
B
C
~~~~~~~~~~~~~~~~~
position : 3 , limit : 3 , capacity : 10
position : 0 , limit : 3 , capacity : 10
A
B
C
ByteBuffer類繼承了Buffer類的所有方法,并在內部提供了一個Byte數組來緩沖字符,可以調用allocate方法來獲取實例。
ByteBufferTest測試案例:
package ecut.streams.nio;import java.nio.ByteBuffer;public class ByteBufferTest {public static void main(String[] args) {ByteBuffer buffer = ByteBuffer.allocate( 1024 );System.out.println( buffer );buffer.putInt( 100 ); // 將 int 數值 放入到 字節緩沖區中,并占用 4 個字節
        System.out.println( buffer );buffer.putChar( 'A' ) ; // 2 個字節
        System.out.println( buffer );/*int x = buffer.getInt();System.out.println( x );//輸出0,pos=6然后 getInt 往后移動4個位置因此pos=10  x為0*/    /*int x = buffer.getInt(0);System.out.println( x );//輸出100,絕對的get從開始位置獲取int post不變*/buffer.flip();int x = buffer.getInt();System.out.println( x );//輸出100
        System.out.println( buffer );char ch = buffer.getChar();System.out.println( ch );System.out.println( buffer );}}
運行結果如下:
java.nio.HeapByteBuffer[pos=0 lim=1024 cap=1024]
java.nio.HeapByteBuffer[pos=4 lim=1024 cap=1024]
java.nio.HeapByteBuffer[pos=6 lim=1024 cap=1024]
100
java.nio.HeapByteBuffer[pos=4 lim=6 cap=1024]
A
java.nio.HeapByteBuffer[pos=6 lim=6 cap=1024]
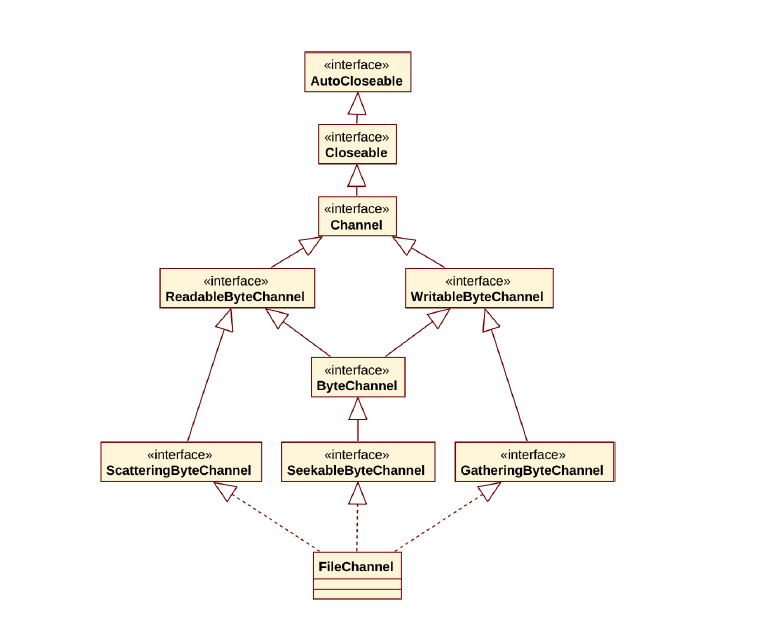
3、Channel
jdk 1.4獲得Channel
FileInputStream fileIn = new FileInputStream();
FileChannel Channel = fileIn.getChannel(filename);
FileOutputStream fileOut = new FileOutputStream(filename);FileChannel Channel = fileOut.getChannel();
jdk 1.7 使用 Files直接獲得通道
 //打開或創建一個文件,返回一個seekable字節通道來訪問該文件
static SeekablstaticeByteChannel newByteChannel(Path path, OpenOption... options)
傳統的io中
?? ?? 1、最終以字節為單位讀寫數據,效率低下-----> 新的IO提供Buffer、Channel就可以以"塊"為單位讀寫
?? ?? 2、傳統流的讀寫操作都是阻塞式的?????????? -----> 新的IO體系中提供Selector來解決阻塞問題
Path接口表示一個目錄或一個文件對應的路徑(它可以定位本地系統中的一個文件或目錄)
Paths類是一個工具類,其中定義了兩個靜態方法,專門用來返回Path對象:
static Path ?? ?get(String first, String... more)
轉換的路徑字符串,或一個字符串序列,當加入形成一個路徑字符串, Path。
?? ??? ??? ?
?static Path ?? ?get(URI uri)
將給定的URI轉換為 Path對象。
Path測試案例一:
package ecut.streams.nio;import java.nio.file.Path;
import java.nio.file.Paths;
import java.util.Iterator;public class PathTest1 {public static void main(String[] args) {Path path = Paths.get( "D:/" , "Amy" ,"C++" , "c++API.chm"  );System.out.println( path );System.out.println( "是否是絕對路徑 : " + path.isAbsolute() );System.out.println( "文件 或 目錄 名稱: " + path.getFileName()  );// 對可變長參數部分的各個 Path 進行迭代的迭代器Iterator<Path> itor = path.iterator();while( itor.hasNext() ){System.out.println( itor.next() );}}}
運行結果如下:
D:\Amy\C++\c++API.chm
是否是絕對路徑 : true
文件 或 目錄 名稱: c++API.chm
Amy
C++
c++API.chm
?File類是一個工具類,提供了對文件或目錄進行操作的大量靜態方法
? static boolean ?? ?exists(Path path, LinkOption... options)
?? ? ??? ???? 測試文件是否存在。 如果path表示的文件或目錄存在則返回true,否則返回false
?? ?
?? ??? ?? static boolean ?? ?notExists(Path path, LinkOption... options)
?? ??? ???? 測試文件是否通過這個路徑不存在。 如果path表示的文件或目錄不存在則返回true,否則返回false
?? ?
?? ??? ?? static boolean ?? ?isDirectory(Path path, LinkOption... options)
? ?? ??? ????? 測試文件是否是一個目錄。 如果oath所表示的是一個目錄則返回true否則返回false
?? ?
?? ??? ? static boolean ?? ?isRegularFile(Path path, LinkOption... options)
?? ??? ??? 測試文件是否與不透明的常規文件內容。 如果path所表示的是一個"正常"的文件則返回true,否則返回false
?? ??? ?? ?
?? ??? ? static boolean ?? ?isSymbolicLink(Path path)
?? ??? ?? 測試是否文件是一個符號鏈接。 如果path所表示的是一個"符號"文件則返回true(Linux環境下對應的是鏈接)
?
? static Path ?? ?copy(Path source, Path target, CopyOption... options)
?????????????????????? 復制一個文件到目標文件。
Path測試案例二:
package ecut.streams.nio;import java.nio.file.Files;
import java.nio.file.Path;
import java.nio.file.Paths;public class PathTest2 {public static void main(String[] args) {//將給定的URI轉換為 Path對象。 Path path = Paths.get( "D:/Amy/C++/c++API.chm"  );//測試文件是否存在。如果path表示的文件或目錄存在則返回true,否則返回false。
        System.out.println( Files.exists( path ) );//測試文件是否是一個目錄。
        System.out.println( Files.isDirectory( path ) );//測試文件是否與不透明的常規文件內容。
        System.out.println( Files.isRegularFile( path ) );}}
運行結果如下:
true
false
true
OpenOption接口用來表示打開文件或目錄的選項
StandardOpenOption 枚舉
LinkOption 枚舉
FileChannel測試案例一:
package ecut.streams.nio;import java.io.IOException;
import java.io.PrintStream;
import java.nio.ByteBuffer;
import java.nio.channels.FileChannel;
import java.nio.channels.SeekableByteChannel;
import java.nio.file.Files;
import java.nio.file.Path;
import java.nio.file.Paths;
import java.nio.file.StandardOpenOption;public class FileChannelTest1 {public static void main(String[] args) throws IOException {PrintStream ps = new PrintStream( "m.txt" );// 獲得指定名稱的文件對應的 Path 實例Path path = Paths.get( "mywtmpx" );// 如果指定 path 存在并且是一個文件if( Files.exists( path ) && Files.isRegularFile( path ) ){// 用只讀方式 打開到 path 的通道SeekableByteChannel channel = Files.newByteChannel( path , StandardOpenOption.READ );// 判斷 channel 是否是一個 FileChannel if( channel instanceof FileChannel ){// 如果是,就強制類型轉換FileChannel fileChannel = (FileChannel) channel ;final ByteBuffer buffer = ByteBuffer.allocate( 37200000 ) ;final int unit = 372 ;final byte[] nameBytes = new byte[32] ;final byte[] ipBytes = new byte[257] ;// 通道并不能直接讀取數據,通道的作用是 將 文件中的 部分 或 全部 數據 "映射" 到 緩沖區int n ;while( ( n = fileChannel.read( buffer )  ) != -1 ) {buffer.flip(); // "鎖定" 緩沖區int x = n / unit ; // 計算本次讀取到的 記錄數 for( int i = 0 ; i < x ; i++ ){// 參考 RandomAccessFileTest2 中的代碼,補充這個循環buffer.position( i * unit );buffer.get(nameBytes);String name = new String( nameBytes ).trim() ;ps.append( name );ps.append( " , " ) ;buffer.position(buffer.position()+36);int pid = buffer.getInt() ; // 4 ps.append( pid + "" );ps.append( " , " ) ;short type = buffer.getShort() ; // 2 ps.append( type + "" );ps.append( " , " ) ;buffer.position( buffer.position() + 6 ) ; // 6int s = buffer.getInt() ; // 4int ms = buffer.getInt() ; // 4 long time = s * 1000L + ms ;ps.append( time + "" );ps.append( " , " ) ;buffer.position( buffer.position() + 26 ) ; // 26
                        buffer.get( ipBytes ) ;String ip = new String( ipBytes ).trim() ;ps.println( ip );    }buffer.clear(); // "釋放" 緩沖區,以便于下次 從通道中 "提取"
                }}}ps.close(); // 關閉打印流
    }}
運行結果如下:
當前工程下增加文件m.txt。
SeekablstaticeByteChannel 的其中的一個實現類java.nio.channels.FileChannel,FileChannel中的一個方法:
abstract MappedByteBuffer ?? ?map(FileChannel.MapMode mode, long position, long size)Map區域直接這個通道的文件到內存中。
FileChannel測試案例二:
package ecut.streams.nio;import java.io.IOException;
import java.io.PrintStream;
import java.nio.MappedByteBuffer;
import java.nio.channels.FileChannel;
import java.nio.channels.SeekableByteChannel;
import java.nio.file.Files;
import java.nio.file.Path;
import java.nio.file.Paths;public class FileChannelTest2 {public static void main(String[] args) throws IOException {PrintStream ps = new PrintStream( "my.txt" );// 如果沒有指定明確的絕對路徑,則從 當前路徑讀取// 在 Eclipse 環境下普通 Java 工程中,默認的當前路徑是 當前工程Path path = Paths.get( "mywtmpx" );// 接口類型的 引用變量 引用了 實現類類型的 一個 實例SeekableByteChannel channel = Files.newByteChannel( path );// 判斷 channel 變量在運行期 所引用的那個實例 是否是 FileChannel 類型if( channel instanceof FileChannel ){FileChannel fc = (FileChannel) channel ;//fc和channel地址相同final long size = fc.size() ; // 獲得 通道對應的 文件的 大小final int unit = 372 ;final long n = size / unit ;MappedByteBuffer buffer = fc.map( FileChannel.MapMode.READ_ONLY, 0 , size );//把數據映射到內存緩沖區,直接對文件的映射final byte[] nameBytes = new byte[32] ;final byte[] ipBytes = new byte[257] ;for( long i = 0 ; i < n ; i++ ) {buffer.get(nameBytes); // 32String name = new String( nameBytes ).trim() ;ps.append( name );ps.append( " , " ) ;buffer.position( buffer.position() + 36 ); //raf.skipBytes( 36 );int pid = buffer.getInt() ; // 4 ps.append( pid + "" );ps.append( " , " ) ;short type = buffer.getShort() ; // 2 ps.append( type + "" );ps.append( " , " ) ;buffer.position( buffer.position() + 6 );  // 6int s = buffer.getInt() ; // 4int ms = buffer.getInt() ; // 4 long time = s * 1000L + ms ;ps.append( time + "" );ps.append( " , " ) ;buffer.position( buffer.position() + 26 ); // 26
                buffer.get( ipBytes ) ;String ip = new String( ipBytes ).trim() ;ps.println( ip );buffer.get();}buffer = null ; // 讓 buffer 本來引用 的那個 緩沖區 實例 不再被引用
            System.gc();//垃圾收集器運行。
            fc.close(); // 關閉通道
            }ps.close(); // 關閉打印流
        }}
運行結果如下:
當前工程下增加文件my.txt。
StandardOpenOption 枚舉 直接開啟這個文件的有關選項
LinkOption 枚舉 以連接的方式去開啟或者創建一個連接 Linux見得比較多
CopyOption 接口用來表示復制文件或目錄時的可選項, 實現了LinkOption和StandardCopyOption接口
利用Files實現文件復制測試案例:
package ecut.streams.nio;import java.io.IOException;
import java.nio.file.Files;
import java.nio.file.Path;
import java.nio.file.Paths;
import java.nio.file.StandardCopyOption;public class CopyFileByNio {public static void main(String[] args) throws IOException {Path source = Paths.get( "D:\\java_workspace\\zhongbang\\JavaAdvanced\\mywtmpx.txt" );String name = source.getFileName().toString() ;System.out.println("name:"+name );System.out.println("source:"+source );Path target = Paths.get( "D:/Amy" , name   );System.out.println("target:"+target );Files.copy( source ,  target , StandardCopyOption.REPLACE_EXISTING);}}
運行結果如下:
D:\Amy目錄下新增文件mywtmpx
name:mywtmpx.txt
source:D:\java_workspace\zhongbang\JavaAdvanced\mywtmpx.txt
target:D:\Amy\mywtmpx.txt
參考博客鏈接
http://blog.csdn.net/xiaodanpeng/article/details/50820868
轉載請于明顯處標明出處
http://www.cnblogs.com/AmyZheng/p/8489229.html
)


)
![happiness[國家集訓隊2011(吳確)]](http://pic.xiahunao.cn/happiness[國家集訓隊2011(吳確)])


