macos mojave

Apple’s macOS Mojave disables subpixel antialiasing, also known as font smoothing, by default. On a MacBook Air or a desktop Mac hooked up to a non-Retina display, upgrading will make your fonts look worse.
蘋果的macOS Mojave默認情況下禁用子像素抗鋸齒,也稱為字體平滑。 在連接到非Retina顯示器的MacBook Air或臺式Mac上,升級將使字體看起來更糟。
Update: We’ve found a better method that will actually re-enable subpixel antialiasing rather than just relying on font smoothing. Open a Terminal and run the following command:
更新:我們發現了一種更好的方法,該方法實際上將重新啟用亞像素抗鋸齒功能,而不僅僅是依靠字體平滑。 打開終端并運行以下命令:
defaults write -g CGFontRenderingFontSmoothingDisabled -bool NO
Log out and log back in for your changes to take effect. Thanks to Dean Herbert for reporting this to us.
注銷并重新登錄,以使更改生效。 感謝Dean Herbert向我們報告此事。
這是區別 (Here’s the Difference)
Subpixel antialiasing is a trick designed to make fonts look better on lower-resolution displays. Without this feature enabled by default, macOS Mojave makes text look thinner and more blurry on non-Retina displays.
亞像素抗鋸齒是一種技巧,旨在使字體在較低分辨率的顯示器上看起來更好。 如果沒有默認啟用此功能,則macOS Mojave會使非Retina顯示屏上的文本看起來更細,更模糊。
(As some eagle-eyed readers have noticed, the below trick doesn’t technically enable subpixel antialiasing. However, this does increase font weight, which makes fonts look less jagged and all-around better on the MacBook Air and other low-resolution displays.)
(正如一些老鷹眼的讀者所注意到的那樣,以下技巧從技術上講并未啟用亞像素抗鋸齒。但是,這確實增加了字體粗細,這使得字體在MacBook Air和其他低分辨率顯示器上看起來不那么鋸齒,并且全方位更好。 )
While subpixel font smoothing is disabled by default, you can re-enable it with a terminal command. There are four possible settings: 0 (disabled), 1 (light smoothing), 2 (medium smoothing), and 3 (heavy smoothing).
默認情況下,禁用子像素字體平滑功能時,可以使用終端命令重新啟用它。 共有四種可能的設置:0(禁用),1(輕度平滑),2(中度平滑)和3(重度平滑)。
Here’s what they look like:
它們是這樣的:
We don’t recommend enabling subpixel antialiasing if you have Mac with a Retina display. Fonts should look nice and readable on a Retina display even without subpixel antialiasing. But, if you have a non-Retina display, we recommend re-enabling this feature.
如果您的Mac配備Retina顯示器,我們不建議啟用亞像素抗鋸齒功能。 即使沒有亞像素抗鋸齒,字體也應該在Retina顯示屏上看起來不錯并且可讀。 但是,如果您使用的不是Retina顯示屏,建議您重新啟用此功能。
如何啟用亞像素抗鋸齒 (How to Enable Subpixel Antialiasing)
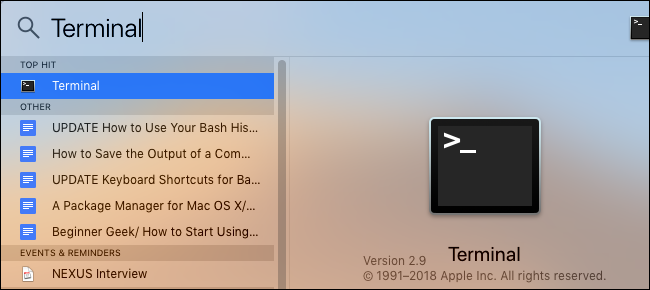
You must run a terminal command to change your subpixel antialiasing settings. To open a Terminal window, press Command+Space to open Spotlight search, type “Terminal,” and press Enter. You can also open a Finder window and head to Applications > Utilities > Terminal.
您必須運行終端命令來更改子像素抗鋸齒設置。 要打開終端窗口,請按Command + Space打開Spotlight搜索,鍵入“ Terminal”,然后按Enter。 您也可以打開Finder窗口并轉到“應用程序”>“實用程序”>“終端”。
Copy and paste one of the following commands into the Terminal window and press Enter.
將以下命令之一復制并粘貼到“終端”窗口中,然后按Enter。
Light font smoothing (1):
輕字體平滑(1):
defaults -currentHost write -globalDomain AppleFontSmoothing -int 1
Medium font smoothing (2):
中字體平滑處理(2):
defaults -currentHost write -globalDomain AppleFontSmoothing -int 2
Heavy font smoothing (3):
重字體平滑處理(3):
defaults -currentHost write -globalDomain AppleFontSmoothing -int 3
No font smoothing (0):
沒有字體平滑處理(0):
defaults -currentHost write -globalDomain AppleFontSmoothing -int 0

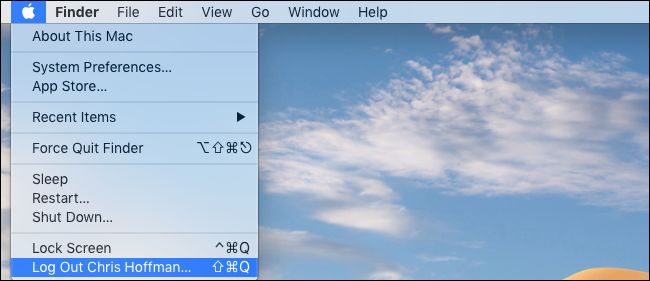
Sign out of your Mac and sign back in. Your changes won’t fully take effect until you do.
退出Mac,然后重新登錄。您所做的更改將完全生效。
Feel free to try different font smoothing levels. You’ll just have to sign out and sign back in before you can see your changes after running each command.
隨意嘗試不同的字體平滑級別。 您只需注銷并重新登錄,即可在運行每個命令后看到所做的更改。
This process was tested on macOS Mojave developer beta 3, also known as macOS Mojave public beta 2.
此過程已在macOS Mojave開發人員beta 3(也稱為macOS Mojave公共beta 2)上進行了測試。
翻譯自: https://www.howtogeek.com/358596/how-to-fix-blurry-fonts-on-macos-mojave-with-subpixel-antialiasing/
macos mojave


)


![char data[0]在struct末尾的用法](http://pic.xiahunao.cn/char data[0]在struct末尾的用法)


 - SOA架構體系)


![[MobX State Tree數據組件化開發][3]:選擇正確的types.xxx](http://pic.xiahunao.cn/[MobX State Tree數據組件化開發][3]:選擇正確的types.xxx)