Azure DevOps非常好用,但是為代理準備單獨的服務器經常會顯得性價比不高:配置低了,前端構建時會教會你做人,配置太高又有點浪費資源,代理數量少了各團隊構建要打架。對于既想享受DevOps的美妙之處但是資源捉襟見肘的小公司,真是一件比較頭痛的事情。那么有沒有更具備性價比的方案呢?那自然是有的,那就是基于Docker進行自托管。
這里不建議大家丟k8s集群里面去,一是會搶資源,二是k8s容器運行時不推薦大家使用docker,三是不安全。那么現在我們就可以準備一臺好點的服務器,來基于Docker來托管自有的Azure DevOps代理。
編寫Dockerfile
廢話不多,建議大家直接抄代碼吧:
FROM ubuntu:20.04
RUN DEBIAN_FRONTEND=noninteractive apt-get update
RUN DEBIAN_FRONTEND=noninteractive apt-get upgrade -yRUN DEBIAN_FRONTEND=noninteractive apt-get install -y -qq --no-install-recommends \apt-transport-https \apt-utils \ca-certificates \curl \git \iputils-ping \jq \lsb-release \software-properties-common \gss-ntlmsspRUN curl -sL https://aka.ms/InstallAzureCLIDeb | bash# Can be 'linux-x64', 'linux-arm64', 'linux-arm', 'rhel.6-x64'.
ENV TARGETARCH=linux-x64WORKDIR /azp
COPY ./start.sh .
COPY ./vsts-agent-linux-x64-2.181.2.tar.gz .
RUN chmod +x start.shENTRYPOINT [ "./start.sh" ]如果對Dockerfile不理解,可以參考筆者之前的教程、博客和書籍《Docker+Kubernetes應用開發與快速上云》來解決問題以及查看日志。這里不建議大家使用官方教程,基本上走不通還問題頗多。
值得注意的是,上面涉及到了兩個文件:
start.sh
vsts-agent-linux-x64-2.181.2.tar.gz(從Azure DevOps管理界面下載)
start.sh腳本內容參考如下:
#!/bin/bash
set -eif [ -z "$AZP_URL" ]; thenecho 1>&2 "error: missing AZP_URL environment variable"exit 1
fiif [ -z "$AZP_TOKEN_FILE" ]; thenif [ -z "$AZP_TOKEN" ]; thenecho 1>&2 "error: missing AZP_TOKEN environment variable"exit 1fiAZP_TOKEN_FILE=/azp/.tokenecho -n $AZP_TOKEN > "$AZP_TOKEN_FILE"
fiunset AZP_TOKENif [ -n "$AZP_WORK" ]; thenmkdir -p "$AZP_WORK"
fiexport AGENT_ALLOW_RUNASROOT="1"cleanup() {if [ -e config.sh ]; thenprint_header "Cleanup. Removing Azure Pipelines agent..."# If the agent has some running jobs, the configuration removal process will fail.# So, give it some time to finish the job.while true; do./config.sh remove --unattended --auth negotiate --userName build --password $(cat "$AZP_TOKEN_FILE") && breakecho "Retrying in 30 seconds..."sleep 30donefi
}print_header() {lightcyan='\033[1;36m'nocolor='\033[0m'echo -e "${lightcyan}$1${nocolor}"
}# Let the agent ignore the token env variables
export VSO_AGENT_IGNORE=AZP_TOKEN,AZP_TOKEN_FILEprint_header "1. Determining matching Azure Pipelines agent..."print_header "url=$AZP_URL/_apis/distributedtask/packages/agent?platform=$TARGETARCH&top=1"# AZP_AGENT_PACKAGES=$(curl -LsS \
#     -u user:$(cat "$AZP_TOKEN_FILE") \
#     -H 'Accept:application/json;' \
#     "$AZP_URL/_apis/distributedtask/packages/agent?platform=$TARGETARCH&top=1")AZP_AGENT_PACKAGES=$(curl -LsS \--ntlm \-u build:$(cat "$AZP_TOKEN_FILE") \-H 'Accept:application/json;' \"$AZP_URL/_apis/distributedtask/packages/agent?platform=$TARGETARCH&top=1")print_header "$AZP_AGENT_PACKAGES"AZP_AGENT_PACKAGE_LATEST_URL=$(echo "$AZP_AGENT_PACKAGES" | jq -r '.value[0].downloadUrl')# print_header "1.2 AZP_AGENT_PACKAGE_LATEST_URL=$AZP_AGENT_PACKAGE_LATEST_URL..."if [ -z "$AZP_AGENT_PACKAGE_LATEST_URL" -o "$AZP_AGENT_PACKAGE_LATEST_URL" == "null" ]; thenecho 1>&2 "error: could not determine a matching Azure Pipelines agent"echo 1>&2 "check that account '$AZP_URL' is correct and the token is valid for that account"exit 1
fiprint_header "2. extracting Azure Pipelines agent..."tar zxf ./vsts-agent-linux-x64-2.181.2.tar.gz & wait $!
#curl -LsS $AZP_AGENT_PACKAGE_LATEST_URL | tar -xz & wait $!source ./env.shprint_header "3. Configuring Azure Pipelines agent..."./config.sh --unattended \--agent "${AZP_AGENT_NAME:-$(hostname)}" \--url "$AZP_URL" \--auth negotiate \--userName build \--password $(cat "$AZP_TOKEN_FILE") \--pool "${AZP_POOL:-Default}" \--work "${AZP_WORK:-_work}" \--replace \--acceptTeeEula & wait $!print_header "4. Running Azure Pipelines agent..."trap 'cleanup; exit 0' EXIT
trap 'cleanup; exit 130' INT
trap 'cleanup; exit 143' TERMchmod +x ./run.sh# To be aware of TERM and INT signals call run.sh
# Running it with the --once flag at the end will shut down the agent after the build is executed
./run.sh "$@" & wait $!當然大家也可以直接使用我已經做好了的鏡像:ccr.ccs.tencentyun.com/xinlai/tfsagnet:latest
這樣,代碼都不用抄了,多省事。相關環境變量如下所示:
| 環境變量 | 說明 |
|---|---|
| AZP_URL | Azure DevOps 或Azure DevOps Server實例的 URL。 |
| AZP_TOKEN | 密碼。PAT認證有問題,被我改成了negotiate認證。 |
| AZP_AGENT_NAME | 代理名稱 (默認值:容器主機名) 。 |
| AZP_POOL | 代理池名稱 (默認值:?Default) 。 |
| AZP_WORK | 工作目錄 (默認值:?_work) 。 |
在Docker中運行
參考腳本:
docker run -e AZP_URL=<Azure DevOps instance> -e AZP_TOKEN=<密碼> -e AZP_AGENT_NAME=mydockeragent ccr.ccs.tencentyun.com/xinlai/tfsagnet:latest
但是現在的構建離不開Docker,那么Docker in Docker我們肯定是需要的,修改后參考腳本如下所示:
docker run --name docker-ag \
-e AZP_AGENT_NAME=docker-tx-ag \
-e AZP_URL=\
-e AZP_TOKEN=<密碼> \
-v /var/run/docker.sock:/var/run/docker.sock \
-v /usr/bin/docker:/usr/bin/docker \
--user root \
--restart=always \
ccr.ccs.tencentyun.com/xinlai/tfsagnet:latest
使用portainer來管理Docker代理
在一臺服務器上跑了幾個實例,為了便于管理,我們可以運行一個portainer實例來進行管理,參考腳本如下:
docker run -d -p 80:9000 --restart=always -v /var/run/docker.sock:/var/run/docker.sock --name prtainer portainer/portainer
然后我們就可以登錄其Web管理界面來進行監控和管理:
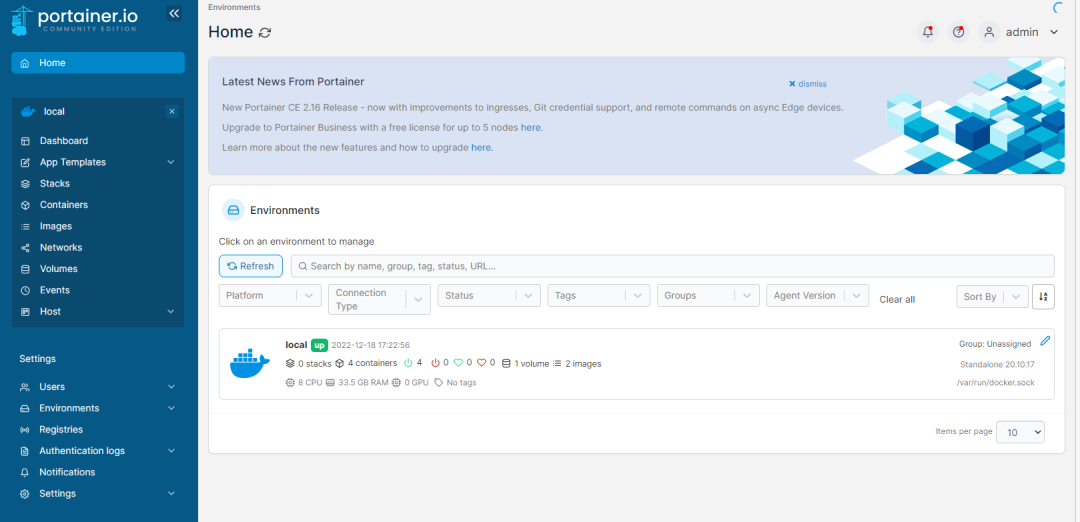
portainer管理UI
我們可以在一臺服務器多跑幾個:
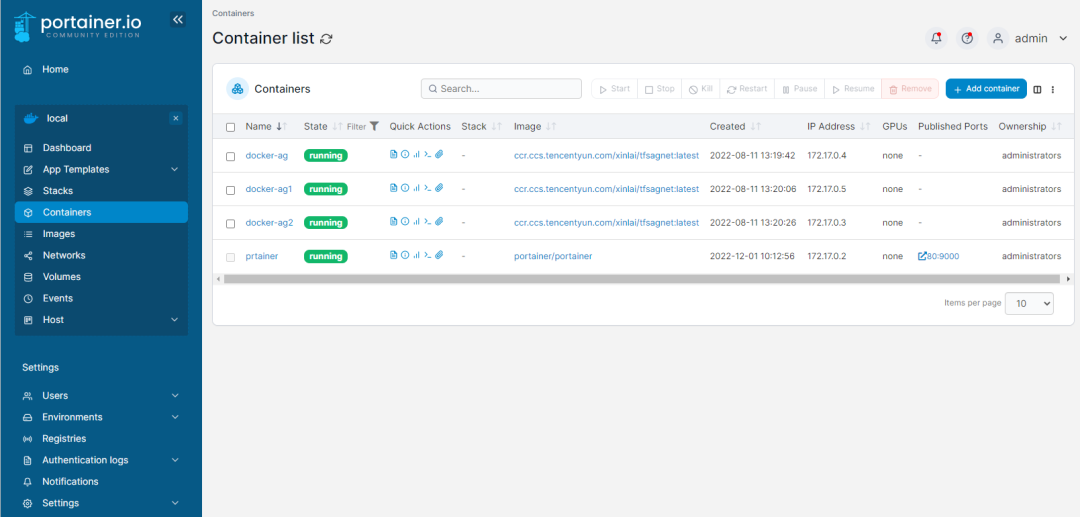
Docker代理
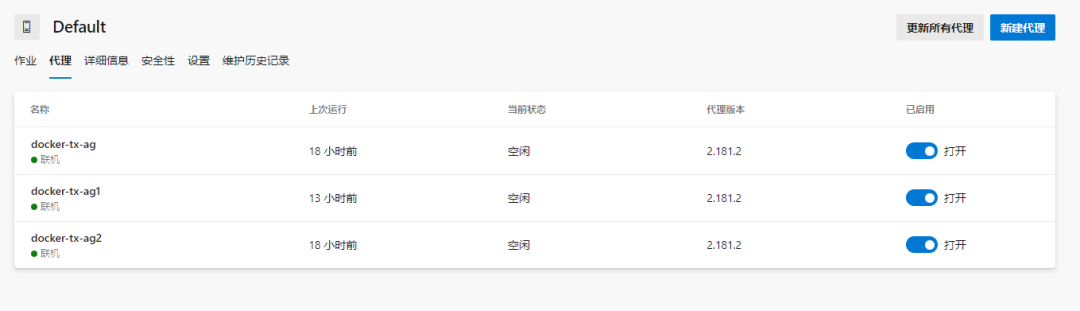
運行了之后,我們可以在Azure DevOps的默認代理池看到他們:
定時清理
基于容器構建很方便,但是費空間,尤其是高頻次構建,多運行時構建時,各種懸浮鏡像的存在,我們可以加個定時構建任務來進行清理,參考腳本如下:
docker system prune -a -f
這樣,50G的系統盤一拖3個代理,也是夠了。
最后
至此,整個教程到此就結束了。服務器推薦配置如下所示:
磁盤大小:30~50G,如代碼文件過大可以適當增加空間以及增加自動清理的頻率
內存:16~32G,如果只構建后端代碼,8G也是夠了,但是前端構建是個黑洞,很多代碼構建時沒個16G內存,會直接原地崩潰
CPU:4~8核


—— JDBC 基礎)


)


 文章列表接口分頁、過濾、搜索、排序)

無法進入tt1~tt6(NVIDIA驅動安裝相關-黑屏,login loop,分辨率)...)