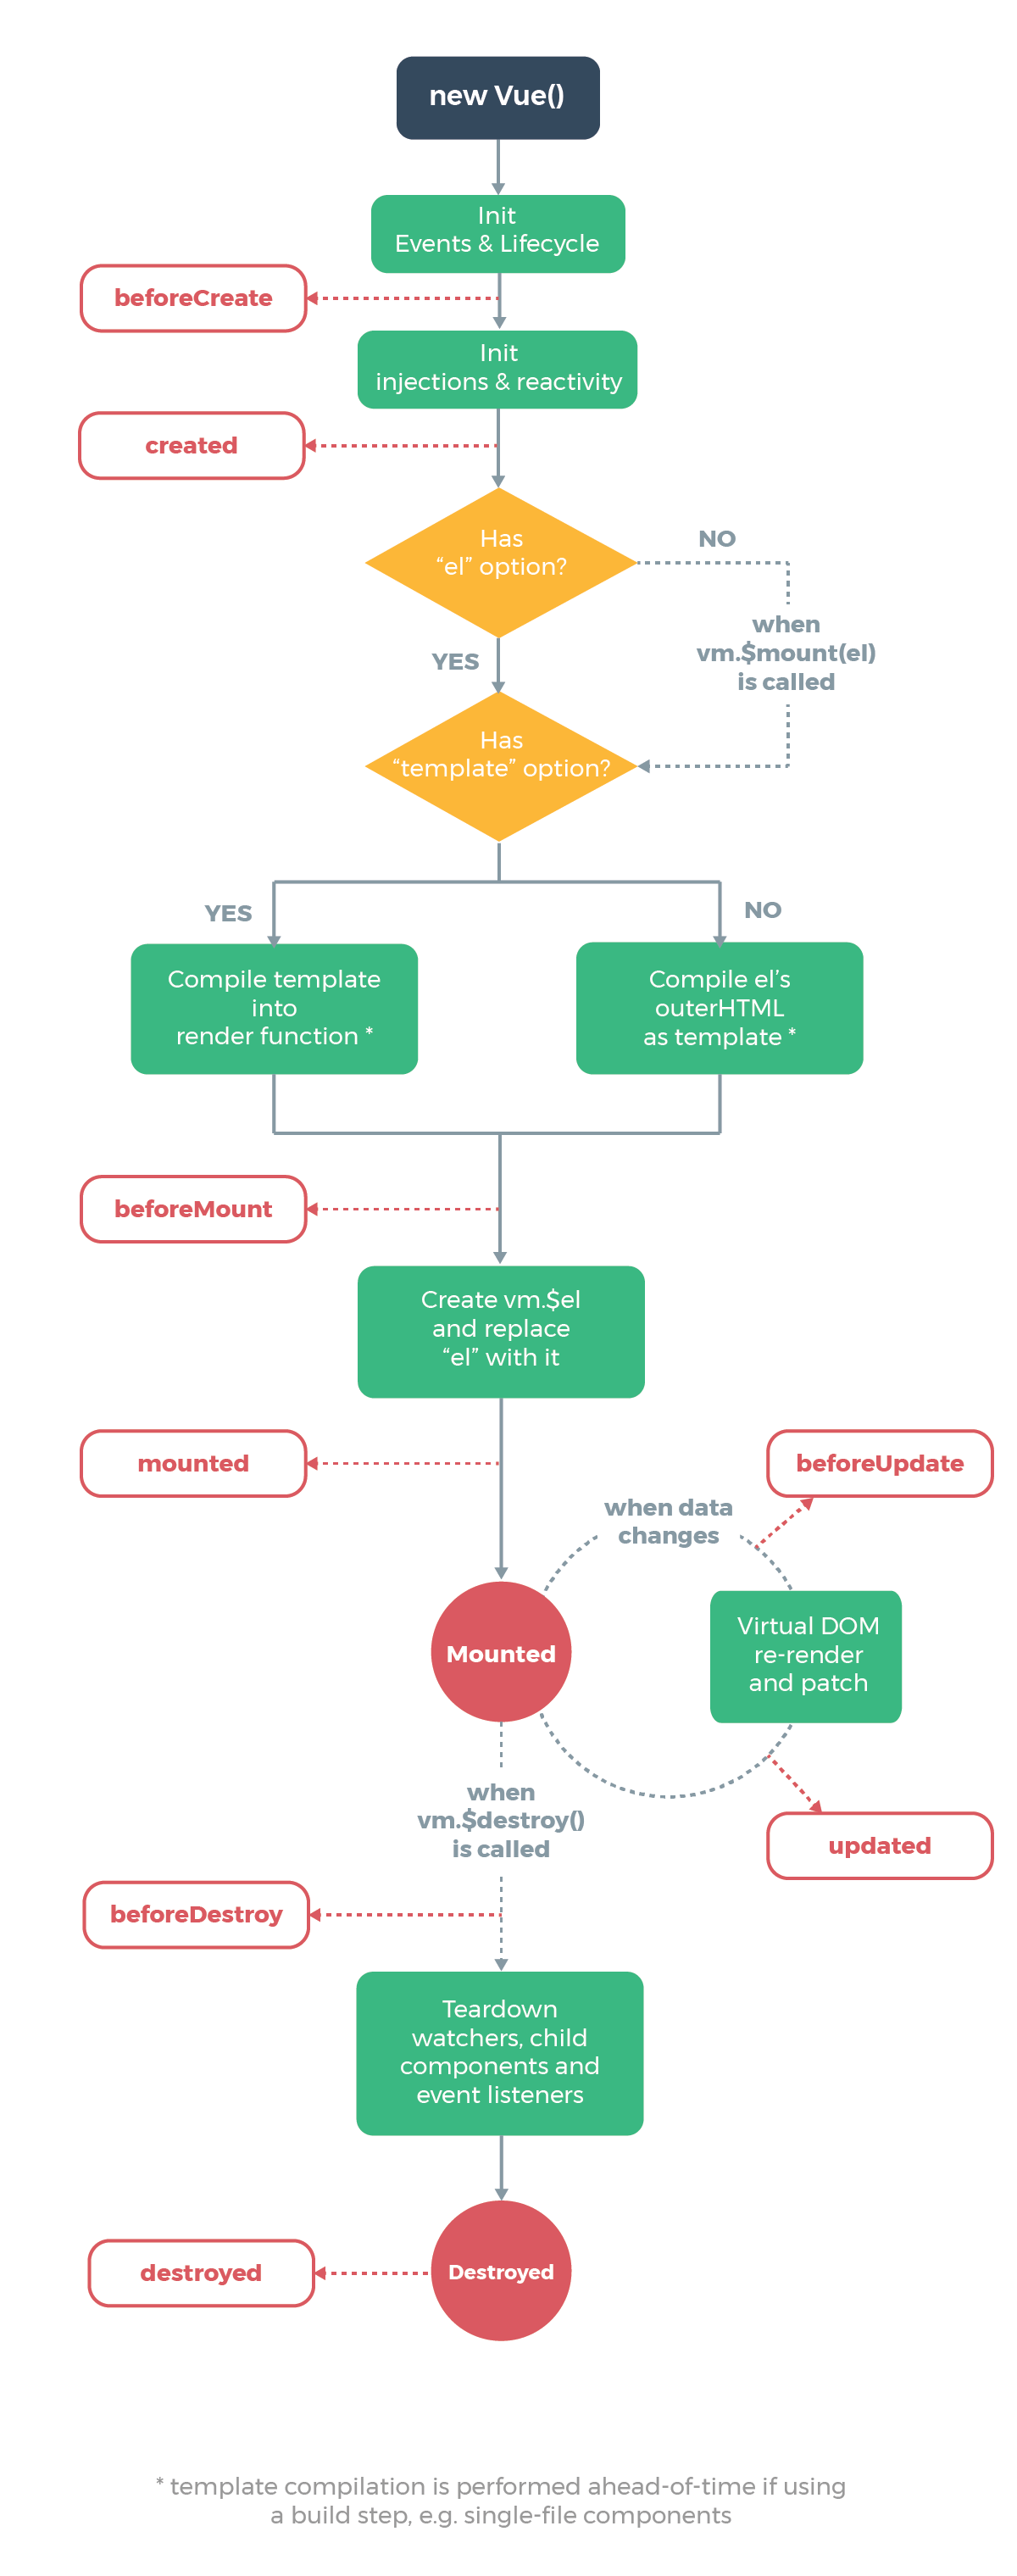
vue---day03

1. Vue的生命周期

- 創建和銷毀的時候可以做一些我們自己的事情

- beforeCreated
- created
- beforeMount
- mounted
- beforeUpdate
- updated
- activated
- deactivated
- beforeDestroy
- destroyed

1.1 知識點回顧

1.1.1 beforeCreated 在實例創建之前除標簽外,所有的vue實例需要的數據,事件都不存在
1.1.2 created 實例被我創建之后,data和事件已經被解析到,el還沒有解析到
1.1.3 beforeMount 開始找標簽,數據還沒被渲染,事件也沒被監聽
1.1.4 mounted 開始渲染數據和監聽事件
1.1.5 beforeUpdate 數據已經被修改在虛擬DOM,但是還沒渲染到頁面上
1.1.6 updated 開始使用Diff算法,將虛擬DOM中的要修改數據應用到頁面上,真實DOM中的數據也被修改了
1.1.7 beforeDestroy 所有的數據都存在
1.1.8 destroyed 所有的數據都存在(在虛擬DOM中)
1.1.9 <keep-alive></keep-alive> Vue提供的用來緩存消除的標簽
- activated和deactivated取代了beforeDestroy和destroyed的執行

?

 
2. Vue的路由系統

2.1 VueRouter的實現原理
- 通過監聽a的錨點值,來動態的顯示頁面內容

2.2 VueRouter的安裝使用

2.2.1 第一步:
 1       Vue.use(VueRouter)
        2.2.2 第二步:創建router對象和每個url對應的組件
 1       let Home = {
 2                 template:``,
 3             };
 4 
 5             let Login = {
 6                 template:``,
 7             };
 8 
 9             let router = new VueRouter({
10                 routes:[
11                     {
12                         name:'home',
13                         path:'/',
14                         components:Home',
15                     },
16                     {
17                         name:'login',
18                         path:'/login',
19                         components:Login,
20                     },
21                 ]
22             });
        2.2.3 第三步:注冊router對象到根實例中
1       new Vue({
2                 el:'#app',
3                 template:`<App/>`,
4                 components:{
5                     App,
6                 }
7                 router:router,
8             });
        2.2.4 第四步:
1       let App = {
2                 template:`
3                     <router-link :to='{ name: 'home' }'>首頁</router-link>
4                     <router-link :to='{ name: 'login' }'>登錄</router-link>
5 
6                     <router-view></router-view>
7                 `
8             }
    2.3 VueRouter之命名路由
同上
2.4 VueRouter之路由參數
- user_change/1/
- user_detail/?user_id=1
 1     let Home = {
 2             template:`
 3                 <h1>歡迎</h1>
 4             `
 5         };
 6 
 7         let UserDetail = {
 8             template:`
 9                 <h2>用戶詳情</h2>
10             `,
11         };
12 
13         let UserChange = {
14             template:`
15                 <h3>修改用戶信息</h3>
16             `,
17         };
18 
19         let App = {
20             template:`
21                 <div>
22                     <router-link :to="{ name: 'home' }">首頁</router-link>
23                     <router-link :to="{ name: 'user_detail', query: { user_id: 1 } }">用戶詳情</router-link>
24                     <router-link :to="{ name: 'user_change', params: { user_id: 1 } }">修改用戶信息</router-link>
25                     <router-view></router-view>
26                 </div>
27             `
28         };
29 
30         let router = new VueRouter({
31             routes:[
32                 {
33                     'name':'home',
34                     'path':'/',
35                     'component':Home,
36                 },
37                 {
38                     'name':'user_detail',
39                     'path':'/user_detail',
40                     'component':UserDetail,
41                 },
42                 {
43                     'name':'user_change',
44                     'path':'/user_change/:user_id',
45                     'component':UserChange,
46                 },
47             ]
48         });
    2.5 VueRouter之路由參數的實現原理
1         this.$router.params
2         this.$router.query
    2.6 VueRouter之子路由
 1      let Home = {
 2           template: `
 3               <div>
 4                   <h1>歡迎</h1>
 5               </div>
 6               `
 7           };
 8 
 9         let Phone = {
10             template: `
11                 <div>
12                     <h2>手機品牌</h2>
13                     <router-link :to="{name: 'huawei'}" append>華為</router-link>
14                     <router-link :to="{name: 'oneplus'}" append>一加</router-link>
15 
16                     <router-view></router-view>
17                 </div>
18                 `,
19         };
20         let HuaWei = {
21             template: `
22                     <div>
23                         <h3>華為手機</h3>
24                     </div>
25                 `,
26         };
27         let OnePlus = {
28             template: `
29                     <div>
30                         <h3>一加手機</h3>
31                     </div>
32                 `,
33 
34         let App = {
35             template: `
36                 <div>
37                     <router-link :to="{ name: 'home' }">首頁</router-link>
38                     <router-link :to="{ name: 'phone'}">手機品牌</router-link>
39 
40                     <router-view></router-view>
41                 </div>
42                 `,
43         };
44 
45         let router = new VueRouter({
46         routes: [
47             {
48                 'name': 'home',
49                 'path': '/',
50                 'component': Home,
51             },
52             {
53                 'name': 'phone',
54                 'path': '/phone',
55                 'component': Phone,
56                 'children': [
57                     {
58                         'name':'huawei',
59                         'path': 'huawei',
60                         'component': HuaWei,
61                     },
62                     {
63                         'name':'oneplus',
64                         'path': 'oneplus',
65                         'component': OnePlus,
66                     },
67                 ],
68 
69             },
70         ]
71     });
    2.7 VueRouter之子路由重定向
 1     let router = new VueRouter({
 2             routes: [
 3                 {
 4                     name: 'home',
 5                     path: '/',
 6                     component: Home,
 7                 },
 8                 {
 9                     name: 'login',
10                     path: '/login',
11                     component: Login
12                 },
13                 {
14                     name: 'pay',
15                     path: '/pay',
16                     redirect: '/login',
17                     component: Pay,
18                 },
19             ]
20         });
    2.8 VueRouter之子路由的鉤子函數
 1     let router = new VueRouter({
 2             routes: [
 3                 {
 4                     name: 'home',
 5                     path: '/',
 6                     component: Home,
 7                 },
 8                 {
 9                     name: 'login',
10                     path: '/login',
11                     component: Login
12                 },
13                 {
14                     name: 'pay',
15                     path: '/pay',
16                     meta: { required_login: true },
17                     component: Pay,
18                 },
19             ]
20         });
21 
22         // 通過router對象的beforeEach(function(to, from, next))
23         router.beforeEach(function (to, from, next) {
24            console.log("to: ", to);
25            console.log("from: ", from);
26            console.log("next: ", next);
27            if ( to.meta.required_login ) {
28                next('/login');
29            } else {
30                next();
31            }
32         });
    2.9 VueRouter之子路由的去 # 號
 1      let router = new VueRouter({
 2             mode:'history',
 3             routes: [
 4                 {
 5                     name: 'home',
 6                     path: '/',
 7                     component: Home,
 8                 },
 9                 {
10                     name: 'login',
11                     path: '/login',
12                     component: Login
13                 },
14                 {
15                     name: 'pay',
16                     path: '/pay',
17                     component: Pay,
18                 },
19             ]
20         });
 

轉載于:https://www.cnblogs.com/xjmlove/p/10268118.html

本文來自互聯網用戶投稿,該文觀點僅代表作者本人,不代表本站立場。本站僅提供信息存儲空間服務,不擁有所有權,不承擔相關法律責任。
如若轉載,請注明出處:http://www.pswp.cn/news/278456.shtml
繁體地址,請注明出處:http://hk.pswp.cn/news/278456.shtml
英文地址,請注明出處:http://en.pswp.cn/news/278456.shtml

如若內容造成侵權/違法違規/事實不符,請聯系多彩編程網進行投訴反饋email:809451989@qq.com,一經查實,立即刪除!

相關文章

U Sparkle 開發者計劃招募中!

向我們投稿吧 在此之前&#xff0c;我們有收到過幾篇民間高手的投稿&#xff0c;如&#xff1a; USequencer 初識&#xff08;作者&#xff1a;焱燚(七火)&#xff09; Unity游戲界面解決方案: PSD For UGUI&#xff08;作者&#xff1a;張俊欽&#xff09; UGUI 降低填充率技巧…

階乘和 大整數

///大整數階乘的和 #include<bits/stdc.h> using namespace std; int main() {int n;while(cin>>n){int a[2000] {1},b[2000] {0}; //存放結果的數組a。int c; //b用于存放每位存放的結果。int r0; //r用來表示進位的數。int h1,hb1; //h用來表示運算過程中 結果a…

如何添加引文標_如何在Google文檔中查找和添加引文

如何添加引文標When writing papers, you need to generate a detailed and accurate list of all the sources you’ve cited in your paper. With Google Docs, you can easily find and then add citations to all of your research papers. 撰寫論文時&#xff0c;您需要生…

mongo ttl索引

db.log_events.find() # 查找log_events里的所有數據db.log_events.createIndex( { "LogDT": 1 }, { expireAfterSeconds: 3600 } ) #設置log_events里的TTL過期索引清理時間為3600秒db.runComman…

Linux Centos下SQL Server 2017安裝和配置

Linux Centos下SQL Server 2017安裝和配置 原文:Linux Centos下SQL Server 2017安裝和配置我們知道在Linux下安裝服務有很多方式&#xff0c;最為簡單的也就是yum安裝&#xff0c;但是很多服務通過yum是無法安裝的&#xff0c;如果想使用yum安裝&#xff0c;需要指定yum安裝倉庫…

如何在Linux上使用端口敲門(以及為什么不應該這樣做)

Photographee.eu/ShutterstockPhotographee.eu/ShutterstockPort knocking is a way to secure a server by closing firewall ports—even those you know will be used. Those ports are opened on demand if—and only if—the connection request provides the secret knoc…

小到年貨大到產業,劉村長的扶貧模式有點厲害!

河北省阜平縣平石頭村的村民&#xff0c;今年春節再也不用頭疼買什么年貨&#xff0c;去哪買年貨的問題了&#xff0c;因為他們的“村長”劉強東&#xff0c;給每戶人家都送來了年貨大禮包&#xff01;大禮包里不僅有牛奶、果汁、毛衣、長褲、波司登羽絨服、枕頭、毛巾、炊大皇…

java - 匿名類

匿名內部類 概念&#xff1a;即內部類的簡化寫法 前提&#xff1a;存在一個類&#xff08;可以是具體類也可以是抽象類&#xff09;或接口 格式&#xff1a;new 類名或接口名{重寫的方法} 本質&#xff1a;創建的是繼承了類或實現了接口的子類匿名對 象。 匿名類總是final&…

leetcode 342. Power of Four

沒想出來不用循環的。記錄下。 如果是2的次方&#xff0c;必有num & (nums - 1) bool isPowerOfFour(int num) {if (num < 1) return false;if (num & (num - 1)) return false; // 排除不是2的倍數if (num & 0x55555555) return true; // 排除不是4的倍數&am…

克隆ubuntu硬盤_使用Ubuntu Live CD克隆硬盤

克隆ubuntu硬盤Whether you’re setting up multiple computers or doing a full backup, cloning hard drives is a common maintenance task. Don’t bother burning a new boot CD or paying for new software – you can do it easily with your Ubuntu Live CD. 無論是設置…

頁面緩存處理的幾種方法

html只要加在頭部就可以了. <HEAD> <META HTTP-EQUIV"Pragma" CONTENT"no-cache"> <META HTTP-EQUIV"Cache-Control" CONTENT"no-cache"> <META HTTP-EQUIV"Expires" CONTENT"0"> </H…

Nginx的Mainline version、Stable version、Legacy version的版本區別

Nginx官網提供了三個類型的版本Mainline version&#xff1a;Mainline 是 Nginx 目前主力在做的版本&#xff0c;可以說是開發版Stable version&#xff1a;最新穩定版&#xff0c;生產環境上建議使用的版本Legacy versions&#xff1a;遺留的老版本的穩定版 nginx下載地址&…

從Boxee的Amie Street訪問音樂

One of our favorite sites for discovering new music is Amie Street. Today we take a look at the Amie Street app for Boxee that allows you to access your favorite tunes from the Boxee interface. 我們最喜歡的發現新音樂的網站之一是Amie Street。 今天&#xff0…

redis學習目錄

redis學習目錄 redis安裝 說明 python中使用 centos7安裝redis redis.conf配置信息詳解 redis主從同步 redis持久化 RDB與AOF redis不重啟,切換到RDB備份到AOF備份 redis哨兵功能 redis-cluster(集群) 轉載于:https://www.cnblogs.com/yuncong/p/10293624.html

如何在SpringBoot項目中使用攔截器

相比springmvc&#xff0c;springboot中攔截器不需要在xml中配置&#xff0c;只需定義攔截器類 implements HandlerInterceptor 和攔截器攔截路徑的配置類extends WebMvcConfigurerAdapter 1.SessionInterceptor package com.example.demo;import org.springframework.web.serv…

如何在Word,Excel和PowerPoint 2010中裁剪圖片

When you add pictures to your Office documents you might need to crop them to remove unwanted areas, or isolate a specific part. Today we’ll take a look at how to crop images in Office 2010. 將圖片添加到Office文檔時&#xff0c;可能需要裁剪它們以刪除不需要…

Python 調度算法 死鎖 靜動態鏈接 分頁分段

1 select poll epoll的區別基本上select有3個缺點: 連接數受限查找配對速度慢數據由內核拷貝到用戶態poll改善了第一個缺點 epoll改了三個缺點. (1&#xff09;select&#xff0c;poll實現需要自己不斷輪詢所有fd集合&#xff0c;直到設備就緒&#xff0c;期間可能要睡眠和喚醒…

在Windows 7 Media Center中創建音樂播放列表

One of the new features in Windows 7 Media Center is the ability to easily create music playlists without using Media Player. Today we’ll take a closer look at how to create them directly in Media Center. Windows 7 Media Center的新功能之一是無需使用Media …

(轉)WebSphere的web工程中怎么獲取數據源

原文&#xff1a;http://aguu125.iteye.com/blog/1694313 https://blog.csdn.net/bigtree_3721/article/details/44900325-------JNDI之java:comp/env was配置數據源和tomcat是不同的。tomcat只需要配置tomcat 的service.xml或者content.xml&#xff0c;然后 WEB程序就不需要配…

阿里數據庫內核月報:2017年04月

摘要&#xff1a;阿里數據庫內核月報&#xff1a;2017年04月# 01 MySQL 源碼分析 MySQL 半同步復制數據一致性分析# 02 MYSQL 新特性 MySQL 8.0對Parser所做的改進# 03 MySQL 引擎介紹 Sphinx源碼剖析&#xff08;二&#xff09;# 04 PgSQL 特性分析 checkpoint機制淺析…