前言
之前已經介紹了RabbitMQ交換機模型的相關簡單概念,都是作為此篇的基礎鋪墊,如果對此篇不懂的可以先看我上一篇的介紹認識RabbitMQ交換機模型,或者聯系評論,分享《RabbitMQ實戰指南》電子書給大家,里面雖然有些許錯誤,但總體還是很棒的一本書!
本文主要介紹RabbitMQ的消息是怎么產生和通過它是怎么接收消息的(RabbitMQ如何運轉)、Connection和Channel概念、RabbitMQ的簡單部署、Java代碼簡單實踐三個部分
?
?
?
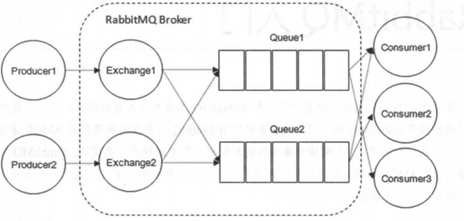
一、RabbitMQ的運轉流程
1、生產者流程
1) 生產者連接到RabbitMQ Broker,建立Connection,開啟信道Channel(Connection與Channel概念下面會介紹)
2) 生產者聲明一個交換器,設置相關屬性。
3) 生產者聲明一個隊列并設置相關屬性
4) 生產者通過路由鍵將交換器和隊列綁定起來
5) 生產者發送消息到RabbitMQ Broker,包括路由鍵、交換器信息等
6)?相應的交換器根據路由鍵查找匹配的隊列
7) 如果找到則消息存入相應隊列中
8) 如果沒找到則根據配置的屬性丟棄或者回退給生產者
9) 關閉信道
10)關閉連接
2、消費者流程
1) 消費者連接到RabbitMQ Broker,建立Connection,開啟Channel
2) 消費者向RabbitMQ Broker請求消費相應隊列中消息,可能會設置相應的回調函數。
3) 等待RabbitMQ Broker回應并投遞相應隊列中的消息,消費者接收消息。
4) 消費者確認ack接收到的消息。
5) RabbitMQ從隊列中刪除相應已經被確認的消息。
6) 關閉信道。
7) 關閉連接
?
其實,最主要最不好理解的也就是Connection與Channel這兩個概念,如果只是光看這些流程會相當不理解,為什么先建立Connection再建立Channel,這兩個又是什么區別?所以再往下就是介紹Connection與Channel了!
?
二、Connection與Channel概念
1、 Connection:實際就是一條TCP連接,TCP一旦建立起來,客戶端緊接著可以創建AMQP信道。
2、 Channel:每個Channel都有唯一的ID,都是建立在Connection上的虛擬連接,RabbitMQ處理每條AMQP指令都是通過信道完成的
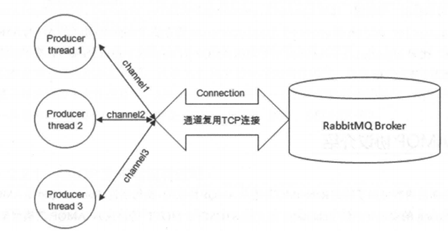
(結合兩張圖,更好理解Connection與Channel兩個概念)
3、單TCP復用連接與多信道的優勢
1)為什么TCP連接只有一條,而每個生產者都會創建一條唯一的信道呢?想象下,實際情況,會有很多的生產者生產消息,多個消費者消費消息,那么就不得不創建多個線程,建立多個TCP連接。多個TCP連接的建立必然會對操作系統性能消耗較高,也不方便管理。從而選擇一種類似于NIO(非阻塞I/O, Non-blocking I/O)技術是很有必要的,多信道的在TCP基礎上的建立就是這么實現的。
2)每個線程都有自己的一個信道,復用了Connection的TCP連接,信道之間相互獨立,相互保持神秘,節約TCP連接資源,當然本身信道的流量很大的話,也可以創建多個適當的Connection的TCP連接,需要根據具體業務情況制定。
三、RabbitMQ部署
主要以Linux CentOS 7舉例部署,
1、準備Erlang環境
安裝運行RabbitMQ之前,先安裝Erlang環境,因為RabbitMQ是relang語言寫的。下載http://www.erlang.org/downloads得到otp_src_21.2.tar.gz包
1)解壓到/opt/erlang目錄下,./configure配置生成make?make install
[root@hidden]# tar xvf otp_src_21.2.tar.gz
[root@hidden]# cd otp_src_21.2
[root@hidden otp_src_21.2]#./configure --prefix=/opt/er1ang
如果安裝過程出現"No curses library functions found",則需要安裝ncurses
[root@hidden otp_src_21.2]# yum install ncurses-devel
2)編譯安裝make & make install
[root@hidden otp_src_21.2]# make & make install
3)修改/etc/profile文件,增加如下語句
ERLANG_HOME=/opt/erlang
export PATH=$PATH:$ERLANG_HOME/bin
export ERLANG_HOME
4)執行/etc/profile配置文件
[root@hidden otp_src_21.2]# source /etc/profile
5)測試是否安裝成功
[root@hidden otp_src_21.2]#erl
如果出現如下語句,則說明安裝成功
Erlang/OTP 21 [erts-10.2] [source] [64-bit] [smp:1:1] [ds:1:1:10] [async-threads:1] [hipe]Eshell V10.2  (abort with ^G)
1>
2、安裝RabbiMQ
RabbitMQ安裝比Erlang安裝簡單很多,下載generic壓縮包:rabbitmq-server-generic-unix-3.7.11.tar.xz
1)解壓壓縮到到Erlang同目錄/opt下
[root@hidden]# tar zvxf rabbitmq-server-generic-unix-3.7.11.tar.xz
[root@hidden]# cd /opt
[root@hidden]# mv rabbitmq-server-generic-unix-3.7.11.tar.xz rabbitmq
2)修改/etc/profile文件,增加如下語句
export PATH=$PATH:/opt/rabbitmq/sbin
export RABBITMQ_HOME=/opt/rabbitmq
3)執行profile文件,使其生效
[root@hidden otp_src_21.2]# source /etc/profile
4)修改運行為守護進程模式
[root@hidden otp_src_21.2]# rabbitmq-server -detached
5)測試是否安裝成功,出現Status of node rabbit@.........如下語句則說明安裝成功
[root@hidden?rabbitmq]# rabbitmqctl status
Status of node rabbit@iz2ze49fh77zgs1rzxo0l7z ...
[{pid,11462},
{running_applications,
[{rabbit,"RabbitMQ","3.7.11"},
{mnesia,"MNESIA CXC 138 12","4.15.5"},
{os_mon,"CPO CXC 138 46","2.4.7"},
{sysmon_handler,"Rate-limiting system_monitor event handler","1.1.0"},
{rabbit_common,
"Modules shared by rabbitmq-server and rabbitmq-erlang-client",
"3.7.11"},
{ranch,"Socket acceptor pool for TCP protocols.","1.7.1"},
{ssl,"Erlang/OTP SSL application","9.1"},
{public_key,"Public key infrastructure","1.6.4"},
{asn1,"The Erlang ASN1 compiler version 5.0.8","5.0.8"},
{inets,"INETS CXC 138 49","7.0.3"},
{recon,"Diagnostic tools for production use","2.3.6"},
{xmerl,"XML parser","1.3.18"},
{jsx,"a streaming, evented json parsing toolkit","2.9.0"},
..........
3、新增用戶與授權
RabbitMQ默認情況下用戶和密碼都為“guest”,但只能通過默認的本地網絡localhost訪問,網絡訪問受限,所以需要再單獨新增用戶授予權限
1)新增root用戶
?新增用戶名為root,密碼為root
[root@hidden rabbitmq]# rabbitmqctl add_user root root
2)授權root用戶到默認vhost可配置、可讀、可寫權限
[root@hidden rabbitmq]# rabbitmqctl set_permissions -p / root ".*" ".*" ".*"
3)設置root為管理員角色
[root@hidden rabbitmq]# rabbitmqctl set_user_tags root administrator
四、Java代碼實踐
首先maven下載jar包:
<!-- rabbitmq--><dependency><groupId>com.rabbitmq</groupId><artifactId>amqp-client</artifactId><version>5.6.0</version></dependency>
1、生產者類
import com.rabbitmq.client.Channel;
import com.rabbitmq.client.Connection;
import com.rabbitmq.client.ConnectionFactory;
import com.rabbitmq.client.MessageProperties;
import java.io.IOException;
import java.util.concurrent.TimeoutException;/*** @author jian* @date 2019/2/14* @description RabbitMQ測試: 消息服務端**/
public class RabbitProducer {// 路由鍵private static final String ROUTING_KEY = "routingkey_demo";// 交換機名稱private static final String EXCHANGE_NAME = "exchange_demo";// 隊列名稱private static final String QUEUE_NAME = "queue_demo";// RabbitMQ地址private static final String IP_ADDRESS = "xxx.xxx.xxx.xxx";// RabbitMQ默認端口5672private static final int PORT = 5672;public static void publicMeesage () {// 1)通過連接工廠建立復用TCP連接ConnectionFactory connectionFactory = new ConnectionFactory();connectionFactory.setHost(IP_ADDRESS);connectionFactory.setPort(PORT);connectionFactory.setUsername("root");connectionFactory.setPassword("root");try {Connection connection = connectionFactory.newConnection();// 2)建立多信道Channel channel = connection.createChannel();// 3)聲明交換器:創建一個direct、持久化、非自動刪除的交換器channel.exchangeDeclare(EXCHANGE_NAME, "direct", true, false, null);// 4)聲明隊列:創建一個持久化、非排他的、非自動刪除的隊列channel.queueDeclare(QUEUE_NAME, true, false, false, null);// 5)將交換器與隊列通過路由鍵綁定
            channel.queueBind(QUEUE_NAME, EXCHANGE_NAME, ROUTING_KEY);// 6) 發送持久化消息String message = "hello world!";channel.basicPublish(EXCHANGE_NAME, ROUTING_KEY, MessageProperties.PERSISTENT_TEXT_PLAIN, message.getBytes());System.out.println("producer published message: " + message);// 7)關閉信道
            channel.close();// 8)關閉連接
            connection.close();} catch (IOException e) {e.printStackTrace();} catch (TimeoutException e) {e.printStackTrace();}}
}
?
2、消費者類
import com.rabbitmq.client.*;
import java.io.IOException;
import java.util.concurrent.TimeUnit;
import java.util.concurrent.TimeoutException;/*** @author jian* @date 2019/2/14* @description RabbitMQ測試:消費者消費消息*/
public class RabbitConsumer {// 隊列名稱private static final String QUEUE_NAME = "queue_demo";// RabbitMQ地址private static final String IP_ADDRESS = "xxx.xxx.xxx.xxx";// RabbitMQ默認端口5672private static final int PORT = 5672;public static void recevieMessage() {Address[] addresses = new Address[]{new Address(IP_ADDRESS, PORT)};// 1)通過連接工廠建立復用TCP連接ConnectionFactory connectionFactory = new ConnectionFactory();connectionFactory.setUsername("root");connectionFactory.setPassword("root");try {// 2)建立連接:此處與生產者建立建立連接是不同的Connection connection = connectionFactory.newConnection(addresses);// 3) 創建channel信道Channel channel = connection.createChannel();// 設置客戶端最多接收未被ack消息的個數channel.basicQos(64);// 4)消費者向RabbitMQ Broker請求消費相應隊列中消息: 有消息就會執行回調函數handleDeliveryDefaultConsumer defaultConsumer = new DefaultConsumer(channel) {@Overridepublic void handleDelivery(String consumerTag, Envelope envelope, AMQP.BasicProperties properties, byte[] body) throws IOException {System.out.println("consumer received message: " + new String(body, "UTF-8"));try {TimeUnit.SECONDS.sleep(1);} catch (InterruptedException e) {e.printStackTrace();}}};// 5)消費者確認ack接收 到的消息:自動回復隊列應答channel.basicConsume(QUEUE_NAME, true, defaultConsumer);// 等待回調函數執行完畢TimeUnit.SECONDS.sleep(5);// 6) 關閉信道
            channel.close();// 7) 關閉連接
            connection.close();} catch (IOException e) {e.printStackTrace();} catch (TimeoutException e) {e.printStackTrace();} catch (InterruptedException e) {e.printStackTrace();}}
}
3、測試類
public class RabbitMQTest {public static void main(String[] args) {RabbitProducer.publicMeesage();RabbitConsumer.recevieMessage();}
}
4、測試結果
producer published message: hello world!
consumer received message: hello world!
?


)


