
背景
上月立過一個 flag,看完 vue-router 的源碼,可到后面逐漸發現 vue-router 的源碼并不是像很多總結的文章那么容易理解,閱讀過你就會發現里面的很多地方都會有多層的函數調用關系,還有大量的 this 指向問題,而且會有很多輔助函數需要去理解。但還是堅持啃下來了(當然還沒看完,內容是真的多),下面是我在政采云(實習)工作閑暇時間閱讀源碼的一些感悟和總結,并帶分析了大三時期使用的 vue-element-admin (https://panjiachen.gitee.io/vue-element-admin-site/zh/guide/#%E5%8A%9F%E8%83%BD) 這個 vuer 無所不知的后臺框架的動態路由權限控制原理。順便附帶本文實踐 demo 地址: 基于后臺框架開發的 學生管理系統 (https://github.com/251205668/student-admin-template)。
vue-router 源碼分析

首先閱讀源碼之前最好是將 Vue 和 vue-router 的源碼克隆下來,然后第一遍閱讀建議先跟著 官方文檔 (https://router.vuejs.org/zh/) 先走一遍基礎用法,然后第二遍開始閱讀源碼,先理清楚各層級目錄的作用和抽出一些核心的文件出來,過一遍代碼的同時寫個小的 demo 邊看邊打斷點調試,看不懂沒關系,可以邊看邊參考一些總結的比較好的文章,最后將比較重要的原理過程根據自己的理解整理出來,然后畫一畫相關的知識腦圖加深印象。
前置知識: flow 語法
JS 在編譯過程中可能看不出一些隱蔽的錯誤,但在運行過程中會報各種各樣的 bug。flow (https://flow.org/en/docs/getting-started/) 的作用就是編譯期間進行靜態類型檢查,盡早發現錯誤,拋出異常。
Vue、Vue-router 等大型項目往往需要這種工具去做靜態類型檢查以保證代碼的可維護性和可靠性。本文所分析的 vue-router 源碼中就大量的采用了 flow 去編寫函數,所以學習 flow 的語法是有必要的。
首先安裝 flow 環境,初始化環境
npm?install?flow-bin?-g
flow?init
在 index.js 中輸入這一段報錯的代碼
/*@flow*/
function add(x: string, y: number): number {
  return x + y
}
add(2, 11)
在控制臺輸入 flow,這個時候不出意外就會拋出異常提示,這就是簡單的 flow 使用方法。
具體用法還需要參考 flow官網 (https://flow.org/en/docs/types/primitives/),另外這種語法是類似于 TypeScript (https://www.typescriptlang.org/) 的。
注冊
我們平時在使用 vue-router 的時候通常需要在 main.js 中初始化 Vue 實例時將 vue-router 實例對象當做參數傳入
例如:
import?Router?from?'vue-router'
Vue.use(Router)
const?routes?=?[
???{
?????path:?'/student',
????name:?'student',
????component:?Layout,
????meta:?{?title:?'學生信息查詢',?icon:?'documentation',?roles:?['student']?},
????children:?[
??????{
????????path:?'info',
????????component:?()?=>?import('@/views/student/info'),
????????name:?'studentInfo',
????????meta:?{?title:?'信息查詢',?icon:?'form'?}
??????},
??????{
????????path:?'score',
????????component:?()?=>?import('@/views/student/score'),
????????name:?'studentScore',
????????meta:?{?title:?'成績查詢',?icon:?'score'?}
??????}
????]
??}
??...
];
const?router?=?new?Router({
??mode:?"history",
??linkActiveClass:?"active",
??base:?process.env.BASE_URL,
??routes
});
new?Vue({
????router,
????store,
????render:?h?=>?h(App)
}).$mount("#app");
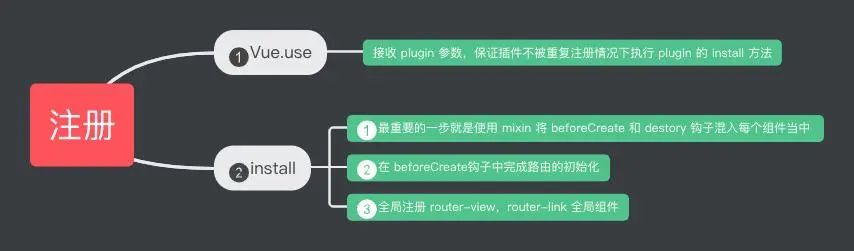
Vue.use
那么 Vue.use(Router) 又在做什么事情呢
問題定位到 Vue 源碼中的 src/core/global-api/use.js 源碼地址 (https://github.com/vuejs/vue/blob/dev/src/core/global-api/use.js)
export?function?initUse?(Vue:?GlobalAPI)?{
??Vue.use?=?function?(plugin:?Function?|?Object)?{
????//?拿到?installPlugins?
????const?installedPlugins?=?(this._installedPlugins?||?(this._installedPlugins?=?[]))
????//?保證不會重復注冊
????if?(installedPlugins.indexOf(plugin)?>?-1)?{
??????return?this
????}
????//?獲取第一個參數?plugins?以外的參數
????const?args?=?toArray(arguments,?1)
????//?將?Vue?實例添加到參數
????args.unshift(this)
????//?執行?plugin?的?install?方法?每個?insatll?方法的第一個參數都會變成?Vue,不需要額外引入
????if?(typeof?plugin.install?===?'function')?{
??????plugin.install.apply(plugin,?args)
????}?else?if?(typeof?plugin?===?'function')?{
??????plugin.apply(null,?args)
????}
????//?最后用?installPlugins?保存?
????installedPlugins.push(plugin)
????return?this
??}
}
可以看到 Vue 的 use 方法會接受一個 plugin 參數,然后使用 installPlugins 數組 保存已經注冊過的 plugin。首先保證 plugin 不被重復注冊,然后將 Vue 從函數參數中取出,將整個 Vue 作為 plugin 的install 方法的第一個參數,這樣做的好處就是不需要麻煩的另外引入 Vue,便于操作。接著就去判斷 plugin 上是否存在 install 方法。存在則將賦值后的參數傳入執行 ,最后將所有的存在 install 方法的 plugin 交給 installPlugins維護。
install
了解清楚 Vue.use 的結構之后,可以得出 Vue 注冊插件其實就是在執行插件的 install 方法,參數的第一項就是 Vue,所以我們將代碼定位到 vue-router 源碼中的 src/install.js 源碼地址 (https://github.com/vuejs/vue-router/blob/dev/src/install.js)
//?保存?Vue?的局部變量
export?let?_Vue
export?function?install?(Vue)?{
??//?如果已安裝
??if?(install.installed?&&?_Vue?===?Vue)?return
??install.installed?=?true
?//?局部變量保留傳入的?Vue
??_Vue?=?Vue
??const?isDef?=?v?=>?v?!==?undefined
??const?registerInstance?=?(vm,?callVal)?=>?{
????let?i?=?vm.$options._parentVnode
????if?(isDef(i)?&&?isDef(i?=?i.data)?&&?isDef(i?=?i.registerRouteInstance))?{
??????i(vm,?callVal)
????}
??}
??//?全局混入鉤子函數?每個組件都會有這些鉤子函數,執行就會走這里的邏輯
??Vue.mixin({
????beforeCreate?()?{
??????if?(isDef(this.$options.router))?{
????????//?new?Vue?時傳入的根組件?router?router對象傳入時就可以拿到?this.$options.router
????????//?根?router
????????this._routerRoot?=?this
????????this._router?=?this.$options.router
????????this._router.init(this)
????????//?變成響應式
????????Vue.util.defineReactive(this,?'_route',?this._router.history.current)
??????}?else?{
????????//?非根組件訪問根組件通過$parent
????????this._routerRoot?=?(this.$parent?&&?this.$parent._routerRoot)?||?this
??????}
??????registerInstance(this,?this)
????},
????destroyed?()?{
??????registerInstance(this)
????}
??})
??//?原型加入?$router?和?$route
??Object.defineProperty(Vue.prototype,?'$router',?{
????get?()?{?return?this._routerRoot._router?}
??})
??Object.defineProperty(Vue.prototype,?'$route',?{
????get?()?{?return?this._routerRoot._route?}
??})
//?全局注冊
??Vue.component('RouterView',?View)
??Vue.component('RouterLink',?Link)
//?獲取合并策略
??const?strats?=?Vue.config.optionMergeStrategies
??//?use?the?same?hook?merging?strategy?for?route?hooks
??strats.beforeRouteEnter?=?strats.beforeRouteLeave?=?strats.beforeRouteUpdate?=?strats.created
}
可以看到這段代碼核心部分就是在執行 install 方法時使用 mixin 的方式將每個組件都混入 beforeCreate,destroyed 這兩個生命周期鉤子。在 beforeCreate 函數中會去判斷當前傳入的 router 實例是否是根組件,如果是,則將 _routerRoot 賦值為當前組件實例、_router 賦值為傳入的VueRouter 實例對象,接著執行 init 方法初始化 router,然后將 this_route 響應式化。非根組件的話 _routerRoot 指向 $parent 父實例。然后執行 registerInstance(this,this) 方法,該方法后會,接著原型加入 $router 和 $route,最后注冊 RouterView 和 RouterLink,這就是整個 install 的過程。
小結
Vue.use(plugin) 實際上在執行 plugin上的 install 方法,insatll 方法有個重要的步驟:
- 使用
mixin在組件中混入beforeCreate,destory這倆個生命周期鉤子 - 在
beforeCreate這個鉤子進行初始化。 - 全局注冊
router-view,router-link組件
VueRouter
接著就是這個最重要的 class : VueRouter。這一部分代碼比較多,所以不一一列舉,挑重點分析。vueRouter源碼地址 (https://github.com/vuejs/vue-router/blob/v3.1.2/src/index.js)。
構造函數
??constructor?(options:?RouterOptions?=?{})?{
????this.app??=?null
????this.apps?=?[]
????//?傳入的配置項
????this.options?=?options
????this.beforeHooks?=?[]
????this.resolveHooks?=?[]
????this.afterHooks?=?[]
????this.matcher?=?createMatcher(options.routes?||?[],?this)
????//?一般分兩種模式?hash?和?history?路由?第三種是抽象模式
????let?mode?=?options.mode?||?'hash'
????//?判斷當前傳入的配置是否能使用?history?模式
????this.fallback?=?mode?===?'history'?&&?!supportsPushState?&&?options.fallback?!==?false
????//?降級處理
????if?(this.fallback)?{
??????mode?=?'hash'
????}
????if?(!inBrowser)?{
??????mode?=?'abstract'
????}
????this.mode?=?mode
????//?根據模式實例化不同的?history,history?對象會對路由進行管理?繼承于history?class
????switch?(mode)?{
??????case?'history':
????????this.history?=?new?HTML5History(this,?options.base)
????????break
??????case?'hash':
????????this.history?=?new?HashHistory(this,?options.base,?this.fallback)
????????break
??????case?'abstract':
????????this.history?=?new?AbstractHistory(this,?options.base)
????????break
??????default:
????????if?(process.env.NODE_ENV?!==?'production')?{
??????????assert(false,?`invalid?mode:?${mode}`)
????????}
????}
??}
首先在初始化 vueRouter 整個對象時定義了許多變量,app 代表 Vue 實例,options 代表傳入的配置參數,然后就是路由攔截有用的 hooks 和重要的 matcher (后文會寫到)。構造函數其實在做兩件事情: 1. 確定當前路由使用的 mode;2. 實例化對應的 history 對象。
init
接著完成實例化 vueRouter 之后,如果這個實例傳入后,也就是剛開始說的將 vueRouter 實例在初始化 Vue 時傳入,它會在執行 beforeCreate 時執行 init 方法
init?(app:?any)?{
??...
??this.apps.push(app)
??//?確保后面的邏輯只走一次
??if?(this.app)?{
????return
??}
??//?保存?Vue?實例
??this.app?=?app
??const?history?=?this.history
??//?拿到?history?實例之后,調用?transitionTo?進行路由過渡
??if?(history?instanceof?HTML5History)?{
????history.transitionTo(history.getCurrentLocation())
??}?else?if?(history?instanceof?HashHistory)?{
????const?setupHashListener?=?()?=>?{
??????history.setupListeners()
????}
????history.transitionTo(
??????history.getCurrentLocation(),
??????setupHashListener,
??????setupHashListener
????)
??}
}
init 方法傳入 Vue 實例,保存到 this.apps 當中。Vue實例 會取出當前的 this.history,如果是哈希路由,先走 setupHashListener 函數,然后調一個關鍵的函數 transitionTo 路由過渡,這個函數其實調用了 this.matcher.match 去匹配。
小結
首先在 vueRouter 構造函數執行完會完成路由模式的選擇,生成 matcher ,然后初始化路由需要傳入 vueRouter 實例對象,在組件初始化階段執行 beforeCreate 鉤子,調用 init 方法,接著拿到 this.history 去調用 transitionTo 進行路由過渡。
Matcher

之前在 vueRouter 的構造函數中初始化了 macther,本節將詳細分析下面這句代碼到底在做什么事情,以及 match 方法在做什么 源碼地址 (https://github.com/vuejs/vue-router/blob/dev/src/create-matcher.js)。
?this.matcher?=?createMatcher(options.routes?||?[],?this)
首先將代碼定位到create-matcher.js
export?function?createMatcher?(
??routes:?Array,
??router:?VueRouter):?Matcher?{
??//?創建映射表
??const?{?pathList,?pathMap,?nameMap?}?=?createRouteMap(routes)
??//?添加動態路由
??function?addRoutes(routes){...}
??//?計算新路徑
??function?match?(
????raw:?RawLocation,
????currentRoute?:?Route,
????redirectedFrom?:?Location):?Route?{...}
??//?...?后面的一些方法暫不展開
??
???return?{
????match,
????addRoutes
??}
}
createMatcher 接受倆參數,分別是 routes,這個就是我們平時在 router.js 定義的路由表配置,然后還有一個參數是 router 他是 new vueRouter 返回的實例。
createRouteMap
下面這句代碼是在創建一張 path-record,name-record 的映射表,我們將代碼定位到 create-route-map.js 源碼地址 (https://github.com/vuejs/vue-router/blob/dev/src/create-route-map.js)
export?function?createRouteMap?(
??routes:?Array,
??oldPathList?:?Array,
??oldPathMap?:?Dictionary,
??oldNameMap?:?Dictionary):?{
??pathList:?Array,pathMap:?Dictionary,nameMap:?Dictionary
}?{//?記錄所有的?pathconst?pathList:?Array?=?oldPathList?||?[]//?記錄?path-RouteRecord?的?Mapconst?pathMap:?Dictionary?=?oldPathMap?||?Object.create(null)//?記錄?name-RouteRecord?的?Mapconst?nameMap:?Dictionary?=?oldNameMap?||?Object.create(null)//?遍歷所有的?route?生成對應映射表
??routes.forEach(route?=>?{
????addRouteRecord(pathList,?pathMap,?nameMap,?route)
??})//?調整優先級for?(let?i?=?0,?l?=?pathList.length;?i?????if?(pathList[i]?===?'*')?{
??????pathList.push(pathList.splice(i,?1)[0])
??????l--
??????i--
????}
??}return?{
????pathList,
????pathMap,
????nameMap
??}
}
createRouteMap 需要傳入路由配置,支持傳入舊路徑數組和舊的 Map 這一步是為后面遞歸和 addRoutes 做好準備。首先用三個變量記錄 path,pathMap,nameMap,接著我們來看 addRouteRecord 這個核心方法。這一塊代碼太多了,列舉幾個重要的步驟
//?解析路徑
const?pathToRegexpOptions:?PathToRegexpOptions?=
????route.pathToRegexpOptions?||?{}
//?拼接路徑
const?normalizedPath?=?normalizePath(path,?parent,?pathToRegexpOptions.strict)
//?記錄路由信息的關鍵對象,后續會依此建立映射表
const?record:?RouteRecord?=?{
??path:?normalizedPath,
??regex:?compileRouteRegex(normalizedPath,?pathToRegexpOptions),
??//?route?對應的組件
??components:?route.components?||?{?default:?route.component?},
??//?組件實例
??instances:?{},
??name,
??parent,
??matchAs,
??redirect:?route.redirect,
??beforeEnter:?route.beforeEnter,
??meta:?route.meta?||?{},
??props:?route.props?==?null
??????{}
????:?route.components
????????route.props
??????:?{?default:?route.props?}
}
使用 recod 對象 記錄路由配置有利于后續路徑切換時計算出新路徑,這里的 path 其實是通過傳入父級 record 對象的path和當前 path 拼接出來的 ?。然后 regex 使用一個庫將 path 解析為正則表達式。如果 route 有子節點就遞歸調用 addRouteRecord
?//?如果有?children?遞歸調用?addRouteRecord
????route.children.forEach(child?=>?{
??????const?childMatchAs?=?matchAs
??????????cleanPath(`${matchAs}/${child.path}`)
????????:?undefined
??????addRouteRecord(pathList,?pathMap,?nameMap,?child,?record,?childMatchAs)
????})
最后映射兩張表,并將 record·path 保存進 pathList,nameMap 邏輯相似就不列舉了
??if?(!pathMap[record.path])?{
????pathList.push(record.path)
????pathMap[record.path]?=?record
??}
廢了這么大勁將 pathList 和 pathMap 和 nameMap 抽出來是為啥呢? 首先 pathList 是記錄路由配置所有的 path,然后 pathMap 和 nameMap 方便我們傳入 path 或者 name 快速定位到一個 record,然后輔助后續路徑切換計算路由的。
addRoutes
這是在 vue2.2.0 之后新添加的 api ,或許很多情況路由并不是寫死的,需要動態添加路由。有了前面的 createRouteMap 的基礎上我們只需要傳入 routes 即可,他就能在原基礎上修改
function?addRoutes?(routes)?{
??createRouteMap(routes,?pathList,?pathMap,?nameMap)
}
并且看到在 createMathcer 最后返回了這個方法,所以我們就可以使用這個方法
return?{
????match,
????addRoutes
??}
match
function?match?(
??raw:?RawLocation,
??currentRoute?:?Route,
??redirectedFrom?:?Location):?Route?{
??...
}
接下來就是 match 方法,它接收 3 個參數,其中 raw 是 RawLocation 類型,它可以是一個 url 字符串,也可以是一個 Location 對象;currentRoute 是 Route 類型,它表示當前的路徑;redirectedFrom 和重定向相關。match 方法返回的是一個路徑,它的作用是根據傳入的 raw 和當前的路徑 currentRoute 計算出一個新的路徑并返回。至于他是如何計算出這條路徑的,可以詳細看一下如何計算出location的 normalizeLocation 方法和 _createRoute 方法。
小結
createMatcher: 根據路由的配置描述建立映射表,包括路徑、名稱到路由record的映射關系, 最重要的就是createRouteMap這個方法,這里也是動態路由匹配和嵌套路由的原理。addRoutes: 動態添加路由配置match: 根據傳入的raw和當前的路徑currentRoute計算出一個新的路徑并返回。
路由模式

vue-router 支持三種路由模式(mode):hash、history、abstract,其中 abstract 是在非瀏覽器環境下使用的路由模式 源碼地址 (https://github.com/vuejs/vue-router/blob/dev/src/index.js)。
這一部分在前面初始化 vueRouter 對象時提到過,首先拿到配置項的模式,然后根據當前傳入的配置判斷當前瀏覽器是否支持這種模式,默認 IE9 以下會降級為 hash。然后根據不同的模式去初始化不同的 history 實例。
????//?一般分兩種模式?hash?和?history?路由?第三種是抽象模式不常用
????let?mode?=?options.mode?||?'hash'
????//?判斷當前傳入的配置是否能使用?history?模式
????this.fallback?=?mode?===?'history'?&&?!supportsPushState?&&?options.fallback?!==?false
????//?降級處理
????if?(this.fallback)?{
??????mode?=?'hash'
????}
????if?(!inBrowser)?{
??????mode?=?'abstract'
????}
????this.mode?=?mode
????//?根據模式實例化不同的?history?history?對象會對路由進行管理?繼承于?history?class
????switch?(mode)?{
??????case?'history':
????????this.history?=?new?HTML5History(this,?options.base)
????????break
??????case?'hash':
????????this.history?=?new?HashHistory(this,?options.base,?this.fallback)
????????break
??????case?'abstract':
????????this.history?=?new?AbstractHistory(this,?options.base)
????????break
??????default:
????????if?(process.env.NODE_ENV?!==?'production')?{
??????????assert(false,?`invalid?mode:?${mode}`)
????????}
????}
小結
vue-router 支持三種路由模式,hash、history和?abstract。默認為 hash,如果當前瀏覽器不支持?history則會做降級處理,然后完成 history 的初始化。
路由切換
 切換 url 主要是調用了
 push 方法,下面以哈希模式為例,分析push方法實現的原理 。push 方法切換路由的實現原理 源碼地址 (https://github.com/vuejs/vue-router/blob/dev/src/history/hash.js)
首先在 src/index.js 下找到 vueRouter 定義的 push 方法
??push?(location:?RawLocation,?onComplete?:?Function,?onAbort?:?Function)?{
????//?$flow-disable-line
????if?(!onComplete?&&?!onAbort?&&?typeof?Promise?!==?'undefined')?{
??????return?new?Promise((resolve,?reject)?=>?{
????????this.history.push(location,?resolve,?reject)
??????})
????}?else?{
??????this.history.push(location,?onComplete,?onAbort)
????}
??}
接著我們需要定位到 history/hash.js。這里首先獲取到當前路徑然后調用了 transitionTo 做路徑切換,在回調函數當中執行 pushHash 這個核心方法。
push?(location:?RawLocation,?onComplete?:?Function,?onAbort?:?Function)?{
????const?{?current:?fromRoute?}?=?this
????//?路徑切換的回調函數中調用?pushHash
????this.transitionTo(
??????location,
??????route?=>?{
????????pushHash(route.fullPath)
????????handleScroll(this.router,?route,?fromRoute,?false)
????????onComplete?&&?onComplete(route)
??????},
??????onAbort
????)
??}
而 pushHash 方法在做完瀏覽器兼容判斷后調用的 pushState 方法,將 url 傳入
export?function?pushState?(url?:?string,?replace?:?boolean)?{
??const?history?=?window.history
??try?{
???//?調用瀏覽器原生的?history?的?pushState?接口或者?replaceState?接口,pushState?方法會將?url?入棧
????if?(replace)?{
??????history.replaceState({?key:?_key?},?'',?url)
????}?else?{
??????_key?=?genKey()
??????history.pushState({?key:?_key?},?'',?url)
????}
??}?catch?(e)?{
????window.location[replace???'replace'?:?'assign'](url)
??}
}
可以發現,push 底層調用了瀏覽器原生的 history 的 pushState 和 replaceState 方法,不是 replace 模式 會將 url 推歷史棧當中。
另外提一嘴拼接哈希的原理
源碼位置 (https://github.com/vuejs/vue-router/blob/dev/src/history/hash.js)
初始化 HashHistory 時,構造函數會執行 ensureSlash 這個方法
export?class?HashHistory?extends?History?{
??constructor?(router:?Router,?base:??string,?fallback:?boolean)?{
????...
????ensureSlash()
??}
??...
??}
這個方法首先調用 getHash,然后執行 replaceHash()
function?ensureSlash?():?boolean?{
??const?path?=?getHash()
??if?(path.charAt(0)?===?'/')?{
????return?true
??}
??replaceHash('/'?+?path)
??return?false
}
下面是這幾個方法
export?function?getHash?():?string?{
??const?href?=?window.location.href
??const?index?=?href.indexOf('#')
??return?index?===?-1???''?:?href.slice(index?+?1)
}
//?真正拼接哈希的方法?
function?getUrl?(path)?{
??const?href?=?window.location.href
??const?i?=?href.indexOf('#')
??const?base?=?i?>=?0???href.slice(0,?i)?:?href
??return?`${base}#${path}`
}
function?replaceHash?(path)?{
??if?(supportsPushState)?{
????replaceState(getUrl(path))
??}?else?{
????window.location.replace(getUrl(path))
??}
}
export?function?replaceState?(url?:?string)?{
??pushState(url,?true)
}
舉個例子來說: 假設當前URL是 http://localhost:8080,path 為空,執行 replcaeHash('/' + path),然后內部執行 getUrl 計算出 url 為http://localhost:8080/#/,最后執行 pushState(url,true),就大功告成了!
小結
hash 模式的 push 方法會調用路徑切換方法 transitionTo,接著在回調函數中調用pushHash方法,這個方法調用的 pushState 方法底層是調用了瀏覽器原生 history 的方法。push 和 replace 的區別就在于一個將 url 推入了歷史棧,一個沒有,最直觀的體現就是 replace 模式下瀏覽器點擊后退不會回到上一個路由去 ,另一個則可以。
router-view & router-link
vue-router 在 install 時全局注冊了兩個組件一個是 router-view 一個是 router-link,這兩個組件都是典型的函數式組件。源碼地址 (https://github.com/vuejs/vue-router/tree/dev/src/components)
router-view
首先在 router 組件執行 beforeCreate 這個鉤子時,把 this._route 轉為了響應式的一個對象
?Vue.util.defineReactive(this,?'_route',?this._router.history.current)
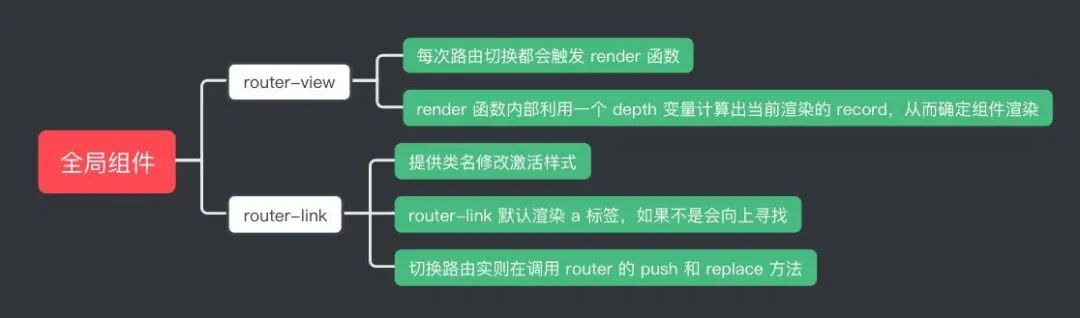
所以說每次路由切換都會觸發 router-view 重新 render 從而渲染出新的視圖。
核心的 render 函數作用請看代碼注釋
??render?(_,?{?props,?children,?parent,?data?})?{
????...
????//?通過?depth?由?router-view?組件向上遍歷直到根組件,遇到其他的?router-view?組件則路由深度+1?這里的?depth?最直接的作用就是幫助找到對應的?record
????let?depth?=?0
????let?inactive?=?false
????while?(parent?&&?parent._routerRoot?!==?parent)?{
??????//?parent.$vnode.data.routerView?為?true?則代表向上尋找的組件也存在嵌套的?router-view?
??????if?(parent.$vnode?&&?parent.$vnode.data.routerView)?{
????????depth++
??????}
??????if?(parent._inactive)?{
????????inactive?=?true
??????}
??????parent?=?parent.$parent
????}
????data.routerViewDepth?=?depth
????if?(inactive)?{
??????return?h(cache[name],?data,?children)
????}
???//?通過?matched?記錄尋找出對應的?RouteRecord?
????const?matched?=?route.matched[depth]
????if?(!matched)?{
??????cache[name]?=?null
??????return?h()
????}
?//?通過?RouteRecord?找到?component
????const?component?=?cache[name]?=?matched.components[name]
???//?往父組件注冊?registerRouteInstance?方法
????data.registerRouteInstance?=?(vm,?val)?=>?{?????
??????const?current?=?matched.instances[name]
??????if?(
????????(val?&&?current?!==?vm)?||
????????(!val?&&?current?===?vm)
??????)?{
????????matched.instances[name]?=?val
??????}
????}
??//?渲染組件
????return?h(component,?data,?children)
??}
觸發更新也就是 setter 的調用,位于 src/index.js,當修改 _route 就會觸發更新。
history.listen(route?=>?{
??this.apps.forEach((app)?=>?{
????//?觸發?setter
????app._route?=?route
??})
})
router-link
分析幾個重要的部分:
- 設置
active路由樣式
router-link 之所以可以添加 router-link-active 和 router-link-exact-active 這兩個 class 去修改樣式,是因為在執行 render 函數時,會根據當前的路由狀態,給渲染出來的 active 元素添加 class
render?(h:?Function)?{
??...
??const?globalActiveClass?=?router.options.linkActiveClass
??const?globalExactActiveClass?=?router.options.linkExactActiveClass
??//?Support?global?empty?active?class
??const?activeClassFallback?=?globalActiveClass?==?null
??????'router-link-active'
????:?globalActiveClass
??const?exactActiveClassFallback?=?globalExactActiveClass?==?null
??????'router-link-exact-active'
????:?globalExactActiveClass
????...
}
router-link默認渲染為a標簽,如果不是會去向上查找出第一個a標簽
?if?(this.tag?===?'a')?{
??????data.on?=?on
??????data.attrs?=?{?href?}
????}?else?{
??????//?find?the?first??child?and?apply?listener?and?href
??????const?a?=?findAnchor(this.$slots.default)
??????if?(a)?{
????????//?in?case?the??is?a?static?node
????????a.isStatic?=?false
????????const?aData?=?(a.data?=?extend({},?a.data))
????????aData.on?=?on
????????const?aAttrs?=?(a.data.attrs?=?extend({},?a.data.attrs))
????????aAttrs.href?=?href
??????}?else?{
????????//?不存在則渲染本身元素
????????data.on?=?on
??????}
????}
- 切換路由,觸發相應事件
const?handler?=?e?=>?{
??if?(guardEvent(e))?{
????if?(this.replace)?{
??????//?replace路由
??????router.replace(location)
????}?else?{
??????//?push?路由
??????router.push(location)
????}
??}
}
權限控制動態路由原理分析
我相信,開發過后臺項目的同學經常會碰到以下的場景: 一個系統分為不同的角色,然后不同的角色對應不同的操作菜單和操作權限。例如: 教師可以查詢教師自己的個人信息查詢然后還可以查詢操作學生的信息和學生的成績系統、學生用戶只允許查詢個人成績和信息,不允許更改。在 vue2.2.0 之前還沒有加入 addRoutes 這個 API 是十分困難的的。
目前主流的路由權限控制的方式是:
- 登錄時獲取
token保存到本地,接著前端會攜帶token再調用獲取用戶信息的接口獲取當前用戶的角色信息。 - 前端再根據當前的角色計算出相應的路由表拼接到常規路由表后面。
登錄生成動態路由全過程
了解 如何控制動態路由之后,下面是一張全過程流程圖
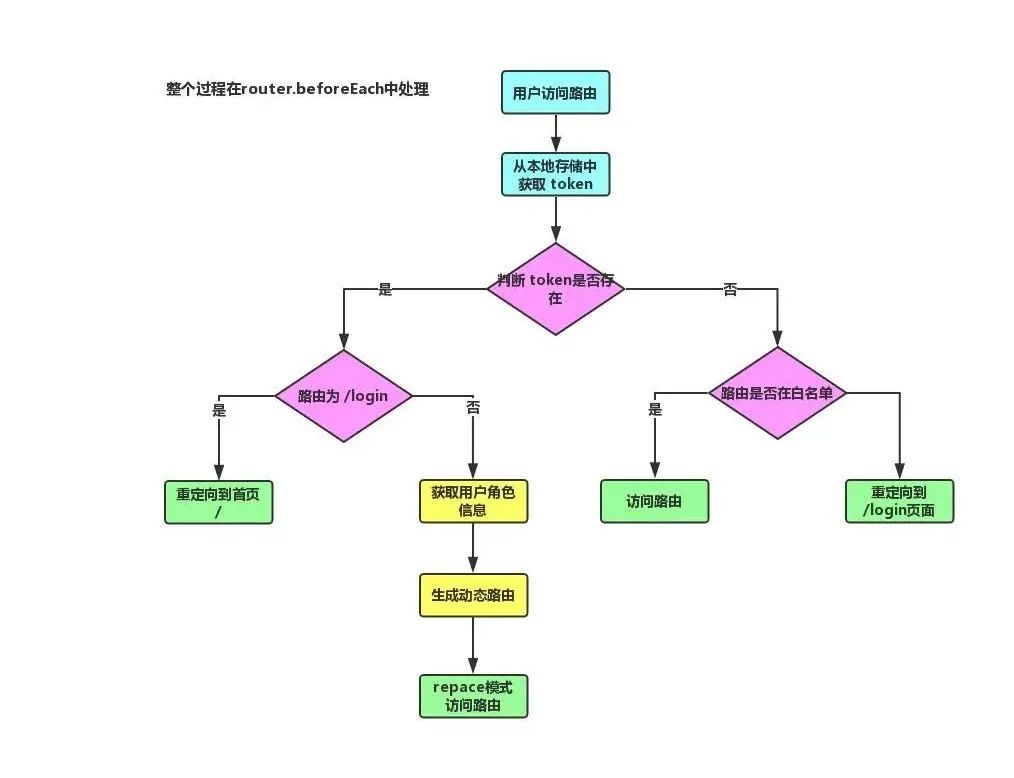
前端在 beforeEach 中判斷:
- 緩存中存在 JWT 令牌
- 訪問
/login: 重定向到首頁/ - 訪問
/login以外的路由: ?首次訪問,獲取用戶角色信息,然后生成動態路由,然后訪問以replace模式訪問/xxx路由。這種模式用戶在登錄之后不會在history存放記錄
- 訪問
- 不存在 JWT 令牌
- 路由在白名單中: 正常訪問
/xxx路由 - 不在白名單中: 重定向到
/login頁面
- 路由在白名單中: 正常訪問
結合框架源碼分析
下面結合 vue-element-admin 的源碼分析該框架中如何處理路由邏輯的。
路由訪問邏輯分析
首先可以定位到和入口文件 main.js 同級的 permission.js, 全局路由守衛處理就在此。源碼地址 (https://github.com/251205668/student-admin-template/blob/master/src/permission.js)
const?whiteList?=?['/login',?'/register']?//?路由白名單,不會重定向
//?全局路由守衛
router.beforeEach(async(to,?from,?next)?=>?{
??NProgress.start()?//路由加載進度條
??//?設置?meta?標題
??document.title?=?getPageTitle(to.meta.title)
??//?判斷?token?是否存在
??const?hasToken?=?getToken()
??if?(hasToken)?{
????if?(to.path?===?'/login')?{
??????//?有?token?跳轉首頁
??????next({?path:?'/'?})
??????NProgress.done()
????}?else?{
??????const?hasRoles?=?store.getters.roles?&&?store.getters.roles.length?>?0
??????if?(hasRoles)?{
????????next()
??????}?else?{
????????try?{
??????????//?獲取動態路由,添加到路由表中
??????????const?{?roles?}?=?await?store.dispatch('user/getInfo')
??????????const?accessRoutes?=?await?store.dispatch('permission/generateRoutes',?roles)
??????????router.addRoutes(accessRoutes)
??????????//??使用?replace?訪問路由,不會在?history?中留下記錄,登錄到?dashbord?時回退空白頁面
??????????next({?...to,?replace:?true?})
????????}?catch?(error)?{
??????????next('/login')
??????????NProgress.done()
????????}
??????}
????}
??}?else?{
????//?無?token
????//?白名單不用重定向?直接訪問
????if?(whiteList.indexOf(to.path)?!==?-1)?{
??????next()
????}?else?{
??????//?攜帶參數為重定向到前往的路徑
??????next(`/login?redirect=${to.path}`)
??????NProgress.done()
????}
??}
})
這里的代碼我都添加了注釋方便大家好去理解,總結為一句話就是訪問路由 /xxx,首先需要校驗 token 是否存在,如果有就判斷是否訪問的是登錄路由,走的不是登錄路由則需要判斷該用戶是否是第一訪問首頁,然后生成動態路由,如果走的是登錄路由則直接定位到首頁,如果沒有 token 就去檢查路由是否在白名單(任何情況都能訪問的路由),在的話就訪問,否則重定向回登錄頁面。
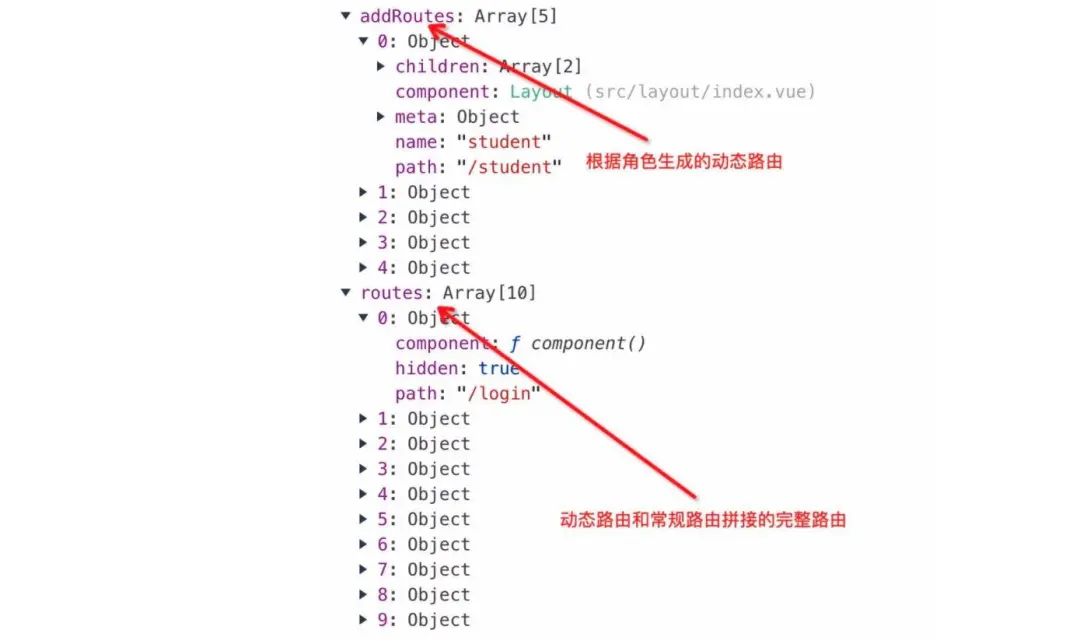
下面是經過全局守衛后路由變化的截圖
結合Vuex生成動態路由
下面就是分析這一步 const accessRoutes = await store.dispatch('permission/generateRoutes', roles) 是怎么把路由生成出來的。源碼地址 (https://github.com/251205668/student-admin-template/blob/master/src/store/modules/permission.js)
首先 vue-element-admin 中路由是分為兩種的:
- constantRoutes: 不需要權限判斷的路由
- asyncRoutes: 需要動態判斷權限的路由
//?無需校驗身份路由
export?const?constantRoutes?=?[
??{
????path:?'/login',
????component:?()?=>?import('@/views/login/index'),
????hidden:?true
??}
??...
??],
?//?需要校驗身份路由?
export?const?asyncRoutes?=?[
??//?學生角色路由
??{
????path:?'/student',
????name:?'student',
????component:?Layout,
????meta:?{?title:?'學生信息查詢',?icon:?'documentation',?roles:?['student']?},
????children:?[
??????{
????????path:?'info',
????????component:?()?=>?import('@/views/student/info'),
????????name:?'studentInfo',
????????meta:?{?title:?'信息查詢',?icon:?'form'?}
??????},
??????{
????????path:?'score',
????????component:?()?=>?import('@/views/student/score'),
????????name:?'studentScore',
????????meta:?{?title:?'成績查詢',?icon:?'score'?}
??????}
????]
??}]
??...
生成動態路由的源碼位于 src/store/modules/permission.js 中的 generateRoutes 方法,源碼如下:
?generateRoutes({?commit?},?roles)?{
????return?new?Promise(resolve?=>?{
??????let?accessedRoutes
??????if?(roles.includes('admin'))?{
????????accessedRoutes?=?asyncRoutes?||?[]
??????}?else?{
??????//?不是?admin?去遍歷生成對應的權限路由表
????????accessedRoutes?=?filterAsyncRoutes(asyncRoutes,?roles)
??????}
??????//?vuex?中保存異步路由和常規路由
??????commit('SET_ROUTES',?accessedRoutes)
??????resolve(accessedRoutes)
????})
??}
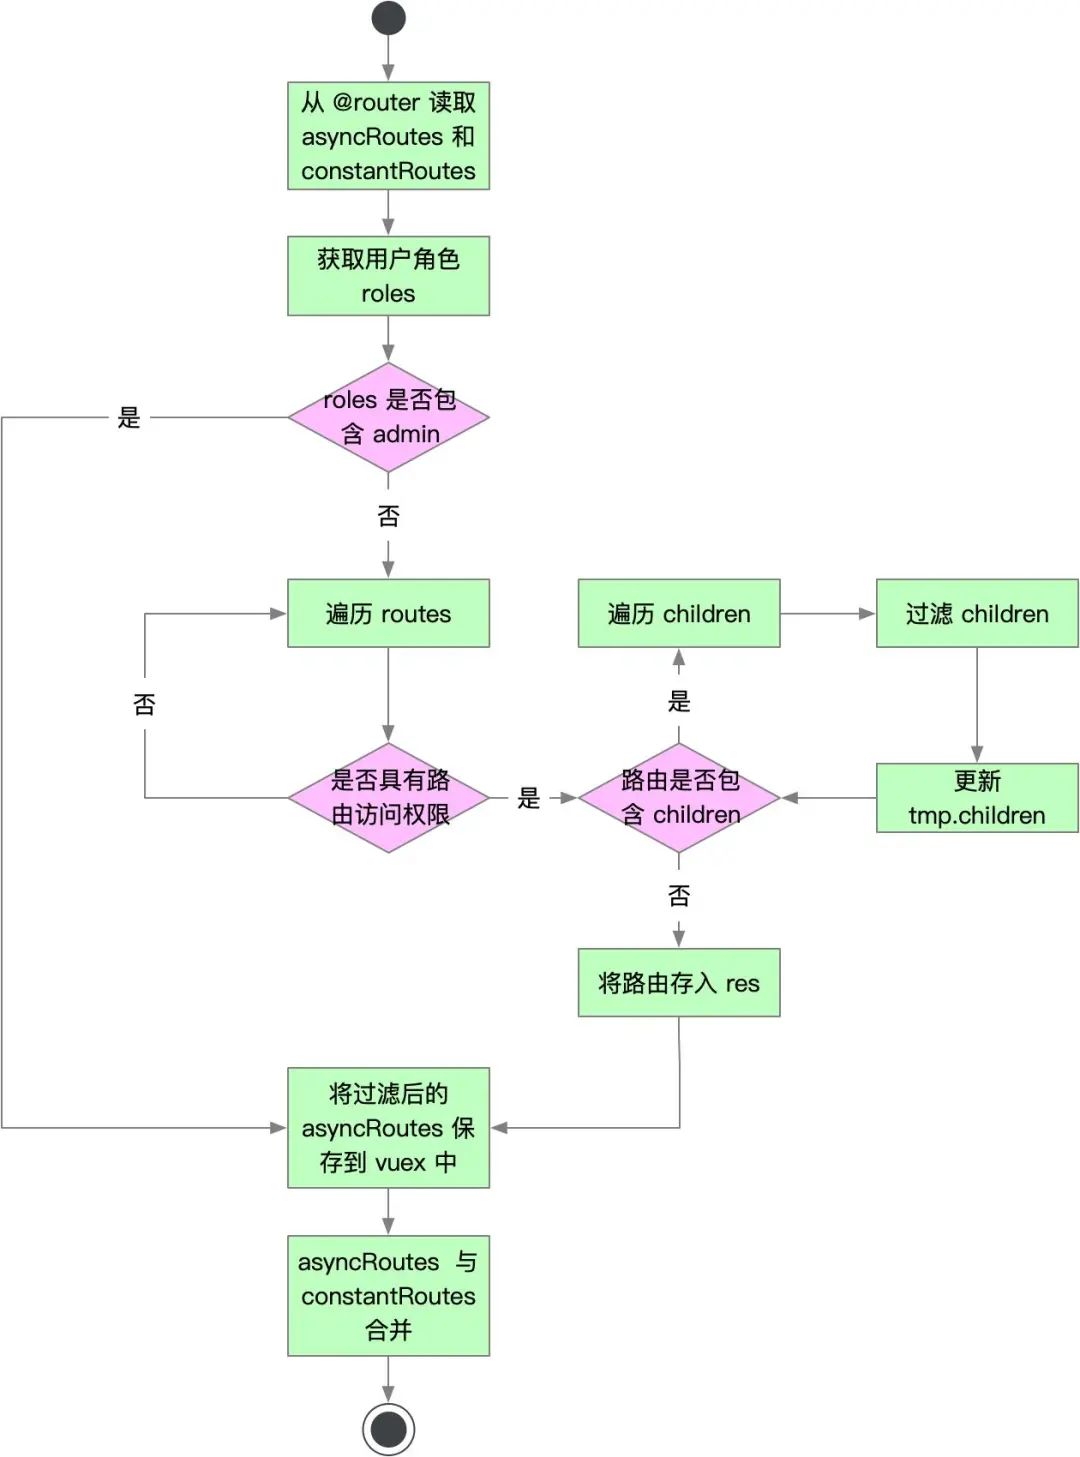
從 route.js 讀取 asyncRoutes 和 constantRoutes 之后首先判斷當前角色是否是 admin,是的話默認超級管理員能夠訪問所有的路由,當然這里也可以自定義,否則去過濾出路由權限路由表,然后保存到 Vuex 中。最后將過濾之后的 asyncRoutes 和 constantRoutes 進行合并。過濾權限路由的源碼如下:
export?function?filterAsyncRoutes(routes,?roles)?{
??const?res?=?[]
??routes.forEach(route?=>?{
????//?淺拷貝
????const?tmp?=?{?...route?}
????//?過濾出權限路由
????if?(hasPermission(roles,?tmp))?{
??????if?(tmp.children)?{
????????tmp.children?=?filterAsyncRoutes(tmp.children,?roles)
??????}
??????res.push(tmp)
????}
??})
??return?res
}
首先定義一個空數組,對傳入 asyncRoutes 進行遍歷,判斷每個路由是否具有權限,未命中的權限路由直接舍棄 判斷權限方法如下:
function?hasPermission(roles,?route)?{
??if?(route.meta?&&?route.meta.roles)?{
????//?roles?有對應路由元定義的?role?就返回?true
????return?roles.some(role?=>?route.meta.roles.includes(role))
??}?else?{
????return?true
??}
}
接著需要判斷二級路由、三級路由等等的情況,再做一層迭代處理,最后將過濾出來的路由推進數組返回。然后追加到 constantRoutes 后面
?SET_ROUTES:?(state,?routes)?=>?{
????state.addRoutes?=?routes
????state.routes?=?constantRoutes.concat(routes)
??}
動態路由生成全過程
總結
vue-router源碼分析部分- 注冊: 執行
install方法,注入生命周期鉤子初始化 - vueRouter: 當組件執行
beforeCreate傳入router實例時,執行init函數,然后執行history.transitionTo路由過渡 - matcher : 根據傳入的
routes配置創建對應的pathMap和nameMap,可以根據傳入的位置和路徑計算出新的位置并匹配對應的record - 路由模式: 路由模式在初始化
vueRouter時完成匹配,如果瀏覽器不支持則會降級 - 路由 切換: 哈希模式下底層使用了瀏覽器原生的
pushState和replaceState方法 - router-view: 調用父組件上存儲的
$route.match控制路由對應的組件的渲染情況,并且支持嵌套。 - router-link: 通過
to來決定點擊事件跳轉的目標路由組件,并且支持渲染成不同的tag,還可以修改激活路由的樣式。
- 注冊: 執行
權限控制動態路由部分
- 路由邏輯: 全局路由攔截,從緩存中獲取令牌,存在的話如果首次進入路由需要獲取用戶信息,生成動態路由,這里需要處理
/login特殊情況,不存在則判斷白名單然后走對應的邏輯 - 動態生成路由: 傳入需要
router.js定義的兩種路由。判斷當前身份是否是管理員,是則直接拼接,否則需要過濾出具備權限的路由,最后拼接到常規路由后面,通過addRoutes追加。
- 路由邏輯: 全局路由攔截,從緩存中獲取令牌,存在的話如果首次進入路由需要獲取用戶信息,生成動態路由,這里需要處理
讀后感想
或許閱讀源碼的作用不能像一篇開發文檔一樣直接立馬對日常開發有所幫助,但是它的影響是長遠的,在讀源碼的過程中都可以學到眾多知識,類似閉包、設計模式、時間循環、回調等等 JS 進階技能,并穩固并提升了你的 JS 基礎。當然這篇文章是有缺陷的,有幾個地方都沒有分析到,比如導航守衛實現原理和路由懶加載實現原理,這一部分,我還在摸索當中。
如果一味的死記硬背一些所謂的面經,或者直接死記硬背相關的框架行為或者 API ,你很難在遇到比較復雜的問題下面去快速定位問題,了解怎么去解決問題,而且我發現很多人在使用一個新框架之后遇到點問題都會立馬去提對應的 Issues,以至于很多流行框架 Issues 超過幾百個或者幾千個,但是許多問題都是因為我們并未按照設計者開發初設定的方向才導致錯誤的,更多都是些粗心大意造成的問題。
參考文章
帶你全面分析 vue-router 源碼 (萬字長文) (https://juejin.im/post/6844904064367460366)
vuejs 源碼解析 (https://github.com/answershuto/learnVue)
近期1024程序員們過節,他們都在干這件事....面試官:聊聊對Vue.js框架的理解 若此文有用,何不素質三連??


)
)


單元格函數,OP參數)