axure9控件樹 rp
Segmented controls are not very easy to tackle in prototyping. This is especially true when you have more than 2 segments. This article will show you how to create a segmented control with 3 segments in Axure in just 2 simple steps. The technique can be applied for any number of segments.
在原型設計中,分段控件并不是很容易解決。 當您具有兩個以上的細分時,尤其如此。 本文將向您展示如何通過兩個簡單的步驟在Axure中創建具有3個細分的細分控件。 該技術可以應用于任何數量的段。
Ready? Let’s begin!
準備? 讓我們開始!
先決條件 (Prerequisites)
To follow along, you’ll need to be a little bit familiar with Axure and have some understanding about widgets, interactions, local variables and expressions.
要繼續學習,您需要對Axure有所了解,并對小部件,交互,局部變量和表達式有所了解。
Also, if you haven’t done it yet, you can download Axure latest version from Axure Website.
另外,如果您尚未執行此操作,則可以從Axure網站下載最新版本。
您將創造什么 (What you will create)

You will create a segmented control (a very well known input control pattern) used in mobile or desktop UI. This type of control allows the user to switch to a specific option within a group. If you want to learn more about this control type you can take a look at the Apple HIG here: https://developer.apple.com/design/human-interface-guidelines/ios/controls/segmented-controls/
您將創建在移動或桌面UI中使用的分段控件 (一種眾所周知的輸入控件模式)。 這種控制類型允許用戶切換到組中的特定選項。 如果您想了解有關此控件類型的更多信息,可以在這里查看Apple HIG: https : //developer.apple.com/design/human-interface-guidelines/ios/controls/segmented-controls/
To make everything work(on the interaction part), we will use a little bit of logic to respond to the Click or Tap event in order to change the selected option (but we will not gonna use global variables for this, instead we will take advantage of local variables).
為了使一切正常工作(在交互部分),我們將使用一點邏輯來響應Click或Tap事件,以更改選定的選項(但我們不會為此使用全局變量,而是將局部變量的優勢)。
The reason for not using a global variable to handle the selected state is because we want this component to be self contained (without dependencies) to be easily reused across projects.
不使用全局變量來處理選定狀態的原因是因為我們希望該組件是自包含的(沒有依賴項),以便可以在項目中輕松重用。
分步說明 (Step by step instructions)
The level of difficulty is easy to medium. Everything was broken into 2 steps so you can follow along more easily.
難易程度中等。 一切都分為2個步驟,因此您可以更輕松地進行后續操作。
步驟1 —建立必要的形狀 (Step 1 — Building the necessary shapes)
In this step we are going to create all the necessary shapes for our segmented control. To see an overview of the shapes and structure take a look at the image below.
在這一步中,我們將為分段控件創建所有必要的形狀。 要查看形狀和結構的概述,請看下面的圖片。

Basically, we have only one group called “Segmented Control” and inside we have:
基本上,我們只有一個稱為“分段控制”的組,內部有:
- “Options” group — In this group there are all the options for this control, these are named with the “+” prefix to indicate that will hold the interaction (in the next step) “選項”組-該組中有此控件的所有選項,這些選項都以“ +”前綴命名,以表示將保持交互(在下一步中)
- “Selector” — this shape indicates the current selection “選擇器”-此形狀表示當前選擇
- 2 separator shapes (Separator 1, Separator 2) to separate the segments 2種分隔符形狀(分隔符1,分隔符2)用于分隔段
- “Options background” — this is the gray background that makes the control to feel like one shape “選項背景”-這是使控件感覺像一個形狀的灰色背景
- “Control background” — out control background for the component (can be optional) “控制背景”-組件的控制背景(可以是可選的)
If you don’t have too much experience with Axure shape widgets then you can read more about them here: https://docs.axure.com/axure-rp/reference/shapes/.
如果您對Axure形狀小部件沒有太多經驗,則可以在這里閱讀有關它們的更多信息: https : //docs.axure.com/axure-rp/reference/shapes/ 。
The “Options” group is actually made of Label Widgets and the way they are laid out is to overlap a little bit the boundaries of the separator shapes. These boundaries are set up in such a way that can be used to determine the left and right limit for each segment.
“選項”組實際上是由標簽小部件組成的 ,它們的布局方式是使分隔符形狀的邊界重疊一點。 這些邊界的設置方式可用于確定每個線段的左邊界和右邊界。
Also, notice that the “Selector” sits under the “Options” group and it has a wider length.
另外,請注意,“選擇器”位于“選項”組下,并且長度更大。
See all shapes properties below.
請參閱下面的所有形狀屬性。

Shape properties (of course you can adjust these properties to fit your needs):
形狀屬性(當然,您可以調整這些屬性以適合您的需求):
Options (+Option 1/+Option 2/+Option 3):
選項 (+選項1 / +選項2 / +選項3):
- Width/Height: 115/28 寬度/高度:115/28
- Fill: none 填寫:無
- Shadow: fill: #000000, opacity: 15%, x: 0, y: 3, blur: 8 陰影:填充:#000000,不透明度:15%,x:0,y:3,模糊:8
Selector:
選擇器 :
- Width/Height: 117/28 寬/高:117/28
- Fill: #FFFFFF 填寫:#FFFFFF
- Border: 1, fill: #000000, opacity: 4% 邊框:1,填充:#000000,不透明度:4%
- Corner: 7 角球:7
- Shadow: fill: #000000, opacity: 12%, x: 0, y: 3, blur: 8 陰影:填充:#000000,不透明度:12%,x:0,y:3,模糊:8
Separator (Separator 1/Separator 2):
分隔符 (分隔符1 /分隔符2) :
- Width/Height: 1/16 寬度/高度:1/16
- Fill: #8E8E93 填充:#8E8E93
Options background:
選項背景 :
- Width/Height: 343/32 寬度/高度:343/32
- Fill: #767680, Opacity: 12% 填充:#767680,不透明度:12%
- Corner: 9 角球:9
Control background:
控制背景 :
- Width/Height: 375/44 寬/高:375/44
- Fill: #ffffff 填寫:#ffffff
第2步-添加互動 (Step 2 — Adding interactivity)
The only interaction that you are going to add is on the +Option(1/2/3) widgets on the Click or Tap event. Basically, what you need is to move the “Selector” shape on the horizontal axis to the left bound of the widget that triggered the event.
您要添加的唯一交互是在Click或Tap事件上的+ Option(1/2/3)小部件上。 基本上,您需要將水平軸上的“選擇器”形狀移動到觸發事件的小部件的左邊界。
You are going to add this interaction only on one of the +Option widgets (in this case +Option 1) and using the copy/paste function replicate this interaction on the rest of the widgets +Option 2, +Option 3.
您將僅在其中一個+ Option小部件(在本例中為+ Option 1 )上添加此交互,并使用復制/粘貼功能在其余小部件+ Option 2 +3中復制此交互。
As you can see it is really easy to add the interaction to new segments all you need is to copy/paste the existing one.
如您所見,將交互添加到新段中確實很容易,您所需要的只是復制/粘貼現有??段。
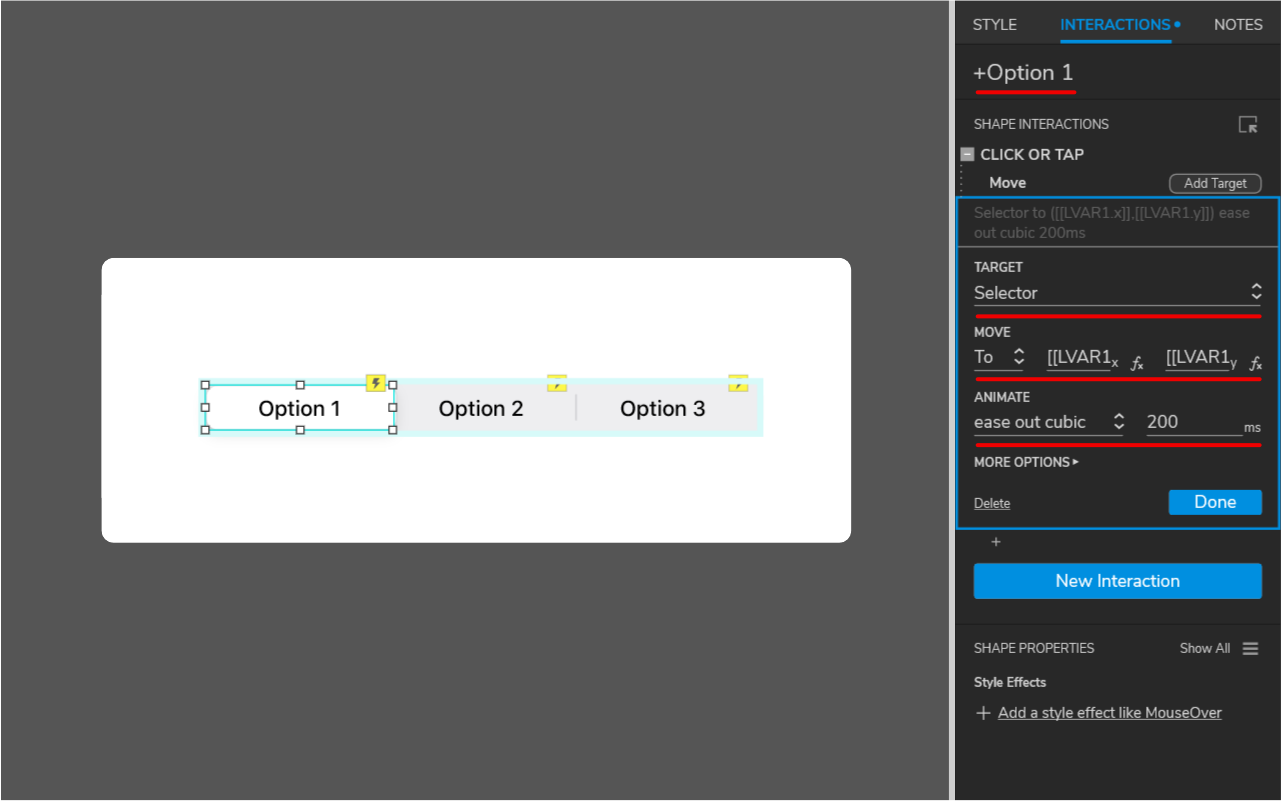
To achieve the required interaction (basically to move the “Selector” widget to the appropriate position) you will use some expressions inside one action with the following settings:
為了實現所需的交互(基本上是將“選擇器”小部件移動到適當的位置),您將在具有以下設置的一個動作內使用一些表達式 :
Action Move:
動作動作 :
- Target: Selector 目標:選擇器
- Move: to 搬去
Move X = [[LVAR1.x]] — this expression give us the new X position
移動X = [[LVAR1.x]]-此表達式為我們提供了新的X位置
- Move Y = [[LVAR1.y]] — here we use the local variable y position to maintain the “Selector” at the same Y position 移動Y = [[LVAR1.y]]-在這里,我們使用局部變量y位置將“選擇器”保持在相同的Y位置
- Animate: ease with cubic, 200ms 動畫效果:立體感輕松200ms
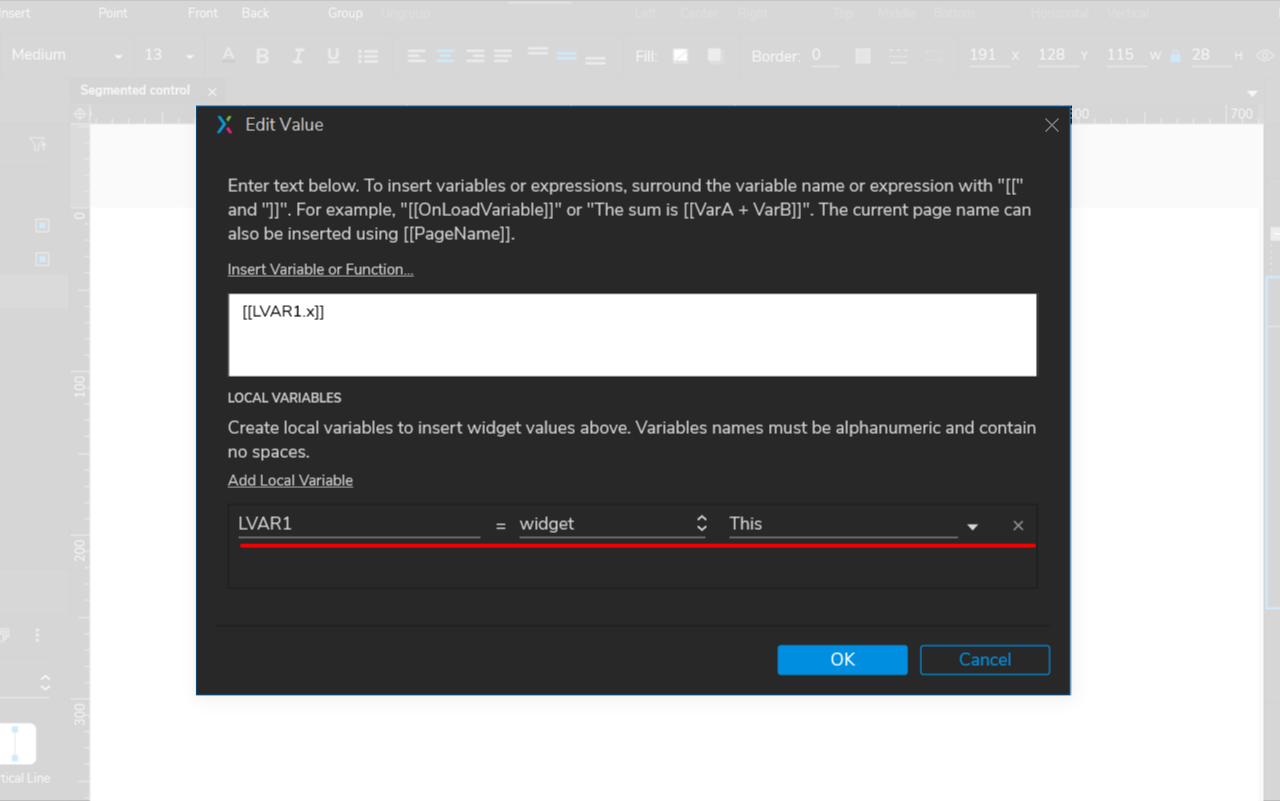
LVAR1 is a local variable and it represents the current widget that triggered the event, in Axure is referred as This widget.
LVAR1是一個局部變量,它代表觸發事件的當前窗口小部件,在Axure中稱為此窗口小部件。
If you are not really familiar with events, actions, cases you can read more about them on the Axure website https://docs.axure.com/axure-rp/reference/events-cases-actions/.
如果您不太熟悉事件,操作和案例,則可以在Axure網站https://docs.axure.com/axure-rp/reference/events-cases-actions/上閱讀有關它們的更多信息。
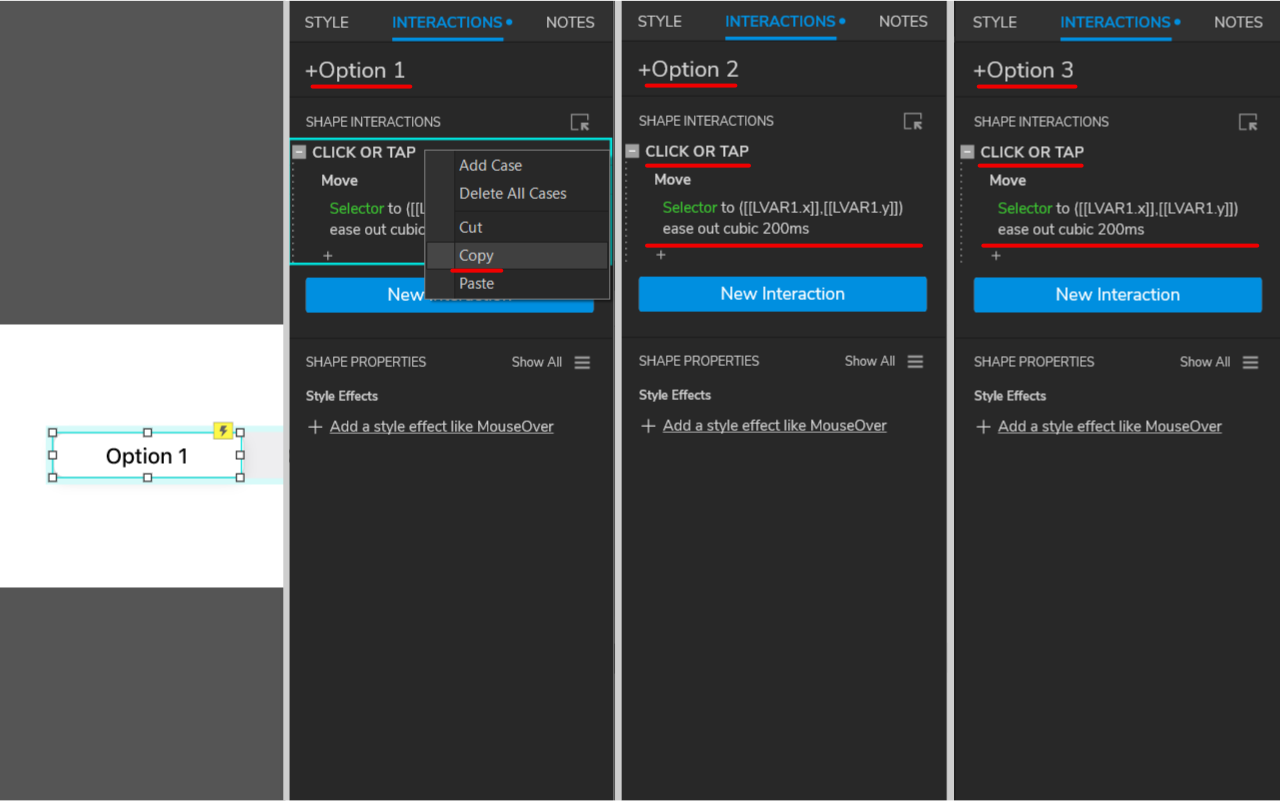
All right now that you have the interaction completed all you need is to copy/paste on the rest of the +Option widgets and that is it.
現在,您已經完成了交互,您需要復制/粘貼其余的+ Option小部件,僅此而已。
Creating a segmented control is relatively easy in Axure if you have the appropriate document structure. Now, you can use your new segmented control in future projects.
如果您具有適當的文檔結構,則在Axure中創建分段控件相對容易。 現在,您可以在以后的項目中使用新的分段控件。
You can also download the Axure file from here: https://hi.switchy.io/1SLZ
您也可以從此處下載Axure文件: https ://hi.switchy.io/1SLZ
翻譯自: https://uxdesign.cc/how-to-create-a-segmented-control-in-axure-rp-9-100cecd13ab2
axure9控件樹 rp
本文來自互聯網用戶投稿,該文觀點僅代表作者本人,不代表本站立場。本站僅提供信息存儲空間服務,不擁有所有權,不承擔相關法律責任。 如若轉載,請注明出處:http://www.pswp.cn/news/275596.shtml 繁體地址,請注明出處:http://hk.pswp.cn/news/275596.shtml 英文地址,請注明出處:http://en.pswp.cn/news/275596.shtml
如若內容造成侵權/違法違規/事實不符,請聯系多彩編程網進行投訴反饋email:809451989@qq.com,一經查實,立即刪除!相關文章


【送書-小姐姐配音】低代碼平臺的核心價值與優勢

oracle靜默安裝集群,靜默安裝Oracle數據庫10g篇
中奇怪的一項功能)
sketch鋼筆工具_設計工具(Sketch,Adobe XD,Figma和InVision Studio)中奇怪的一項功能

modprobe:FATAL: could not load /lib/modules/2.6.35-22-generic/modules.dep No such file or directory

Python進階:如何將字符串常量轉化為變量?

怎么在matlab中圖像中外接矩形,Matlab 最小外接矩形

尤雨溪開發的 vue-devtools 如何安裝,為何打開文件的功能鮮有人知?

sketch浮動布局_使用智能布局和調整大小在Sketch中創建更好的可重用符號

用Sql添加刪除字段,判斷字段是否存在的方法

小姐姐筆記:我是如何學習簡單源碼拓展視野的

php表決器代碼,三人表決器:VHDL源代碼

保持危機感和緊迫感_什么是緊迫的:您需要知道的一切
)
劍指offer java版(一)

如何系統搭建現代 Web CI/CD

sqlserver oracle 數據類型對應關系,SQLSERVER和ORACLE數據類型對應關系詳解和對應表格整理...


