sketch鋼筆工具
When you build a new product that is very similar to the existing products in the market, the designers and product managers tend to do certain features different from others. Sometimes this brings a good change, sometimes worse.
當您構建與市場上現有產品非常相似的新產品時,設計師和產品經理往往會執行某些不同于其他產品的功能。 有時,這會帶來好的變化,有時會帶來更糟的變化。
I used 4 interface design tools: Sketch, Adobe XD, Figma, and InVision Studio. All these have an almost similar kind of UI & workflow. The Sketch did a rethinking in the era of Illustrator & Photoshop and pioneered in this UI pattern for vector design tools and all the others followed.
我使用了4種界面設計工具:Sketch,Adobe XD,Figma和InVision Studio。 所有這些都具有幾乎類似的UI和工作流程。 Sketch在Illustrator&Photoshop時代進行了重新思考,并在矢量設計工具的UI模式方面開創了先河,隨后所有其他工具也紛紛問世。
Let’s see some of the subtle differences I noticed in the same features among these tools…
讓我們看看我在這些工具的相同功能中發現的一些細微差異……
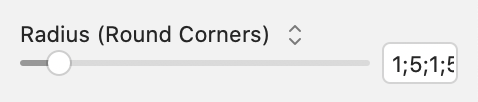
角半徑 (Corner Radius)
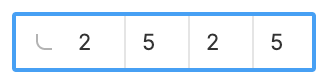
Always a second of mental calculation is needed when you want to have a different radius for each corner of a rounded rectangle. In 3 out of 4 applications, the radius value starts from the top left corner and progresses in the clockwise direction. Sketch has the most clumsy version of this. Even though XD & Figma supports rounded handles to adjust the individual corner radius, I always preferred typing radius values. It helps me to be consistent across the screens.
當您想為圓角矩形的每個角具有不同的半徑時,總是需要一秒鐘的心理計算。 在4個應用中,有3個的半徑值從左上角開始,并沿順時針方向進行。 Sketch具有最笨拙的版本。 即使XD&Figma支持圓角手柄來調整各個角的半徑,我還是總是喜歡鍵入半徑值。 它可以幫助我在屏幕之間保持一致。

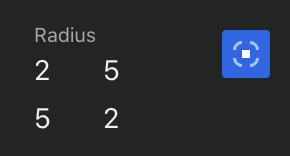
The newest tool in the market, InVision Studio made a subtle change in the positioning of numbers which made it a lot easier to relate with the actual corners of a rectangle.
市場上最新的工具InVision Studio對數字的位置進行了細微的更改,從而使與矩形的實際角點的關聯變得容易得多。
Undoubtedly, the odd one out wins in this case.
毫無疑問,在這種情況下,單數勝出獲勝。
This problem and solution reminded me of the classic knob positioning challenge of a four-burner stove. Read more about it here: http://ergo.human.cornell.edu/DEA3510HWs/HoffmanandChan2011.pdf
這個問題和解決方案使我想起了四燃燒爐的經典旋鈕定位挑戰。 在此處了解更多信息: http : //ergo.human.cornell.edu/DEA3510HWs/HoffmanandChan2011.pdf
更改回選擇/移動工具 (Change back to selection/move tool)
In 3 out 4 applications, the moment you finish drawing something with the shape tool (rectangle, oval, polygon…) or artboard tool, it returns to the move/selection tool, so that you can resize or move the drawn shape or artboard. But in Adobe XD, the same tool remains selected till you manually select the ‘Select’ tool or press ‘Esc’ twice.
在四分之三的應用程序中,當您使用形狀工具(矩形,橢圓形,多邊形...)或畫板工具完成繪制時,它會返回到移動/選擇工具,以便您可以調整或移動繪制的形狀或畫板的大小。 但是在Adobe XD中,直到您手動選擇“選擇”工具或按兩次“ Esc”鍵之前,該工具仍保持選中狀態。


Maybe XD chose to go like this because all other Adobe tools like Photoshop & Illustrator follows this same pattern. For those applications, this behavior may be relevant, but in interface design, I rarely use the same shape tool twice. Most of the time, I resize or adjust the position of the shape after drawing it. Figma has an option in Preferences to ‘Keep tool selected after use’. Maybe XD also could have kept it optional like that for the users who come from Photoshop or Illustrator.
也許XD之所以選擇這樣,是因為所有其他Adobe工具(如Photoshop和Illustrator)都遵循相同的模式。 對于那些應用程序,此行為可能是相關的,但是在界面設計中,我很少兩次使用相同的形狀工具。 大多數時候,我在繪制形狀后調整大小或調整形狀的位置。 Figma在“首選項”中有一個“使用后保留工具”選項。 對于來自Photoshop或Illustrator的用戶,也許XD可以將其保持為可選。
This time, the odd one out failed to make it better.
這次,奇怪的失敗了。
調整手柄大小 (Resize Handles)
All the 4 applications show resize handles (□) at the 4 corners. But only 3 out them shows the resize handles on the 4 sides/edges. The last one, Figma doesn’t show it at the edges. Instead, the whole side borders can be used to resize the width or height of the object.
所有4個應用程序的4個角均顯示調整大小的手柄(□)。 但是其中只有3個在4個側面/邊緣顯示調整大小的手柄。 最后一個,Figma沒有在邊緣顯示它。 而是可以使用整個側面邊框來調整對象的寬度或高度。
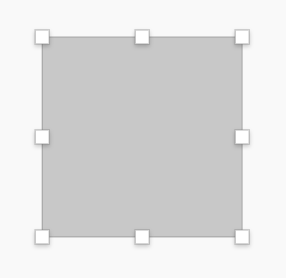
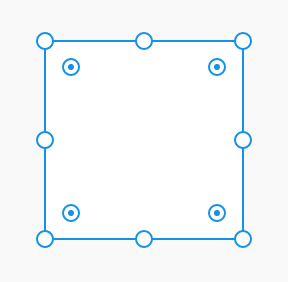
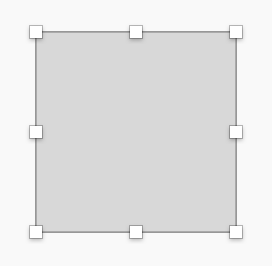
The intention of Figma was good. Why should we limit the horizontal or vertical resize to a tiny square handle when you have the whole edge in front of you? But unfortunately, this causes more accidental resizes. Sometimes when I casually try to drag and move the object, it stretches instead of move. One convenience leads to another inconvenience!
Figma的意圖很好。 當整個邊緣都在您面前時,為什么我們應該將水平或垂直調整大小限制為很小的正方形手柄? 但是不幸的是,這會導致更多的意外調整大小。 有時,當我隨便嘗試拖動和移動對象時,它會拉伸而不是移動。 一種便利導致另一種不便!
For this odd one out feature, there is a good side & bad side. So it’s a tie.
對于這種奇怪的單出功能,有一個好的方面和一個壞的方面。 所以這是一條領帶。
復制和粘貼樣式 (Copy & Paste Style)
‘Style’ is basically the combination of colors and effects (like a shadow, border, etc.) you’ve applied to a layer. Sketch & InVision Studio call it as ‘Style’. Adobe XD calls it ‘Appearance’ and Figma calls it ‘Properties’.
“樣式”基本上是您已應用于圖層的顏色和效果(例如陰影,邊框等)的組合。 Sketch&InVision Studio將其稱為“樣式”。 Adobe XD將其稱為“外觀”,而Figma將其稱為“屬性”。
In Sketch, XD & Studio, the process to copy the style from one object to another is like this:
在Sketch,XD和Studio中,將樣式從一個對象復制到另一個對象的過程如下:
1. Select the parent object
1.選擇父對象
2. Right-click → Copy (OR press Cmd + C shortcut)
2.右鍵單擊→復制(或按Cmd + C快捷鍵)
3. Select the child object
3.選擇子對象
4. Right-click → Paste Style/Appearance (OR press Cmd + Option + V)
4.右鍵單擊→粘貼樣式/外觀(或按Cmd + Option + V )
If you do the same in Figma, nothing will happen. Because its flow is the exact opposite there. A regular copy command won’t copy the properties. For that, you’ve to do:
如果在Figma中執行相同的操作,則不會發生任何事情。 因為它的流動與那里正好相反。 常規復制命令不會復制屬性。 為此,您必須執行以下操作:
Right-click → Copy / Paste → Copy Properties (OR press Cmd + Option + C).
右鍵單擊→復制/粘貼→復制屬性(或按Cmd + Option + C )。
Then you can select any other object and do a normal Cmd + V to paste the properties.
然后,您可以選擇任何其他對象并執行常規的Cmd + V來粘貼屬性。
Figma has one additional feature where the user can select a property from the right-side panel, copy it, and paste on another object. Maybe because of this, they’ve changed their workflow a little bit. Still, modifying a popular workflow that users are familiar with is not something that I would prefer unless it is making it easier.
Figma還有一個附加功能,用戶可以從右側面板中選擇一個屬性,將其復制并粘貼到另一個對象上。 也許正因為如此,他們對工作流程進行了一些更改。 盡管如此,修改用戶熟悉的流行工作流并不是我所希望的,除非這樣做使它變得更加容易。
This odd one out feature doesn’t add any extra value to the user, instead, go against a familiar flow.
這種奇怪的單出功能不會給用戶帶來任何額外的價值,而是違背了熟悉的流程。
輸入值的行為 (Behavior on Entering Values)
All the 4 applications have a lot of input fields on the right-side panel to enter many values. In 3 out of 4 applications, once you enter a value in these fields and press Return/Enter, the field gets deselected. To make any more changes, each time you’ve to click on the input field again. But not in Sketch! In Sketch, the input field remains selected until you click outside or press ‘Esc’. This very small change in behavior comes in handy when you are playing with the font size, opacity, shadow radius, etc.
所有4個應用程序在右側面板上都有很多輸入字段,可輸入許多值。 在4個應用程序中,有3個在這些字段中輸入值并按Return / Enter后,該字段將被取消選擇。 要進行更多更改,每次您都必須再次單擊輸入字段時。 但不在Sketch中! 在“草圖”中,輸入字段將保持選中狀態,直到您單擊外部或按“ Esc”。 當您使用字體大小,不透明度,陰影半徑等進行播放時,這種非常小的行為變化會派上用場。
I like the Sketch’s behavior in the above case since I find it relevant in most cases.
我喜歡上述情況下的Sketch行為,因為我發現它與大多數情況相關。
Another minor difference you can see here is when you click on an input field, XD & Figma selects the value already present in the field. So when you start typing it replaces the whole value. I find this useful in most scenarios. Studio & Sketch places the cursor where you click. Most of the time I’ve to press Cmd + A or Backspace to replace the existing value with a new one. (Sketch has a tricky workaround though. If you click on the border of the input field, it selects the whole value.)
您可以在此處看到的另一個細微差別是,當您單擊輸入字段時,XD&Figma選擇該字段中已經存在的值。 因此,當您開始鍵入時,它將替換整個值。 我發現這在大多數情況下都很有用。 Studio&Sketch將光標置于您單擊的位置。 大多數時候,我必須按Cmd + A或Backspace鍵將現有值替換為新值。 (不過,草圖有一個棘手的解決方法。如果單擊輸入字段的邊框,它將選擇整個值。)
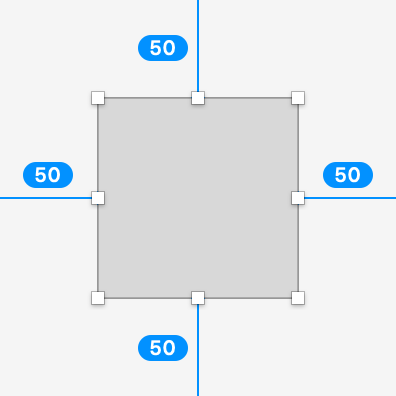
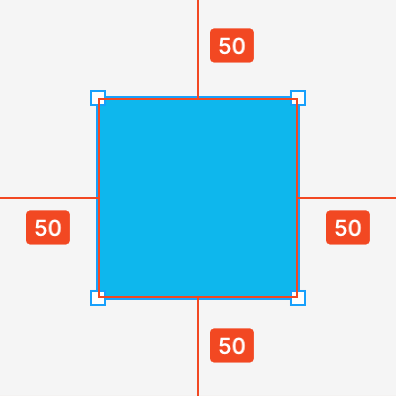
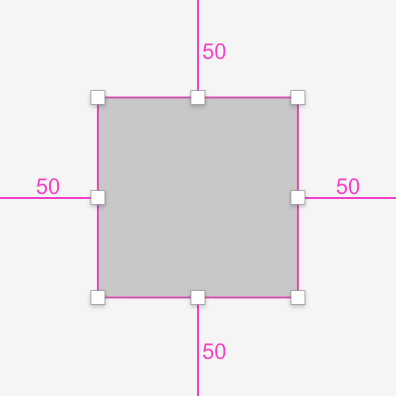
顯示測量 (Display of Measurements)
Sketch and Figma display the measurements and dimensions as white text on a colored box. This helps to see the measurements clearly irrespective of the background color. Adobe XD & InVision Studio shows it in plain pink color. This is a very irritating factor despite its clean looks. Whenever I’m working on a project with a lot of reddish colors it’s very hard to see the values. Often I’ve to change the background color temporarily just to see if my padding or margin is correct as expected.
Sketch和Figma在彩色框中以白色文本顯示測量值和尺寸。 無論背景顏色如何,這有助于清晰地查看測量結果。 Adobe XD和InVision Studio以純粉紅色顯示它。 盡管外觀干凈,但這是一個非常令人討厭的因素。 每當我在一個帶有很多紅色的項目上工作時,很難看到這些值。 通常,我不得不臨時更改背景顏色,只是為了查看我的填充或邊距是否正確。

Sometimes the usability takes a hit with the trade-offs that we do to make the UI look clean and sleek. XD even removed the ? and ▼symbols in the layers panel which indicates the expand and collapse actions. Instead, the user has to click on the group or shape icon to expand and collapse. It takes a bit of time to understand the states of these icons, which are expandable, and where to click.
有時,為了使UI看起來干凈整潔,在權衡取舍方面會遭受打擊。 XD甚至刪除了表示展開和折疊動作的“圖層”面板中的?和▼符號。 而是,用戶必須單擊組或形狀圖標以展開和折疊。 需要花費一些時間來了解這些圖標的狀態(這些圖標可以展開以及在何處單擊)。
撤消行為 (Undo Behavior)
Figma is the first application I’ve seen which stores every selection state in the history stack. So when you undo, each selection also will be considered as one step. This is useful when you select multiple layers by holding Shift and then you accidentally click somewhere outside and your whole selection is gone. In all other 3 applications, the undo applies to only changes that are made to the screen. Sketch & XD stores the selection state if you make any changes to the layers selected. InVision Studio does not retain any selection state at all. Figma’s behavior gives you more control, but increase the number of ‘undo’ by more than double to go back to a previous step. Again, one convenience leads to another inconvenience!
Figma是我見過的第一個將每個選擇狀態存儲在歷史堆棧中的應用程序。 因此,當您撤消操作時,每個選擇也將被視為一個步驟。 當您按住Shift鍵選擇多個圖層,然后不小心在外面的某個地方單擊而整個選擇都消失了時,這很有用。 在所有其他3個應用程序中,撤消僅適用于對屏幕所做的更改。 如果對選定的圖層進行任何更改,Sketch&XD將存儲選擇狀態。 InVision Studio完全不保留任何選擇狀態。 Figma的行為為您提供了更多控制權,但是將“撤消”的次數增加了一倍以上,以返回上一步。 同樣,一種便利會帶來另一種不便!
If I’ve to nitpick, another similar thing in Figma is the selection of the parent group. In all other 3 applications, you can simply press the ‘Esc’ button to select the parent group after selecting a nested (child) layer/group. Each ‘Esc’ press will go one level up. I’ve learned this behavior naturally without seeing any tutorial because it matches my mental model. Figma also has this same feature, but you’ve to press Shift + Enter for doing it. A simple ‘Esc’ will discard all selections in Figma. They did like this probably to match with their other bunch of advanced shortcuts to move between the nested objects. But they should’ve kept the basics simple and stupid.
如果我要挑剔,那么Figma中的另一件事是選擇父組。 在所有其他3個應用程序中,您可以在選擇嵌套的(子)圖層/組后簡單地按“ Esc”按鈕選擇父組。 每按一次“ Esc”鍵將向上一級。 我自然地學習了這種行為,而沒有看任何教程,因為它與我的心理模型相匹配。 Figma也具有相同的功能,但是您必須按Shift + Enter 。 一個簡單的“ Esc”將丟棄Figma中的所有選擇。 他們確實喜歡這樣做,以便與其他高級快捷方式相匹配,以在嵌套對象之間移動。 但是他們應該保持基礎簡單而愚蠢。
Without a doubt, Figma is the most powerful and feature-rich application among these four (except in prototyping part, probably). But while adding more features, its learning curve is increasing. Every feature is getting more complicated and users have to consciously remember more shortcuts than the other tools. I hope they’ll still keep the basics simple while going for more advanced features.
毫無疑問,Figma是這四個工具中功能最強大,功能最豐富的應用程序(可能在原型制作部分除外)。 但是,在增加更多功能的同時,其學習曲線也在不斷增加。 每個功能都變得越來越復雜,用戶必須有意識地記住比其他工具更多的快捷方式。 我希望他們在使用更高級的功能時仍能保持簡單的基礎。
我希望其他四個功能都具備: (Some other features I wish all the four had it:)
1. Option to adjust vertical and horizontal spacing: Sketch did it slightly better by giving the ‘Tidy’ option right along with it. If there are more than two objects, you can adjust the vertical or horizontal spacing between them only after tidying up.
1.調整垂直和水平間距的選項: Sketch通過將“ Tidy”選項與它一起提供,使其略有改善。 如果有兩個以上的對象,則只有在整理后才能調整它們之間的垂直或水平間距。
2. Easiness to override components: In Adobe XD, you can work with a component just like any other object. The ‘drag and drop’ to replace a sub-component is also too good experience compared to selection from a dropdown in other tools. The only sad part is, XD won’t retain the overridden text when we replace a sub-component.
2.輕松覆蓋組件:在Adobe XD中,您可以像處理任何其他對象一樣使用組件。 與從其他工具的下拉菜單中進行選擇相比,“拖放”來替換子組件也是一種很好的體驗。 唯一可悲的是,當我們替換子組件時,XD不會保留覆蓋的文本。
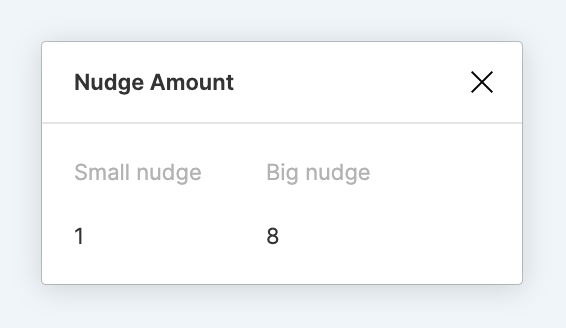
3. Option to change the nudge value: In Figma & Sketch, I can adjust the nudge value to a custom number from the ‘Preferences’. It is helpful, especially when designing for Android, where most of the values will be in multiples of 8.
3.更改微調值的選項:在Figma&Sketch中,我可以從“首選項”中將微調值調整為自定義數字。 這很有用,特別是在為Android設計時,其中大多數值都是8的倍數。

4. Align child elements to the artboard edges: Only in Studio & Sketch, you can align the child member of a group to the edges of an artboard. Sketch has the option to align even multiple items together with the artboard.
4.將子元素與畫板邊緣對齊:僅在Studio&Sketch中,您可以將組的子成員與畫板邊緣對齊。 Sketch可以選擇將多個項目與畫板對齊。
6. Pen tool & selection colors in Figma, the timeline in Studio, some prototyping features in XD, etc. are the other things I hope will soon get implemented in all.
6.我希望很快就能實現其他方面的功能,包括Figma中的鋼筆工具和選擇顏色,Studio中的時間線,XD中的一些原型制作功能,等等。
Changes are good. Even though it often fails, we get a few good things also out of it. If everyone starts just copying others’ features exactly the same, then where is the novelty? Where is the innovation? Hoping for more competition which leads to more time-saving features not forgetting the basics.
變化是好的。 即使它經常失敗,我們也會從中得到一些好處。 如果每個人都開始完全照搬別人的特征,那么新穎性在哪里? 創新在哪里? 希望有更多競爭,從而帶來更多省時的功能,而又不要忘記基礎知識。
翻譯自: https://uxdesign.cc/odd-one-out-features-in-design-tools-sketch-adobe-xd-figma-and-invision-studio-4f08cd08acdb
sketch鋼筆工具
本文來自互聯網用戶投稿,該文觀點僅代表作者本人,不代表本站立場。本站僅提供信息存儲空間服務,不擁有所有權,不承擔相關法律責任。 如若轉載,請注明出處:http://www.pswp.cn/news/275591.shtml 繁體地址,請注明出處:http://hk.pswp.cn/news/275591.shtml 英文地址,請注明出處:http://en.pswp.cn/news/275591.shtml
如若內容造成侵權/違法違規/事實不符,請聯系多彩編程網進行投訴反饋email:809451989@qq.com,一經查實,立即刪除!相關文章

modprobe:FATAL: could not load /lib/modules/2.6.35-22-generic/modules.dep No such file or directory

Python進階:如何將字符串常量轉化為變量?

怎么在matlab中圖像中外接矩形,Matlab 最小外接矩形

尤雨溪開發的 vue-devtools 如何安裝,為何打開文件的功能鮮有人知?

sketch浮動布局_使用智能布局和調整大小在Sketch中創建更好的可重用符號

用Sql添加刪除字段,判斷字段是否存在的方法

小姐姐筆記:我是如何學習簡單源碼拓展視野的

php表決器代碼,三人表決器:VHDL源代碼

保持危機感和緊迫感_什么是緊迫的:您需要知道的一切
)
劍指offer java版(一)

如何系統搭建現代 Web CI/CD

sqlserver oracle 數據類型對應關系,SQLSERVER和ORACLE數據類型對應關系詳解和對應表格整理...


ui邊框設計圖_UI設計形狀和對象基礎知識:填充和邊框

如何移除項目中無用的 console.log 代碼

WCF - 服務實例管理模式

oracle io lost,磁盤IO故障

易思匯完成近億元B輪融資,信中利投資
