sketch浮動布局
Sketch is a widely used tool for UI designs. It implemented the
Sketch是用于UI設計的廣泛使用的工具。 它實施了
atomic design methodology and made the workflow of UI design much more efficient. You can create a Symbol in Sketch and use it everywhere in your design, which gives you a great advantage to keep “a single source of truth. “原子設計方法,并使UI設計的工作流程更加高效。 您可以在Sketch中創建一個Symbol并將其在設計中的任何地方使用,這為您保持“單一事實來源”提供了很大的優勢。 “However, it’s painful to create a slightly complex Symbol before Sketch introduced the Smart Layout and Resizing features. All Sketch users experienced how the contents inside a symbol were stretched not as intended and had to “detach” it. In this article, I want to share my experience of creating better Symbols to gain more flexibility and reduce the detaching.
但是,在Sketch引入智能布局和調整大小功能之前,創建一個稍微復雜的Symbol是很痛苦的。 所有Sketch用戶都體驗了如何將符號內的內容拉伸到超出預期的程度,并不得不“分離”該符號。 在本文中,我想分享我創建更好的Symbols的經驗,以獲得更多的靈活性并減少分離。
引入智能布局 (Introducing Smart Layout)
Smart Layout is a feature introduced in Sketch 58. You can select the Layout when you create a Symbol. Smart Layout gives you more possibility to customize the Symbols for different Scenarios.
Smart Layout是Sketch 58中引入的功能。創建符號時可以選擇Layout。 智能布局使您可以為不同的場景自定義符號。
Let’s take a navigation menu for example. First, I created a simple Symbol called “Menu item” and then used it in another “Menu” Symbol:
讓我們以一個導航菜單為例。 首先,我創建了一個名為“菜單項”的簡單符號,然后在另一個“菜單”符號中使用了它:

For the “Menu” Symbol I applied the horizontal “Left to Right Layout”:
對于“菜單”符號,我應用了水平的“從左到右布局”:

When I use the “Menu” Symbol in the page design, I can easily hide one element in it and the following elements will be automatically “pulled”:
當我在頁面設計中使用“菜單”符號時,我可以輕松地在其中隱藏一個元素,隨后的元素將被自動“拉出”:
It’s often that different pages on the same website have different navigation items. With Smart Layout you can design a menu with all possible items and hide the unnecessary ones in different scenarios.
同一網站上的不同頁面通常具有不同的導航項。 使用Smart Layout,您可以設計一個包含所有可能項目的菜單,并在不同情況下隱藏不必要的菜單。
To learn more about Smart Layout, you can visit this page on Sketch’s website.
要了解有關智能布局的更多信息,請訪問Sketch網站上的此頁面 。
調整大小簡介 (Introducing Resizing)
Resizing is a feature to control the positioning and stretching of the element when its parent (a Symbol or a Group) get resized. There are two options: “Pin to Edge” and “Fix Size”:
調整大小是一項功能,可以在調整其父項(符號或組)的大小時控制元素的位置和拉伸。 有兩個選項:“ Pin to Edge”和“ Fix Size”:

With these two options you can make an element stay in its position or keep its size while its parent element get stretched.
使用這兩個選項,可以使元素保持其位置或在其父元素被拉伸時保持其大小。
Let’s say you have a simple button with an icon. The icon will be resized according to the button if you don’t set up the Resizing:
假設您有一個帶有圖標的簡單按鈕。 如果您未設置調整大小,則圖標將根據按鈕調整大小:

To fix this we can make the icon pin to top-left and keep its size:
為了解決這個問題,我們可以將圖標固定在左上角并保持其大小:

Here is the result:
結果如下:
結合智能布局和調整大小 (Combining Smart Layout and Resizing)
Smart Layout plus Resizing can help you create powerful and configurable components and dramatically ease the pain of maintaining a design system.
智能版式和調整大小可以幫助您創建功能強大且可配置的組件,并大大減輕維護設計系統的麻煩。
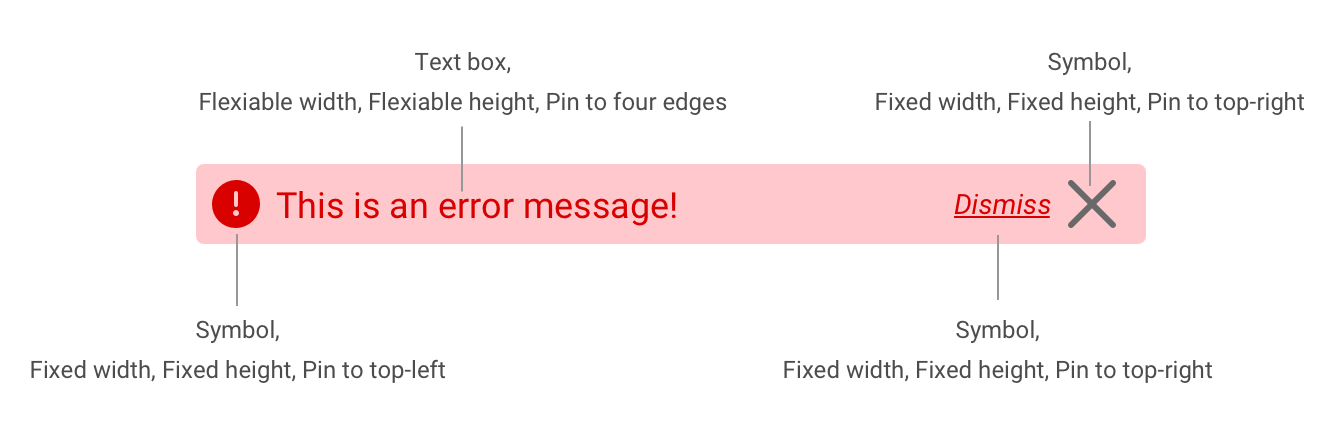
Now let’s try to create a notification component which could contain
現在讓我們嘗試創建一個通知組件,其中可能包含
- an indicator icon, a “close” button, or a “Dismiss” link. 指示器圖標,“關閉”按鈕或“關閉”鏈接。
- multiple-line text. 多行文字。
As you can see in this image:
正如您在此圖中看到的:

Yes, we can do it with just one Symbol!
是的,我們只用一個符號就能做到!
First, we have to create simple Symbols for the “info” button, the “close” button, and the “Dismiss” link so we can hide them if it’s necessary, because we can only hide Symbols in Sketch.
首先,我們必須為“信息”按鈕,“關閉”按鈕和“關閉”鏈接創建簡單的符號,以便在必要時可以將其隱藏,因為我們只能在Sketch中隱藏符號。
After that we can set up the Resizing for each element:
之后,我們可以為每個元素設置“調整大小”:
“info” button: Fixed width, Fixed height, Pin to top-left.
“信息”按鈕: 固定寬度,固定高度,固定在左上角。
“close” button and “Dismiss” link: Fixed width, Fixed height, Pin to top-right
“關閉”按鈕和“關閉”鏈接: 固定寬度,固定高度,固定在右上角
The text content part is a little bit tricky. You have to first select the “Fixed Size” in the Alignment section:
文本內容部分有些棘手。 您必須先在“對齊”部分中選擇“固定大小”:

Then under Resizing unselect all “Fix Size” and make it pin to all four edges:
然后在“調整大小”下取消選擇所有“固定大小”,并將其固定到所有四個邊緣:

The whole configuration is as below:
整個配置如下:
Then you can use the symbol in the page design, hide the elements when you want to, or resize it to make a multiple-line dialog:
然后,您可以在頁面設計中使用符號,在需要時隱藏元素,或調整其大小以形成多行對話框:
翻譯自: https://uxdesign.cc/create-better-reusable-symbols-in-sketch-using-smart-layout-and-resizing-46e6f21744eb
sketch浮動布局
本文來自互聯網用戶投稿,該文觀點僅代表作者本人,不代表本站立場。本站僅提供信息存儲空間服務,不擁有所有權,不承擔相關法律責任。 如若轉載,請注明出處:http://www.pswp.cn/news/275586.shtml 繁體地址,請注明出處:http://hk.pswp.cn/news/275586.shtml 英文地址,請注明出處:http://en.pswp.cn/news/275586.shtml
如若內容造成侵權/違法違規/事實不符,請聯系多彩編程網進行投訴反饋email:809451989@qq.com,一經查實,立即刪除!相關文章

用Sql添加刪除字段,判斷字段是否存在的方法

小姐姐筆記:我是如何學習簡單源碼拓展視野的

php表決器代碼,三人表決器:VHDL源代碼

保持危機感和緊迫感_什么是緊迫的:您需要知道的一切
)
劍指offer java版(一)

如何系統搭建現代 Web CI/CD

sqlserver oracle 數據類型對應關系,SQLSERVER和ORACLE數據類型對應關系詳解和對應表格整理...


ui邊框設計圖_UI設計形狀和對象基礎知識:填充和邊框

如何移除項目中無用的 console.log 代碼

WCF - 服務實例管理模式

oracle io lost,磁盤IO故障

易思匯完成近億元B輪融資,信中利投資

遠程連接 錯誤 內部錯誤_關于錯誤的性質和原因。 了解錯誤因素

得到鵝廠最新前端開發手冊一份

性能測試分析之帶寬瓶頸的疑惑

Android 中的LayoutInflater的理解

linux rootfs編譯進內核,九鼎x6818開發板筆記:uboot、kernel、rootfs編譯和燒寫
