axure ui設計
Axure is a powerful prototyping software with a lot of history. It has been around for many years and is available for Windows and Mac. Axure gained a lot of functionality over time, and today you can look at Axure as all in one tool. You can basically create a lot of UI/UX artifacts without leaving it.
Axure是一款功能強大的原型開發軟件,具有悠久的歷史。 它已經存在多年了,可用于Windows和Mac。 隨著時間的流逝,Axure獲得了很多功能,如今您可以將Axure視為一個工具。 您基本上可以創建很多UI / UX工件,而無需離開它。
先決條件 (Prerequisites)
You don’t need to have any previous experience with Axure to follow along with this article, but if you do have, maybe this article can help you to shed some light on some core concepts related to interactions and prototyping in general, that are usually misunderstood or not so obvious for designers.
您無需具有任何 Axure 經驗就可以與本文一起學習,但是如果您確實有,那么這篇文章也許可以幫助您大致了解一些與交互和原型相關的核心概念,這些概念通常是對于設計師來說,誤解還是不那么明顯。
我們在本文中要解決的問題 (What are we trying to address within this article)
Designers coming from other screen design tools like Sketch, Figma, Adobe XD can find it difficult to understand how Axure is actually working, the terminology, tools and how to build an interactive prototype.
來自其他屏幕設計工具(例如Sketch,Figma和Adobe XD)的設計人員會發現,很難理解Axure的實際工作原理,術語,工具以及如何構建交互式原型 。
Prototyping is an important step in UX methodology and can play a big role in improving the user experience. A prototype is a simulation, usually used to help understand and test how an application (or feature) works, what it does and how to interact with it.
原型制作是UX方法學中的重要一步,可以在改善用戶體驗方面發揮重要作用。 原型是一種模擬,通常用于幫助理解和測試應用程序(或功能)的工作方式,功能以及與之交互的方式。
In order to create any kind of prototype you will need to add interactions to some of your design elements.
為了創建任何種類的原型,您將需要向某些設計元素添加交互 。
Axure is regarded as a software with a steep learning curve, and the reason is clear: it has a lot to offer, there are a lot of features packed and this is not so obvious at the first glance.
Axure被認為是具有陡峭學習曲線的軟件,其原因很明顯:它提供了很多功能,打包了許多功能,乍一看這并不那么明顯。
In general, you can do a lot in Axure. You can do wireframes, diagrams or high-fidelity UIs (like you usually do in Sketch, Figma, Adobe XD) but in this article we will focus on the prototyping interactions part. So, I’m not gonna do a deep dive of Axure interface and features simply because it is not the scope of this article and I would probably need to write an entire chapter of a book.
通常,您可以在Axure中做很多事情。 您可以進行線框,圖表或高保真UI(就像您通常在Sketch,Figma,Adobe XD中所做的那樣),但是在本文中, 我們將重點關注原型交互部分 。 因此,我不會僅僅因為這不是本文的范圍而對Axure的界面和功能進行深入研究,所以我可能需要寫一本書的整個章節。
讓我們開始 (Let’s begin)
If you have used screen design tools like Sketch, Figma, Adobe XD or any other general design tool like Photoshop, Affinity then you are pretty much used with the tool metaphor. Tool metaphor? Let me explain.
如果您使用過諸如Sketch,Figma,Adobe XD之類的屏幕設計工具,或者諸如Photoshop,Affinity之類的任何其他常規設計工具,那么您幾乎可以使用該工具隱喻 。 工具的隱喻? 讓我解釋。
The way these apps model the interaction is by using existing mental models that people have with tools in real life.
這些應用程序對交互進行建模的方式是使用人們在現實生活中使用工具所擁有的現有思維模型 。
In real life when you want to build something, you are using different tools to achieve this. So, for instance, if you want to do a watercolor painting you are going to use a glass of water and brushes. Both, the brushes and the glass of water, are tools to help you place the colors on the canvas to accomplish your watercolor masterpiece.
在現實生活中,當您想要構建某些東西時,您正在使用不同的工具來實現這一目標。 因此,例如,如果您想進行水彩繪畫,則將使用一杯水和畫筆。 刷子和玻璃水都是幫助您將顏色放置在畫布上以完成水彩杰作的工具。
In software applications you can use these existing mental models and add on top of them conceptual models.
在軟件應用程序中,您可以使用這些現有的思維模型,并在它們之上添加概念模型 。
Next, I’m gonna try to explain the conceptual models used in these kinds of applications by breaking them into levels. Each new level adds more abstraction and knowledge on top of the previous one.
接下來,我將嘗試將這些應用程序劃分為各個級別,以解釋這些應用程序中使用的概念模型 。 每個新級別都在前一個級別之上添加了更多抽象和知識。
第一級 (First level)
So let’s take for instance Affinity Photo (which is very similar to Photoshop) and see how this conceptual model that I’ve described earlier it’s used. All the available tools are represented by an icon in the tools toolbar. You interact with the tools in the same way you interact in real life, you pick the tool and use it to draw something (of course we need to make sure we’ve set the right colors) on the artboard (just a note here, I’ve simplified this example a lot, but you get the idea).
因此,讓我們以Affinity Photo(與Photoshop非常相似)為例,看看如何使用我之前描述的概念模型。 工具欄中的所有可用工具都用一個圖標表示。 您與現實生活中的互動方式相同,可以選擇工具并使用它在畫板上畫一些東西(當然,我們需要確保設置正確的顏色)(請注意此處,我已經簡化了很多示例,但您明白了。
We, as designers, interact with the same concepts and, in most cases, the same terminology from the real life like:
作為設計師,我們與現實生活中的相同概念以及大多數情況下的相同術語進行交互,例如:
Tools: Pencil; Brush; Eraser
工具 :鉛筆; 刷; 橡皮
Canvas
帆布
Artboard
畫板

As you can see these tools help us to place the colors on the artboard. The way the colors are applied is in our direct control through the tool.
如您所見,這些工具可幫助我們在畫板上放置顏色。 顏色的應用方式是我們通過該工具直接控制的。
So the conceptual flow for the first level has these steps:
因此,第一級的概念流程包含以下步驟:
- Pick the tool (make sure we have the correct colors setup) 選擇工具(確保我們有正確的顏色設置)
- Place the colors on the artboard 將顏色放在畫板上
第二級 (Second level)
Let’s now go a little bit further and continue with our example of using Affinity Photo and try to use the rectangle tool which adds a vector (object) rectangle on the artboard. If you are familiar with vector drawing apps then there is nothing new up to this point everything should be familiar.
現在讓我們更進一步,繼續我們使用Affinity Photo的示例,并嘗試使用在畫板上添加矢量(對象)矩形的矩形工具 。 如果您熟悉矢量繪圖應用程序,那么到目前為止還沒有什么新鮮事物。

But there is something different here, we’ve used a special tool, the rectangle tool in our case, to place a rectangle object on the artboard; basically we no longer place colors directly, but the object renders its geometry using some attributes that we can change.
但是這里有些不同,我們使用了一種特殊的工具(在本例中為矩形工具)將一個矩形對象放置在畫板上。 基本上,我們不再直接放置顏色,而是使用一些我們可以更改的屬性來渲染對象的幾何形狀。
This is actually a big change because behind the scene the software is doing the heavy lifting like drawing the geometry using sophisticated mathematical functions. All we do is to change some of the properties that impact the behavior of these mathematical functions.
這實際上是一個很大的變化,因為該軟件在后臺進行了繁重的工作,例如使用復雜的數學函數繪制幾何圖形。 我們要做的就是更改一些影響這些數學函數行為的屬性。
It’s interesting to note that, on this level, the tool and the conceptual model are already more abstract than on the first level, but for now we don’t have problems adapting because we used this model in other similar apps.
有趣的是,在此級別上,該工具和概念模型已經比在第一級上更加抽象,但是目前,由于在其他類似應用程序中使用了此模型,因此我們沒有任何問題。
Let’s recap, we can use special tools (e.g rectangle tool, pen tool, ellipse tool and so on) to create objects and then manipulate their properties to fit our needs.
回顧一下,我們可以使用特殊工具(例如,矩形工具,鋼筆工具,橢圓工具等)創建對象,然后操縱它們的屬性來滿足我們的需求。
So the conceptual flow for the second level looks like this:
因此,第二級的概念流程如下所示:
- Pick the tool 選擇工具
- Create the object 創建對象
- Change the object properties 更改對象屬性
第三級 (Third level)
Now it’s time to leave the familiar world of Affinity Photo and move to Axure where we have similar objects like the ones that I’ve previously described but there are some key differences.
現在該離開熟悉的Affinity Photo了, 移到Axure ,我們在這里有類似的對象,如我之前描述的,但是有一些關鍵的區別。
One key difference is related to the terminology.
一個主要區別與術語有關。
For instance:
例如:
Artboards = Pages (in Axure there are no artboards only pages and you can see only one page at a time)
畫板=頁面(在Axure中,沒有僅畫板的 頁面 ,一次只能看到一頁)
Objects = Widgets (Axure refers to the objects as widgets, just to make us a little bit aware that are more special than the objects that we are use to, and we will see this in a bit)
對象=窗口小部件(Axure將對象稱為窗口小部件 ,只是讓我們稍微意識到它們比我們過去使用的對象更加特殊,我們將在稍后看到這一點)
Another key difference is in the way we create these objects and place them on the page. In Axure, in general, we create new objects by dragging them from the Library pane into the page. This is a little different conceptual model than the one we’ve used before. The Library pane holds some ‘templates’ (sometimes referred to as blueprints) that we can use to create new objects.
另一個主要區別在于我們創建這些對象并將其放置在頁面上的方式。 通常,在Axure中,我們通過將新對象從“ 庫”窗格拖動到頁面中來創建新對象 。 這與我們以前使用的概念模型有些不同。 “ 庫”窗格中包含一些可用于創建新對象的 “模板”(有時稱為藍圖 )。
However, as a quick note, Axure allows us to use the tools conceptual model as well but the type of objects that we can create is more limited.
但是,作為一個簡短的說明,Axure允許我們也使用工具概念模型,但是我們可以創建的對象類型受到限制。
So, why is Axure calling these objects widgets? Simply put, they are a little more advanced. As in the second level example, they have properties that can be adjusted but they can also respond to events.
那么,為什么Axure調用這些對象 控件 ? 簡而言之,它們更加先進。 與第二級示例一樣,它們具有可以調整的屬性 ,但它們也可以響應事件 。
This possibility to respond to events is the key ingredient in creating any kind of interactions (interactivity) in Axure and in many other similar tools which are heavily influenced by Axure.
響應事件的可能性是創建任何類型的交互 (交互性)的關鍵因素 在Axure和許多其他受Axure影響的類似工具中。
To sum up, the conceptual flow looks like this:
概括起來,概念流程如下所示:
Create a new object (widget) by dragging it from the Library pane
通過從“庫”窗格中拖動來創建一個新對象 (小部件)
Change the object (widget) properties
更改對象 (小部件)屬性
Optionally: Respond to the events of the object (widget)
可選:響應對象的事件(小部件)
Axure小部件 (Axure widgets)
Now that you have been introduced to Axure widgets let’s explore them in more depth.
現在,您已經了解了Axure 小部件,讓我們更深入地探索它們。
Within the app, Axure groups these widgets in categories which are inside libraries and they are available within the app in the Library pane. These widgets sometimes are listed multiple times under a slightly different name but with different default settings, for instance the rectangle widget is available as Box 1, Box 2, Box 3, Primary Button with some different initial properties like: fill color, border, corners and so on. In essence they are the same widget but with a setup for a predefined purpose (again, like a template).
在應用程序中,Axure將這些小部件分組在庫內的類別中,并且它們在應用程序的“ 庫”窗格中可用。 這些小部件有時會以略有不同的名稱多次列出,但具有不同的默認設置,例如,矩形小部件可作為Box 1 , Box 2 , Box 3,Primary Button使用,它們具有一些不同的初始屬性,例如:填充顏色,邊框,角等等。 本質上,它們是相同的小部件,但具有用于預定義目的的設置(同樣,類似于模板)。

On Axure documentation these widgets are grouped based on their packed functionality in 2 categories like basic and advanced but, I would group them in 3 categories:
在Axure 文檔中,這些小部件根據其打包功能分為基本和高級兩個類別,但我將它們分為三個類別:
Basic (in this category are shape widgets that are familiar in general with any UI/UX designer and some specific ones used only in some cases)
基本的 (在此類別中是形狀小部件,通常對任何UI / UX設計器都很熟悉,并且某些特定的僅在某些情況下使用)
In this category we have the following widgets:
在此類別中,我們有以下小部件:
- Line 線
- Rectangle 長方形
- Elipse 橢圓形
- Image 圖片
- Placeholder (used usually for wireframing purposes) 占位符(通常用于線框圖)
- Connector (used for diagrams or flows) 連接器(用于圖或流程)
- Hotspot (non visual, used to define an area on the page to be used as a link to another page or to simply trigger and action) 熱點(非視覺,用于定義頁面上的區域以用作到另一個頁面的鏈接或簡單地觸發和操作)
- Snapshot (it embeds a image view of a different page) 快照(它嵌入另一個頁面的圖像視圖)
- Inline frame (it embeds external content inside the page) 內聯框架(將外部內容嵌入頁面內)
Semi-advanced (these offer additional user input in general or are part of the common UI patterns)
半高級 (通常提供其他用戶輸入,或者是常見UI模式的一部分)
- Text field 文本域
- Text area 文字區
- Droplist 刪除清單
- List box 列表框
- Checkbox 選框
- Radio button 單選按鈕
- Tree 樹
- Table 表
- Classic menu (horizontal/vertical) 經典菜單(水平/垂直)
Advanced (these have some advanced functionalities that I’ll touch on a future article)
高級 (這些功能有些高級功能,我將在以后的文章中介紹)
- Dynamic panel 動態面板
- Repeater 直放站
Each of these widgets have a set of common properties and events and specific ones.
這些小部件中的每一個都有一組共同的屬性和事件以及特定的屬性 。
Axure交互模型 (Axure interaction model)
The interaction model is inspired from RAD (Rapid Application Development) tools in general, and one difference is that we don’t write any code.
交互模型通常是從RAD(快速應用程序開發)工具中獲得啟發的,而不同之處在于我們不編寫任何代碼。
In order to make it easier to follow, let me introduce you to some of the terminology:
為了更容易理解,讓我向您介紹一些術語:
Event — it’s a thing that happens at a specific moment and a widget can listen to specific events like: Click or Tap, Mose Down, Mouse Move, Mouse Up
事件 -這是在特定時刻發生的事情,并且小部件可以偵聽特定事件,例如:單擊或輕擊,向下按下,鼠標移動,向上移動
Trigger — this is what initiate the event
觸發 -這是引發事件的原因
Action — represent part of the response to an event
動作 -代表事件響應的一部分
If you don’t fully understand what they are, don’t worry I’ll explain them and their relation down below.
如果您不完全了解它們是什么,請不要擔心,我將在下面解釋它們及其關系。
In order to build (design) our prototype we place inside a page multiple widgets and adjust their properties and/or respond to different events (like the Click or Tap event) using actions. Also a prototype can have one or more pages depending on the needs.
為了構建(設計)原型,我們在頁面中放置多個小部件并調整其屬性和/或使用動作來響應不同的事件(例如Click或Tap事件)。 原型還可以根據需要包含一個或多個頁面。
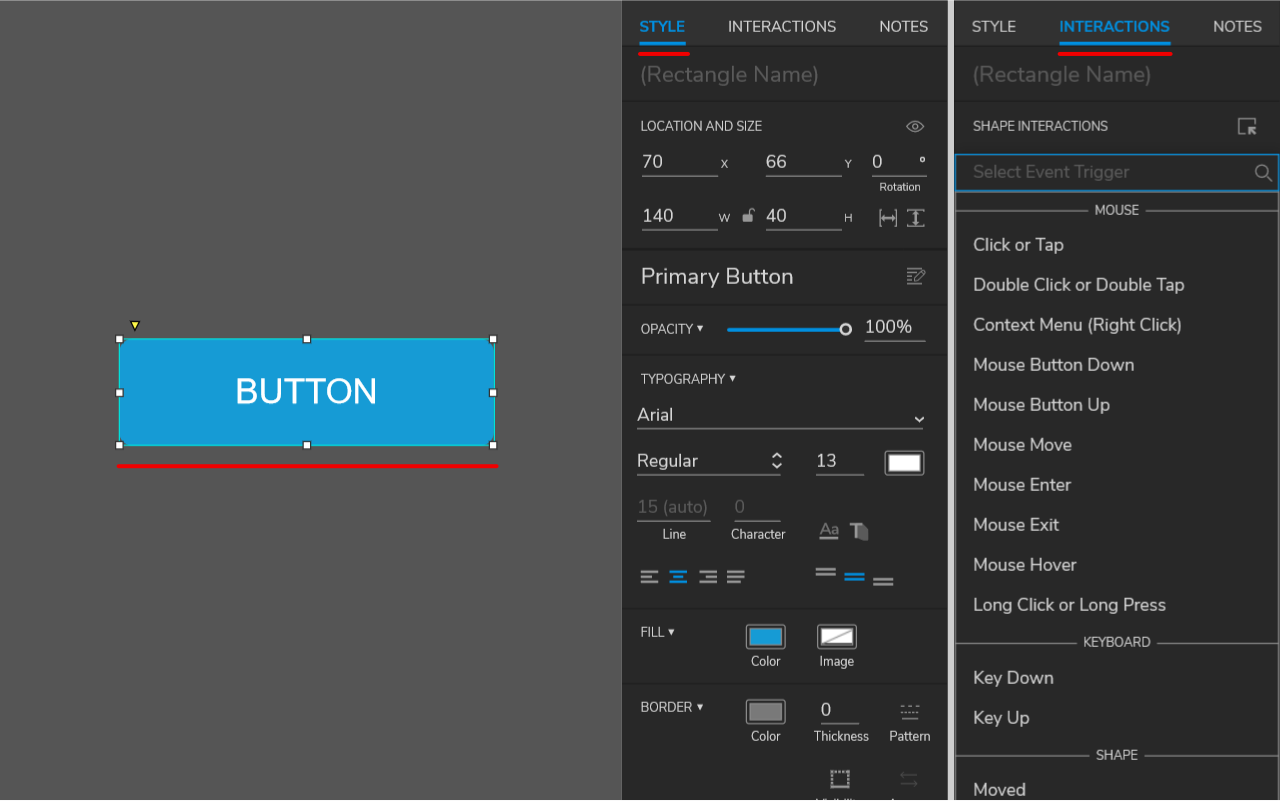
Let’s see how this model works in Axure (see the image below).
讓我們看看該模型如何在Axure中工作(請參見下圖)。

So, each widget can listen to events, the events are triggered by an interaction and the response to an event can be an action or a list of actions.
因此,每個 小部件 都可以 偵聽事件 , 事件是 由 交互 觸發 的 ,對 事件 的 響應 可以是一個 動作 或 動作 列表 。
Now that you’ve seen the relation between these concepts you should have enough understanding about the underlying interaction model.
既然您已經了解了這些概念之間的關系,那么您應該對底層的交互模型有足夠的了解。
This is it for now, in future articles we will learn more about these interactions, how to use them and also we will learn about other concepts like states, conditions and expressions.
現在就是這樣,在以后的文章中,我們將學習更多有關這些交互作用,如何使用它們的知識,并且還將了解其他概念,例如狀態,條件和表達式 。
翻譯自: https://uxdesign.cc/understanding-axure-rp-9-for-ui-ux-designers-part-1-interactions-96ff62b5f657
axure ui設計
本文來自互聯網用戶投稿,該文觀點僅代表作者本人,不代表本站立場。本站僅提供信息存儲空間服務,不擁有所有權,不承擔相關法律責任。 如若轉載,請注明出處:http://www.pswp.cn/news/275365.shtml 繁體地址,請注明出處:http://hk.pswp.cn/news/275365.shtml 英文地址,請注明出處:http://en.pswp.cn/news/275365.shtml
如若內容造成侵權/違法違規/事實不符,請聯系多彩編程網進行投訴反饋email:809451989@qq.com,一經查實,立即刪除!相關文章

如何不讓FCKEditor自動添加P標簽

Greenplum 優化CASE - 對齊JOIN字段類型,使用數組代替字符串,降低字符串處理開銷,列存降低掃描開銷...

杭州 3~5年 前端面經,高頻面試題總結

職稱以考代評學院考計算機嗎,軟考與職稱的關系,軟考是以考代評,不用另外再去評審...

figma下載_我關于Figma文件封面的故事

圖解選擇排序與插入排序

2011年上半年網頁游戲開測數據報告發布
...)
計算機python程序設計導論,程序設計導論:Python計算與應用開發實踐(原書第2版)...

vue-cli 將被 create-vue 替代?初始化基于 vite 的 vue3 項目為何如此簡單?

lynda ux_如何進入UX領域

php字符串學習筆記

This is a Blog Test

可以測試體育跑步的軟件,某高校現跑步打卡神器 能檢測出是在走還是跑

一道很熟悉的前端面試題,你怎么答?

:尋找指定和的整數對_尋找時間:如何增加設計的時間

JavaScript命名空間namespace的實現方法

通過MySQL存儲原理來分析排序和鎖

1600k 打印頭測試軟件,巧修LQ-1600K打印機打印頭

linkedin爬蟲_重新設計Linkedin的指導功能-用戶體驗案例研究
