1. 前言
大家好,我是若川。歡迎關注我的公眾號若川視野源碼共讀活動ruochuan12
想學源碼,極力推薦之前我寫的《學習源碼整體架構系列》jQuery、underscore、lodash、vuex、sentry、axios、redux、koa、vue-devtools、vuex4、koa-compose、vue-next-release、vue-this等十余篇源碼文章。
美國時間 2021 年 10 月 7 日早晨,Vue 團隊等主要貢獻者舉辦了一個
Vue Contributor Days在線會議,蔣豪群[1](知乎胖茶[2],Vue.js 官方團隊成員,Vue-CLI 核心開發),在會上公開了`create-vue`[3],一個全新的腳手架工具。
create-vue使用npm init vue@next一行命令,就能快如閃電般初始化好基于vite的Vue3項目。
本文就是通過調試和大家一起學習這個300余行的源碼。
閱讀本文,你將學到:
1.?學會全新的官方腳手架工具?create-vue?的使用和原理
2.?學會使用?VSCode?直接打開?github?項目
3.?學會使用測試用例調試源碼
4. 學以致用,為公司初始化項目寫腳手架工具。
5.?等等
2. 使用 npm init vue@next 初始化 vue3 項目
create-vue github README[4]上寫著,An easy way to start a Vue project。一種簡單的初始化vue項目的方式。
npm?init?vue@next估計大多數讀者,第一反應是這樣竟然也可以,這么簡單快捷?
忍不住想動手在控制臺輸出命令,我在終端試過,見下圖。
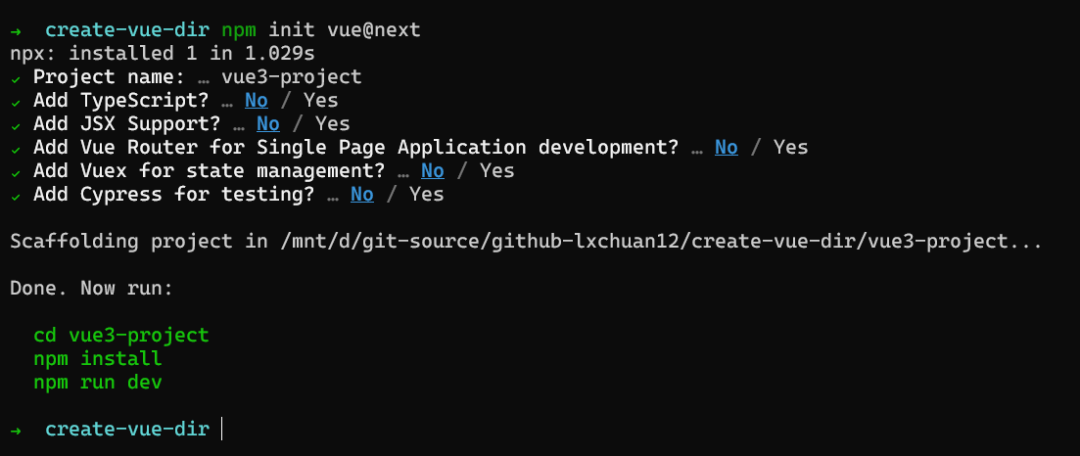
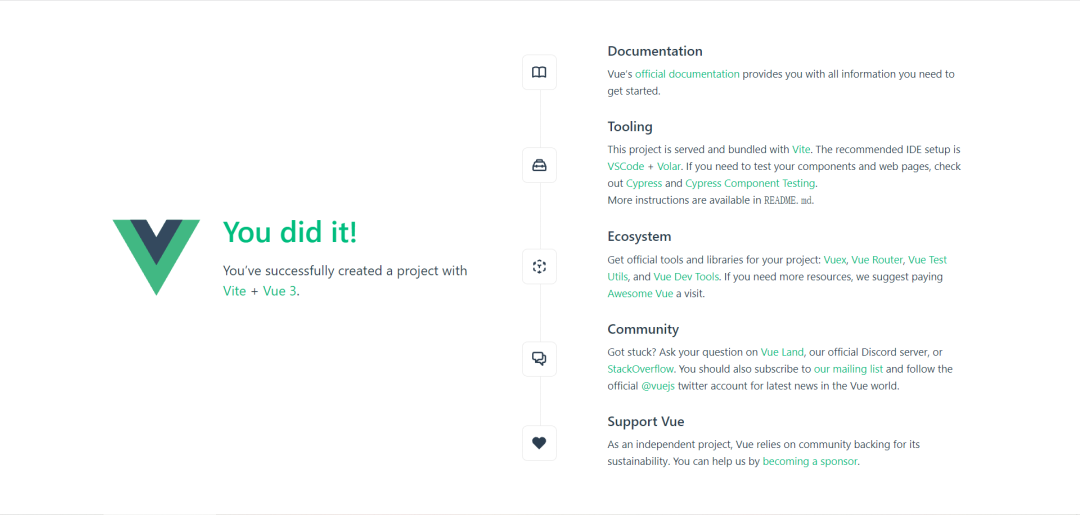
最終cd vue3-project、npm install 、npm run dev打開頁面http://localhost:3000[5]。
2.1 npm init && npx
為啥 npm init 也可以直接初始化一個項目,帶著疑問,我們翻看 npm 文檔。
npm init[6]
npm init 用法:
npm?init?[--force|-f|--yes|-y|--scope]
npm?init?<@scope>?(same?as?`npx?<@scope>/create`)
npm?init?[<@scope>/]<name>?(same?as?`npx?[<@scope>/]create-<name>`)
npm init <initializer> 時轉換成npx命令:
npm init foo -> npx create-foo
npm init @usr/foo -> npx @usr/create-foo
npm init @usr -> npx @usr/create
看完文檔,我們也就理解了:
#?運行
npm?init?vue@next
#?相當于
npx?create-vue@next我們可以在這里create-vue[7],找到一些信息。或者在npm create-vue[8]找到版本等信息。
其中@next是指定版本,通過npm dist-tag ls create-vue命令可以看出,next版本目前對應的是3.0.0-beta.6。
npm?dist-tag?ls?create-vue
-?latest:?3.0.0-beta.6
-?next:?3.0.0-beta.6
發布時 npm publish --tag next 這種寫法指定 tag。默認標簽是latest。
可能有讀者對 npx 不熟悉,這時找到阮一峰老師博客 npx 介紹[9]、nodejs.cn npx[10]
npx 是一個非常強大的命令,從 npm 的 5.2 版本(發布于 2017 年 7 月)開始可用。
簡單說下容易忽略且常用的場景,npx有點類似小程序提出的隨用隨走。
輕松地運行本地命令
node_modules/.bin/vite?-v
#?vite/2.6.5?linux-x64?node-v14.16.0#?等同于
#?package.json?script:?"vite?-v"
#?npm?run?vitenpx?vite?-v
#?vite/2.6.5?linux-x64?node-v14.16.0
使用不同的 Node.js 版本運行代碼某些場景下可以臨時切換 node 版本,有時比 nvm 包管理方便些。
npx?node@14?-v
#?v14.18.0npx?-p?node@14?node?-v?
#?v14.18.0
無需安裝的命令執行
#?啟動本地靜態服務
npx?http-server
#?無需全局安裝
npx?@vue/cli?create?vue-project
#?@vue/cli 相比 npm init vue@next npx create-vue@next 很慢。#?全局安裝
npm?i?-g?@vue/cli
vue?create?vue-project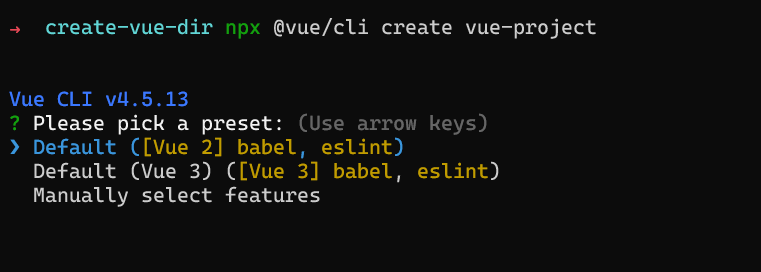
npm init vue@next (npx create-vue@next) 快的原因,主要在于依賴少(能不依賴包就不依賴),源碼行數少,目前index.js只有300余行。
3. 配置環境調試源碼
3.1 克隆 create-vue 項目
本文倉庫地址 create-vue-analysis[11],求個star~
#?可以直接克隆我的倉庫,我的倉庫保留的?create-vue?倉庫的?git?記錄
git?clone?https://github.com/lxchuan12/create-vue-analysis.git
cd?create-vue-analysis/create-vue
npm?i
當然不克隆也可以直接用 VSCode 打開我的倉庫。https://open.vscode.dev/lxchuan12/create-vue-analysis
順帶說下:我是怎么保留 create-vue 倉庫的 git 記錄的。
#?在?github?上新建一個倉庫?`create-vue-analysis`?克隆下來
git?clone?https://github.com/lxchuan12/create-vue-analysis.git
cd?create-vue-analysis
git?subtree?add?--prefix=create-vue?https://github.com/vuejs/create-vue.git?main
#?這樣就把 create-vue 文件夾克隆到自己的 git 倉庫了。且保留的 git 記錄
關于更多 git subtree,可以看Git Subtree 簡明使用手冊[12]
3.2 package.json 分析
//?create-vue/package.json
{"name":?"create-vue","version":?"3.0.0-beta.6","description":?"An?easy?way?to?start?a?Vue?project","type":?"module","bin":?{"create-vue":?"outfile.cjs"},
}bin指定可執行腳本。也就是我們可以使用 npx create-vue 的原因。
outfile.cjs 是打包輸出的JS文件
{"scripts":?{"build":?"esbuild?--bundle?index.js?--format=cjs?--platform=node?--outfile=outfile.cjs","snapshot":?"node?snapshot.js","pretest":?"run-s?build?snapshot","test":?"node?test.js"},
}
執行 npm run test 時,會先執行鉤子函數 pretest。run-s 是 npm-run-all[13] 提供的命令。run-s build snapshot 命令相當于 npm run build && npm run snapshot。
根據腳本提示,我們來看 snapshot.js 文件。
3.3 生成快照 snapshot.js
這個文件主要作用是根據const featureFlags = ['typescript', 'jsx', 'router', 'vuex', 'with-tests'] 組合生成31種加上 default 共計 32種 組合,生成快照在 playground目錄。
因為打包生成的 outfile.cjs 代碼有做一些處理,不方便調試,我們可以修改為index.js便于調試。
//?路徑?create-vue/snapshot.js
const?bin?=?path.resolve(__dirname,?'./outfile.cjs')
//?改成?index.js?便于調試
const?bin?=?path.resolve(__dirname,?'./index.js')我們可以在for和 createProjectWithFeatureFlags 打上斷點。
createProjectWithFeatureFlags其實類似在終端輸入如下執行這樣的命令
node?./index.js?--xxx?--xxx?--forcefunction?createProjectWithFeatureFlags(flags)?{const?projectName?=?flags.join('-')console.log(`Creating?project?${projectName}`)const?{?status?}?=?spawnSync('node',[bin,?projectName,?...flags.map((flag)?=>?`--${flag}`),?'--force'],{cwd:?playgroundDir,stdio:?['pipe',?'pipe',?'inherit']})if?(status?!==?0)?{process.exit(status)}
}//?路徑?create-vue/snapshot.js
for?(const?flags?of?flagCombinations)?{createProjectWithFeatureFlags(flags)
}調試:
VSCode打開項目,VSCode高版本(1.50+)可以在create-vue/package.json=>scripts=>"test": "node test.js"。鼠標懸停在test上會有調試腳本提示,選擇調試腳本。如果對調試不熟悉,可以看我之前的文章koa-compose
調試時,大概率你會遇到:create-vue/index.js 文件中,__dirname 報錯問題。可以按照如下方法解決。在 import 的語句后,添加如下語句,就能愉快的調試了。
//?路徑?create-vue/index.js
//?解決辦法和nodejs?issues
//?https://stackoverflow.com/questions/64383909/dirname-is-not-defined-in-node-14-version
//?https://github.com/nodejs/help/issues/2907import?{?fileURLToPath?}?from?'url';
import?{?dirname?}?from?'path';const?__filename?=?fileURLToPath(import.meta.url);
const?__dirname?=?dirname(__filename);
接著我們調試 index.js 文件,來學習。
4. 調試 index.js 主流程
回顧下上文 npm init vue@next 初始化項目的。

單從初始化項目輸出圖來看。主要是三個步驟。
1.?輸入項目名稱,默認值是?vue-project
2.?詢問一些配置?渲染模板等
3.?完成創建項目,輸出運行提示
async?function?init()?{//?省略放在后文詳細講述
}//?async?函數返回的是Promise?可以用?catch?報錯
init().catch((e)?=>?{console.error(e)
})4.1 解析命令行參數
//?返回運行當前腳本的工作目錄的路徑。
const?cwd?=?process.cwd()
//?possible?options:
//?--default
//?--typescript?/?--ts
//?--jsx
//?--router?/?--vue-router
//?--vuex
//?--with-tests?/?--tests?/?--cypress
//?--force?(for?force?overwriting)
const?argv?=?minimist(process.argv.slice(2),?{alias:?{typescript:?['ts'],'with-tests':?['tests',?'cypress'],router:?['vue-router']},//?all?arguments?are?treated?as?booleansboolean:?true
})minimist[14]
簡單說,這個庫,就是解析命令行參數的。看例子,我們比較容易看懂傳參和解析結果。
$?node?example/parse.js?-a?beep?-b?boop
{?_:?[],?a:?'beep',?b:?'boop'?}$?node?example/parse.js?-x?3?-y?4?-n5?-abc?--beep=boop?foo?bar?baz
{?_:?[?'foo',?'bar',?'baz'?],x:?3,y:?4,n:?5,a:?true,b:?true,c:?true,beep:?'boop'?}
比如
npm?init?vue@next?--vuex?--force4.2 如果設置了 feature flags 跳過 prompts 詢問
這種寫法方便代碼測試等。直接跳過交互式詢問,同時也可以省時間。
//?if?any?of?the?feature?flags?is?set,?we?would?skip?the?feature?prompts//?use?`??`?instead?of?`||`?once?we?drop?Node.js?12?supportconst?isFeatureFlagsUsed?=typeof?(argv.default?||?argv.ts?||?argv.jsx?||?argv.router?||?argv.vuex?||?argv.tests)?==='boolean'//?生成目錄let?targetDir?=?argv._[0]//?默認?vue-projectsconst?defaultProjectName?=?!targetDir???'vue-project'?:?targetDir//?強制重寫文件夾,當同名文件夾存在時const?forceOverwrite?=?argv.force4.3 交互式詢問一些配置
如上文npm init vue@next 初始化的圖示
輸入項目名稱
還有是否刪除已經存在的同名目錄
詢問使用需要 JSX Router vuex cypress 等。
let?result?=?{}try?{//?Prompts://?-?Project?name://???-?whether?to?overwrite?the?existing?directory?or?not?//???-?enter?a?valid?package?name?for?package.json//?-?Project?language:?JavaScript?/?TypeScript//?-?Add?JSX?Support?//?-?Install?Vue?Router?for?SPA?development?//?-?Install?Vuex?for?state?management??(TODO)//?-?Add?Cypress?for?testing?result?=?await?prompts([{name:?'projectName',type:?targetDir???null?:?'text',message:?'Project?name:',initial:?defaultProjectName,onState:?(state)?=>?(targetDir?=?String(state.value).trim()?||?defaultProjectName)},//?省略若干配置{name:?'needsTests',type:?()?=>?(isFeatureFlagsUsed???null?:?'toggle'),message:?'Add?Cypress?for?testing?',initial:?false,active:?'Yes',inactive:?'No'}],{onCancel:?()?=>?{throw?new?Error(red('?')?+?'?Operation?cancelled')}}])}?catch?(cancelled)?{console.log(cancelled.message)//?退出當前進程。process.exit(1)}4.4 初始化詢問用戶給到的參數,同時也會給到默認值
//?`initial`?won't?take?effect?if?the?prompt?type?is?null//?so?we?still?have?to?assign?the?default?values?hereconst?{packageName?=?toValidPackageName(defaultProjectName),shouldOverwrite,needsJsx?=?argv.jsx,needsTypeScript?=?argv.typescript,needsRouter?=?argv.router,needsVuex?=?argv.vuex,needsTests?=?argv.tests}?=?resultconst?root?=?path.join(cwd,?targetDir)//?如果需要強制重寫,清空文件夾if?(shouldOverwrite)?{emptyDir(root)//?如果不存在文件夾,則創建}?else?if?(!fs.existsSync(root))?{fs.mkdirSync(root)}//?腳手架項目目錄console.log(`\nScaffolding?project?in?${root}...`)//?生成?package.json?文件const?pkg?=?{?name:?packageName,?version:?'0.0.0'?}fs.writeFileSync(path.resolve(root,?'package.json'),?JSON.stringify(pkg,?null,?2))4.5 根據模板文件生成初始化項目所需文件
//?todo://?work?around?the?esbuild?issue?that?`import.meta.url`?cannot?be?correctly?transpiled//?when?bundling?for?node?and?the?format?is?cjs//?const?templateRoot?=?new?URL('./template',?import.meta.url).pathnameconst?templateRoot?=?path.resolve(__dirname,?'template')const?render?=?function?render(templateName)?{const?templateDir?=?path.resolve(templateRoot,?templateName)renderTemplate(templateDir,?root)}//?Render?base?templaterender('base')//?添加配置//?Add?configs.if?(needsJsx)?{render('config/jsx')}if?(needsRouter)?{render('config/router')}if?(needsVuex)?{render('config/vuex')}if?(needsTests)?{render('config/cypress')}if?(needsTypeScript)?{render('config/typescript')}4.6 渲染生成代碼模板
//?Render?code?template.//?prettier-ignoreconst?codeTemplate?=(needsTypeScript???'typescript-'?:?'')?+(needsRouter???'router'?:?'default')render(`code/${codeTemplate}`)//?Render?entry?file?(main.js/ts).if?(needsVuex?&&?needsRouter)?{render('entry/vuex-and-router')}?else?if?(needsVuex)?{render('entry/vuex')}?else?if?(needsRouter)?{render('entry/router')}?else?{render('entry/default')}4.7 如果配置了需要 ts
重命名所有的 .js 文件改成 .ts。重命名 jsconfig.json 文件為 tsconfig.json 文件。
jsconfig.json[15] 是VSCode的配置文件,可用于配置跳轉等。
把index.html 文件里的 main.js 重命名為 main.ts。
//?Cleanup.if?(needsTypeScript)?{//?rename?all?`.js`?files?to?`.ts`//?rename?jsconfig.json?to?tsconfig.jsonpreOrderDirectoryTraverse(root,()?=>?{},(filepath)?=>?{if?(filepath.endsWith('.js'))?{fs.renameSync(filepath,?filepath.replace(/\.js$/,?'.ts'))}?else?if?(path.basename(filepath)?===?'jsconfig.json')?{fs.renameSync(filepath,?filepath.replace(/jsconfig\.json$/,?'tsconfig.json'))}})//?Rename?entry?in?`index.html`const?indexHtmlPath?=?path.resolve(root,?'index.html')const?indexHtmlContent?=?fs.readFileSync(indexHtmlPath,?'utf8')fs.writeFileSync(indexHtmlPath,?indexHtmlContent.replace('src/main.js',?'src/main.ts'))}4.8 配置了不需要測試
因為所有的模板都有測試文件,所以不需要測試時,執行刪除 cypress、/__tests__/ 文件夾
if?(!needsTests)?{//?All?templates?assumes?the?need?of?tests.//?If?the?user?doesn't?need?it://?rm?-rf?cypress?**/__tests__/preOrderDirectoryTraverse(root,(dirpath)?=>?{const?dirname?=?path.basename(dirpath)if?(dirname?===?'cypress'?||?dirname?===?'__tests__')?{emptyDir(dirpath)fs.rmdirSync(dirpath)}},()?=>?{})}4.9 根據使用的 npm / yarn / pnpm 生成README.md 文件,給出運行項目的提示
//?Instructions://?Supported?package?managers:?pnpm?>?yarn?>?npm//?Note:?until?<https://github.com/pnpm/pnpm/issues/3505>?is?resolved,//?it?is?not?possible?to?tell?if?the?command?is?called?by?`pnpm?init`.const?packageManager?=?/pnpm/.test(process.env.npm_execpath)??'pnpm':?/yarn/.test(process.env.npm_execpath)??'yarn':?'npm'//?README?generationfs.writeFileSync(path.resolve(root,?'README.md'),generateReadme({projectName:?result.projectName?||?defaultProjectName,packageManager,needsTypeScript,needsTests}))console.log(`\nDone.?Now?run:\n`)if?(root?!==?cwd)?{console.log(`??${bold(green(`cd?${path.relative(cwd,?root)}`))}`)}console.log(`??${bold(green(getCommand(packageManager,?'install')))}`)console.log(`??${bold(green(getCommand(packageManager,?'dev')))}`)console.log()5. npm run test => node test.js 測試
//?create-vue/test.js
import?fs?from?'fs'
import?path?from?'path'
import?{?fileURLToPath?}?from?'url'import?{?spawnSync?}?from?'child_process'const?__dirname?=?path.dirname(fileURLToPath(import.meta.url))
const?playgroundDir?=?path.resolve(__dirname,?'./playground/')for?(const?projectName?of?fs.readdirSync(playgroundDir))?{if?(projectName.endsWith('with-tests'))?{console.log(`Running?unit?tests?in?${projectName}`)const?unitTestResult?=?spawnSync('pnpm',?['test:unit:ci'],?{cwd:?path.resolve(playgroundDir,?projectName),stdio:?'inherit',shell:?true})if?(unitTestResult.status?!==?0)?{throw?new?Error(`Unit?tests?failed?in?${projectName}`)}console.log(`Running?e2e?tests?in?${projectName}`)const?e2eTestResult?=?spawnSync('pnpm',?['test:e2e:ci'],?{cwd:?path.resolve(playgroundDir,?projectName),stdio:?'inherit',shell:?true})if?(e2eTestResult.status?!==?0)?{throw?new?Error(`E2E?tests?failed?in?${projectName}`)}}
}
主要對生成快照時生成的在 playground 32個文件夾,進行如下測試。
pnpm?test:unit:cipnpm?test:e2e:ci6. 總結
我們使用了快如閃電般的npm init vue@next,學習npx命令了。學會了其原理。
npm?init?vue@next?=>?npx?create-vue@next快如閃電的原因在于依賴的很少。很多都是自己來實現。如:Vue-CLI中 vue create vue-project 命令是用官方的npm包validate-npm-package-name[16],刪除文件夾一般都是使用 rimraf[17]。而 create-vue 是自己實現emptyDir和isValidPackageName。
非常建議讀者朋友按照文中方法使用VSCode調試 create-vue 源碼。源碼中還有很多細節文中由于篇幅有限,未全面展開講述。
學完本文,可以為自己或者公司創建類似初始化腳手架。
目前版本是3.0.0-beta.6。我們持續關注學習它。除了create-vue 之外,我們還可以看看create-vite[18]、create-umi[19] 的源碼實現。
最后歡迎加我微信 ruochuan12源碼共讀 活動,大家一起學習源碼,共同進步。
7. 參考資料
發現 create-vue 時打算寫文章加入到源碼共讀比我先寫完文章。
@upupming ?vue-cli 將被 create-vue 替代?初始化基于 vite 的 vue3 項目為何如此簡單?
參考資料
[1]
點擊閱讀原文查看更多
最近組建了一個湖南人的前端交流群,如果你是湖南人可以加我微信?ruochuan12?私信 湖南?拉你進群。
推薦閱讀
1個月,200+人,一起讀了4周源碼
我歷時3年才寫了10余篇源碼文章,但收獲了100w+閱讀
老姚淺談:怎么學JavaScript?
我在阿里招前端,該怎么幫你(可進面試群)

·················?若川簡介?·················
你好,我是若川,畢業于江西高校。現在是一名前端開發“工程師”。寫有《學習源碼整體架構系列
從2014年起,每年都會寫一篇年度總結,已經寫了7篇,點擊查看年度總結。
同時,最近組織了源碼共讀活動

識別上方二維碼加我微信、拉你進源碼共讀群
今日話題
略。歡迎分享、收藏、點贊、在看我的公眾號文章~

:3.3 使用Unicode進行文字處理)


![BZOJ4825: [Hnoi2017]單旋(Splay)](http://pic.xiahunao.cn/BZOJ4825: [Hnoi2017]單旋(Splay))


