1. 前言
大家好,我是若川。最近組織了源碼共讀活動,感興趣的可以點此加我微信ruochuan12 參與,每周大家一起學習200行左右的源碼,共同進步。已進行三個月了,很多小伙伴表示收獲頗豐。
想學源碼,極力推薦之前我寫的《學習源碼整體架構系列》 包含20余篇源碼文章。
本文倉庫 element-analysis,求個star^_^[1]
最近組織了源碼共讀活動,大家一起學習源碼,每周學習200行左右的源碼,已進行到13期。于是搜尋各種值得我們學習,且代碼行數不多的源碼。
其中 element-ui[2]新建組件的源碼[3] 僅 100多行,非常值得我們學習。
可以通過 github1s.com 在線 VSCode 打開:https://github1s.com/ElemeFE/element/blob/dev/build/bin/new.js
閱讀本文,你將學到:
1.?學會調試學習源碼
2.?element-ui?如何初始化新的組件
3.?可以學以致用應用到自己開發的項目中,比如新增頁面等
4.?等等
2. 環境準備
2.1 克隆
#?推薦克隆我的項目,保證與文章同步
git?clone?https://github.com/lxchuan12/element-analysis.git
#?npm?i?-g?yarn
cd?element-analysis/element?&&?npm?run?dev#?或者克隆官方項目
git?clone?https://github.com/ElemeFE/element.git
#?npm?i?-g?yarn
cd?element?&&?npm?run?dev
2.2 看開源項目的 README 和貢獻文檔等
看開源項目,我們一般先看README,README.md[4] 中一般有貢獻指南[5]。
開發環境搭建
首先你需要 Node.js 4+,yarn 和 npm 3+。注意:我們使用 yarn 進行依賴版本的鎖定,所以請不要使用
npm install安裝依賴。
git?clone?git@github.com:ElemeFE/element.git
npm?run?dev#?open?http://localhost:8085
package.json
{"script":?{"bootstrap":?"yarn?||?npm?i","build:file":?"node?build/bin/iconInit.js?&?node?build/bin/build-entry.js?&?node?build/bin/i18n.js?&?node?build/bin/version.js","dev":?"npm?run?bootstrap?&&?npm?run?build:file?&&?cross-env?NODE_ENV=development?webpack-dev-server?--config?build/webpack.demo.js?&?node?build/bin/template.js",},
}
在 npm run dev 時是先執行了 npm run bootstrap => yarn || npm i 命令,安裝好了依賴。
npm run build:file 應該留著下一篇文章講述。
組件開發規范
通過
make new創建組件目錄結構,包含測試代碼、入口文件、文檔 如果包含父子組件,需要更改目錄結構,參考Button組件內如果依賴了其他組件,需要在當前組件內引入,參考Select
make 命令的配置對應根目錄 Makefile。
#?element/Makefile
new:node?build/bin/new.js?$(filter-out?$@,$(MAKECMDGOALS))
通過查看 Makefile 文件我們知道了make new命令對應的是:node build/bin.new.js。
接著我們來調試源碼。
2.3 調試源碼
在最新版的 VSCode 中,auto attach 功能,默認支持智能調試,如果發現不支持,可以通過快捷鍵 ctrl + shift + p 查看是否啟用。
ctrl + 快捷鍵打開終端。輸入如下命令,即可調試build/bin/new.js`。
make?new?ruochuan?若川組件
#?Ubuntu?和?Mac?支持?make?命令
#?不支持可以用?node
node?build/bin/new.js?ruochuan?若川組件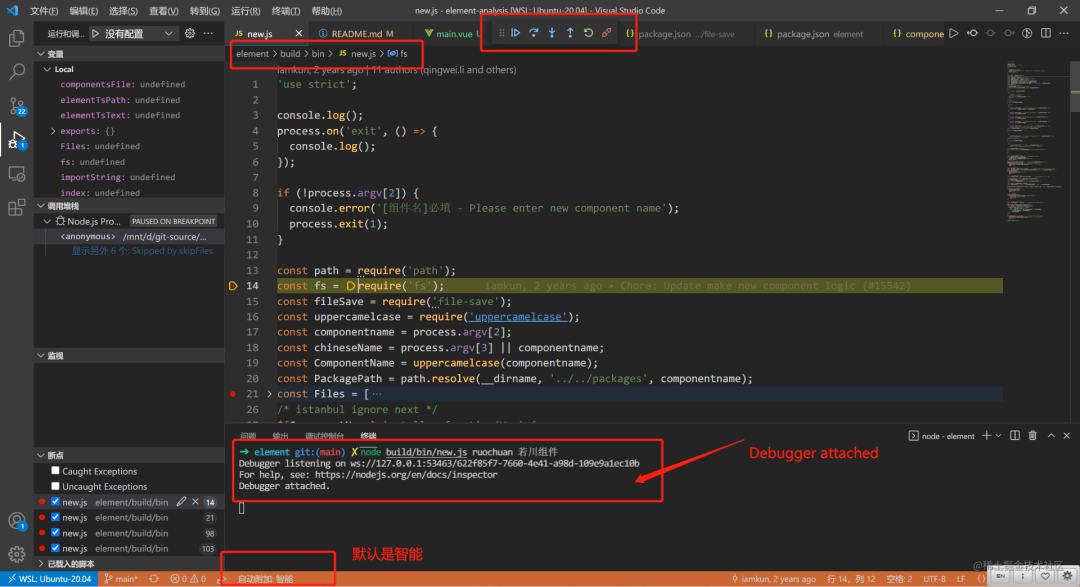
更多調試細節可以看我的這篇文章:新手向:前端程序員必學基本技能——調試JS代碼
接著我們按調試來看主流程。
3. 主流程
我看完 build/bin/new.js 源碼畫了一張流程圖。畢竟俗話說得好,一圖勝千言。

同時執行完命令后也新增和修改了若干文件,git diff 如下圖所示。
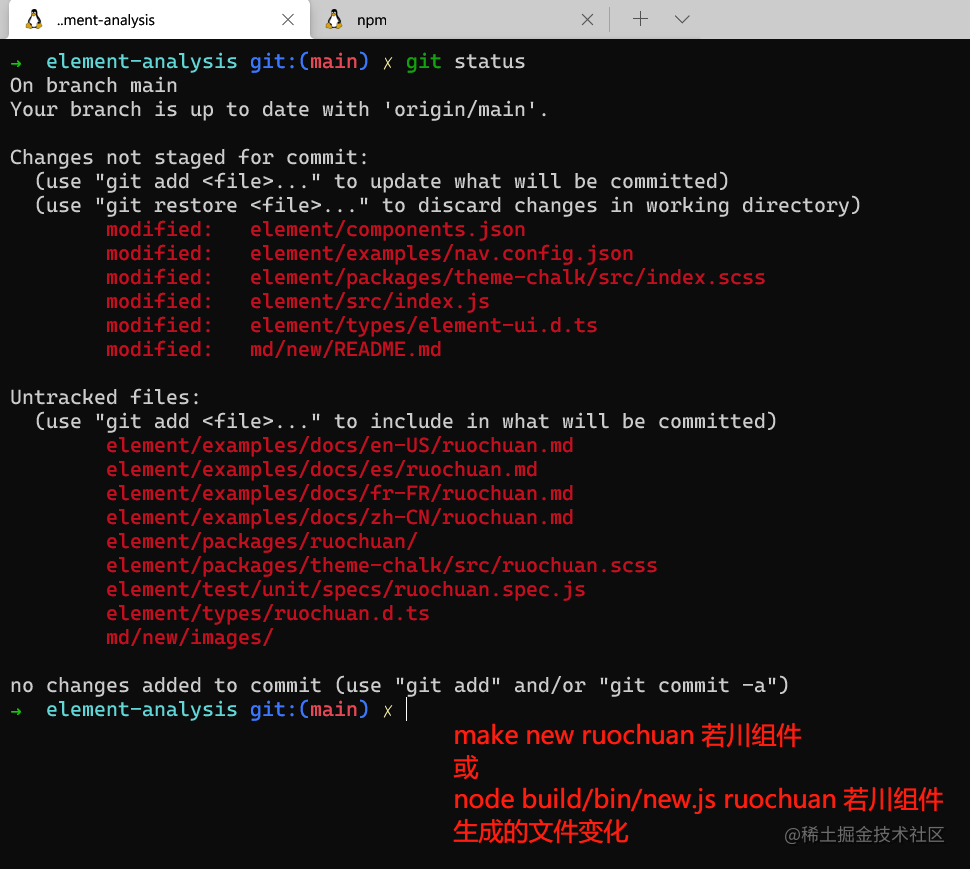
接著我們來看 build/bin/new.js 文件。
3.1 文件開頭判斷
'use?strict';console.log();
process.on('exit',?()?=>?{console.log();
});//?第一個參數沒傳遞報錯,退出進程
if?(!process.argv[2])?{console.error('[組件名]必填?-?Please?enter?new?component?name');process.exit(1);
}
關于 process 對象可以查看 阮一峰老師 process 對象[6]
process.argv屬性返回一個數組,由命令行執行腳本時的各個參數組成。它的第一個成員總是node,第二個成員是腳本文件名,其余成員是腳本文件的參數。
接著我們來看,引用的依賴等。
3.2 引用依賴等
//?路徑模塊
const?path?=?require('path');
//?文件模塊
const?fs?=?require('fs');
//?保存文件
const?fileSave?=?require('file-save');
//?轉駝峰
const?uppercamelcase?=?require('uppercamelcase');
//?第一個參數?組件名
const?componentname?=?process.argv[2];
//?第二個參數?組件中文名
const?chineseName?=?process.argv[3]?||?componentname;
//?轉駝峰
const?ComponentName?=?uppercamelcase(componentname);
//?package?路徑
const?PackagePath?=?path.resolve(__dirname,?'../../packages',?componentname);
//?const?Files?=?[];
其中 file-save[7] 依賴,顧名思義,且非常關鍵。我們可以在 node_module/file-save 查看一些信息。也可以在 https://npmjs.com 搜索其信息。
接著,我們來看文件模板。定義了若干文件模板,方便寫入到項目中。
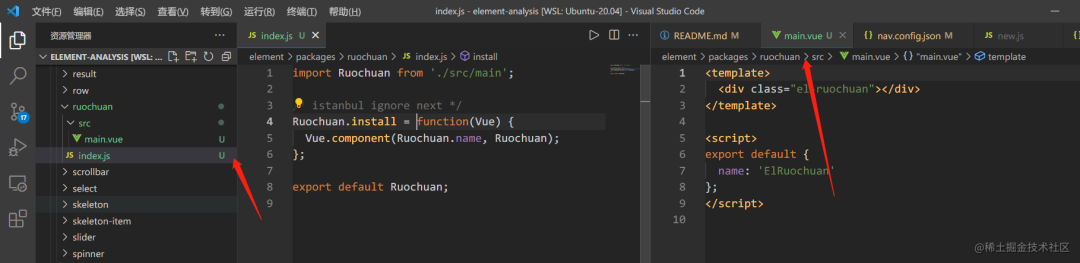
3.3 文件模板 Files
const?Files?=?[{filename:?'index.js',content:?`import?${ComponentName}?from?'./src/main';/*?istanbul?ignore?next?*/
${ComponentName}.install?=?function(Vue)?{Vue.component(${ComponentName}.name,?${ComponentName});
};export?default?${ComponentName};`},{filename:?'src/main.vue',content:?`<template><div?class="el-${componentname}"></div>
</template><script>
export?default?{name:?'El${ComponentName}'
};
</script>`},
//???省略其他
];
接著我們繼續看添加對應的路徑到組件 json 配置中。
3.4 把 componentname 添加到 components.json
//?添加到?components.json
const?componentsFile?=?require('../../components.json');
if?(componentsFile[componentname])?{console.error(`${componentname}?已存在.`);process.exit(1);
}
componentsFile[componentname]?=?`./packages/${componentname}/index.js`;
fileSave(path.join(__dirname,?'../../components.json')).write(JSON.stringify(componentsFile,?null,?'??'),?'utf8').end('\n');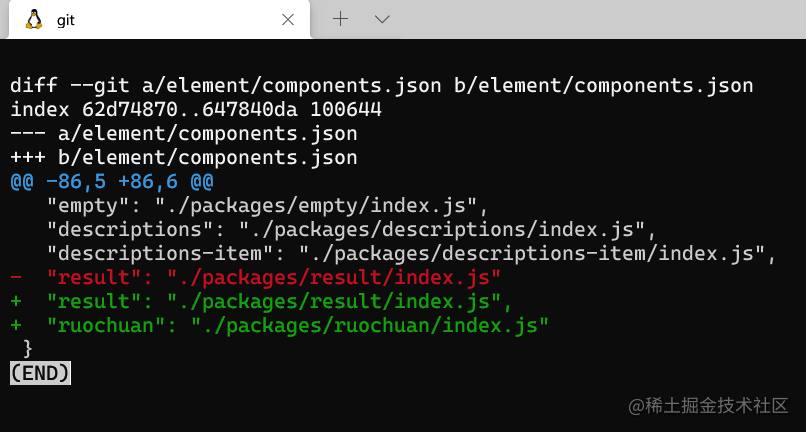
3.5 把 componentname.scss 添加到 index.scss
//?添加到?index.scss
const?sassPath?=?path.join(__dirname,?'../../packages/theme-chalk/src/index.scss');
const?sassImportText?=?`${fs.readFileSync(sassPath)}@import?"./${componentname}.scss";`;
fileSave(sassPath).write(sassImportText,?'utf8').end('\n');
3.6 把 componentname.d.ts 添加到 element-ui.d.ts
//?添加到?element-ui.d.ts
const?elementTsPath?=?path.join(__dirname,?'../../types/element-ui.d.ts');let?elementTsText?=?`${fs.readFileSync(elementTsPath)}
/**?${ComponentName}?Component?*/
export?class?${ComponentName}?extends?El${ComponentName}?{}`;const?index?=?elementTsText.indexOf('export')?-?1;
const?importString?=?`import?{?El${ComponentName}?}?from?'./${componentname}'`;elementTsText?=?elementTsText.slice(0,?index)?+?importString?+?'\n'?+?elementTsText.slice(index);fileSave(elementTsPath).write(elementTsText,?'utf8').end('\n');
3.7 創建 package
//?const?PackagePath?=?path.resolve(__dirname,?'../../packages',?componentname);
//?創建?package
Files.forEach(file?=>?{fileSave(path.join(PackagePath,?file.filename)).write(file.content,?'utf8').end('\n');
});
3.8 把新增的組件添加到 nav.config.json
const?navConfigFile?=?require('../../examples/nav.config.json');Object.keys(navConfigFile).forEach(lang?=>?{let?groups?=?navConfigFile[lang][4].groups;groups[groups.length?-?1].list.push({path:?`/${componentname}`,title:?lang?===?'zh-CN'?&&?componentname?!==?chineseName??`${ComponentName}?${chineseName}`:?ComponentName});
});fileSave(path.join(__dirname,?'../../examples/nav.config.json')).write(JSON.stringify(navConfigFile,?null,?'??'),?'utf8').end('\n');console.log('DONE!');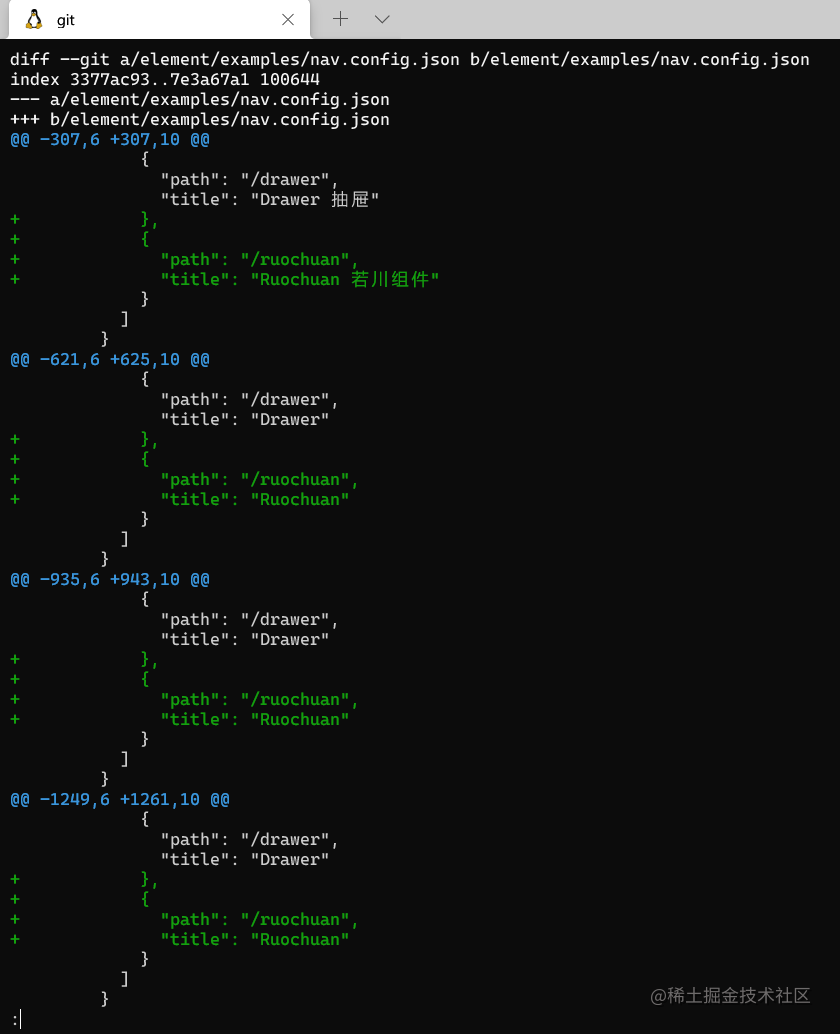
nav.config.json 的修改,新增的組件顯示在導航這里。其中有四次修改是對應四種語言。

4. 總結
再次放出開頭的流程圖。
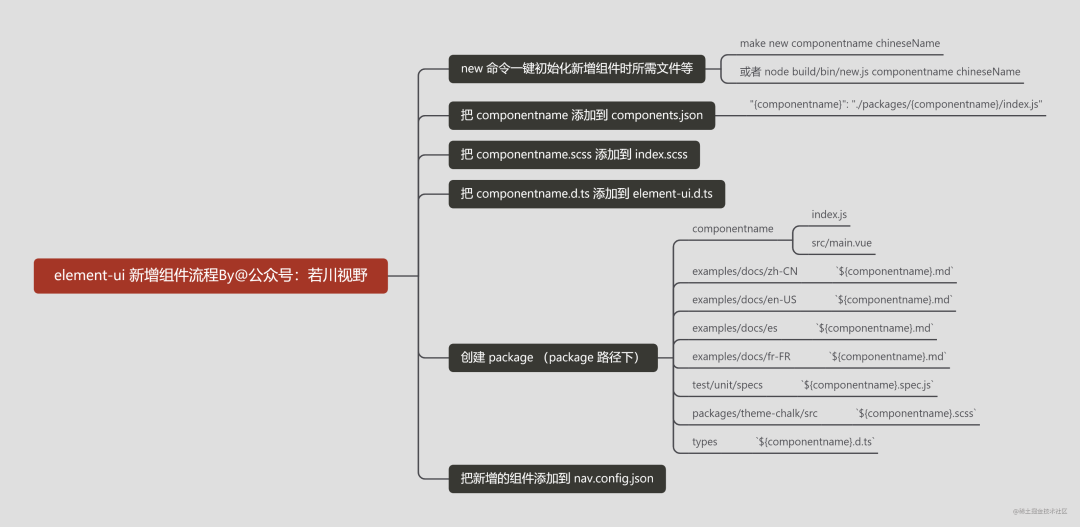
通過看 element-ui[8]新建組件的源碼[9] 流程,我們學到了 file-save[10] 這么方便的寫入文件的庫等。
同時給我們啟發:公司項目新建頁面時,或者組件庫新增組件時,是不是可以類似做到的,一條命令省去一些繁雜重復的操作。
建議讀者克隆我的倉庫[11]動手實踐調試源碼學習。
后續也可以查看 file-save[12] 源碼實現等。
最后可以持續關注我@若川。歡迎加我微信 ruochuan12 交流,參與 源碼共讀 活動,大家一起學習源碼,共同進步。
參考資料
[1]
本文倉庫 element-analysis,求個star^_^: https://github.com/lxchuan12/element-analysis.git
[2]更多點擊閱讀原文查看
最近組建了一個湖南人的前端交流群,如果你是湖南人可以加我微信?ruochuan12?私信 湖南 拉你進群。
推薦閱讀
1個月,200+人,一起讀了4周源碼
我歷時3年才寫了10余篇源碼文章,但收獲了100w+閱讀
老姚淺談:怎么學JavaScript?
我在阿里招前端,該怎么幫你(可進面試群)

·················?若川簡介?·················
你好,我是若川,畢業于江西高校。現在是一名前端開發“工程師”。寫有《學習源碼整體架構系列》10余篇,在知乎、掘金收獲超百萬閱讀。
從2014年起,每年都會寫一篇年度總結,已經寫了7篇,點擊查看年度總結。
同時,最近組織了源碼共讀活動,幫助1000+前端人學會看源碼。公眾號愿景:幫助5年內前端人走向前列。

識別上方二維碼加我微信、拉你進源碼共讀群
今日話題
略。分享、收藏、點贊、在看我的文章就是對我最大的支持~

)


--JavaScript中的原型和類)


