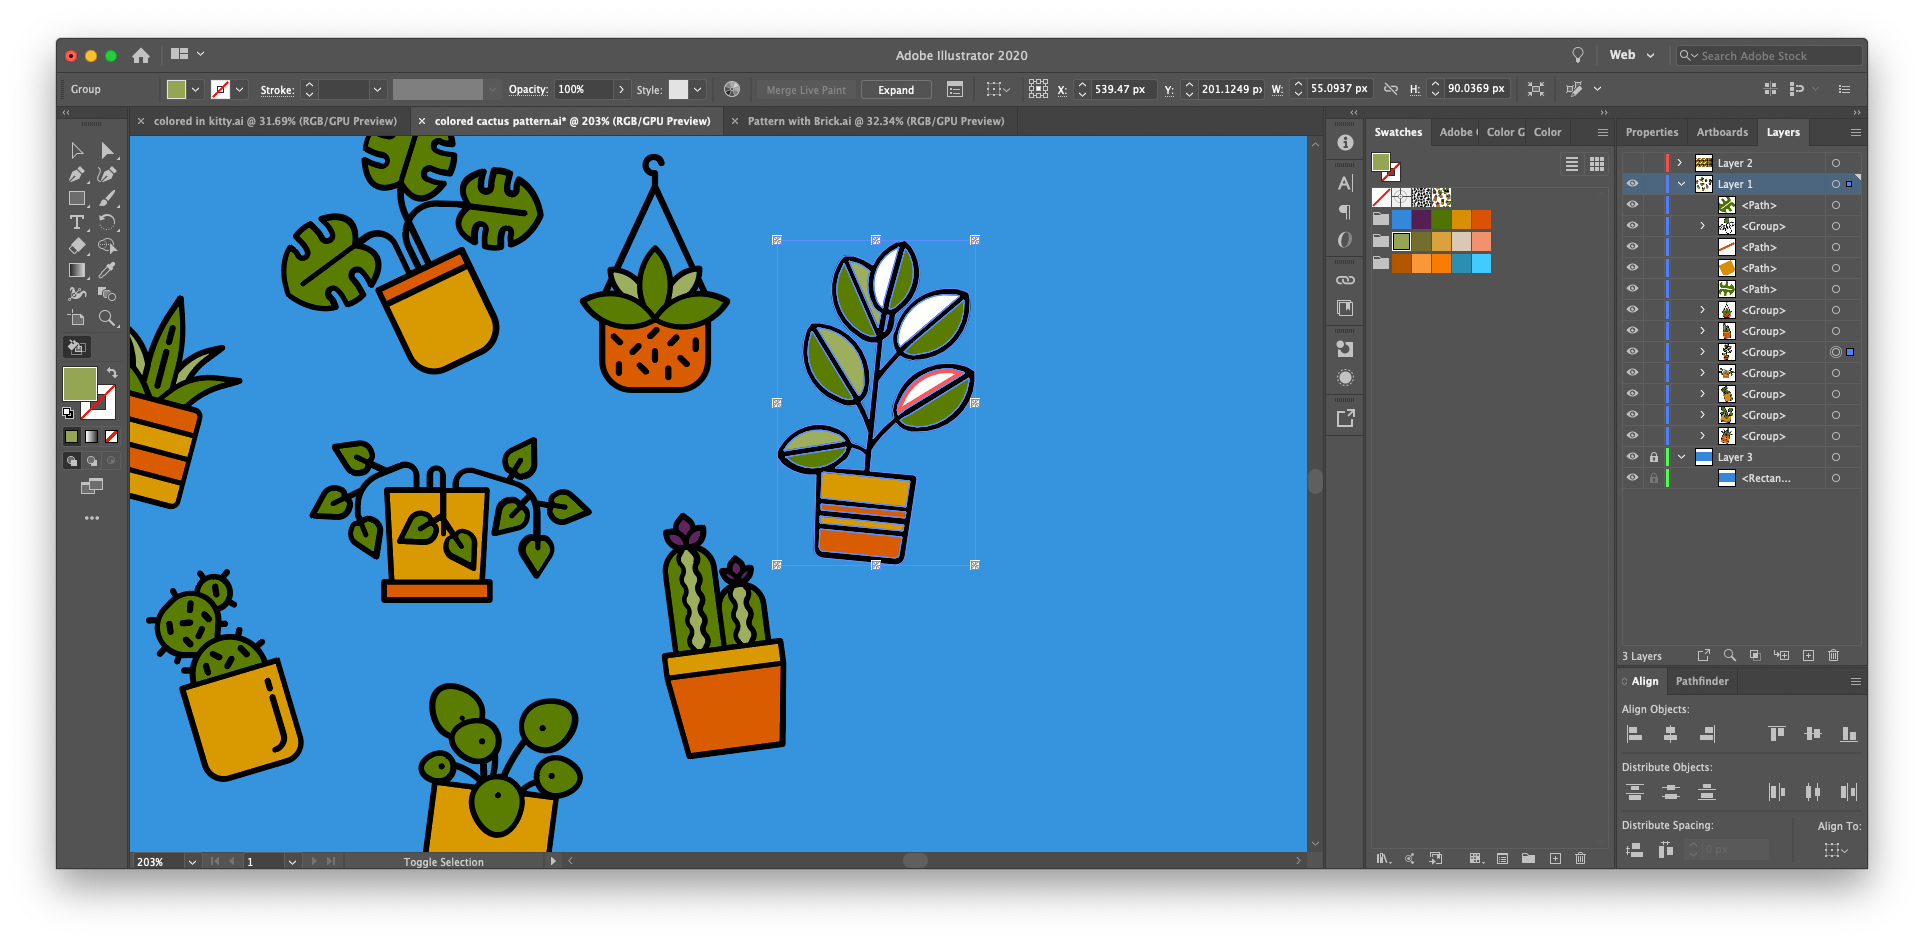
桌面圖標擺放圖案
Level up your video calls with a custom backdrop created using Noun Project icons.
使用使用Noun Project圖標創建的自定義背景來升級視頻通話。
The only thing more visually pleasing than a well-designed icon is a neat, eye-catching pattern made with dozens of them. You can level up your Zoom backgrounds, social media cover photos and more by building your own repeating pattern with your favorite icons.
唯一比一個精心設計的圖標更具視覺吸引力的是,由數十個圖標組成的整潔,醒目的圖案。 您可以通過使用自己喜歡的圖標構建自己的重復圖案來升級Zoom背景,社交媒體封面照片等。
Drawing from Noun Project’s extensive library, you can use Adobe Illustrator or a free online pattern-making tool like Patterninja to build your own.
從Noun Project的廣泛庫中提取內容,您可以使用Adobe Illustrator或免費的在線模式制作工具(例如Patterninja)來構建自己的工具。
Let’s get started!
讓我們開始吧!
使用Noun Project附加組件在Illustrator CC中創建重復圖案 (Creating a repeating pattern in Illustrator CC with the Noun Project Add-On)
The Noun Project Adobe Add-On is your new best friend for bringing Noun Project’s vast library of over 3 million icons right into your workflow. Just like our Mac App, this extension allows you to search within our boundless database and instantly drag and drop icons right onto your artboard.
Noun Project Adob??e附加組件是您最好的新朋友,它將Noun Project擁有超過300萬個圖標的龐大庫帶入您的工作流程。 就像我們的Mac App一樣 ,此擴展程序可讓您在無限的數據庫中進行搜索,并將圖標立即拖放到畫板上。
This extension comes with 100 free starter icons, but a NounPro account will allow you to search and instantly download any icon you want, royalty-free, and enjoy the additional options to customize color, size, rotation and background shape instantly.
該擴展程序附帶100個免費的啟動器圖標,但是NounPro帳戶將使您可以搜索并立即下載所需的任何圖標,并且無需支付使用費,還可以享受其他選項來立即自定義顏色,大小,旋轉度和背景形狀。
Download the Adobe Add-On, open Illustrator and click “Create New” to make a new document. Illustrator comes with several templates for web or print — in this example, let’s just click their “Web-Large” template that’s 1920 px wide by 1080 px tall, a common aspect ratio for web pages, YouTube videos, and more. Make sure the document Color Mode is in RGB for web, and click “Create.”
下載Adobe Add-On ,打開Illustrator,然后單擊“新建”以創建新文檔。 Illustrator帶有多個用于Web或打印的模板-在此示例中,我們只需單擊其“ Web-Large”模板,該模板的寬為1920像素,高為1080像素,是網頁,YouTube視頻等的常見寬高比。 確保文檔“色彩模式”在RGB中用于Web,然后單擊“創建”。
Download the Adobe Add-On, open Illustrator and click “Create New” to make a new document. Illustrator comes with several templates for web or print — in this example, let’s just click their “Web-Large” template that’s 1920 px wide by 1080 px tall, a common aspect ratio for web pages, YouTube videos, and more. Make sure the document Color Mode is in RGB for web, and click “Create.” Note: Other common dimensions you might want to try include a Twitter cover photo (1500 px wide by 500 px tall) or a Facebook cover photo (820 px wide by 360 px tall). If you’d like to print your pattern, just be sure to pick the common “Letter” size and make sure the Color Mode is on CMYK.)
下載Adobe Add-On ,打開Illustrator,然后單擊“新建”以創建新文檔。 Illustrator帶有多個用于Web或打印的模板-在此示例中,我們只需單擊其“ Web-Large”模板,該模板的寬為1920像素,高為1080像素,是網頁,YouTube視頻等的常見寬高比。 確保文檔“色彩模式”在RGB中用于Web,然后單擊“創建”。 注意: 您可能想嘗試的其他常見尺寸包括Twitter封面照片(寬1500像素,高500像素)或Facebook封面照片(寬820像素,高360像素)。 如果要打印圖案,請確保選擇常用的“ Letter”尺寸,并確保“ Color Mode”處于CMYK上。)
Find the Noun Project Extension under Window > Extensions > Noun Project.
在窗口>擴展>名詞項目下找到名詞項目擴展。
If you’re a NounPro subscriber, sign in to your account to unlock your unlimited, royalty-free icon downloads and customization options.
如果您是NounPro訂戶,請登錄您的帳戶以解鎖無限的,免版稅的圖標下載和自定義選項。
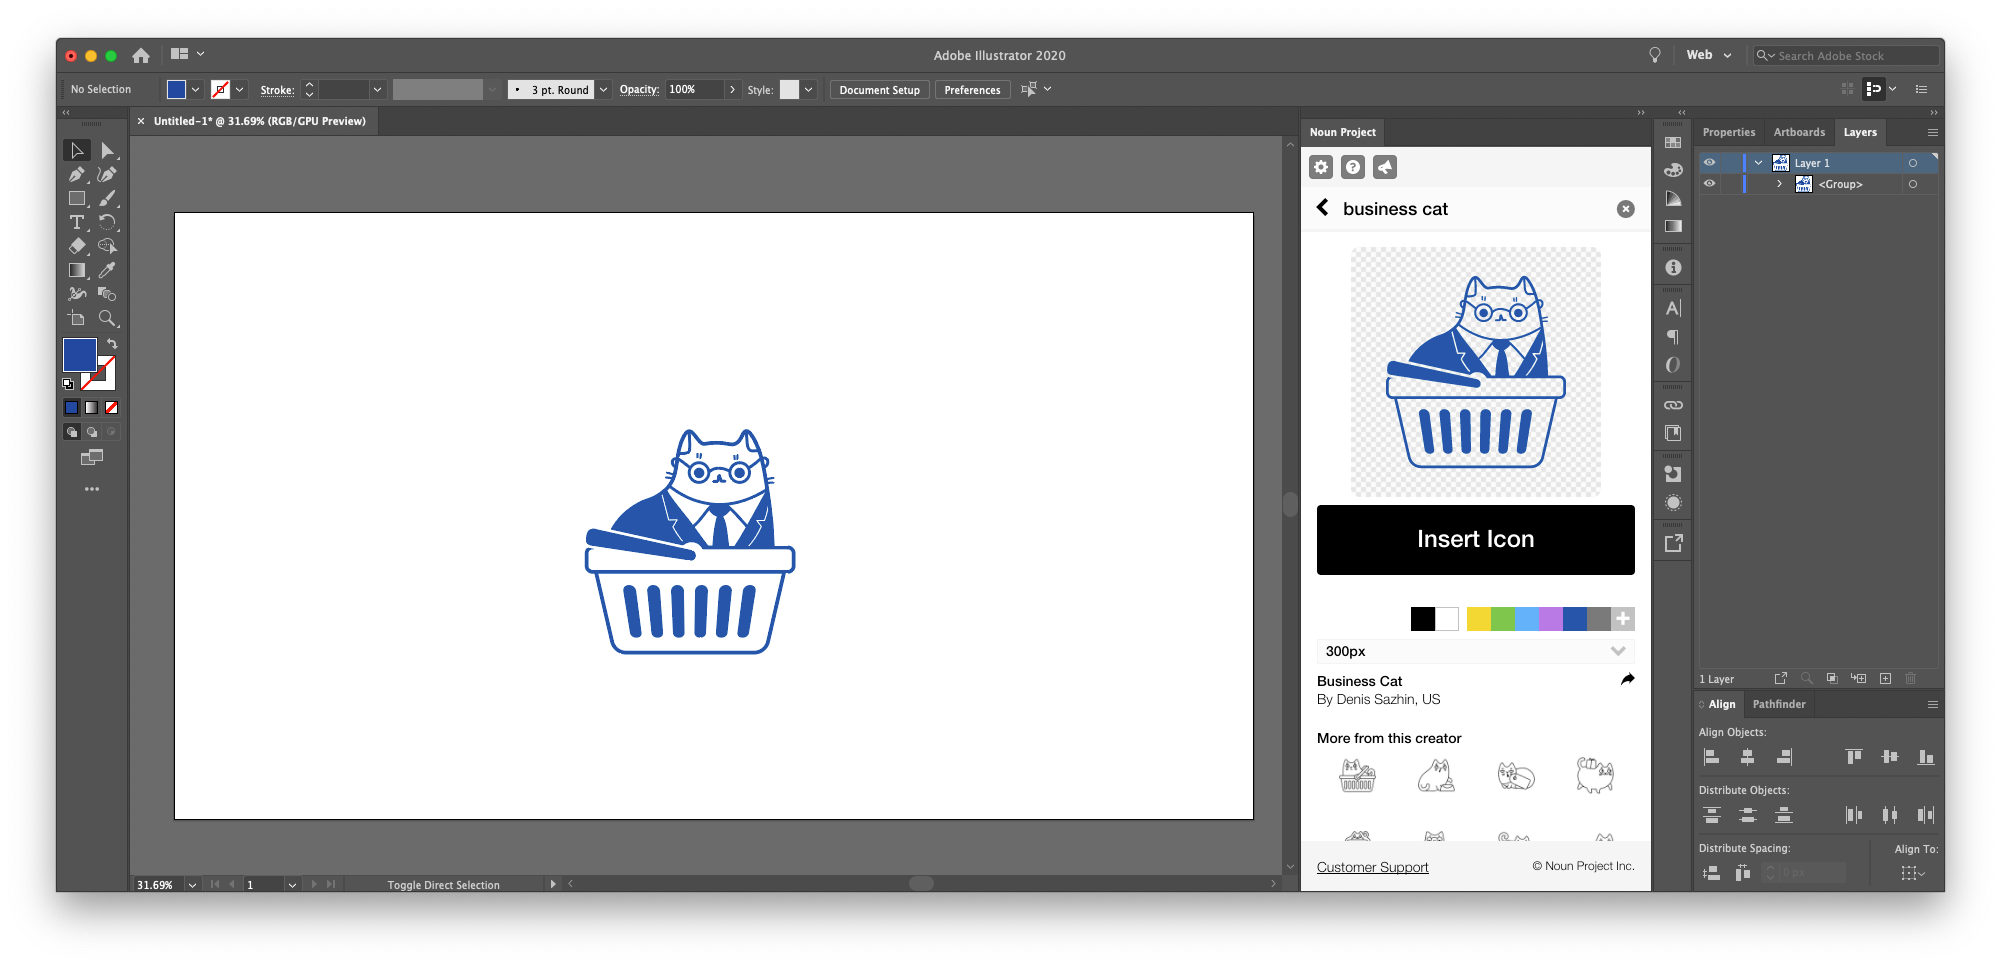
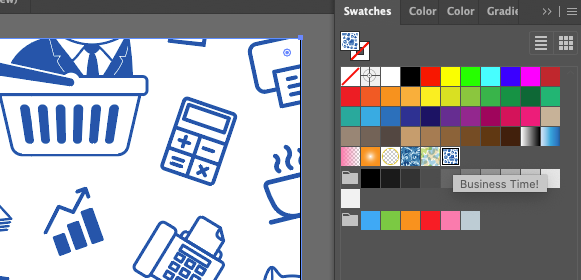
Search for your an icon of your choice and click “Enter”. In this example, I’ve searched for “Business Cat” by Denis Sazhin. Hovering over an icon, click the black “download” arrow in the upper-right to instantly insert it onto the canvas, or you can click the icon to reveal customization options.
搜索您選擇的圖標,然后單擊“ Enter”。 在此示例中,我搜索了Denis Sazhin的“商務貓” 。 將鼠標懸停在圖標上,單擊右上角的黑色“下載”箭頭將其立即插入畫布,或者單擊圖標以顯示自定義選項。
- If desired, you can select a color from the bar of options or click the gray “+” to hand-select your own or enter a HEX value. Once you’ve selected a color, all new icons you search will appear in that color by default until you revert to black. 如果需要,您可以從選項欄中選擇一種顏色,或單擊灰色的“ +”以手動選擇您自己的顏色或輸入一個十六進制值。 選擇顏色后,默認情況下,搜索到的所有新圖標都會以該顏色顯示,直到您恢復為黑色為止。
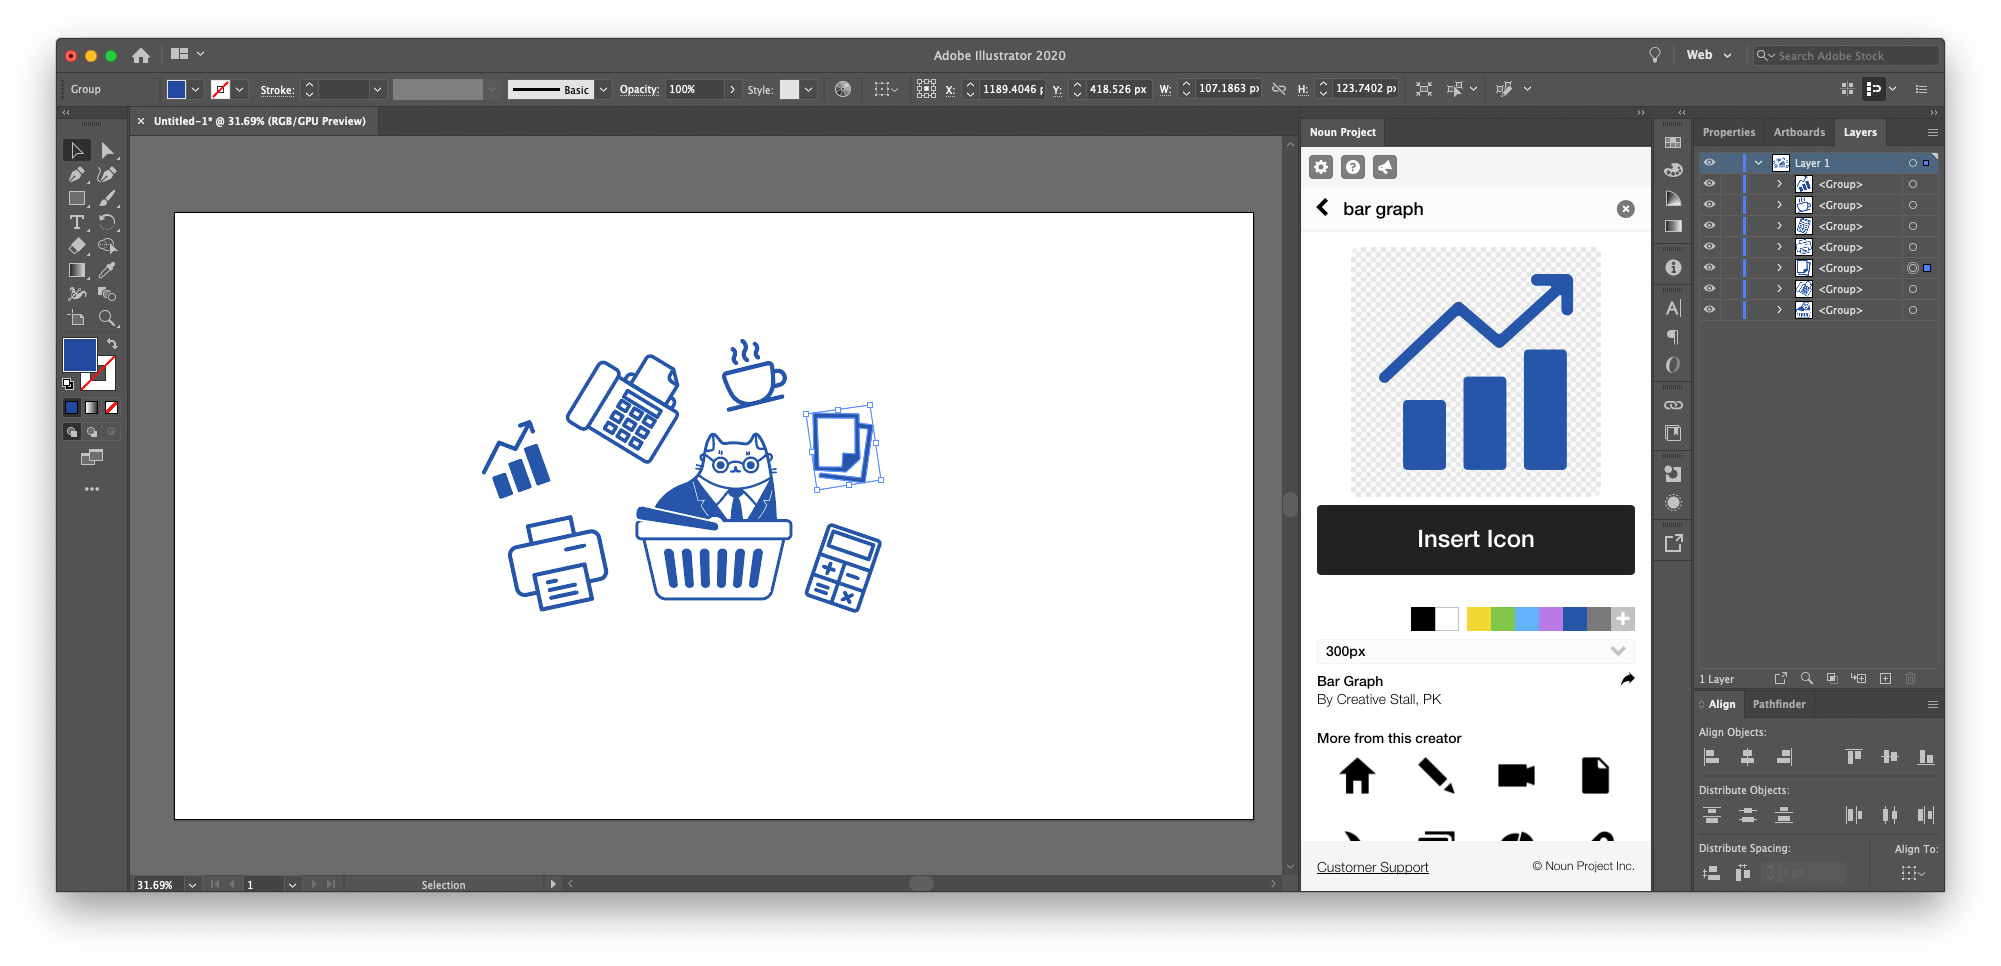
You can insert as many additional icons onto your artboard as you want. Here, I’m going to keep my “corporate chic” going by inserting papers, a printer, a telephone, a coffee mug, and a calculator.
您可以根據需要在畫板上插入盡可能多的其他圖標。 在這里,我將通過插入紙張 , 打印機 , 電話 , 咖啡杯和計算器來保持“公司時尚”。
Using the selection tool “V” (the black cursor in your tool bar), click and drag your icons into new positions. You can also scale them up and down by grabbing a corner of their bounding box and holding “Shift” while you click and drag to ensure proportional resizing. Hovering your cursor just beyond the bounding box corners, you’ll see the cursor turn into a rotational arrow — click and drag this around to rotate the icon clockwise or counterclockwise.
使用選擇工具“ V”(工具欄中的黑色光標),單擊并將圖標拖到新位置。 您也可以通過抓住它們的邊界框的一個角并在單擊和拖動時按住“ Shift”來縮放它們,以確保按比例調整大小。 將光標懸停在剛剛超越邊界框角落,你會看到光標轉成旋轉箭頭-點擊并拖動這個繞到圖標順時針或逆時針旋轉。
Pattern-making is a highly intuitive and visual art; it’s all about how you fill the negative spaces and achieve balance. Start spacing out and arranging your cluster of icons in a way that feels cohesive to you — then you can fine tune it in the next step.
圖案制作是一種高度直觀和視覺化的藝術。 這一切都是關于如何填補負面空間并實現平衡的。 開始排列并以對您有凝聚力的方式排列圖標集群,然后可以在下一步中對其進行微調。
制作自己的圖案……并嘗試! (Make your pattern… and experiment!)
Using the selection tool “V,” drag your cursor across all icons on the artboard to select them.
使用選擇工具“ V”,將光標拖動到畫板上的所有圖標上以將其選中。
Then go to Object > Pattern > Make. Here’s where it gets super fun.
然后轉到“ 對象”>“圖案”>“制作”。 這是超級有趣的地方。
You’ll see a pop-up window alerting you that the pattern you’ve made will be saved under your swatches (Window > Swatches), meaning it can ultimately behave as a “fill” just like any solid color.
您會看到一個彈出窗口,警告您制作的圖案將保存在色板下(“ 窗口”>“色板” ),這意味著它最終可以像任何純色一樣充當“填充”。
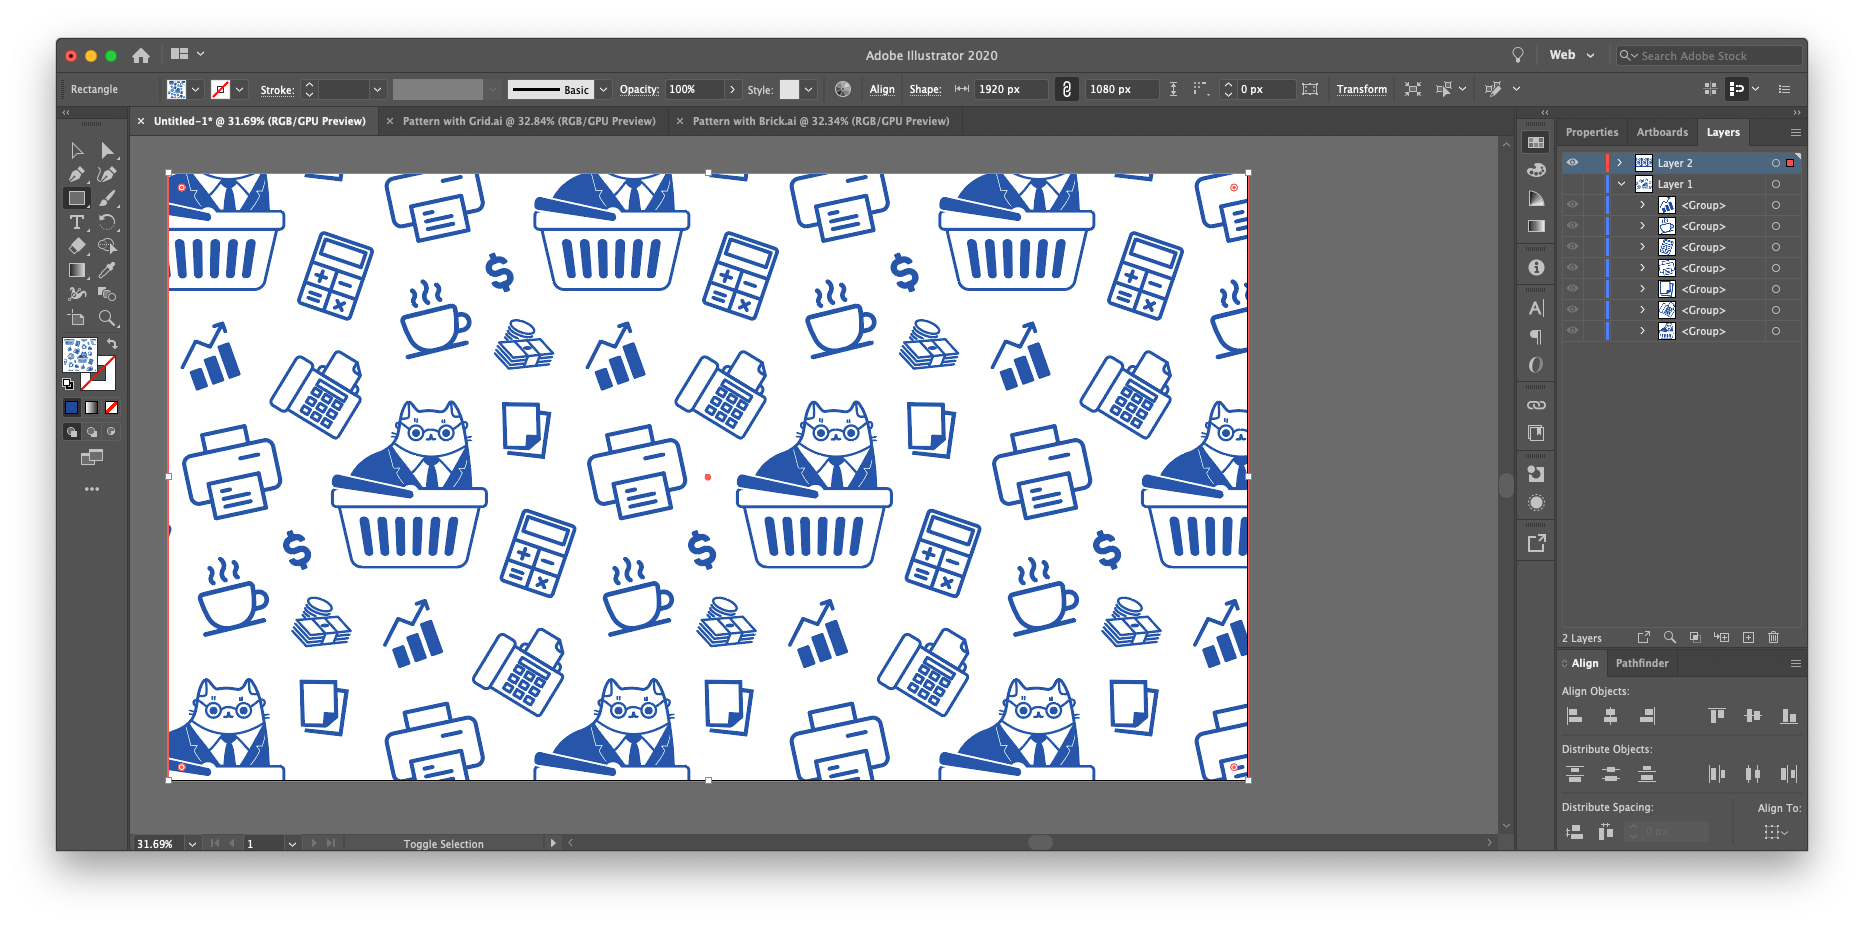
In this pattern-making view, you’ll see your artwork repeat itself based on the icons arrayed within the highlighted rectangle frame (or “tile”) on your artboard.
在這種制作模式的視圖中,您將看到您的作品根據畫板上突出顯示的矩形框(或“平鋪”)中排列的圖標進行重復。
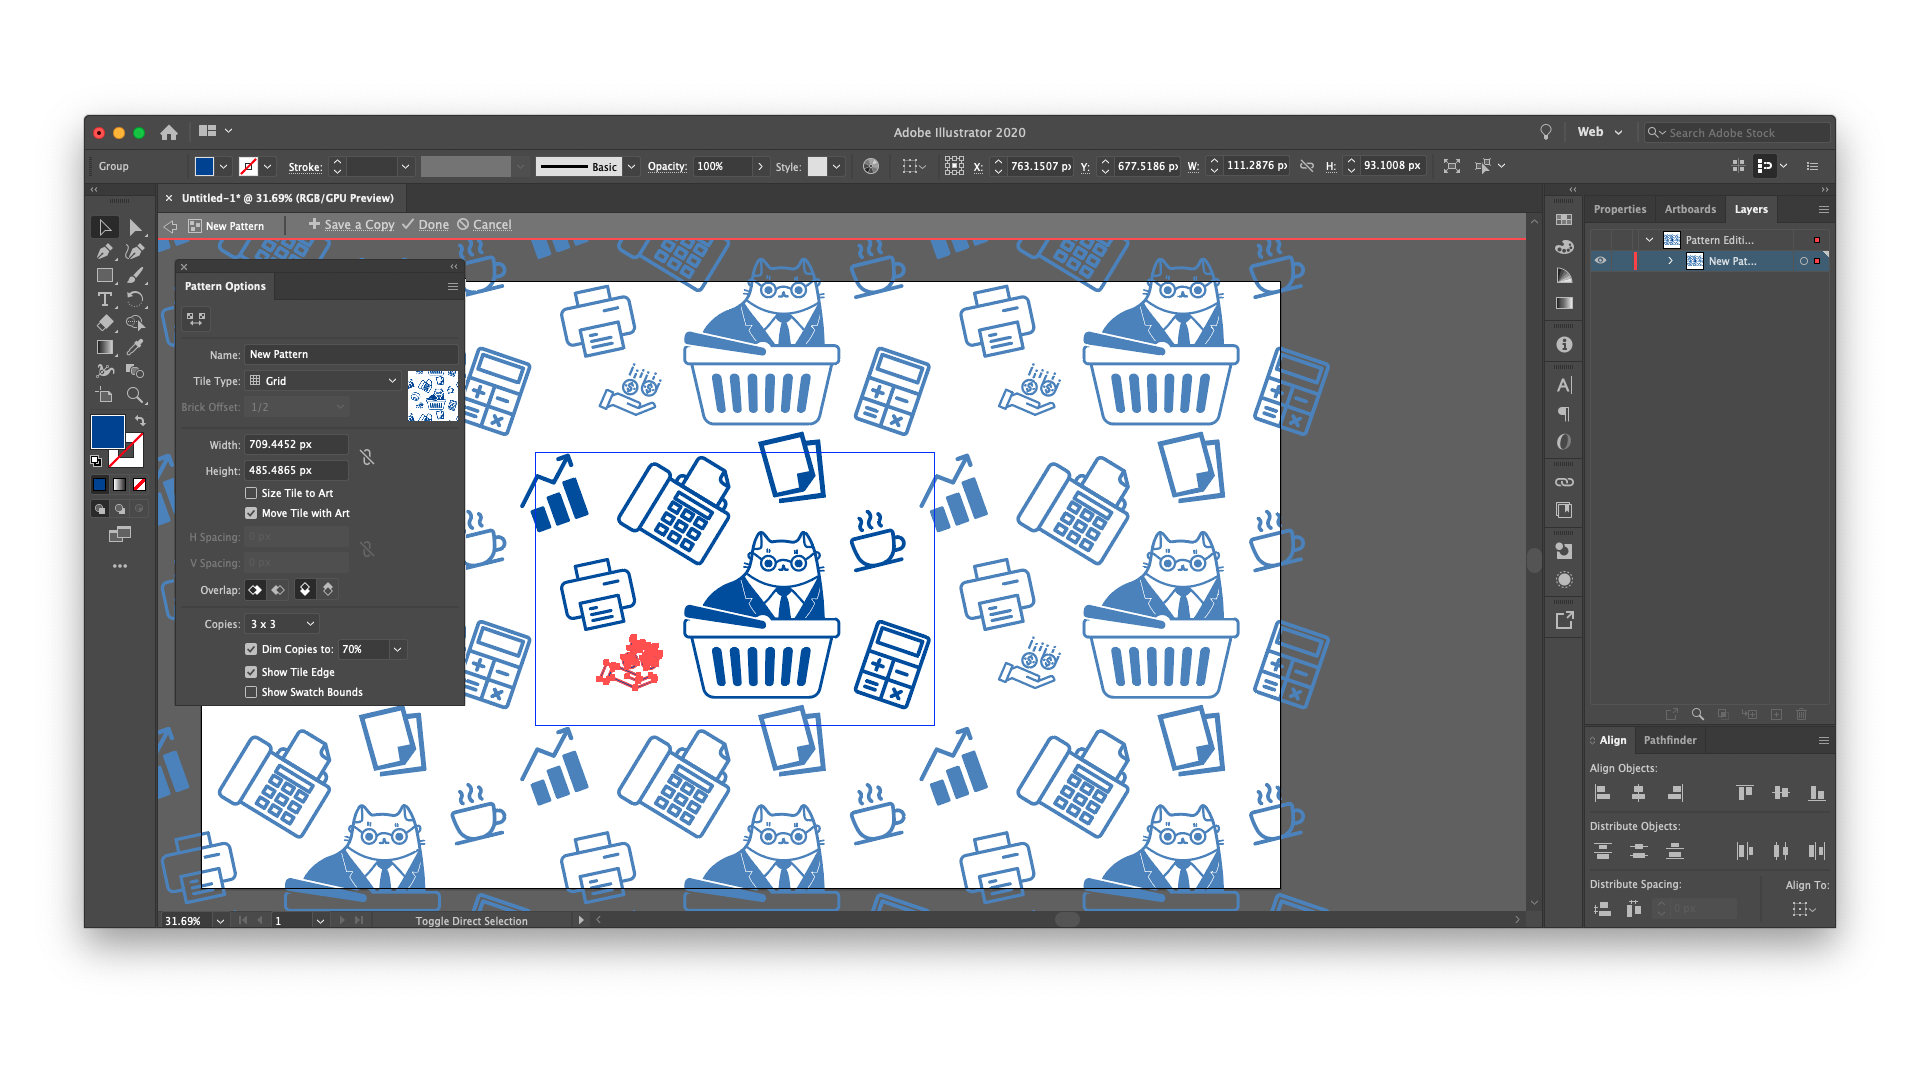
In the Pattern Options window that pops up, you’ll see some key formatting options that dictate how your tile appears and repeats.
在彈出的“圖案選項”窗口中,您將看到一些關鍵的格式設置選項,這些選項決定了瓷磚的顯示和重復方式。
- First, pay attention to “Tile Type.” The drop-down menu of options includes “Grid” (the elements will repeat with a straight vertical and horizontal stacking pattern) or “Brick by Row” (tile will repeat horizontally, but additional rows on top and beneath will be staggered). In the latter case, you can play with “Brick Offset” to dictate how much these stacked rows are staggered from the baseline, as shown below. 首先,請注意“平鋪類型”。 選項的下拉菜單包括“網格”(元素將以垂直的垂直和水平堆疊圖案重復)或“按行磚砌”(平鋪將水平重復,但頂部和下方的其他行將錯開)。 在后一種情況下,您可以使用“磚塊偏移”來規定這些堆疊的行與基線之間的間隔,如下所示。
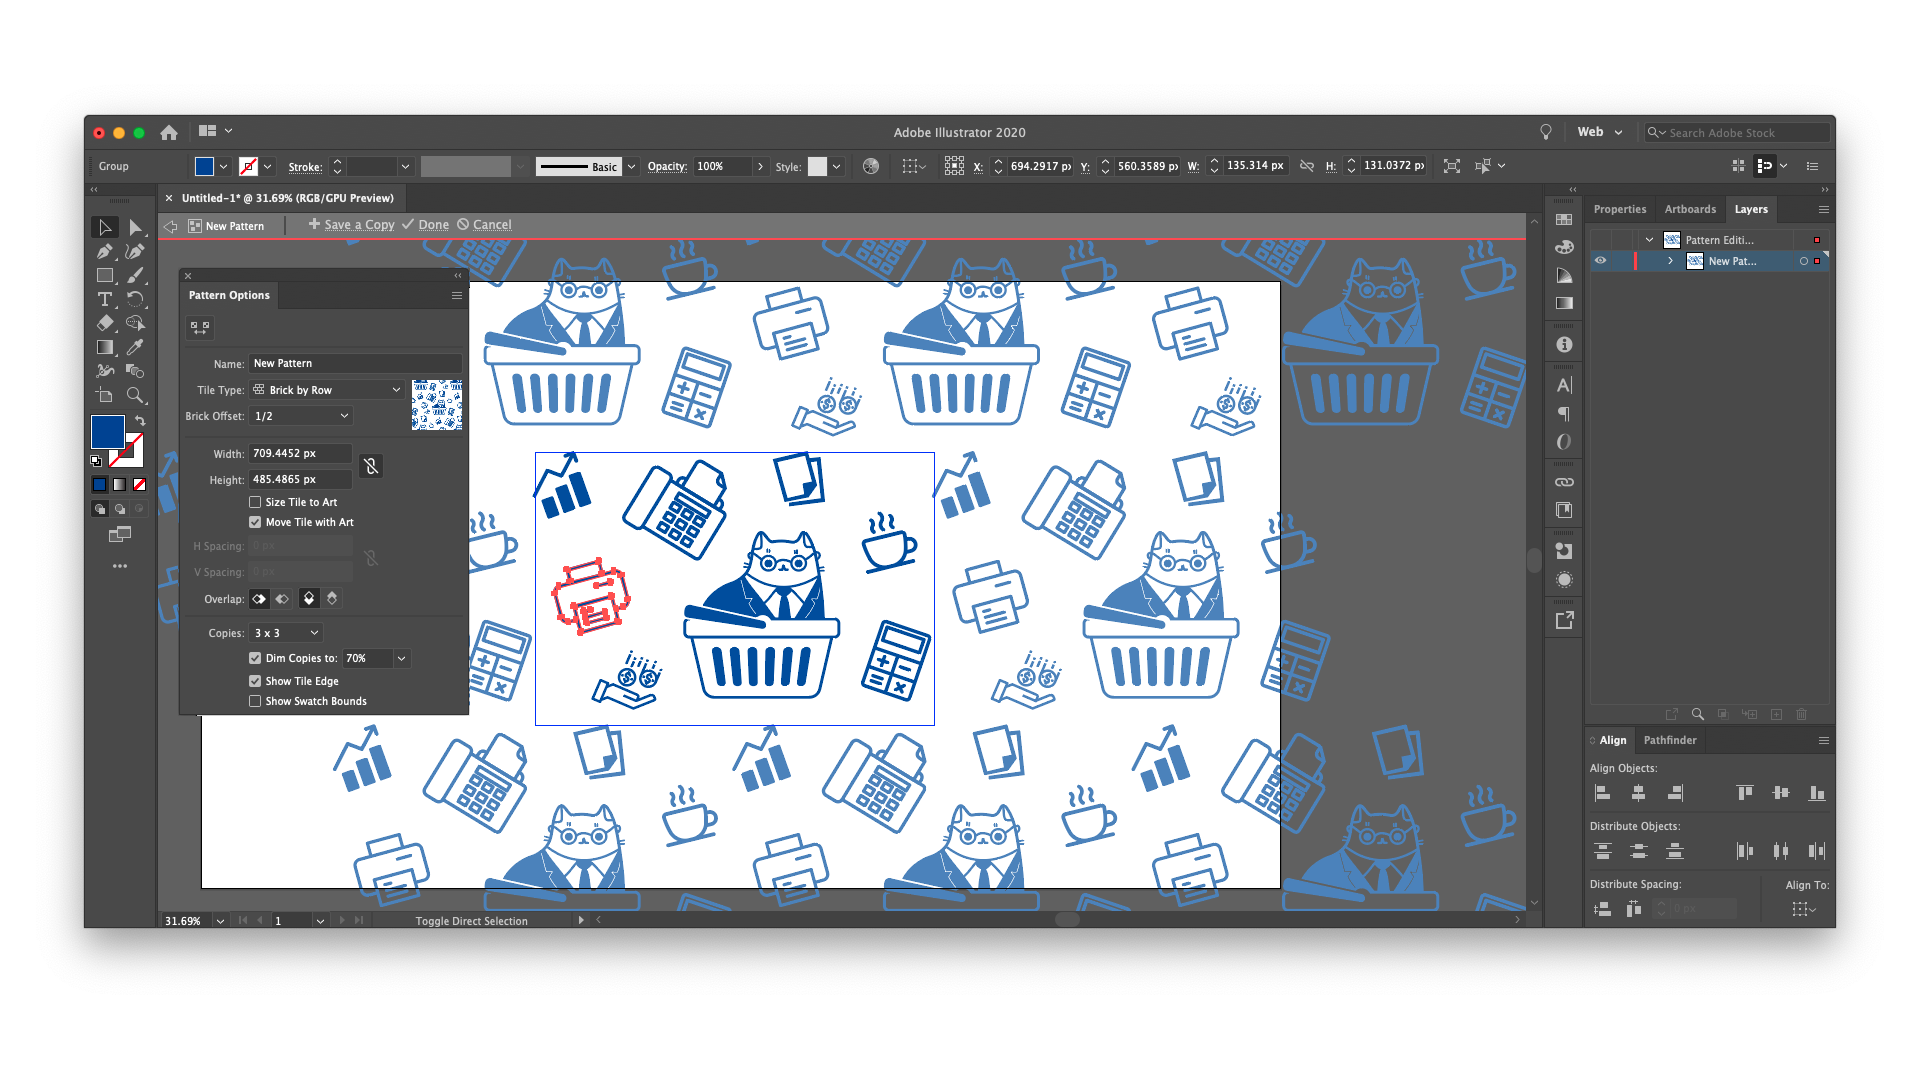
- Above all, this is the time to experiment and see what works best for your pattern. “Hex” tile options allow for tighter spacing by using a stackable hexagon shape instead of a rectangular tile. 最重要的是,這是嘗試并查看最適合您的模式的時間。 “十六進制”圖塊選項通過使用可堆疊的六邊形形狀而不是矩形圖塊,可以縮小間距。
- You can also play with the “Width” and “Height” field (use arrow keys, and shift+arrow keys to adjust pixel values) to see how it changes the spacing by extending or contracting your tile. Again, this process is highly optical and intuitive, so just keep playing! 您也可以使用“寬度”和“高度”字段(使用箭頭鍵和Shift +箭頭鍵調整像素值)來查看其如何通過擴展或收縮圖塊來改變間距。 同樣,此過程高度直觀且直觀,因此請繼續玩!
As you explore these Pattern Options, you may start to see some overlap or spacing issues between your icons. The great thing about this view is you can continue using the selection tool “V” to move and scale the icons within your tile as much as necessary.
當您瀏覽這些模式選項時,您可能會開始看到圖標之間的重疊或間距問題。 關于此視圖的妙處在于,您可以繼續使用選擇工具“ V”在必要時移動和縮放圖塊中的圖標。

As you go, keep looking for that visual balance and make sure the icons are arrayed to fill in any white space. You can continue inserting new Noun Project icons, right in the pattern view. Also observe how you can drag an icon across or even beyond the highlighted boundary of your central tile, and it will maintain its form and continue repeating, so that you can continue optically spacing it out.
進行時,請繼續尋找視覺平衡,并確保將圖標排列成可填充任何空白的位置。 您可以繼續在模式視圖中繼續插入新的Noun Project圖標。 還要觀察如何將圖標拖到中心圖塊的突出邊界上,甚至超出它,它將保持其形狀并繼續重復,以便您可以繼續以光學方式將其隔開。
保存您的圖案并將其用作填充 (Save your pattern and use it like a fill)
Once you’re generally happy with this pattern (you can always return to edit it later), give your pattern a name at the top of the same Pattern Options window. Along the top of your artboard (within the gray banner that shows you current “Isolation Mode” controls), click “Done.”
一旦對此模式大體滿意(以后隨時可以返回編輯),請在同一“模式選項”窗口的頂部為您的模式命名。 在畫板的頂部(在顯示您當前的“隔離模式”控件的灰色橫幅內),單擊“完成”。
Great! Now, where did your pattern go?
大! 現在,您的模式到哪里去了?
It’s automatically saved in your swatches (Window > Swatches), right at the end of your first group of default colors.
它會自動保存在您的色板(“窗口”>“色板” )中,就在第一組默認顏色的末尾。
Let’s see it in action:
讓我們來看看它的作用:
First, clean up your artboard clutter by hiding the original icons you used. In your layers panel (Window > Layers), click the eyeball icon next to the layer where all your icons are listed to make them all invisible. You can create a new layer above it with the “+” icon at the bottom of the Layers panel to start working with new shapes.
首先,通過隱藏使用的原始圖標來清理畫板中的雜物。 在“圖層”面板(“ 窗口”>“圖層” )中,單擊列出所有圖標的圖層旁邊的眼球圖標,使它們全部不可見。 您可以使用“圖層”面板底部的“ +”圖標在其上方創建一個新圖層,以開始使用新形狀。
Make a rectangle to span your whole artboard (click M, and drag from one corner to the opposite corner). Traditionally, you can fill your rectangle with any solid color you click in your Swatches, but let’s go ahead and click our pattern swatch to see it fill the shape! Nice.
制作一個矩形以覆蓋整個畫板(單擊M ,然后從一個角拖動到另一個角)。 傳統上,您可以在色板中單擊任何純色來填充矩形,但讓我們繼續單擊我們的圖案色板以查看其填充形狀! 真好
如果我要縮小并看到圖案的更多重復該怎么辦? (What if I want to zoom out and see more repetitions of my pattern?)
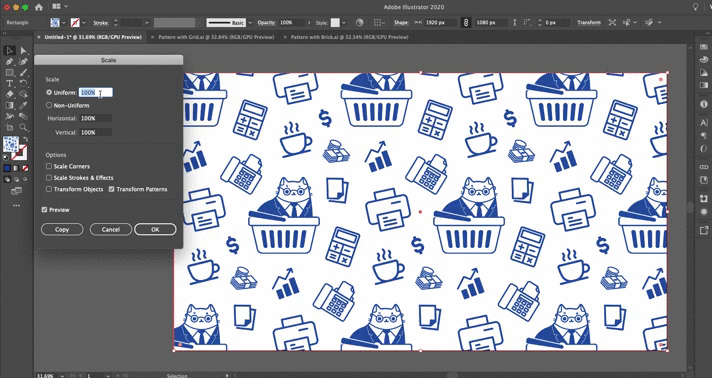
Maybe you’re not seeing as much of the repeating pattern as you’d like. Let’s look at how to scale the pattern within your rectangle to zoom in or out of it.
也許您沒有看到想要的重復模式。 讓我們看一下如何縮放矩形中的圖案以放大或縮小矩形。
With the rectangle selected with “V,” Go to Object > Transform > Scale.
用“ V”選擇矩形后,轉到“ 對象”>“變換”>“縮放” 。
Under “Options,” make sure the box that says “Transform Pattern” is checked, but not the box that says “Transform Object.” This will leave the size of your overall rectangle intact, but let you zoom in or out of the pattern.
在“選項”下,確保選中“轉換模式”框,但不要選中“轉換對象”框。 這將使整個矩形的大小保持不變,但可以放大或縮小圖案。
- Make sure “Preview” is also selected so you can see the changes immediately. 確保還選擇了“預覽”,以便您可以立即看到更改。
- At the top, under “Scale,” click the percentage next to “Uniform” and use your up and down arrow keys to change the scale — you’ll see it zooming in and out. Hold “shift” along with the arrows to more quickly scroll by multiples of 10%. 在頂部的“比例”下,單擊“均勻”旁邊的百分比,然后使用向上和向下箭頭鍵更改比例-您會看到它在放大和縮小。 按住箭頭上的“ shift”,可以更快地滾動10%的倍數。
- When you’ve done the amount of scaling you’d like, click “OK.” 完成所需的縮放比例后,請單擊“確定”。
我可以改變圖案的顏色嗎? (Can I change my pattern’s color?)
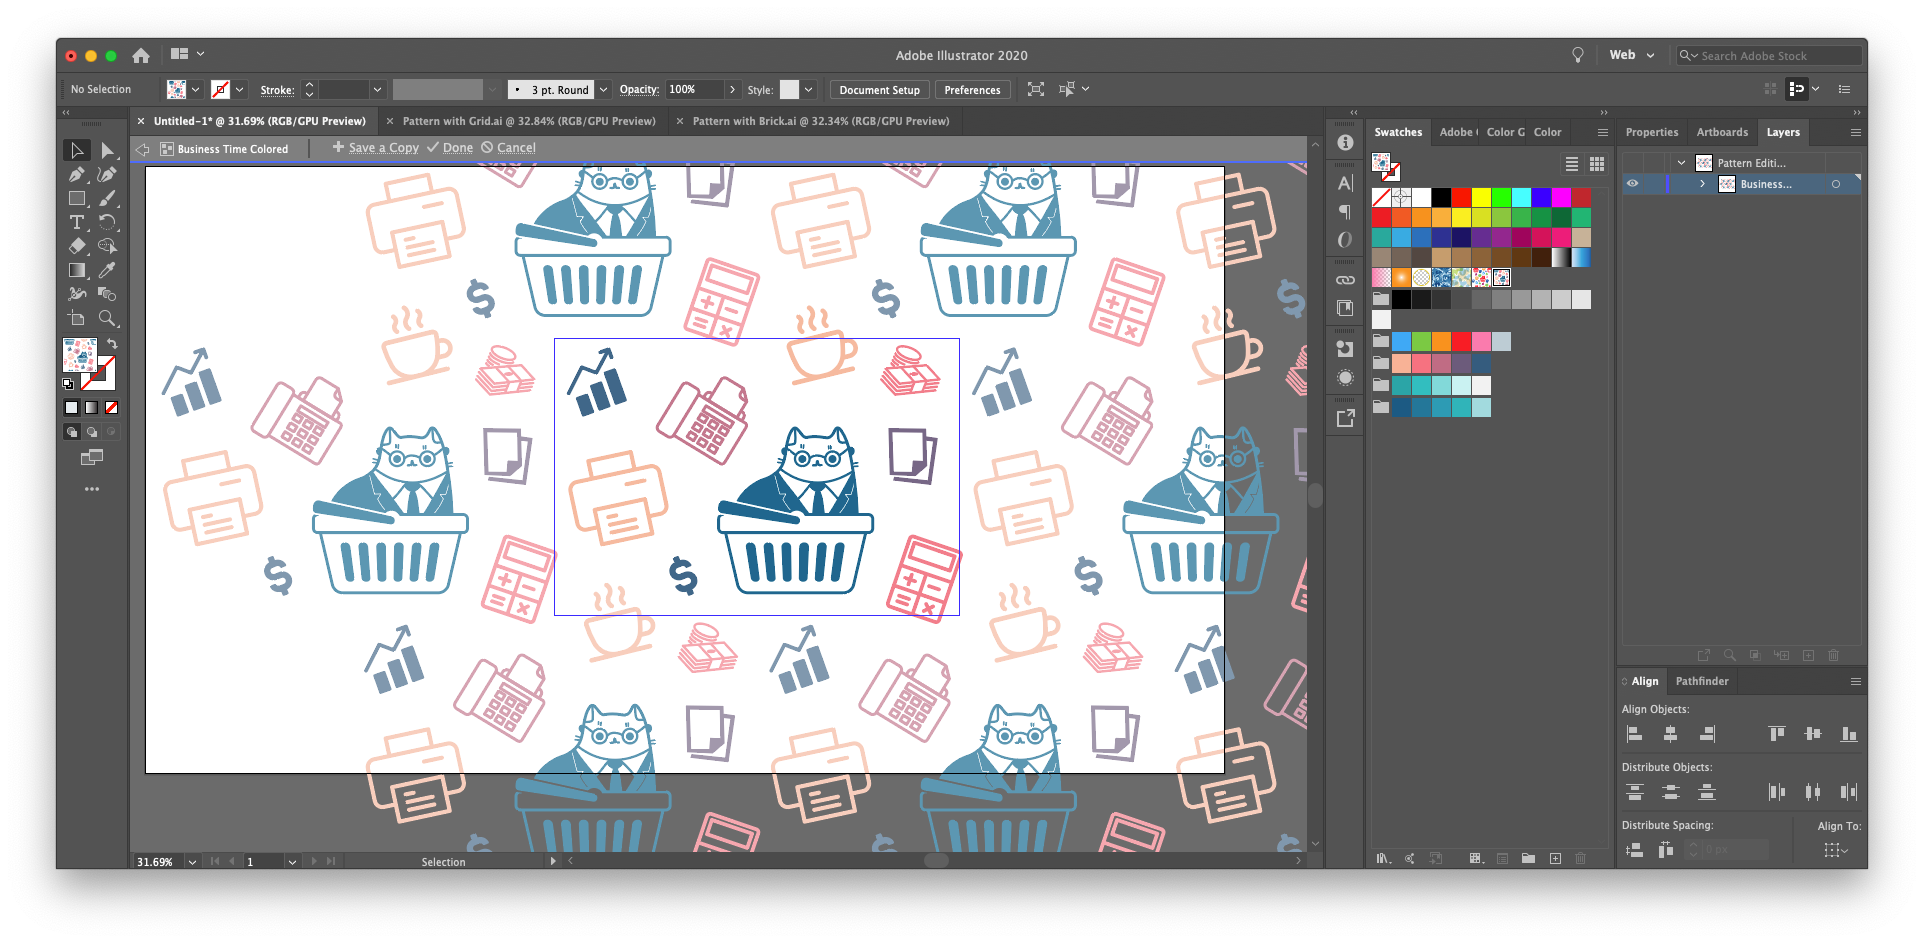
You can make any adjustments to your pattern you’d like — just double click the pattern from your Swatches panel to bring up the pattern editing mode again.
您可以根據需要對圖案進行任何調整-只需從“色板”面板中雙擊圖案即可再次調出圖案編輯模式。
You can select the entire cluster of icons (using “V”), or any single icon you want, and simply click a different color within the swatches or color window.
您可以選擇整個圖標組(使用“ V”),也可以選擇任何單個圖標,然后只需在色板或顏色窗口中單擊另一種顏色即可。
Want to set this pattern against a different background color? Make an additional layer to fill with a new rectangle, and select a new fill color.
是否要針對其他背景顏色設置此圖案? 新建一個圖層以填充新的矩形,然后選擇一種新的填充顏色。
Hint: A great way to quickly use a pleasing, harmonious color scheme is to use Adobe Color Themes (Window > Color Themes). Under the “Explore” button, you can browse some of the most popular color palettes contributed by fellow designers, or do a keyword search using theme ideas like “sunset” or “forest” to find inspiration.
提示:快速使用令人愉悅的,和諧的配色方案的一種好方法是使用Adobe顏色主題(“ 窗口”>“顏色主題” )。 在“瀏覽”按鈕下,您可以瀏覽由其他設計師提供的一些最受歡迎的調色板,或者使用諸如“日落”或“森林”之類的主題創意進行關鍵字搜索以找到靈感。
獎勵:使用Live Paint用多種顏色填充每個圖標 (Bonus: Fill each icon with multiple colors using Live Paint)
We’ve previously written a tutorial about using Live Paint (K) to color in the white spaces of an icon and add multiple colors for a more detailed and eye-catching effect. You can supercharge your patterns with the same method.
之前,我們已經編寫了有關使用Live Paint(K)在圖標的白色空間中進行著色并添加多種顏色以獲得更詳細和醒目的效果的教程 。 您可以使用相同的方法來增強樣式。
In short:
簡而言之:
Select an icon on your artboard with “V” and make sure that it’s a compound path, as that’s the only way it can be colored in (Object > Compound Path > Make)
在畫板上用“ V”選擇一個圖標,并確保它是復合路徑,因為這是可以在( 對象>復合路徑>生成 )中對其進行著色的唯一方法
With the object still selected, hit “K” for Live Paint (or go to Object > Live Paint > Make)
在仍然選擇對象的情況下,對Live Paint單擊“ K” (或轉到Object> Live Paint> Make )。
- With the Live Paint tool (K) selected, you can hover over the white spaces within your icon and you’ll see their borders highlighted. Simply click inside to manually color each space, using colors from your Swatches window (this is where it’s especially great to use Color Themes). 選中“動態繪制”工具(K)后,您可以將鼠標懸停在圖標上的空白區域上,并且其邊框將突出顯示。 只需單擊內部以使用“色板”窗口中的顏色手動為每個空間上色(這在使用“顏色主題”時特別有用)。
- Once you’ve colored the icons how you’d like, select each one and make a new pattern just as before. 為圖標著色后,請像以前一樣選擇每個圖標并制作一個新圖案。
Note: You cannot Live Paint an icon within the pattern editing view — painting must be done before you make the pattern.
注意:您不能在圖案編輯視圖中對圖標進行實時繪制-必須在繪制圖案之前完成繪制。

Not an Adobe subscriber? Not to fear. Some free online pattern making sites exist, such as Patterninja. Patterninja has the advantage of being simple and intuitive to use, as you can upload (or drag and drop) your Noun Project SVG icon files from your computer, and manually resize, rotate, color, and move the icons across your canvas.
不是Adobe訂閱者? 不要害怕。 存在一些免費的在線制版網站,例如Patterninja 。 Patterninja具有使用簡單直觀的優點,因為您可以從計算機上載(或拖放)Noun Project SVG圖標文件,并在畫布上手動調整圖標的大小,旋轉,著色和移動。
請務必查看我們的其他教程,以獲取更多創造性的方法來充分利用Noun Project圖標,或者只是涉足新的藝術愛好! (Be sure to check out our other tutorials for other creative ways to make the most of Noun Project icons, or simply dabble in a new artistic hobby!)
翻譯自: https://blog.thenounproject.com/make-an-eye-popping-pattern-with-icons-8260b033ab51
桌面圖標擺放圖案
本文來自互聯網用戶投稿,該文觀點僅代表作者本人,不代表本站立場。本站僅提供信息存儲空間服務,不擁有所有權,不承擔相關法律責任。 如若轉載,請注明出處:http://www.pswp.cn/news/275187.shtml 繁體地址,請注明出處:http://hk.pswp.cn/news/275187.shtml 英文地址,請注明出處:http://en.pswp.cn/news/275187.shtml
如若內容造成侵權/違法違規/事實不符,請聯系多彩編程網進行投訴反饋email:809451989@qq.com,一經查實,立即刪除!相關文章

3個多月,近3000人參與的源碼共讀,誠邀加入~

upc 組隊賽18 STRENGTH【貪心模擬】


“這張圖告訴你什么?”

我們從 UmiJS 遷移到了 Vite

將DataTable的內容以EXCEl的形式導出到本地

智能家居數據庫設計_設計更智能的數據表

可能是全網首個前端源碼共讀活動,誠邀你加入一起學習

vsftpd 的配置項目

線段樹專輯——pku 3667 Hotel

houseparty不流暢_重新設計Houseparty –用戶體驗案例研究

你不知道的 Node.js 工具函數
)
Java應用集群下的定時任務處理方案(mysql)

概念驗證_設置成功的UX概念驗證

從 vue3 和 vite 源碼中,我學到了一行代碼統一規范團隊包管理器的神器


6個高效辦公的Excel小技巧,學會讓你高效辦公

unity 完美像素_像素完美

)