案例研究:設計與方法
速度設計簡介 (Intro to Speed Designing)
I’ve been an advocate of speed redesigning technique for a while. The idea is simple — decrease the hand-eye lag and make super quick decisions, seemingly without thinking. The logic behind it is that after you practice enough, you’ll actually be able to make the right choices automatically.
我提倡速度重新設計技術已有一段時間了。 這個想法很簡單-減少手眼的時滯并做出超快速的決定,似乎沒有考慮。 這樣做的邏輯是,經過足夠的練習,您實際上將能夠自動做出正確的選擇。
And even if you make a wrong one, you’ll have a result much quicker than you can then refine. Some have thought, that it was to undermine the proper UX process? but in reality, it gave you a possibility to have something substantial to show before those meetings even start. And when the design process is currently becoming a lot faster and less cluttered, it can be a good addition to any skillset.
即使您輸入了錯誤的結果 ,也將比隨后的改進快得多。 有人認為這是在破壞適當的UX進程 ?,但實際上, 它使您有可能在會議開始之前就展示一些實質性內容 。 而且,當設計過程目前變得越來越快且變得混亂時,對于任何技能組來說,它都是很好的補充。
You can read more about the technique here:
您可以在此處閱讀有關該技術的更多信息:
迷你案例研究:重新設計信號應用程序 (Mini Case-Study: Signal app redesign)
I’m in the middle of writing a chapter on Dark Mode for UI Design Styles right now, but the examples I chose to illustrate it (the Signal messenger app) had some other problems in them. Usually ones that are quite easy to fix.
我現在正在寫一章有關UI設計樣式的深色模式的文章,但是我選擇說明的示例(Signal Messenger應用程序)中還有其他問題。 通常那些很容易修復。
Dark mode will only be a backdrop here, a mere illustration to show the thought process in the overall fix. Of course that redesign was completely unsolicited . Now when we have that out of the way let’s start.
黑暗模式在這里僅是一個背景,僅是說明整個修復過程中思維過程的圖示。 當然,重新設計完全是不請自來的。 現在,當我們解決了這個問題時,讓我們開始吧。
主畫面 (The home screen)
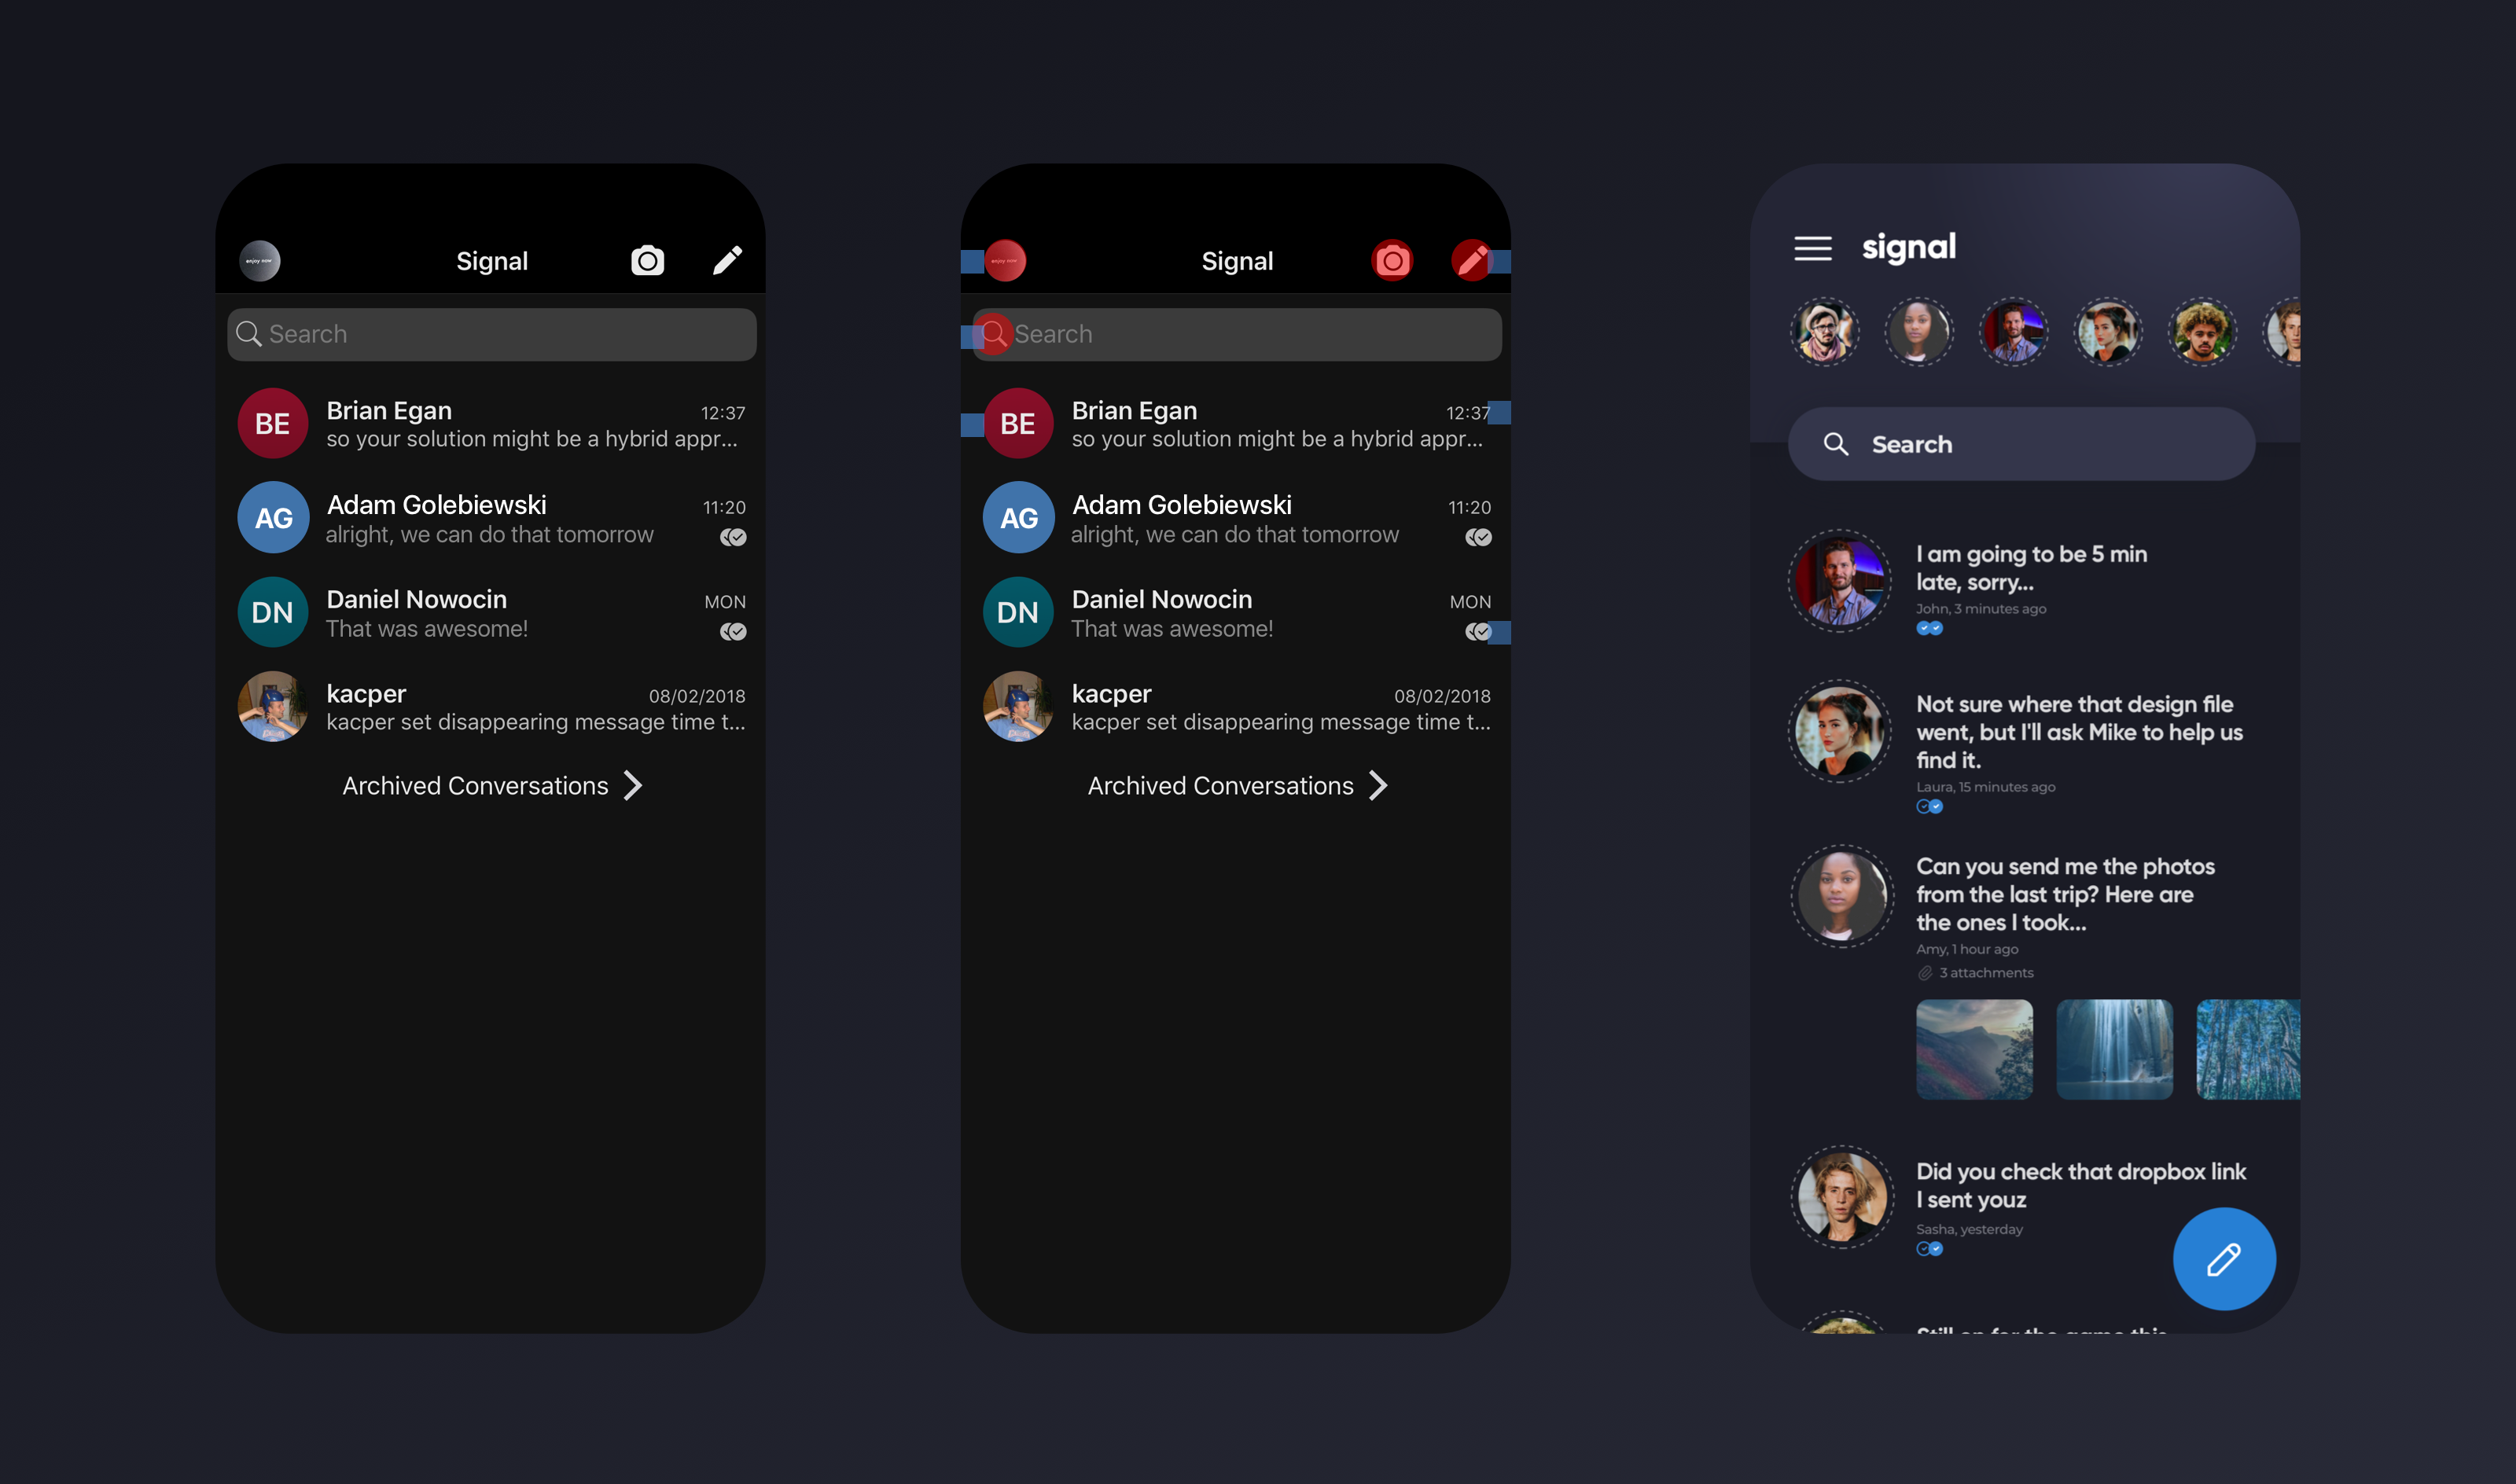
Starting with the message list screen we first identify the left margin. It’s usually the easiest way to begin a visual redesign. Then to check proportions of objects I created a red circle the size of the profile picture.
從消息列表屏幕開始,我們首先確定左邊距。 通常,這是開始視覺重新設計的最簡單方法。 然后,為了檢查對象的比例,我創建了一個紅色的圓圈,該圓圈的大小與個人資料圖片的大小相同。
As you can see in the middle screen not everything has the same alignment on the sides, and the icons are proportionally bigger than they should be.
如您在中間屏幕中看到的,并不是所有的東西在側面都具有相同的對齊方式,并且圖標成比例地大于其應有的大小。
Of course the margins don’t always have to be completely the same, but in this case it seems that it wasn’t a planned approach, but rather a front-end developer coded it this way.
當然,利潤并不總是必須完全相同,但是在這種情況下,這似乎不是計劃的方法,而是前端開發人員以這種方式進行了編碼。
下一步:創意 (Next step: ideas)
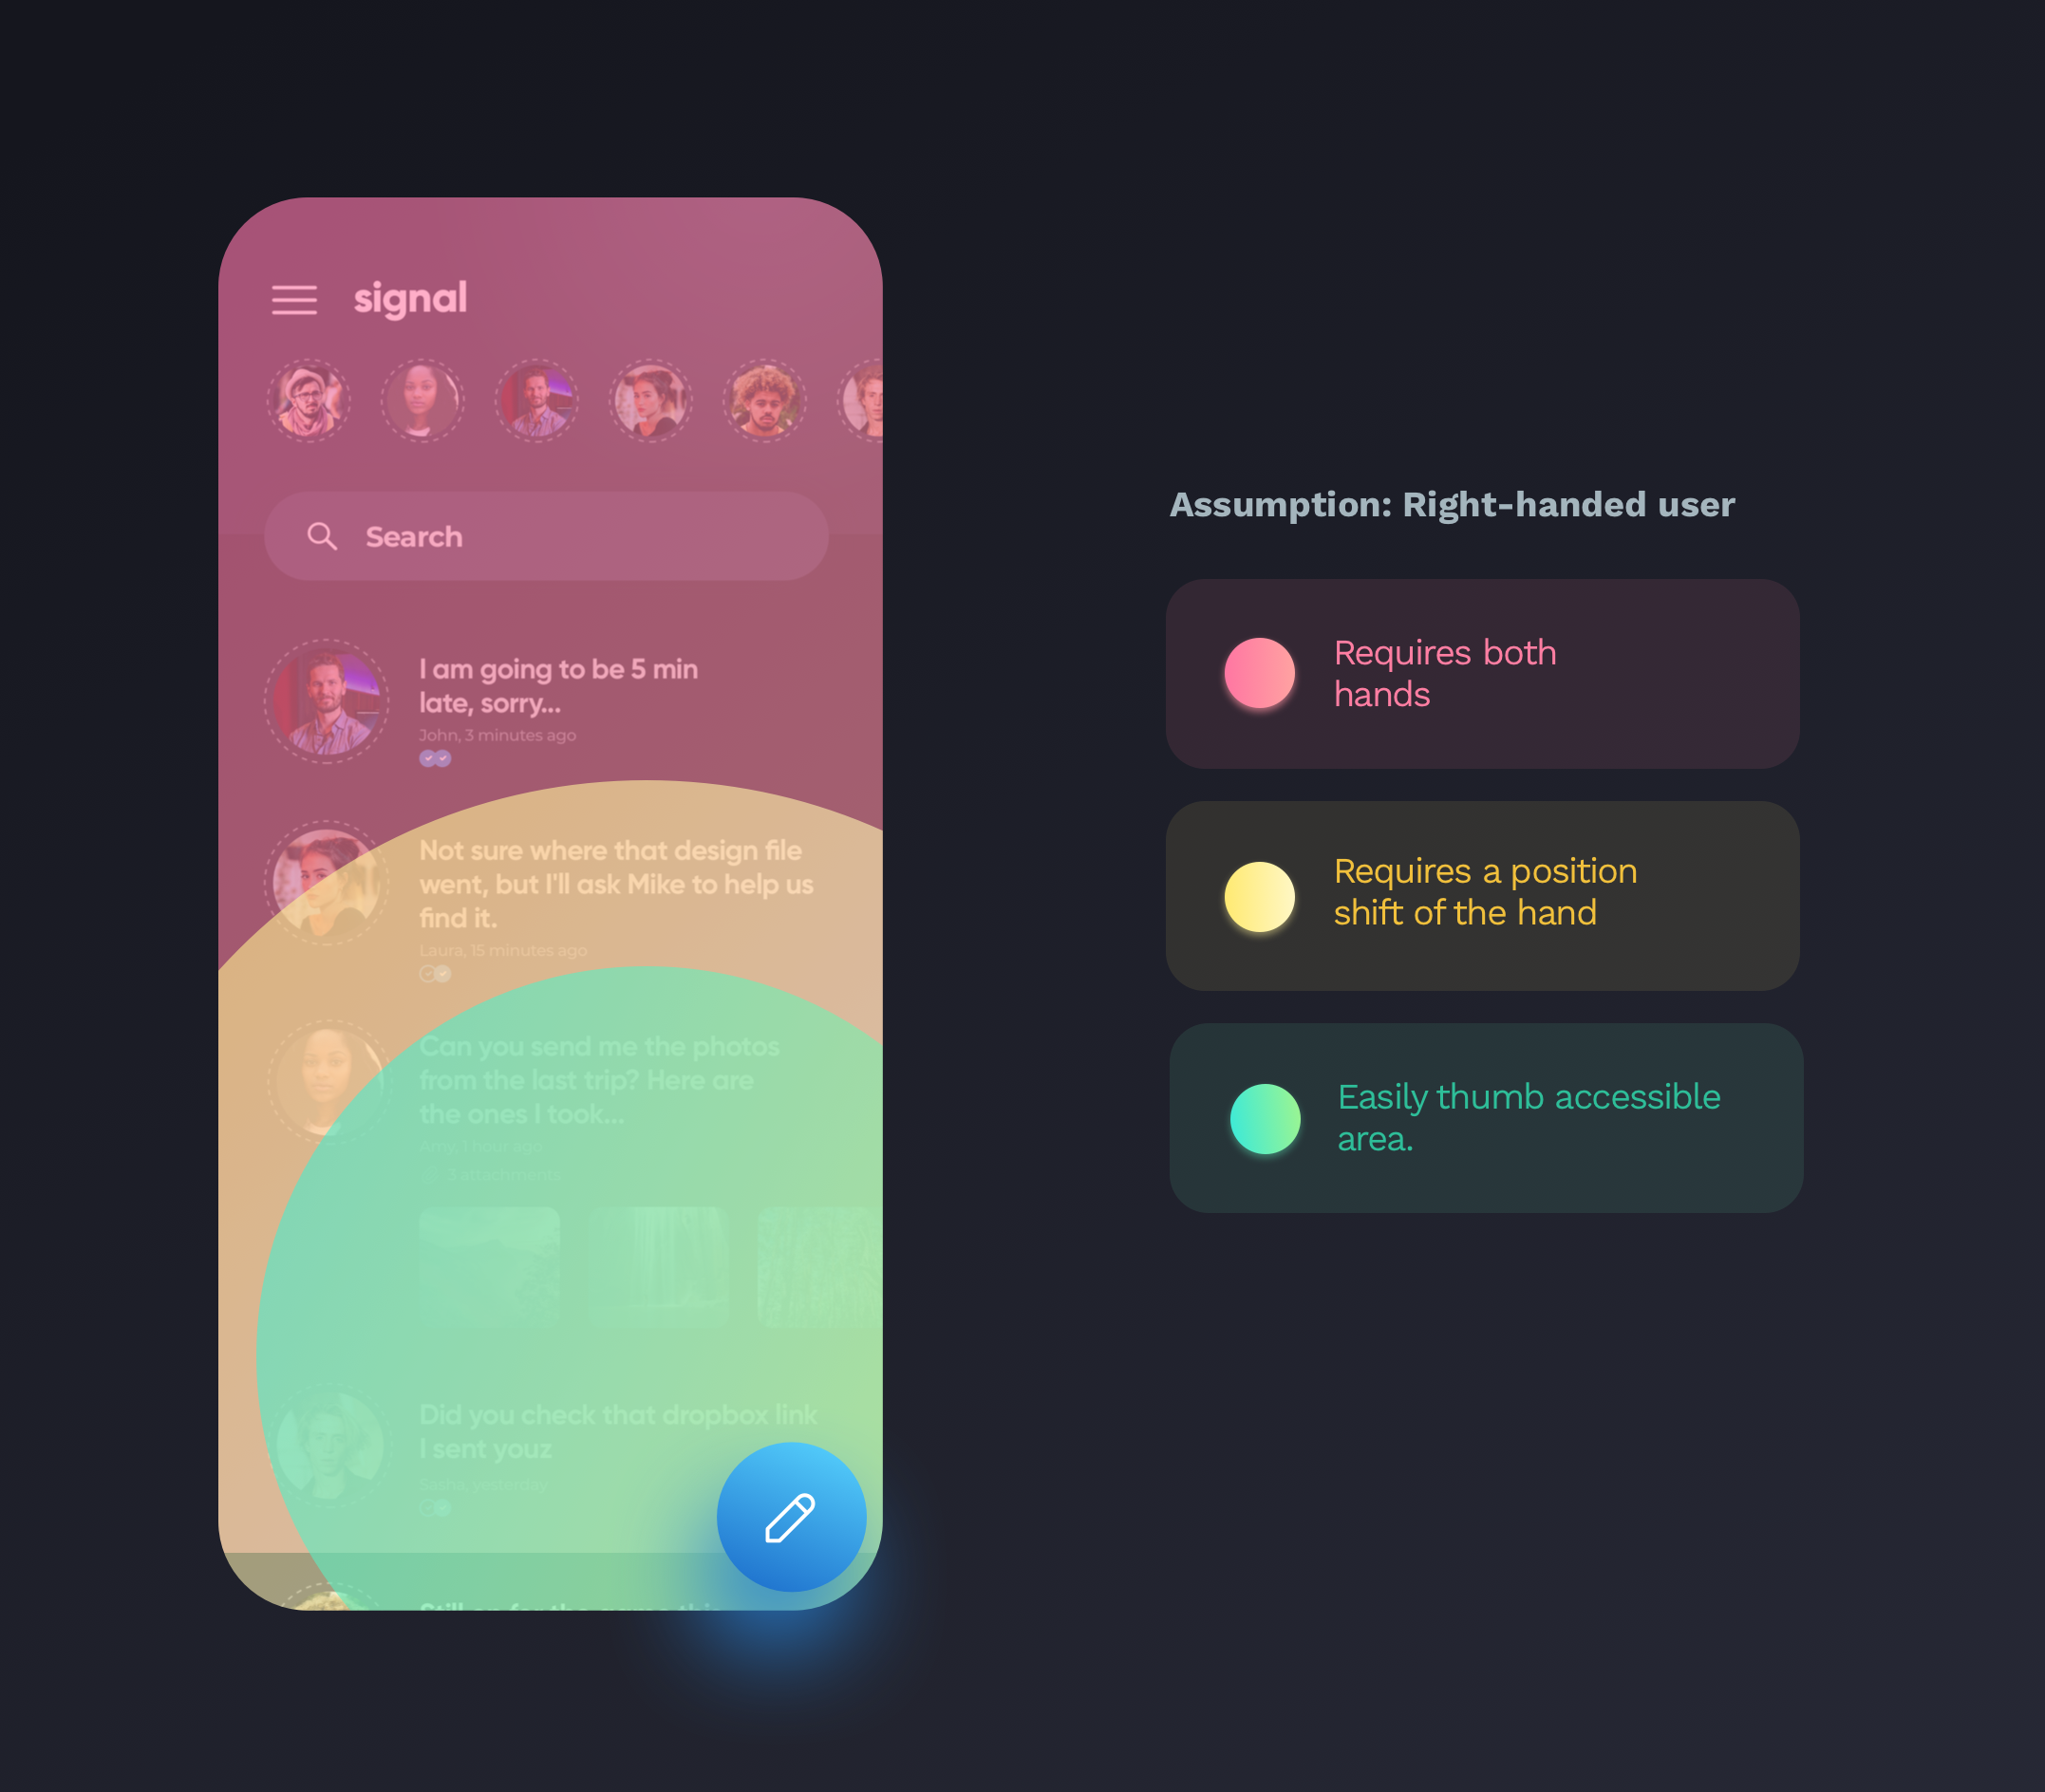
After we create our little grid and define at least two spacing values it’s time to take a look at the navigation. It’s very likely that the new message button (currently: top-right) will be used pretty often. I moved it to the bottom right, where it’s easily accessible by the thumb.
創建小網格并定義至少兩個間距值之后,就該看看導航了。 新消息按鈕(當前:右上角)很有可能會經常使用。 我將其移至右下角,拇指可以輕松訪問該位置。
Another idea, which can be a bit controversial was to make a more readable messages view. Of course that comes at a cost of seeing less messages on screen. In this case I’d suggest an option for a normal and “condensed” mode in the settings to cater to all the preferences.
另一個可能引起爭議的想法是使消息視圖更具可讀性。 當然,這是以在屏幕上看到較少消息為代價的。 在這種情況下,我建議在設置中為普通和“濃縮”模式提供一個選項,以適應所有首選項。
故事嗎 真? ♂?♂? (Stories? Really? 🤦?♂?)
“Stories” here are simply group-chats or open messages “to all my friends” that you can jump into from the top of the screen. That’s a bit “dribbbly” in the approach, and the case for it needs to be defended, but it’s another conversation starter.
這里的“故事”只是群聊或“發給所有朋友”的公開消息,您可以從屏幕頂部跳入。 這種方法有點“搖搖欲墜”,需要辯護,但這是另一個開始的話題。
Plus, it’s a lot easier to distinguish group chats from regular messages that way.
此外,以這種方式將群聊與常規消息區分開來要容易得多。
Once again — coming up with a quick idea like that can lead to some interesting discussions on the proper UX meeting. And it’s always easy to remove it and shrink the navbar.
再次提出一個類似這樣的快速想法可以導致在適當的UX會議上進行一些有趣的討論。 而且,將其刪除并縮小導航欄總是很容易的。
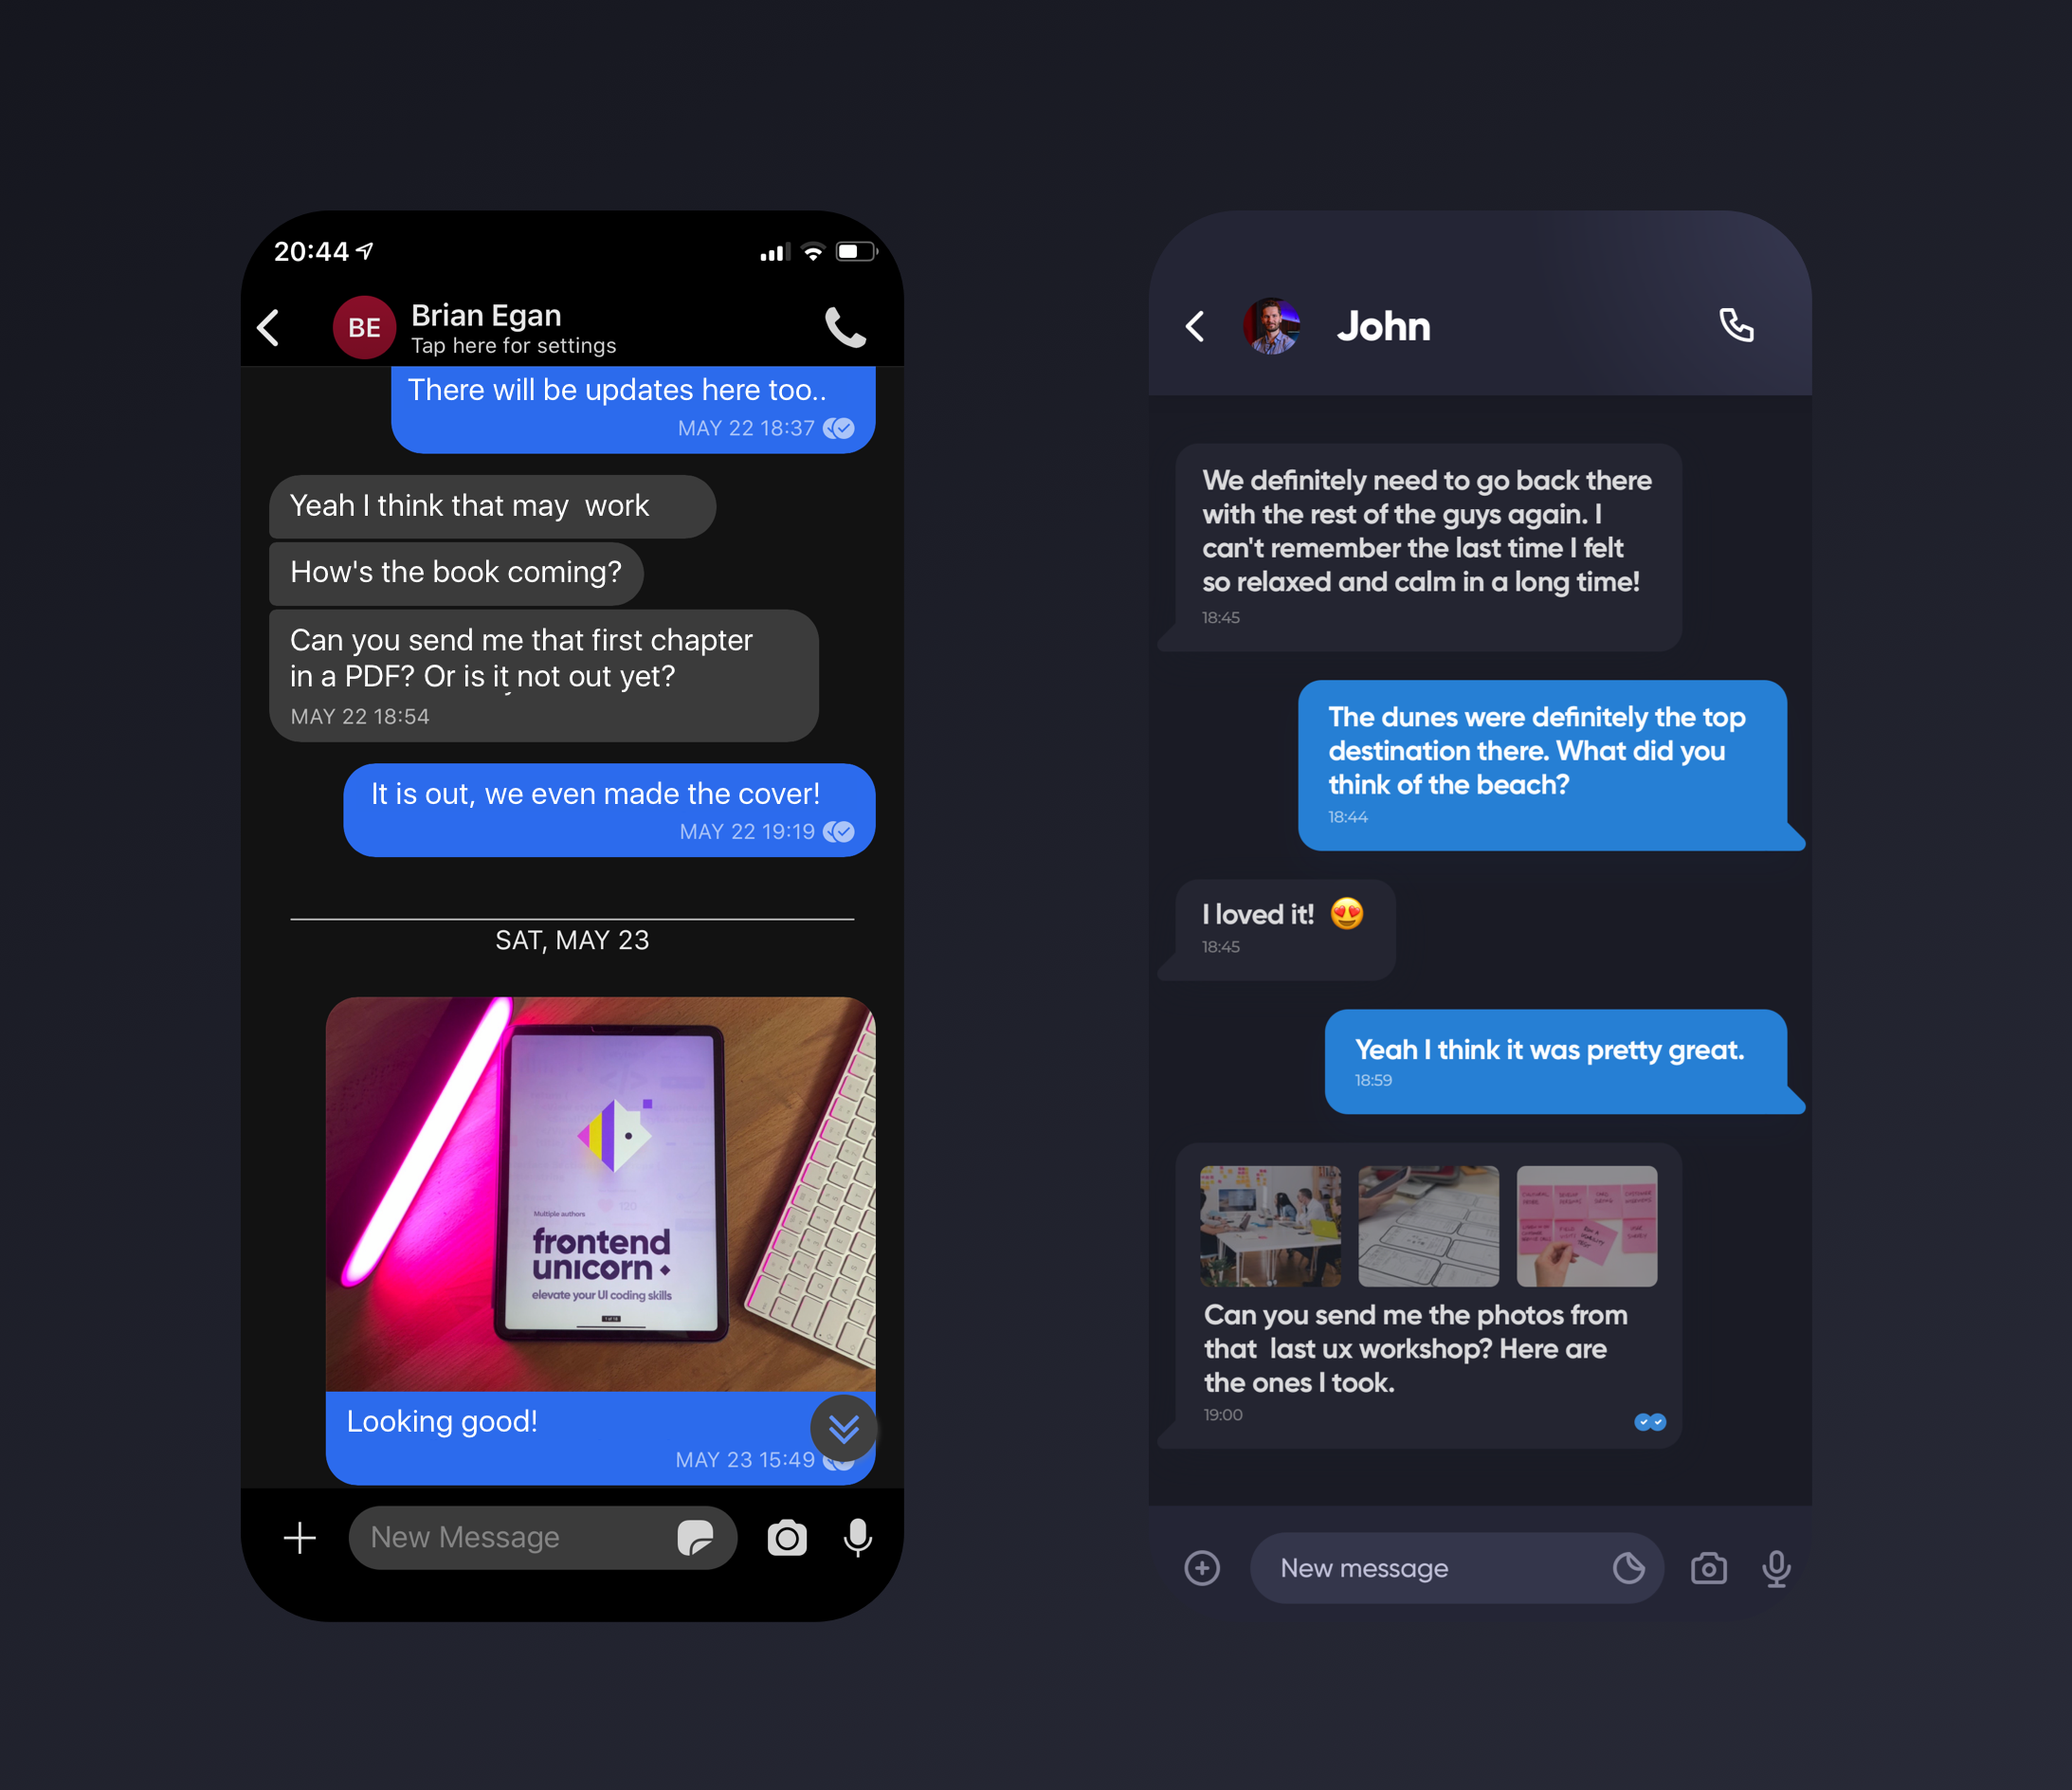
訊息檢視 (Message view)
The original message view was actually pretty good already, taking cues from iMessage and other, similar apps. I did however notice a weird alignment in the top part, and very highly condensed messages as the two main pain-points.
原來的消息視圖實際上已經非常不錯,可以從iMessage和其他類似的應用程序中獲得提示。 但是,我確實注意到頂部有一個奇怪的對齊方式,并且高度濃縮的消息是兩個主要的痛點。
Let’s take a look at that header.
讓我們看一下標題。

The original back chevron is a bit too close to the left side compared to the phone icon on the right. I understand that native iOS enforces a special position for the back arrow, but if we’re already placing the phone icon at some distance from the right, then maybe it’s good to go all the way and make a custom navbar?
與右側的電話圖標相比,原始的后V形人字形過于靠近左側。 我知道本機iOS會為后退箭頭強制設置特殊位置,但是如果我們已經將電話圖標放置在距右側一定距離的位置,那么最好一直進行并自定義導航欄?
You know… with a proper alignment for the arrow? That top-left edge of the screen brings balance to the entire product going down along the left-side. (In the ltr reading countries, but the margins should be the same on both sides, so rtl would work the same way)
您知道嗎……箭頭是否正確對齊? 屏幕的左上邊緣為整個產品沿著左側下降提供了平衡。 (在ltr閱讀國家/地區,但雙方的利潤率應相同,因此rtl的工作方式相同)
So once again adding our safe-space arrows and all the elements in and using the left-spacing from the previous screen and half-of it to re-align those objects slightly.
因此,再次添加安全空間箭頭和其中的所有元素,并使用上一個屏幕的左間距和其中的一半來稍微重新對齊這些對象。
While we’re at it I’m also changing the phone icon to make it just a tiny bit smaller.
在此過程中,我還更改了電話圖標,使其尺寸縮小了一點。
通過明確說明,您可以擁有更好的想法。 (By bringing clarity you allow yourself to have better ideas.)
The first rule is to fix the grids, proportions, fonts and colors. Then you can add some decorative tweaks (like a gradient background) but those initial changes will allow you to see the app in a whole new light.
第一條規則是固定網格,比例,字體和顏色。 然后,您可以添加一些裝飾性調整(例如漸變背景),但這些初始更改將使您以全新的眼光看待該應用。
Your brain won’t have to process the bad alignment anymore so it can use all that power to come up with better UX ideas as well.
您的大腦不再需要處理錯誤的對齊方式,因此它也可以利用所有功能提出更好的UX想法。
快速設計→測試→修改。 (Design fast → test → modify.)
The goal of this approach is simple. Before your senior UXers can even find their stack of colorful post-its for the kickoff workshop, you already have a redesign to discuss on that meeting. And it’s not “just pretty pictures”.
這種方法的目標很簡單。 在您的高級UX用戶甚至無法為啟動研討會找到他們五顏六色的便利貼之前,您已經進行了重新設計,可以在該會議上進行討論。 這不是“漂亮的圖片”。
Making something look good gives you perspective to make it better on all the other planes of its existence too.
使事物看起來不錯,也可以使您在存在的所有其他方面也使其變得更好。
Don’t forget to test your assumptions both on your colleagues and on the actual users. This approach doesn’t replace the right process. It just comes in before, because by working on autopilot you can actually come up with some great ideas.
不要忘了在同事和實際用戶上檢驗您的假設。 這種方法不能替代正確的過程。 它只是出現在前面,因為通過自動駕駛工作,您實際上可以想到一些很棒的主意。
設計也應該很有趣。 (Design should be fun too.)

Now, set a timer to 90 minutes and go make something awesome!
現在,將計時器設置為90分鐘,然后做點很棒的事情!
Design should be fun. Be playful and explore.
設計應該很有趣。 好玩,探索。
下一步是什么? (What’s next?)
The upcoming Dark Mode chapter is a free supplement for the 📕 Designing User Interfaces book. You can get 50 pages for free here. You can also watch some of my 📺 YouTube tutorials on design, or check out my agency :-)
即將推出的“暗模式”一章是《 設計用戶界面》一書的免費補充。 您可以在這里免費獲得50頁。 您也可以觀看我的某些YouTube設計教程 ,或查看我的代理商 :-)
If you haven’t already go follow UX Collective as well for more awesome design content daily!
如果您還沒有去過UX Collective,那么請每天精彩的設計內容!
翻譯自: https://uxdesign.cc/how-to-do-a-1-hour-redesign-7648bf3265ea
案例研究:設計與方法
本文來自互聯網用戶投稿,該文觀點僅代表作者本人,不代表本站立場。本站僅提供信息存儲空間服務,不擁有所有權,不承擔相關法律責任。 如若轉載,請注明出處:http://www.pswp.cn/news/275042.shtml 繁體地址,請注明出處:http://hk.pswp.cn/news/275042.shtml 英文地址,請注明出處:http://en.pswp.cn/news/275042.shtml
如若內容造成侵權/違法違規/事實不符,請聯系多彩編程網進行投訴反饋email:809451989@qq.com,一經查實,立即刪除!相關文章

圖文并茂重新認識下遞歸

《C和指針》讀書筆記

FPGA設計者的5項基本功

unity 全息交互ui_UI向3D投影全息界面的連續發展

開發工具 快捷鍵整理

前端構建新世代,Esbuild 原來還能這么玩!

大三下學期十四周總結

平面設計師和ui設計師_平面設計師為什么要享受所有樂趣?

轉:Xcode下的GDB調試命令

web表單設計:點石成金_設計復雜的用戶表單:12個UX最佳實踐

跨平臺開發框架到底哪家強?5款主流框架橫向對比!

【一句日歷】2019年6月

Android學習摘要一之Android歷史

c#創建web應用程序_創建Web應用程序圖標集的6個步驟

基于pnpm + lerna + typescript的最佳項目實踐 - 理論篇

nginx 多進程 + io多路復用 實現高并發

轉載:程序員從初級到中級10個秘訣

ux設計工具_UX設計中的工具和實用主義

幕后常駐嘉賓配音小姐姐的2021年度總結
...)