大家好,我是若川。持續組織了6個月源碼共讀活動,感興趣的可以點此加我微信 ruochuan12?參與,每周大家一起學習200行左右的源碼,共同進步。同時極力推薦訂閱我寫的《學習源碼整體架構系列》?包含20余篇源碼文章。歷史面試系列
Lerna?運行流程剖析
https://www.zoo.team/article/lerna-js

前言
隨著前端組件、包庫等工程體系發展,業務組件和工具庫關系越來越復雜,非常容易遇到倉庫多,庫之間互相依賴。導致維護極其困難,發包過程非常繁瑣,極大程度地限制了前端同學的開發效率。
此刻,出現了一種新的項目管理方式—— Monorepo。一個倉庫管理多個項目。

MultiRepo 是目前常用的項目管理方式。但有些場景是不適用的,存在問題。
多業務組件、互相依賴、無法復用
發包流程復雜、版本管理痛苦
此刻就有了 lerna.js
簡介
“Lerna (lerna) ?is a tool that optimizes the workflow around managing multi-package repositories with git and npm.
Lerna 是一個優化基于 git + npm 的多 package 的項目管理工具。
有哪些項目正在使用 Ta ?
Vue Cli https://github.com/vuejs/vue-cli
create-react-app https://github.com/babel/babel
mint-ui ?https://github.com/ElemeFE/mint-ui
......
知識點
通過閱讀本文,你將會學會下圖內容:

使用與實踐
基本指令

Lerna?的幾個基本常用指令, 不是本文重點哦。文檔在這里(https://lerna.js.org/)。
下圖是結構目錄等。

與工作區使用

//?package.json?添加
"workspaces":["packages/*"
]
//?lerna.json?添加"useWorkspaces":true,"npmClient":?"yarn",//?配置好后,所有依賴就會安裝在最外層的?node_modules?中,且支持軟鏈接方式//?npm?7.x?之后,同樣支持工作區域
學習的過程中少不了查看實現過程和運行流程。接下來我們分析一下 Lerna 中的一些代碼,希望從中你能學到許多。
原理剖析
我們先 Github 克隆源碼(https://github.com/lerna/lerna)
觀察一下目錄
指令的初始化流程
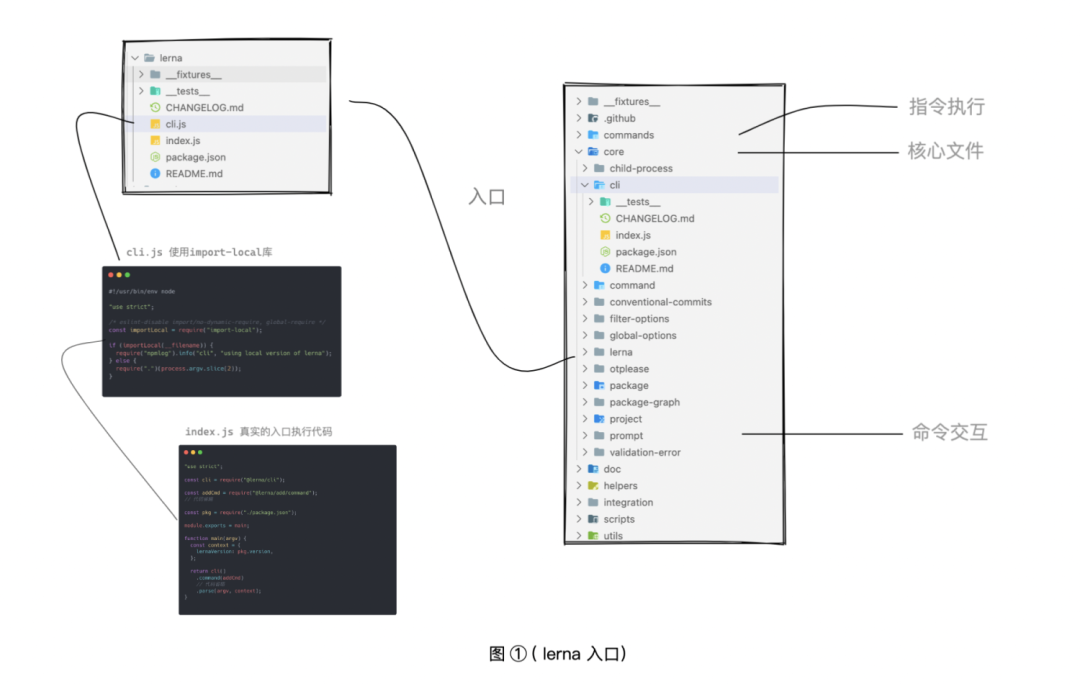
腳手架入口文件位于 /core/lerna/cli.js
“core/lerna/cli.js ?入口
#!/usr/bin/env?node"use?strict";/*?eslint-disable?import/no-dynamic-require,?global-require?*/
const?importLocal?=?require("import-local");
//?判斷是否處于本地包文件,下文會介紹
if?(importLocal(__filename))?{require("npmlog").info("cli",?"using?local?version?of?lerna");
}?else?{
//?進入真實的入口執行代碼require(".")(process.argv.slice(2));?//?[node,?lerna,?指令]
}
如圖一和代碼入口的文件僅執行了一條判斷語句 ,其目的是為了當項目的局部環境和全局環境都存在 Lerna 時優先使用局部環境下的 Lerna 代碼
import-local 一個判斷是否本地包的方法庫
require(".") ?是導入當前目錄下的 index.js ?并傳入指令執行代碼 ( process.argv -> ?[node, lerna, 指令] )

“core/lerna/index.js ?初始化
/**?省略相同代碼?*///?導入?@lerna/cli?文件?
const?cli?=?require("@lerna/cli");//?.....?省略相同指令導入
//?導入?publish?指令文件
const?publishCmd?=?require("@lerna/publish/command");
const?pkg?=?require("./package.json");module.exports?=?main;//?最終導出方法
function?main(argv)?{const?context?=?{lernaVersion:?pkg.version,};return?cli()//?.....?省略?.command(publishCmd).parse(argv,?context);?//?解析注入指令?&?參數(版本號)?
}
來到這個代碼中,如圖二和代碼實際上做了這幾件事
初始化導入包 ("@lerna/cli")—— cli 實例
導入所需要的指令文件
通過 cli 實例的 command 方法注冊指令
parse(argv, context) 是執行解析注入指令和參數(版本號) 將 Cli | 指令 | 入參 進行模塊劃分,無論在業務中還是開源庫中,都是一種優秀的劃分方式
“core/cli/index.js ?全局指令初始化

const?dedent?=?require("dedent");?//?去除空行
const?log?=?require("npmlog");
const?yargs?=?require("yargs/yargs");
const?{?globalOptions?}?=?require("@lerna/global-options");module.exports?=?lernaCLI;function?lernaCLI(argv,?cwd)?{const?cli?=?yargs(argv,?cwd);return?globalOptions(cli).usage("Usage:?$0?<command>?[options]").demandCommand(1,?"A?command?is?required.?Pass?--help?to?see?all?available?commands?and?options.")?//?期望命令個數.recommendCommands()?//?推薦命令.strict()??//?嚴格模式.fail((msg,?err)?=>?{//?...?省略}).alias("h",?"help")?//?別名.alias("v",?"version").wrap(cli.terminalWidth())?//?寬高?.epilogue(dedent`When?a?command?fails,?all?logs?are?written?to?lerna-debug.log?in?the?current?working?directory.For?more?information,?find?our?manual?at?https://github.com/lerna/lerna`);??//?結尾
}
查看圖三全局指令初始化,我們會發現全局指令接受實例的傳入,也支持指令的注冊。顯然這也導出了改 cli 實例(單一實例)
指令的注冊使用了 yargs 包進行管理(yargs 不是本文重點,不贅述)
返回實例,全局指令注冊 return 實例
Config 是基本的配置分組等
導出實例給 core/lerna/index.js 調用 我們回到 ?core/lerna/index.js 文件,使用了 command 方法注冊指令傳入了導入的指令文件。
“commands/ 業務指令的注冊
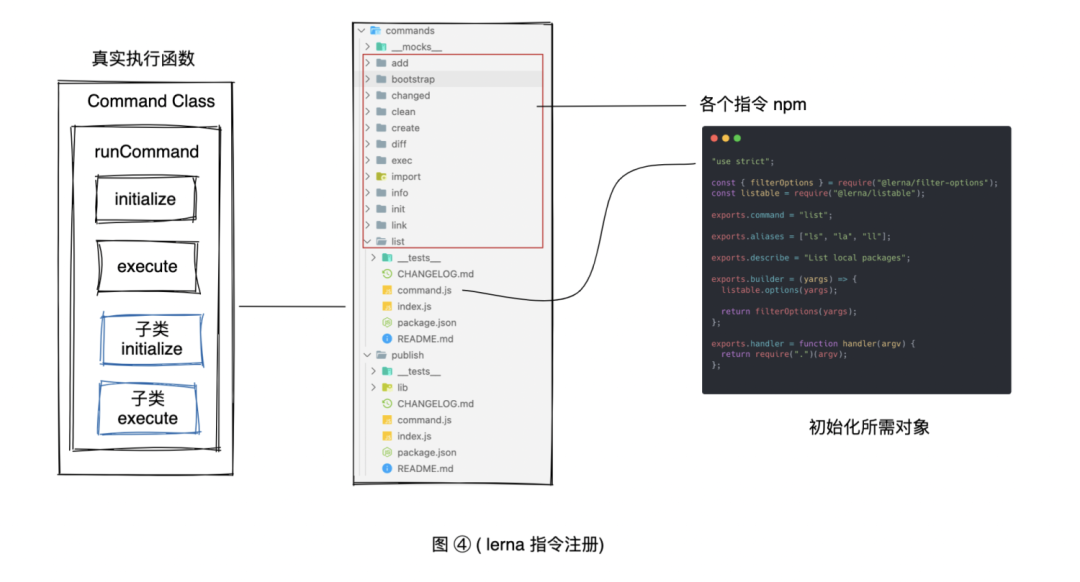
可以看到圖 4 中 commands 文件包中有著所有 lerna 指令的注冊文件,每個文件夾帶著 command.js 和 index.js
在 core/lerna/index.js 導入的都是該目錄中的 command.js (同入口邏輯在 handler 中執行了該目錄下的 index.js )
command.js 包括?yargs 的 command、aliases、describe、builder (執行前的參數操作)、handler (指令執行邏輯)?
以 list 指令舉例
執行指令的邏輯的方法在 index.js
繼承 Command 做 指令的初始化
父類中會在 constructor 執行 initialize 和 execute 方法
const?{?Command?}?=?require("@lerna/command");
const?listable?=?require("@lerna/listable");
const?{?output?}?=?require("@lerna/output");
const?{?getFilteredPackages?}?=?require("@lerna/filter-options");module.exports?=?factory;function?factory(argv)?{return?new?ListCommand(argv);
}class?ListCommand?extends?Command?{get?requiresGit()?{return?false;}initialize()?{let?chain?=?Promise.resolve();chain?=?chain.then(()?=>?getFilteredPackages(this.packageGraph,?this.execOpts,?this.options));chain?=?chain.then((filteredPackages)?=>?{this.result?=?listable.format(filteredPackages,?this.options);});return?chain;}execute()?{//?piping?to?`wc?-l`?should?not?yield?1?when?no?packages?matchedif?(this.result.text.length)?{output(this.result.text);}this.logger.success("found","%d?%s",this.result.count,this.result.count?===?1???"package"?:?"packages");}
}module.exports.ListCommand?=?ListCommand;“core/command/index.js ?所有指令的 Command Class

const?{?Project?}?=?require("@lerna/project");
//?省略大部分容錯?和?log
class?Command?{constructor(_argv)?{const?argv?=?cloneDeep(_argv);//?"FooCommand"?=>?"foo"this.name?=?this.constructor.name.replace(/Command$/,?"").toLowerCase();//?composed?commands?are?called?from?other?commands,?like?publish?->?versionthis.composed?=?typeof?argv.composed?===?"string"?&&?argv.composed?!==?this.name;//?launch?the?commandlet?runner?=?new?Promise((resolve,?reject)?=>?{//?run?everything?inside?a?Promise?chain//?異步鏈let?chain?=?Promise.resolve();chain?=?chain.then(()?=>?{this.project?=?new?Project(argv.cwd);});//?配置、環境初始化等chain?=?chain.then(()?=>?this.configureEnvironment());chain?=?chain.then(()?=>?this.configureOptions());chain?=?chain.then(()?=>?this.configureProperties());chain?=?chain.then(()?=>?this.configureLogging());chain?=?chain.then(()?=>?this.runValidations());chain?=?chain.then(()?=>?this.runPreparations());//?最終執行邏輯chain?=?chain.then(()?=>?this.runCommand());chain.then((result)?=>?{warnIfHanging();resolve(result);},(err)?=>?{if?(err.pkg)?{//?Cleanly?log?specific?package?error?detailslogPackageError(err,?this.options.stream);}?else?if?(err.name?!==?"ValidationError")?{//?npmlog?does?some?funny?stuff?to?the?stack?by?default,//?so?pass?it?directly?to?avoid?duplication.log.error("",?cleanStack(err,?this.constructor.name));}//?ValidationError?does?not?trigger?a?log?dump,?nor?do?external?package?errorsif?(err.name?!==?"ValidationError"?&&?!err.pkg)?{writeLogFile(this.project.rootPath);}warnIfHanging();//?error?code?is?handled?by?cli.fail()reject(err);});});//?...省略部分代碼}runCommand()?{return?Promise.resolve()//?命令初始化.then(()?=>?this.initialize()).then((proceed)?=>?{if?(proceed?!==?false)?{//?指令執行return?this.execute();}//?early?exits?set?their?own?exitCode?(if?non-zero)});}//?子類不存在?時?拋出錯誤initialize()?{throw?new?ValidationError(this.name,?"initialize()?needs?to?be?implemented.");}execute()?{throw?new?ValidationError(this.name,?"execute()?needs?to?be?implemented.");}
}module.exports.Command?=?Command;
在 Class 中最關心的就是 constructor 的邏輯 ,如圖 5 和代碼。上面寫到,每個子指令類會執行 initialize 和 execute 方法。我們整理一下
創建 Promise.resolve() 異步 Chain。
對全局配置、參數、環境初始化
執行 runCommand 方法
runCommand 調用 initialize 和 execute(如果子類沒有將會 執行 父類拋出異常) 采用了模板模式,對子指令通邏輯統一模板化。基本的執行流程就是這樣。在這個 Class 中,很巧妙地將指令的初始化、指令的執行等邏輯均注冊在 Promise 的異步任務中。
指令的執行邏輯均晚于 Cli 的同步代碼。(不影響 Cli 的代碼執行)
所有異常錯誤都可以統一捕獲 通過上面的學習,我們幾乎了解了 Lerna 的 一個指令 輸入 -> 解析 -> 注冊 -> 執行 -> 輸出 的流程。
轉過頭我們看下腳手架初始化的第一步的 import-local 到底做了什么?
腳手架的初始化流程
import-local ?用于獲取 npm 是否包存在本地(當前工作區域),用于判斷全局安裝的包如果本地有安裝,優先用本地的,在 webpack-cli 中等絕大多數 cli 中都有運用。
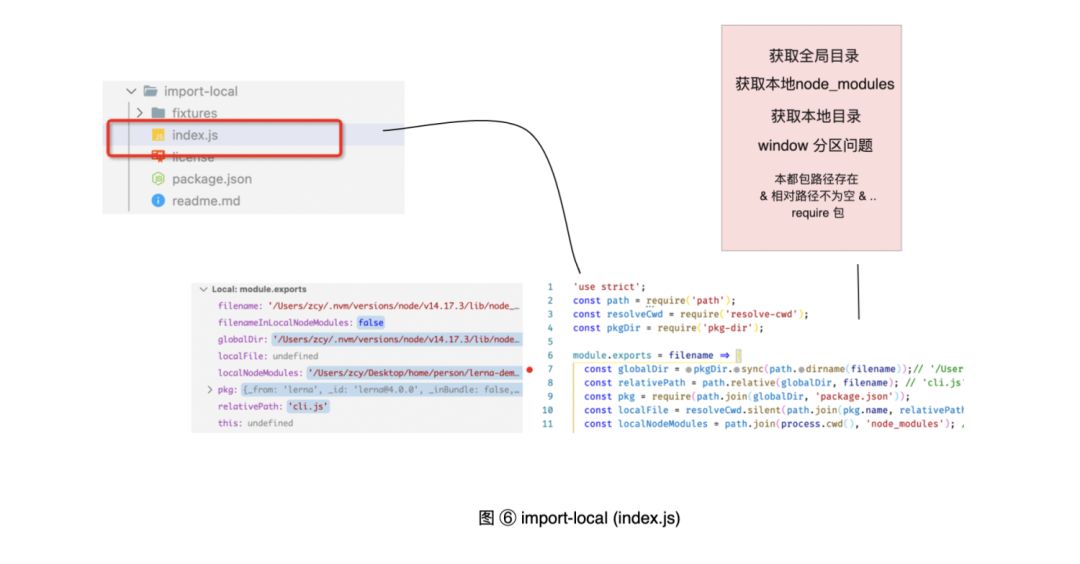
const?path?=?require('path');
const?resolveCwd?=?require('resolve-cwd');
const?pkgDir?=?require('pkg-dir');module.exports?=?filename?=>?{//?'/Users/nvm/versions/node/v14.17.3/lib/node_modules/lerna'?全局文件夾const?globalDir?=?pkgDir.sync(path.dirname(filename));const?relativePath?=?path.relative(globalDir,?filename);?//?'cli.js'const?pkg?=?require(path.join(globalDir,?'package.json'));//?'/Users/Desktop/person/lerna-demo/node_modules/lerna/cli.js'?//?本地文件const?localFile?=?resolveCwd.silent(path.join(pkg.name,?relativePath));?//?'/Users/Desktop/person/lerna-demo/node_modules'??//?本地文件的?node_modulesconst?localNodeModules?=?path.join(process.cwd(),?'node_modules');?const?filenameInLocalNodeModules?=?!path.relative(localNodeModules,?filename).startsWith('..')?&&//?On?Windows,?if?`localNodeModules`?and?`filename`?are?on?different?partitions,?`path.relative()`?returns?the?value?of?`filename`,?resulting?in?`filenameInLocalNodeModules`?incorrectly?becoming?`true`.path.parse(localNodeModules).root?===?path.parse(filename).root;//?Use?`path.relative()`?to?detect?local?package?installation,//?because?__filename's?case?is?inconsistent?on?Windows//?Can?use?`===`?when?targeting?Node.js?8//?See?https://github.com/nodejs/node/issues/6624//?導入使用本地包return?!filenameInLocalNodeModules?&&?localFile?&&?path.relative(localFile,?filename)?!==?''?&&?require(localFile);
};
通過最后一行,可以分析出,最核心的是解析出指定的 npm 包存在全局和 npm 的文件夾、路徑。進而判斷是 require() 本地還是全局。
問題 & 對比
對比和查看問題之前,我們要關注一下 Monorepo 單倉庫多項目管理的模式帶來的優勢。
前端工作中你是否會遇到以下問題?
問題 1:
前端同學小明發現了在小紅同學的項目中存在相同的業務邏輯
A: ?我選擇復制一下代碼
B: ?我選擇封裝成 npm 包多項目復用
顯然 A 方式就不是解決該問題的一種選項,完全不不符合應用程序的代碼設計思想。
大多數同學就會異口同聲我選擇 B
那么如果這個 npm 包在后續迭代過程中發現,包依賴也要隨之升級發布,怎么辦?
又或者業務中存在大多數這種場景,每個包沒有統一管理,花絕大多數時間在包依賴之間升級發布。以及各自包的迭代。
你可能只是刪除了一行代碼,你卻要每個依賴這個包的 npm 包全部執行一遍流程。
問題 2:
在開發中,避免不了對 npm 包的更新,當你更新過程中少不了統一的打 tag 以及當前更新的包的影響面。是小的改動,還是大版本 api 無法兼容的升級。這些操作可能都會導致開發的項目中依賴未及時更新,tag 標記錯誤出現問題。
優勢 & 劣勢
就目前來看,Monorepo 解決的是,多倉庫之間的依賴變更升級,批量包管理節省時間成本的事情。
所以在開源社區中使用這種模式的一般存在于依賴拆分包,但是彼此之間獨立的項目(npm 和腳手架等等)
但是 Lerna 的多包管理也有不足之處
依賴之間調試復雜
changelog 信息不完整
Lerna 本身不支持工作區概念,需要借助其他工具
CI 定制成本大
其他 MultiRepo 方案

從圖中我們可以看出
pnpm 更注重包的管理(像下載,穩定準確性等),相比之下 Lerna 更注重包的發布流程規范指定。
二者適用的場景略有不同。
拓展
import-local 解析
如圖六和下方代碼,很顯然 resolve-cwd 和 pkg-dir 是實現 import-local 的主要工具包
resolve-cwd 解析類似 require.Resolve () 的模塊的路徑,但是要從當前工作目錄中解析。
pkg-dir 從根目錄查找節點。js 項目或 npm 包
“resolve-cwd 中使用 resolve-from 工具包解析路徑來源
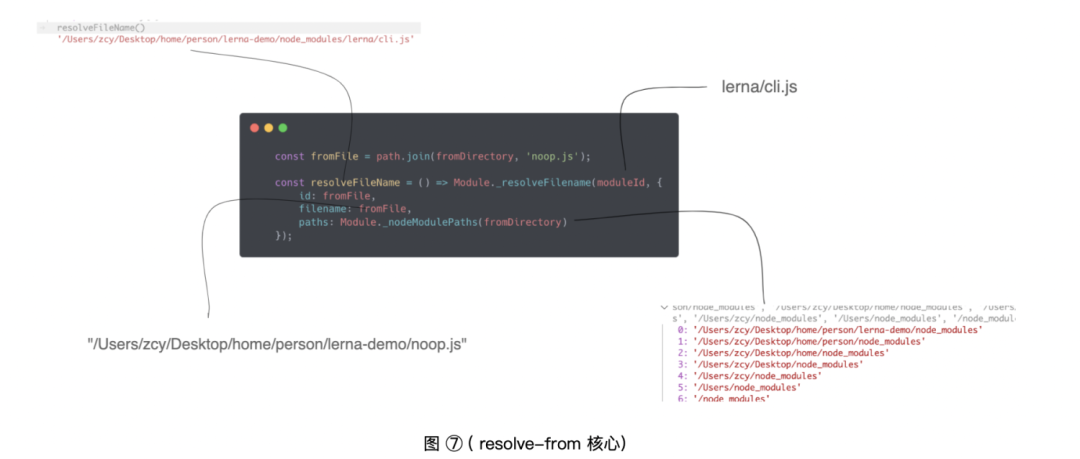
const?path?=?require('path');
const?Module?=?require('module');
//?省略部分代碼
const?fromFile?=?path.join(fromDirectory,?'noop.js');//?'/Users/Desktop/home/person/lerna-demo/noop.js'const?resolveFileName?=?()?=>?Module._resolveFilename(moduleId,?{id:?fromFile,filename:?fromFile,paths:?Module._nodeModulePaths(fromDirectory)
});
使用原生的 module 的原生的兩個 Api:Module._resolveFilename 和 Module._nodeModulePaths
Module._nodeModulePaths 推斷出可能存在該 node/js/json 等包文件的路徑數組
而在 Module._resolveFilename 這個方法中,首先會去檢查,本地模塊是否有這個模塊,如果有,直接返回,如果沒有,繼續往下查找。模塊對象的屬性 包含
module.id
module.filename
module.loaded
module.parent
module.children
module.paths Module 是實現 require() 和 熱加載的核心方法之一。
部分實現可以參考阮一峰老師的 require() 源碼解讀(https://www.ruanyifeng.com/blog/2015/05/require.html)


“pkg-dir ?中使用 find-up 工具包 向上找全局包文件夾
const?locatePath?=?require('locate-path');
const?stop?=?Symbol('findUp.stop');module.exports.sync?=?(name,?options?=?{})?=>?{let?directory?=?path.resolve(options.cwd?||?'');const?{root}?=?path.parse(directory);const?paths?=?[].concat(name);const?runMatcher?=?locateOptions?=>?{if?(typeof?name?!==?'function')?{return?locatePath.sync(paths,?locateOptions);}const?foundPath?=?name(locateOptions.cwd);if?(typeof?foundPath?===?'string')?{return?locatePath.sync([foundPath],?locateOptions);}return?foundPath;};//?eslint-disable-next-line?no-constant-conditionwhile?(true)?{const?foundPath?=?runMatcher({...options,?cwd:?directory});if?(foundPath?===?stop)?{return;}if?(foundPath)?{return?path.resolve(directory,?foundPath);}if?(directory?===?root)?{return;}directory?=?path.dirname(directory);}
};
全局包文件夾全的在當前執行 cwd 向上查找存在 package.json 文件
所以 locatePath.sync 接受一個查找的文件路徑數組和執行的 cwd 路徑
通過 while 循環直至找到 return path.resolve(directory, foundPath);
什么是軟鏈接

fs.symlink(target, path[, type], callback)?Node/symlink (http://nodejs.cn/api/fs.html#fssymlinktarget-path-type-callback)
target <string> | <Buffer> | <URL>   // 目標文件
path <string> | <Buffer> | <URL>  // 創建軟鏈對應的地址
type <string>
該 API 會創建路徑為 path 的鏈接,該鏈接指向 target。type 參數僅在 Windows 上可用,在其他平臺上則會被忽略。可以被設置為 dir、 file 或 function。如果未設置 type 參數,則 Node.js 將會自動檢測 target 的類型并使用 file 或 dir。
如果 target 不存在,則將會使用 'file'。Windows 上的連接點要求目標路徑是絕對路徑。當使用 'function' 時,target 參數將會自動地標準化為絕對路徑。
總結
從 Lerna 的流程設計中,我們可以發現,每個可執行的 Node 程序,Lerna 都對其進行了拆分,再合。在自己的代碼設計中,相信你也會遇到雜亂的代碼。此刻你是無視,還是從“雜” -> “分” -> “合”來整理代碼
其次我們看到 Lerna 中,使用了單例來注冊指令。在注冊指令,又采用了面相對象和模板模式,來抽離公共的初始化邏輯。而在指令的執行過程中,全是微任務的任務執行,這都是可以學習的設計思路和設計模式。
最后其他 MultiRepo 方案對比中可以看出,工具賦予的能力都有其優劣,沒有好與不好,只有更適合。
參考文獻
Lerna 文檔(https://lerna.js.org)
阮一峰老師的require() 源碼解讀(https://www.ruanyifeng.com/blog/2015/05/require.html)

·················?若川簡介?·················
你好,我是若川,畢業于江西高校。現在是一名前端開發“工程師”。寫有《學習源碼整體架構系列》20余篇,在知乎、掘金收獲超百萬閱讀。
從2014年起,每年都會寫一篇年度總結,已經寫了7篇,點擊查看年度總結。
同時,最近組織了源碼共讀活動,幫助3000+前端人學會看源碼。公眾號愿景:幫助5年內前端人走向前列。

識別上方二維碼加我微信、拉你進源碼共讀群
今日話題
略。分享、收藏、點贊、在看我的文章就是對我最大的支持~


高級職位)


)
AS3中的stage,this,root的區別)


