大家好,我是若川。持續組織了8個月源碼共讀活動,感興趣的可以?點此加我微信ruochuan12?參與,每周大家一起學習200行左右的源碼,共同進步。同時極力推薦訂閱我寫的《學習源碼整體架構系列》?包含20余篇源碼文章。歷史面試系列。另外:目前建有江西|湖南|湖北籍前端群,可加我微信進群。
之前的文章把響應式系統基本講完了,沒看過的同學可以看一下 vue.windliang.wang/。這篇文章主要是按照 Vue2 源碼的目錄格式和調用過程,把我們之前寫的響應式系統移動進去。
html 中我們提供一個 id 為 root 的根 dom 。
<!DOCTYPE?html>
<html?lang="en"><head><meta?charset="UTF-8"?/><meta?http-equiv="X-UA-Compatible"?content="IE=edge"?/><meta?name="viewport"?content="width=device-width,?initial-scale=1.0"?/><title>Document</title></head><body><div?id="root"></div><script?src="bundle.js"></script></body>
</html>
其中 bundle.js 就是我們打包好的測試代碼,對應 ./VueLiang0/vueliang0.js ,代碼如下:
import?Vue?from?"./src/core/index";new?Vue({el:?"#root",data()?{return?{test:?1,name:?"data:liang",};},watch:?{test(newVal,?oldVal)?{console.log(newVal,?oldVal);},},computed:?{text()?{return?"computed:hello:"?+?this.name;},},methods:?{hello()?{return?"調用methods:hello";},click()?{this.test?=?3;this.name?=?"wind";},},render()?{const?node?=?document.createElement("div");const?dataNode?=?document.createElement("div");dataNode.innerText?=?this.test;node.append(dataNode);const?computedNode?=?document.createElement("div");computedNode.innerText?=?this.text;node.append(computedNode);const?methodsNode?=?document.createElement("div");methodsNode.innerText?=?this.hello();node.append(methodsNode);node.addEventListener("click",?this.click);return?node;},
});
提供了 data 、watch 、computed、methods ,在 render 方法中正常情況的話應該是返回虛擬 dom ,這里我們直接生成一個真的 dom 返回。
代理
我們使用 data、methods 或者 computed 的時候,都是通過 this.xxx ,而不是 this.data.xxx 或者 this.methods.xxx ,是因為 Vue 幫我們把這些屬性、方法都掛載到了 Vue 實例上。
掛載 methods
//?VueLiang0/src/core/instance/state.js
function?initMethods(vm,?methods)?{for?(const?key?in?methods)?{vm[key]?=typeof?methods[key]?!==?"function"???noop?:?bind(methods[key],?vm);}
}
掛載 computed
export?function?defineComputed(target,?key,?userDef)?{...Object.defineProperty(target,?key,?sharedPropertyDefinition);
}
掛載 data
function?initData(vm)?{let?data?=?vm.$options.data;data?=?vm._data?=typeof?data?===?"function"???getData(data,?vm)?:?data?||?{};if?(!isPlainObject(data))?{data?=?{};}//?proxy?data?on?instanceconst?keys?=?Object.keys(data);const?props?=?vm.$options.props;const?methods?=?vm.$options.methods;let?i?=?keys.length;while?(i--)?{const?key?=?keys[i];//?檢查?methods?是否有同名屬性if?(process.env.NODE_ENV?!==?"production")?{if?(methods?&&?hasOwn(methods,?key))?{console.warn(`Method?"${key}"?has?already?been?defined?as?a?data?property.`,vm);}}//?檢查?props?是否有同名屬性if?(props?&&?hasOwn(props,?key))?{process.env.NODE_ENV?!==?"production"?&&console.warn(`The?data?property?"${key}"?is?already?declared?as?a?prop.?`?+`Use?prop?default?value?instead.`,vm);}?else?if?(!isReserved(key))?{?//?非內置屬性proxy(vm,?`_data`,?key);?//?代理}}observe(data);?//?變為響應式數據
}
為了保證 data 的對象值的穩定,我們的 data 屬性其實是一個函數,返回一個對象,所以上邊我們用 getData 方法先拿到對象。
export?function?getData(data,?vm)?{try?{return?data.call(vm,?vm);}?catch?(e)?{return?{};}
}
之后依次判斷 data 屬性是否和 methods 、computed 屬性重名,非線上環境會打印警告,然后調用 isReserved 判斷是否是內置屬性。
/***?Check?if?a?string?starts?with?$?or?_*/
export?function?isReserved(str)?{const?c?=?(str?+?"").charCodeAt(0);return?c?===?0x24?||?c?===?0x5f;
}
最后調用 proxy 方法,將 data 屬性掛在到 ?vm 對象中,相當于將 methods 、computed 的同名屬性進行了覆蓋。
export?function?proxy(target,?sourceKey,?key)?{sharedPropertyDefinition.get?=?function?proxyGetter()?{return?this[sourceKey][key];};sharedPropertyDefinition.set?=?function?proxySetter(val)?{this[sourceKey][key]?=?val;};Object.defineProperty(target,?key,?sharedPropertyDefinition);
}
響應式
把各個屬性初始化完成后,調用 mounted 方法,把我們的 dom 掛載到根節點中。
Vue.prototype._init?=?function?(options)?{const?vm?=?this;vm.$options?=?options;vm._renderProxy?=?vm;initState(vm);if?(vm.$options.el)?{vm.$mount(vm.$options.el);}
};
$mount 方法中把 el 對應的 dom 拿到,然后調用 mountComponent 方法進行掛載 dom 。
Vue.prototype.$mount?=?function?(el)?{el?=?el?&&?document.querySelector(el);return?mountComponent(this,?el);
};
mountComponent 方法中定義 ?updateComponent 方法和 Watcher 對象,這樣當 updateComponent 中依賴的屬性變化的時候,updateComponent 就會被自動調用。
export?function?mountComponent(vm,?el)?{vm.$el?=?el;let?updateComponent;updateComponent?=?()?=>?{vm._update(vm._render());};//?we?set?this?to?vm._watcher?inside?the?watcher's?constructor//?since?the?watcher's?initial?patch?may?call?$forceUpdate?(e.g.?inside?child//?component's?mounted?hook),?which?relies?on?vm._watcher?being?already?definednew?Watcher(vm,?updateComponent,?noop?/*?isRenderWatcher?*/);return?vm;
}
_update 方法原本是進行虛擬 dom 的掛載,這里的話我們直接將 render 返回的 dom 進行掛載。
Vue.prototype._update?=?function?(dom)?{const?vm?=?this;/*****這里僅僅是把?dom?更新,vue2?源碼中這里會進行虛擬?dom?的處理?*/if?(vm.$el.children[0])?{vm.$el.removeChild(vm.$el.children[0]);}vm.$el.appendChild(dom);/*******************************/
};
整體流程
入口文件代碼如下:
import?Vue?from?"./src/core/index";new?Vue({el:?"#root",...
});
第一行代碼 import Vue from "./src/core/index"; 的時候會進行一些初始化,src/core/index 代碼如下:
//?src/core/index
import?Vue?from?'./instance/index'
import?{?initGlobalAPI?}?from?'./global-api/index'initGlobalAPI(Vue)?//?Vue?上掛載一些靜態全局的方法export?default?Vue
第一行 import Vue from './instance/index' 繼續進行一些初始化,instance/index 代碼如下:
//?src/core/instance/index.js
import?{?initMixin?}?from?"./init";
import?{?stateMixin?}?from?"./state";
import?{?lifecycleMixin?}?from?"./lifecycle";
import?{?renderMixin?}?from?"./render";function?Vue(options)?{this._init(options);
}initMixin(Vue);
stateMixin(Vue);
lifecycleMixin(Vue);
renderMixin(Vue);export?default?Vue;
initMixin 是在 Vue 掛載一個 _init 方法,也就是在 new Vue 的時候執行。
import?{?initState?}?from?"./state";export?function?initMixin(Vue)?{Vue.prototype._init?=?function?(options)?{const?vm?=?this;vm.$options?=?options;vm._renderProxy?=?vm;initState(vm);if?(vm.$options.el)?{vm.$mount(vm.$options.el);}};
}
_init 方法調用 initState 方法初始化 data 、watch 、computed、methods ,并且把他們變為響應式數據,還有上邊講到的把屬性掛載到 Vue 實例上。
$mount 方法就是前邊講到的,把 render 返回的 dom 掛載到 el 節點上。
剩下的 stateMixin、lifecycleMixin 、renderMixin 是在 ?Vue.prototype ?原型對象中掛載各種方法,這里不細說了。
所以整體過程就是下邊的樣子:
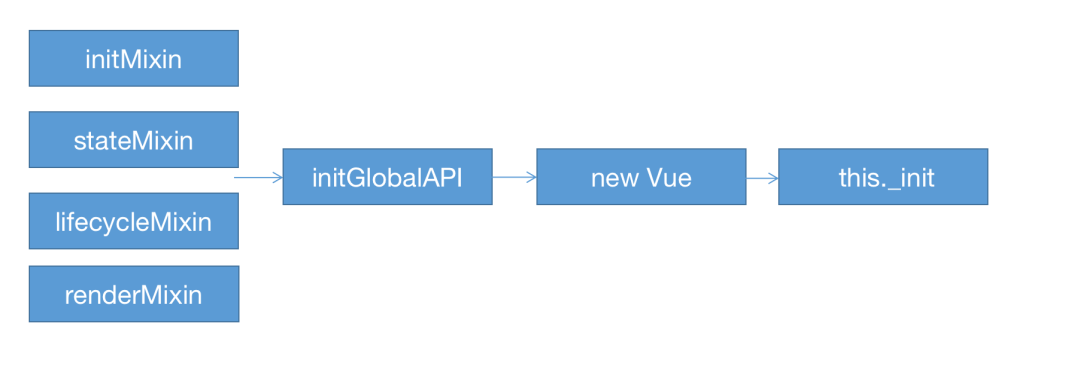
最開始的各種 Mixin 是在 Vue.prototype ?原型對象上掛載需要的方法,initGlobalAPI 是直接在 Vue 上掛載方法,new Vue 就是傳入 options 屬性,接著調用 this.init 方法將 data 、watch 、computed、methods ?這些進行初始化,最后調用 $mount 方法掛載 dom 。
最終效果
我們運行下程序,修改 webpack.config.js 的 entry 為我們寫好的測試文件。
const?path?=?require("path");
module.exports?=?{entry:?"./VueLiang0/vueliang0.js",output:?{path:?path.resolve(__dirname,?"./dist"),filename:?"bundle.js",},devServer:?{static:?path.resolve(__dirname,?"./dist"),},
};
然后執行 npm run dev 。
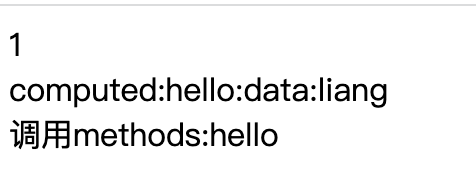
可以看到 data 、computed 和 methods ?都調用正常,接下來測試一下響應式,我們測試文件中添加了 click 事件。
import?Vue?from?"./src/core/index";new?Vue({el:?"#root",data()?{return?{test:?1,name:?"data:liang",};},watch:?{test(newVal,?oldVal)?{console.log(newVal,?oldVal);},},computed:?{text()?{return?"computed:hello:"?+?this.name;},},methods:?{hello()?{return?"調用methods:hello";},click()?{this.test?=?3;this.name?=?"wind";},},render()?{const?node?=?document.createElement("div");const?dataNode?=?document.createElement("div");dataNode.innerText?=?this.test;node.append(dataNode);const?computedNode?=?document.createElement("div");computedNode.innerText?=?this.text;node.append(computedNode);const?methodsNode?=?document.createElement("div");methodsNode.innerText?=?this.hello();node.append(methodsNode);//?click?事件node.addEventListener("click",?this.click);return?node;},
});
點擊的時候會更改 text 和 name 的值,看一下效果:
當我們點擊的時候視圖就自動進行了更新,簡化的響應式系統就被我們實現了。
總
更詳細代碼的大家可以在 github 進行查看和調試。
https://github.com/wind-liang/vue2
現在我們的 render 函數是直接返回 dom ,當某個屬性改變的時候整個 dom 樹會全部重新生成,但更好的方式肯定是采用虛擬 dom ,進行局部更新。

·················?若川簡介?·················
你好,我是若川,畢業于江西高校。現在是一名前端開發“工程師”。寫有《學習源碼整體架構系列》20余篇,在知乎、掘金收獲超百萬閱讀。
從2014年起,每年都會寫一篇年度總結,已經堅持寫了8年,點擊查看年度總結。
同時,最近組織了源碼共讀活動,幫助4000+前端人學會看源碼。公眾號愿景:幫助5年內前端人走向前列。

掃碼加我微信 ruochuan12、拉你進源碼共讀群
今日話題
目前建有江西|湖南|湖北?籍 前端群,想進群的可以加我微信 ruochuan12?進群。分享、收藏、點贊、在看我的文章就是對我最大的支持~


