引言
在用戶使用 Java Swing 進行用戶界面開發過程中,會碰到如何對 Java Swing 的控件進行布局的問題。Swing 的控件放置在容器 (Container) 中,容器就是能夠容納控件或者其它容器的類,容器的具體例子有 Frame、Panel 等等。容器需要定義一個布局管理器來對控件進行布局管理,Swing 當中提供的主要的布局管理器有 FlowLayout、BorderLayout、BoxLayout、GridLayout 和 GridBaglayout, 它們的主要特點如表 1 所示:
表 1. Swing 中的一些主要布局管理器的比較
布局管理器
特點FlowLayout
把控件按照順序一個接一個由左向右的水平放置在容器中,一行放不下,就放到下一行
BorderLayout
將整個容器劃分成東南西北中五個方位來放置控件,放置控件時需要指定控件放置的方位
BoxLayout
可以指定在容器中是否對控件進行水平或者垂直放置,比 FlowLayout 要更為靈活
GridLayout
將整個容器劃分成一定的行和一定的列,可以指定控件放在某行某列上
GridBagLayout
是 Swing 當中最靈活也是最復雜的布局管理器,可對控件在容器中的位置進行比較靈活的調整
本文主要關注在 BoxLayout 布局管理器的使用上。我們首先對 BoxLayout 作一下介紹。
BoxLayout 介紹
如前所述,BoxLayout 可以把控件依次進行水平或者垂直排列布局,這是通過參數 X_AXIS、Y_AXIS 來決定的。X_AXIS 表示水平排列,而 Y_AXIS 表示垂直排列。BoxLayout 的構造函數有兩個參數,一個參數定義使用該 BoxLayout 的容器,另一個參數是指定 BoxLayout 是采用水平還是垂直排列。下面是一個創建 BoxLayout 實例的例子:
JPanel panel=new JPanel();
BoxLayout layout=new BoxLayout(panel, BoxLayout.X_AXIS);
panel.setLayout(layoout);Show moreShow more icon
在這個例子中,一個 BoxLayout 布局管理器的實例 layout 被創建,這個實例被設置為 panel 的布局管理器,該布局管理器采用了水平排列來排列控件。
當 BoxLayout 進行布局時,它將所有控件依次按照控件的優先尺寸按照順序的進行水平或者垂直放置,假如布局的整個水平或者垂直空間的尺寸不能放下所有控件,那么 BoxLayout 會試圖調整各個控件的大小來填充整個布局的水平或者垂直空間。
BoxLayout 往往和 Box 這個容器結合在一起使用,這么做的理由是,BoxLayout 是把控件以水平或者垂直的方向一個接一個的放置,如果要調整這些控件之間的空間,就會需要使用 Box 容器提供的透明的組件作為填充來填充控件之間的空間,從而達到調整控件之間的間隔空間的目的。Box 容器提供了 4 種透明的組件,分別是 rigid area、strut、glue、filler。Box 容器分別提供了不同的方法來創建這些組件。這四個組件的特點如下:
Rigid area 是一種用戶可以定義水平和垂直尺寸的透明組件;
strut 與 rigid area 類似,但是用戶只能定義一個方向的尺寸,即水平方向或者垂直方向,不能同時定義水平和垂直尺寸;
當用戶將 glue 放在兩個控件之間時,它會盡可能的占據兩個控件之間的多余空間,從而將兩個控件擠到兩邊;
Filler 是 Box 的內部類,它與 rigid area 相似,都可以指定水平或者垂直的尺寸,但是它可以設置最小,最大和優先尺寸。
用 BoxLayout 進行布局
在了解了 BoxLayout 和 Box 容器的基本特點后,我們來看一下 BoxLayout 的優點,首先 BoxLayout 可以進行對控件進行垂直或者水平布局,同時 BoxLayout 使用起來較為簡單,然而把它和 Box 容器相結合,就可以進行較為復雜的布局,達到同使用 GridBagLayout 的一樣的效果,但是使用起來要簡單方便多了。我們用按鈕的布局作為例子來看怎樣運用 BoxLayout 和 Box 容器進行布局:
圖 1. 應用 BoxLayout 進行按鈕布局例子 1

我們在布局中經常會碰到如圖 1 所示要把按鈕放在容器的兩端,那么我們就可以給容器定義一個 BoxLayout 來布局按鈕,我們在按鈕 1 和按鈕 2 之間放置一個不可見的 glue,如前面所提到的那樣,glue 就會盡量擠占掉兩個按鈕之間的空間,從而將兩個按鈕放在兩端。
圖 2. 應用 BoxLayout 進行按鈕布局例子 2

再來看圖 2 的例子,我們經常會遇到要將兩個按鈕放在容器的右邊,我們就可以給容器定義一個 BoxLayout, 先放一個不可見的 glue,這個 glue 會擠占左邊的空間,從而將兩個按鈕推到右邊,
在兩個按鈕之間再放一個 strut,它也是不可見的,它會把兩個按鈕分隔開。
BoxLayout 布局實例
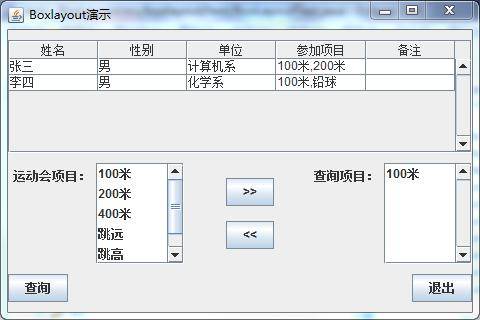
在基于前面討論的基礎上,我們現在來看一個具體的運用例子,假設圖 3 是我們需要完成的用戶界面:
圖 3. BoxLayout 演示

這個演示是一個虛擬的用戶對話框,只用于演示如何使用 BoxLayout, 例子代碼中沒有實現控件的動作。我們假定通過它用戶可以選擇要查詢的運動會項目,然后查詢,對話框中的表格顯示了查詢到的運動會項目的報名情況。為了完成這個布局,我們從上到下分別定義了 3 個 Panel, 分別叫做 topPanel,middlePanel,bottomPanel,這 3 個 Panel 都使用 BoxLayout。我們先看最上邊的 topPanel,也就是包含表格的 Panel,topPanel 布局的基本思路是該 Panel 采用 BoxLayout 的垂直排列布局,先放置一個不可見的 Strut, 使 topPanel 相 對頂部留出一定的空間, 再放置包含表格的滾動窗格, 再加入一個不可見的 Strut ,從而使 topPanel 和 middlePanel 之間留出一定的空間。 TopPanel 的代碼如清單 1 所示:
清單 1. topPanel 示例代碼清單
static void createTopPanel() {
topPanel = new JPanel();
String[] columnName = { "姓名", "性別", "單位", "參加項目", "備注" };
String[][] rowData = { { "張三", "男", "計算機系", "100 米 ,200 米", "" },
{ "李四", "男", "化學系", "100 米,鉛球", "" },
};
// 創建表格
JTable table = new JTable(new DefaultTableModel(rowData, columnName));
// 創建包含表格的滾動窗格
JScrollPane scrollPane = new JScrollPane(table);
scrollPane.setVerticalScrollBarPolicy(JScrollPane.VERTICAL_SCROLLBAR_ALWAYS);
// 定義 topPanel 的布局為 BoxLayout,BoxLayout 為垂直排列
topPanel.setLayout(new BoxLayout(topPanel, BoxLayout.Y_AXIS));
// 先加入一個不可見的 Strut,從而使 topPanel 對頂部留出一定的空間
topPanel.add(Box.createVerticalStrut(10));
// 加入包含表格的滾動窗格
topPanel.add(scrollPane);
// 再加入一個不可見的 Strut,從而使 topPanel 和 middlePanel 之間留出一定的空間
topPanel.add(Box.createVerticalStrut(10));
}Show moreShow more icon
位于中間的 middlePanel 比較復雜些,它的左邊包括標簽運動會項目和運動會項目列表,中間是兩個按鈕,我們假定點擊 >> 按鈕將會把用戶在運動會項目列表中選中的項目移到右邊的查詢項目列表,點擊 << 按鈕則將右邊查詢項目列表中選中的項目移回到左邊的運動會項目列表。它的布局的基本思路是定義了三個子 Panel,這三個子 Panel 分別對應最左邊的標簽和運動會項目列表,中間的兩個按鈕,和最右邊的標簽和查詢項目列表,最左邊的 Panel 采用 BoxLayout 的水平排列布局,中間的 Panel 采用 BoxLayout 的垂直排列布局,兩個按鈕之間加入一個不可見的 rigidArea,調整兩個按鈕之間的垂直距離,最右邊的 Panel 采用 BoxLayout 的水平排列布局放置標簽和查詢項目列表。然后采用水平排列布局的 middlePanel 將三個 Panel 依次水平的加入。 MiddlePanel 的代碼如清單 2 所示。
清單 2. middlePanel 示例代碼清單
static void createMiddlePanel() {
// 創建 middlePanel
middlePanel = new JPanel();
// 采用水平布局
middlePanel .setLayout(new BoxLayout(middlePanel,BoxLayout.X_AXIS ));
// 創建標簽運動會項目
JLabel sourceLabel = new JLabel("運動會項目:");
sourceLabel.setAlignmentY(Component.TOP_ALIGNMENT );
sourceLabel.setBorder(BorderFactory.createEmptyBorder (4, 5, 0, 5));
// 創建列表運動會項目
DefaultListModel listModel = new DefaultListModel();
listModel.addElement("100 米");
listModel.addElement("200 米");
listModel.addElement("400 米");
listModel.addElement("跳遠");
listModel.addElement("跳高");
listModel.addElement("鉛球");
JList sourceList = new JList(listModel);
sourceList.setSelectionMode(ListSelectionModel.MULTIPLE_INTERVAL_SELECTION );
sourceList.setVisibleRowCount(5);
JScrollPane sourceListScroller = new JScrollPane(sourceList);
sourceListScroller.setPreferredSize(new Dimension(120, 80));
sourceListScroller
.setVerticalScrollBarPolicy(JScrollPane.VERTICAL_SCROLLBAR_ALWAYS );
sourceListScroller.setAlignmentY(Component.TOP_ALIGNMENT );
// 創建最左邊的 Panel
JPanel sourceListPanel = new JPanel();
// 最左邊的 Panel 采用水平布局
sourceListPanel.setLayout(new BoxLayout(sourceListPanel,
BoxLayout.X_AXIS ));
// 加入標簽到最左邊的 Panel
sourceListPanel.add(sourceLabel);
// 加入列表運動會項目到最左邊的 Panel
sourceListPanel.add(sourceListScroller);
sourceListPanel.setAlignmentY(Component.TOP_ALIGNMENT );
sourceListPanel.setBorder(BorderFactory.createEmptyBorder (0, 0, 0, 30));
// 將最左邊的 Panel 加入到 middlePanel
middlePanel .add(sourceListPanel);
// 定義中間的兩個按鈕
JButton toTargetButton = new JButton(">>");
JButton toSourceButton = new JButton("<
// 定義中間的 Panel
JPanel buttonPanel = new JPanel();
// 中間的 Panel 采用水平布局
buttonPanel.setLayout(new BoxLayout(buttonPanel, BoxLayout.Y_AXIS ));
// 將按鈕 >> 加入到中間的 Panel
buttonPanel.add(toTargetButton);
//兩個按鈕之間加入一個不可見的 rigidArea
buttonPanel.add(Box.createRigidArea (new Dimension(15, 15)));
// 將按鈕 << 加入到中間的 Panel
buttonPanel.add(toSourceButton);
buttonPanel.setAlignmentY(Component.TOP_ALIGNMENT );
buttonPanel.setBorder(BorderFactory.createEmptyBorder (15, 5, 15, 5));
// 將中間的 Panel 加入到 middlePanel
middlePanel .add(buttonPanel);
// 創建標簽查詢項目
JLabel targetLabel = new JLabel("查詢項目:");
targetLabel.setAlignmentY(Component.TOP_ALIGNMENT );
targetLabel.setBorder(BorderFactory.createEmptyBorder (4, 5, 0, 5));
// 創建列表查詢項目
DefaultListModel targetListModel = new DefaultListModel();
targetListModel.addElement("100 米");
JList targetList = new JList(targetListModel);
targetList
.setSelectionMode(ListSelectionModel.MULTIPLE_INTERVAL_SELECTION );
targetList.setVisibleRowCount(5);
JScrollPane targetListScroller = new JScrollPane(targetList);
targetListScroller.setPreferredSize(new Dimension(120, 80));
targetListScroller
.setVerticalScrollBarPolicy(JScrollPane.VERTICAL_SCROLLBAR_ALWAYS );
targetListScroller.setAlignmentY(Component.TOP_ALIGNMENT );
// 創建最右邊的 Panel
JPanel targetListPanel = new JPanel();
// 設置最右邊的 Panel 為水平布局
targetListPanel.setLayout(new BoxLayout(targetListPanel,
BoxLayout.X_AXIS ));
// 將標簽查詢項目加到最右邊的 Panel
targetListPanel.add(targetLabel);
// 將列表查詢項目加到最右邊的 Panel
targetListPanel.add(targetListScroller);
targetListPanel.setAlignmentY(Component.TOP_ALIGNMENT );
targetListPanel.setBorder(BorderFactory.createEmptyBorder (0, 30, 0, 0));
// 最后將最右邊的 Panel 加入到 middlePanel
middlePanel .add(targetListPanel);
}Show moreShow more icon
我們最后來看一下 bottomPanel 如何布局,bottomPanel 包括分布在兩邊的兩個按鈕,其實 bottomPanel 的布局和章節用 BoxLayout 進行布局中的圖 1 是一致的,我們在兩個按鈕之間加入一個 glue, 這個 glue 會擠占兩個按鈕之間的空間,從而將兩個按鈕布局到兩邊,在 bottemPanel 中用一個 buttonPanel 來放置這兩個按鈕。BottomPanel 采用 BoxLayout, 首先放入一個 strut, 從而使 bottomPanel 和 middlePanel 之間留出距離,再放入 buttonPanel,再放入一個 strut, 從而使 bottomPanel 和底部之間留出距離,BottomPanel 的代碼如清單 3 所示。
清單 3. bottomPanel 示例代碼清單
static void createBottomPanel() {
// 創建查詢按鈕
JButton actionButton = new JButton("查詢");
// 創建退出按鈕
JButton closeButton = new JButton("退出");
// 創建 bottomPanel
bottomPanel = new JPanel();
// 設置 bottomPanel 為垂直布局
bottomPanel .setLayout(new BoxLayout(bottomPanel,BoxLayout.Y_AXIS ));
// 創建包含兩個按鈕的 buttonPanel
JPanel buttonPanel = new JPanel();
// 設置 bottomPanel 為水平布局
buttonPanel.setLayout(new BoxLayout(buttonPanel, BoxLayout.X_AXIS ));
// 將查詢按鈕加入到 buttonPanel
buttonPanel.add(actionButton);
//加入一個 glue, glue 會擠占兩個按鈕之間的空間
buttonPanel.add(Box.createHorizontalGlue ());
// 將退出按鈕加入到 buttonPanel
buttonPanel.add(closeButton);
// 加入一個 Strut,從而使 bottomPanel 和 middlePanel 上下之間留出距離
bottomPanel .add(Box.createVerticalStrut (10));
// 加入 buttonPanel
bottomPanel .add(buttonPanel);
// 加入一個 Strut,從而使 bottomPanel 和底部之間留出距離
bottomPanel .add(Box.createVerticalStrut (10));
}Show moreShow more icon
我們用一個 Panel 來從上到下放置 topPanel、middlePanel 和 bottomPanel,這個 Panel 采用了 GridBagLayout, 最后我們將這個 Panel 加到一個窗體中去,請參考清單 4。
清單 4. 創建窗體示例代碼清單
public static void main(String[] args) {
// 創建 topPanel
createTopPanel ();
// 創建 middlePanel
createMiddlePanel ();
// 創建 bottomPanel
createBottomPanel ();
// 創建包含 topPanel,middlePanel 和 bottomPanel 的 panelContainer
JPanel panelContainer = new Jpanel();
//panelContainer 的布局為 GridBagLayout
panelContainer.setLayout(new GridBagLayout());
GridBagConstraints c1 = new GridBagConstraints();
c1.gridx = 0;
c1.gridy = 0;
c1.weightx = 1.0;
c1.weighty = 1.0;
c1.fill = GridBagConstraints.BOTH ;
// 加入 topPanel
panelContainer.add(topPanel,c1);
GridBagConstraints c2 = new GridBagConstraints();
c2.gridx = 0;
c2.gridy = 1;
c2.weightx = 1.0;
c2.weighty = 0;
c2.fill = GridBagConstraints.HORIZONTAL ;
// 加入 middlePanel
panelContainer.add(middlePanel,c2);
GridBagConstraints c3 = new GridBagConstraints();
c3.gridx = 0;
c3.gridy = 2;
c3.weightx = 1.0;
c3.weighty = 0;
c3.fill = GridBagConstraints.HORIZONTAL ;
// 加入 bottomPanel
panelContainer.add(bottomPanel,c3);
// 創建窗體
JFrame frame = new JFrame("Boxlayout 演示");
frame.setDefaultCloseOperation(JFrame.EXIT_ON_CLOSE );
panelContainer.setOpaque(true);
frame.setSize(new Dimension(480, 320));
frame.setContentPane(panelContainer);
frame.setVisible(true);
}Show moreShow more icon
本文的例子是在文件 BoxLayoutDemo.zip 中,您將其展開,導入到 Eclipse 中去,就可運行例子。
結束語
您通過本文的介紹,可以對 BoxLayout 這個布局管理器如何進行布局能夠有一定的了解,也可以在自己的實踐過程中進一步總結出自己的方法。
Download
相關主題


)

)


![[譯]Java 垃圾回收介紹](http://pic.xiahunao.cn/[譯]Java 垃圾回收介紹)


 沒完成,先分享下...)


